K NEX. CAUTION: Keep hands, face, hair, clothing and Power Cord away from all moving parts. Caution: Do not trip on cord.
|
|
|
- Geraldo Aquino Abreu
- 6 Há anos
- Visualizações:
Transcrição

1


2 K NEX Building Basics Start Building To begin your model, find step number 1 and follow the numbers. Each piece has its own shape and color. Look at the pictures, find the pieces that match what you see, and connect them together. It helps to face your model in the same direction as the instructions while you build. The arrows show you where the parts connect, but not all connection points have arrows. The faded color parts are the ones you have already put together. Connectors You can slide these special connectors together. Push tightly until you hear a click. Pay close attention to the instructions and position them horizontally or vertically exactly as they are shown. Parts List Before you start building, be sure to compare the parts in your set with the parts listed here. If anything is missing, call or write to us using the information on the back cover. We re here to help! Spacers There are places in your model where you need to use spacers. Be sure to use the correct number of spacers shown in the instructions. CAUTION: Keep hands, face, hair, clothing and Power Cord away from all moving parts. Caution: Do not trip on cord. + - Battery Information CAUTION: Be sure to insert the batteries correctly and always follow the toy and battery manufacturers instructions. Do not mix old and new batteries or alkaline, standard (carbonzinc) or rechargeable (nickel-cadmium) batteries. Only batteries of the same or equivalent type recommended should be used. Always remove weak or dead batteries from the product; do not short-circuit supply terminals. Insert batteries with correct polarity (+/-) as shown. Important Tips Alkaline batteries AA (LR6) are recommended. Rechargeable batteries are not recommended. Remove rechargeable batteries from toy before charging; they must be charged only under adult supervision. Non-rechargeable batteries must not be recharged. Keep components free of dust; do not immerse or use in water. Do not dispose of batteries in a fire; they could leak or explode and cause injury. Remove all batteries if the toy will not be used for a long period of time. Do not put rods smaller than 2 inches in any openings of the motor; they will damage the motor and cannot be removed. Help the environment by disposing of your product and packaging responsibly. The wheelie bin symbol indicates that the product and batteries must not be disposed of in the domestic waste as they contain substances which can be damaging to the environment and health. Please use designated collection points or recycling facilities when disposing of the item or batteries.
 en el motor? Est-ce que tu as installé 2 piles AA (ou LR6) dans le moteur?")
 no motor? Heb je er 2 AA (of LR6) batterijen ingestoken?")


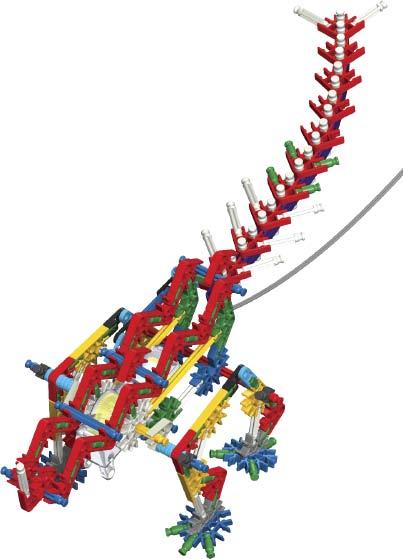
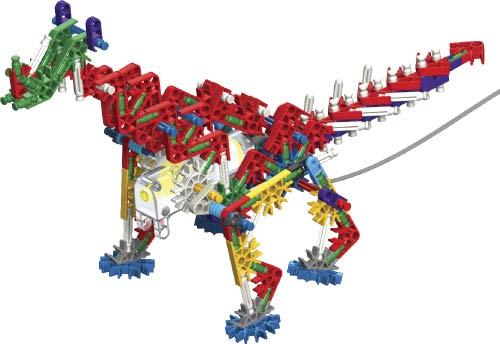
3 K NEXosaurus REX EN ES FR DE IT PT NL Did you install 2 AA (or LR6) batteries in the motor? Instalaste dos pilas AA (o LR6) en el motor? Est-ce que tu as installé 2 piles AA (ou LR6) dans le moteur? Hast du 2 Batterien der Baugröße AA (oder LR6) eingelegt? Hai installato 2 batterie AA (o LR6) nel motore? Foram instaladas as pilhas 2 AA (ou LR6) no motor? Heb je er 2 AA (of LR6) batterijen ingestoken? WARNING: CHOKING HAZARD - SMALL PARTS. Not for children under 3 years. ADVERTENCIA: PELIGRO DE ASFIXIA PIEZAS PEQUEÑAS. No para niños menores de 3 años. AVERTISSEMENT : DANGER D ÉTOUFFEMENT - Pièces de petite taille. Ne convient pas aux enfants de moins de 3 ans. WARNHINWEIS: ERSTICKUNGSGEFAHR KLEINTEILE. Nicht geeignet für Kinder unter 3 Jahren. AVVERTENZA: PERICOLO DI SOFFOCAMENTO CONTIENE PICCOLE PARTI. Non adatto per bambini al di sotto di 3 anni. AVISO: PERIGO DE SUFOCAÇÃO PEÇAS PEQUENAS. Não se destina a crianças com menos de 3 anos de idade. WAARSCHUWING: VERSTIKKINGSGEVAAR KLEINE ONDERDELEN. Niet geschikt voor kinderen onder


4


5 x

6


7 x
 batteries in the motor?")

 dans le moteur?")
 eingelegt?")

8 Megasaurus 2 EN Did you install 2 AA (or LR6) batteries in the motor? ES Instalaste dos pilas AA (o LR6) en el motor? FR Est-ce que tu as installé 2 piles AA (ou LR6) dans le moteur? DE Hast du 2 Batterien der Baugröße AA (oder LR6) eingelegt? IT Hai installato 2 batterie AA (o LR6) nel motore? PT Foram instaladas as pilhas 2 AA (ou LR6) no motor? NL Heb je er 2 AA (of LR6) batterijen ingestoken?


9


10 x

11
12 ES Español Consejos básicos de construcción de K'NEX A construir Para empezar tu modelo, es necesario buscar el paso número 1 y seguir los números. Cada pedazo tiene su propia forma y su propio color. Mira las imágenes, busca los pedazos que corresponden con lo que se ve y conéctalos. Durante la construcción, te ayudará si tienes el modelo en la misma dirección que las instrucciones. Las flechas muestran donde las partes se conectan; sin embargo, no todos los puntos de conexión tienen flechas. Las partes descoloradas son las que ya se han conectado. Conectores Se puede juntar estos conectores especiales deslizándolos. Empujar ligeramente hasta oír un clic. Hace falta prestar mucha atención a las instrucciones y posicionar los conectores horizontal o verticalmente exactamente tal como se muestran. Lista de piezas Antes de empezar con la construcción, asegúrate de comparar las piezas en tu conjunto con la lista de las piezas aquí. Si faltan algunas, llámanos o escríbenos siguiendo las instrucciones en la página trasera. Estamos aquí para ayudarte Información acerca de las pilas PRECAUCIÓN: Asegúrese de insertar las pilas correctamente y de siempre seguir las instrucciones del fabricante del juguete y de las pilas. No mezcle pilas viejas con nuevas, ni pilas alcalinas, estándar (carbón-cinc) o recargables (níquel-cadmio). Se debe usar solamente pilas del mismo tipo, o las que se recomienden como equivalentes. Siempre retire las pilas débiles o gastadas del producto; no forme cortocircuito en los puntos de intercambio. Inserte las pilas de acuerdo con los esquemas de polaridad (+/-). 3 Espaciadores Hay lugares en tu modelo donde tendrás que utilizar espaciadores. Asegúrate de utilizar el color correcto y el número de espaciadores indicados en las instrucciones. Consejos importantes Se recomiendan las pilas alcalinas. No se recomiendan las pilas recargables. Retire las pilas recargables del juguete antes de cargarlas; éstas deben ser cargadas solamente bajo la supervisión de un adulto. No se debe recargar las pilas que no son recargables. Mantenga los componentes sin polvo; no sumerja ni use en agua. No deseche las pilas en el fuego ya que pueden tener fugas, explotar y causar lesiones personales. Retire todas las pilas si el juguete no se usará por mucho tiempo. PRECAUCIÓN: Mantener las manos, cara, pelo, ropa y cable de alimentación alejados de todas las piezas móviles. Precaución: Evite enredarse en el cable. No meta las vanilas pequeñas en los orificios del motor ya que dañarian el motor y no se podrian sacar. Proteja el medio ambiente desechando su producto y el embalaje de una manera responsable. El símbolo del recipiente con ruedas indica que el producto y las pilas no deben tirarse en la basura doméstica, ya que contienen sustancias que pueden dañar el medio ambiente y la salud. Por favor acuda a los lugares de recolección designados o a instalaciones de reciclaje para desechar el artículo o las pilas.

13 FR Français Notions de base K'NEX pour le montage Commence la construction Pour commencer ton modèle, trouve l étape numéro 1 et suis les numéros. Chaque pièce a sa propre forme et sa propre couleur. Regarde les illustrations, trouve les pièces qui correspondent à ce que tu vois et assemble-les. Pour t aider pendant que tu construis, oriente ton modèle dans le même sens que les instructions. Les flèches t indiquent où les pièces s assemblent, mais les points de raccordement n ont pas tous des flèches. Les pièces de couleur délavée sont celles que tu as déjà assemblées. Connecteurs Tu peux assembler ces connecteurs tout à fait uniques en les faisant glisser l un avec l autre. Pousse fort jusqu à ce que tu entendes un «clic». Lis les instructions attentivement et positionne-les horizontalement ou verticalement, en suivant exactement les illustrations. Liste des pièces Avant de commencer à construire, assure-toi de comparer les pièces dans ta boîte à la liste de pièces fournie ici. S il manque quelque chose, téléphone-nous ou écris-nous en te servant des informations figurant au verso de la notice. Nous sommes là pour t aider! Espaceurs Il y a des endroits sur ton modèle ou tu auras besoin de te servir d espaceurs. Assure-toi d utiliser la bonne couleur et le nombre d espaceurs indiqué sur les instructions. ATTENTION : Tenez toute pièce mobile à l écart des mains, duvisage, des cheveux, des vêtements et du cordon d alimentation. Attention : ne pas se prendre les pieds dans le cordon. + - Informations Pile ATTENTION : S assurer d installer les piles correctement et de suivre toujours les directives des fabricants du jouet et des piles. Ne pas mélanger des piles neuves avec des piles usées. Ne pas mélanger des piles alcalines avec des piles standard (Leclanché), ou des piles rechargeables (au nickel-cadmium). Il convient d utiliser uniquement des piles du type recommandé ou d un type équivalent. Retirer toujours les piles faibles ou mortes du produit ; ne pas faire court-circuiter lesterminaux. Installer les piles en respectant la polarité (+/-) comme l indique le schéma. Conseils importants Les piles alcalines sont recommandées. l est déconseillé d utiliser des piles rechargeables. Retirer les piles rechargeables du jouet avant de les recharger; elles doivent être chargées exclusivement en présence d un adulte. Les piles qui ne sont pas rechargeables ne doivent pas être rechargées. Veiller à ce que les éléments restent à l abri de la poussière ; ne pas les plonger dans l eau ; ne pas utiliser dans l eau. Ne pas jeter les piles dans le feu ; elles risqueraient de fuir ou d exploser et d entraîner des blessures. Retirer toutes les piles si le jouet restera inutilisé pendant longtemps. Ne mettez pas les petites tiges dans les trous du moteur, elles endommageraient le moteur et il n est pas possible de les enlever. Aidez l environnement en jetant votre produit et son emballage de manière responsable. Le symbole de la poubelle à roulettes indique qu il ne faut pas jeter le produit et les piles avec les ordures ménagères car ils contiennent des substances pouvant être nocives à l environnement et à la santé. Veuillez utiliser les points de collecte de déchets ou les centres de tri désignés lorsque vous jetez l article ou les piles. 13
14 DE Deutsch Grundlegende Bauanleitungen für K'NEX Los geht s mit dem Bauen Beginne mit dem Bauen des Modells beim 1. Schritt und folge den Zahlen. Jedes Teil hat seine eigene Form und Farbe. Schaue die Bilder an, suche nach den passenden Teilen zu den Bildern und füge sie richtig zusammen. Halte dein Modell während des Zusammenbauens möglichst genau so wie in der Anleitung. Die Pfeile deuten an, wo die Teile zusammengefügt werden. Allerdings haben nicht alle Verbindungspunkte Pfeile. Die bereits zusammengefügten Teile sind in blassen Farben abgebildet. Verbindungsstücke Diese besonderen Verbindungsstücke kannst du zusammenschieben. Drücke sie fest, bis du ein Klicken hörst. Achte genau auf die Anleitung und positioniere die Verbindungsstücke genau wie in der Abbildung. Abstandsstücke An manchen Stellen in deinem Modell musst du Abstandsstücke einbauen. Achte darauf, die richtige Farbe und Anzahl von Abstandsstücken wie in der Anleitung gezeigt zu verwenden. Zahl von Teilen Bevor du mit dem Bauen anfängst, solltest du prüfen ob die Teile in deinem Bausatz mit denen auf dieser Teileliste übereinstimmen. Falls etwas fehlt, rufe uns an oder schreibe uns (siehe Rückseite). Wir sind für dich da! VORSICHT: Haare, Finger, Gesicht und Kleidungsstücke nicht mit beweglichen Teilen in Berührung kommen lassen. Vorsicht: Bitte stolpern Sie nicht über das Kabel. Informationen zu den Batterien VORSICHT: Achte darauf dass die Batterien korrekt eingelegt werden und folge den Anweisungen der Spielzeug- und Batterienfabrikanten. Mische keine alten und neuen Batterien oder alkaline Batterien, Standardbatterien (Kohle-Zink) oder wiederaufladbare Batterien (Nickel- Cadmium). Verwende nur Batterien des gleichen Typs oder des empfohlenen äquivalenten Typs. Leere oder verbrauchte Batterien aus dem Spielzeug entfernen; darauf achten, dass die Pole der Batterie nicht kurzgeschlossen werden. Beim Einlegen der Batterien auf die korrekte Polarität (+/-), wie dargestellt, achten. Wichtige Tipps Alkaline Batterien werden empfohlen. Wiederaufladbare Batterien sind nicht empfohlen. Bei Verwendung von wiederaufladbaren Batterien müssen diese aus dem Spielzeug entfernt werden, bevor sie wieder aufgeladen werden; das Wiederaufladen darf nur unter Aufsicht eines Erwachsenen stattfinden. Nichtwiederaufladbare Batterien dürfen nicht wieder aufgeladen werden. Die Komponenten von Staub freihalten; nicht in Wasser tauchen. Zu entsorgende Batterien nicht ins Feuer werfen; sie können auslaufen oder explodieren und Körperverletzungen verursachen. Wenn das Spielzeug längere Zeit nicht verwendet werden soll, alle Batterien entfernen. In keine der Öffnungen des Motor kleine Stangen einsetzen; sie beschädigen den Motor un können nicht entfernt werden. Trage zum Umweltschutz bei und entsorge unser Produkt sowie die Verpackung in verantwortungsvoller Weise. Das Mülltonnen-Symbol bedeutet, dass das Produkt und die Batterien nicht dem Restmüll zugeführt werden dürfen, weil sie Stoffe enthalten, die sich schädigend auf die Umwelt und die Gesundheit auswirken können. Bitte recycle den Artikel bzw. die Batterien und werfe sie in die entsprechenden Recyclingcontainer. IT Italiano Il fondamentale di costruzione di K NEX Cominciare la costruzione Per cominciare il tuo modello, trova il passo numero 1 e segui i numeri. Ogni pezzo ha la sua forma e il suo colore. Guarda le figure, trova i pezzi che corrispondono a ciò che vedi e congiungili insieme. È un aiuto se tieni il tuo modello di fronte a te nella stessa direzione delle istruzioni mentre costruisci. Le frecce ti indicano dove sono congiunte le parti ma non tutti i punti di congiunzione hanno le frecce. Le parti con i colori sbiaditi sono quelle che hai già messo insieme. Connettori Puoi infilare insieme questi connettori speciali. Spingi bene finché non senti un clic. Fa ben attenzione alle istruzioni e mettili orizzontalmente o verticalmente esattamente come viene mostrato. Spaziatori Ci sono posti nel tuo modello dove hai bisogno di usare gli spaziatori. Assicurati di usare il numero e il colore corretti degli spaziatori mostrati nelle istruzioni. Elenco delle parti Prima di cominciare a costruire, accertati di confrontare le parti che sono nel tuo set con l elenco delle parti qui. Se ne manca una chiamaci o scrivici usando le informazioni che sono nella retrocopertina. Noi siamo qui per aiutarti! ATTENZIONE: Tenere i capelli, le dita, il viso e i vestiti lontano da tutte le parti in movimento. Informazioni sulle batterie ATTENZIONE: Accertarsi di inserire le batterie correttamente e seguire sempre le istruzioni del produttore delle batterie e del giocattolo. Non mettere insieme batterie nuove e vecchie o alcaline, standard (carbonio-zinco) e ricaricabili (nichel-cadmio). Usare sempre batterie raccomandate dello stesso tipo o di tipo equivalente. Rimuovere sempre batterie quasi scariche o completamente scariche dal prodotto; non causare corto circuito ai terminali di alimentazione. Inserire le batterie con la polarità corretta (+/-) come illustrato. Consigli importanti Si raccomanda l'uso di batterie alcaline. Non si raccomanda l'uso di batterie ricaricabili. Rimuovere le batterie ricaricabili dal giocattolo prima della carica: devono essere caricate solo sotto la supervisione di un adulto. Le batterie non ricaricabili non devono essere ricaricate. Mantenere i componenti privi di polvere; non immergere o usare in acqua. Non gettare le batterie nel fuoco, poiché potrebbero perdere o esplodere e causare lesioni. Rimuovere tutte le batterie se il giocattolo non verrà usato per un lungo periodo di tempo. Non inserire aste più corte di 5,1 cm (2 pollici) nei fori del motore, in quanto danneggerebbero il motore e non possono essere rimosse. Aiuta l ambiente eliminando il prodotto e la confezione in modo responsabile. Il simbolo concernente il secchio con le ruote indica che il prodotto e le batterie non possono essere eliminati con la spazzatura domestica in quanto contengono sostanze che possono danneggiare l ambiente e la salute. Usare i punti di raccolta designati o gli impianti di riciclaggio quando si devono eliminare l articolo e le batterie. 14
15 PT Português Fundamentos de Construção K NEX Inicia construção Para iniciares a construção do teu modelo, procura a etapa 1 e segue os números. Cada peça tem a sua própria configuração e cor. Observa as ilustrações, procura as peças que correspondem ao que estás a ver e liga umas às outras. É mais fácil se estiveres virado para o modelo na mesma direcção mostrada nas ilustrações durante o processo de construção. As setas mostram os pontos onde as peças são conectadas, mas nem todos os pontos de conexão possuem setas. As peças com cores desbotadas pertencem às secções que já foram coordenadas. Conectores Podes fazer deslizar estes conectores especiais em conjunto. Empurra com força até escutares um estalido. Presta muita atenção às instruções e posiciona-as na horizontal ou na vertical, exactamente como são mostradas. Espaçadores Existem segmentos no teu modelo onde necessitas de colocar espaçadores. Certifica-te de que usas a cor e o número de espaçadores exactos, de acordo com o mostrado nas instruções. Lista de peças Antes de iniciares a construção, certifica-te de que comparas as peças do teu conjunto com a lista das peças aqui. Se faltar alguma peça telefona ou escreve-nos usando as informações indicadas na contracapa. Estamos aqui para te ajudar! CUIDADO: Mantém o cabelo, os dedos, a cara e a roupa afastados de todas as peças móveis. Informações sobre as pilhas CUIDADO: Certifique-se de que introduz as pilhas correctamente e siga sempre as instruções do fabricante da bateria e do brinquedo. Não combine pilhas usadas com pilhas novas, pilhas alcalinas, padrão (carbono-zinco) ou pilhas recarregáveis (níquel-cádmio). Deverão ser usadas apenas pilhas do mesmo tipo ou equivalentes ao tipo recomendado. Retire sempre as pilhas fracas ou gastas do produto; não provoque um curto-circuito nos terminais de alimentação. Introduza as pilhas com a polaridade correcta (+/-), conforme se mostra. Conselhos importantes Recomenda se o uso de pilhas alcalinas. Não se recomenda o uso de pilhas recarregáveis. Retire as pilhas recarregáveis do brinquedo antes de as carregar; estas pilhas devem ser recarregadas apenas sob vigilância de adultos. As pilhas não recarregáveis não devem ser carregadas. Mantenha os componentes livres de poeiras; não mergulhe em água nem use água. Não elimine as pilhas queimando-as; estas podem apresentar fugas ou explodir causando lesões. Retire todas as pilhas do brinquedo se não tencionar usá-lo durante um longo período de tempo. Não coloque varetas de tamanho inferior a 5,1 cm (2 pol.) em nenhuma abertura do motor; as varetas causarão danos no motor e não podem ser removidas. Ajude o ambiente eliminando o seu produto e a embalagem vazia responsavelmente. A imagem do contentor do lixo com rodinhas indica que o produto e as pilhas não devem ser eliminados juntamente com os resíduos domésticos pois contêm substâncias que podem provocar efeitos noviços no ambiente e na saúde. Por favor use os pontos de recolha designados ou as instalações de reciclagem quando necessitar de eliminar o produto ou as pilhas. NL Nederlands Basisstappen voor K'NEX bouwen Begin te bouwen Om je model te beginnen, moet je eerst stap nummer 1 vinden en dan de nummers volgen. Elk stuk heeft zijn eigen vorm en kleur. Kijk naar de prentjes, vind de stukken die overstemmen met wat je ziet, en maak ze aan mekaar vast. Het helpt wanneer je model dezelfde richting volgt als de aanwijzingen terwijl je bouwt. De pijlen duiden je aan waar de onderdelen zich vasthechten, maar niet alle hechtingspunten hebben pijlen. De onderdelen met afnemende kleur werden reeds eerder aan mekaar vastgemaakt. Verbindingstukken Deze speciale verbindingsstukken kunnen in mekaar geschoven worden. Druk ze goed tezamen tot wanneer je een klik hoort. Geef goed aandacht aan de aanwijzingen en richt ze horizontaal of vertikaal af, precies zoals afgebeeld. Afstandsstukken Er zijn plaatsen in je model waar afstandsstukken moeten gebruikt worden. Vergewis je ervan de correcte kleur en het nummer van de afstandsstukken te gebruiken die aangeduid zijn in de aanwijzingen. Onderdelenlijst Voor je begint te bouwen, vergewis je ervan de onderdelen in je geheel na te gaan met de onderdelenlijst hier. Wanneer iets ontbreekt, bel ons op of schrijf ons door gebruik te maken van de informatie op het achterblad. We staan er om je te helpen! OPGEPAST: Hou het haar, de vingers, het gezicht en kledij verwijderd van alle bewegende onderdelen. Batterijgegevens OPGEPAST: Verzeker je ervan dat de batterijen er op de juiste manier in te steken en volg steeds de aanduidingen van de speelgoed- en batterijenfabrikanten. Meng geen oude en nieuwe batterijen of alkalische, gewone (koolstof-zink) of herlaadbaarse (nikkel-cadmium) batterijen met mekaar. Uitsluitend batterijen van dezelfde of van een aanbevolen equivalente soort dienen gebruikt te worden. Verwijder steeds uitgeputte of ontladen batterijen uit het produkt; veroorzaak geen kortsluiting van de voedingspolen. Steek de batterijen erin volgens de juiste polariteit (+/-) zoals afgebeeld. Belangrijke tips Alkalische batterijen worden aanbevolen. Herlaadbare batterijen worden niet aanbevolen. Verwijder herlaadbare batterijen uit het speelgoed alvorens ze te herladen; ze moeten slechts herladen worden onder het toezicht van een volwassene. Niet-herlaadbare batterijen mogen niet herladen worden. Bescherm onderdelen tegen stof; dompel ze niet of gebruik ze niet in water. Werp de batterijen niet in het vuur; ze zouden kunnen lekken of ontploffen en verwondingen veroorzaken. Verwijder alle batterijen wanneer het speelgoed gedurende lange tijd niet gebruikt zal worden. Plaats staafjes in de openingen van het motor, zij zouden de motor beschadigen en kunnen niet worden verwijderd. Help de omgeving door uw product en verpakking verantwoordelijk weg te werpen. Het symbol met de vuilnisbak op wieltjes duidt aan dat het product en de batterijen niet mogen weggeworpen worden in huishoudvuil vermits ze stoffen bevatten die de omgeving en de gezondheid kunnen schaden. Gelieve de aangeduide verzamelpunten of recyclageinstallaties te gebruiken wanneer u zich wil ontdoen van dit artikel of deze batterijen. 15

16
EN CAUTION: ATTENZIONE: PT CUIDADO: Important Tips: ATTENTION : DE VORSICHT: CAUTION: Sugestões Importantes: ES PRECAUCIÓN: Wichtige Tipps:
 EN CAUTION: To Avoid Battery Leakage - Be sure to insert the batteries correctly and always follow the toy and battery manufacturers instructions. Do not mix old and new batteries or alkaline, standard
FOR PARENTS & KIDS. WARNING: CHOKING HAZARD - Small parts. Not for children under 3 years.
 IMPORTANT STUFF FOR PARENTS & KIDS Keep these instructions in a handy location. They contain important safety information. Read all warnings and instructions before you start to build and operate the model.
Building Basics. Tyrannosaurus...10 Ferris Wheel...12 Catamaran...14 Excavator...17 Building Ideas...20
 Ice Cream Cone/Fish...4 Coconut Tree...5 Plane...6 Skier...7 Rocket Ship...8 AMERICAN MADE PARTS (EN) CONTENTS Parts List Tyrannosaurus...0 Ferris Wheel... Catamaran...4 Excavator...7 Building Ideas...0
BUILDING BASICS BATTERY INFORMATION
 Parts List Before you start building, be sure to compare the parts in your set with the parts list here. If anything is missing, call or write to us using the information on the back cover. We are here
Building Basics. CONTENTS Eggbeater...10 Jet...12 Dragster...14 Dune Buggy...17 Dump Truck...20 Building Ideas...23.
 Moose/Snowboarder... Tow Truck/Squirrel...5 Butterfly/Weightlifter...6 Submarine...7 Hammerhead Shark...8 Swing Ride...9 AMERICAN MADE PARTS CONTENTS Eggbeater...0 Jet... Dragster... Dune Buggy...7 Dump
AVERTISSEMENT : RISQUE D ÉTOUFFEMENT
 (EN) English WARNING: CHOKING HAZARD Small parts. Not for children under 3 years. CAUTION: Keep hands, face, hair, clothing and Power Cord away from all moving parts. Caution: Do not trip on cord. WARNING:
ROBO-STING. Building Worlds Kids Love BUILDING SET JEU DE CONSTRUCTION
 Building Worlds Kids Love ROBO-STING BUILDING SET JEU DE CONSTRUCTION 7+ 13244 LR6 ) A ( A 2X Not included Pas inclus No se incluyen Nicht enthalten Non incluse Não estão incluídas Niet inberepen Building
VORSICHT: NL OPGEPAST:
 EN CAUTION: To Avoid Battery Leakage - Be sure to insert the batteries correctly and always follow the toy and battery manufacturers instructions. Do not mix old and new batteries or alkaline, standard
7 + 2 X Not included MOTOR MOTEUR * REVVIN RACECAR 2-IN-1 BUILDING SET VOITURE DE COURSE MONTÉE EN RÉGIME 2 EN 1 JEU DE CONSTRUCTION BUILDS
 Building Worlds Kids Love MOTOR MOTEUR * REVVIN RACECAR -IN- BUILDING SET VOITURE DE COURSE MONTÉE EN RÉGIME EN JEU DE CONSTRUCTION 7 + BUILDS À CONSTRUIRE ** 7 + 6005 X Not included AA (LR6) Pas inclus
1 # DE SW Hoth_v13.indd 1 9/17/13 11:41 AM
 1 # 80 980 DE SW Hoth_v13.indd 1 9/17/13 11:41 AM x2 x6 x2 x30 x30 x6 2 DE SW Hoth_v13.indd 2 9/17/13 11:41 AM x2 x2 3 DE SW Hoth_v13.indd 3 9/17/13 11:41 AM ± 2 cm 4 DE SW Hoth_v13.indd 4 9/17/13 11:41
ROBO-JAWS BUILDING SET JEU DE CONSTRUCTION. 2 X Not included MOTOR MOTEUR. Building Worlds Kids Love MOTOR BUILDS CONSTRUIRE **
 Building Worlds Kids Love MOTOR ROBO-JAWS BUILDING SET JEU DE CONSTRUCTION MOTOR MOTEUR BUILDS À 3À CONSTRUIRE ** 7 + 34406 X Not included AA (LR6) Pas inclus No se incluyen Nicht enthalten Non incluse
IMPORTANT STUFF FOR PARENTS AND KIDS INFORMATIONS IMPORTANTES POUR LES PARENTS ET LES ENFANTS CONTENUS CONTENTS. Go to for instruction updates
 (EN) CONTENTS K NEX Building Basics... 4 Parts List... 5 Amazin 8 Roller Coaster... 6 Track Building Tips... 16 Tips and Troubleshooting... 29 (FR) CONTENUS K NEX Bases de la Construction... 4 Liste des
SCREAMING SIDESHOW ROLLER COASTER BUILDING SET SIDESHOW CRI MONTAGNES RUSSES JEU DE CONSTRUCTION X Not included MOTOR MOTEUR *
 Building Worlds Kids Love SCREAMING SIDESHOW ROLLER COASTER BUILDING SET SIDESHOW CRI MONTAGNES RUSSES JEU DE CONSTRUCTION 7 + X Not included AA (LR6) Pas inclus No se incluyen Nicht enthalten Non incluse
MOTOR * Building Worlds Kids Love REVOLUTION FERRIS WHEEL BUILDING SET RÉVOLUTION GRANDE ROUE JEU DE CONSTRUCTION. * Motore
 Building Worlds Kids Love REVOLUTION FERRIS WHEEL BUILDING SET RÉVOLUTION GRANDE ROUE JEU DE CONSTRUCTION EEL WH FERRIS 7+ 540 LR6 ) A ( A X MOTOR * MOTEUR Not included Pas inclus No se incluyen Nicht
INFORMATIONS IMPORTANTES POUR LES PARENTS ET LES ENFANTS IMPORTANT STUFF FOR PARENTS AND KIDS CONTENUS CONTENTS. Go to for instruction updates
 (EN) CONTENTS K NEX Building Basics... 4 Parts List... 5 Building Idea... 5 Raptor s Revenge Roller Coaster... 6 Track Building Tips.... 21 Tips and Troubleshooting.... 41 (FR) CONTENUS K NEX Bases de
INFORMATIONS IMPORTANTES POUR LES PARENTS ET LES ENFANTS IMPORTANT STUFF FOR PARENTS AND KIDS. Go to for instruction updates
 IMPORTANT STUFF FOR PARENTS AND KIDS Keep these instructions in a handy location. They contain important safety information. Read all warnings and instructions before you start to build and operate the
CONTENTS CONTENIDOS CONTENUS. Important stuff for Parents & Kids. Información importante para los Padres y Niños
 ES EN CONTENTS K NEX Building Basics................ 4 Parts List.......................... 5 Building Idea........................ 5 SUPER CYCLONE COASTER.......... 6 Track Building Tips....................
Building Basics CONTENTS. Fish...4 Wind Surfer...5 Hang Glider...6 High Diver...7 Jellyfish...8 Anchor...9 Inner Tube...10 Swordfish...
 Fish...4 Wind Surfer...5 Hang Glider...6 High Diver...7 Jellyfish...8 Anchor...9 Inner Tube...0 Swordfish... AMERICAN MADE PARTS CONTENTS Picnic Basket...4 Turtle...6 Sea Plane...0 Fishing Boat... Lifeguard
2x AM03773F. 4x AM03773KJ. 1x AM03772BBG. 2x AM03772KJ. 2x AM03772F. 3x AM09493BBG. 2x AM09493F. 2x AM09493BDG. 2x AM09493BMG.
 AM01480YG AM01480BBG AM09493F AM09493YG 5x AM09493KJ AM09493BBG AM09493BDG AM09493BMG AM03772BBG AM03772KJ AM03772F AM03773F AM03773KJ AM01113F AM03328AGZ AM03328F AM03328BDG AM01140F M12251F AM09105F
Keep this important information for future reference
 MECHA CLAW Roller Coaster Building Set GRIFFE DE MECHA Montagnes Russes Jeu de construction.5 ft 79 cm [] AA (LR6) AA (LR6) Not Included/Pas Inclus[] Ages 7-447 (EN) English Keep this important information
BUILD AND BLAST WARNING:
 TM Building Worlds Kids Love FLASH FIRE MOTORIZED BLASTER BUILDING SET MOTORISÉ DE LA FLASH FIRE BLASTER JEU DE CONSTRUCTION BUILD AND BLAST FIRES UP TO 75 ft! TIRE Á PLUS DE m!** 0 - - SHOT MOTORIZED
9-14. WARNING: CHOKING HAZARD Small parts. Not for children under 3 years.
 KRAKEN S REVENGE Roller Coaster Building Set LA VENGEANCE mc DE KRAKEN Montagnes Russes Jeu de construction [] AA (LR6) AA (LR6) Not Included/Pas Inclus [] WARNING: CHOKING HAZARD Small parts. Not for
OVER 7 ft TALL! PLUS DE 2 m DE HAUT! ** MOTORIZED LAUNCHER ** LANCEUR MOTORISE SKY SPRINTER ROLLER COASTER BUILDING SET SPRINTER DU CEIL
 Building Worlds Kids Love MOTORIZED LAUNCHER ** LANCEUR MOTORISE SKY SPRINTER ROLLER COASTER BUILDING SET SPRINTER DU CEIL 3X C 52478 (LR1 4) MONTAGNES RUSSES JEU DE CONSTRUCTION Not included Pas inclus
IAN 93902 1/22. Washing machine cabinet. Mobile lavatrice Istruzioni per il montaggio. Armario saledizo de máquina lavadora Instrucciones de montaje
 Washing machine cabinet ES PT DE AT CH Armario saledizo de máquina lavadora Instrucciones de montaje Armário para montar por cima da máquina de lavar a roupa Instruções de montagem Waschmaschinenüberbauschrank
Building Ideas! Idees de 35Construction! * Building Worlds Kids Love. 350pc/pza. Super Value Tub Conteneur la Valeur Super.
 35 Building Ideas! Idees de 35Construction! * Building Worlds Kids Love 350 350pc/pza Super Value Tub Conteneur la Valeur Super pc/pza 7 + 16490 Start Building To begin your model, find the and follow
Important Stuff for Parents and Kids
 (EN) English CONTENTS K NEX Building Basics... 6 Parts List... 7 Star Shooter Roller Coaster... 8 Tips and Troubleshooting... 30 Keep this important information for future reference Important Stuff for
3x AM15494E. 6x M1346BLG. 3x AM15500F. 2x AM04219BLG. 1x AM09825BLG. 1x AM09186BLG. 1x AM09826BLG. 1x AM09187BLG. 8x AM07475BLG.
 AS032491 AM01086BDG 6x AM01086BLG 4x AM07629BDG AM09013BYE 4x AM09013BDG 6x AM09013BLG AM01087BDG 6x AM01087BLG AM01313BDG 4x AM01313BLG AM09033BYE 10x AM09033BDG 6x AM09033BLG 5x AM01323BDG AM10273F 3x
CAUTION: Important Tips
 CONTENTS STEEL SCORPION COASTER....... 4 Track Building Tips................. 25 Tips & Troubleshooting............. 42 DOUBLE DIP COASTER........... 43 ES EN FR CONTENIDOS STEEL SCORPION COASTER.......
Important Stuff for Parents and Kids
 (EN) English CONTENTS K NEX Building Basics... 6 Parts List... 7 Amazin 8 Roller Coaster... 8 Tips and Troubleshooting... 30 Keep this important information for future reference Important Stuff for Parents
Building Basics. Parts List
 Building Basics Start Building To begin your model, find the and follow the numbers. Each piece has its own shape and color. Just look at the pictures, find the pieces in your set that match and then connect
Education MOTOR MOTEUR* 2 X. Experiments Expériences
 Education STEM EXPLORATIONS: SWING RIDE BUILDING SET EXPLORATION STEM : SE BALANCER MONTER JEU DE CONSTRUCTION S SCIENCE LA SCIENCE T TECHNOLOGY TECHNOLOGIE E ENGINEERING INGÉNIERIE M MATH MATHÉMATIQUES
9 + WILD WHIPLASH ROLLER COASTER BUILDING SET COUP DE FOUET SAUVAGE MONTAGNES RUSSES JEU DE CONSTRUCTION MOTOR MOTEUR * 2 X Not included
 Building Worlds Kids Love WILD WHIPLASH ROLLER COASTER BUILDING SET COUP DE FOUET SAUVAGE MONTAGNES RUSSES JEU DE CONSTRUCTION 9 + X Not included AA (LR6) Pas inclus No se incluyen Nicht enthalten Non
SLINGSHOT LAUNCHER PROPULSEUR* LANCE-PIERRE. Building Worlds Kids Love INFINITE JOURNEY ROLLER COASTER BUILDING SET
 Building Worlds Kids Love INFINITE JOURNEY ROLLER COASTER BUILDING SET ROLLERR COASTE VOYAGE INFINI MONTAGNES RUSSES JEU DE CONSTRUCTION 7+ SLINGSHOT LAUNCHER PROPULSEUR* LANCE-PIERRE 5407 * Lanzador Tirabete
1. DESCARGA DEL SOFTWARE DE BLUETOOTH EN EL SMARTPHONE
 MANUAL DEL USUARIO PARA BLUETOOTH ES 1. DESCARGA DEL SOFTWARE DE BLUETOOTH EN EL SMARTPHONE Entre en Apple Store o Google Play y busque: - BH Premium - BH Lite BH Premium BH Lite 2. FIJACIÓN DEL MÓDULO
START HERE PTB: COMECE AQUI FRA: MISE EN ROUTE ITA: PER COMINCIARE PTG: INICIAR AQUI ESP: EMPEZAR AQUÍ
 START HERE PTB: COMECE AQUI FRA: MISE EN ROUTE ITA: PER COMINCIARE PTG: INICIAR AQUI ESP: EMPEZAR AQUÍ Install the software (required for full webcam functionality). Instale o software (necessário para
BUILDING BASICS BASES DE LA CONSTRUCTION
 (EN) English Keep this important information for future reference WARNING: CHOKING HAZARD Small parts. Not for children under 3 years. CAUTION: Keep hands, face, hair and clothing away from all moving
GUIA PRINCIPAL CONTEÚDO
 GUIAPRINCIPAL ORazerNagaéomouseMMO(MassivelyMultiplayerOnlineGaming,jogodecomputadorcom centenasdemilharesdejogadoreson linesimultaneamente)definitivo,quemudaoequilíbrioentre tecladoemouse,reunindoumnúmeroinéditodecomandosdejogoemumúnicolocal.ogrip
BUILD AND BLAST WARNING:
 TM Building Worlds Kids Love K-X ROTOSHOT BLASTER BUILDING SET JEU DE CONSTRUCTION BUILD AND BLAST FIRES UP TO 7 ft! TIRE Á PLUS DE m! ** -SHOT ROTO CHAMBER ROTO CHAMBRE A -TIR BUILDS CONSTRUIT LES* 8
LUNAR LAUNCH. Roller Coaster Building Set LANCEMENT LUNAIR. Montagnes Russes Jeu de construction. 44 in 114 cm. Ages 9-14
 LUNAR LAUNCH Roller Coaster Building Set LANCEMENT LUNAIR Montagnes Russes Jeu de construction 44 in 4 cm STOMP LAUNCHER Ages 9-4 545 (EN) English Keep this important information for future reference (FR)
Quickstart Guide. WiPry-Pro Combo
 Quickstart Guide CONNECT TO APPLE DEVICE ACCESSORY EXTERNAL TRIGGER 2.4-2.5GHz ANTENNA WARNING DO NOT APPLY MORE THAN 20DBM TO THE ANTENNA WITHOUT EXTERNAL ATTENUATION WARNING DO NOT APPLY MORE THAN -0.5/+3.8V
Radio / Cassette. Long Beach C31. Installation instructions Notice de montage Instrucciones de instalación Instruções de montagem
 Radio / assette Long each 3 Installation instructions Notice de montage Instrucciones de instalación Instruções de montagem Installation instructions Notice de montage Instrucciones de instalación Instruções
Radio / CD. Honolulu CD50. Installation instructions Notice de montage Instrucciones de instalación Instruções de de montagem
 Radio / D Honolulu D50 Installation instructions Notice de montage Instrucciones de instalación Instruções de de montagem Installation instructions Notice de montage Instrucciones de instalación Instruções
8-18. WARNING: Do not aim at eyes or face. TO AVOID INJURY: Use only foam darts designed for this product. Do not modify foam dart or Blaster Chamber.
 BUILD AND BLAST BARRACUDA ROTOSHOT BLASTER Building Set BLASTER Á TIR ROTATIF BARRACUDA Jeu de construction BUILDS 5MODÈLES* Ages 8-8 4703 WARNING: Do not aim at eyes or face. TO AVOID INJURY: Use only
CAJONERA Instrucciones de montaje. CASSETTIERA Istruzioni per il montaggio. KOMMODE Montageanleitung. CHEST OF DRAWERS Assembly instruction
 ES CAJONERA Instrucciones de montaje IT CASSETTIERA Istruzioni per il montaggio GB CHEST OF DRAWERS Assembly instruction DE AT KOMMODE Montageanleitung CH PT MÓVEL Instruções de montagem new / 9 0 8 7
Start Here Comece aqui Mise en route Empezar aquí
 Start Here Comece aqui Mise en route Empezar aquí 1 Install the software (required for full functionality). Instale o software (necessário para funcionalidade total). Installez le logiciel (requis pour
DONKEY 19689. 2. Using a small cross-head (positive) screwdriver, undo the screw that secures the battery compartment door. Copyright ROMPA Ltd
 screwdriver, undo the screw that secures the battery compartment door. Copyright ROMPA Ltd") DONKEY 19689 CONTENTS 1 x switch-adapted Donkey This product requires, but does not include, 3 AA batteries and a switch See www.rompa.com for a comprehensive range of switches BEFORE USE 1. Locate the
DONKEY 19689 CONTENTS 1 x switch-adapted Donkey This product requires, but does not include, 3 AA batteries and a switch See www.rompa.com for a comprehensive range of switches BEFORE USE 1. Locate the
5827 Blue Ranger vs. Xandred Ranger Azul vs. Xandred Ranger Bleu contre Xandred
 5827 Blue Ranger vs. Xandred Ranger Azul vs. Xandred Ranger Bleu contre Xandred Ranger Blu contro Xandred Ranger Azul X Xandred Blauer Ranger gegen Xandred Blue Ranger vs. Xandred MA03019B MA11101F 4X
Caderno de Questões. Edição Abril 2013 Prova para Nível Básico 4ºano ao 6º do Ensino Fundamental
 www.redepoc.com Caderno de Questões Edição Abril Prova para Nível Básico 4ºano ao 6º do Ensino Fundamental Qualquer tentativa gera alguma pontuação. Responda cada questão em apenas uma folha A organização
BUILD AND BLAST WARNING:
 TM Building Worlds Kids Love MEGA BOOM BUILDING SET MÉGA- BOUM JEU DE CONSTRUCTION BUILD AND BLAST FIRES UP TO 75 ft! TIRE Á PLUS DE 22 m!** BUILDS CONSTRUIT LES*6 8 + 47527 WARNING: Do not aim at eyes
MOTOR MOTEUR BLIZZARD BLAST ROLLER COASTER BUILDING SET MONTAGNES RUSSES EXPLOSION D UNE TEMPÊTE DE NEIGE JEU DE CONSTRUCTION
 MOTOR MOTEUR Building Worlds Kids Love BLIZZARD BLAST ROLLER COASTER BUILDING SET MONTAGNES RUSSES EXPLOSION D UNE TEMPÊTE DE NEIGE JEU DE CONSTRUCTION + ft ft.9 ++ m m 5440 LR6 ) A ( A 9 + X Not included
Instruções de Montagem Assembly instructions
 Instruções de Montagem Assembly instructions Material que você precisará Material you'll need 1. Cola branca White glue 2. Canetas ou lápis coloridos Color markers or pencils Dicas úteis Useful tips Leia
Remove all traces of old nail polish before you start. Apply a full coat of a base colour on your nails with the brush. Let it dry for 5 minutes.
 01601-INSTP-1-01 INSTRUCCIONES ANLEITUNG INSTRUCTIES ISTRUZIONI INSTRUÇÕES 1 Remove all traces of old nail polish before you start. Apply a full coat of a base colour on your nails with the brush. Let
Security Kit. Security Kit. Security Kit. Security Kit. See Reverse Side For Security Installation Instructions 8811-000008
 Security Kit Security Kit See Reverse Side For 8811-000008 See Reverse Side For 8811-000008 Security Kit Security Kit See Reverse Side For 8811-000008 See Reverse Side For 8811-000008 1. Using security
English Español Français canadien Português brasileiro
 English Español Français canadien Português brasileiro English Tuxera NTFS for Mac The Toshiba Canvio External Hard Drive is formatted with NTFS and can be read and written on Windows PCs. Mac OS X can
IMPORTANT STUFF FOR PARENTS AND KIDS INFORMATIONS IMPORTANTES POUR LES PARENTS ET LES ENFANTS CONTENUS CONTENTS. Go to for instruction updates
 (EN) CONTENTS K NEX Building Basics...4 Parts List...5 Thunderbolt Strike Roller Coaster...6 Track Assembly Tips...39 Tips and Troubleshooting...41 (FR) CONTENUS K NEX Bases de la Construction...4 Liste
LIGHT PANEL CONTENTS Light Panel Power supply Fixtures (brackets, screws)
") Page 1 of 8 LIGHT PANEL 20367 CONTENTS Light Panel Power supply Fixtures (brackets, screws) ABOUT THIS PRODUCT The Light Panel may be used on a table top as a free-standing object, or mounted either horizontally
Page 1 of 8 LIGHT PANEL 20367 CONTENTS Light Panel Power supply Fixtures (brackets, screws) ABOUT THIS PRODUCT The Light Panel may be used on a table top as a free-standing object, or mounted either horizontally
TAPA Y ASIENTO PARA WC ASSE PER WC TAMPO PARA SANITA TOILET SEAT WC-SITZ Z30830A / Z30830B / Z30830C / Z30830D IT MT DE AT CH
 ES TAPA Y ASIENTO PARA WC IT MT ASSE PER WC PT TAMPO PARA SANITA GB MT TOILET SEAT DE AT CH WC-SITZ 5 Z080A / Z080B / Z080C / Z080D 7096_ES_IT.indd /4/20 7:0:4 PM x 2 x 4 5 6 7 8 A x 2 2 2 7096_ES_IT.indd
RS-485 Kit. Kit RS-485. Kit RS-485. SSW-07 / SSW-08 English / Español / Português Document: / 04. Installation Guide. Guia de Instalación
 RS-485 Kit Kit RS-485 Kit RS-485 Installation Guide SSW-07 / SSW-08 English / Español / Português Document: 0899.5711 / 04 Guia de Instalación Guia de Instalação 1. DESCRIPTION OF THE KIT Contents: Table
MANUAL PRINCIPAL ÍNDICE
 MANUALPRINCIPAL ORazerNagaéosupremoratoparajogosdogéneroMassivelyMultiplayerOnline(MMO)quealternao equilíbrioentretecladoeratoaocentralizarumnúmerosemprecedentesdecomandosdojogo.uma grelhademúltiplosbotõesparaopolegarcomfuncionalidadeintegralderemapeamentoemacro
1. Product Name. 2. Product Code. 3. Colour. 4. Brief Description. 5. Contents. Switch Adapted Clip On Fan. Colours may vary
 1. Product Name Switch Adapted Clip On Fan 2. Product Code 20489 3. Colour Colours may vary 4. Brief Description Connects to your switch for switch activation. 5. Contents Fan with cable with 3.5mm jack
Prova F Grupo Porto 11º ano, Nível de Continuação
 Prova F Grupo Porto 11º ano, Nível de Continuação Esta prova desenvolve-se em três partes e tem uma duração aproximada de 15 minutos para cada grupo de dois alunos. Domínios de referência: Information
manual de instrucciones manuel des instructions manual de instruções
 LxAxP= 1.845x2.540x633 mm 4356 4262 4262 4384 4384 4355 4232 4353 4235 4228 4881 4881 4244 4354 4352 4251 4252 4253 4247 4249 4245 4248 4242 4246 4240 COD GĜĬ FĪ HT Î GĜ Ĩ ĜTĖĬ QTD. DIMENSÃO=MM COD DESCRIÇÃO
Acti 9 Smartlink fr en es de cz pt nl zh ru
 Ati 9 Smartlink fr en es de z pt nl zh ru Ati 9 Smartlink SB- iat A99 iatl A9 ifs A9A6897 FS A96899 RA i6 A97p Reflex i6 A96pppp A9MEMT P M SV F V F iemt Y Y() ) Y(manu Auto i6 F F A u t o www.shneider-eletri.om
Einzelteilübersicht / Spare parts list / Liste des pièces détachées / Onderdelenoverzicht / Lista da piezas / Resumo de peça individual 2
 Inhalt Contents Contenu Inhoud Contenido Conteúdo Einzelteilübersicht / Spare parts list / Liste des pièces détachées / Onderdelenoverzicht / Lista da piezas / Resumo de peça individual 2 Montagehilfen
Guião N. Descrição das actividades
 Proposta de Guião para uma Prova Grupo: 006 Disciplina: Inglês, Nível de Continuação, 11.º ano Domínio de Referência: Um Mundo de Muitas Culturas Duração da prova: 15 a 20 minutos 1.º MOMENTO Guião N Intervenientes
100171058_N369225491 100171074_N369225492 100171084_N369225490 100171066_N369225488 URBAN C
 100171058_N369225491 100171074_N369225492 100171066_N369225488 100171084_N369225490 URBAN C Lea atentamente estas instrucciones antes de comenzar la instalación. - Compruebe el producto por si faltasen
Kit Tecsystem for MVW-01. Kit Tecsystem para MVW-01. Kit Tecsystem Installation, Configuration and Operation Guide
 Kit Tecsystem for MVW0 Kit Tecsystem para MVW0 Kit Tecsystem Installation, Configuration and Operation Guide Kit Tecsystem Guía de Instalación, Configuración y Operación Kit Tecsystem Guia de Instalação,
Color chart / Tabla De colores / Charte de couleurs / Farbentafel / Kleurenkaart / Carta dei colori / Tabela de cores
 Marvel, The Fantastic Four, Invisible Woman, The Thing, Human Torch, Mr. Fantastic and Dr. Doom: TM & 2005 Marvel Characters, Inc. All rights reserved. www.marvel.com. The Fantastic Four Motion Picture:
1. Product Name. 2. Product Code. 3. Colour. 4. Brief Description. 5. Contents. 6. Snoezelen Stimulations. Switch Adapted Fibre Optic Lamp
 1. Product Name Switch Adapted Fibre Optic Lamp 2. Product Code 20709 3. Colour Clear base; white fibres 4. Brief Description Activate your switch to activate the light through the fibres and in the base.
2x AM15664AGV. 5x AM15611AGV. 1x AM15699KM. 6x AM15607AGV. 3x AS x AM16248MX. 1x AS060199
 17x AS060191 18x AM15603KM AS0601915 3x AS060196 1 AM15605KM 10x AM15698GT 3x AM15615GT 9x AM15633GT AM15606GT AM15631GT 75 135 4x AM15619GT AS0601914 AS060192 7x AM15604KM 4x AM15623AGV 10 3x AM15624AGV
CONTENTS BATTERY INFORMATION IMPORTANT STUFF FOR PARENTS AND KIDS
 (EN) English CONTENTS K NEX Building Basics...4 Parts List...5 Sorcerer s Eclipse Roller Coaster...6 Track Assembly Tips... 54 Tips and Troubleshooting... 57 IMPORTANT STUFF FOR PARENTS AND KIDS You will
TWILIGHT TURTLE 20491
 Page 1 of 6 TWILIGHT TURTLE 20491 CONTENTS Your Twilight Turtle is supplied in one box containing: 1 x Twilight Turtle 1 x Star Guide (small booklet) Please note: This product requires, and includes, 3
4-Port USB Charger 5.1A
 Multi Language Quick Guide 4-Port USB Charger 5.1A CUSBPWR51A V1.0 English 1. Package contents The following items are present in the package of the Conceptronic 4-Port USB Charger 5.1A 2. Specifications
NOTE: CETTE NOTICE DESSINS DOIT ETRE ACCOMPAGNEE DE LA NOTICE TEXTES : N
 Drawings Manual of Installation, Use, and Maintenance Behind Jambs WITH Integrated Operator Models: Wayne-Dalton Optimal, Wayne-Dalton Confort, NOTE: THIS DRAWINGS MANUAL MUST BE ACCOMPANIED BY THE NOTES
1x AM09197BLG. 2x AM06618ACX. 1x AM02391TS. 2x AM15299BDG. 1x AM01797ACX
 AM01113RF AM09393BDG AM09593BTN 8x AM09593BDG 8x M0948BDG 8x M1146BDG 4x AM03329BDG AM01087BDG 3x AM01313BLG 4x AM01313BDG AM09493BTN 4x AM09493BDG 6x AM09033BLG AM03058BDG AM03058BTN 3x AM03058BLG AM01480BDG
MANUAL DE INSTALAÇÃO MANUAL DE INSTALACIÓN INSTALLATION GUIDE
 MANUAL DE INSTALAÇÃO MANUAL DE INSTALACIÓN INSTALLATION GUIDE Patch Panel Descarregado Angular/ Patch Panel Descargado Angular/ Angled Modular Patch Panel youtube.com/furukawabrasil Use um leitor de códigos
Inglês. Entrelinha 1,5 (Versão única igual à Versão 1) Teste Intermédio de Inglês. Parte III Compreensão do oral. Entrelinha 1,5.
 Teste Intermédio de Inglês. Parte III Compreensão do oral. Entrelinha 1,5.") Teste Intermédio de Inglês Parte III Compreensão do oral Entrelinha 1,5 Teste Intermédio Inglês Entrelinha 1,5 (Versão única igual à Versão 1) Duração do Teste: 15 minutos 22.02.2013 9.º Ano de Escolaridade
Teste Intermédio de Inglês Parte III Compreensão do oral Entrelinha 1,5 Teste Intermédio Inglês Entrelinha 1,5 (Versão única igual à Versão 1) Duração do Teste: 15 minutos 22.02.2013 9.º Ano de Escolaridade
SISTEMA AUTO-NIVELADOR DE FARÓIS
 INSTRUÇÕES DE MONTAGEM (EN) INSTALL MOUNTING INSTRUCTIONS (ES) INSTRUCCIONES DE MONTAJE (FR) GUIDE D'INSTALLATION SISTEMA AUTO-NIVELADOR DE FARÓIS P/ KITS HID (EN) Auto Leveling System for HID KITS (ES)
CHECK DEVICE TRANSPONDER RF REF REF REF 10292
 IT/EN/ES/PT 1/6 CHECK DEVICE TRANSPONDER RF Prodotto da/manufactured by/fabricado por: DIESSE Diagnostica Senese SpA Via delle Rose 10 53035 Monteriggioni (Siena) - Italy Modifiche introdotte nella revisione
GUIÃO C (Grupo Joaninhas)
") Duração da Prova: 15 a 20 minutos Domínios de Referência: Tempos livres: Media; Trabalho 1.º Momento Avaliação da Expressão Oral no Ensino Secundário Disciplina: Alemão (Iniciação, Nível 2 11º ano) GUIÃO
Duração da Prova: 15 a 20 minutos Domínios de Referência: Tempos livres: Media; Trabalho 1.º Momento Avaliação da Expressão Oral no Ensino Secundário Disciplina: Alemão (Iniciação, Nível 2 11º ano) GUIÃO
Copyright ROMPA Ltd SNORING PIG 20134
 SNORING PIG 20134 CONTENTS 1 x Snoring Pig with cable attached Please note: Snoring Pig requires, but does not include 3 x AA batteries. BEFORE USE 1. Lay the pig down so that his head is facing to the
SR2 COM01 Quick start
 SR COM0 Quick start Aim: SR COM0 alarm message on your mobile phone. Objectif : réception sur votre téléphone mobile d'un message d'alarme provenant du SR COM0. Zweck: Empfang einer Alarmmeldung vom SR
Anybus-CC Modules. Módulos Anybus-CC. Módulos Anybus-CC. Installation, Configuration Guía de Instalación, Guia de Instalação,
 Anybus-CC Modules Módulos Anybus-CC Módulos Anybus-CC Installation, Configuration Guía de Instalación, Guia de Instalação, and Operation Guide Configuración y Operación Configuração e Operação Anybus-CC
Motors Automation Energy Transmission & Distribution Coatings. USB Plug-in Module Módulo Plug-in USB
 Motors Automation Energy Transmission & Distribution Coatings USB Plug-in Module Módulo Plug-in USB CFW100 Installation, Configuration and Operation Guide Guía de Instalación, Configuración y Operación
POLYPLAY MASTER INSTRUÇÕES DE MONTAGEM INSTRUCCIONES DE MONTAJE/ASSEMBLE INSTRUCTION. Ref.: 0957.7
 Com a adição de mais Polyplays ao seu, ele pode tomar a forma que você quiser. Conheça todos os modelos de Polyplays: Super, Master e Mega. Depois disso, sua imaginação é que dita as regras. Super Master
O examinador dá o primeiro momento por terminado, dizendo: Vielen Dank!.
 PROVA DE EXPRESSÃO ORAL DE ALEMÃO PROPOSTA DE GUIÃO Iniciação (2 anos de aprendizagem) Domínios de referência: FREIZEIT / REISEN 1.º MOMENTO Intervenientes e tempos Descrição das actividades O examinador
POLYPLAY SUPER INSTRUÇÕES DE MONTAGEM INSTRUCCIONES DE MONTAJE/ASSEMBLE INSTRUCTION. Ref.:
 Com a adição de mais Polyplays ao seu, ele pode tomar a forma que você quiser. Conheça todos os modelos de Polyplays: Super, Master e Mega. Depois disso, sua imaginação é que dita as regras. Super Master
PROCEDIMENTOS NECESSÁRIOS ANTES DE UTILIZAR O EQUIPAMENTO. Instalação do Rasther PC. Habilitação das Montadoras
 Guia Rápido Rasther PC PROCEDIMENTOS NECESSÁRIOS ANTES DE UTILIZAR O EQUIPAMENTO Antes de iniciar o uso do Rasther, será necessário instalar o programa Rasther PC, habilitar as montadoras adquiridas juntamente
GB - User Manual F - Manuel d Utilisation D - Bedienungsanleitung PT - Manual de Instruções
 GB PROFESSIONAL PA AMPLIFIER AMPLIFICATEUR PROFESSIONNEL PA PROFESSIONELLER PA VERSTÄRKER PAA-60USB (95-1000) GB - User Manual F - Manuel d Utilisation D - Bedienungsanleitung PT - Manual de Instruções
DIVERSOS PEDRAVELHA REF REF 1123 ± 14 Kg 43 x Ø 23cm S/ACESSÓRIOS REF ± 421 Kg 207 x Ø 126cm REF 1124 ± 180 Kg 140 x Ø 100cm
 CATÁLOGO DIVERSOS DIVERSOS REF 1123 REF 1124.1 REF 1124 REF 1123 ± 14 Kg 43 x Ø 23cm S/ACESSÓRIOS REF 1124.1 ± 421 Kg 207 x Ø 126cm REF 1124 ± 180 Kg 140 x Ø 100cm REF 1166 REF 1166.1 REF 1166.2 REF 1139
EU DECLARATION OF CONFORMITY
 The following product: (Brand) EU DECLARATION OF CONFORMITY HEAVY-DUTY WORKSITE PLL RADIO - WITH WIRELESS BLUETOOTH CONNECTION Power requirements: 7.5VDC 1A or 4x LR14 battery (Type of equipment, description)
JELLY BEAMER WIRELESS SWITCH 19458
 JELLY BEAMER WIRELESS SWITCH 19458 CONTENTS 1 x receiver (left, above) 1 x switch (transmitter, right, above) 3 x extra interchangeable tops yellow, blue, green This product requires, but does not include
MarkWare Facility Identification Software
 English TABLE OF CONTENTS Arrows...3 Exit...4 Fasteners...5 Fire safety...6 First aid & rescue...7 Hazmat diamond...8 Hazmat HSID...9 Hazmat transport...10 Hazmat triangle...11 Hazmat-WHMIS-SIMDUT...12
Telemóvel Interactivo
 N7296 Telemóvel Interactivo www.fisher-price.pt Informação ao consumidor Guarde estas instruções para referência futura pois contêm informação importante. Funciona com 3 pilhas AA (incluídas). A instalação
1. DESCARGA DEL SOFTWARE DE BLUETOOTH EN EL SMARTPHONE
 M AN UAL DEL USUARIO PARA BLUETOOT H ES 1. DESCARGA DEL SOFTWARE DE BLUETOOTH EN EL SMARTPHONE Entre en Apple Store o Google Play y busque: - BH Premium BH Premium 2. FIJACIÓN DEL MÓDULO BLUETOOTH Fije
Guia de Instalação Rápida TE100-PCBUSR
 Guia de Instalação Rápida TE100-PCBUSR Table Índice of Contents Português... 1. Antes de Iniciar... 2. Como Instalar... 1 1 2 Troubleshooting... 3 Version 07.27.2007 1. Antes de Iniciar Conteúdo da Embalagem
N7295
 Calculadora Interactiva N7295 www.fisher-price.pt Informação ao consumidor Guarde estas instruções para referência futura pois contêm informação importante. Funciona com 3 pilhas AA (incluídas). A instalação
GUIÃO I. Grupo: Continente e Ilha. 1º Momento. Intervenientes e Tempos. Descrição das actividades
 GUIÃO I Prova construída pelos formandos e validada pelo GAVE, 1/6 Grupo: Continente e Ilha Disciplina: Inglês, Nível de Continuação 11.º ano Domínio de Referência: Um mundo de Muitas Culturas 1º Momento
Digital Inputs and Outputs Expansion Kit Kit de Expansión de Entradas y Salidas Digitales Kit de Expansão de Entradas e Saídas Digitais
 Motors Energy Automation Coatings Digital Inputs and Outputs Expansion Kit Kit de Expansión de Entradas y Salidas Digitales Kit de Expansão de Entradas e Saídas Digitais SSW-06 Installation Guide Guia