CAUTION: Important Tips
|
|
|
- Nina Canejo Avelar
- 6 Há anos
- Visualizações:
Transcrição

1


2 CONTENTS STEEL SCORPION COASTER Track Building Tips Tips & Troubleshooting DOUBLE DIP COASTER ES EN FR CONTENIDOS STEEL SCORPION COASTER Consejos para armar las Pistas Consejos y solución de Problemas DOUBLE DIP COASTER CONTENUS STEEL SCORPION COASTER Conseils pour le circuit Conseils & Dépannage DOUBLE DIP COASTER IMPORTANT STUFF FOR PARENTS & KIDS Keep these instructions in a handy location. They contain important safety information. Read all warnings and instructions before you start to build and operate the model. WARNING: CHOKING HAZARD - Small parts. Not for children under 3 years. CAUTION: Keep hands, face, hair and clothing away from all moving parts. CAUTION: Do not use the speaker close to your ear! Misuse may cause damage to hearing. CAUTION: Be careful not to tip the model over. Model should be placed on a flat and hard surface. Share the K'NEX experience with your child and make building with K'NEX a family fun adventure. Take your time to enjoy the building process. Don't rush! While you re building make sure you face your model in the same direction as the pictures show in the instructions. Product and colors may vary. WARNING: As with all small batteries, the batteries used in this toy should be kept away from small children, who still put things in their mouths. If they are swallowed, promptly see a doctor and have the doctor phone collect (US only). CAUTION: Be sure to insert the batteries correctly and always follow the toy and battery manufacturers instructions. Do not mix old and new batteries or alkaline, standard (carbon-zinc) or rechargeable (nickelcadmium) batteries. Only batteries of the same or equivalent type recommended should be used. Always remove weak or dead batteries from the product; do not short-circuit supply terminals. Insert batteries with correct polarity (+/-) as shown. Important Tips Alkaline batteries are recommended. Rechargeable batteries are not recommended. Remove rechargeable batteries from toy before charging; they must be charged only under adult supervision. Non-rechargeable batteries must not be recharged. Keep components free of dust; do not immerse or use in water. Do not dispose of batteries in a fire; they could leak or explode and cause injury. Remove all batteries if the toy will not be used for a long period of time. Do not put rods smaller than 2 inches in any openings of the motor; they will damage the motor, and cannot be removed. Help the environment by disposing of your product and packaging responsibly. The wheelie bin symbol indicates that the product and batteries must not be disposed of in the domestic waste as they contain substances which can be damaging to the environment and health. Please use designated collection points or recycling facilities when disposing of the item or batteries. BATTERY INFORMATION MOTOR: Use a small Phillips head screwdriver to loosen the screw. Insert 2 fresh AA batteries (LR6) into the compartment with the correct polarity (+/-) as shown here. + How to Insert and Remove Batteries + SPEAKERS: Use a small Phillips head screwdriver to loosen the screws. Insert 2 fresh AAA batteries (LR03) into the compartment with the correct polarity (+/-) as shown here. FCC Statements:! WARNING: Changes or modifications to this unit not expressly approved by the party responsible for the compliance could void the users right to operate the equipment. This device complies with Part 15 of the FCC Rules. Operation is subject to the following two conditions: 1. This device may not cause harmful interference and 2. This device must accept any interference received, including interference that may cause undesired operation. This model is tested to comply with FCC standards - FOR HOME OR OFFICE USE. This equipment has been tested and found to comply with the limits for a Class B digital device, pursuant to part 15 of the FCC Rules. These limits are designed to provide reasonable protection against harmful interference in a residential installation. This equipment generates, uses and can radiate radio frequency energy, and, if not installed and used in accordance with the instructions, may cause harmful interference to radio communications. However, there is no guarantee that interference will not occur in a particular installation. If this equipment does cause harmful interference to radio or television reception, which can be determined by turning the equipment off and on, the user is encouraged to try to correct the interference by one or more of the following measures: (1) Reorient or relocate the receiving antenna. (2) Increase the separation between the equipment and receiver. (3) Consult the dealer or an experienced radio/tv technician. (4) Connect the equipment into an outlet on a circuit different from that to which the receiver is connected. This Class B digital apparatus complies with Canadian ICES


3 Start Building BUILDING BASICS To begin your model, find the 1 and follow the numbers. Each piece has its own shape and color. Just look at the pictures, find the pieces in your set that match and then connect them together. Try to face your model in the same direction as the instructions while you build. The arrows show you where the parts connect, but not all connections points have arrows. Faded colors show you this section is already built. Spacers There are places in your model where you need to add blue and silver spacers. Be sure to use the right color and count them carefully. Connectors There are blue and gray connectors with special long slots. They slide together as you see in the pictures. Push these parts together until you hear a click. 1 Graphic Panels See page 39 for attaching panels to model. 2 Chain Be sure to attach all the chain links in the same direction Parts Count Before you start building, be sure to compare the parts in your set with the parts list here. If anything is missing, call or write to us using the information on the back cover. We are here to help you! Go to for Instruction Updates Vaya a para actualizaciones de instrucción Va à pour des mises à jour des instructions 3


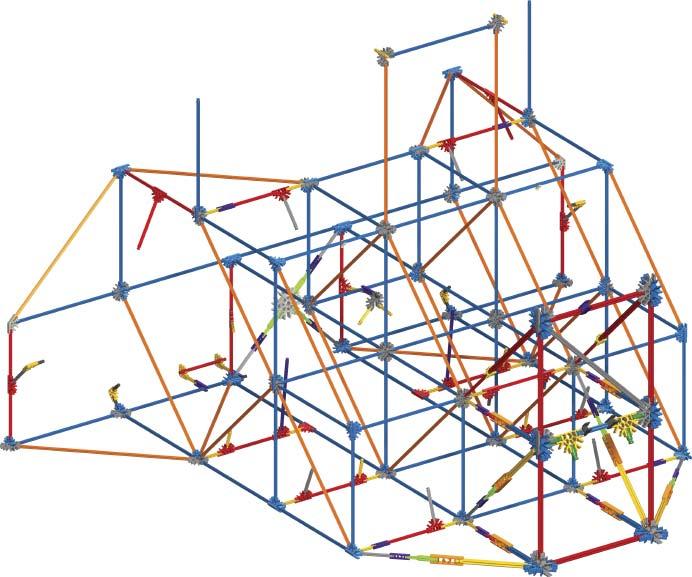
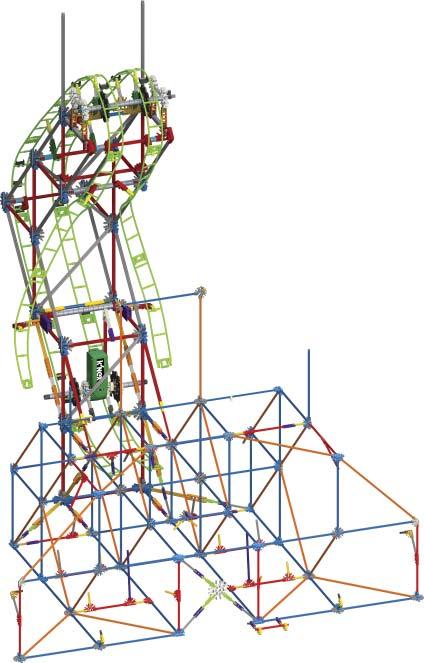
4 STEEL SCORPION ROLLER COASTER TM/MC WARNING: CHOKING HAZARD - SMALL PARTS. Not for children under 3 years. ADVERTENCIA: PELIGRO DE ASFIXIA PIEZAS PEQUEÑAS. No para niños menores de 3 años. AVERTISSEMENT : DANGER D ÉTOUFFEMENT - Pièces de petite taille. Ne convient pas aux enfants de moins de 3 ans. WARNHINWEIS: ERSTICKUNGSGEFAHR KLEINTEILE. Nicht geeignet für Kinder unter 3 Jahren. AVVERTENZA: PERICOLO DI SOFFOCAMENTO CONTIENE PICCOLE PARTI. Non adatto per bambini al di sotto di 3 anni. AVISO: PERIGO DE SUFOCAÇÃO PEÇAS PEQUENAS. Não se destina a crianças com menos de 3 anos de idade. WAARSCHUWING: VERSTIKKINGSGEVAAR KLEINE ONDERDELEN. Niet geschikt voor kinderen onder
5

6

7
8 x10 1-6
9

10
11 1-10 x
12

13 x4 x
 batterijen gestoken in de motor? Hai installato 2 batterie AA (o LR6) nel motore? Foram instaladas as pilhas 2 AA (ou LR6) no motor? Heb je er 2 AA (of LR6) batterijen ingestoken?")
14 EN ES FR DE IT PT NL Did you install 2 AA (or LR6) batteries in the motor? Instalaste dos pilas AA (o LR6) en el motor? Est-ce que tu as installé 2 piles AA (ou LR6) dans le moteur? Heb je 2 AA (of LR6) batterijen gestoken in de motor? Hai installato 2 batterie AA (o LR6) nel motore? Foram instaladas as pilhas 2 AA (ou LR6) no motor? Heb je er 2 AA (of LR6) batterijen ingestoken?


15


16

17
18

19
20
21 x
22

23

24

25 Track Building Tips: Consejos para armar las Pistas: Conseils pour le circuit : EN ES FR Attach the black chain guides to the top of the track and attach the connectors to the bottom of the track exactly as shown. Sujeta las Guías de Cadena al lado superior de la Pista. Sujeta los conectores en el lado inferior de la Pista, exactamente como se muestra. Fixe les guides de chaîne à la partie supérieure du circuit. Fixe les connecteurs à la partie inférieure du circuit exactement comme l indique le schéma. EN ES FR Be sure to push the connectors on firmly until they click. Empuja los Conectores hacia adentro hasta que oigas un clic. Pousse bien les connecteurs jusqu à ce qu ils «cliquent». EN Always connect the track top side to top side throughout the build. ES Al construir, conecta siempre la Pista de lado superior a lado superior. FR Connecte toujours le côté supérieur du circuit contrele côté supérieur tout au long de la construction. 25


26 x


27 x EN Always join this end of the track to the previous track piece first, then connect the rest of the track to the tower. ES Connecte toujours le côté supérieur du circuit contre le côté supérieur tout au long de la construction. FR A siempre este extremo de la pista a el pedazo anterior de la pista primero, entonces conecta el resto de la pista con la torre. DE Die einzelnen Schienenstücke müssen immer mit der Oberseite nach oben zeigen, wenn sie miteinander verbunden werden. IT Collega sempre la rotaia parte superiore a parte superiore in tutta la costruzione. PT Liga sempre a face superior da pista à face superior durante a montagem. NL Maak steeds de bovenkant van het spoor vast aan de bovenkant tijdens de opbouw. 27


28 x

29 x

30 x

31 x


32 x

33 x

34 x

35 46 x


36 x
37 50 50 EN IMPORTANT: Attach all the chain links in the same direction ES FR IMPORTANTE: Conecta los Eslabones de la Cadena en la misma dirección. IMPORTANT : Attache les chaînons dans le même sens DE IT WICHTIG: Befestige die Kettenglieder immer in die gleiche Richtung. IMPORTANTE: Collegare le maglie della catena nella stessa direzione PT IMPORTANTE: Prende os Elos da Corrente seguindo a mesma direcção. NL BELANGRIJK: Maak de ketenschakels vast in dexelfde richting x26 x x x


38


39

40 EN To attach the cars, slide them onto an open end of the track. If the cars get stuck on the way down, make sure they are not hitting any K NEX parts. ES Para sujetar los Coches, aprieta la Pista levemente y engancha las ruedas en la Pista. Si los coches quedan atascados mientras van hacia abajo: Asegúrate de que el coche no esté golpeando ninguna de las piezas K'NEX. FR Pour fixer les voitures, pince légèrement le circuit et fixe les roues dessus. Si des voitures restent coincées au cours de la descente. Vérifie que la voiture ne heurte pas des pièces K NEX


41 EN ES FR Speakers work with any mp3 player. ipod/mp3 player not included. ipod is a registered trademark of Apple, Inc. Los altavoces trabajan con cualquier mp3 jugador. El jugador ipod/mp3 no incluyó. ipod es una marca registrada de Apple, Inc. Les haut-parleurs travaillent avec mp3 joueur. ipod/mp3 joueur n a pas inclus. ipod est une marque déposée inscrite de Apple, Inc. OFF APAGAR ÉTEINDRE 59 41
42 1-59 Go to for Instruction Updates Va à pour des mises à jour des instructions Vaya a para actualizaciones de instrucción EN TIPS & TROUBLESHOOTING If the motor is not working properly: Check to see if you have fresh batteries and that they are installed correctly. If it is still not working, call our Consumer Hotline at KID-KNEX (USA and Canada only). See the back cover for other ways to contact K NEX. If a car gets stuck on the track: Is the model built correctly? Make sure the cars are not hitting any K NEX parts. Are the track pieces connected properly? Are the cars attached to the track correctly? Adjust the track to eliminate any flat or little bumpy spots on the track. ES CONSEJOS Y SOLUCIÓN DE PROBLEMAS Si el Motor o el Módulo del Sonido no funcionan: Comprueba si tienes pilas nuevas y si están instaladas correctamente. Si aún así no trabaja, llama a nuestra Línea de Servicio al Cliente al KID-KNEX (EE.UU. y Canadá solamente). Mira en la cubierta de atrás para otras formas de comunicarte con K'NEX. Si los coches quedan atascados mientras van hacia abajo: El modelo está construido correctamente? Asegúrate de que el coche no esté golpeando ninguna de las piezas K'NEX. Las piezas de la Pista están conectadas correctamente? El coche está sujetado a la Pista correctamente? Ajusta la Pista para eliminar cualquier lugar plano que le encuentres. FR CONSEILS & DÉPANNAGE Si le moteur ou le module son ne marche pas : Vérifie que tu as des piles neuves et qu elles sont installées correctement. Si ça ne marche toujours pas, appelle notre ligne d assistance à la clientèle à KID-KNEX (USA et Canada uniquement). Regarde au verso pour d autres moyens de contacter K NEX. Si des voitures restent coincées au cours de la descente : Est-ce que le modèle est construit comme il faut? Vérifie que la voiture ne heurte pas des pièces K NEX. Est-ce que les pièces du circuit sont connectées comme il faut? Est-ce que la voiture est fixée au circuit comme il faut? Ajuste le circuit de façon à y éliminer des endroits plats. 42

43 DOUBLE DIP ROLLER COASTER EN Building Idea Bonus instructions at - rides ES Idea para la construcción Instrucciones de la prima en - rides FR Idée de construction Plans supplementaires á - rides DE Bauvorschlag Zusätzliche Bauanleitungen bei - rides IT Idea di costruzione Bonus Istruzioni a - rides PT Ideia de construção Instruções do bônus em - rides NL Idee voor bouwen De instructies van de bonus bij - rides 43
44 ES Español (Página 2) Información importante para los padres y niños Guarda estas instrucciones en un sitio conveniente. Contienen información importante de seguridad. Lee todas las advertencias e instrucciones antes de comenzar a construir y operar este modelo. ADVERTENCIA: PELIGRO DE ASFIXIA - Piezas pequeñas. No es para niños menores de 3 años. PRECAUCIÓN: Mantén el cabello, los dedos, la cara y la ropa alejada de las piezas móviles. PRECAUCIÓN: No uses el Módulo de Sonido cerca del oído! El uso indebido puede producir daño al oído. PRECAUCIÓN: Si el cabello del niño entra en contacto con las partes en movimiento del juguete, puede quedar enredado. Compartan la experiencia K'NEX con su niño y hagan que la construcción con K'NEX sea una divertida aventura de toda la familia. Dedica tiempo a disfrutar el proceso de construcción. No te apresures! Mientras construyes, trata de colocar tu modelo en la misma dirección que se muestra en las instrucciones. El producto y los colores pueden variar. Información acerca de las pilas ADVERTENCIA: Como con todas las pilas pequeñas, las pilas que se usan en este juguete se deben tener lejos del alcance de los niños, quienes todavía están en edad de ponerse cosas en la boca. Si estas pilas son tragadas, inmediatamente vea a un médico. PRECAUCIÓN: Asegúrese de insertar las pilas correctamente y de siempre seguir las instrucciones del fabricante del juguete y de las pilas. No mezcle pilas viejas con nuevas, ni pilas alcalinas, estándar (carbón-cinc) o recargables (níquel-cadmio). Se debe usar solamente pilas del mismo tipo, o las que se recomienden como equivalentes. Siempre retire las pilas débiles o gastadas del producto; no forme cortocircuito en los puntos de intercambio. Inserte las pilas de acuerdo con los esquemas de polaridad (+/-). Consejos importantes Se recomiendan las pilas alcalinas. No se recomiendan las pilas recargables. Retire las pilas recargables del juguete antes de cargarlas; éstas deben ser cargadas solamente bajo la supervisión de un adulto. No se debe recargar las pilas que no son recargables. Mantenga los componentes sin polvo; no sumerja ni use en agua. No deseche las pilas en el fuego ya que pueden tener fugas, explotar y causar lesiones personales. Retire todas las pilas si el juguete no se usará por mucho tiempo. No meta las vanilas pequeñas en los orificios del motor ya que dañarian el motor y no se podrian sacar. Proteja el medio ambiente desechando su producto y el embalaje de una manera responsable. El símbolo del recipiente con ruedas indica que el producto y las pilas no deben tirarse en la basura doméstica, ya que contienen sustancias que pueden dañar el medio ambiente y la salud. Por favor acuda a los lugares de recolección designados o a instalaciones de reciclaje para desechar el artículo o las pilas. Cómo insertar y quitar las pilas Motor: Utilizar un pequeño destornillador principal Phillips para aflojar el tornillo y para quitar la cubierta de batería. Insertar 2 AA (o LR6) baterías frescas en el compartimiento de batería con la polaridad correcta (+/-). Altavoces estéreos: Utilizar un pequeño destornillador principal Phillips para aflojar el tornillo y para quitar la cubierta de batería. Insertar 2 AAA (o LR03) baterías frescas en el compartimiento de batería con la polaridad correcta (+/-). (Página 3) Consejos básicos de construcción de K'NEX Empieza a construir Para comenzar tu modelo, busca el 1 y sigue los números. Cada pieza tiene su propia forma y color. Simplemente mira los dibujos, busca las piezas correspondientes en tu juego y después conéctalas. Mientras construyes, trata de colocar tu modelo en la misma dirección que se muestra en las instrucciones. Los colores desteñidos muestran que esta sección ya está construida. Conecta las nuevas secciones en los lugares señalados por las flechas. Las nuevas piezas que agregues estarán en colores vivos. Conectores Hay conectores azules y plateados con ranuras largas especiales. Se enganchan deslizándose como ves en los dibujos. Conecta estas piezas empujándolas hasta que oigas clic. Espaciadores Hay lugares en tu modelo donde tendrás que agregar Espaciadores azules y plateados. Cerciórate de usar el color correcto y cuéntalos con cuidado. Paneles Gráficos Ver las página 39 para la atadura paneles para modelar. Cadena Asegúrate de fijar todos los elementos de la cadena en la misma dirección. Lista de piezas Antes de empezar con la construcción, asegúrate de comparar las piezas en tu conjunto con la lista de las piezas aquí. Si faltan algunas, llámanos o escríbenos siguiendo las instrucciones en la página trasera. Estamos aquí para ayudarte. 44
45 FR Français (Page 2) Informations importantes pour les parents et les enfants Garde ces instructions à portée de la main. Elles comportent d'importantes informations de sécurité. Lis tous les avertissements et les instructions avant de commencer le montage et l'exploitation du modèle. AVERTISSEMENT : DANGER D'ÉTOUFFEMENT - Petites pièces. Ne convient pas aux enfants de moins de 3 ans. ATTENTION : Garde les cheveux, les doigts, la figure et les vêtements à l'écart de toutes les pièces mobiles. ATTENTION : N'utilise pas le module sonore près des oreilles. ATTENTION : Faire attention de ne pas renverser le modèle. Le modèle devrait être placé sur une surface plate et dure. Partage l'expérience K'NEX avec ton enfant et fais du montage K'NEX un agréable projet de famille. Prends ton temps lors du montage. Ne te presse pas. Essaye de situer ton modèle dans le même sens que les instructions durant le montage. Le produit et les couleurs peuvent varier. Informations Pile AVERTISSEMENT : Comme c est le cas pour toutes les piles de petite taille, les piles utilisées dans ce jouet doivent être tenues hors de la portée des jeunes enfants, qui sont à l âge où ils mettent encore des choses dans la bouche. Dans l éventualité où un enfant les avalerait, consulter un médecin sans tarder. ATTENTION : S assurer d installer les piles correctement et de suivre toujours les directives des fabricants du jouet et des piles. Ne pas mélanger des piles neuves avec des piles usées. Ne pas mélanger des pilesalcalines avec des piles standard (Leclanché), ou des piles rechargeables (au nickel-cadmium). Il convient d utiliser uniquement des piles du type recommandé ou d un type équivalent. Retirer toujours les piles faibles ou mortes du produit ; ne pas faire court-circuiter lesterminaux. Installer les piles en respectant la polarité (+/-) comme l indique le schéma. Conseils importants Les piles alcalines sont recommandées. l est déconseillé d utiliser des piles rechargeables. Retirer les piles rechargeables du jouet avant de les recharger; elles doivent être chargées exclusivement en présence d un adulte. Les piles qui ne sont pas rechargeables ne doivent pas être rechargées. Veiller à ce que les éléments restent à l abri de la poussière ; ne pas les plonger dans l eau ; ne pas utiliser dans l eau. Ne pas jeter les piles dans le feu ; elles risqueraient de fuir ou d exploser et d entraîner des blessures. Retirer toutes les piles si le jouet restera inutilisé pendant longtemps. Ne mettez pas les petites tiges dans les trous du moteur, elles endommageraient le moteur et il n est pas possible de les enlever. Aidez l environnement en jetant votre produit et son emballage de manière responsable. Le symbole de la poubelle à roulettes indique qu il ne faut pas jeter le produit et les piles avec les ordures ménagères car ils contiennent des substances pouvant être nocives à l environnement et à la santé. Veuillez utiliser les points de collecte de déchets ou les centres de tri désignés lorsque vous jetez l article ou les piles. Comment mettre et retirer des piles Moteur : Utiliser un petit Phillips tournevis pour desserrer la vis et pour enlever la couverture de batterie. Insérer 2 AA (ou LR6) batteries fraîches dans le compartiment de batterie avec la polarité correcte (+/-). Haut-parleurs : Utiliser un petit Phillips tournevis pour desserrer la vis et pour enlever la couverture de batterie. Insérer 2 AAA (ou LR03) batteries fraîches dans le compartiment de batterie avec la polarité correcte (+/-). (Page 3) Notions de base K'NEX pour le montage Démarre ta construction Pour commencer ton modèle, trouve l étape numéro 1 et suis les numéros. Chaque pièce a sa propre forme et sa propre couleur. Regarde les illustrations, trouve les pièces qui correspondent à ce que tu vois et assemble-les. Pour t aider pendant que tu construis, oriente ton modèle dans le même sens que les instructions. Les flèches t indiquent où les pièces s assemblent, mais les points de raccordement n ont pas tous des flèches. Les pièces de couleur délavée sont celles que tu as déjà assemblées. Connecteurs Tu peux assembler ces connecteurs tout à fait uniques en les faisant glisser l un avec l autre. Pousse fort jusqu à ce que tu entendes un «clic». Lis les instructions attentivement et positionne-les horizontalement ou verticalement, en suivant exactement les illustrations. Espaceurs Il y a des endroits sur ton modèle ou tu auras besoin de te servir d espaceurs. Assure-toi d utiliser la bonne couleur et le nombre d espaceurs indiqué sur les instructions. Chaine Assure-toi de fixer tous les maillons de la chaîne dans le même sens. Panneaux Graphiques Voir page 39 pour la fixation des panneaux à modéliser. Liste des pièces Avant de commencer à construire, assure-toi de comparer les pièces dans ta boîte à la liste de pièces fournie ici. S il manque quelque chose, téléphone-nous ou écris-nous en te servant des informations figurant au verso de la notice. Nous sommes là pour t aider! Déclaration de la FCC :! AVERTISSEMENT : tout changement ou toute modification non approuvée par le parti responsable de la conformité pourraient annuler le droit de l'utilisateur à faire fonctionner l'appareil. Cet appareil conforme à la Partie 15 de la réglementation de la FCC. Son fonctionnement est soumis aux deux conditions suivantes: 1. Ce système ne saurait entraîner de brouillage préjudiciable. 2. Ce système doit accepter toute interférence reçue, y compris des interférences susceptibles d entraîner un fonctionnement indésirable. Ce modèle est testé afin d être conforme aux normes FCC POUR UN USAGE PERSONNEL OU PROFESSIONNEL. Cet équipement a été testé et est conforme aux limites d'un appareil numérique de classe B, en vertu de la partie 15 de la réglementation de la FCC. Ces limites sont déterminées en vue de fournir une protection raisonnable contre un brouillage préjudiciable dans une installation résidentielle. Cet équipement génère, utilise et est en mesure d irradier de l énergie radiofréquence, et s il n est pas installé ou utilisé conformément au mode d emploi, risque d entraîner un brouillage préjudiciable pour les communications radio. Il n y a toutefois aucune garantie qu un brouillage ne surviendra pas pour une installation particulière. Si cet équipement entraîne un brouillage préjudiciable à une réception radio ou de télévision, ce qui peut être déterminé en l éteignant et en le rallumant, il est recommandé d essayer de remédier au brouillage en prenant l une ou plusieurs des mesures suivantes : (1) réorienter ou changer de place l antenne, de réception. (2) augmenter l écart entre l équipement et le récepteur. (3) consulter le fournisseur ou encore un technicien qualifié en matière de radio/tv. (4) brancher l équipement dans une prise sur un circuit qui soit différent de celui nécessaire au récepteur. Cet appareil numérique de classe B est conforme aux normes canadiennes NMB
46 DE Deutsch (Seite 2) Was Eltern und Kinder unbedingt wissen sollten Halte diese Anleitungen stets griffbereit. Sie enthalten alle wichtigen Sicherheitshinweise. Lies bitte alle Warnhinweise und Anleitungen, bevor du mit dem Bauen und Spielen beginnst. WARNHINWEIS: ERSTICKUNGSGEFAHR - Vorsicht Kleinteile! Nicht für Kinder unter 3 Jahren geeignet. VORSICHT: Haare, Finger, Gesicht und Kleidungsstücke nicht mit beweglichen Teilen in Berührung kommen lassen. VORSICHT: Das Sound Modul auf keinen Fall ans Ohr oder in die Nähe des Ohrs halten! Bei falscher Anwendung kann es zu Gehörschäden kommen. VORSICHT: Die Haare des Kindes können in Kontakt mit bewegenden Teilen des Spielzeugs kommen und sich verfangen. Helfen Sie Ihrem Kind beim Bauen mit K'NEX und machen Sie aus diesem Bauprojekt ein Abenteuer mit Spaß und guter Laune für die gesamte Familie. Das Zusammenbauen macht Spaß, also nehmen Sie sich Zeit und hetzen Sie nicht! Versuche, dein Modell beim Zusammenbauen so zu orientieren, dass es in die gleiche Richtung weist, wie es in den Anleitungen beschrieben und gezeigt wird. Die Produkte und Farben unterscheiden sich eventuell von denen auf den Abbildungen. Informationen zu den Batterien WARNHINWEIS: Wie alle anderen kleinen Batterien sollten auch die in diesem Spielzeug verwendeten Batterien aus der Reichweite kleiner Kinder, die noch dazu neigen, Kleinteile in den Mund zu stecken, ferngehalten werden. Nach Verschlucken sofort einen Arzt konsultieren. VORSICHT: Achte darauf dass die Batterien korrekt eingelegt werden und folge den Anweisungen der Spielzeug- und Batterienfabrikanten. Mische keine alten und neuen Batterien oder alkaline Batterien, Standardbatterien (Kohle-Zink) oder wiederaufladbare Batterien (Nickel-Cadmium). Verwende nur Batterien des gleichen Typs oder des empfohlenen äquivalenten Typs. Leere oder verbrauchte Batterien aus dem Spielzeug entfernen; darauf achten, dass die Pole der Batterie nicht kurzgeschlossen werden. Beim Einlegen der Batterien auf die korrekte Polarität (+/-), wie dargestellt, achten. Wichtige Tipps Alkaline Batterien werden empfohlen. Wiederaufladbare Batterien sind nicht empfohlen. Bei Verwendung von wiederaufladbaren Batterien müssen diese aus dem Spielzeug entfernt werden, bevor sie wieder aufgeladen werden; das Wiederaufladen darf nur unter Aufsicht eines Erwachsenen stattfinden. Nichtwiederaufladbare Batterien dürfen nicht wieder aufgeladen werden. Die Komponenten von Staub freihalten; nicht in Wasser tauchen. Zu entsorgende Batterien nicht ins Feuer werfen; sie können auslaufen oder explodieren und Körperverletzungen verursachen. Wenn das Spielzeug längere Zeit nicht verwendet werden soll, alle Batterien entfernen. In keine der Öffnungen des Motor kleine Stangen einsetzen; sie beschädigen den Motor un können nicht entfernt werden. Trage zum Umweltschutz bei und entsorge unser Produkt sowie die Verpackung in verantwortungsvoller Weise. Das Mülltonnen-Symbol bedeutet, dass das Produkt und die Batterien nicht dem Restmüll zugeführt werden dürfen, weil sie Stoffe enthalten, die sich schädigend auf die Umwelt und die Gesundheit auswirken können. Bitte recycle den Artikel bzw. die Batterien und werfe sie in die entsprechenden Recyclingcontainer. Anweisungen zum Einlegen und Entfernen der Batterien Motor: Einen kleinen Kreuzkopfschraubenzieher benutzen, um die Schraube zu lösen und die Batterieabdeckung zu entfernen. 2 frische AA (oder LR6) Batterien in den Batterieraum mit der korrekten Polarität einsetzen (+/-). Stereolautsprecher: Einen kleinen Kreuzkopfschraubenzieher benutzen, um die Schraube zu lösen und die Batterieabdeckung zu entfernen. 2 frische AAA (oder LR03) Batterien in den Batterieraum mit der korrekten Polarität einsetzen (+/-). (Seite 3) Grundlegende Bauanleitungen für K'NEX Los geht s mit dem Bauen Um mit dem Bauen deines Modells zu beginnen, suche die Nummer 1 und folge den laufenden Nummern. Jedes Teil hat seine eigene Form und Farbe. Schau dir einfach die Abbildungen an, such die Teile in deinem Bausatz, die so aussehen wie das, was du auf der Abbildung siehst und steck sie ineinander. Versuche, dein Modell beim Zusammenbauen so zu orientieren, dass es in die gleiche Richtung weist, wie es in den Anleitungen beschrieben und gezeigt wird. Blasse Farben weisen darauf hin, dass dieser Streckenabschnitt bereits zusammengebaut ist. Verbindungsstücke Blaue und silberfarbene verbindungsstücke haben besonders lange Schlitze. Wie du vauf der Abbildung sehen kannst, lassen sie sich ineinander schieben. Achte beim Aneinanderfügen dieser Teile darauf, dass du ein Klickgeräusch hörst. Erst dann sind die Teile fest miteinander verbunden. Abstandsstücke An manchen Stellen in deinem Modell musst du Abstandsstücke einbauen. Achte darauf, die richtige Farbe und Anzahl von Abstandsstücken wie in der Anleitung gezeigt zu verwenden. Grafik-Panels Sieh Seite 39 für die Befestigung Tafeln, um zu modellieren. Kette Achte darauf, alle Kettenglieder in der gleichen Richtung zu verbinden. Teileliste Bevor du mit dem Bauen anfängst, solltest du prüfen ob die Teile in deinem Bausatz mit denen auf dieser Teileliste übereinstimmen. Falls etwas fehlt, rufe uns an oder schreibe uns (siehe Rückseite). Wir sind für dich da! (Seite 25) Tipps für die Schienen: Maak de kettinggidsen vast bovenaan het spoor. Maak de koppelstukken vast aan de onderkant van het spoor precies zoals afgebeeld. Druk de koppelstukken goed erin tot ze klikken. Die einzelnen Schienenstücke müssen immer mit der Oberseite nach oben zeigen, wenn sie miteinander verbunden werden. (Seite 40) Om de wagens vast te maken, knijp lichtjes aan het spoor en haak de wielen op het spoor vast. Wanneer wagens vastlopen tijdens de daling: Verzeker je ervan dat de wagen tegen geen K NEX onderdelen aanloopt. (Seite 41) ipod/mp3 Spieler nicht enthalten. ipod ist ein eingetragenes Warenzeichen des Apple, Inc. (Seite 42) Tipps und Fehlerbehebungen Falls der Motor oder das Soundmodul nicht funktionieren: Überprüfe, ob die Batterien voll sind und richtig eingelegt sind. Falls es immer noch nicht funktioniert, kannst du innerhalb der USA und Kanadas unsere Hotline anrufen (Tel KID-KNEX). Auf der Rückseite dieser Anleitung findest du weitere Möglichkeiten, K NEX. zu kontaktieren. Falls die Wagen bei der Abfahrt stecken bleiben: Ist das Modell richtig zusammengebaut? Überprüfe, ob der Wagen gegen einzelne Bauteile stößt. Sind die Schienenstücke richtig miteinander verbunden? Sitzt der Wagen richtig auf den Schienen? Ändere den Schienenverlauf so, dass die Wagen immer genügend Schwung haben. IT Italiano (Pagina 2) Informazioni importanti per bambini e genitori Tenere queste istruzioni a portata di mano. Contengono importanti informazioni di sicurezza. Leggere tutte le avvertenze e le istruzioni prima di iniziare a costruire il modello e di farlo funzionare. AVVERTENZA: PERICOLO DI SOFFOCAMENTO - Piccole parti. Non adatto a bambini di età inferiore ai 3 anni. ATTENZIONE: Tenere i capelli, le dita, il viso e i vestiti lontano da tutte le parti in movimento. ATTENZIONE: Non usare il modulo del suono vicino alle orecchie! Un uso improprio potrebbe causare danni all'udito. ATTENZIONE: I capelli del bambino potrebbero impigliarsi se vengono a contatto con le parti del giocattolo in movimento. Condividi l'esperienza di K'NEX con tuo figlio e rendi la costruzione con K'NEX un divertimento per tutta la famiglia. Prendi il tempo necessario per divertirti durante il processo di costruzione. Non ti affrettare! Orienta il tuo modello nella stessa direzione indicata nelle istruzioni. Il prodotto e i colori possono variare. Informazioni sulle batterie AVVERTENZA: Come per tutte le batterie piccole, le batterie utilizzate in questo giocattolo devono essere tenute lontano dalla portata dei bambini piccoli, che mettono ancora oggetti in bocca. Se vengono ingerite, consultare un medico immediatamente e informarlo. ATTENZIONE: Accertarsi di inserire le batterie correttamente e seguire sempre le istruzioni del produttore delle batterie e del giocattolo. Non mettere insieme batterie nuove e vecchie o alcaline, standard (carbonio-zinco) e ricaricabili (nichel-cadmio). Usare sempre batterie raccomandate dello stesso tipo o di tipo equivalente. Rimuovere sempre batterie quasi scariche o completamente scariche dal prodotto; non causare corto circuito ai terminali di alimentazione. Inserire le batterie con la polarità corretta (+/-) come illustrato. Consigli importanti Si raccomanda l'uso di batterie alcaline. Non si raccomanda l'uso di batterie ricaricabili. Rimuovere le batterie ricaricabili dal giocattolo prima della carica: devono essere caricate solo sotto la supervisione di un adulto. Le batterie non ricaricabili non devono essere ricaricate. Mantenere i componenti privi di polvere; non immergere o usare in acqua. Non gettare le batterie nel fuoco, poiché potrebbero perdere o esplodere e causare lesioni. Rimuovere tutte le batterie se il giocattolo non verrà usato per un lungo periodo di tempo. Non inserire aste più corte di 5,1 cm (2 pollici) nei fori del motore, in quanto danneggerebbero il motore e non possono essere rimosse. Aiuta l ambiente eliminando il prodotto e la confezione in modo responsabile. Il simbolo concernente il secchio con le ruote indica che il prodotto e le batterie non possono essere eliminati con la spazzatura domestica in quanto contengono sostanze che possono danneggiare l ambiente e la salute. Usare i punti di raccolta designati o gli impianti di riciclaggio quando si devono eliminare l articolo e le batterie. Come inserire e rimuovere le batterie Motore: Utilizzare un piccolo cacciavite phillips per allentare la vite e per rimuovere la copertura di batteria. Inserire 2 AA (o LR6) batterie fresche nello scompartimento di batteria con la polarità corretta (+/-). Altoparlanti stereo: Utilizzare un piccolo cacciavite phillips per allentare la vite e per rimuovere la copertura di batteria. Inserire 2 AAA (o LR03) batterie fresche nello scompartimento di batteria con la polarità corretta (+/-). (Pagina 3) Istruzioni di base per costruire con K NEX Comincia a costruire Per iniziare il modello, cerca il numero 1 e segui i numeri. Ogni pezzo ha una sua forma e un suo colore. Guarda la figura, trova i pezzi corrispondenti nel set e mettili insieme. Cerca di tenere il modello nella stessa direzione della figura e in tal modo sarà più semplice attaccare i pezzi nei posti giusti. I colori spenti ti dicono che questa sezione è già stata costruita. Dovrai collegare la nuova sezione al punto indicato dalla punta della freccia. Connettori È molto importante posizionare i connettori blu e argento in una specifica direzione. Presta molta attenzione alle istruzioni e posiziona i connettori orizzontalmente o verticalmente proprio come illustrato. Spingi con forza fino ad udire un clic. Spaziatori Ci sono punti nel tuo modello a cui dovrai aggiungere spaziatori blu e argento. Accertati si contarli attentamente. Pannelli Grafici Vedere le pagina 39 per il collegamento di pannelli a modello. Catena Accertati di attaccare tutti i collegamenti della catena nella stessa direzione. Elenco delle parti Prima di cominciare a costruire, accertati di confrontare le parti che sono nel tuo set con l elenco delle parti qui. Se ne manca una chiamaci o scrivici usando le informazioni che sono nella retrocopertina. Noi siamo qui per aiutarti! (Pagina 25) Punte delle rotaie: Attacca le guide a catena sulla parte superiore della rotaia. Collega i connettori sulla base della rotaia esattamente come illustrato. Premi i connettori saldamente fino a che si fissano con uno scatto. Collega sempre la rotaia parte superiore a parte superiore in tutta la costruzione. (Pagina 40) Per collegare le carrozze, stacca un pezzo di rotaia e quindi infila le ruote della carrozza sulla parte superiore della rotaia. Quindi unisci i pezzi della rotaia. Se le carrozze si arrestano durante la discesa: Controlla che la carrozza non abbia colpito qualche altra parte K NEX. (Pagina 41) ipod/mp3 il giocatore non ha incluso. l ipod è un marchio depositato di Apple, Inc. (Pagina 42) Suggerimenti e risoluzione dei problemi Se il motore o il modulo del suono non funzionano: Controlla che le batterie siano nuove e che siano installate correttamente. Se ancora non dovesse funzionare, chiama il numero di assistenza ai clienti KID-KNEX (USA e Canada soltanto). Vedi il retro della scatola per trovare altri modi di contattare K NEX. Se le carrozze si arrestano durante la discesa: Il modello è costruito correttamente? Controlla che la carrozza non abbia colpito qualche altra parte K NEX. I pezzi della rotaia sono collegati correttamente? La carrozza è collegata alla rotaia correttamente? Regola la rotaia per eliminare qualsiasi parte piatta sulla stessa. 46
47 PT Português (Página 2) Coisas importantes para os Pais e os Miúdos Mantenha estas instruções num local de fácil acesso, pois contêm informações importantes de segurança. Lê as instruções e advertências antes de começares a construir e a operar o modelo. AVISO: PERIGO DE SUFOCAÇÃO - Peças pequenas. Não se destina a crianças com menos de 3 anos de idade. CUIDADO: Mantém o cabelo, os dedos, a cara e a roupa afastados de todas as peças móveis. CUIDADO: Não use o módulo de som próximo dos ouvidos! O uso incorrecto pode causar danos na audição. CUIDADO: O cabelo da criança pode ficar emaranhado se entrar em contacto com as peças móveis do brinquedo. Compartilhe da experiência K'NEX com os miúdos e faça com que o processo de construção com K'NEX se torne numa aventura entre família. Não te precipites para assim poderes desfrutar do processo de construção. Não o faças à pressa! Tenta fazer com que o teu modelo esteja virado exactamente na mesma direcção indicada nas instruções. Tanto o produto como as respectivas cores podem variar. Informações sobre as pilhas AVISO: Como acontece com toda as pilhas pequenas, as pilhas usadas neste brinquedo devem ser mantidas fora do alcance de crianças pequenas, que estejam ainda em idade de pôr objectos na boca. No caso destas pilhas terem sido engolidas, consulte imediatamente um médico. CUIDADO: Certifique-se de que introduz as pilhas correctamente e siga sempre as instruções do fabricante da bateria e do brinquedo. Não combine pilhas usadas com pilhas novas, pilhas alcalinas, padrão (carbono-zinco) ou pilhas recarregáveis (níquel-cádmio). Deverão ser usadas apenas pilhas do mesmo tipo ou equivalentes ao tipo recomendado. Retire sempre as pilhas fracas ou gastas do produto; não provoque um curto-circuito nos terminais de alimentação. Introduza as pilhas com a polaridade correcta (+/-), conforme se mostra. Conselhos importantes Recomenda se o uso de pilhas alcalinas. Não se recomenda o uso de pilhas recarregáveis. Retire as pilhas recarregáveis do brinquedo antes de as carregar; estas pilhas devem ser recarregadas apenas sob vigilância de adultos. As pilhas não recarregáveis não devem ser carregadas. Mantenha os componentes livres de poeiras; não mergulhe em água nem use água. Não elimine as pilhas queimando-as; estas podem apresentar fugas ou explodir causando lesões. Retire todas as pilhas do brinquedo se não tencionar usá-lo durante um longo período de tempo. Não coloque varetas de tamanho inferior a 5,1 cm (2 pol.) em nenhuma abertura do motor; as varetas causarão danos no motor e não podem ser removidas. Ajude o ambiente eliminando o seu produto e a embalagem vazia responsavelmente. A imagem do contentor do lixo com rodinhas indica que o produto e as pilhas não devem ser eliminados juntamente com os resíduos domésticos pois contêm substâncias que podem provocar efeitos noviços no ambiente e na saúde. Por favor use os pontos de recolha designados ou as instalações de reciclagem quando necessitar de eliminar o produto ou as pilhas. Como inserir e remover as pilhas Motor: Usar uma chave de fenda principal pequena de Phillips para afrouxar o parafuso e para remover a tampa de bateria. Introduzir 2 AA (ou LR6) baterias frescas no compartimento de bateria com a polaridade correta (+/-). Altofalantes estereofónicos: Usar uma chave de fenda principal pequena de Phillips para afrouxar o parafuso e para remover a tampa de bateria. Introduzir 2 AAA (ou LR03) baterias frescas no compartimento de bateria com a polaridade correta (+/-). (Página 3) Pontos básicos para a construção K NEX Inicia a construção Para começar o teu modelo, procura o 1 e segue os números. Cada peça tem a sua própria forma definida e cor. Basta simplesmente olhares para a ilustração, procurar as peças do teu jogo correspondentes às que estás a ver e, em seguida, conectar umas nas outras. Enquanto estás a montar as peças, tenta manter o teu modelo na mesma direcção, conforme mostrado na ilustração, para assim ligares as peças correctamente. As cores desbotadas indicam que esta secção já está montada. Passarás então a fazer a conexão da nova secção no local indicado pelas setas. Conectores É muito importante que posiciones os conectores azuis e cor de prateados numa direcção específica. Presta muita atenção às instruções e coloca estes conectores horizontal ou verticalmente, exactamente conforme se mostra nas ilustrações. Junta as partes simultaneamente e com firmeza até ouvires um "estalido". Espaçadores Existirão certos pontos no teu modelo que necessitam a colocação de espaçadores azuis e prateados. Assegura-te que os contas cuidadosamente. Painéis Gráficos Ver página 39 para a ligação painéis para modelar. Corrente Assegura-te que prendes todos os elos da corrente seguindo a mesma direcção. Lista de peças Antes de iniciares a construção, certifica-te de que comparas as peças do teu conjunto com a lista das peças aqui. Se faltar alguma peça telefona ou escreve-nos usando as informações indicadas na contracapa. Estamos aqui para te ajudar! (Página 25) Sugestões para a Pista: Prende as Guias de Corrente ao topo da Pista. Liga os conectores à base da Pista exactamente como demonstrado. Faz avançar os conectores firmemente até encaixarem com um estalido. Liga sempre a face superior da Pista à face superior durante a montagem. (Página 40) Para prenderes as Carruagens, desliga uma peça da Pista e, seguidamente, enfia as rodas da Carruagem sobre a face superior da Pista. Depois junta as peças da Pista umas às outras. Se as Carruagens ficarem encravadas na descida: Assegura-te de que a Carruagem não está a chocar contra outras peças K NEX. (Página 41) O jogador ipod/mp3 não incluiu. ipod é uma marca registrada de Apple, Inc. (Página 42) Sugestões e Resolução de Problemas Se o Motor ou o Módulo de Som não funcionar: Verifica se as pilhas são novas e se estão instaladas correctamente. Caso continuem sem funcionar, contacta a Linha Directa de Atendimento ao Consumidor através do número KID-KNEX (apenas nos EUA e no Canadá). Consulta a contra capa para mais informações sobre como contactares a K NEX. Se as Carruagens ficarem encravadas na descida: O modelo foi construído correctamente? Assegura-te de que a Carruagem não está a chocar contra outras peças K NEX. As peças da Pista estão ligadas correctamente? A Carruagem está presa à Pista correctamente? Ajusta a Pista para eliminares qualquer ponto plano na Pista. NL Nederlands (Bladzijde 2) Belangrijke gegevens voor ouders en kinderen Bewaar deze aanwijzingen op een gemakkelijk bereikbare plaats. Ze bevatten belangrijke veiligheidsgegevens. Gelieve alle waarschuwingen en aanwijzingen te lezen vóór je het model begint op te bouwen en te gebruiken. WAARSCHUWING: VERSTIKKINGSGEVAAR - Kleine onderdelen. Niet geschikt voor kinderen onder 3 jaar. OPGEPAST: Hou het haar, de vingers, het gezicht en kledij verwijderd van alle bewegende onderdelen. OPGEPAST: Gebruik de geluidsmodule niet kort bij je oren. Ongepast gebruik ervan kan je gehoor beschadigen. OPGEPAST: Als het haar van het kind in aanraking komt met bewegende onderdelen van het speelgoed kan het haar verstrikt raken. Deel de K'NEX ondervinding met je kind en maak van het bouwen met K'NEX een aangenaam familieavontuur. Neem je tijd tijdens het bouwen en monteren. Spoed je niet! Tracht je model in dezelfde richting te plaatsen als de aanwijzingen terwijl je bouwt en monteert. Produkt en kleuren kunnen afwijken. Batterijgegevens WAARSCHUWING: Zoals het geval is voor alle kleine batterijen, moeten de batterijen voor dit speelgoed buiten het bereik gehouden worden van kleine kinderen die nog steeds voorwerpen in de mond steken. Ingeval een batterij wordt ingeslikt, neem onmiddellijk contact op met een dokter. OPGEPAST: Verzeker je ervan dat de batterijen er op de juiste manier in te steken en volg steeds de aanduidingen van de speelgoed- en batterijenfabrikanten. Meng geen oude en nieuwe batterijen of alkalische, gewone (koolstof-zink) of herlaadbaarse (nikkel-cadmium) batterijen met mekaar. Uitsluitend batterijen van dezelfde of van een aanbevolen equivalente soort dienen gebruikt te worden. Verwijder steeds uitgeputte of ontladen batterijen uit het produkt; veroorzaak geen kortsluiting van de voedingspolen. Steek de batterijen erin volgens de juiste polariteit (+/-) zoals afgebeeld. Belangrijke tips Alkalische batterijen worden aanbevolen. Herlaadbare batterijen worden niet aanbevolen. Verwijder herlaadbare batterijen uit het speelgoed alvorens ze te herladen; ze moeten slechts herladen worden onder het toezicht van een volwassene. Niet-herlaadbare batterijen mogen niet herladen worden. Bescherm onderdelen tegen stof; dompel ze niet of gebruik ze niet in water. Werp de batterijen niet in het vuur; ze zouden kunnen lekken of ontploffen en verwondingen veroorzaken. Verwijder alle batterijen wanneer het speelgoed gedurende lange tijd niet gebruikt zal worden. Plaats staafjes in de openingen van het motor, zij zouden de motor beschadigen en kunnen niet worden verwijderd. Help de omgeving door uw product en verpakking verantwoordelijk weg te werpen. Het symbol met de vuilnisbak op wieltjes duidt aan dat het product en de batterijen niet mogen weggeworpen worden in huishoudvuil vermits ze stoffen bevatten die de omgeving en de gezondheid kunnen schaden. Gelieve de aangeduide verzamelpunten of recyclageinstallaties te gebruiken wanneer u zich wil ontdoen van dit artikel of deze batterijen. Insteken en verwijderen van batterijen Installeer alle batterijen in de Motor en in de geluidsmodule vóór je begint te bouwen. Motor: Gebruik een kleine hoofdschroevedraaier Phillips om de schroef los te maken en de batterijdekking te verwijderen. Neem 2 verse AA (of LR6) batterijen in het batterijcompartiment met op de correcte polariteit (+/-). Stereo Sprekers: Gebruik een kleine hoofdschroevedraaier Phillips om de schroef los te maken en de batterijdekking te verwijderen. Neem 2 verse AAA (of LR03) batterijen in het batterijcompartiment met op de correcte polariteit (+/-). (Bladzijde 3) Basisstappen voor K'NEX bouwen Begin te bouwen Om met je model te beginnen, vind eerst het nummer 1 en volg de nummers. Elk stuk heeft zijn eigen vorm en kleur. Kijk gewoonweg naar de afbeeldingen, vind de overeenstemmende stukken terug in je geheel en maak ze aan mekaar vast. Tracht je model in dezelfde richting te plaatsen als de aanwijzingen terwijl je bouwt en monteert. De vervaagde kleuren duiden aan dat dit deel reeds is opgebouwd. Gelieve het nieuwe deel vast te koppelen op de plaats aangeduid door de pijlen. Koppelstukken Er zijn blauwe en zilveren koppelstukken met speciale lange gleuven. Ze schuiven in mekaar zoals je kunt zien op de afbeeldingen. Duw deze onderdelen in mekaar tot je een klik hoort. Tussenstukken In je model zijn er plaatsen waar blauwe en zilveren tussenstukken moeten toegevoegd worden. Verzeker je ervan de juiste kleur te gebruiken en tel ze zorgvuldig. Grafische Panelen Zie pagina 39 voor het bevestigen van panelen tot model. Chain Zorg ervoor dat alle schakels in dezelfde richting te bevestigen. Onderdelen Lijst Voordat u begint met bouwen, moet u de onderdelen vergelijken de set met de onderdelen lijst hier. Als er iets ontbreekt, bel of schrijf ons gebruik van de informatie op de achterkant. We zijn hier om u te helpen! (Bladzijde 25) Spoortips: Maak de kettinggidsen vast bovenaan het spoor. Maak de koppelstukken vast aan de onderkant van het spoor precies zoals afgebeeld. Druk de koppelstukken goed erin tot ze klikken. Maak steeds de bovenkant van het spoor vast aan de bovenkant tijdens de opbouw. (Bladzijde 40) Om de wagens vast te maken, knijp lichtjes aan het spoor en haak de wielen op het spoor vast. Wanneer wagens vastlopen tijdens de daling: Verzeker je ervan dat de wagen tegen geen K NEX onderdelen aanloopt. (Bladzijde 41) ipod/mp3 speler omvatte niet. ipod is een ingeschreven handelsmerk van Apple, Inc. (Bladzijde 42) Tips & Oplossen van problemen Wanneer de motor- of klankmodule niet werkt: Kijk na dat je nieuwe batterijen hebt en dat ze er behoorlijk zijn aangebracht. Werkt het nog steeds niet, bel dan de Klantendienst Hotline op aan het nummer KID-KNEX (uitsluitend in de VS en Canada). Kijk naar het achterblad voor andere manieren om contact op te nemen met K NEX. Wanneer wagens vastlopen tijdens de daling: Is het model behoorlijk opgebouwd? Verzeker je ervan dat de wagen tegen geen K NEX onderdelen aanloopt. Zijn de spoorstukken behoorlijk verbonden? Is de wagen behoorlijk aan het spoor verbonden? Ajusteer het spoor om platte stukken op het spoor te verwijderen. 47

48
BUILDING BASICS. Parts List
 BUILDING BASICS Start Building To begin your model, find step number 1 and follow the numbers. Each piece has its own shape and color. Look at the pictures, find the pieces that match what you see, and
BUILDING BASICS BATTERY INFORMATION
 2 Parts List Before you start building, be sure to compare the parts in your set with the parts list here. If anything is missing, call or write to us using the information on the back cover. We are here
Building Basics. Tyrannosaurus...10 Ferris Wheel...12 Catamaran...14 Excavator...17 Building Ideas...20
 Ice Cream Cone/Fish...4 Coconut Tree...5 Plane...6 Skier...7 Rocket Ship...8 AMERICAN MADE PARTS (EN) CONTENTS Parts List Tyrannosaurus...0 Ferris Wheel... Catamaran...4 Excavator...7 Building Ideas...0
BUILDING BASICS. Building Instructions Instructions Pour les Jouets. Building Ideas Idées de Jouets... 14
 SUPER VALUE TUB BUILDING BASICS Building Instructions Instructions Pour les Jouets WAVE RUNNER.......... 3 SAILBOAT.............. 4 SPORTING YACHT....... 6 RACER................ 8 BI-WING PLANE.........
Capa de alimentação CP12
 Manual do usuário Capa de alimentação CP12 Índice Introdução...3 O carregamento facilitado...3 Especificações...3 Usando a capa de alimentação...4 Carregando seu celular...4 Informações legais...6 2 Introdução
Manual do usuário. Xperia TX TV Dock DK22 Xperia T TV Dock DK23 DK22/DK23
 Manual do usuário Xperia TX TV Dock DK22 Xperia T TV Dock DK23 DK22/DK23 Índice Introdução... 3 Visão geral do TV Dock... 3 Introdução... 4 Smart Connect... 4 Como atualizar o Smart Connect...4 Utilização
Building Basics. CONTENTS Eggbeater...10 Jet...12 Dragster...14 Dune Buggy...17 Dump Truck...20 Building Ideas...23.
 Moose/Snowboarder... Tow Truck/Squirrel...5 Butterfly/Weightlifter...6 Submarine...7 Hammerhead Shark...8 Swing Ride...9 AMERICAN MADE PARTS CONTENTS Eggbeater...0 Jet... Dragster... Dune Buggy...7 Dump
Manual do usuário. MHL to HDMI Adapter IM750
 Manual do usuário MHL to HDMI Adapter IM750 Índice Introdução...3 Visão geral do MHL to HDMI Adapter...3 Introdução...4 Smart Connect...4 Como atualizar o Smart Connect...4 Utilização do MHL to HDMI Adapter...5
CAUTION: CUIDADO: Important Tips: DE VORSICHT: Sugestões Importantes: PRECAUCIÓN: Wichtige Tipps: Importantes Consejos: OPGEPAST: ATTENZIONE:
 EN CAUTION: To Avoid Battery Leakage - Be sure to insert the batteries correctly and always follow the toy and battery manufacturers instructions. Do not mix old and new batteries or alkaline, standard
EN CAUTION: ATTENZIONE: PT CUIDADO: Important Tips: ATTENTION : DE VORSICHT: CAUTION: Sugestões Importantes: ES PRECAUCIÓN: Wichtige Tipps:
 EN CAUTION: To Avoid Battery Leakage - Be sure to insert the batteries correctly and always follow the toy and battery manufacturers instructions. Do not mix old and new batteries or alkaline, standard
Manual do usuário. Carregador rápido para veículos AN420
 Manual do usuário Carregador rápido para veículos AN420 Índice Introdução... 3 Carregamento fácil... 3 Usando o Carregador rápido para veículos...4 Carregar dispositivos... 4 Informações jurídicas...5
BUILDING IDEAS D IDÉES DE CONSTRUCTION
 Building Basics Start Building To begin your model, find the and follow the numbers. Each piece has its own shape and color. Just look at the pictures, find the pieces in your set that match and then connect
Manual do usuário. LiveDock multimedia station DK10
 Manual do usuário LiveDock multimedia station DK10 Índice Visão geral da LiveDock multimedia station... 4 Visão geral da parte traseira...5 Visão geral da parte inferior... 5 Introdução... 6 Para carregar...7
CAUTION: Important Tips
 EN CONTENTS FR CONTENUS SPEED DEMON COASTER............. 4 Track Building Tips..................... 26 Tips & Troubleshooting.................. 44 BUILDING IDEA..................... 44 Languages........................
CONTENTS. EXCAVATOR... 4 Accessories Languages CONTENUS. Accessoires Langues
 CONTENTS EXCAVATOR................... 4 Accessories................. 14 Languages............... 14-15 CONTENUS EXCAVATOR................... 4 Accessoires................. 14 Langues..................
BUILDING BASICS BATTERY INFORMATION
 Parts List Before you start building, be sure to compare the parts in your set with the parts list here. If anything is missing, call or write to us using the information on the back cover. We are here
Información importante para los Padres y Niños
 1 (EN) CONTENTS K NEX Building Basics... 4 Parts List... 5 Atomic Coaster... 6 Track Building Tips.... 22 Tips and Troubleshooting.... 49 Building Idea.... 49 (ES) CONTENIDOS K NEX Básicos de Construcción....
Outdoor External Strobe Siren. ADD-ON DEVICE Quickstart Guide. What's inside: 1x Outdoor External Strobe Siren
 ADD-ON DEVICE Quickstart Guide Outdoor External Strobe Siren Model No. OSR1300 What's inside: 1x Outdoor External Strobe Siren 1x Power Adapter Mounting Accessories Broadband internet connection, ios or
IMPORTANT STUFF FOR PARENTS AND KIDS INFORMATIONS IMPORTANTES POUR LES PARENTS ET LES ENFANTS CONTENUS CONTENTS. Go to for instruction updates
 (EN) CONTENTS K NEX Building Basics... 4 Parts List... 5 Amazin 8 Roller Coaster... 6 Track Building Tips... 16 Tips and Troubleshooting... 29 (FR) CONTENUS K NEX Bases de la Construction... 4 Liste des
Información importante para los Padres y Niños
 1 (EN) CONTENTS K NEX Building Basics... 4 Parts List... 5 Phoenix Fury Coaster... 6 Track Building Tips.... 19 Building Idea... 37 Tips & Troubleshooting.... 37 (ES) CONTENIDOS K NEX Básicos de Construcción....
CONTENTS CONTENIDOS CONTENUS. Important stuff for Parents & Kids. Información importante para los Padres y Niños
 ES EN CONTENTS K NEX Building Basics................ 4 Parts List.......................... 5 Building Idea........................ 5 SUPER CYCLONE COASTER.......... 6 Track Building Tips....................
INFORMATIONS IMPORTANTES POUR LES PARENTS ET LES ENFANTS IMPORTANT STUFF FOR PARENTS AND KIDS CONTENUS CONTENTS. Go to for instruction updates
 (EN) CONTENTS K NEX Building Basics... 4 Parts List... 5 Building Idea... 5 Raptor s Revenge Roller Coaster... 6 Track Building Tips.... 21 Tips and Troubleshooting.... 41 (FR) CONTENUS K NEX Bases de
FIRESTORM FREEFALL COASTER MOTOR MOTEUR * NACELLE SUSPENDUE HANGING CAR. 2.83ft.86m. 674 pc/pza 669. pc/pza **
 FIRESTORM FREEFALL COASTER MOTOR HANGING CAR MOTEUR * NACELLE SUSPENDUE 2.83ft.86m 674 pc/pza 669 pc/pza ** 51539 1 (EN) CONTENTS K NEX Building Basics... 4 Parts List... 5 Tips and Troubleshooting....
7-12. WARNING: CHOKING HAZARD Small parts. Not for children under 3 years.
 TM CLICK & CONSTRUCT VALUE Building Set CLIQUEZ ET CONSTRUISEZ LA VALEUR Jeu de construction BUILDS 5MODÈLES* Ages 7-805 WARNING: CHOKING HAZARD Small parts. Not for children under years. ATTENTION : RISQUE
K NEX. CAUTION: Keep hands, face, hair, clothing and Power Cord away from all moving parts. Caution: Do not trip on cord.
 K NEX Building Basics Start Building To begin your model, find step number 1 and follow the numbers. Each piece has its own shape and color. Look at the pictures, find the pieces that match what you see,
Magnetic Charging Dock
 Manual do usuário Magnetic Charging Dock Índice Introdução...3 Carregamento facilitado...3 Utilizando a Plataforma de carregamento magnética...4 Utilizando os apoios...4 Carregando seu celular...4 Informações
CONTENTS CONTENUS. BULLDOZER... 4 HOUSE Languages MAISON Langues
 CONTENTS BULLDOZER......................... 4 HOUSE.............................. 16 Languages..................... 17-19 CONTENUS BULLDOZER......................... 4 MAISON............................
FOR PARENTS & KIDS. WARNING: CHOKING HAZARD - Small parts. Not for children under 3 years.
 IMPORTANT STUFF FOR PARENTS & KIDS Keep these instructions in a handy location. They contain important safety information. Read all warnings and instructions before you start to build and operate the model.
Building Basics CONTENTS. Fish...4 Wind Surfer...5 Hang Glider...6 High Diver...7 Jellyfish...8 Anchor...9 Inner Tube...10 Swordfish...
 Fish...4 Wind Surfer...5 Hang Glider...6 High Diver...7 Jellyfish...8 Anchor...9 Inner Tube...0 Swordfish... AMERICAN MADE PARTS CONTENTS Picnic Basket...4 Turtle...6 Sea Plane...0 Fishing Boat... Lifeguard
CONTENTS CONTENIDOS CONTENUS. Important stuff for Parents & Kids. Información importante para los Padres y Niños
 EN CONTENTS K NEX Building Basics................ 4 Parts List.......................... 5 Building Idea....................... 5 RIPPIN ROCKET 2 COASTER......... 6 Tips & Troubleshooting................
Presenter SNP6000. Register your product and get support at PT Manual do utilizador
 Register your product and get support at www.philips.com/welcome Presenter SNP6000 PT Manual do utilizador 1 a b c d e 2 3 4 Federal Communication Commission Interference Statement This equipment has been
CAUTION: Important Tips
 CONTENTS STEEL SCORPION COASTER....... 4 Track Building Tips................. 25 Tips & Troubleshooting............. 42 DOUBLE DIP COASTER........... 43 ES EN FR CONTENIDOS STEEL SCORPION COASTER.......
Important Stuff for Parents and Kids
 (EN) English CONTENTS K NEX Building Basics... 6 Parts List... 7 Amazin 8 Roller Coaster... 8 Tips and Troubleshooting... 30 Keep this important information for future reference Important Stuff for Parents
(FR) Français. ** Non fournies. ATTENTION : Pour éviter la fuite des piles
 Français. ** Non fournies. ATTENTION : Pour éviter la fuite des piles") MOTOR MOTEUR * (EN) English WARNING: CHOKING HAZARD Small parts. Not for children under 3 years. CAUTION: Keep hands, face, hair, clothing and power cord away from all moving parts. Caution: Do not trip
MOTOR MOTEUR * (EN) English WARNING: CHOKING HAZARD Small parts. Not for children under 3 years. CAUTION: Keep hands, face, hair, clothing and power cord away from all moving parts. Caution: Do not trip
1 # DE SW Hoth_v13.indd 1 9/17/13 11:41 AM
 1 # 80 980 DE SW Hoth_v13.indd 1 9/17/13 11:41 AM x2 x6 x2 x30 x30 x6 2 DE SW Hoth_v13.indd 2 9/17/13 11:41 AM x2 x2 3 DE SW Hoth_v13.indd 3 9/17/13 11:41 AM ± 2 cm 4 DE SW Hoth_v13.indd 4 9/17/13 11:41
Important Stuff for Parents and Kids
 (EN) English CONTENTS K NEX Building Basics... 6 Parts List... 7 Star Shooter Roller Coaster... 8 Tips and Troubleshooting... 30 Keep this important information for future reference Important Stuff for
OVER 7 ft TALL! PLUS DE 2 m DE HAUT! ** MOTORIZED LAUNCHER ** LANCEUR MOTORISE SKY SPRINTER ROLLER COASTER BUILDING SET SPRINTER DU CEIL
 Building Worlds Kids Love MOTORIZED LAUNCHER ** LANCEUR MOTORISE SKY SPRINTER ROLLER COASTER BUILDING SET SPRINTER DU CEIL 3X C 52478 (LR1 4) MONTAGNES RUSSES JEU DE CONSTRUCTION Not included Pas inclus
CONTENTS CONTENUS. TRANSPORTER RIG... 4 TRAILER Languages TRANSPORTER CAMION... 4 REMORQUE Langues
 CONTENTS TRANSPORTER RIG....... 4 TRAILER............... 10 Languages........... 18-19 CONTENUS TRANSPORTER CAMION... 4 REMORQUE............. 10 Langues............. 18-19 BUILDING BASICS Start Building
2X MA09023F 1X MA1153MM 2X AM16641AJM 1X AM16630AJM 2X AM16964MM 1X AM16629AJM 1X AM04497AJM 2X AM03772AJM 4X AS X MA09493F 3X AM09292AJM
 1 2 AM02237F AS968051 AS9682303 AS968053 MA1153MM AM16630AJM AM16629AJM AM16660AJM MA10233BYE MA1480F AM08483MM AM08483AJM AM09923F AM16964MM AM04497AJM MA09493F MA09493BYE MA09033F AM07475F AM16331F 3X
Building Basics Start Building To begin your model, find the 1 and follow the
 (EN) Contents Cruise Ship...3 Castle...3 Sailboat...3 Picture Frame...4 Triangle...5 Hot Air Balloon...6 Fish and Sea Plant...8 Big Truck...0 Owl...2 See-Saw...4 Building Ideas... Back Cover (FR) Contenus
SmartDock for Xperia ion Manual do usuário
 SmartDock for Xperia ion Manual do usuário Índice Introdução...3 Visão geral do SmartDock...3 Carregando o SmartDock...3 Introdução...5 LiveWare manager...5 Como atualizar o LiveWare manager...5 Como selecionar
CAUTION: ATTENZIONE: CUIDADO: Important Tips: ATTENTION : VORSICHT: CAUTION: Sugestões Importantes: PRECAUCIÓN: Wichtige Tipps: CUIDADO:
 EN CAUTION: To Avoid Battery Leakage - Be sure to insert the batteries correctly and always follow the toy and battery manufacturers instructions. Do not mix old and new batteries or alkaline, standard
Manual do usuário. Style Cover Window SCR26
 Manual do usuário Style Cover Window SCR26 Índice Introdução...3 Introdução...3 Visão geral...3 Carregar...3 Configuração de um toque...4 Aprendizagem dos conceitos básicos...5 Interagir com a janela...5
Education PARTS! PIECES! ** BASIC DE BASE SCIENCE LA SCIENCE T TECHNOLOGY TECHNOLOGIE E ENGINEERING INGÉNIERIE M MATH MATHÉMATIQUES* 6 +
 Education 08 PARTS! PIECES! ** S SCIENCE LA SCIENCE T TECHNOLOGY TECHNOLOGIE E ENGINEERING INGÉNIERIE M MATH MATHÉMATIQUES* BASIC DE BASE 6 + 7896 Moose/Snowboarder... Tow Truck/Squirrel...5 Butterfly/Weightlifter...6
Manual do usuário. Xperia P TV Dock DK21
 Manual do usuário Xperia P TV Dock DK21 Índice Introdução...3 Visão geral da parte traseira do TV Dock...3 Introdução...4 Gerenciador do LiveWare...4 Como atualizar o Gerenciador do LiveWare...4 Utilização
BRONTO BUILDING SET JEU DE CONSTRUCTION
 Building Worlds Kids Love BRONTO BUILDING SET JEU DE CONSTRUCTION BUILDS RUIT CON**ST LES 7+ LR6 ) A ( A X Not included Non incluses No se incluyen Nicht enthalten Non incluse Não estão incluídas Niet
9 + WILD WHIPLASH ROLLER COASTER BUILDING SET COUP DE FOUET SAUVAGE MONTAGNES RUSSES JEU DE CONSTRUCTION MOTOR MOTEUR * 2 X Not included
 Building Worlds Kids Love WILD WHIPLASH ROLLER COASTER BUILDING SET COUP DE FOUET SAUVAGE MONTAGNES RUSSES JEU DE CONSTRUCTION 9 + X Not included AA (LR6) Pas inclus No se incluyen Nicht enthalten Non
MOTOR * Building Worlds Kids Love REVOLUTION FERRIS WHEEL BUILDING SET RÉVOLUTION GRANDE ROUE JEU DE CONSTRUCTION. * Motore
 Building Worlds Kids Love REVOLUTION FERRIS WHEEL BUILDING SET RÉVOLUTION GRANDE ROUE JEU DE CONSTRUCTION EEL WH FERRIS 7+ 540 LR6 ) A ( A X MOTOR * MOTEUR Not included Pas inclus No se incluyen Nicht
ROBO-JAWS BUILDING SET JEU DE CONSTRUCTION. 2 X Not included MOTOR MOTEUR. Building Worlds Kids Love MOTOR BUILDS CONSTRUIRE **
 Building Worlds Kids Love MOTOR ROBO-JAWS BUILDING SET JEU DE CONSTRUCTION MOTOR MOTEUR BUILDS À 3À CONSTRUIRE ** 7 + 34406 X Not included AA (LR6) Pas inclus No se incluyen Nicht enthalten Non incluse
ROBO-STING. Building Worlds Kids Love BUILDING SET JEU DE CONSTRUCTION
 Building Worlds Kids Love ROBO-STING BUILDING SET JEU DE CONSTRUCTION 7+ 13244 LR6 ) A ( A 2X Not included Pas inclus No se incluyen Nicht enthalten Non incluse Não estão incluídas Niet inberepen Building
9 + LIGHT-UP MOTOR MOTEUR. 3 X Included. 2 X Not included LOOPING LIGHT-UP ROLLER COASTER BUILDING SET
 Building Worlds Kids Love LOOPING LIGHT-UP ROLLER COASTER BUILDING SET BOUCLE ILLUMINER MONTAGNES RUSSES JEU DE CONSTRUCTION MOTOR MOTEUR LIGHT-UP ROLLER COASTER 9 + LIGHT-UP CAR! TRACK GLOWS! 51455 3
7 + 2 X Not included MOTOR MOTEUR * REVVIN RACECAR 2-IN-1 BUILDING SET VOITURE DE COURSE MONTÉE EN RÉGIME 2 EN 1 JEU DE CONSTRUCTION BUILDS
 Building Worlds Kids Love MOTOR MOTEUR * REVVIN RACECAR -IN- BUILDING SET VOITURE DE COURSE MONTÉE EN RÉGIME EN JEU DE CONSTRUCTION 7 + BUILDS À CONSTRUIRE ** 7 + 6005 X Not included AA (LR6) Pas inclus
7-12 4WD MOTOR. 4WD CRUSHER TANK Building Set. CHAR BROYEUR Jeu de construction BUILDS MODÈLES. Ages. Included. Not Included
 TM WD CRUSHER TANK Building Set CHAR BROYEUR Jeu de construction 3 BUILDS MODÈLES MOTOR Included AA (LR6) AA (LR6) Not Included Ages 7-37 807 37 INX0 WD Crusher Tank V0 0-08.indd WD //8 3:7 PM (EN) English
Manual do usuário. Bluetooth Keyboard BKB10
 Manual do usuário Bluetooth Keyboard BKB10 Índice Noções básicas...3 Visão geral...3 Carregando o teclado...4 Ligando o teclado...5 Configurando o teclado...6 Suporte na Web...7 Informações legais...8
SkillGuide. Guia do usuário. Português
 SkillGuide Guia do usuário Português SkillGuide O SkillGuide é um dispositivo de feedback para oferecer comentários em tempo real e cumulativo do desempenho da RCP. www.laerdal.com.br Itens incluídos SkillGuide
SCREAMING SIDESHOW ROLLER COASTER BUILDING SET SIDESHOW CRI MONTAGNES RUSSES JEU DE CONSTRUCTION X Not included MOTOR MOTEUR *
 Building Worlds Kids Love SCREAMING SIDESHOW ROLLER COASTER BUILDING SET SIDESHOW CRI MONTAGNES RUSSES JEU DE CONSTRUCTION 7 + X Not included AA (LR6) Pas inclus No se incluyen Nicht enthalten Non incluse
AVERTISSEMENT : RISQUE D ÉTOUFFEMENT
 (EN) English WARNING: CHOKING HAZARD Small parts. Not for children under 3 years. CAUTION: Keep hands, face, hair, clothing and Power Cord away from all moving parts. Caution: Do not trip on cord. WARNING:
7-12 MOTOR. ROAD FIGHTERS Building Set COMBATTANTS DE LA ROUTE Jeu de construction BUILDS 3MODÈLES. Ages. Included. Not Included
 TM ROAD FIGHTERS Building Set COMBATTANTS DE LA ROUTE Jeu de construction BUILDS 3MODÈLES MOTOR Included AA (LR6) AA (LR6) Not Included Ages 7-3344 48444 3344 INX0 Road Fighters V0 04-08.indd 4//8 3:43
Building Basics CONTENTS. Start Building
 TM INNOVATION STATION Building Set STATION INNOVATION Jeu de construction 50 BUILDS MODÈLES* Ages 7-7 WARNING: CHOKING HAZARD Small parts. Not for children under years. ATTENTION : RISQUE D ÉTOUFFEMENT
55BUILDING IDEAS! IDÉES DE CONSTRUCTION!* 55 MODEL SUPER VALUE BUILDING SET 55 MODÈLE SUPER VALEUR JEU DE CONSTRUCTION 1:1
 Building Worlds Kids Love 55 MODEL SUPER VALUE BUILDING SET 55 MODÈLE SUPER VALEUR JEU DE CONSTRUCTION IDEAS! IDÉES DE CONSTRUCTION!* 55BUILDING 7 + 68 With Classic & Micro K NEX Parts! * Ideas de construcción!
2x AM03773F. 4x AM03773KJ. 1x AM03772BBG. 2x AM03772KJ. 2x AM03772F. 3x AM09493BBG. 2x AM09493F. 2x AM09493BDG. 2x AM09493BMG.
 AM01480YG AM01480BBG AM09493F AM09493YG 5x AM09493KJ AM09493BBG AM09493BDG AM09493BMG AM03772BBG AM03772KJ AM03772F AM03773F AM03773KJ AM01113F AM03328AGZ AM03328F AM03328BDG AM01140F M12251F AM09105F
9-14. WARNING: CHOKING HAZARD Small parts. Not for children under 3 years.
 KRAKEN S REVENGE Roller Coaster Building Set LA VENGEANCE mc DE KRAKEN Montagnes Russes Jeu de construction [] AA (LR6) AA (LR6) Not Included/Pas Inclus [] WARNING: CHOKING HAZARD Small parts. Not for
7-12. WARNING: CHOKING HAZARD Small parts. Not for children under 3 years.
 TM BUILDER S CHOICE Building Set CHOIX DU CONSTRUCTEUR Jeu de construction BUILDS 35MODÈLES* Ages 7-12 17520 WARNING: CHOKING HAZARD Small parts. Not for children under 3 years. ATTENTION : RISQUE D ÉTOUFFEMENT
Building Ideas! Idees de 35Construction! * Building Worlds Kids Love. 350pc/pza. Super Value Tub Conteneur la Valeur Super.
 35 Building Ideas! Idees de 35Construction! * Building Worlds Kids Love 350 350pc/pza Super Value Tub Conteneur la Valeur Super pc/pza 7 + 16490 Start Building To begin your model, find the and follow
X-FLAME BUILDING SET JEU DE CONSTRUCTION
 Building Worlds Kids Love X-FLAME BUILDING SET JEU DE CONSTRUCTION BUILDS RUIT CON**ST LES 7 + ) A (LRA 6 X Not included Non incluses No se incluyen Nicht enthalten Non incluse Não estão incluídas Niet
Guia de Instalação Rápida TE100-PCBUSR
 Guia de Instalação Rápida TE100-PCBUSR Table Índice of Contents Português... 1. Antes de Iniciar... 2. Como Instalar... 1 1 2 Troubleshooting... 3 Version 07.27.2007 1. Antes de Iniciar Conteúdo da Embalagem
Manual do usuário VH700 VH700VH700
 Manual do usuário VH700 VH700VH700 Índice 1... 3 2... 4 Visão geral do fone de ouvido... 4 Introdução...4 Carregamento...4 Ligando e desligando...4 Pareando o fone de ouvido... 5 Vários pontos... 5 Chamando...6
1. Product Name. 2. Product Code. 3. Colour. 4. Brief Description. 5. Contents. 6. Snoezelen Stimulations. Fibre Optic UFO
 1. Product Name Fibre Optic UFO 2. Product Code 16692 3. Colour Transparent base*; white fibres * Base may be silver-coloured, subject to availability 4. Brief Description Captivating, fine fibre optics.
Dallas RMD 169 Texas DJ
 Radio / MD Dallas RMD 69 Texas DJ Installation instructions Notice de montage Instrucciones de instalación Instruções de montagem G Safety precautions Installation and connection regulations In the event
7-12 4WD MOTOR. 4WD DEMOLITION TRUCK Building Set CAMION DE DEMOLITION 4WD Jeu de construction BUILDS MODÈLES. Ages. Included.
 TM WD DEMOLITION TRUCK Building Set CAMION DE DEMOLITION WD Jeu de construction BUILDS MODÈLES MOTOR Included AA (LR) AA (LR) Not Included Ages 7-0 80 0 INX0 WD Demolition Truck V0 0-08.indd WD //8 : PM
BUILDING BASICS BASES DE LA CONSTRUCTION
 (EN) English Keep this important information for future reference WARNING: CHOKING HAZARD Small parts. Not for children under 3 years. CAUTION: Keep hands, face, hair and clothing away from all moving
Fone de ouvido Bluetooth mono
 Manual do usuário Fone de ouvido Bluetooth mono Índice Visão geral da função...3 Visão geral dos acessórios...4 Noções básicas...5 Carregamento da bateria...5 Ligando e desligando o fone de ouvido...5
AS AS AS AS
 Build & Rebuild! Crea & vuelve a crear! Construis et reconstruis! Bau und Neubau! Bouwen en herbouw! Costruisci e ricostruisci! Construir e Reconstruir! 10516 Thomas at the Sodor Fair Thomas en la Feria
BUILD & RIDE APP WARNING: CHOKING HAZARD Small parts. Not for children under 3 years.
 /MC RIPPING RAPTOR Building Set RAPTOR DÉCHIRANT Jeu de construction. ft 7 cm AA (LR6) AA (LR6) Not Included MOTOR Included WARNING: CHOKING HAZARD Small parts. Not for children under 3 years. ATTENTION
Manual do usuário VH110 VH110VH110
 Manual do usuário VH110 VH110VH110 Índice Visão geral do fone de ouvido... 4 Introdução...4 Carregamento... 4 Ligando e desligando... 4 Pareando o fone de ouvido... 4 Colocando o fone de ouvido... 5 Chamando...5
Keep this important information for future reference
 MECHA CLAW Roller Coaster Building Set GRIFFE DE MECHA Montagnes Russes Jeu de construction.5 ft 79 cm [] AA (LR6) AA (LR6) Not Included/Pas Inclus[] Ages 7-447 (EN) English Keep this important information
ATTACK BATTLERS 7-12 YOUR OPPONENT. X-THRASHER Building Set. X-THRASHER Jeu de construction. Ages
 ATTACK YOUR OPPONENT X-THRASHER Building Set X-THRASHER Jeu de construction BATTLERS Ages 7-7063 (EN) English Keep this important information for future reference. (FR) Français Garde précieusement cette
Building Basics. Parts List
 Building Basics Start Building To begin your model, find the and follow the numbers. Each piece has its own shape and color. Just look at the pictures, find the pieces in your set that match and then connect
INSTALLATION GUIDE MANUAL DE INSTALAÇÃO MANUAL DE INSTALACIÓN
 INSTALLATION GUIDE MANUAL DE INSTALAÇÃO MANUAL DE INSTALACIÓN youtube.com/furukawaelectriclatam Use um leitor de códigos QR 6U/ 12U General Information/ Informações Gerais/ Información General Compatible
x 4
 00002106 a.0 x 4 en Recharge time: approximately 5 minutes. CAUTION: Do not touch the antenna while playing or the car distance control will be altered. If the car begins to gradually slow down, it
Este folleto incluye información importante. Conserve toda la información para futuras referencias.
 Artículo:1142-NL 1 ES PT 2 ES PT 3 ES Colocación de las pilas Asegúrese de que el juguete está APAGADO (cuando corresponda). Quite la tapa de las pilas en la parte trasera del juguete. Para abrir la tapa
ATTENTION : PT CUIDADO:
 EN CAUTION: To Avoid Battery Leakage - Be sure to insert the batteries correctly and always follow the toy and battery manufacturers instructions. Do not mix old and new batteries or alkaline, standard
INSTALLATION GUIDE MANUAL DE INSTALAÇÃO MANUAL DE INSTALACIÓN
 INSTALLATION GUIDE MANUAL DE INSTALAÇÃO MANUAL DE INSTALACIÓN General Information/ Informações Gerais/ Informaciones Generales Compatible with Open Rack Enterprise. To be installed in closed environments.
Swingline Stack-and-Shred 100X Shredder Auto+ Technology. Déchiqueteuse Swingline Stack-and-Shred 100X à technologie Auto+
 Swingline Stack-and-Shred 100X Shredder Auto+ Technology To register this product go to www.swingline.com Pour enregistrer ce produit allez sur www.swingline.com Para registrar este producto vaís en www.swingline.com
Manual do usuário. Style Cover Window SCR26
 Manual do usuário Style Cover Window SCR26 Índice Introdução... 3 Introdução...3 Visão geral...3 Configuração de um toque...3 Carregar...4 Aprendizagem dos conceitos básicos...6 Interagir com a janela...6
Current Measurement Unit - UMC Unidad de Medición de Corriente - UMC Unidade de Medição de Corrente - UMC
 Motors Automation Energy Transmission & Distribution Coatings Current Measurement Unit - UMC Unidad de Medición de Corriente - UMC Unidade de Medição de Corrente - UMC SRW 01-UMC Installation, Configuration
Guia de Instalação Rápida TEW-432BRP
 Guia de Instalação Rápida TEW-432BRP Table Índice of Contents Português... 1. Antes de Iniciar... 2. Instalar Roteador... 3. Bônus... Troubleshooting... 1 1 2 4 5 Version 08.07.2006 1. Antes de Iniciar
Keep this important information for future reference
 MECHA SLASH Ferris Wheel Building Set SABRER DE MECHA Grande Roue Jeu de construction.9 ft 5 cm [] AA (LR6) AA (LR6) Not Included/Pas Inclus[] Ages 7 344 (EN) English Keep this important information for
INFORMATIONS IMPORTANTES POUR LES PARENTS ET LES ENFANTS IMPORTANT STUFF FOR PARENTS AND KIDS. Go to for instruction updates
 IMPORTANT STUFF FOR PARENTS AND KIDS Keep these instructions in a handy location. They contain important safety information. Read all warnings and instructions before you start to build and operate the
3x AM15494E. 6x M1346BLG. 3x AM15500F. 2x AM04219BLG. 1x AM09825BLG. 1x AM09186BLG. 1x AM09826BLG. 1x AM09187BLG. 8x AM07475BLG.
 AS032491 AM01086BDG 6x AM01086BLG 4x AM07629BDG AM09013BYE 4x AM09013BDG 6x AM09013BLG AM01087BDG 6x AM01087BLG AM01313BDG 4x AM01313BLG AM09033BYE 10x AM09033BDG 6x AM09033BLG 5x AM01323BDG AM10273F 3x
VORSICHT: NL OPGEPAST:
 EN CAUTION: To Avoid Battery Leakage - Be sure to insert the batteries correctly and always follow the toy and battery manufacturers instructions. Do not mix old and new batteries or alkaline, standard
MANUAL DE INSTALAÇÃO MANUAL DE INSTALACIÓN INSTALLATION GUIDE
 MANUAL DE INSTALAÇÃO MANUAL DE INSTALACIÓN INSTALLATION GUIDE youtube.com/furukawabrasil Use um leitor de códigos QR/ Utilice el lector de códigos QR/ Use the QR code reader Informações Gerais/ Información
Fone de ouvido Bluetooth estéreo SBH80
 Manual do usuário Fone de ouvido Bluetooth estéreo SBH80 Índice Introdução...3 Visão geral da função...3 Visão geral do hardware...3 Noções básicas...5 Carregamento da bateria...5 Status da bateria...5
MARQUE: MICROSOFT REFERENCE: NATURAL ERGO 4000 CODIC:
 MARQUE: MICROSOFT REFERENCE: NATURAL ERGO 4000 CODIC: 4327829 NOTICE ENG: Microsoft wired keyboard Teclado com fio da Microsoft Clavier avec fil Microsoft Teclado alámbrico de Microsoft ENG: Install the
INSTALLATION GUIDE MANUAL DE INSTALAÇÃO MANUAL DE INSTALACIÓN
 INSTALLATION GUIDE MANUAL DE INSTALAÇÃO MANUAL DE INSTALACIÓN youtube.com/furukawaelectriclatam Use um leitor de códigos QR 42U General Information/ Informações Gerais/ Informaciones Generales Compatible
INSTALLATION GUIDE MANUAL DE INSTALAÇÃO MANUAL DE INSTALACIÓN
 INSTALLATION GUIDE MANUAL DE INSTALAÇÃO MANUAL DE INSTALACIÓN youtube.com/furukawaelectriclatam Use the QR code reader/ Use um leitor de códigos QR/ Utilice el lector de códigos QR General Information/
START HERE PTB: COMECE AQUI FRA: MISE EN ROUTE ITA: PER COMINCIARE PTG: INICIAR AQUI ESP: EMPEZAR AQUÍ
 START HERE PTB: COMECE AQUI FRA: MISE EN ROUTE ITA: PER COMINCIARE PTG: INICIAR AQUI ESP: EMPEZAR AQUÍ Install the software (required for full webcam functionality). Instale o software (necessário para
CEM SCA-05 KIT KIT CEM SCA-05. CEM SCA-05 Kit Installation Guide. Kit CEM SCA-05 Guía de Instalación. Kit CEM SCA-05 Guia de Instalação
 CEM SCA-05 KIT KIT CEM SCA-05 CEM SCA-05 Kit Installation Guide Kit CEM SCA-05 Guía de Instalación Kit CEM SCA-05 Guia de Instalação CONTENTS 1. Kit Description... 1 2. Safety Information... 2 3. Procedures
Radio / Cassette. Long Beach C31. Installation instructions Notice de montage Instrucciones de instalación Instruções de montagem
 Radio / assette Long each 3 Installation instructions Notice de montage Instrucciones de instalación Instruções de montagem Installation instructions Notice de montage Instrucciones de instalación Instruções