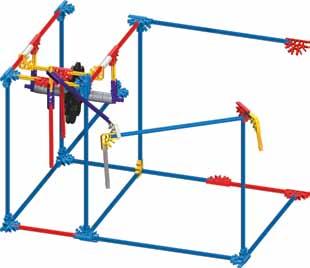
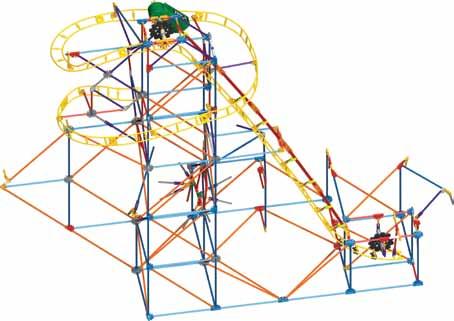
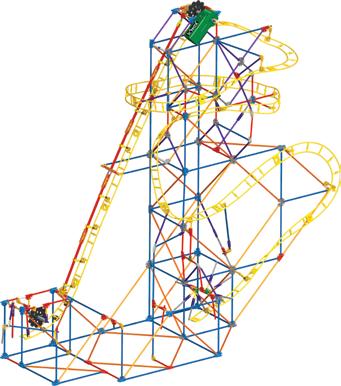
FIRESTORM FREEFALL COASTER MOTOR MOTEUR * NACELLE SUSPENDUE HANGING CAR. 2.83ft.86m. 674 pc/pza 669. pc/pza **
|
|
|
- Vergílio Amaral Figueira
- 6 Há anos
- Visualizações:
Transcrição


1 FIRESTORM FREEFALL COASTER MOTOR HANGING CAR MOTEUR * NACELLE SUSPENDUE 2.83ft.86m 674 pc/pza 669 pc/pza **
 CONTENIDOS K NEX Básicos de Construcción.... 4 Lista de Piezas.... 5 Consejos y Reparación.... 5 Firestorm Freefall Coaster... 6 Consejos para armar las Pistas.")

2 (EN) CONTENTS K NEX Building Basics... 4 Parts List... 5 Tips and Troubleshooting Firestorm Freefall Coaster... 6 Track Building Tips Building Idea (ES) CONTENIDOS K NEX Básicos de Construcción Lista de Piezas Consejos y Reparación Firestorm Freefall Coaster... 6 Consejos para armar las Pistas Idea para la Construcción (FR) CONTENUS K NEX Bases de la Construction Liste des Pièces Conseils et Dépannage Firestorm Freefall Coaster... 6 Conseils pour le Circuit Idée de Construction Important stuff for Parents and Kids Keep these instructions in a handy location. They contain important safety information. Read all warnings and instructions before you start to build and operate the model. WARNING: CHOKING HAZARD - Small parts. Not for children under 3 years. CAUTION: Keep hands, face, hair and clothing away from all moving parts. CAUTION: Be careful not to tip the model over. Model should be placed on a flat and hard surface. Share the K NEX experience with your child and make building with K NEX a family fun adventure. Take your time to enjoy the building process. Don t rush! While you re building make sure you face your model in the same direction as the pictures show in the instructions. Product and colors may vary. Información importante para los Padres y Niños Guarda estas instrucciones en un sitio conveniente. Contienen información importante de seguridad. Lee todas las advertencias e instrucciones antes de comenzar a construir y operar este modelo. ADVERTENCIA: PELIGRO DE ASFIXIA - Piezas pequeñas. No es para niños menores de 3 años. PRECAUCIÓN: Mantén el cabello, los dedos, la cara y la ropa alejada de las piezas móviles. PRECAUCIÓN: Si el cabello del niño entra en contacto con las partes en movimiento del juguete, puede quedar enredado. Compartan la experiencia K NEX con su niño y hagan que la construcción con K NEX sea una divertida aventura de toda la familia. Dedica tiempo a disfrutar el proceso de construcción. No te apresures! Mientras construyes, trata de colocar tu modelo en la misma dirección que se muestra en las instrucciones. El producto y los colores pueden variar. Informations importantes pour les Parents et les Enfants Garde ces instructions à portée de la main. Elles comportent d importantes informations de sécurité. Lis tous les avertissements et les instructions avant de commencer le montage et l exploitation du modèle. AVERTISSEMENT : DANGER D ÉTOUFFEMENT - Petites pièces. Ne convient pas aux enfants de moins de 3 ans. ATTENTION : Garde les cheveux, les doigts, la figure et les vêtements à l écart de toutes les pièces mobiles. ATTENTION : Faire attention de ne pas renverser le modèle. Le modèle devrait être placé sur une surface plate et dure. Partage l expérience K NEX avec ton enfant et fais du montage K NEX un agréable projet de famille. Prends ton temps lors du montage. Ne te presse pas. Essaye de situer ton modèle dans le même sens que les instructions durant le montage. Le produit et les couleurs peuvent varier. Go to for instruction updates Vaya para a las actualizaciones de la instrucción Allez à pour les mises à jour d instruction How to insert and remove batteries Use a small Phillips head screwdriver to loosen the screw. Insert 2 fresh AA batteries (LR6) into the compartment with the correct polarity (+/-) as shown here. Cómo insertar y quitar las pilas Utilizar un pequeño destornillador principal Phillips para aflojar el tornillo y para quitar la cubierta de batería. Insertar 2 AA (LR6) baterías frescas en el compartimiento de batería con la polaridad correcta (+/-). Comment mettre et retirer des piles Utiliser un petit Phillips tournevis pour desserrer la vis et pour enlever la couverture de batterie. Insérer 2 AA (LR6) batteries fraîches dans le compartiment de batterie avec la polarité correcte (+/-). 2
3 (EN) Battery Information CAUTION: Be sure to insert the batteries correctly and always follow the toy and battery manufacturers instructions. Do not mix old and new batteries or alkaline, standard (carbon-zinc) or rechargeable (nickelcadmium) batteries. Only batteries of the same or equivalent type recommended should be used. Always remove weak or dead batteries from the product; do not short-circuit supply terminals. Insert batteries with correct polarity (+/-) as shown. (ES) Información de la batería PRECAUCIÓN: Asegúrese de insertar las pilas correctamente y de siempre seguir las instrucciones del fabricante del juguete y de las pilas. No mezcle pilas viejas con nuevas, ni pilas alcalinas, estándar (carbón-cinc) o recargables (níquel-cadmio). Se debe usar solamente pilas del mismo tipo, o las que se recomienden como equivalentes. Siempre retire las pilas débiles o gastadas del producto; no forme cortocircuito en los puntos de intercambio. Inserte las pilas de acuerdo con los esquemas de polaridad (+/-). (FR) Informations Pile ATTENTION : S assurer d installer les piles correctement et de suivre toujours les directives des fabricants du jouet et des piles. Ne pas mélanger des piles neuves avec des piles usées. Ne pas mélanger des piles alcalines avec des piles standard (Leclanché), ou des piles rechargeables (au nickel-cadmium). Il convient d utiliser uniquement des piles du type recommandé ou d un type équivalent. Retirer toujours les piles faibles ou mortes du produit ; ne pas faire court-circuiter lesterminaux. Installer les piles en respectant la polarité (+/-) comme l indique le schéma. Important tips Alkaline batteries are recommended. Rechargeable batteries are not recommended. Remove rechargeable batteries from toy before charging; they must be charged only under adult supervision. Non-rechargeable batteries must not be recharged. Keep components free of dust; do not immerse or use in water. Do not dispose of batteries in a fire; they could leak or explode and cause injury. Remove all batteries if the toy will not be used for a long period of time. Do not put rods smaller than 2 inches in any openings of the motor; they will damage the motor and cannot be removed. Help the environment by disposing of your product and packaging responsibly. The wheelie bin symbol indicates that the product and batteries must not be disposed of in the domestic waste as they contain substances which can be damaging to the environment and health. Please use designated collection points or recycling facilities when disposing of the item or batteries. Consejos importantes Se recomiendan las pilas alcalinas. No se recomiendan las pilas recargables. Retire las pilas recargables del juguete antes de cargarlas; éstas deben ser cargadas solamente bajo la supervisión de un adulto. No se debe recargar las pilas que no son recargables. Mantenga los componentes sin polvo; no sumerja ni use en agua. No deseche las pilas en el fuego ya que pueden tener fugas, explotar y causar lesiones personales. Retire todas las pilas si el juguete no se usará por mucho tiempo. No meta las vanilas pequeñas en los orificios del motor ya que dañarian el motor y no se podrian sacar. Proteja el medio ambiente desechando su producto y el embalaje de una manera responsable. El símbolo del recipiente con ruedas indica que el producto y las pilas no deben tirarse en la basura doméstica, ya que contienen sustancias que pueden dañar el medio ambiente y la salud. Por favor acuda a los lugares de recolección designados o a instalaciones de reciclaje para desechar el artículo o las pilas. Conseils importants Les piles alcalines sont recommandées. l est déconseillé d utiliser des piles rechargeables. Retirer les piles rechargeables du jouet avant de les recharger; elles doivent être chargées exclusivement en présence d un adulte. Les piles qui ne sont pas rechargeables ne doivent pas être rechargées. Veiller à ce que les éléments restent à l abri de la poussière ; ne pas les plonger dans l eau ; ne pas utiliser dans l eau. Ne pas jeter les piles dans le feu ; elles risqueraient de fuir ou d exploser et d entraîner des blessures. Retirer toutes les piles si le jouet restera inutilisé pendant longtemps. Ne mettez pas les petites tiges dans les trous du moteur, elles endommageraient le moteur et il n est pas possible de les enlever. Aidez l environnement en jetant votre produit et son emballage de manière responsable. Le symbole de la poubelle à roulettes indique qu il ne faut pas jeter le produit et les piles avec les ordures ménagères car ils contiennent des substances pouvant être nocives à l environnement et à la santé. Veuillez utiliser les points de collecte de déchets ou les centres de tri désignés lorsque vous jetez l article ou les piles. 3


4 (EN) Building Basics (ES) Básicos de Construcción (FR) Bases de la Construction 1 2 Start Building To begin your model, find the 1 and follow the numbers. Each piece has its own shape and color. Just look at the pictures, find the pieces in your set that match and then connect them together. Try to face your model in the same direction as the instructions while you build. The arrows show you where the parts connect, but not all connections points have arrows. Faded colors show you this section is already built. Empieza a construir Para comenzar tu modelo, busca el 1 y sigue los números. Cada pieza tiene su propia forma y color. Simplemente mira los dibujos, busca las piezas correspondientes en tu juego y después conéctalas. Mientras construyes, trata de colocar tu modelo en la misma dirección que se muestra en las instrucciones. Los colores desteñidos muestran que esta sección ya está construida. Conecta las nuevas secciones en los lugares señalados por las flechas. Las nuevas piezas que agregues estarán en colores vivos. Démarre ta construction Pour commencer ton modèle, trouve l étape numéro 1 et suis les numéros. Chaque pièce a sa propre forme et sa propre couleur. Regarde les illustrations, trouve les pièces qui correspondent à ce que tu vois et assemble-les. Pour t aider pendant que tu construis, oriente ton modèle dans le même sens que les instructions. Les flèches t indiquent où les pièces s assemblent, mais les points de raccordement n ont pas tous des flèches. Les pièces de couleur délavée sont celles que tu as déjà assemblées. 3 Connectors There are blue and gray connectors with special long slots. They slide together as you see in the pictures. Push these parts together until you hear a click. Conectores Hay conectores azules y plateados con ranuras largas especiales. Se enganchan deslizándose como ves en los dibujos. Conecta estas piezas empujándolas hasta que oigas clic. Connecteurs Tu peux assembler ces connecteurs tout à fait uniques en les faisant glisser l un avec l autre. Pousse fort jusqu à ce que tu entendes un «clic». Lis les instructions attentivement et positionne-les horizontalement ou verticalement, en suivant exactement les illustrations. Chain Be sure to attach all the chain links in the same direction. Cadena Asegúrate de fijar todos los elementos de la cadena en la misma dirección. Chaine Assure-toi de fixer tous les maillons de la chaîne dans le même sens. Spacers There are places in your model where you need to add blue and silver spacers. Be sure to use the right color and count them carefully. Espaciadores Hay lugares en tu modelo donde tendrás que agregar Espaciadores azules y plateados. Cerciórate de usar el color correcto y cuéntalos con cuidado. Espaceurs Il y a des endroits sur ton modèle ou tu auras besoin de te servir d espaceurs. Assure-toi d utiliser la bonne couleur et le nombre d espaceurs indiqué sur les instructions. 4
 Lista de Piezas Antes de empezar con la construcción, asegúrate de comparar las piezas en tu conjunto con la lista de las piezas aquí.")
5 (EN) Parts List Before you start building, be sure to compare the parts in your set with the parts list here. If anything is missing, call or write to us using the information on the back cover. We are here to help you! (ES) Lista de Piezas Antes de empezar con la construcción, asegúrate de comparar las piezas en tu conjunto con la lista de las piezas aquí. Si faltan algunas, llámanos o escríbenos siguiendo las instrucciones en la página trasera. Estamos aquí para ayudarte. (FR) Liste des Pièces Avant de commencer à construire, assure-toi de comparer les pièces dans ta boîte à la liste de pièces fournie ici. S il manque quelque chose, téléphone-nous ou écris-nous en te servant des informations figurant au verso de la notice. Nous sommes là pour t aider! TIPS and TROUBLESHOOTING If the motor is not working properly: Check to see if you have fresh batteries and that they are installed correctly. If it is still not working, call our Consumer Hotline at KID-KNEX (USA and Canada only). See the back cover for other ways to contact K NEX. If a car gets stuck on the track: Is the model built correctly? Make sure the cars are not hitting any K NEX parts. Are the track pieces connected properly? Are the cars attached to the track correctly? Adjust the track to eliminate any flat or little bumpy spots on the track. Consejos y solución Si el motor no funcionan: Comprueba si tienes pilas nuevas y si están instaladas correctamente. Si aún así no trabaja, llama a nuestra Línea de Servicio al Cliente al KID-KNEX (EE.UU. y Canadá solamente). Mira en la cubierta de atrás para otras formas de comunicarte con K NEX. Si los coches quedan atascados mientras van hacia abajo: El modelo está construido correctamente? Asegúrate de que el coche no esté golpeando ninguna de las piezas K NEX. Las piezas de la Pista están conectadas correctamente? El coche está sujetado a la Pista correctamente? Ajusta la Pista para eliminar cualquier lugar plano que le encuentres. CONSEILS et DÉPANNAGE Si le moteur ne marche pas : Vérifie que tu as des piles neuves et qu elles sont installées correctement. Si ça ne marche toujours pas, appelle notre ligne d assistance à la clientèle à KID-KNEX (USA et Canada uniquement). Regarde au verso pour d autres moyens de contacter K NEX. Si des voitures restent coincées au cours de la descente : Est-ce que le modèle est construit comme il faut? Vérifie que la voiture ne heurte pas des pièces K NEX. Est-ce que les pièces du circuit sont connectées comme il faut? Est-ce que la voiture est fixée au circuit comme il faut? Ajuste le circuit de façon à y éliminer des endroits plats. 5

6 Firestorm Freefall Coaster WARNING: CHOKING HAZARD - SMALL PARTS. Not for children under 3 years. ADVERTENCIA: PELIGRO DE ASFIXIA PIEZAS PEQUEÑAS. No para niños menores de 3 años. AVERTISSEMENT : DANGER D ÉTOUFFEMENT - Pièces de petite taille. Ne convient pas aux enfants de moins de 3 ans. WARNHINWEIS: ERSTICKUNGSGEFAHR KLEINTEILE. Nicht geeignet für Kinder unter 3 Jahren. AVVERTENZA: PERICOLO DI SOFFOCAMENTO CONTIENE PICCOLE PARTI. Non adatto per bambini al di sotto di 3 anni. AVISO: PERIGO DE SUFOCAÇÃO PEÇAS PEQUENAS. Não se destina a crianças com menos de 3 anos de idade. WAARSCHUWING: VERSTIKKINGSGEVAAR KLEINE ONDERDELEN. Niet geschikt voor kinderen onder

7

8

9
10 7 1-6 x9 x

11

12

13

14

15 14 x
16 15 x


17
18 18 x
19

20

 Est-ce que tu as installé 2 piles AA (LR6) dans")
 Installierten Sie 2 Batterien AA (LR6) in den")
 Hai installato 2 batterie AA (LR6) nel motore?")
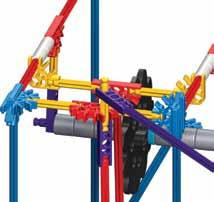
21 2 1 3 (EN) Did you install 2 AA (LR6) batteries in the motor? (ES) Instalaste dos pilas AA (LR6) en el motor? (FR) Est-ce que tu as installé 2 piles AA (LR6) dans le moteur? (DE) Installierten Sie 2 Batterien AA (LR6) in den Motor? (IT) Hai installato 2 batterie AA (LR6) nel motore? (PT) Foram instaladas as pilhas 2 AA (LR6) no motor? (NL) Heb je er 2 AA (LR6) batterijen ingestoken?


22
 Consejos para armar las Pistas: Sujeta las guías de cadena al lado superior de la pista. Sujeta los conectores en el lado inferior de la pista, exactamente como se muestra.")
23 (EN) Track Building Tips: Attach the black chain guides to the top of the track and attach the connectors to the bottom of the track exactly as shown. (ES) Consejos para armar las Pistas: Sujeta las guías de cadena al lado superior de la pista. Sujeta los conectores en el lado inferior de la pista, exactamente como se muestra. (FR) Conseils pour le Pistes : Fixe les guides de chaîne à la partie supérieure du circuit. Fixe les connecteurs à la partie inférieure du circuit exactement comme l indique le schéma. Be sure to push the connectors on firmly until they click. Empuja los conectores hacia adentro hasta que oigas un clic. Pousse bien les connecteurs jusqu à ce qu ils «cliquent». Always connect the track top side to top side throughout the build. Al construir, conecta siempre la pista de lado superior a lado superior. Connecte toujours le côté supérieur du circuit contrele côté supérieur tout au long de la construction. 23

24
 Siempre unirse a este extremo de la pista a la pieza primera pista anterior, a continuación, conecte el resto de la pista a la torre.")
 Immer beitreten dieses Ende der Strecke zum vorherigen Track Stück zuerst, dann treten der Rest der Strecke auf den Turm.")
25 28 (EN) Always join this end of the track to the previous track piece first, then connect the rest of the track to the tower. (ES) Siempre unirse a este extremo de la pista a la pieza primera pista anterior, a continuación, conecte el resto de la pista a la torre. (FR) Toujours joindre à cette extrémité de la voie à la pièce de la piste précédente, puis connecter le reste de la piste à la tour. (DE) Immer beitreten dieses Ende der Strecke zum vorherigen Track Stück zuerst, dann treten der Rest der Strecke auf den Turm. (IT) Sempre partecipare a questo fine della traccia per traccia del pezzo precedente, poi collegare il resto della pista alla torre. (PT) Sempre aderir a este final da trilha para a peça faixa anterior primeiro, e depois conectar o restante da trilha para a torre. (NL) Altijd deelnemen aan deze eind van het spoor naar de vorige track stuk eerst, dan komen de rest van de track naar de toren
26

27

28


29

30

31


32

33

34

35

36

37

38
 IMPORTANT : Attache les chaînons dans le même sens. (DE) WICHTIG: Befestige die Kettenglieder immer in die gleiche Richtung.")
39 (EN) IMPORTANT: Attach all the chain links in the same direction. (ES) IMPORTANTE: Conecta los eslabones de la cadena en la misma dirección. (FR) IMPORTANT : Attache les chaînons dans le même sens. (DE) WICHTIG: Befestige die Kettenglieder immer in die gleiche Richtung. (IT) IMPORTANTE: Collegare le maglie della catena nella stessa direzione. (PT) IMPORTANTE: Prende os elos da corrente seguindo a mesma direcção. (NL) BELANGRIJK: Maak de ketenschakels vast in dexelfde richting x x x1 x13 39

 Para sujetar los coche, desarma una pieza de la pista y entonces ensarta las")


40 (EN) To attach the car, undo a piece of track and then thread the car wheels over the top side of the track. Then join the track pieces together. If the car gets stuck on the way down, make sure it is not hitting any K NEX parts. (ES) Para sujetar los coche, desarma una pieza de la pista y entonces ensarta las ruedas del coche sobre el lado superior de la pista. Luego, junta las piezas de la pista. Si los coches quedan atascados mientras van hacia abajo, asegúrate de que el coche no esté golpeando ninguna de las piezas K NEX. (FR) Pour fixer les voiture, défais un tronçon du circuit, puis fais passer les roues de la voiture par-dessus le côté supérieur du circuit. Assemble ensuite les tronçons du circuit. Si des voiture restent coincées au cours de la descente, vérifie que la voiture ne heurte pas des pièces K NEX
 Bauvorschlag Zusätzliche Bauanleitungen bei www.knex.com/thrill-rides (IT) Idea di costruzione Bonus Istruzioni a www.knex.com/thrill-rides (PT) Ideia de construção Instruções do bônus em www.")
41 Lava Loop Coaster (EN) Building Idea Bonus instructions at (FR) Idée de construction Plans supplementaires á (ES) Idea para la construcción Instrucciones de la prima en (DE) Bauvorschlag Zusätzliche Bauanleitungen bei (IT) Idea di costruzione Bonus Istruzioni a (PT) Ideia de construção Instruções do bônus em (NL) Idee voor bouwen De instructies van de bonus bij 41
42 (DE) Deutsch (Seite 2) Was Eltern und Kinder unbedingt wissen sollten Halte diese Anleitungen stets griffbereit. Sie enthalten alle wichtigen Sicherheitshinweise. Lies bitte alle Warnhinweise und Anleitungen, bevor du mit dem Bauen und Spielen beginnst. WARNHINWEIS: ERSTICKUNGSGEFAHR - Vorsicht Kleinteile! Nicht für Kinder unter 3 Jahren geeignet. VORSICHT: Haare, Finger, Gesicht und Kleidungsstücke nicht mit beweglichen Teilen in Berührung kommen lassen. VORSICHT: Die Haare des Kindes können in Kontakt mit bewegenden Teilen des Spielzeugs kommen und sich verfangen. Helfen Sie Ihrem Kind beim Bauen mit K NEX und machen Sie aus diesem Bauprojekt ein Abenteuer mit Spaß und guter Laune für die gesamte Familie. Das Zusammenbauen macht Spaß, also nehmen Sie sich Zeit und hetzen Sie nicht! Versuche, dein Modell beim Zusammenbauen so zu orientieren, dass es in die gleiche Richtung weist, wie es in den Anleitungen beschrieben und gezeigt wird. Die Produkte und Farben unterscheiden sich eventuell von denen auf den Abbildungen. Anweisungen zum Einlegen und Entfernen der Batterien Einen kleinen Kreuzkopfschraubenzieher benutzen, um die Schraube zu lösen und die Batterieabdeckung zu entfernen. 2 frische AA (oder LR6) Batterien in den Batterieraum mit der korrekten Polarität einsetzen (+/-). (Seite 3) Informationen zu den Batterien VORSICHT: Achte darauf dass die Batterien korrekt eingelegt werden und folge den Anweisungen der Spielzeug- und Batterienfabrikanten. Mische keine alten und neuen Batterien oder alkaline Batterien, Standardbatterien (Kohle-Zink) oder wiederaufladbare Batterien (Nickel-Cadmium). Verwende nur Batterien des gleichen Typs oder des empfohlenen äquivalenten Typs. Leere oder verbrauchte Batterien aus dem Spielzeug entfernen; darauf achten, dass die Pole der Batterie nicht kurzgeschlossen werden. Beim Einlegen der Batterien auf die korrekte Polarität (+/-), wie dargestellt, achten. Wichtige Tipps Alkaline Batterien werden empfohlen. Wiederaufladbare Batterien sind nicht empfohlen. Bei Verwendung von wiederaufladbaren Batterien müssen diese aus dem Spielzeug entfernt werden, bevor sie wieder aufgeladen werden; das Wiederaufladen darf nur unter Aufsicht eines Erwachsenen stattfinden. Nichtwiederaufladbare Batterien dürfen nicht wieder aufgeladen werden. Die Komponenten von Staub freihalten; nicht in Wasser tauchen. Zu entsorgende Batterien nicht ins Feuer werfen; sie können auslaufen oder explodieren und Körperverletzungen verursachen. Wenn das Spielzeug längere Zeit nicht verwendet werden soll, alle Batterien entfernen. In keine der Öffnungen des Motor kleine Stangen einsetzen; sie beschädigen den Motor un können nicht entfernt werden. Trage zum Umweltschutz bei und entsorge unser Produkt sowie die Verpackung in verantwortungsvoller Weise. Das Mülltonnen-Symbol bedeutet, dass das Produkt und die Batterien nicht dem Restmüll zugeführt werden dürfen, weil sie Stoffe enthalten, die sich schädigend auf die Umwelt und die Gesundheit auswirken können. Bitte recycle den Artikel bzw. die Batterien und werfe sie in die entsprechenden Recyclingcontainer. (Seite 4) Grundlegende Bauanleitungen für K NEX Los geht s mit dem Bauen Um mit dem Bauen deines Modells zu beginnen, suche die Nummer 1 und folge den laufenden Nummern. Jedes Teil hat seine eigene Form und Farbe. Schau dir einfach die Abbildungen an, such die Teile in deinem Bausatz, die so aussehen wie das, was du auf der Abbildung siehst und steck sie ineinander. Versuche, dein Modell beim Zusammenbauen so zu orientieren, dass es in die gleiche Richtung weist, wie es in den Anleitungen beschrieben und gezeigt wird. Blasse Farben weisen darauf hin, dass dieser Streckenabschnitt bereits zusammengebaut ist. Abstandsstücke An manchen Stellen in deinem Modell musst du Abstandsstücke einbauen. Achte darauf, die richtige Farbe und Anzahl von Abstandsstücken wie in der Anleitung gezeigt zu verwenden. Kette Achte darauf, alle Kettenglieder in der gleichen Richtung zu verbinden. Verbindungsstücke Blaue und silberfarbene verbindungsstücke haben besonders lange Schlitze. Wie du vauf der Abbildung sehen kannst, lassen sie sich ineinander schieben. Achte beim Aneinanderfügen dieser Teile darauf, dass du ein Klickgeräusch hörst. Erst dann sind die Teile fest miteinander verbunden. (Seite 5) Teileliste Bevor du mit dem Bauen anfängst, solltest du prüfen ob die Teile in deinem Bausatz mit denen auf dieser Teileliste übereinstimmen. Falls etwas fehlt, rufe uns an oder schreibe uns (siehe Rückseite). Wir sind für dich da! Tipps und Fehlerbehebungen Falls der Motor oder das Soundmodul nicht funktionieren: Überprüfe, ob die Batterien voll sind und richtig eingelegt sind. Falls es immer noch nicht funktioniert, kannst du innerhalb der USA und Kanadas unsere Hotline anrufen (Tel KID-KNEX). Auf der Rückseite dieser Anleitung findest du weitere Möglichkeiten, K NEX. zu kontaktieren. Falls die Wagen bei der Abfahrt stecken bleiben: Ist das Modell richtig zusammengebaut? Überprüfe, ob der Wagen gegen einzelne Bauteile stößt. Sind die Schienenstücke richtig miteinander verbunden? Sitzt der Wagen richtig auf den Schienen? Ändere den Schienenverlauf so, dass die Wagen immer genügend Schwung haben. (Seite 23) Tipps für die Schienen: Hierzu müssen die Metallstifte der Schienenstücke aufeinander ausgerichtet sein. Drücke sie so fest, dass sie einhaken. Die einzelnen Schienenstücke müssen immer mit der Oberseite nach oben zeigen, wenn sie miteinander verbunden werden. (Seite 40) Die wagen werden eingehängt, indem ein schienenstück entfernt wird. Dann kannst du die räder des wagens an der oberseite der schienen einhängen. Die schienenstücke werden dann wieder miteinander verbunden. Falls die wagen bei der Abfahrt stecken bleiben, überprüfe, ob der wagen gegen einzelne bauteile stößt. (IT) Italiano (Pagina 2) Informazioni importanti per bambini e genitori Tenere queste istruzioni a portata di mano. Contengono importanti informazioni di sicurezza. Leggere tutte le avvertenze e le istruzioni prima di iniziare a costruire il modello e di farlo funzionare. AVVERTENZA: PERICOLO DI SOFFOCAMENTO - Piccole parti. Non adatto a bambini di età inferiore ai 3 anni. ATTENZIONE: Tenere i capelli, le dita, il viso e i vestiti lontano da tutte le parti in movimento. ATTENZIONE: I capelli del bambino potrebbero impigliarsi se vengono a contatto con le parti del giocattolo in movimento. Condividi l esperienza di K NEX con tuo figlio e rendi la costruzione con K NEX un divertimento per tutta la famiglia. Prendi il tempo necessario per divertirti durante il processo di costruzione. Non ti affrettare! Orienta il tuo modello nella stessa direzione indicata nelle istruzioni. Il prodotto e i colori possono variare. Come inserire e rimuovere le batterie Utilizzare un piccolo cacciavite phillips per allentare la vite e per rimuovere la copertura di batteria. Inserire 2 AA (o LR6) batterie fresche nello scompartimento di batteria con la polarità corretta (+/-). (Pagina 3) Informazioni sulle batterie ATTENZIONE: Accertarsi di inserire le batterie correttamente e seguire sempre le istruzioni del produttore delle batterie e del giocattolo. Non mettere insieme batterie nuove e vecchie o alcaline, standard (carbonio-zinco) e ricaricabili (nichel-cadmio). Usare sempre batterie raccomandate dello stesso tipo o di tipo equivalente. 42 Rimuovere sempre batterie quasi scariche o completamente scariche dal prodotto; non causare corto circuito ai terminali di alimentazione. Inserire le batterie con la polarità corretta (+/-) come illustrato. Consigli importanti Si raccomanda l uso di batterie alcaline. Non si raccomanda l uso di batterie ricaricabili. Rimuovere le batterie ricaricabili dal giocattolo prima della carica: devono essere caricate solo sotto la supervisione di un adulto. Le batterie non ricaricabili non devono essere ricaricate. Mantenere i componenti privi di polvere; non immergere o usare in acqua. Non gettare le batterie nel fuoco, poiché potrebbero perdere o esplodere e causare lesioni. Rimuovere tutte le batterie se il giocattolo non verrà usato per un lungo periodo di tempo. Non inserire aste più corte di 5,1 cm (2 pollici) nei fori del motore, in quanto danneggerebbero il motore e non possono essere rimosse. Aiuta l ambiente eliminando il prodotto e la confezione in modo responsabile. Il simbolo concernente il secchio con le ruote indica che il prodotto e le batterie non possono essere eliminati con la spazzatura domestica in quanto contengono sostanze che possono danneggiare l ambiente e la salute. Usare i punti di raccolta designati o gli impianti di riciclaggio quando si devono eliminare l articolo e le batterie. (Pagina 4) Istruzioni di base per costruire con K NEX Comincia a costruire Per iniziare il modello, cerca il numero 1 e segui i numeri. Ogni pezzo ha una sua forma e un suo colore. Guarda la figura, trova i pezzi corrispondenti nel set e mettili insieme. Cerca di tenere il modello nella stessa direzione della figura e in tal modo sarà più semplice attaccare i pezzi nei posti giusti. I colori spenti ti dicono che questa sezione è già stata costruita. Dovrai collegare la nuova sezione al punto indicato dalla punta della freccia. Spaziatori Ci sono punti nel tuo modello a cui dovrai aggiungere spaziatori blu e argento. Accertati si contarli attentamente. Catena Accertati di attaccare tutti i collegamenti della catena nella stessa direzione. Connettori È molto importante posizionare i connettori blu e argento in una specifica direzione. Presta molta attenzione alle istruzioni e posiziona i connettori orizzontalmente o verticalmente proprio come illustrato. Spingi con forza fino ad udire un clic. (Pagina 5) Elenco delle parti Prima di cominciare a costruire, accertati di confrontare le parti che sono nel tuo set con l elenco delle parti qui. Se ne manca una chiamaci o scrivici usando le informazioni che sono nella retrocopertina. Noi siamo qui per aiutarti! (Pagina 19) Punte delle rotaie: Attacca le guide a catena sulla parte superiore della rotaia. Collega i connettori sulla base della rotaia esattamente come illustrato. Premi i connettori saldamente fino a che si fissano con uno scatto. Collega sempre la rotaia parte superiore a parte superiore in tutta la costruzione. (Pagina 37) Suggerimenti e risoluzione dei problemi Se il motore o il modulo del suono non funzionano: Controlla che le batterie siano nuove e che siano installate correttamente. Se ancora non dovesse funzionare, chiama il numero di assistenza ai clienti KID-KNEX (USA e Canada soltanto). Vedi il retro della scatola per trovare altri modi di contattare K NEX. Se le carrozze si arrestano durante la discesa: Il modello è costruito correttamente? Controlla che la carrozza non abbia colpito qualche altra parte K NEX. I pezzi della rotaia sono collegati correttamente? La carrozza è collegata alla rotaia correttamente? Regola la rotaia per eliminare qualsiasi parte piatta sulla stessa. (Pagina 40) Per collegare le carrozza, stacca un pezzo di rotaia e quindi infila le ruote della carrozza sulla parte superiore della rotaia. Quindi unisci i pezzi della rotaia. Se le carrozze si arrestano durante la discesa, Controlla che la carrozza non abbia colpito qualche altra parte K NEX.
43 (PT) Português (Página 2) Coisas importantes para os Pais e os Miúdos Mantenha estas instruções num local de fácil acesso, pois contêm informações importantes de segurança. Lê as instruções e advertências antes de começares a construir e a operar o modelo. AVISO: PERIGO DE SUFOCAÇÃO - Peças pequenas. Não se destina a crianças com menos de 3 anos de idade. CUIDADO: Mantém o cabelo, os dedos, a cara e a roupa afastados de todas as peças móveis. CUIDADO: O cabelo da criança pode ficar emaranhado se entrar em contacto com as peças móveis do brinquedo. Compartilhe da experiência K NEX com os miúdos e faça com que o processo de construção com K NEX se torne numa aventura entre família. Não te precipites para assim poderes desfrutar do processo de construção. Não o faças à pressa! Tenta fazer com que o teu modelo esteja virado exactamente na mesma direcção indicada nas instruções. Tanto o produto como as respectivas cores podem variar. Como inserir e remover as pilhas Usar uma chave de fenda principal pequena de Phillips para afrouxar o parafuso e para remover a tampa de bateria. Introduzir 2 AA (ou LR6) baterias frescas no compartimento de bateria com a polaridade correta (+/-). (Seite 3) Informações sobre as pilhas CUIDADO: Certifique-se de que introduz as pilhas correctamente e siga sempre as instruções do fabricante da bateria e do brinquedo. Não combine pilhas usadas com pilhas novas, pilhas alcalinas, padrão (carbono-zinco) ou pilhas recarregáveis (níquel-cádmio). Deverão ser usadas apenas pilhas do mesmo tipo ou equivalentes ao tipo recomendado. Retire sempre as pilhas fracas ou gastas do produto; não provoque um curto-circuito nos terminais de alimentação. Introduza as pilhas com a polaridade correcta (+/-), conforme se mostra. Conselhos importantes Recomenda se o uso de pilhas alcalinas. Não se recomenda o uso de pilhas recarregáveis. Retire as pilhas recarregáveis do brinquedo antes de as carregar; estas pilhas devem ser recarregadas apenas sob vigilância de adultos. As pilhas não recarregáveis não devem ser carregadas. Mantenha os componentes livres de poeiras; não mergulhe em água nem use água. Não elimine as pilhas queimando-as; estas podem apresentar fugas ou explodir causando lesões. Retire todas as pilhas do brinquedo se não tencionar usá-lo durante um longo período de tempo. Não coloque varetas de tamanho inferior a 5,1 cm (2 pol.) em nenhuma abertura do motor; as varetas causarão danos no motor e não podem ser removidas. Ajude o ambiente eliminando o seu produto e a embalagem vazia responsavelmente. A imagem do contentor do lixo com rodinhas indica que o produto e as pilhas não devem ser eliminados juntamente com os resíduos domésticos pois contêm substâncias que podem provocar efeitos noviços no ambiente e na saúde. Por favor use os pontos de recolha designados ou as instalações de reciclagem quando necessitar de eliminar o produto ou as pilhas. (Página 4) Pontos básicos para a construção K NEX Inicia a construção Para começar o teu modelo, procura o 1 e segue os números. Cada peça tem a sua própria forma definida e cor. Basta simplesmente olhares para a ilustração, procurar as peças do teu jogo correspondentes às que estás a ver e, em seguida, conectar umas nas outras. Enquanto estás a montar as peças, tenta manter o teu modelo na mesma direcção, conforme mostrado na ilustração, para assim ligares as peças correctamente. As cores desbotadas indicam que esta secção já está montada. Passarás então a fazer a conexão da nova secção no local indicado pelas setas. Espaçadores Existirão certos pontos no teu modelo que necessitam a colocação de espaçadores azuis e prateados. Assegura-te que os contas cuidadosamente. Corrente Assegura-te que prendes todos os elos da corrente seguindo a mesma direcção. Conectores É muito importante que posiciones os conectores azuis e cor de prateados numa direcção específica. Presta muita atenção às instruções e coloca estes conectores horizontal ou verticalmente, exactamente conforme se mostra nas ilustrações. Junta as partes simultaneamente e com firmeza até ouvires um estalido. (Página 5) Lista de peças Antes de iniciares a construção, certifica-te de que comparas as peças do teu conjunto com a lista das peças aqui. Se faltar alguma peça telefona ou escreve-nos usando as informações indicadas na contracapa. Estamos aqui para te ajudar! (Página 19) Sugestões para a Pista: Prende as Guias de Corrente ao topo da Pista. Liga os conectores à base da Pista exactamente como demonstrado. Faz avançar os conectores firmemente até encaixarem com um estalido. Liga sempre a face superior da Pista à face superior durante a montagem. (Página 37) Sugestões e Resolução de Problemas Se o Motor ou o Módulo de Som não funcionar: Verifica se as pilhas são novas e se estão instaladas correctamente. Caso continuem sem funcionar, contacta a Linha Directa de Atendimento ao Consumidor através do número KID-KNEX (apenas nos EUA e no Canadá). Consulta a contra capa para mais informações sobre como contactares a K NEX. Se as Carruagens ficarem encravadas na descida: O modelo foi construído correctamente? Assegura-te de que a Carruagem não está a chocar contra outras peças K NEX. As peças da Pista estão ligadas correctamente? A Carruagem está presa à Pista correctamente? Ajusta a Pista para eliminares qualquer ponto plano na Pista. (Página 40) Para prenderes as carruagem, desliga uma peça da pista e, seguidamente, enfia as rodas da carruagem sobre a face superior da pista. Depois junta as peças da pista umas às outras. Se as carruagem ficarem encravadas na descida, assegura-te de que a carruagem não está a chocar contra outras peças K NEX. (NL) Nederlands (Bladzijde 2) Belangrijke gegevens voor ouders en kinderen Bewaar deze aanwijzingen op een gemakkelijk bereikbare plaats. Ze bevatten belangrijke veiligheidsgegevens. Gelieve alle waarschuwingen en aanwijzingen te lezen vóór je het model begint op te bouwen en te gebruiken. WAARSCHUWING: VERSTIKKINGSGEVAAR - Kleine onderdelen. Niet geschikt voor kinderen onder 3 jaar. OPGEPAST: Hou het haar, de vingers, het gezicht en kledij verwijderd van alle bewegende onderdelen. OPGEPAST: Als het haar van het kind in aanraking komt met bewegende onderdelen van het speelgoed kan het haar verstrikt raken. Deel de K NEX ondervinding met je kind en maak van het bouwen met K NEX een aangenaam familieavontuur. Neem je tijd tijdens het bouwen en monteren. Spoed je niet! Tracht je model in dezelfde richting te plaatsen als de aanwijzingen terwijl je bouwt en monteert. Produkt en kleuren kunnen afwijken. Insteken en verwijderen van batterijen Gebruik een kleine hoofdschroevedraaier Phillips om de schroef los te maken en de batterijdekking te verwijderen. Neem 2 verse AA (of LR6) batterijen in het batterijcompartiment met op de correcte polariteit (+/-). (Seite 3) Batterijgegevens OPGEPAST: Verzeker je ervan dat de batterijen er op de juiste manier in te steken en volg steeds de aanduidingen van de speelgoed- en batterijenfabrikanten. Meng geen oude en nieuwe batterijen of alkalische, gewone (koolstof-zink) of herlaadbaarse (nikkel-cadmium) batterijen met mekaar. Uitsluitend batterijen van dezelfde of van een aanbevolen equivalente soort dienen gebruikt te worden. Verwijder steeds uitgeputte of ontladen batterijen uit het produkt; veroorzaak geen kortsluiting van de voedingspolen. Steek de batterijen erin volgens de juiste polariteit (+/-) zoals afgebeeld. Belangrijke tips Alkalische batterijen worden aanbevolen. Herlaadbare batterijen worden niet aanbevolen. Verwijder herlaadbare batterijen uit het speelgoed alvorens ze te herladen; ze moeten slechts herladen worden onder het toezicht van een volwassene. Niet-herlaadbare batterijen mogen niet herladen worden. Bescherm onderdelen tegen stof; dompel ze niet of gebruik ze niet in water. Werp de batterijen niet in het vuur; ze zouden kunnen lekken of ontploffen en verwondingen veroorzaken. Verwijder alle batterijen wanneer het speelgoed gedurende lange tijd niet gebruikt zal worden. Plaats staafjes in de openingen van het motor, zij zouden de motor beschadigen en kunnen niet worden verwijderd. Help de omgeving door uw product en verpakking verantwoordelijk weg te werpen. Het symbol met de vuilnisbak op wieltjes duidt aan dat het product en de batterijen niet mogen weggeworpen worden in huishoudvuil vermits ze stoffen bevatten die de omgeving en de gezondheid kunnen schaden. Gelieve de aangeduide verzamelpunten of recyclageinstallaties te gebruiken wanneer u zich wil ontdoen van dit artikel of deze batterijen. (Bladzijde 4) Basisstappen voor K NEX bouwen Begin te bouwen Om met je model te beginnen, vind eerst het nummer 1 en volg de nummers. Elk stuk heeft zijn eigen vorm en kleur. Kijk gewoonweg naar de afbeeldingen, vind de overeenstemmende stukken terug in je geheel en maak ze aan mekaar vast. Tracht je model in dezelfde richting te plaatsen als de aanwijzingen terwijl je bouwt en monteert. De vervaagde kleuren duiden aan dat dit deel reeds is opgebouwd. Gelieve het nieuwe deel vast te koppelen op de plaats aangeduid door de pijlen. Koppelstukken Er zijn blauwe en zilveren koppelstukken met speciale lange gleuven. Ze schuiven in mekaar zoals je kunt zien op de afbeeldingen. Duw deze onderdelen in mekaar tot je een klik hoort. Tussenstukken In je model zijn er plaatsen waar blauwe en zilveren tussenstukken moeten toegevoegd worden. Verzeker je ervan de juiste kleur te gebruiken en tel ze zorgvuldig. Keten Maak zeker dat alle ketenschakels vastgemaakt worden in dezelfde richting. (Bladzijde 5) Onderdelenlijst Voor je begint te bouwen, vergewis je ervan de onderdelen in je geheel na te gaan met de onderdelenlijst hier. Wanneer iets ontbreekt, bel ons op of schrijf ons door gebruik te maken van de informatie op het achterblad. We staan er om je te helpen! (Bladzijde 19) Spoortips: Maak de kettinggidsen vast bovenaan het spoor. Maak de koppelstukken vast aan de onderkant van het spoor precies zoals afgebeeld. Druk de koppelstukken goed erin tot ze klikken. Maak steeds de bovenkant van het spoor vast aan de bovenkant tijdens de opbouw. (Bladzijde 37) Tips & Oplossen van problemen Wanneer de motor- of klankmodule niet werkt: Kijk na dat je nieuwe batterijen hebt en dat ze er behoorlijk zijn aangebracht. Werkt het nog steeds niet, bel dan de Klantendienst Hotline op aan het nummer KID-KNEX (uitsluitend in de VS en Canada). Kijk naar het achterblad voor andere manieren om contact op te nemen met K NEX. Wanneer wagens vastlopen tijdens de daling: Is het model behoorlijk opgebouwd? Verzeker je ervan dat de wagen tegen geen K NEX onderdelen aanloopt. Zijn de spoorstukken behoorlijk verbonden? Is de wagen behoorlijk aan het spoor verbonden? Ajusteer het spoor om platte stukken op het spoor te verwijderen. (Bladzijde 40) Om de wagen vast te maken, maak een stuk spoor los en breng dan de wielen van de wagen aan over de bovenkant van het spoor. Maak vervolgens de spoorstukken aan mekaar vast. Wanneer wagens vastlopen tijdens de daling, verzeker je ervan dat de wagen tegen geen K NEX onderdelen aanloopt. 43
44 44
ROBO-STING. Building Worlds Kids Love BUILDING SET JEU DE CONSTRUCTION
 Building Worlds Kids Love ROBO-STING BUILDING SET JEU DE CONSTRUCTION 7+ 13244 LR6 ) A ( A 2X Not included Pas inclus No se incluyen Nicht enthalten Non incluse Não estão incluídas Niet inberepen Building
Building Basics. Parts List
 Building Basics Start Building To begin your model, find the and follow the numbers. Each piece has its own shape and color. Just look at the pictures, find the pieces in your set that match and then connect
INFORMATIONS IMPORTANTES POUR LES PARENTS ET LES ENFANTS IMPORTANT STUFF FOR PARENTS AND KIDS. Go to for instruction updates
 IMPORTANT STUFF FOR PARENTS AND KIDS Keep these instructions in a handy location. They contain important safety information. Read all warnings and instructions before you start to build and operate the
BUILDING BASICS BASES DE LA CONSTRUCTION
 (EN) English Keep this important information for future reference WARNING: CHOKING HAZARD Small parts. Not for children under 3 years. CAUTION: Keep hands, face, hair and clothing away from all moving
AVERTISSEMENT : RISQUE D ÉTOUFFEMENT
 (EN) English WARNING: CHOKING HAZARD Small parts. Not for children under 3 years. CAUTION: Keep hands, face, hair, clothing and Power Cord away from all moving parts. Caution: Do not trip on cord. WARNING:
VORSICHT: NL OPGEPAST:
 EN CAUTION: To Avoid Battery Leakage - Be sure to insert the batteries correctly and always follow the toy and battery manufacturers instructions. Do not mix old and new batteries or alkaline, standard
START HERE PTB: COMECE AQUI FRA: MISE EN ROUTE ITA: PER COMINCIARE PTG: INICIAR AQUI ESP: EMPEZAR AQUÍ
 START HERE PTB: COMECE AQUI FRA: MISE EN ROUTE ITA: PER COMINCIARE PTG: INICIAR AQUI ESP: EMPEZAR AQUÍ Install the software (required for full webcam functionality). Instale o software (necessário para
MOTOR MOTEUR BLIZZARD BLAST ROLLER COASTER BUILDING SET MONTAGNES RUSSES EXPLOSION D UNE TEMPÊTE DE NEIGE JEU DE CONSTRUCTION
 MOTOR MOTEUR Building Worlds Kids Love BLIZZARD BLAST ROLLER COASTER BUILDING SET MONTAGNES RUSSES EXPLOSION D UNE TEMPÊTE DE NEIGE JEU DE CONSTRUCTION + ft ft.9 ++ m m 5440 LR6 ) A ( A 9 + X Not included
IAN 93902 1/22. Washing machine cabinet. Mobile lavatrice Istruzioni per il montaggio. Armario saledizo de máquina lavadora Instrucciones de montaje
 Washing machine cabinet ES PT DE AT CH Armario saledizo de máquina lavadora Instrucciones de montaje Armário para montar por cima da máquina de lavar a roupa Instruções de montagem Waschmaschinenüberbauschrank
DONKEY 19689. 2. Using a small cross-head (positive) screwdriver, undo the screw that secures the battery compartment door. Copyright ROMPA Ltd
 screwdriver, undo the screw that secures the battery compartment door. Copyright ROMPA Ltd") DONKEY 19689 CONTENTS 1 x switch-adapted Donkey This product requires, but does not include, 3 AA batteries and a switch See www.rompa.com for a comprehensive range of switches BEFORE USE 1. Locate the
DONKEY 19689 CONTENTS 1 x switch-adapted Donkey This product requires, but does not include, 3 AA batteries and a switch See www.rompa.com for a comprehensive range of switches BEFORE USE 1. Locate the
Start Here Comece aqui Mise en route Empezar aquí
 Start Here Comece aqui Mise en route Empezar aquí 1 Install the software (required for full functionality). Instale o software (necessário para funcionalidade total). Installez le logiciel (requis pour
Security Kit. Security Kit. Security Kit. Security Kit. See Reverse Side For Security Installation Instructions 8811-000008
 Security Kit Security Kit See Reverse Side For 8811-000008 See Reverse Side For 8811-000008 Security Kit Security Kit See Reverse Side For 8811-000008 See Reverse Side For 8811-000008 1. Using security
1. DESCARGA DEL SOFTWARE DE BLUETOOTH EN EL SMARTPHONE
 MANUAL DEL USUARIO PARA BLUETOOTH ES 1. DESCARGA DEL SOFTWARE DE BLUETOOTH EN EL SMARTPHONE Entre en Apple Store o Google Play y busque: - BH Premium - BH Lite BH Premium BH Lite 2. FIJACIÓN DEL MÓDULO
GUIA PRINCIPAL CONTEÚDO
 GUIAPRINCIPAL ORazerNagaéomouseMMO(MassivelyMultiplayerOnlineGaming,jogodecomputadorcom centenasdemilharesdejogadoreson linesimultaneamente)definitivo,quemudaoequilíbrioentre tecladoemouse,reunindoumnúmeroinéditodecomandosdejogoemumúnicolocal.ogrip
Radio / CD. Honolulu CD50. Installation instructions Notice de montage Instrucciones de instalación Instruções de de montagem
 Radio / D Honolulu D50 Installation instructions Notice de montage Instrucciones de instalación Instruções de de montagem Installation instructions Notice de montage Instrucciones de instalación Instruções
Quickstart Guide. WiPry-Pro Combo
 Quickstart Guide CONNECT TO APPLE DEVICE ACCESSORY EXTERNAL TRIGGER 2.4-2.5GHz ANTENNA WARNING DO NOT APPLY MORE THAN 20DBM TO THE ANTENNA WITHOUT EXTERNAL ATTENUATION WARNING DO NOT APPLY MORE THAN -0.5/+3.8V
1. Product Name. 2. Product Code. 3. Colour. 4. Brief Description. 5. Contents. 6. Snoezelen Stimulations. Switch Adapted Fibre Optic Lamp
 1. Product Name Switch Adapted Fibre Optic Lamp 2. Product Code 20709 3. Colour Clear base; white fibres 4. Brief Description Activate your switch to activate the light through the fibres and in the base.
PROCEDIMENTOS NECESSÁRIOS ANTES DE UTILIZAR O EQUIPAMENTO. Instalação do Rasther PC. Habilitação das Montadoras
 Guia Rápido Rasther PC PROCEDIMENTOS NECESSÁRIOS ANTES DE UTILIZAR O EQUIPAMENTO Antes de iniciar o uso do Rasther, será necessário instalar o programa Rasther PC, habilitar as montadoras adquiridas juntamente
Caderno de Questões. Edição Abril 2013 Prova para Nível Básico 4ºano ao 6º do Ensino Fundamental
 www.redepoc.com Caderno de Questões Edição Abril Prova para Nível Básico 4ºano ao 6º do Ensino Fundamental Qualquer tentativa gera alguma pontuação. Responda cada questão em apenas uma folha A organização
POLYPLAY SUPER INSTRUÇÕES DE MONTAGEM INSTRUCCIONES DE MONTAJE/ASSEMBLE INSTRUCTION. Ref.:
 Com a adição de mais Polyplays ao seu, ele pode tomar a forma que você quiser. Conheça todos os modelos de Polyplays: Super, Master e Mega. Depois disso, sua imaginação é que dita as regras. Super Master
Guia de Instalação Rápida TE100-PCBUSR
 Guia de Instalação Rápida TE100-PCBUSR Table Índice of Contents Português... 1. Antes de Iniciar... 2. Como Instalar... 1 1 2 Troubleshooting... 3 Version 07.27.2007 1. Antes de Iniciar Conteúdo da Embalagem
SISTEMA AUTO-NIVELADOR DE FARÓIS
 INSTRUÇÕES DE MONTAGEM (EN) INSTALL MOUNTING INSTRUCTIONS (ES) INSTRUCCIONES DE MONTAJE (FR) GUIDE D'INSTALLATION SISTEMA AUTO-NIVELADOR DE FARÓIS P/ KITS HID (EN) Auto Leveling System for HID KITS (ES)
Disciplina: Alemão (Nível 2)
") Disciplina: Alemão (Nível 2) GUIÃO B Duração da Prova: 15 a 20 minutos Domínios de Referência: O EU, O LAZER 1.º Momento Intervenientes e Tempos Descrição das Actividades [O examinador cumprimenta os examinandos
Disciplina: Alemão (Nível 2) GUIÃO B Duração da Prova: 15 a 20 minutos Domínios de Referência: O EU, O LAZER 1.º Momento Intervenientes e Tempos Descrição das Actividades [O examinador cumprimenta os examinandos
GUIÃO I. Grupo: Continente e Ilha. 1º Momento. Intervenientes e Tempos. Descrição das actividades
 GUIÃO I Prova construída pelos formandos e validada pelo GAVE, 1/6 Grupo: Continente e Ilha Disciplina: Inglês, Nível de Continuação 11.º ano Domínio de Referência: Um mundo de Muitas Culturas 1º Momento
100171058_N369225491 100171074_N369225492 100171084_N369225490 100171066_N369225488 URBAN C
 100171058_N369225491 100171074_N369225492 100171066_N369225488 100171084_N369225490 URBAN C Lea atentamente estas instrucciones antes de comenzar la instalación. - Compruebe el producto por si faltasen
A machine that blows bubbles at the press of your switch (not included)
") 1. Product Name Bubbles 2. Product Code 20139 3. Colour As shown 4. Brief Description A machine that blows bubbles at the press of your switch (not included) 5. Contents Bubbles machine with cable attached
1. Product Name Bubbles 2. Product Code 20139 3. Colour As shown 4. Brief Description A machine that blows bubbles at the press of your switch (not included) 5. Contents Bubbles machine with cable attached
IDE 2.5" hd:basic. hdd enclosure caixa externa para disco rígido
 IDE 2.5" hd:basic hdd enclosure caixa externa para disco rígido IDE 2.5" hd:basic USER S GUIDE SPECIFICATONS HDD Support: IDE 2.5 Material: Aluminium Input connections: IDE HDD Output connections: USB
O examinador dá o primeiro momento por terminado, dizendo: Vielen Dank!.
 PROVA DE EXPRESSÃO ORAL DE ALEMÃO PROPOSTA DE GUIÃO Iniciação (2 anos de aprendizagem) Domínios de referência: FREIZEIT / REISEN 1.º MOMENTO Intervenientes e tempos Descrição das actividades O examinador
MANUAL PRINCIPAL ÍNDICE
 MANUALPRINCIPAL ORazerNagaéosupremoratoparajogosdogéneroMassivelyMultiplayerOnline(MMO)quealternao equilíbrioentretecladoeratoaocentralizarumnúmerosemprecedentesdecomandosdojogo.uma grelhademúltiplosbotõesparaopolegarcomfuncionalidadeintegralderemapeamentoemacro
POLYPLAY MASTER INSTRUÇÕES DE MONTAGEM INSTRUCCIONES DE MONTAJE/ASSEMBLE INSTRUCTION. Ref.: 0957.7
 Com a adição de mais Polyplays ao seu, ele pode tomar a forma que você quiser. Conheça todos os modelos de Polyplays: Super, Master e Mega. Depois disso, sua imaginação é que dita as regras. Super Master
Inglês. Entrelinha 1,5 (Versão única igual à Versão 1) Teste Intermédio de Inglês. Parte III Compreensão do oral. Entrelinha 1,5.
 Teste Intermédio de Inglês. Parte III Compreensão do oral. Entrelinha 1,5.") Teste Intermédio de Inglês Parte III Compreensão do oral Entrelinha 1,5 Teste Intermédio Inglês Entrelinha 1,5 (Versão única igual à Versão 1) Duração do Teste: 15 minutos 22.02.2013 9.º Ano de Escolaridade
Teste Intermédio de Inglês Parte III Compreensão do oral Entrelinha 1,5 Teste Intermédio Inglês Entrelinha 1,5 (Versão única igual à Versão 1) Duração do Teste: 15 minutos 22.02.2013 9.º Ano de Escolaridade
1. DESCARGA DEL SOFTWARE DE BLUETOOTH EN EL SMARTPHONE
 M AN UAL DEL USUARIO PARA BLUETOOT H ES 1. DESCARGA DEL SOFTWARE DE BLUETOOTH EN EL SMARTPHONE Entre en Apple Store o Google Play y busque: - BH Premium BH Premium 2. FIJACIÓN DEL MÓDULO BLUETOOTH Fije
SR2 COM01 Quick start
 SR COM0 Quick start Aim: SR COM0 alarm message on your mobile phone. Objectif : réception sur votre téléphone mobile d'un message d'alarme provenant du SR COM0. Zweck: Empfang einer Alarmmeldung vom SR
Kit Tecsystem for MVW-01. Kit Tecsystem para MVW-01. Kit Tecsystem Installation, Configuration and Operation Guide
 Kit Tecsystem for MVW0 Kit Tecsystem para MVW0 Kit Tecsystem Installation, Configuration and Operation Guide Kit Tecsystem Guía de Instalación, Configuración y Operación Kit Tecsystem Guia de Instalação,
DIBELS TM. Portuguese Translations of Administration Directions
 DIBELS TM Portuguese Translations of Administration Directions Note: These translations can be used with students having limited English proficiency and who would be able to understand the DIBELS tasks
Guião N. Descrição das actividades
 Proposta de Guião para uma Prova Grupo: 006 Disciplina: Inglês, Nível de Continuação, 11.º ano Domínio de Referência: Um Mundo de Muitas Culturas Duração da prova: 15 a 20 minutos 1.º MOMENTO Guião N Intervenientes
ÍNDICE PORTUGUÊS INDEX ENGLISH
 ÍNDICE PORTUGUÊS 1. Introdução...2 2. Características...2 3. Avisos...3 4. Instalação...3 4.1 Alimentação por pilha AAA 4.2 Alimentação pela entrada USB 5. Utilizando o Produto...5 6. Solução de Problemas...5
MarkWare Facility Identification Software
 English TABLE OF CONTENTS Arrows...3 Exit...4 Fasteners...5 Fire safety...6 First aid & rescue...7 Hazmat diamond...8 Hazmat HSID...9 Hazmat transport...10 Hazmat triangle...11 Hazmat-WHMIS-SIMDUT...12
Acti 9 Smartlink fr en es de cz pt nl zh ru
 Ati 9 Smartlink fr en es de z pt nl zh ru Ati 9 Smartlink SB- iat A99 iatl A9 ifs A9A6897 FS A96899 RA i6 A97p Reflex i6 A96pppp A9MEMT P M SV F V F iemt Y Y() ) Y(manu Auto i6 F F A u t o www.shneider-eletri.om
Descrição das Actividades. [O examinador cumprimenta os examinandos, confirma os seus nomes, e explicita os procedimentos do 1º momento da prova.
 Duração da Prova: 15 a 20 minutos Domínios de Referência: A Escola; o Lazer (Férias) 1.º Momento Avaliação da Expressão Oral no Ensino Secundário Disciplina: Alemão (Iniciação, Nível 3 12º ano) GUIÃO B
TAPA Y ASIENTO PARA WC ASSE PER WC TAMPO PARA SANITA TOILET SEAT WC-SITZ Z30830A / Z30830B / Z30830C / Z30830D IT MT DE AT CH
 ES TAPA Y ASIENTO PARA WC IT MT ASSE PER WC PT TAMPO PARA SANITA GB MT TOILET SEAT DE AT CH WC-SITZ 5 Z080A / Z080B / Z080C / Z080D 7096_ES_IT.indd /4/20 7:0:4 PM x 2 x 4 5 6 7 8 A x 2 2 2 7096_ES_IT.indd
REF.: 20050/20051/20052
 controleantimicrobianonatural REF.: 20050/20051/20052 Dicas de Conservação / Maintenance Tips / Dicas para Conservación *Para limpar ou tirar manchas, utilize uma flanela umedecida em solução de água e
Caderno de Questões. Do 7ºano à 3º do Ensino Médio
 www.redepoc.com Caderno de Questões Do 7ºano à 3º do Ensino Médio Qualquer tentativa gera alguma pontuação A organização das resoluções será levada em conta Responda cada questão em um folha 7 PONTOS Q
HR Connect System Alert
 HR Connect System Alert To: All Employees Alert: System Downtime From November 30 December 3, the HR Connect Self-Service system will be down for maintenance. You will be unable to complete transactions
Guião M. Descrição das actividades
 Proposta de Guião para uma Prova Grupo: Inovação Disciplina: Inglês, Nível de Continuação, 11.º ano Domínio de Referência: O Mundo do trabalho Duração da prova: 15 a 20 minutos 1.º MOMENTO Guião M Intervenientes
Inglês. Guião. Teste Intermédio de Inglês. Parte III Interacção Oral. Teste Intermédio. Duração do Teste: 10 a 15 minutos De 27.04.2011 a 13.05.
 Teste Intermédio de Inglês Parte III Interacção Oral Teste Intermédio Inglês Guião Duração do Teste: 10 a 15 minutos De 27.04.2011 a 13.05.2011 9.º Ano de Escolaridade Decreto-Lei n.º 6/2001, de 18 de
1:24 Scale BUGGY +14 GD30103 1:24 MANUAL DE UTILIZADOR MANUALE DE USUÁRIO / USER MANUAL
 1:24 Scale BUGGY +14 GD30103 1:24 MANUAL DE UTILIZADOR MANUALE DE USUÁRIO / USER MANUAL PT ES EN OFF-ROAD BUGGY R/C Manual de Utilização Página 4 OFF-ROAD BUGGY R/C Manuale de Usuário Pagina 6 OFF-ROAD
Manual do usuário. User s Manual JS052. Super band - guitarra sem fio PS2 / PS3 / Wii Super band - wireless guitar PS2 / PS3 / Wii
 Super band - guitarra sem fio Manual do usuário User s Manual Super band - guitarra sem fio PS2 / PS3 / Wii Super band - wireless guitar PS2 / PS3 / Wii 1 JS052 ÍNDICE CARACTERÍSTICAS DO PRODUTO...03 peças
A Associação de Pais do LFIP tem o prazer de vos anunciar que no dia 29 de Novembro de 2014 irá realizar-se o 3º Marché de Noël Solidaire.
 Caros pais, A Associação de Pais do LFIP tem o prazer de vos anunciar que no dia 29 de Novembro de 2014 irá realizar-se o 3º Marché de Noël Solidaire. Esta iniciativa insere-se no âmbito de um projeto
Serviços: API REST. URL - Recurso
 Serviços: API REST URL - Recurso URLs reflectem recursos Cada entidade principal deve corresponder a um recurso Cada recurso deve ter um único URL Os URLs referem em geral substantivos URLs podem reflectir
Apêndice B AVISOS REGULAMENTARES DA AGÊNCIA. Apêndice B AVISOS REGULARMENTARES DA AGÊNCIA B-1
 Apêndice B AVISOS REGULAMENTARES DA AGÊNCIA Apêndice B AVISOS REGULARMENTARES DA AGÊNCIA B-1 MANUAL DO USUÁRIO Aviso da Commissão das Comunicações Federais Este equipamento tem sido testado e fundado para
PROPOSTA DE GUIÃO PARA UMA PROVA
 PROPOSTA DE GUIÃO PARA UMA PROVA Alemão Iniciação (Nível 2) Domínio de Referência: Junge Leute Schule und Reisen 1.º MOMENTO Intervenientes e Tempos (1 minuto) (Introdução) Descrição das actividades Hallo!
ENGLISH PORTUGUÊS ENGLISH FRANÇAIS DEUTSCH ESPAÑOL. Pop-up Blocker settings:
 ENGLISH PORTUGUÊS ESPAÑOL DEUTSCH FRANÇAIS ENGLISH It has come to our attention that some users are having trouble viewing the new Data Policy and Privacy Statement due to their pop-up being blocked by
idav RENAULT VERSÃO PORTUGUÊS
 Manual de atualização do rádio Media NAV ULC Duster, 26/04/203 Page of 0 VERSÃO PORTUGUÊS O software do rádio está em constante evolução. E, como é de se esperar, as versões mais recentes corrigem alguns
4-Port USB Charger 5.1A
 Multi Language Quick Guide 4-Port USB Charger 5.1A CUSBPWR51A V1.0 English 1. Package contents The following items are present in the package of the Conceptronic 4-Port USB Charger 5.1A 2. Specifications
Dropbox Quick Start. What is Dropbox? The Dropbox Folder
 Dropbox Quick Start What is Dropbox? Dropbox is a free service that lets you bring all your photos, docs, and videos anywhere. Any file you save to your Dropbox will also automatically save to all your
Inglês. Guião. Teste Intermédio de Inglês. Parte IV Interação oral em pares. Teste Intermédio
 Teste Intermédio de Inglês Parte IV Interação oral em pares Teste Intermédio Inglês Guião Duração do Teste: 10 a 15 minutos De 25.02.2013 a 10.04.2013 9.º Ano de Escolaridade D TI de Inglês Página 1/ 7
DS100 Dual Monitor Desk Stand, Vertical
 USA 1-800-888-88 Europe +31 (0)33-600 DS100 Dual Monitor Desk Stand, Vertical ASSEMBLY INSTRUCTIONS INSTRUCCIONES DE INSTALACIÓN NOTICE D ASSEMBLAGE INSTRUÇÕES DE MONTAGEM 1 A B C 1x 2x 2x 8x 8x 7-100mm
GUIÃO Domínio de Referência: CIDADANIA E MULTICULTURALISMO
 PROJECTO PROVAS EXPERIMENTAIS DE EXPRESSÃO ORAL DE LÍNGUA ESTRANGEIRA - 2005-2006 Ensino Secundário - Inglês, 12º ano - Nível de Continuação 1 1º Momento GUIÃO Domínio de Referência: CIDADANIA E MULTICULTURALISMO
UNIVERSIDADE FEDERAL DO CEARÁ COORDENADORIA DE CONCURSOS CCV. Casa de Cultura Alemã. Semestre IV CADERNO-QUESTIONÁRIO
 UNIVERSIDADE FEDERAL DO CEARÁ COORDENADORIA DE CONCURSOS CCV Casa de Cultura Alemã Semestre IV CADERNO-QUESTIONÁRIO Data: 12 de Julho de 2015. Duração: das 9:00 às 12:00 horas. LEIA COM ATENÇÃO AS INSTRUÇÕES
Radio D Teil 1. Deutsch lernen und unterrichten Arbeitsmaterialien. Capítulo 21 Um tubarão em Hamburgo
 Capítulo 21 Um tubarão em Hamburgo Com temperaturas insuportáveis na redação da Rádio D, uma incumbência de pesquisa no litoral chega em boa hora. e devem ir a Hamburgo. Pelo que tudo indica, um tubarão
Los casquillos guía broca son componentes para la protección de los utillajes y para facilitar el guiado de las brocas.
 Los casquillos guía broca son componentes para la protección de los utillajes y para facilitar el guiado de las brocas. Tienen la finalidad de mantener siempre el útil en perfectas condiciones dentro de
Guia de Instalação Rápida TMR-121EC H/W: V1.0R
 Guia de Instalação Rápida TMR-121EC H/W: V1.0R Table Índice of Contents Português... 1. Antes de Iniciar... 2. Como Instalar... 1 1 3 Troubleshooting... 5 Version 07.09.2008 1. Antes de Iniciar Conteúdo
TOD11707009-Manual_Proprietario_148x210_c.indd 1 05/10/2012 10:09:43
 TOD11707009-Manual_Proprietario_148x210_c.indd 1 05/10/2012 10:09:43 2 MANUAL DO PROPRIETÁRIO TODESCHINI Agradecemos a sua escolha pelos produtos Todeschini. Para aumentar a vida útil de seu mobiliário,
FAIRTRADE LABELLING ORGANIZATIONS INTERNATIONAL
 A: Tous les acteurs de la filière du Commerce Equitable certifiés pour la mangue, la banane, la pulpe d araza / Produtores e Comerciantes certificados da manga, da banana e da polpa de araza de CJ Tous
Prova H Grupo Aveiro 11º ano, Nível de continuação
 Prova H Grupo Aveiro 11º ano, Nível de continuação Avaliação da Expressão Oral no Ensino Secundário Esta prova desenvolve-se em três momentos e tem uma duração aproximada de 15 minutos para cada grupo
Guia de Instalação Rápida TEG-PCITXR TEG-PCITXRL 3.02
 Guia de Instalação Rápida TEG-PCITXR TEG-PCITXRL 3.02 Índice Português 1 1. Antes de Iniciar 1 2. Como instalar 2 Troubleshooting 5 Version 03.18.2010 1. Antes de Iniciar Português Conteúdo da Embalagem
SRW 01-HMI. Remote Keypad (HMI) HMI Remoto HMI Remota. Installation Guide Guía de Instalación Guia de Instalação. English / Español / Português
 HMI Remoto HMI Remota. Installation Guide Guía de Instalación Guia de Instalação. English / Español / Português") Motors Automation Energy Transmission & Distribution Coatings Remote Keypad (HMI) HMI Remoto HMI Remota SRW 01-HMI Installation Guide Guía de Instalación Guia de Instalação English / Español / Português
Motors Automation Energy Transmission & Distribution Coatings Remote Keypad (HMI) HMI Remoto HMI Remota SRW 01-HMI Installation Guide Guía de Instalación Guia de Instalação English / Español / Português
Especificações terra. Pre-Roll (Mobile) Copyright 2012, Terra Networks Brasil S.A. Última atualização 16/10/2015
 Copyright 2012, Terra Networks Brasil S.A. Última atualização 16/10/2015") Pre-Roll (Mobile) Última atualização 16/10/2015 Especificação do formato O vídeo anúncio pre-roll é exibido antes do vídeo de conteúdo de acordo com a frequência pré-definida no canal. O vídeo anúncio
Pre-Roll (Mobile) Última atualização 16/10/2015 Especificação do formato O vídeo anúncio pre-roll é exibido antes do vídeo de conteúdo de acordo com a frequência pré-definida no canal. O vídeo anúncio
Manual de montagem do KIT 5E1
 www.altanatubes.com Manual de montagem do KIT 5E1 Partes do seu kit Parabéns por adquirir o KIT 5E1 da Altana Tubes. Com ele você terá não apenas prazer de montar o seu próprio amplificadro, como a certeza
EtherNet/IP Fieldbus Kit
 EtherNet/IP Fieldbus Kit Kit Fieldbus EtherNet/IP EtherNet/IP Fieldbus Kit Installation, Setup and Operation Guide Kit Fieldbus EtherNet/IP Guía de Instalación, Configuración y Operación Kit Fieldbus EtherNet/IP
PROTOCOLO DE R EABILITAÇÃO
 Orteq_rehab_booklet_PR 31/10/08 15:08 Page 1 Rehabilitation protocol in other languages can be downloaded from the website www.orteq.com or can be ordered at Orteq via your physician. Het rehabilitatieprotocol
Guia de Instalação Rápida TFM-560X H/W : YO
 Guia de Instalação Rápida TFM-560X H/W : YO Table Índice of Contents... 1. Antes de Iniciar... 2. Como instalar... 1 1 2 Troubleshooting... 7 Version 08.04.2008 1. Antes de Iniciar Conteúdo da Embalagem
Para mudar de modo, pressionar o nariz da bola só depois da música/ sons pararem!
 Para mudar de modo, pressionar o nariz da bola só depois da música/ sons pararem! Guardar estas instruções para referência futura pois contêm informação importante. Funciona com 3 pilhas AA (incluídas).
Radio D Teil 1. Deutsch lernen und unterrichten Arbeitsmaterialien. Capítulo 17 Círculos de cereais
 Capítulo 17 Círculos de cereais Círculos misteriosos em uma plantação de cereais motivam e Philipp a fazerem uma pesquisa no local. Trata-se de um campo de pouso para óvni ou alguém quer ganhar dinheiro
Memory Module MMF-02. Modulo de Memoria MMF-02. Módulo de Memória MMF-02 CFW70X
 Motors Automation Energy Transmission & Distribution Coatings Memory Module MMF-02 Modulo de Memoria MMF-02 Módulo de Memória MMF-02 CFW70X Installation, Configuration and Operation Guide Guía de Instalación,
PAAES/UFU 2ª Etapa Subprograma 2011-2014
 SERVIÇO PÚBLICO FEDERAL MINISTÉRIO DA EDUCAÇÃO UNIVERSIDADE FEDERAL DE UBERLÂNDIA Pró-Reitoria de Graduação Diretoria de Processos Seletivos PAAES 2ª ETAPA SUBPROGRAMA 2011/2014 24 de fevereiro de 2013
MANUAL DE INSTRUCCIONES CONTROL REMOTO AA-5454
 MANUAL DE INSTRUCCIONES CONTROL REMOTO AA-5454 ESTIMADO CLIENTE Con el fin de que obtenga el mayor desempeño de su producto, por favor lea este manual de instrucciones cuidadosamente antes de comenzar
Guião A. Descrição das actividades
 Proposta de Guião para uma Prova Grupo: Ponto de Encontro Disciplina: Inglês, Nível de Continuação, 11.º ano Domínio de Referência: Um Mundo de Muitas Culturas Duração da prova: 15 a 20 minutos 1.º MOMENTO
GUIÃO A. Ano: 9º Domínio de Referência: O Mundo do Trabalho. 1º Momento. Intervenientes e Tempos. Descrição das actividades
 Ano: 9º Domínio de Referência: O Mundo do Trabalho GUIÃO A 1º Momento Intervenientes e Tempos Descrição das actividades Good morning / afternoon / evening, A and B. For about three minutes, I would like
Estação Power 10. Instruções de montagem
 Estação Power 10 Instruções de montagem (Náilon) (Náilon) (Náilon) (Náilon) (curvo) - 1 - LISTA DE PARTES N o Descrição Qtd. 1 Tubo de suporte 1 2 Tubo em T 1 3 Viga horizontal 1 4 Tubo de guia 2 5 Tubo
SATA 3.5. hd:basic. hdd enclosure caixa externa para disco rígido
 SATA 3.5 hd:basic hdd enclosure caixa externa para disco rígido hd:basic USER S GUIDE SPECIFICATIONS HDD support: SATA 3.5 Material: Aluminium Input connections: SATA HDD Output connections: USB 2.0
hdd enclosure caixa externa para disco rígido
 hdd enclosure caixa externa para disco rígido USER S GUIDE SPECIFICATONS HDD Support: SATA 2.5 Material: Aluminium and plastics Input connections: SATA HDD Output connections: USB 3.0 (up to 5.0Gbps)
ISO 19732 Nuovo Colore / New colour / Nuevo color Nova cor / Nouvelle couleur / Neue Farbe
 ISO COLOR 1 FILTRI - FILTRES FILTROS - FILTROS FILTRES - FILTER ARAG ha allineato i colori delle cartucce filtro secondo quanto richiesto dalla normativa ISO 19732:2007 e per facilitare il riconoscimento
PROFESIONALIDAD Y EXPERIENCIA
 TABERSEO Nuestra actividad principal está enfocada a la distribución moderna de productos de menaje para el hogar básicamente cocina, mesa y ordenación. We are focused to the mass distribution market being
MINIKIT. 10-500 mg/l CaCO 3 L414160 EN FR ES PT. Calcium Hardness Dureté calcique Dureza cálcica Dureza de cálcio
 MINIKIT 10-500 mg/l CaCO 3 L414160 EN FR ES PT Calcium Hardness Dureté calcique Dureza cálcica Dureza de cálcio EN Introduction This MINIKIT provides a simple way of measuring calcium hardness in the range
Iniciar. Antes de utilizar o comando à distância. Instalação. Efectuar a ligação a uma fonte de vídeo. Efectuar a ligação a um computador
 Iniciar 1 Antes de utilizar o comando à distância Inserir as pilhas Período de substituição das pilhas e Utilizar o comando à distância Alcance de funcionamento do comando à distância 2 Instalação Tamanho
Logements. Innovation & Qualité
 Logements Innovation & Qualité Innovation & Qualité FCM - Cofragens e Construções, S.A.. FCM - Espagne. FCM - Cofraje si Constructii, SRL. FCM - Algérie. FCM & LC Construções, Lda.. FCM - Fôrmas e Construções,
Guia de Instalação Rápida TBW-101UB TBW-102UB
 Guia de Instalação Rápida TBW-101UB TBW-102UB Índice Português... 1. Antes de Iniciar... 2. Como instalar... 3. Usando o Adaptador Bluetooth... 1 1 2 4 Troubleshooting... 5 (Version 05.30.2006) 1. Antes
G15. Manual de instruções. radio PMR446
 G15 Manual de instruções radio PMR446 Resumo Software de programação (optional) 2 Conteúdo 2 Características principais 3 Controlos principais e peças do rádio 4 Operações 6 Ligar/desligar a alimentação
Guião E. 1.º MOMENTO Intervenientes e tempos
 Proposta de Guião para uma Prova Disciplina: Espanhol, Nível de Iniciação, 11.º ano (A2) Domínio de Referência: Viajes y Transportes Duração da prova: 15 a 20 minutos Guião E 1.º MOMENTO Intervenientes
Cuando debemos substituir pernos y tuercas
 Cuando debemos substituir pernos y tuercas LÍNEA DE CAMIONES Y BUSES RODAFUSO HACE CON NUESTROS EMPLEADOS, LA INSPECCIÓN DE TUERCAS DE LA RUEDA EN UNA FERIA PARA CHOFÉRES DE VEÍCULOS PESADOS. ESTE TRABAJO
DIGI-HEALTH BALANÇA DIGITAL HC021-HC022
 DIGI-HEALTH BALANÇA DIGITAL BÁSCULA DIGITAL HC021-HC022 DE INSTRUÇÕES DE INSTRUCIONES 05/2015 2 AVISOS Utilize a balança em superfícies firmes e planas para obter maior precisão e acuracidade nos resultados.
Desafios tecnológicos para o Projeto Observatório Logístico de Transporte
 Desafios tecnológicos para o Projeto Observatório Logístico de Transporte If we have data, let s look at data. If all we have are opinions, let s go with mine. Jim Barksdale, ex-ceo AT&T e Netscape Se
Motors Automation Energy Transmission & Distribution Coatings
 Motors Automation Energy Transmission & Distribution Coatings Remote Serial HMI HMI Remota Serial CFW100 Installation, Configuration and Operation Guide Guía de Instalación, Configuración y Operación Guia
User s Manual ENGLISH. Manual del Usuario ESPAÑOL. Manual do Usuário PORTUGUES
 User s Manual ENGLISH M-70-15-0862(02) Manual del Usuario ESPAÑOL Manual do Usuário PORTUGUES USER MANUAL DESCRIPTION PLEASE NOTE! This product is packed sterile (ETO sterilization) and intended for disposal
Guia de Instalação Rápida TEW-430APB
 Guia de Instalação Rápida TEW-430APB Table Índice of Contents Português... 1. Antes de Iniciar... 2. Instalação de Hardware... 3. Configure o Ponto de Acesso... 1 1 2 3 Troubleshooting... 6 Version 08.04.2008
MARQUE: MICROSOFT REFERENCE: TOUCH MOUSE CODIC:
 MARQUE: MICROSOFT REFERENCE: TOUCH MOUSE CODIC: 1288334 NOTICE SET UP CONFIGURAR INSTALLATION ΡΥΘΜΙΣΗ CONFIGURAZIONE CONFIGURACIÓN TOUCH TOCAR ΑΦΗ TOCCO TOQUE TÁCTIL + + 1 + + 2 3 i www.microsoft.com/hardware/downloads
MANUAL DE INSTRUCCIONES RADIO PORTÁTIL RD-5699
 MANUAL DE INSTRUCCIONES RADIO PORTÁTIL RD-5699 ESTIMADO CLIENTE Con el fin de que obtenga el mayor desempeño de su producto, por favor lea este manual de instrucciones cuidadosamente antes de comenzar
MANUAL DE OPERACIONES
 MANUAL DE OPERACIONES INTRUCCIONES DE SEGURIDAD IMPORTANTES El signo de exclamación dentro del triángulo equilátero intenta alertar al usuario de la presencia de instrucciones operativas y de mantenimiento