SOL 200 SB 20+ V C250V DB 200V SOL 200H SB 20+ O C250V PL DB 200H SOL 250 SB 25+ V C250H SOL 250H SB 25+ O D230
|
|
|
- Theodoro Pedro Quintão Batista
- 9 Há anos
- Visualizações:
Transcrição
1 SOL 00 SB 0+ V C50V DB 00V SOL 00H SB 0+ O C50V PL DB 00H SOL 50 SB 5+ V C50H SOL 50H SB 5+ O D30 Installation en intégration toiture In-Roof Installation Instalación integrado en tejado Instalação no telhado Installazione a incasso Installatie in het dak Indachmontage In - Roof A

2

3 Table des matières Contents Contenido Índice Indice Inhoud Inhalt.0 FR Symboles et outils EN Symbols and tools ES Símbolos y herramientas PT Símbolos e ferramentas IT Simboli e attrezzature NL Symbolen en instrumenten DE Symbole und Tools.0 FR Santé et sécurité EN Health and safety ES Salud y seguridad PT Saúde e segurança IT Salute e sicurezza NL Gezondheid en veiligheid DE Arbeitssicherheit 3.0 FR Poids et dimensions EN Weight and dimensions ES Peso y dimensiones PT Peso e dimensões IT Peso e misure NL Gewicht en afmetingen DE Gewicht und Abmessungen 4.0 FR Contenu et composants du kit EN Kit contents and components ES Contenido y componentes del kit PT Conteúdo e componentes do Kit IT Contenuto e componenti dei kit NL Inhoud en onderdelen van de set DE Inhalt und Komponenten des Sets 5.0 FR Installation EN Installation ES Instalación PT Instalação IT Installazione NL Installatie DE Montage 6.0 FR Charges de neige et de vent EN Snow and wind load ES Carga de nieve y viento PT Carga de vento e neve IT Carico della neve e del vento NL Sneeuw- en windlast DE Schnee- und Windlast 7.0 FR Législation et maintenance EN Legislation and maintenance ES Legislación y mantenimiento PT Legislação e manutenção IT Legislazione e manutenzione NL Wetgeving en onderhoud DE Vorschriften und Wartung 8.0 FR Pièces de rechange EN Spares parts ES Piezas de recambio PT Peças sobressalentes IT Parti di ricambio NL Reserveonderdelen DE Ersatzteile 9.0 FR Notes EN Notes ES Notas PT Notas IT Note NL Notities DE Notes

4 .0 Symboles Symbols Símbolos Símbolos Simboli Symbolen Symbole Outils Tools Herramientas Ferramentas Attrezzature Instrumenten Tools 0 bar 0 FR Avertissement EN Caution ES Precaución PT Cuidado IT Attenzione NL Opgelet DE Vorsicht FR Informations EN Information ES Información PT Informações IT Informazione NL Informatie DE Information oder Hinweis FR Capteur solaire EN Collector ES Colector PT Colector IT Collettore NL Collector DE Kollektor FR Numéro de référence du chapitre EN Chapter reference number ES Número de referencia de capítulo PT Número de referência de capítulo IT Numero del capitolo NL Referentienummer van hoofdstuk DE Referenznummer des Kapitels FR Non livré avec le kit EN Not supplied in the kit ES No suministrado en el kit PT Não fornecido com o Kit IT Non è fornito in dotazione nel kit NL Niet meegeleverd DE Nicht im Set enthalten FR Poids EN Weight ES Peso PT Peso IT Peso NL Gewicht DE Gewicht FR Retirer le film protecteur adhésif EN Remove the protective adhesive film ES Quitar el film protector adhesivo PT Retirar a película protectora adesiva IT Rimuovere la pellicola protettiva adesiva NL Verwijder de beschermende kleeffolie DE Selbstklebende Schutzfolie entfernen FR Mesure EN Measure ES Medición PT Medida IT Misura NL Afmeting DE Abmessung FR Pression maximale EN Maximum pressure ES Presión máxima PT Pressão máxima IT Pressione massima NL Maximum druk DE Maximaldruck FR Nettoyer la surface ou la zone EN Clean the surface or area ES Limpiar la superficie o zona PT Limpar a superfície ou a zona IT Pulire la superficie o zona interessata NL Het oppervlak of de zone zuiver maken DE Die Oberfläche oder den Bereich säubern FR Tournevis (Torx) EN Screwdriver (Torx) ES Destornillador (Torx) PT Chave de fendas (Torx) IT Cacciavite (Torx) NL Schroevendraaier (Torx) DE Schraubendreher (Torx) FR Marteau EN Hammer ES Martillo PT Martelo IT Martello NL Hamer DE Hammer FR Mètre a ruban EN Tape mesure ES Metro PT Metro IT Metro NL Meetlint DE Meter FR Disqueuse EN Hand held angle grinder ES Radial PT Radial IT Molla a disco NL Hand slijpmachine DE Handschleifer 4

5 Santé et sécurité Health and safety Seguridad y salud Saúde e segurança Salute e sicurezza Gezondheid en veiligheid Arbeitssicherheit.0 FR Utilisez un casque de sécurité EN Use safety helmet ES Utilizar casco de seguridad PT Use um capacete de segurança IT Usare il casco di sicurezza NL Gebruik een veiligheidshelm DE Schutzhelm verwenden FR Utilisez des chaussures de sécurité EN Use safety shoes ES Utilizar calzado de seguridad PT Use sapatos de segurança IT Usare calzature di sicurezza NL Gebruik veiligheidsschoenen DE Sicherheitsschuhe verwenden FR Utilisez un harnais de sécurité pour éviter les chutes EN Use safety harness for protection against falling ES Utilizar arnés de seguridad para protección contra caídas PT Use um arnês de segurança para evitar as quedas IT Usare cintura di sicurezza per proteggersi da cadute NL Gebruik een veiligheidsgordel voor bescherming tegen vallen DE Sicherheitsgurt zum Schutz vor Herabfallen verwenden FR Utilisez des gants de sécurité EN Use safety gloves ES Utilizar guantes de protección PT Use luvas de protecção IT Usare guanti di sicurezza NL Gebruik veiligheidshandschoenen DE Schutzhandschuhe verwenden FR Utilisez des lunettes de sécurité EN Use safety goggles ES Utilizar gafas de seguridad PT Use óculos de segurança IT Usare occhiali di sicurezza NL Gebruik een veiligheidsbril DE Schutzbrille verwenden FR Incluez le capteur dans le système de protection de l immeuble contre la foudre EN Include the collector in the lightning protection device of the building ES Incluir el colector en el dispositivo de protección contra rayos del edificio PT Inclua o colector no sistema de protecção contra os raios do imóvel IT Includere il collettore nel dispositivo di protezione contro i fulmini dell edificio NL Bouw de collector in de bliksemafleider van het gebouw DE Kollektor in den Blitzschutz des Gebäudes integrieren kg FR Risque de foudre par temps orageux EN Danger of lightning in stormy weather ES Peligro de rayos en días de tormenta PT Perigo de raios em dias de trovoada IT Pericolo di fulmini durante i giorni di tempesta NL Bliksemgevaar bij stormweer DE Es besteht Blitzgefahr bei Sturmwetter FR Charge lourde EN Heavy load ES Carga pesada PT Carga pesada IT Carico pesante NL Zware lading DE Schwerlast FR Attention risque de dérapage EN Beware of tripping ES Atención riesgo de tropezar PT Atenção risco de tropeçar IT Attenzione pericolo di caduta NL Gevaar van struikelen DE Vorsicht Stolpergefahr FR Risque de surfaces glissantes EN Beware of slippery surfaces ES Riesgo de suelo resbaladizo PT Atenção risco de superfícies escorregadias IT Rischio per suolo scivoloso NL Risico van gladde oppervlakken DE Vorsicht Rutschgefahr FR Risque de températures élevées EN Beware of high temperatures ES Peligro de altas temperaturas PT Perigo de altas temperaturas IT Pericolo per alte temperature NL Gevaar van hoge temperaturen DE Vorsicht hohe Temperaturen FR Manipuler le capteur en saisissant le profil EN Handle collector by the frame ES Manipular el colector por el perfil PT Manipular o colector pelo perfil IT Manipolare il collettore attraverso il profilo NL Neem de collector vast aan het profiel DE Kollektor am Profil anfassen 5

6 * Zen 3.0 Poids et dimensions Weight and dimensions Peso y dimensiones Peso e dimensões Peso e misure Gewicht en afmetingen Gewicht und Abmessungen 0 bar 0 SOL00 DB 00H SB 0 +V SOL00H SB 0 +O DB 00V C50V SB5 +V SOL 50 C50H SB5 +O SOL 50H [kg] [bar] x [mm] y [mm] z [mm] w [mm] V [mm] D DB 00V DB 00H kg 6

7 3.0 kg 7

8 4.0 Contenu et composants du kit Kit contents and components Contenido y componentes del kit Conteúdo e componentes do Kit Contenuto e componenti dei kit Inhoud en onderdelen van de set Inhalt und Komponenten des Sets + + SOL00 SOL 50 SB 0 +V SB 5 +V C50V C50V PL D30 DB 00V DB 00H SOL00H SOL 50H SB 0 +O SB 5 +O C50H DB 00V DB 00H F 8

9 G H /* /4* /* *,5 m 9

10 /4* 4/8* /4* *,5 m 0
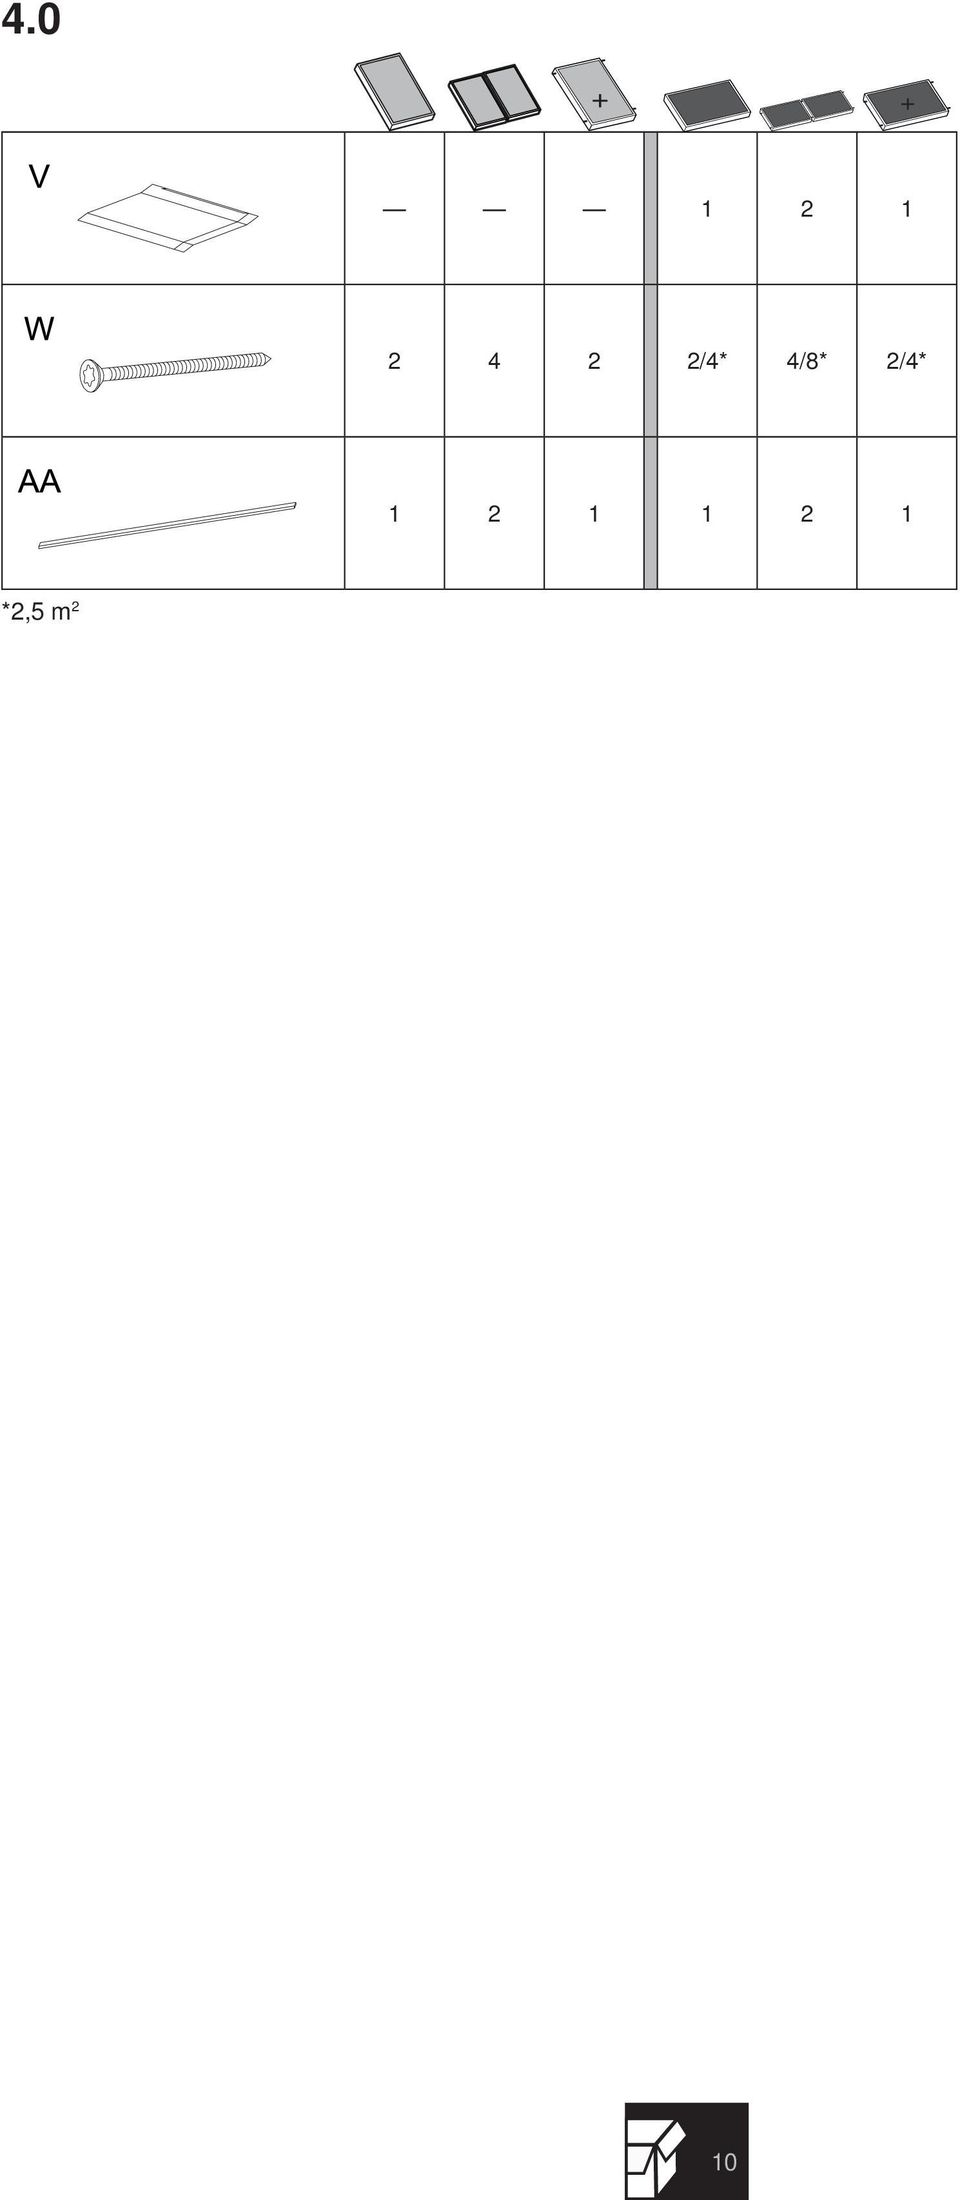
11 4.0 FR A Bravette inférieure droite B Bravette inférieure centrale C Bravette inférieure gauche D Support inférieur du panneau E Support latéral du panneau F Guide latéral droit G Guide latéral gauche H Guide central J Bois de soutien supérieur K Bravette supérieure droite L Bravette supérieure centrale M Bravette supérieure gauche N Fixation Q Mousse isolante R Vis (5 x 40 mm) S Clou T Instructions U Brav. inf. supplémentaire horizontal V Brav. supérieure supplémentaire horizontal W Vis (5 x 80 mm) AA Mousse isolante (supérieure) EN A Lower right tray B Lower intermediate tray C Lower left tray D Panel lower support E Panel side support F Right lateral guide G Left lateral guide H Intermediate guide J Upper wooden support K Upper right tray L Upper intermediate tray M Upper left tray N Fitting Q Insulating foam R Screw (5 x 40 mm) S Nail T Instructions U Lower, horizontal additional tray V Upper, horizontal additional tray W Screw (5 x 80 mm) AA Insulating foam (Upper) ES A Bandeja inferior derecha B Bandeja inferior intermedia C Bandeja inferior izquierda D Soporte inferior panel E Soporte panel F Guía lateral derecha G Guía lateral izquierda H Guía intermedia J Madera de apoyo superior K Bandeja superior derecha L Panel superior intermedio M Bandeja superior izquierda N Fijación Q Espuma aislante R Tornillo (5 x 40 mm) S Clavo T Instrucciones U Bandeja inf. adicional horizontal V Bandeja sup. adicional horizontal W Tornillo (5 x 80 mm) AA Espuma aislante (superior) PT A Tabuleiro inferior direito B Tabuleiro inferior intermédio C Tabuleiro inferior esquerdo D Suporte inferior painel E Suporte lateral painel F Guia lateral direita G Guia lateral esquerda H Guia intermédia J Madeira de apoio superior K Tabuleiro superior direito L Tabuleiro superior intermédio M Tabuleiro superior esquerdo N Fixação Q Espuma isolante R Parafuso (5 x 40 mm) S Prego T Instruções U Tabuleiro inf. adicional horizontal V Tabuleiro sup. adicional horizontal W Parafuso (5 x 80 mm) AA Espuma isolante (superior) IT A Vassoio inferiore destro B Vassoio inferiore intermedio C Vassoio inferiore sinistro D Supporto inferiore pannello E Supporto laterale pannello F Guida laterale destra G Guida laterale sinistra H Guida intermedia J Supporto superiore in legno K Vassoio superiore destro L Vassoio superiore intermedio M Vassoio superiore sinistro N Fissaggio Q Schiuma isolante R Vite (5 x 40 mm) S Chiodo T Istruzioni U Vassoio inf. orizz. supplementare V Vassoio sup. orizz. supplementare W Vite (5 x 80 mm) AA Schiuma isolante (superiore) NL A Bak rechts onderaan B Bak onderaan centraal C Plaat linksonderaan D Onderste steun paneel E Zijsteun paneel F Laterale geleider rechts G Laterale geleider links H Centrale geleider J Houten steun bovenaan K Plaat rechtsbovenaan L Plaat bovenaan centraal M Plaat linksbovenaan N Bevestiging Q Isolatieschuim R Bout (5 x 40 mm) S Spijker T Instructies U Extra bak onderaan horizontaal V Extra bak bovenaan horizontaal W Bout (5 x 80 mm) AA Isolatieschuim (bovenaan) DE A Wanne unten rechts B Wanne unten Mitte C Wanne unten links D Untere Halterung Panele E Seitliche Halterung Panele F Seitenführung rechts G Seitenführung links H Mittlere Führung J Stützholz oben K Wanne oben rechts L Wanne oben Mitte M Wanne oben links N Befestigung Q Isolierschaum R Schraube (5 x 40 mm) S Nagel T Anleitung U Zusätzliche waagrechte Wanne unten V Zusätzliche waagrechte Wanne oben W Schraube (5 x 80 mm) AA Isolierschaum (oben)
 AA Mousse isolante (supérieure) EN A Lower right tray B Lower intermediate tray C Lower left tray D Panel lower support E Panel side support F")
12 5.0 Installation Installation Instalación Instalação Installazione Installatie Montage FR Avant la pose d'un kit pour toiture, imperméabiliser le toit via une membrane protectrice. EN Before installing an in Roof Kit, waterproof the roof using a protective membrane. ES Antes de la instalación de un kit in Roof impermeabilizar el tejado mediante una membrana protectora. PT Antes da instalação de um Kit de Roof, deve-se impermeabilizar o telhado com uma membrana protectora. IT Prima dell'installazione di un kit In Roof impermeabilizzare il tetto mediante una guaina protettiva. NL Maak alvorens een in Roof kit te installeren het dak waterdicht met behulp van een beschermingsmembraan. DE Vor der Installation eines Indach-Sets das Dach mit einer Schutzfolie imprägnieren.

13 5.0 SOL00 SB 0 +V DB 00 SOL00H SB 0 +O DB 00 C50V SB 5 +V SOL 50 C50H SB 0 +O SOL 50H Y Y Y D

14 5.0 FR EN ES PT IT NL DE Le bois utiliser ne doit pas présenter de nœuds, de bavures, de bleuissement fongique ou de résine. Les dimensions des lattes de bois doivent être supérieures à 50 mm x 8 mm, classe C4. S assurer que les lattes de bois sont bien fixées au toit par des vis adéquates. The battens used must not have knots, rough edges, blue stain or sap. The dimensions of the wooden battens must not be below 50 mm x 8 mm, C4 class. Make sure that the wooden battens are correctly attached to the roof using suitable fixings. Las maderas a utilizar deberán estar exentas de gemas, barbas, azulados y resinas. Las dimensiones de los listones de madera no deberían ser inferiores a 50mm x 8mm, clase C4. Asegúrese de que los listones de madera se encuentran correctamente fijados al tejado mediante los tornillos apropiados.. As madeiras a utilizar não devem apresentar nós, barbas, azulamentos ou resinas. As dimensões das ripas de madeira não deveriam ser inferiores a 50 mm x 8 mm, classe C4. Assegurar-se de que as ripas de madeira se encontram correctamente fixadas ao telhado, com os parafusos adequados. Il legno utilizzato deve essere privo di nodi, sbavature, fungo blu o resina. La grandezza dei listelli di legno non deve essere di sezione inferiore a 50 mm x 8 mm, categoria C4. Assicurarsi che i listelli di legno siano fissati correttamente al tetto mediante le viti corrispondenti. Het te gebruiken hout mag geen knoesten, scherpe randen, blauwe vlekken en harsresten hebben. De afmetingen van de houten latjes mogen niet kleiner zijn dan 50 mm x 8 mm, klasse C4. Ga na of de houten latjes correct en met de juiste bouten aan het dak bevestigd zijn. Das zu verwendende Holz darf keine Astlöcher, Maserungen, Bläueschäden und Harze vorweisen. Die Abmessungen der Holzleisten dürfen nicht kleiner als 50 mm x 8 mm sein, Klasse C4. Vergewissern Sie sich, dass die Holzleisten mit geeigneten Schrauben korrekt am Dach befestigt sind. 4

15 5.0 FR EN ES PT IT NL DE Préassembler les bacs inférieurs pour centrer le kit sur le toit existant et éviter de découper les tuiles inutilement ou de façon incorrecte. Pre-assemble the lower trays to centre the kit on the existing roof and prevent unnecessary and/or incorrect cutting of the tiles. Pre-ensamblar las bandejas inferiores para centrar el kit sobre el tejado existente y evitar cortes innecesarios y/o incorrectos sobre las tejas.. Realizar uma pré-montagem dos tabuleiros inferiores para centrar o kit sobre o telhado existente e evitar cortes desnecessários e/ou incorrectos nas telhas. Preassemblare i vassoi inferiori per centrare il kit sopra il tetto esistente ed evitare tagli inutili o non corretti sulle tegole. De onderste platen vooraf monteren zodat de kit centraal op de dakpannen geplaatst kan worden en onnodige en/of incorrecte openingen tussen de dakpannen vermeden kunnen worden. Die unteren Wannen vormontieren, um den Bausatz am vorhandenen Dach zu zentrieren und unnötige und/oder falsche Schnitte an den Dachziegeln zu vermeiden. 5

16 5. Bravette inférieure droite Lower right tray Bandeja inferior derecha Tabuleiro inferior direito Vassoio inferiore destro Plaat rechtsonderaan Wanne unten rechts A A D S A D 6

17 Bravette inférieure centrale Lower central tray Bandeja inferior central Tabuleiro inferior central Vassoio inferiore centrale Plaat onderaan centraal Wanne unten Mitte 5. B 3 B A B D S B D 7

18 5.3 Bravette inférieure gauche Lower left tray Bandeja inferior izquierda Tabuleiro inferior esquerdo Vassoio inferiore sinistro Plaat linksonderaan Wanne unten links C 3 C B C D S C D 8

19 Panneaux Collectors Paneles Painéis Pannelli Collectoren Panelen 5.4 9

20 5.4 0

21
22 5.5 Connexions hydrauliques Hydraulic connections Conexiones hidráulicas Ligações hidráulicas Collegamenti idraulici Hydraulische verbindingen Hydraulikverbindungen
23 D P4 P P0 P4 P5 3 P9 P3 P mm 3
24 5.5 DB 00V DB 00H N N4 N N4 40 mm 3 N
25 Guides Guides Guías Guias Guide Geleidingen Führungen 5.6 F 3 H H 5
26 5.6 4 G 6
27 Éléments supérieurs Upper elements Elementos superiores Elementos superiores Elementi superiori Bovenste onderdelen Obere Elemente 5.7 7
28 5.8 Bravette supérieure gauche Upper left tray Bandeja superior izquierda Tabuleiro superior esquerdo Vassoio superiore sinistro Plaat linksbovenaan Wanne oben links AA AA 8
29 Bravette supérieure centrale Upper central tray Bandeja superior central Tabuleiro superior central Vassoio superiore centrale Plaat bovenaan centraal Wanne oben Mitte 5.9 9
30 5.0 Bravette supérieure droite Upper right tray Bandeja superior derecha Tabuleiro superior direito Vassoio superiore destro Plaat rechtsbovenaan Wanne oben rechts 30
31 Fixations Fittings Fijaciones Fixações Fissaggi Bevestigingen Befestigungen 5. 3
32 5. Tuiles Tiles Tejas Telhas Tegole Dakpannen Dachziegel Q Q 0 mm Q 3
33 33 5.
34
35 Charges de neige et de vent Snow and Wind Load Cargas de nieve y viento Carga de vento e neve Carico della neve e del vento Sneeuw- en windlast Schnee- und Windlast FR Les limites de charge sont calculées pour un bois d une classe de résistance C4 et des dimensions de 50 x 8 mm. Pour les matériaux de différentes classes, les valeurs suivant peuvent être différentes. Charge caractéristique maximale de neige (sk) =,94 kn/m² Pression de vent maximale correspondant à la vitesse maximale (qp) = 0,8 kn/m² Limites de charge calculées pour les installations sur les zones centrales du toit et conformes aux spécifications du manuel. En cas de question, veuillez vous adresser à votre distributeur officiel. REMARQUE : cette limite sera réduite pour les installations où les contreforts augmentent les risques de chutes d eau ou de neige. Dans les zones à charge de neige élevée (plus de kn/m²), il est recommandé d installer un pareneige àune distance maximale de 0.5 m audessus du capteur solaire. La charge de vent maximale supportée par la structure de montage dépend, entre autres facteurs, de la hauteur et de la zone géographique du site. Cette structure doit être installée conformément aux dispositions de la norme EN99. Consultez votre revendeur agréé en cas de doute. EN The load limits are calculated for C4 resistant class wood and 50 x 8 mm dimensions. For materials with different classes, the following values may be different. Maximum characteristic snow load (sk) =.94 kn/m² Maximum wind pressure corresponding to peak velocity (qp) = 0.8 kn/m² Load limits calculated for installations installed in central covered areas and in accordance with the manual s specifications. In the event of any doubt, please contact your official supplier. NOTE: This limit will be reduced for installations where abutments create additional risks of drifting or falling snow. In high snow load areas (greater than kn/m²) it is recommended that a snow fence is fitted at maximum distance of 0.5m above the collector. The maximum wind load to be borne by the mounting structure depends on the height and geographical area of the site among other factors This structure must be installed in accordance with the provisions of the EN99 standard. If in doubt consult a suitable qualified structural engineer. ES Los límites de carga están calculados para una madera de clase resistente C4 y dimensiones 50 x 8 mm. Para materiales con diferentes clases los siguientes valores pueden ser diferentes. Máxima carga característica de nieve (sk) =.94 kn/m² Máxima presión de viento correspondiente a la velocidad pico (qp) = 0.8 kn/m² Límites de carga calculados para instalaciones instaladas en zonas centrales de cubierta y según las especificaciones del manual. Consulte su distribuidor oficial en caso de duda. NOTA: Este límite se reducirá en instalaciones con estribos que causen riesgos adicionales de acumulación o caída de nieve. En zonas donde se produzcan grandes cargas de nieve (superiores a kn/m²), se recomienda instalar una barrera paranieve a una distancia máxima de 0.5 m sobre el colector. La carga máxima de viento a soportar por la estructura de montaje depende de la altura y zona geográfica del emplazamiento entre otros factores. Esta estructura debe instalarse de acuerdo con las disposiciones de la norma EN99. Consulte su distribuidor oficial en caso de duda. PT Os limites de carga estão calculados para uma madeira de classe resistente C4 e dimensões de 50 x 8 mm. Para materiais com diferentes classes, os valores seguintes podem ser diferentes. Carga máxima característica de neve (sk) =,94 kn/m² Pressão máxima de vento, correspondente ao pico de velocidade (qp) = 0,8 kn/m² Limites de carga calculados para instalações situadas em zonas centrais de cobertura e de acordo com as especificações do manual. Em caso de dúvida, consulte o seu distribuidor oficial. NOTA: Este limite será reduzido em instalações onde os pilares criem riscos adicionais de deslizamento ou queda de neve. Nas áreas com carga de neve elevada (superior a kn/m²), recomendase a instalação de uma barreira de neve a uma distância máxima de 0,5 acima do colector. A carga de vento máxima suportada pela estrutura de montagem depende da altura e da zona geográfica do lugar, entre diversos factores. Esta estrutura deve ser instalada de acordo com o disposto pela norma EN99. Consulte o seu vendedor oficial caso tenha dúvidas. IT 6.0 EN99 I limiti di carico sono calcolati per un legno di tipo resistente della categoria C4 e di dimensioni pari a 50 x 8 mm. Per materiali di diverso tipo i valori indicati di seguito possono variare. Valore caratteristico del carico massimo di neve (sk) =.94 kn/m² Pressione massima del vento corrispondente alla velocità di picco (qp) = 0.8 kn/m² Limiti di carico calcolati per installazioni situate in zone centrali della copertura e secondo le specifiche del manuale. Per maggiori informazioni rivolgersi al proprio distributore ufficiale di fiducia. NOTA: tale limite andrà ridotto per installazioni nelle quali gli ancoraggi creano ulteriore rischio di spostamento o caduta di neve. Nelle zone soggette a carichi di neve elevati (maggiori di kn/m²) si raccomanda di installare una barriera paraneve ad una distanza massima di 0,5 m al di sopra del collettore. Tra gli altri fattori, dipende dall altezza e dalla zona geografica del luogo. Questa struttura deve essere installata in ottemperanza alla norma EN99. Consultare il distributore ufficiale in caso di dubbi. NL Het draagvermogen is berekend voor hout van een C4-weerstandsklasse en met de afmetingen 50 x 8 mm. Voor materialen van andere sterkteklassen kunnen de volgende waarden anders zijn. Maximale lading bij sneeuw (sk) =.94 kn/m² Maximale winddruk bij pieksnelheid (qp) = 0.8 kn/m² Laadlimieten berekend voor installaties in centrale overdekte zones en volgens de specificaties in de handleiding. Raadpleeg uw officiële dealer in geval van twijfel. OPMERKING : Deze limiet zal gereduceerd worden voor installaties waarvan steunpunten bijkomende risico s vormen voor opgewaaide of vallende sneeuw. In gebieden met een grote sneeuwlast (hoger dan kn/m²) wordt de opstelling van een sneeuwheka anbevolen op een maximale afstand van 0.5m boven de collector. De maximum windbelasting die de montagestructuur moet aankunnen, hangt o.a. af van de hoogte en het geografische gebied van de locatie. Deze structuur moet geïnstalleerd worden in overeenstemming met de bepalingen van de norm EN99. Raadpleeg uw officiële verdeler in geval van twijfel. DE Die Lastbegrenzung ist für Holz der Widerstandsklasse C4 und mit Abmessungen von 50 x 8 mm berechnet. Für Materialien anderer Festigkeitsklassen können die folgenden Werte anders sein. Maximale typische Schneelast (Sk) =,94 kn/m² Maximaler Winddruck entsprechend der Übertragungsrate (Qp) = 0,8 kn/m² Lastbegrenzungen berechnet für Anlagen, die in zentralen Bereichen von Bedachungen und gemäß der Spezifikationen des Handbuchs installiert sind. Fragen Sie im Zweifelsfall Ihren Vertragshändler. HINWEIS: Dieser Grenzwert wird für Installationen, bei denen Dachaufbauten zu einem zusätzlichen Risiko für Abrutschen oder Herabfallen von Schnee führen, herabgesetzt. In Bereichen mit hoher Schneelast (höher als kn/m²) wirdempfohlen, einen Schneezaun in einem maximalen Abstand von 0,5 m über dem Kollektor anzubringen. Die vom Montagesystem aufzunehmende Höchstbelastung durch Wind hängt neben anderen Faktoren von der Höhe und der geografischen Lage des Standorts ab. Das Montagesystem ist nach den Anweisungen der Norm EN99 zu installieren. Bei Fragen bitte an Ihren Vertriebshändler wenden. 35
36 7.0 Législation, maintenance et recommandations Legislation, maintenance and recommendations Legislación, mantenimiento y recomendación Legislação, manutenção e recomendações Legislazione, manutenzione e raccomandazioni Wetgeving, onderhoud en aanbevelingen Gesetzgebung, Wartung und Empfehlungen FR LÉGISLATION Veuillez tenir compte des instructions suivantes en termes de lois, réglementations et règles techniques. Lors de la mise en place d installations à énergie solaire, il convient de respecter la législation et la réglementation en vigueur aux niveaux régional, national, européen ou international s appliquant au pays concerné. Les règles techniques généralement admises s appliquent. Elles sont habituellement formulées sous formes de normes, directives, prescriptions, dispositions et règlements techniques formulés par les organismes régionaux et nationaux, les fournisseurs d énergie, les organisations de commerce et comités techniques dans les domaines concernés. Lors de l installation de modules solaires, sont à prendre en compte de manière conséquente les éventuelles mesures d étanchéification du toit et des murs répondant à des exigences élevées en matière de protection contre les eaux de pluie. Afin de répondre aux exigences en termes de prévention des accidents, l emploi de dispositifs de sécurité tels que des sangles, échafaudages, supports, etc. peut s avérer nécessaire. Un tel matériel de sécurité n est pas fourni et doit être commandé séparément. Seul un personnel dûment qualifié et autorisé, disposant de qualifications reconnues (délivrées par un institut régional ou national) dans le domaine concerné, est en droit de procéder au montage. RECOMMEANDATIONS - Utilisez un harnais de sécurité lors de travaux en hauteur. - La structure du toit doit être contrôlée et reconnue comme appropriée avant le début des travaux. - Consultez un ingénieur en charpente si vous n êtes pas sûr de l installation du capteur solaire. - Les charges dues à la neige peuvent dépasser Les capacités de la structure de la propriété. - Les charges dues au vent peuvent engendrer des forces excessives au niveau de la structure et provoquer des dégâts. - L installateur est responsable de l adéquation du site et de sa sous-structure. - Le capteur solaire doit être installé correctement afin d éviter tout dommage dû à la chute de débris ou à des actes de vandalisme. - Tous les travaux de tuyauterie de l installation doivent être reliés à la terre. - Dans les zones à risques, le capteur solaire doit être protégé contre la foudre. - Deux personnes au moins sont recommandées pour soulever ce produit. - Le capteur solaire ne doit pas être soulevé par ses raccords de tuyauterie. - Assurez-vous que Tous Les raccords hydrauliques sont correctement serrés et exempts de fuites. - Évitez d installer le capteur solaire dans des zones ombragées. - Le système doit être inspecté une fois Les travaux terminés. - Il est en outre recommandé de procéder à une inspection annuelle. - N employez pas de force excessive lors de l installation du capteur solaire. - Les surfaces chaudes et exposées devant être touchées doivent être isolées pour éviter toute blessure. - Il n est pas nécessaire de lubrifier les raccords à joint torique. - Le capteur solaire ne doit pas être installé sur une surface de toit irrégulière. - Des goujons et boulons d ancrage peuvent s avérer nécessaires pour sécuriser le capteur solaire sur une surface de toit appropriée. - Pour les champs importants, des canalisations, des ensembles de pompes et des plans spécifiques seront nécessaires. Les illustrations de ce manuel peuvent différer du matériel fourni. L entreprise ne se responsabilise pas pour la différence éventuelle entre les images du manuel et le montage effectif. - Le kit clignotant doit être installé correctement pour prévenir les dégâts des eaux dans la propriété. - Avant l installation d un kit Dans le toit, protégez le toit à l aide d une membrane protectrice. - S assurer que les lattes en bois sont bien fixées au toit par des vis adéquates. MAINTENANCE Il est recommandé d effectuer chaque année les vérifications suivantes: ) Vérifiez que l installation du capteur solaire ne présente pas de signe de détérioration ni d accumulation de débris. ) Vérifiez que le capteur solaire et le système de montage ne sont pas corrodés et réparez-les si nécessaire. 3) Vérifiez l étanchéité des attaches. Si les attaches ne sont pas facilement accessibles, la sécurité globale de l installation du capteur solaire peut indiquer la présence d un problème. 4) Recherchez d éventuelles fuites de liquide ou détériorations sur les raccords et la tuyauterie, en vérifiant notamment l état de l isolation des tuyaux, et réparez si nécessaire. Recherchez d éventuelles traces de fuites à l intérieur du bâtiment. 5) Examinez la toiture autour de l installation du capteur solaire et recherchez d éventuelles détériorations ; réparez-les si nécessaire. 6) Assurez-vous que des feuillages ne font pas de l ombre aux capteurs solaires. 7) Le cas échéant, vérifiez l état des lests servant à sécuriser le système. 8) Dans les zones où de la poussière s est accumulée sur le capteur solaire, utilisez uniquement des matériaux et méthodes de nettoyage non abrasifs pour nettoyer les capteurs solaires et les composants du système de montage. EN LEGISLATION Please note the following instructions regarding laws, regulations and technical rules. When setting up solar energy installations, the laws and regulations at local, state, European and international level that apply to the country in question must be observed. Generally acknowledged technical regulations apply; these are usually formulated in the form of standards, guidelines, provisions, regulations and technical rules laid down by local and national bodies, energy supply companies, trade organisations and technical committees in the relevant fields. The installation of solar units may require improved rain resistance with regard to roof, wall and sealing technology and this must be taken into account accordingly. To meet regulations for the prevention of accidents, it may be necessary to use safety equipment (straps, scaffolding, supports, etc.). Such safety equipment is not supplied. Installation must only be carried out by technically qualified and authorised personnel with a recognised qualification (verified by a state or national body) in the relevant technical area. - Installation of this solar thermal equipment should only be undertaken by persons suitably qualified to do so. Attendance of an appropriate training course and Microgeneration Certification Scheme (MCS) certification should be undertaken in order for the homeowner to claim any incentive which maybe available. RECOMMENDATIONS - Use a safety harness when working at height. - The structure of the roof must be assessed for its suitability prior to commencing work. - Consult a structural Engineer if you are unsure of the collector s siting. - Loading due to snow may exceed the capability of the property s structure. - Wind loads may cause excess forces on the structure and cause damage. - The installer is responsible for the suitability of the site and its sub-structure. - The collector should be sited to avoid damage from falling debris and vandalism. - All pipe work within this installation must be earth bonded. - In exposed areas, the collector must be protected against the risk of lightning. - It is recommended that a minimum of people are used to lift this product. - The collector must not be lifted by its pipe connections. - Ensure all hydraulic connections are securely fixed and are free of leaks. - Avoid installing the collector in shaded areas. - The system must be inspected on completion of the work. - A further inspection is recommended annually. - Do not apply excessive force when installing the collector. - Hot, exposed surfaces that can be touched must be insulated to protect against injury. - Lubrication is not required for the O ring connections. - The collector must not be installed on an uneven roof surface. - An anchor plug and bolt may be used to secure the collector on a suitable roof surface. - Large arrays will require specialist piping, pump groups and design. The illustrations in this manual may differ from the equipment supplied The company cannot be held responsible for any differences between the images in the manual and the actual assembly. - The flashing kit must be installed correctly to prevent water damage to the property. - Before the installtion an In Roof kit, waterproff the roof with a protective membrane. - Make sure that the wooden slats are correctly attached to the roof with the suitable bolts. MAINTENANCE It is recommended that the following checks are carried out on an annual basis: ) Check the collector installation for any signs of damage or any build up of debris. ) Check for any corrosion to the collector or the mounting system and repair if necessary. 3) Check the tightness of the fasteners. Where fasteners cannot be readily accessed, the overall security of the collector installation may indicate whether problems exist. 4) Check the fittings and pipe work for any signs of fluid leakage or damage, including the condition of the pipe insulation, and repair if necessary. Check inside the building for any evidence of leaks. 5) Examine the roof tiles around the collector installation for any damage or deterioration, and repair if necessary. 6 )Check for any foliage growth that may cause shading of the collectors. 7) Where applicable, check the condition of any ballast used to secure the system. 8) In areas where there may be a build up of dirt on the collector, only nonabrasive cleaning materials and methods should be used to clean the collectors and mounting system components. 36
In - Roof DB DB 200V DB 200H
 DB 200V DB 200H Installation en intégration toiture In-Roof Installation Instalación integrado en tejado Instalação no telhado Installazione a incasso Installatie in het dak Indachmontage In - Roof DB
DB200V - DB200H. In - Roof DB
 DB00V - DB00H Installation en intégration toiture In-Roof Installation Instalación integrado en tejado Instalação no telhado Installazione a incasso Installatie in het dak Indachmontage In - Roof DB 55
IAN 93902 1/22. Washing machine cabinet. Mobile lavatrice Istruzioni per il montaggio. Armario saledizo de máquina lavadora Instrucciones de montaje
 Washing machine cabinet ES PT DE AT CH Armario saledizo de máquina lavadora Instrucciones de montaje Armário para montar por cima da máquina de lavar a roupa Instruções de montagem Waschmaschinenüberbauschrank
Symboles Symbols Símbolos Símbolos Simboli Symbolen Symbole. Outils Tools Herramientas Ferramentas Tools Gereedschap Tools 1.0
 D230 C250V-C250 DB 200V-DB 200 Installation de toit plat Flat Roof Installation Instalación en cubierta plana Instalação em telhados planos Installazione su tetto piano Installatie plat dak Flachdachmontage
ATC ROC KHS 10 & 20. Grupo Hidráulico Solar Instrucciones de Instalación, Montaje y Funcionamiento para el INSTALADOR Página... 4
 KHS 0 & 0 ES Grupo Hidráulico Solar Instrucciones de Instalación, Montaje y Funcionamiento para el INSTALADOR Página... GB Solar Pump Unit Installation, Assembly and Operating Instrucitos for the INSTALLER
Radio / CD. Honolulu CD50. Installation instructions Notice de montage Instrucciones de instalación Instruções de de montagem
 Radio / D Honolulu D50 Installation instructions Notice de montage Instrucciones de instalación Instruções de de montagem Installation instructions Notice de montage Instrucciones de instalación Instruções
Security Kit. Security Kit. Security Kit. Security Kit. See Reverse Side For Security Installation Instructions 8811-000008
 Security Kit Security Kit See Reverse Side For 8811-000008 See Reverse Side For 8811-000008 Security Kit Security Kit See Reverse Side For 8811-000008 See Reverse Side For 8811-000008 1. Using security
INSTALLATION GUIDE MANUAL DE INSTALAÇÃO MANUAL DE INSTALACIÓN
 INSTALLATION GUIDE MANUAL DE INSTALAÇÃO MANUAL DE INSTALACIÓN youtube.com/furukawaelectriclatam Use the QR code reader/ Use um leitor de códigos QR/ Utilice el lector de códigos QR General Information/
In - Roof SOL 200 SB 20+V C250V DB 200V SOL 200H SB 20+O C250V PL DB 200H SOL 250 SB 25+V C250H SOL 250H SB 25+O D230
 SOL 00 SB 0+V C50V DB 00V SOL 00H SB 0+O C50V PL DB 00H SOL 50 SB 5+V C50H SOL 50H SB 5+O D30 Installation en intégration toiture In-Roof Installation Instalación integrado en tejado Instalação no telhado
Para uma utilização de acordo com o fim previsto, deverá igualmente ter em atenção as instruções de montagem e utilização.
 de Montage- und Bedienungsanleitung, Art.-Nr.: 255 301, 04.2013-03 en Installation/Operating Manual, Art. No. 255 301, 04.2013-03 es Instrucciones de montaje y servicio, nº de artículo 255 301, 04.2013-03
START HERE PTB: COMECE AQUI FRA: MISE EN ROUTE ITA: PER COMINCIARE PTG: INICIAR AQUI ESP: EMPEZAR AQUÍ
 START HERE PTB: COMECE AQUI FRA: MISE EN ROUTE ITA: PER COMINCIARE PTG: INICIAR AQUI ESP: EMPEZAR AQUÍ Install the software (required for full webcam functionality). Instale o software (necessário para
In - Roof DB DB 200V DB 200H
 DB 200V DB 200H Installation en intégration toiture In-Roof Installation Instalación integrado en tejado Instalação no telhado Installazione a incasso Installatie in het dak Indachmontage In - Roof DB
100171058_N369225491 100171074_N369225492 100171084_N369225490 100171066_N369225488 URBAN C
 100171058_N369225491 100171074_N369225492 100171066_N369225488 100171084_N369225490 URBAN C Lea atentamente estas instrucciones antes de comenzar la instalación. - Compruebe el producto por si faltasen
TL3112KIT - KTL3112KIT
 ATTACCO SPECIFICO PER S0 TOOL BOX - SPECIFIC FITTING KIT FOR S0 TOOL BOX - KIT DE FIXATION SPÉCIFIQUE POUR S0 TOOL BOX - KIT DE ANCLAJES ESPECÍFICO PARA S0 TOOL BOX - SPEZIFISCHES MONTAGEKIT FÜR S0 TOOL
KME Kit. Size 8 and 8E. Kit KME. Tamaño 8y8E. Kit KME. Mecânica 8e8E. KME Kit. Kit KME. Kit KME. Installation Guide. Guía de Instalación
 KME Kit Size 8 and 8E Kit KME Tamaño 8y8E Kit KME Mecânica 8e8E KME Kit Installation Guide Kit KME Guía de Instalación Kit KME Guia de Instalação KME Kit - Size 8 and 8E Summary - English I. General information......0
Current Measurement Unit - UMC Unidad de Medición de Corriente - UMC Unidade de Medição de Corrente - UMC
 Motors Automation Energy Transmission & Distribution Coatings Current Measurement Unit - UMC Unidad de Medición de Corriente - UMC Unidade de Medição de Corrente - UMC SRW 01-UMC Installation, Configuration
Quickstart Guide. WiPry-Pro Combo
 Quickstart Guide CONNECT TO APPLE DEVICE ACCESSORY EXTERNAL TRIGGER 2.4-2.5GHz ANTENNA WARNING DO NOT APPLY MORE THAN 20DBM TO THE ANTENNA WITHOUT EXTERNAL ATTENUATION WARNING DO NOT APPLY MORE THAN -0.5/+3.8V
D 230 C250V C250H. Standard Rail
 D 230 C250V C250H Installation sur le toit On-Roof Installation Instalación sobre tejado Instalação sobre telhado Installazione su tetto Door-tegel Installatie Aufdachmontage Standard Rail 750067703a Table
Start Here Comece aqui Mise en route Empezar aquí
 Start Here Comece aqui Mise en route Empezar aquí 1 Install the software (required for full functionality). Instale o software (necessário para funcionalidade total). Installez le logiciel (requis pour
D 230 C250V C250H PREMIUM
 D 230 C250V C250H Installation de toit plat Flat Roof Installation Instalación en cubierta plana Instalação em telhados planos Installazione su tetto piano Installatie plat dak Flachdachmontage PREIU 750068303a
Dallas RMD 169 Texas DJ
 Radio / MD Dallas RMD 69 Texas DJ Installation instructions Notice de montage Instrucciones de instalación Instruções de montagem G Safety precautions Installation and connection regulations In the event
MarkWare Facility Identification Software
 English TABLE OF CONTENTS Arrows...3 Exit...4 Fasteners...5 Fire safety...6 First aid & rescue...7 Hazmat diamond...8 Hazmat HSID...9 Hazmat transport...10 Hazmat triangle...11 Hazmat-WHMIS-SIMDUT...12
D 230 C250-C250H DB200V-DB200H. Standard Rail
 D 230 C250-C250H DB200V-DB200H Installation sur le toit On-Roof Installation Instalación sobre tejado Instalação sobre telhado Installazione su tetto Op dak Installatie Aufdachmontage Standard Rail 750067706D
Motor PTC Kit. Kit PTC del Motor. Kit PTC do Motor SSW-07 / SSW-08
 Motors Automation Energy Transmission & Distribution Coatings Motor PTC Kit Kit PTC del Motor Kit PTC do Motor SSW-07 / SSW-08 Installation, Configuration and Operation Guide Guía de Instalación, Configuración
PRO C250V C250H SUN C250V C250H. In-Roof
 PRO C250V C250H SUN C250V C250H dans le toit In-Roof Instalación integrado en tejado Instalação no telhado Installazione a incasso Installatie In het dak Indachmontage In-Roof 750068601 Table des matières
D 230 C250V C250H PREMIUM
 D 230 C250V C250H Installation de toit plat Flat Roof Installation Instalación en cubierta plana Instalação em telhados planos Installazione su tetto piano Installatie plat dak Schwerlast Flachdachständer
SRW 01-HMI. Remote Keypad (HMI) HMI Remoto HMI Remota. Installation Guide Guía de Instalación Guia de Instalação. English / Español / Português
 HMI Remoto HMI Remota. Installation Guide Guía de Instalación Guia de Instalação. English / Español / Português") Motors Automation Energy Transmission & Distribution Coatings Remote Keypad (HMI) HMI Remoto HMI Remota SRW 01-HMI Installation Guide Guía de Instalación Guia de Instalação English / Español / Português
Motors Automation Energy Transmission & Distribution Coatings Remote Keypad (HMI) HMI Remoto HMI Remota SRW 01-HMI Installation Guide Guía de Instalación Guia de Instalação English / Español / Português
SISTEMA AUTO-NIVELADOR DE FARÓIS
 INSTRUÇÕES DE MONTAGEM (EN) INSTALL MOUNTING INSTRUCTIONS (ES) INSTRUCCIONES DE MONTAJE (FR) GUIDE D'INSTALLATION SISTEMA AUTO-NIVELADOR DE FARÓIS P/ KITS HID (EN) Auto Leveling System for HID KITS (ES)
INSTALLATION GUIDE MANUAL DE INSTALAÇÃO MANUAL DE INSTALACIÓN
 INSTALLATION GUIDE MANUAL DE INSTALAÇÃO MANUAL DE INSTALACIÓN General Information/ Informações Gerais/ Información General Structure for the installation of high depth equipaments; Standard 19 rack; Capacity
IKD 4860.0 GE BEDIENUNGSANWEISUNG. mit Montageanweisungen
 BEDIENUNGSANWEISUNG mit Montageanweisungen Instrucciones de Uso y de Montaje Instructions for use and installation Instructions d utilisation e avis de montage Instruções de uso com indicações para montagem
INSTALLATION GUIDE MANUAL DE INSTALAÇÃO MANUAL DE INSTALACIÓN
 INSTALLATION GUIDE MANUAL DE INSTALAÇÃO MANUAL DE INSTALACIÓN youtube.com/furukawaelectriclatam Use um leitor de códigos QR 6U/ 12U General Information/ Informações Gerais/ Información General Compatible
D 230 C250V C250H. In-Roof
 D 230 C250V C250H Installation dans le toit In-Roof Installation Instalación integrado en tejado Instalação no telhado Installazione a incasso Installatie In het dak Indachmontage In-Roof 750068604a Table
Kit Tecsystem for MVW-01. Kit Tecsystem para MVW-01. Kit Tecsystem Installation, Configuration and Operation Guide
 Kit Tecsystem for MVW0 Kit Tecsystem para MVW0 Kit Tecsystem Installation, Configuration and Operation Guide Kit Tecsystem Guía de Instalación, Configuración y Operación Kit Tecsystem Guia de Instalação,
D230 C250V C250H DB 200V DB 200H D200 SL DH200 SL CH250 SL
 D230 C250V C250H DB 200V DB 200H D200 SL DH200 SL CH250 SL Installation sur toiture On-Roof Installation Instalación sobre tejado Instalação sobre telhado Installazione su tetto Op dak Installatie Aufdachmontage
DS100 Dual Monitor Desk Stand, Vertical
 USA 1-800-888-88 Europe +31 (0)33-600 DS100 Dual Monitor Desk Stand, Vertical ASSEMBLY INSTRUCTIONS INSTRUCCIONES DE INSTALACIÓN NOTICE D ASSEMBLAGE INSTRUÇÕES DE MONTAGEM 1 A B C 1x 2x 2x 8x 8x 7-100mm
INSTRUCCIONES DE MONTAJE / ASSEMBLY INSTRUCTIONS / INSTRUCCIONS DE MONTAGE / INSTRUÇÕES DE MONTAGEM KAMI
 1/7 Fijación a tierra / Fix on the floor Fixation au sol/fixação ao solo 1 2 SB 1. Poste / post / poteau / poste 2. Superficie juego / playing surface / surface de jeu / piso de jogo 3. Cemento / concret
Memory Module MMF-02. Modulo de Memoria MMF-02. Módulo de Memória MMF-02 CFW70X
 Motors Automation Energy Transmission & Distribution Coatings Memory Module MMF-02 Modulo de Memoria MMF-02 Módulo de Memória MMF-02 CFW70X Installation, Configuration and Operation Guide Guía de Instalación,
D 230 C250V C250H. In-Roof 15º
 D 230 C250V C250H Installation dans le toit In-Roof Installation Instalación integrado en tejado Instalação no telhado Installazione a incasso Installatie In het dak Indachmontage In-Roof 15º 750135602b
POLYPLAY MASTER INSTRUÇÕES DE MONTAGEM INSTRUCCIONES DE MONTAJE/ASSEMBLE INSTRUCTION. Ref.: 0957.7
 Com a adição de mais Polyplays ao seu, ele pode tomar a forma que você quiser. Conheça todos os modelos de Polyplays: Super, Master e Mega. Depois disso, sua imaginação é que dita as regras. Super Master
BENITO Play. Loop 3 JPV402. Instrucciones de montaje Instructions de montage Assembly instructions
 BENITO Play Loop 3 JPV402 Instrucciones de montaje Instructions de montage Assembly instructions Area de seguridad: Safe area: Aire de sécurité Área de segurança: Altura max. caida: Maximum drop high:
D 230 C250V C250H a
 D 230 C250V C250H Installation dans le toit In-Roof Installation Instalación integrado en tejado Instalação no telhado Installazione a incasso Installatie In het dak Indachmontage Slate-Tile 750093203a
DISTRIBUCIÓN DE HABITACIONES
 DISTRIBUCIÓN DE HABITACIONES Cada una de las habitaciones del apartamento son dobles (para dos personas). y se habilitarán el número de habitaciones en función del numero de huéspedas a alojar. Ejemplos:
INSTALLATION GUIDE MANUAL DE INSTALAÇÃO MANUAL DE INSTALACIÓN
 INSTALLATION GUIDE MANUAL DE INSTALAÇÃO MANUAL DE INSTALACIÓN General Information/ Informações Gerais/ Informaciones Generales Compatible with Open Rack Enterprise. To be installed in closed environments.
Smart Relay Relé Inteligente SRW 01-UMCT
 Motors Automation Energy Transmission & Distribution Coatings Smart Relay Relé Inteligente SRW 01-UMCT Installation, Configuration and Operation Guide Guía de Instalación, Configuración y Operación Guia
DISTRIBUCIÓN DE HABITACIONES
 DISTRIBUCIÓN DE HABITACIONES Cada una de las habitaciones del apartamento son dobles (para dos personas). y se habilitarán el número de habitaciones en función del numero de huéspedas a alojar. Ejemplos:
Manual de Instrução / Assembly Instruc ons / Manual de Armado
 Manual de Instrução / Assembly Instruc ons / Manual de Armado É obrigatório seguir os procedimentos abaixo para uma instalação correta do produto; Caso a instalação não esteja correta há risco de queda
Durante a instalação do rack, manuseie com cuidado para evitar acidentes.
 MANUAL DE INSTALAÇÃO MANUAL DE INSTALACIÓN INSTALLATION GUIDE youtube.com/furukawabrasil Rack de Parede Enterprise Rack de Pared Enterprise Enterprise Wall Cabinet Use um leitor de códigos QR/ Utilice
VÁLVULAS DE RETENÇÃO MANUAL DE INSTRUÇÕES E MANUTENÇÃO SÉRIE: R
 22/04/2013 MANUAL DE INSTRUÇÕES E MANUTENÇÃO SÉRIE: R cmo@cmo.es http://www.cmo.es pág. 1 MONTAGEM DESCRIÇÃO Directiva sobre máquinas: DIR 2006/42/CE (MÁQUINAS). Directiva sobre equipamentos sob pressão:
Conselhos Gerais de Reparação e testes. Teste e Reparação seguros de equipamentos WABCO
 Conselhos Gerais de Reparação e testes Teste e Reparação seguros de equipamentos WABCO Conselhos Gerais de Reparação e Teste Teste e Reparação de equipamentos WABCO Edição 2 Esta publicação não está sujeita
KIT CONVERSE AD INCASSO PER 1 COLLETTORE TELAIO
 KIT CONVERSE AD INCASSO PER COLLETTORE TELAIO IT ITALIANO... KIT D'ENCASTREMENT POUR CAPTEUR À CHÂSSIS RECESSED FLASHING KIT FOR FRAME-MOUNTED COLLECTOR FR / EN FRANÇAIS / ENGLISH... 7 RINNENBAUSATZ INDACHMONTAGE
MANUAL DE MONTAGEM ASSEMBLY INSTRUCTIONS INSTRUCCIONES DE MONTAJE COD BR:86100 COD US:89600 V : 00
 MANUAL DE MONTAGEM ASSEMBLY INSTRUCTIONS INSTRUCCIONES DE MONTAJE COD BR:8600 COD US:89600 Sumário Summary Resumen Introdução Introduction Introducción 3 Antes de começar Before starting Antes de comenzar
MANUAL DE INSTALAÇÃO MANUAL DE INSTALACIÓN INSTALLATION GUIDE
 MANUAL DE INSTALAÇÃO MANUAL DE INSTALACIÓN INSTALLATION GUIDE youtube.com/furukawabrasil Use um leitor de códigos QR/ Utilice el lector de códigos QR/ Use the QR code reader Informações Gerais/ Información
MANUAL DE MONTAGEM ASSEMBLY INSTRUCTIONS INSTRUCCIONES DE MONTAJE COD BR: COD US: V : 00
 MANUAL DE MONTAGEM ASSEMBLY INSTRUCTIONS INSTRUCCIONES DE MONTAJE COD BR: 86000 COD US: 89700 Sumário Summary Resumen Introdução Introduction Introducción 3 Antes de começar Before starting Antes de comenzar
MANUAL DE MONTAGEM ASSEMBLY INSTRUCTIONS INSTRUCCIONES DE MONTAJE COD BR: COD US: V : 00
 MANUAL DE MONTAGEM ASSEMBLY INSTRUCTIONS INSTRUCCIONES DE MONTAJE COD BR: 8600 COD US: 89500 Sumário Summary Resumen Introdução Introduction Introducción 3 Antes de começar Before starting Antes de comenzar
Kit hydraulique pour pompe à chaleur et préparateur d eau chaude sanitaire. Hydraulic kit for heat pump and domestic hot water tank
 FR ES Kit hydraulique pour pompe à chaleur et préparateur d eau chaude sanitaire Hydraulic kit for heat pump and domestic hot water tank Kit hidráulico para bomba de calor y acumulador de agua caliente
AVANTI ANCHOR PONTO DE SEGURANÇA Manual do Utilizador e Instruções de instalação
 AVANTI ANCHOR PONTO DE SEGURANÇA Manual do Utilizador e Instruções de instalação AVANTI ANCHOR PONTO DE SEGURANÇA Manual do Utilizador e Instruções de instalação Data da publicação: 1ªt Edição - Junho
MANUAL DE OPERACIONES
 MANUAL DE OPERACIONES INTRUCCIONES DE SEGURIDAD IMPORTANTES El signo de exclamación dentro del triángulo equilátero intenta alertar al usuario de la presencia de instrucciones operativas y de mantenimiento
Instruções de montagem
 Instruções de montagem Colectores planos Suporte de instalação 6 720 643 442 (2010/03) PT 6720616592.00-1.SD Indice Indice 1 Esclarecimento dos símbolos e indicações de segurança...............................
RKM 2001 ALPIN RKM 2300 ALPIN RKA 2500 ALPIN RKE 2500N EASY ALPIN EPI 25
 Estrutura de Suporte dos Coletores RKM 2001 ALPIN RKM 2300 ALPIN RKA 2500 ALPIN RKE 2500N EASY ALPIN EPI 25 Terraço Plano Parque Industrial e Comercial de Loulé, Lote 11 A Índice 1 - Recomendações de segurança...
WMF1 - WMT2/3/4 FKF12/13
 670609 (0/06) JF/Lö PTENDEFRITES WMF - WMT// FKF/ 0.06.0 670609 0.06.0 670609 0.06.0 670609 Indice Table of contents Inhaltsverzeichnis Table de matieres Indice Indice FKF FKF WMF WMF WMT WMT WMT WMT WMT
Instalação da sua máquina de lavar louça...59-64
 Sumário Páginas Instalação da sua máquina de lavar louça...59-64 Colocação a nível regulação dos pés...59 Protecção anti-embaciamento...59 Revestimento da porta...60 Equilibragem da porta...60 Fixação
accessories accesorios accessoires acessórios A129
 manual de instrucciones manuel des instructions manual de instruções 1.507X1.128X453 MM 5443 CÓDIGO DESCRIÇÃO DAS PEÇAS LATERAL DIREITA LATERAL ESQUERDA LATERAL INTERNA TAMPO DO DVD TAMPO TAMPO BASCULANTE
MANUAL DE MONTAGEM ASSEMBLY INSTRUCTIONS INSTRUCCIONES DE MONTAJE COD BR: BPP 21 COD US: 3AMC V : 00
 MANUAL DE MONTAGEM ASSEMBLY INSTRUCTIONS INSTRUCCIONES DE MONTAJE COD BR: BPP 2 COD US: 3AMC 2 Sumário Summary Resumen Introdução Introduction Introducción Antes de começar Before starting Antes de comenzar
CEM SCA-05 KIT KIT CEM SCA-05. CEM SCA-05 Kit Installation Guide. Kit CEM SCA-05 Guía de Instalación. Kit CEM SCA-05 Guia de Instalação
 CEM SCA-05 KIT KIT CEM SCA-05 CEM SCA-05 Kit Installation Guide Kit CEM SCA-05 Guía de Instalación Kit CEM SCA-05 Guia de Instalação CONTENTS 1. Kit Description... 1 2. Safety Information... 2 3. Procedures
 Biblioteca NUBE HERRAMIENTA: DESTORNILLADOR DE ESTRELLA. Importante: - Estudie a fondo las notas de montaje. - Reparar las piezas que componen su mueble - Reagrupar y controlar los tornillos. - Provéase
USB Communication Kit Kit de Comunicación USB Kit de Comunicação USB SSW-06
 Motors Energy Automation Coatings USB Communication Kit Kit de Comunicación USB Kit de Comunicação USB SSW-06 Installation Guide Guia de Instalación Guia de Instalação English / Español / Português Summary
MANUAL DE MONTAGEM ASSEMBLY INSTRUCTIONS INSTRUCCIONES DE MONTAJE COD BR: BPP 70 COD US: 133AMC V : 00
 MANUAL DE MONTAGEM ASSEMBLY INSTRUCTIONS INSTRUCCIONES DE MONTAJE COD BR: BPP 70 COD US: 33AMC 2 Sumário Summary Resumen Introdução Introduction Introducción Antes de começar Before starting Antes de comenzar
1 a M5 x 12mm. Neo-Flex LCD Stand A B C ASSEMBLY INSTRUCTIONS INSTRUCCIONES DE INSTALACIÓN NOTICE D ASSEMBLAGE INSTRUÇÕES DE MONTAGEM.
 Neo-Flex LCD Stand ASSEMBLY INSTRUCTIONS INSTRUCCIONES DE INSTALACIÓN NOTICE D ASSEMBLAGE INSTRUÇÕES DE MONTAGEM 5" (127 mm) height range Rango de ajuste en altura: 5 (127 mm) Ajustement en hauteur sur
1. DESCARGA DEL SOFTWARE DE BLUETOOTH EN EL SMARTPHONE
 MANUAL DEL USUARIO PARA BLUETOOTH ES 1. DESCARGA DEL SOFTWARE DE BLUETOOTH EN EL SMARTPHONE Entre en Apple Store o Google Play y busque: - BH Premium - BH Lite BH Premium BH Lite 2. FIJACIÓN DEL MÓDULO
Manual de Instalação de Sistemas Fotovoltaicos em Telhados - PHB
 Manual de Instalação de Sistemas Fotovoltaicos em Telhados - PHB Índice Capítulo Título Página 1 Informações Gerais 3 2 Segurança 4 3 Especificações Técnicas 5 4 Ferramentas, Instrumentos e Materiais 6
D 230 C250V C250H a
 D 230 C250V C250H Installation sur le toit On-Roof Installation Instalación sobre tejado Instalação sobre telhado Installazione su tetto Door-tegel Installatie Aufdachmontage Clipping Rail 750068103a Table
BEDIENUNGSANWEISUNG EMA 950.0. mit Montageanweisungen
 BEDIENUNGSANWEISUNG mit Montageanweisungen GB F NL I E P Instructions for use and installation instructions Instructions d'utilisation e avis de montage Gebruiksaanwijzing en montagehandleiding Istruzioni
CAJONERA Instrucciones de montaje. CASSETTIERA Istruzioni per il montaggio. KOMMODE Montageanleitung. CHEST OF DRAWERS Assembly instruction
 ES CAJONERA Instrucciones de montaje IT CASSETTIERA Istruzioni per il montaggio GB CHEST OF DRAWERS Assembly instruction DE AT KOMMODE Montageanleitung CH PT MÓVEL Instruções de montagem new / 9 0 8 7
Complimentary Reference Material
 Complimentary Reference Material This PDF has been made available as a complimentary service for you to assist in evaluating this model for your testing requirements. TMG offers a wide range of test equipment
ASA 50-IN. ES ACUMULADORES PARA BOMBA DE CALOR Instrucciones de Instalación, Montaje y Funcionamiento para el INSTALADOR
 ASA 50-IN ES ACUMULADORES PARA BOMBA DE CALOR Instrucciones de Instalación, Montaje y Funcionamiento para el INSTALADOR PT ACUMULADOR PARA INSTALAÇÕES SOLARES Instruções de instalação, montagem e funcionamento
Ewpe Smart App Operation Manual
 Ewpe Smart App Operation Manual Control Flow Chart intelligent home appliances Home Wi-Fi Cellular/ Other Wi-FI Home wireless router Home Wi-Fi APP Operating Systems Requirement for User's smart phone:
MANUAL DE MONTAGEM ASSEMBLY INSTRUCTIONS INSTRUCCIONES DE MONTAJE COD BR: BC 67 COD US: 136AMC V : 00
 MANUAL DE MONTAGEM ASSEMBLY INSTRUCTIONS INSTRUCCIONES DE MONTAJE COD BR: BC 67 COD US: 36AMC 2 Sumário Summary Resumen Introdução Introduction Introducción Antes de começar Before starting Antes de comenzar
G-Line. » Grapas - Pinzas» Almohadillas» Ejes de seguridad» Recomendaciones de instalación
 G-Line ES» Grapas - Pinzas» lmohadillas» Ejes de seguridad» Recomendaciones de instalación PO» Suportes vidrio» orrachas» Eixos de segurança» Recomendações para a colocação EN» Glass Clamps» Gaskets» Security
15300 ASSEMBLY INSTRUCTIONS
 5300 ASSEMBLY INSTRUCTIONS MANUAL DE MONTAGEM INSTRUCCIONES DE MONTAJE COD BR: 5300 COD US: 5300 Dimensões: L: 70 A: 530 P: 447mm Dimensiones: L: 70 A: 530 P: 447mm Dimensions: W: 85. H: 0.86 D: 7.59 inches
MANUAL DE INSTALAÇÃO MANUAL DE INSTALACIÓN INSTALLATION GUIDE
 MANUAL DE INSTALAÇÃO MANUAL DE INSTALACIÓN INSTALLATION GUIDE Patch Panel Descarregado Angular/ Patch Panel Descargado Angular/ Angled Modular Patch Panel youtube.com/furukawabrasil Use um leitor de códigos
Instruções de instalação
 Instruções de instalação Acessórios Cabos de ligação do acumulador da caldeira de aquecimento Para técnicos especializados Ler atentamente antes da montagem. Logano plus GB225-Logalux LT300 6 720 642 644
MARQUE: MICROSOFT REFERENCE: NATURAL ERGO 4000 CODIC:
 MARQUE: MICROSOFT REFERENCE: NATURAL ERGO 4000 CODIC: 4327829 NOTICE ENG: Microsoft wired keyboard Teclado com fio da Microsoft Clavier avec fil Microsoft Teclado alámbrico de Microsoft ENG: Install the
INSTALLATION GUIDE MANUAL DE INSTALAÇÃO MANUAL DE INSTALACIÓN
 INSTALLATION GUIDE MANUAL DE INSTALAÇÃO MANUAL DE INSTALACIÓN youtube.com/furukawaelectriclatam Use um leitor de códigos QR 42U General Information/ Informações Gerais/ Informaciones Generales Compatible
PRESS CLIPPING 13 13 July 2015 www.mecasolar.com
 PRESS CLIPPING 13 13 July 2015 www.mecasolar.com MECASOLAR attends ENERSOLAR BRASIL MECASOLAR is attending one of the leading solar events in Brazil, to be held in São Paulo from 15 to 17 July. The company
manual de instrucciones manuel des instructions manual de instruções
 0600 1.200X602X313 mm 4026 4026 4022 4025 4024 4020 4023 4020 4021 CÓDIGO DESCRIÇÃO DAS PEÇAS 4020 4021 4022 4023 4024 4025 4026 LATERAL BASE INFERIOR BASE SUPERIOR PRATELEIRA BATENTE PORTA FUNDO TRASEIRO
Segurança e Higiene do Trabalho
 Guia Técnico Segurança e Higiene do Trabalho Volume XXXI Trabalhos com segurança em telhados um Guia Técnico de Copyright, todos os direitos reservados. Este Guia Técnico não pode ser reproduzido ou distribuído
MANUAL DE MONTAGEM ASSEMBLY INSTRUCTIONS INSTRUCCIONES DE MONTAJE
 MANUAL DE MONTAGEM ASSEMBLY INSTRUCTIONS INSTRUCCIONES DE MONTAJE COD BR: BPP 5 COD US: 6AMC27, 6AMC3, 6AMC32 2 Sumário Summary Resumen 6 Acessórios incluídos na caixa Hardware included in box Accesorios
INSTRUÇÕES DE UTILIZAÇÃO
 INSTRUÇÕES DE UTILIZAÇÃO ANTES DE UTILIZAR A PLACA DE FOGÃO SUGESTÕES PARA A PROTECÇÃO DO AMBIENTE PRECAUÇÕES E RECOMENDAÇÕES GERAIS SUGESTÕES PARA POUPANÇA DE ENERGIA CUIDADOS E MANUTENÇÃO GUIA PARA RESOLUÇÃO
INSTRUÇÕES DE MONTAGEM
 SUPORTE AIRON WALL M 100 SUPORTE AIRON WALL M 100/80 INSTRUÇÕES DE MONTAGEM Imagens ilustrativas / Imágenes Ilustrativas / Ilustrative Images hapa ase Suporte asculante Esquerdo Suporte asculante Direito
GUIA DO USUÁRIO. Dome fixo AXIS T90C10 IR-LED. Dome fixo AXIS T90C20 IR-LED PORTUGUÊS
 GUIA DO USUÁRIO Dome fixo AXIS T90C10 IR-LED Dome fixo AXIS T90C20 IR-LED PORTUGUÊS Medidas de segurança Leia com atenção este guia de instalação até o final antes de instalar o produto. Guarde o guia
MANUAL DE MONTAGEM ASSEMBLY INSTRUCTIONS INSTRUCCIONES DE MONTAJE COD BR: BBN V : 01
 MANUAL DE MONTAGEM ASSEMBLY INSTRUCTIONS INSTRUCCIONES DE MONTAJE COD BR: BBN 09-06 2 Sumário Summary Resumen 6 Acessórios incluídos na caixa Hardware included in box Accesorios incluidos en la caja 7
GUIA DE INSTALAÇÃO. AXIS T91A61 Wall Mount. AXIS T91A62 Parapet Mount. AXIS T91A63 Ceiling Mount. AXIS T91A64 Corner Mount. AXIS T91A67 Pole Mount
 GUIA DE INSTALAÇÃO AXIS T91A61 Wall Mount AXIS T91A62 Parapet Mount PORTUGUÊS AXIS T91A63 Ceiling Mount AXIS T91A64 Corner Mount AXIS T91A67 Pole Mount Considerações legais A vigilância por vídeo e áudio
MobileView Mounting Bracket
 Installation Instructions MobileView Mounting Bracket (Catalog Number 2727-MRMB1) Inside... English... 1 Français... 3 Deutsch... 5 Espagnol... 7 Italiano... 9 Português... 11 Installation Instructions
Física Experimental - Mecânica - Conjunto para queda de corpos, multicronômetro de rolagem de dados e sensor, pino ML, 5 VCC - EQ235B
 Índice Remissivo... 5 Abertura... 6 O presente manual é composto por três partes: Documentação do produto, Instruções para o professor e Atividades para o aluno.... 6 Documentação do produto / Documentación
Kl!XX. Sistema de Montagem
 Kl!XX Sistema de Montagem Índice 1 Novos Caminhos 2 Segurança no trabalho 3 Conselhos sobre electricidade 4 Lista de peças 5 Lista de ferramentas 6 Preparação no solo 7 Montagem em cobertura de telha 8
MANUAL DE MONTAGEM ASSEMBLY INSTRUCTIONS INSTRUCCIONES DE MONTAJE
 MANUAL DE MONTAGEM ASSEMBLY INSTRUCTIONS INSTRUCCIONES DE MONTAJE COD BR: BPP 62-29, BPP 62-69 COD US: 94AMC29, 94AMC34 2 Sumário Summary Resumen 6 Acessórios incluídos na caixa Hardware included in box
SILLA DE ESCRITORIO MOD. YS
 SILLA DE ESCRITORIO MOD. YS 511-02786 Por favor, lea las instrucciones cuidadosamente antes de montarlo para garantizar un funcionamiento seguro y satisfactorio. Por favor, leia as instruções cuidadosamente
MANUAL DE MONTAGEM ASSEMBLY INSTRUCTIONS INSTRUCCIONES DE MONTAJE COD BR: BLC V : 01 1
 MANUAL DE MONTAGEM ASSEMBLY INSTRUCTIONS INSTRUCCIONES DE MONTAJE COD BR: BLC 30-06 V : 0 V : 0 2 Sumário Summary Resumen 6 Acessórios incluídos na caixa Hardware included in box Accesorios incluidos en