Thank you for buying this JB Systems product. To take full advantage of all possibilities, please read these operating instructions very carefully.
|
|
|
- Edison Castanho Marques
- 6 Há anos
- Visualizações:
Transcrição
1
2
3 ENGLISH OPERATION MANUAL OPERATION MANUAL Thank you for buying this JB Systems product. To take full advantage of all possibilities, please read these operating instructions very carefully. FEATURES 192 DMX channels 12 Fixtures of 16 channels each (best used with fixtures having up to 8 channels) 30 Banks of 8 programmable scenes (total = 240 scenes) 6 Programmable chases of 240 scenes 8 Sliders for manual control of channels Assignable joystick for ease of use File Dump allows data to be sent or received between two units Auto mode program controlled by speed and fade time sliders Fade time/assign fade time Reversible DMX channels allows fixture to react in opposition to others in a chase 8 channel or 16 channel mode Fine adjustment for joystick pan and tilt Blackout master button Manual Override button allows you to grab any fixture on the fly Built in microphone for music triggering MIDI control over banks, chases and blackout DMX Polarity selector Power failure memory BEFORE USE Check the contents: Check that the carton contains the following items: SM-1612 SCANMASTER AC/DC adapter Operating instructions Some important instructions: To prevent fire or shock hazard, do not expose this appliance to rain or moisture. In order to prevent electric shock, do not open the cover. If a problem occurs, contact your dealer. Don t place metal objects or spill liquid inside the unit. Electric shock or malfunction may result. Prevent use in dusty environments, clean the unit regularly. JB SYSTEMS 1/89 SM-1612 SCANMASTER


4 ENGLISH OPERATION MANUAL Safety instructions: CAUTION: To reduce the risk of electric shock, do not remove the top cover. No userserviceable parts inside. Refer servicing to qualified service personnel only. The lightning flash with arrowhead symbol within the equilateral triangle is intended to alert the use or the presence of un-insulated dangerous voltage within the product s enclosure that may be of sufficient magnitude to constitute a risk of electric shock. The exclamation point within the equilateral triangle is intended to alert the user to the presence of important operation and maintenance (servicing) instructions in the literature accompanying this appliance. This symbol means: indoor use only This symbol means: Read instructions This symbol means: Lamp Control Gear The device is suitable for mounting on standard flammable surfaces. Standard flammable surfaces include building materials such as wood and wood-based materials more than 2mm thick. To prevent fire or shock hazard, do not expose this appliance to rain or moisture. To avoid condensation to be formed inside, allow the unit to adapt to the surrounding temperatures when bringing it into a warm room after transport. Condense sometimes prevents the unit from working at full performance or may even cause damages. This unit is for indoor use only. Don t place metal objects or spill liquid inside the unit. No objects filled with liquids, such as vases, shall be placed on this appliance. Electric shock or malfunction may result. If a foreign object enters the unit, immediately disconnect the mains power. No naked flame sources, such as lighted candles, should be placed on the appliance. Don t cover any ventilation openings as this may result in overheating. Prevent use in dusty environments and clean the unit regularly. Keep the unit away from children. Inexperienced persons should not operate this device. Maximum save ambient temperature is 40 C. Don t use this unit at higher ambient temperatures. Always unplug the unit when it is not used for a longer time or before you start servicing. The electrical installation should be carried out by qualified personal only, according to the regulations for electrical and mechanical safety in your country. Check that the available voltage is not higher than the one stated on the rear panel of the unit. The socket inlet shall remain operable for disconnection from the mains. The power cord should always be in perfect condition: switch the unit immediately off when the power cord is squashed or damaged. It must be replaced by the manufacturer, its service agent or similarly qualified persons in order to avoid a hazard JB SYSTEMS 2/89 SM-1612 SCANMASTER
5 ENGLISH OPERATION MANUAL Never let the power-cord come into contact with other cables! In order to avoid a hazard, the unit shall only be used with the AC-adaptor delivered with it. If the AC-adaptor is damaged, a same model adaptor shall be used only. In order to prevent electric shock, do not open the cover. Apart from the mains fuse there are no user serviceable parts inside. Never repair a fuse or bypass the fuse holder. Always replace a damaged fuse with a fuse of the same type and electrical specifications! In the event of serious operating problems, stop using the appliance and contact your dealer immediately. Please use the original packing when the device is to be transported. Due to safety reasons it is prohibited to make unauthorized modifications to the unit. Some words explained: SCENE: A scene is a set of different fader values that describes a certain condition at a given moment. Example: You have set the faders on the SM-1612 to put a fixture in a certain direction, with a certain gobo and a certain color. The combination of these different fader values is called SCENE BANK: On the SM-1612 there are 8 scene buttons. Under each scene button a scene can be stored. To have a total of 240 scene memories you need to put these scenes in banks. That is why you have 30 banks with each 8 scenes: 30 x 8 = 240 scenes. Example: BANK1 (scene1 ; scene2 ; scene3 ; scene8) BANK2 (scene1 ; scene2 ; scene3 ; scene8) BANK3 (scene1 ; scene2 ; scene3 ; scene8) BANK30 (scene1 ; scene2 ; scene3 ; scene8) CHASE: On the SM-1612 there are 6 programmable chases. A chase is a succession of scenes. This succession of scenes can be programmed by the user in any order. One chase contains a maximum of 240 scenes. SPEED: time between 2 scenes in a chase running in automatic mode. FADE TIME: This is the amount of time it takes for a fixture (or fixtures) to move from one place to another. PAN/TILT: PAN means moving horizontally or moving on the X-axis. TILT means moving vertically or moving on the Y-axis. JB SYSTEMS 3/89 SM-1612 SCANMASTER
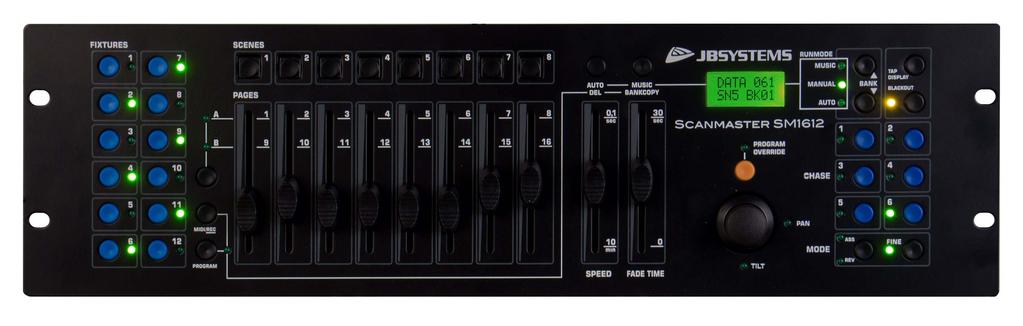
6 ENGLISH OPERATION MANUAL FUNCTIONS (FRONT) 1. FIXTURE BUTTONS: Used to select one or more fixtures. 2. SCENE BUTTONS: Used to load or store a certain scene. 3. FADERS: Used to control the values of the different channels. 4. PAGE SELECT BUTTON: Every fixture can have up to 16channels. These 16 channels are divided over 2 pages with each 8 channels (faders): PAGE A: channels 1 8 PAGE B: channels OVERRIDE BUTTON: When a chase is running, you can select 1 or more fixtures and control them independently from the chase running at that moment. 6. SPEED SLIDER: Used to select the chase speed within a range of 0.1seconds to 10minutes. 7. FADE TIME SLIDER: Used to adjust the fade time within a range of 0 to 30sec. 8. LCD DISPLAY: Shows the current activity or programming state. The LCD Display contains 2 lines of 8 characters each. Below is a list of abbreviations used: LCD DISPLAY FULL MESSAGE SN1 scene1 is active BK1 bank1 is active CHASE1 chase1 is active STEP 009 step 9 of a chase DATA 184 DMX-value the last fader used = 184 (0 255) SP:1m34s Speed is set to 1minute and 34 seconds. FT:3.31s Fade time is set to 3,31seconds ASS04 05 Joystick is assigned to channels 4 & 5 (PAN=4 * TILT=5) RES10 13 DMX channels 10 & 13 are reversed 9. JOYSTICK PAN: Used to control the panning (horizontal movements) of the selected fixture(s) 10. JOYSTICK TILT: Used to control the tilt (up/down movements) of the selected fixture(s) 11. PROGRAM BUTTON: Used to enter or leave the program mode. 12. MIDI/RECORD BUTTON: Used to record actions in memory or to set a MIDI channel. 13. AUTO/DELETE BUTTON: Running mode: Used to switch between manual and automatic chase mode. Program mode: Used to delete scenes or chases. JB SYSTEMS 4/89 SM-1612 SCANMASTER
7 ENGLISH OPERATION MANUAL 14. MUSIC/BANK COPY BUTTON: Running mode: Used to switch between manual and music chase mode. Program mode: Used to copy banks. 15. BANK UP/DOWN BUTTON: Used to select one of the 30 banks or to select one of the steps in a chase. 16. TAP/DISPLAY BUTTON: Used to select different display modes. Used to change the readout of the channel DMX-values: you can change between real DMX-values (0 255) or values in percentage (0 100%) Also used as TAP-function in auto chase mode to set the chase speed: tap the button twice with a certain time interval. (alternative to the speed fader) 17. BLACKOUT BUTTON: Used to stop all DMX output. 18. CHASE BUTTON: Used to activate one or more chases. 19. FINE BUTTON: Used to control the PAN/TILT functions of a fixture with the smallest increment. This gives you the possibility to position the fixtures with high precision. (sometimes using the channel faders can give you even better results) 20. MODE: Pushing Mode and Fine buttons together activates joystick assign and channel reverse modes. FUNCTIONS (rear) 1. MIDI INPUT: Can be used to receive MIDI data. 2. DMX POLARITY SWITCH: A DMX-signal normally has the following connections: 1=ground * 2=Data- * 3=Data+ In some cases it happens that a cable is inversed, as a result of this the DMXconnection doesn t work. This can be solved by using this switch. If your DMX connection doesn t work and all your DMX-receivers are properly addressed, you can check this switch. In normal conditions always put this switch in the left position. 3. DMX OUTPUT: Sends DMX-signals to the connected fixtures 4. FILE DUMP INPUT: Used to connect to a second SM-1612 and copy its chases and scenes. Don t use this connector to daisy chain the DMX-signal of two controllers! 5. DC INPUT: connect the supplied AC/DC adapter to this input. If you should use another adapter, please make sure that it has 9 ~ 12Vdc and minimum 300mA with + in the center. 6. POWER SWITCH: Used to switch the unit ON/OFF JB SYSTEMS 5/89 SM-1612 SCANMASTER
8 ENGLISH OPERATION MANUAL 7. AUDIO input: receives audio from any line or record output on audio equipment. If this input is not used, the internal microphone of SM-1612 takes over. SET UP 1. FIXTURE SETUP: SM-1612 has 12 fixtures buttons. Each fixture button represents 16 DMX-addresses. (8faders on page A and 8faders on page B) In most cases SM-1612 will be used with fixture having 8 or less DMX addresses. This means that in most cases only page A will be used. The following chart helps you setting up the DMX-start address on your fixtures: Fixture # Digital Setting Dip Switch Setting On and 5 On and 6 On ,5 and 6 On and 7 On ,5 and 7 On ,6 and 7 On ,5,6 and 7 On and 8 On ,5 and 8 On ,6 and 8 On ,5,6 and 8 On 2. JOYSTICK SETUP: For each fixture any 2 addresses can be assigned to the PAN and TILT of the joystick: Press and hold the Program button until its LED blinks. Press 2 times the Mode and Fine buttons at the same time. The assign LED should light. (if reverse LED is lit, press both buttons a second time together) Use the bank UP and DOWN keys to select the axis you wish to assign (PAN or TILT). If your fixture has more than 8 DMX addresses, you can use the Tap/Display button to select 16 or 8 channel mode. Press the button corresponding to the fixture you wish to edit. While holding the mode button press the scene number corresponding to the slider which controls the movement. (Example: If pan is controlled by slider number 4, press and hold the Mode button while pressing scene button 4). When both PAN and TILT are assigned, press the Mode and Fine buttons at the same time again to exit Assign mode. Note: you can still use the channel faders instead of the joystick to control the movements of the fixture. 1. DELETE JOYSTICK SETUP FOR A FIXTURE: Enable Programming Mode. (Press and hold the Program button until its LED blinks) Press 2 times the Mode and Fine buttons at the same time. The assign LED should light. (if reverse LED is lit, press both buttons a second time together) If your fixture has more than 8 DMX addresses, you can use the Tap/Display button to select 16 or 8 channel mode. Press the button corresponding to the fixture you wish to edit. JB SYSTEMS 6/89 SM-1612 SCANMASTER
9 ENGLISH OPERATION MANUAL While holding the mode button, press the Auto/Del button. Press the program button for some seconds to stop program mode 4. FADE TIME SETUP: During auto and music chase playback you can introduce a fade time between the steps of the chase. You can choose to affect only the PAN/TILT channels or ALL channels. If you select X/Y channels you won t have the inconvenience that gobo s, colors also change slowly while the slow PAN/TILT movements take place. With the power off, press the mode and Tap/Display buttons at the same time. Turn the unit on and press the Tap/Display button to change between ONLY X/Y (fade time only for PAN/TILT) and ALL CH (fade time affects all channels) The LCD reads: AL CH ONLY X/Y OR FD TIME FD TIME First press the Mode button and hold it, now press the Tap/Display button at the same time to store your setting into memory. All LEDs will flash 3times. If you do not wish to save your setting, press the blackout key to exit this operation. Important note: first assign the PAN/TILT of the joystick (see earlier) before you set up the fade times. If you change the fixture PAN/TILT assignments later, you have to restart the fade time setup! 5. REVERSE JOYSTICK MOVEMENT/DMX CHANNEL: The PAN and/or TILT movements, or even certain channels can be reversed. (DMX value is 255 when the fader is down and 000 when the fader is in upper position) Enable Programming Mode. (Press and hold the Program button until its LED blinks) Press 1 time the Mode and Fine buttons at the same time. The reverse LED should light. (if assign LED is lit, press both buttons a second time together) If your fixture has more than 8 DMX addresses, you can use the Tap/Display button to select 16 or 8 channel mode. Press the button corresponding to the fixture you wish to edit. While holding the mode button, press the corresponding scene button the channel you wish to reverse. (Example: You want to reverse the TILT on a fixture. In program mode press the mode and fine buttons together until the reverse led is lit. Choose the fixture you want to modify. Hold the mode button and press the scene button of the slider which corresponds with the channel for TILT movements. Press the mode and fine buttons together until both the assign and reverse leds are turned off. Press the program button for some seconds to stop program mode). Note: you can reverse a maximum of 48 channels. 6. DELETE REVERSE FUNCTION ON JOYSTICK MOVEMENT/DMX CHANNEL: Enable Programming Mode. (Press and hold the Program button until its LED blinks) Press 1 time the Mode and Fine buttons at the same time. The reverse LED should light. (if assign LED is lit, press both buttons a second time together) If your fixture has more than 8 DMX addresses, you can use the Tap/Display button to select 16 or 8 channel mode. Press the button corresponding to the fixture you wish to edit. While holding the mode button, press the Auto/Del button. Press the program button for some seconds to stop program mode JB SYSTEMS 7/89 SM-1612 SCANMASTER
10 ENGLISH OPERATION MANUAL Note: all inversed addresses for that fixture will be reset to normal. 7. MIDI CHANNEL SETTING: Press and hold down the MIDI/Rec button for three seconds: the display shows MIDI xx (xx is the midi channel: between 01 and 16) Use the Up/Down buttons to select the MIDI channel 1 to 16 you would like the SM-1612 to be activated from. Press and hold down the MIDI/Rec button again for three seconds: the MIDI operation is now on. MIDI CHANNEL SETTING: BANK (Octave) NOTE NUMBER FUNCTION BANK 1 00 TO 07 1 to 8 of Bank 1 on or off BANK 2 08 TO 15 1 to 8 of Bank 2 on or off BANK 3 16 TO 23 1 to 8 of Bank 3 on or off BANK 4 24 TO 31 1 to 8 of Bank 4 on or off BANK 5 32 TO 39 1 to 8 of Bank 5 on or off BANK 6 40 TO 47 1 to 8 of Bank 6 on or off BANK 7 48 TO 55 1 to 8 of Bank 7 on or off BANK 8 56 TO 63 1 to 8 of Bank 8 on or off BANK 9 64 TO 71 1 to 8 of Bank 9 on or off BANK TO 79 1 to 8 of Bank10 on or off BANK TO 87 1 to 8 of Bank11 on or off BANK TO 95 1 to 8 of Bank12 on or off BANK TO to 8 of Bank13 on or off BANK TO to 8 of Bank14 on or off BANK TO to 8 of Bank14 on or off CHASES 120 TO to 6 Chases BLACK OUT 126 BLACKOUT The SM-1612 SCANMASTER only receives MIDI notes and you may have to transpose your keyboard to find the proper notes SCENES 1. PROGRAMMING A SCENE: a. Enter program mode (Press and hold the Program button until its LED blinks) b. Check the blackout button and verify that the LED is not lit, if it is, press it once to exit blackout mode. c. Verify that the speed and fade time sliders are positioned at zero. d. Press the fixture button corresponding to the unit you wish to control. You may control several fixtures together by pressing the button corresponding to the fixture(s) you wish to program. e. Move the faders and joystick to the desired position. (In some rare cases, if necessary, you may select page B to control channels 9-16.) f. Press the bank Up/Down button to choose the bank you want to store this scene into. There are a total of 30 banks you can select, you may store up to 8 scenes in each bank. g. Once all fixtures are programmed into the desired position for the scene, press the MIDI/Rec button. JB SYSTEMS 8/89 SM-1612 SCANMASTER
11 ENGLISH OPERATION MANUAL h. Press the scene button you wish to store your scene into. All LEDs will flash three times to confirm the operation. The LCD readout will show the bank and scene. i. Repeat steps d h until all scenes have been programmed. j. If you don t intend to continue programming at this time, press and hold the program button for some seconds to exit program mode. The LED will turn off. 2. EDITING A SCENE: a. Enter program mode (Press and hold the Program button until its LED blinks) b. Check the blackout button and verify that the LED is not lit, if it is, press it once to exit blackout mode. c. Press the Bank Up/Down button to select the bank containing the scene you wish to edit. d. Select the scene you wish to edit by pressing it s scene button. e. Select the fixtures and use the faders and/or joystick to make the desired adjustments to the scene. f. Once you have completed the changes, press the MIDI/Rec button. g. Press the scene button that corresponds to the scene you re editing. This will override the existing scene. h. Press and hold the program button for some seconds to exit program mode. The LED will turn off. Note: Be sure to select the same scene in steps d and g, otherwise you may accidentally record over an existing scene. 3. COPY A SCENE: a. Enter program mode (Press and hold the Program button until its LED blinks) b. If you want to check the output, verify that the blackout LED is not lit, if it is, press it once to exit blackout mode. c. Press the Bank Up/Down buttons to select the bank containing the scene you wish to copy. d. Press the scene button of the scene you wish to copy. e. Press the Bank Up/Down buttons to select the bank you wish to copy the scene to. f. Press the MIDI/Rec button. g. Press the scene button you wish to copy the scene to. If you want to copy other scenes, you can repeat steps c to g. h. Press and hold the program button for some seconds to exit program mode. The LED will turn off. 4. DELETE A SCENE: a. Enter program mode (Press and hold the Program button until its LED blinks) b. If you want to check the output, verify that the blackout LED is not lit, if it is, press it once to exit blackout mode. c. Press the Bank Up/Down buttons to select the bank containing the scene you wish to delete. d. Press and hold down the Auto/Del button. While holding the button, press the scene button that corresponds with the scene you wish to delete. All LEDs will blink 3 times. When the programmed scene is deleted, all DMX channel values will be set to 0. If you want to delete other scenes, you can repeat steps c & d. JB SYSTEMS 9/89 SM-1612 SCANMASTER
12 ENGLISH OPERATION MANUAL e. Press and hold the program button for some seconds to exit program mode. The LED will turn off. 5. DELETE ALL SCENES: a. Switch the unit off. b. Switch the unit back on while you press and hold down the Program and Bank Down buttons at the same time. All scenes should be cleared. Note: Be aware that all your scenes will be lost, to be used with care! 6. COPY A BANK OF SCENES: a. Enter program mode (Press and hold the Program button until its LED blinks) b. If you want to check the output, verify that the blackout LED is not lit, if it is, press it once to exit blackout mode. c. Press the Bank Up/Down buttons to select the bank containing the scenes you wish to copy. d. Press the MIDI/Rec button. e. Press the Bank Up/Down buttons to select the bank you wish to copy to. f. Press the Music/Bank Copy button, all LEDs will blink three times indicating the function has been completed. g. Press and hold the program button for some seconds to exit program mode. The LED will turn off. CHASES A chase is a succession of scenes in a certain order so you must have already programmed these scenes in order to program a chase. Before programming chases for the first time it is recommended you delete all chases in the controller. See Delete All Chases for instructions on how to do so. 1. DELETE ALL CHASES: a. Switch the unit off. b. Switch the unit back on while you press and hold down the Auto/Del and Bank Down buttons at the same time. All chases should be cleared. Note: Be aware that all your chases will be lost, to be used with care! 2. PROGRAMMING A CHASE: a. Enter program mode (Press and hold the Program button until its LED blinks) b. Check the blackout button and verify that the LED is not lit, if it is, press it once to exit blackout mode. c. Press the button of the chase you wish to program. d. Press the Bank Up/Down buttons to select the bank containing the scene(s) you wish to program in your chase. e. Press the button of the desired scene. f. Press the MIDI/Rec button. g. Repeat steps d to g until all desired scenes have been entered. h. Press and hold the program button for some seconds to exit program mode. The LED will turn off. JB SYSTEMS 10/89 SM-1612 SCANMASTER
13 ENGLISH OPERATION MANUAL 3. INSERT A CHASE STEP: a. Enter program mode (Press and hold the Program button until its LED blinks) b. Check the blackout button and verify that the LED is not lit, if it is, press it once to exit blackout mode. c. Press the button of the chase you wish to program. d. Press the TAP/Display button, the LCD display will show the current chase step. e. Press the Bank Up/Down button and scroll to the step you wish to insert the step after. f. Press the MIDI/Rec button, the segment display will read the step one step higher than before. The LCD shows the current chase, scene, and bank. g. Press the Bank Up/Down buttons to select the bank containing the scene you wish to insert in your chase. h. Once you have selected the scene you wish to insert, press the MIDI/Rec button again. All LEDs will blink three times indicating the new step has been inserted into the chase. i. Repeat steps e to h until all desired scenes have been inserted. j. Press and hold the program button for some seconds to exit program mode. The LED will turn off. 4. DELETE A CHASE STEP: a. Enter program mode (Press and hold the Program button until its LED blinks) b. Check the blackout button and verify that the LED is not lit, if it is, press it once to exit blackout mode. c. Press the button of the chase that contains the step you want to delete. d. Press the Tap/Display button, the LCD shows the current step. e. Press the Bank Up/Down buttons and scroll to the step you wish to delete. f. Press the Auto/Del button to delete the step. All LEDs will flash three times indicating the requested operation has been performed. g. Eventually repeat steps e and f until all desired steps have been deleted. h. Press and hold the program button for some seconds to exit program mode. The LED will turn off. 5. ADDING A BANK OF SCENES TO A CHASE: Note: The bank of scenes will be added at the end of the chase. a. Enter program mode (Press and hold the Program button until its LED blinks) b. Check the blackout button and verify that the LED is not lit, if it is, press it once to exit blackout mode. c. Press the button of the chase you wish to edit. d. Use the Bank Up/Down key to select the bank of scenes you wish to add. e. Press the Music/Bank Copy button. f. Press the MIDI/Rec copy button, all LEDs will blink three times indicating that the requested operation has been performed. g. Press and hold the program button for some seconds to exit program mode. The LED will turn off. JB SYSTEMS 11/89 SM-1612 SCANMASTER
14 ENGLISH OPERATION MANUAL PLAYBACK OF SCENES There are three modes in which you can playback scenes: 1. Manual Mode: You can select and show one or more scenes manually. a. When the power is turned on, the unit starts automatically in manual mode. b. Check if the Manual mode LED is lit. c. Check the blackout button and verify that the LED is not lit, if it is, press it once to exit blackout mode. d. Use the Bank Up/down button to select the bank with the scenes you wish to run. e. Press the scene button corresponding to the scene you wish to display. f. Eventually repeat steps d and e to select others scenes. 2. Auto Mode: You can run a bank of programmed scenes in sequence. You can use the Manual override button, see further for more information. a. Press the Auto/Del button to enter into Auto mode. The Auto LED turns on. b. Use the bank Up/Down button to select a bank of scenes to run. c. After selecting the bank of scenes to run, you can use the speed slider and Fade Time slider to adjust the speed of the scene progression. d. You can use the TAP/Display button to set the speed instead. The time between the last two taps equals the length of time between steps. This setting will stay in effect until the speed slider is moved. e. Press the Auto/Display button to exit Auto mode. 3. Music Mode: You can run a bank of programmed scenes to the beat of the music. You can use the internal microphone or add an external music signal. You can use the Manual override button, see further for more information. a. Press the Music/Bank copy button to activate Music mode. The Music LED turns on. b. Use the bank Up/Down button to select a bank of scenes you wish to run. The scenes selected will run through sequentially to the beat of the music. c. Press the Music/Bank Copy button again to exit music mode. PLAYBACK OF CHASES There are three modes in which you can playback chases: 1. Manual Mode: You can select and show a chase manually. a. When the power is turned on, the unit starts automatically in manual mode. b. Check if the Manual mode LED is lit. c. Check the blackout button and verify that the LED is not lit, if it is, press it once to exit blackout mode. d. Select the chase you want to use. The LCD display shows the chase number. e. Press the TAP/Display button, the LCD display now shows the STEP-numbers of the selected chase. f. Use the Bank Up/down buttons to manually show the different steps of the chase. g. Eventually select another chase and repeat steps e and f. (pressing the same chase a second time unselects it) JB SYSTEMS 12/89 SM-1612 SCANMASTER
15 ENGLISH OPERATION MANUAL 2. Auto Mode: You can run one or more chases at an adjustable speed. If you select more than one chase, all chases will be run one by one. The LED of the active chase blinks. You can use the Manual override button, see further for more information. a. Press the Auto/Del button to enter into Auto mode. The Auto LED turns on. b. Select one or more chases. (pressing the same chase a second time unselects it) The LEDs of the selected chases are lit. The active chase blinks and its name + active scene/bank are shown on the display. c. Use the speed slider and Fade Time slider to adjust the speed of the chases. d. You can use the TAP/Display button to set the speed instead. The time between the last two taps equals the length of time between steps. This setting will stay in effect until the speed slider is moved. e. Press the Auto/Display button to exit Auto mode. 3. Music Mode: You can run one or more chases to the beat of the music. You can use the internal microphone or add an external music signal. If you select more than one chase, all chases will be run one by one. The active chase blinks. You can use the Manual override button, see further for more information. a. Press the Music/Bank copy button to activate Music mode. The Music LED turns on. b. Select one or more chases. (pressing the same chase a second time unselects it) The LEDs of the selected chases are lit. The active chase blinks and its name + active scene/bank are shown on the display. c. Press the Music/Bank Copy button again to exit music mode. Note: You can use the fade time slider to make the movement a little smoother. Don t add too much fade time, the music synchronization will be completely lost! OVERRIDE FUNCTION During playback of scenes and chases in auto and music mode, it is possible to select one or more fixtures and manipulate their functions manually. To do this just select the fixtures you want to lift out of the running sequence and press the override button. Now you can manipulate all functions of the selected fixtures, completely independent from the running sequence. At any moment you can select or unselect additional fixtures. Once a fixture in unselected or the override function is disabled, the fixtures continue the sequence. FILE DUMP It is possible a memory dump from one SM-1612 to another SM This saves you a lot of programming work! 1. Prepare to send file dump: these actions have to be carried out on the Scanmaster that has to send the file dump. a. Turn the power off. b. Press the following buttons at the same time and hold down while you turn on the power: fixture2 button fixture3 button scene1 button JB SYSTEMS 13/89 SM-1612 SCANMASTER
16 ENGLISH OPERATION MANUAL The display shows TRANSMIT to indicate that the SM-1612 is ready to send. 2. Prepare to receive file dump: these actions have to be carried out on the Scanmaster that has will receive the file dump. a. Turn the power off. b. Press the following buttons at the same time and hold down while you turn on the power: Fixture8 button Fixture9 button Scene2 button The display shows RECEIVE to indicate that the SM-1612 is ready to receive. 3. Start sending file dump: On the Scanmaster showing TRANSMIT on its display, press the scene buttons 7 and 8 at the same time. The display shows a small progression bar. Don t touch both Scanmasters during this operation. At the end of the operation both units will automatically return to normal. Before you start using the unit that received the file dump, switch it off and on! MAINTENANCE Clean by wiping with a polished cloth slightly dipped with water. Avoid getting water inside the unit. Do not use volatile liquids such as benzene or thinner which will damage the unit. SPECIFICATIONS This unit is radio-interference suppressed. This product meets the requirements of the current European and national guidelines. Conformity has been established and the relevant statements and documents have been deposited by the manufacturer. Power Input: DC 9 ~ 12V 300mA minimum. AC/DC Power adapter: AC 240V, 50Hz 12Vdc / 300mA DMX outputs: 3pin XLR; DMX, channels Midi input: 5pin Din Audio input: Cinch 0.1V ~ 1Vpp Size: 48.3 x 13.4 x 8.5cm (19 / 3U) Weight: 2.7kg Every information is subject to change without prior notice You can download the latest version of this user manual on our website: JB SYSTEMS 14/89 SM-1612 SCANMASTER
17 FRANCAIS MODE D EMPLOI MODE D EMPLOI Nous vous remercions d avoir acheté ce produit JB Systems. Veuillez lire ce mode d emploi très attentivement afin de pouvoir exploiter toutes les possibilités de cet appareil. CARACTERISTIQUES 192 canaux DMX 12 appareils (fixtures) de 16 canaux peuvent être programmés (il est conseillé d utiliser des appareils de max. 8 canaux) 30 banques de 8 scènes programmables (total = 240 scènes) 6 chases programmables de 240 scènes 8 curseurs pour un contrôle manuel des canaux joystick assignable pour une utilisation plus aisée File Dump vous permet d échanger des informations entre 2 appareils Pendant le déroulement automatique des programmes, la vitesse d exécution (speed) et le temps de transition (fade time) peuvent être contrôlés par 2 curseurs Fade time/ fade time assigné Des canaux DMX réversibles permettent aux appareils de réagir à l opposé en mode chase Mode 8 canaux ou 16 canaux Ajustage fin des fonctions pan et tilt du joystick Touche Black-out du master (sortie générale) Une touche Manual Override vous permet de contrôler manuellement n importe quel appareil a n importe quel moment Micro incorporé pour un fonctionnement au rythme de la musique Contrôle MIDI des banques, chases et black-out Sélecteur d inversion de polarité DMX Mémoire en cas de panne électrique AVANT L UTILISATION Vérifiez le contenu: Vérifiez si la boite contient les articles suivants : SM-1612 SCANMASTER adaptateur secteur AC/DC Mode d emploi Quelques instructions importantes: Pour éviter l incendie ou l électrocution, n exposez jamais cet appareil à la pluie ou à l humidité. Afin de ne pas vous faire électrocuter, n enlevez jamais le couvercle. Si vous êtes confrontés à un problème, contactez votre dealer. JB SYSTEMS 15/89 SM-1612 SCANMASTER
18 FRANCAIS MODE D EMPLOI N insérez jamais d objets métalliques et ne renversez jamais de liquides dans l appareil. L électrocution ou le mal fonctionnement de l appareil peut en résulter. Évitez les endroits poussiéreux, nettoyez l appareil régulièrement. INSTRUCTIONS DE SECURITE: ATTENTION: afin de réduire le risque d électrocution, n enlevez jamais le couvercle CAUTION de l appareil. Il n y a aucune pièce à l intérieur de l appareil que vous puissiez remplacer vous-même. Confiez l entretien uniquement à des techniciens qualifiés. La flèche dans un triangle met l'utilisateur en garde contre la présence de haute tension sans isolation dans l'appareil, ce qui peut causer un risque d'électrocution. Un point d'exclamation dans un triangle prévient de la présence d'instructions relatives au fonctionnement et à la maintenance se trouvant dans le manuel fourni avec l'appareil. Ce symbole signifie: uniquement pour usage à l'intérieur. Ce symbole signifie : Lire le mode d emploi. Afin d éviter tout risque d incendie ou de décharge électrique, ne pas exposer cet appareil à la pluie ou l humidité. Pour éviter la formation de condensation à l intérieur de l appareil, patientez quelques minutes pour laisser l appareil s adapter à la température ambiante lorsqu il arrive dans une pièce chauffée après le transport. La condensation empêche l'appareil de fonctionner manière optimale, et elle peut même causer des dommages. Cet appareil est destiné à une utilisation à l intérieur uniquement. Ne pas insérer d objet métallique ou renverser de liquide dans l appareil. Aucun objet contenant un liquide, tels que des vases, ne peut être placé sur cet appareil. Cela risquerait de provoquer une décharge électrique ou un dysfonctionnement. Si un corps étranger est introduit dans l appareil, déconnectez immédiatement de la source d alimentation. Aucune source de flamme nue, telle que des bougies allumées, ne peut être placée sur l'appareil. Ne pas couvrir les orifices de ventilation, un risque de surchauffe en résulterait. Ne pas utiliser l'appareil dans un environnement poussiéreux et le nettoyer régulièrement. Ne pas laisser l'appareil à portée des enfants. Les personnes non expérimentées ne doivent pas utiliser cet appareil. La température ambiante maximale d utilisation de l appareil est de 45 C. Ne pas l utiliser au-delà de cette température. Débranchez toujours l appareil si vous ne l utilisez pas de manière prolongée ou avant d entreprendre des réparations. Les installations électriques ne peuvent être faites que par du personnel qualifié et conformément aux règlements de sécurité électrique et mécanique en vigueur dans votre pays. JB SYSTEMS 16/89 SM-1612 SCANMASTER
19 FRANCAIS MODE D EMPLOI Assurez-vous que la tension d alimentation de la source d alimentation de la zone dans laquelle vous vous trouvez ne dépasse pas celle indiquée à l arrière de l appareil. La prise sera toujours accessible pour que le cordon secteur puisse être enlevé à chaque moment. Le cordon d alimentation doit toujours être en condition parfaite. Mettez immédiatement l unité hors tension si le cordon est écrasé ou endommagé. Pour éviter tout risque de choc électrique, le cordon doit être remplacé par le constructeur, son agent ou un technicien qualifié. Ne laissez jamais le cordon d alimentation entrer en contact avec d autres câbles! Pour éviter tout risque de choc électrique, cet appareil doit être remplacé uniquement avec l adaptateur secteur inclus. Si l adaptateur est défectueux, il sera utilisé seulement par un modèle identique. Utilisez toujours des câbles appropriés et certifiés lorsque vous installez l'appareil. Pour éviter toute décharge électrique, ne pas ouvrir l appareil. En dehors des ampoules et du fusible principal, il n y a pas de pièces pouvant être changées par l utilisateur à l intérieur. Ne jamais réparer ou court-circuiter un fusible. Remplacez systématiquement un fusible endommagé par un fusible de même type et ayant les mêmes spécifications électriques! En cas de problèmes de fonctionnement sérieux, arrêtez toute utilisation de l appareil et contactez votre revendeur immédiatement. Utilisez l emballage d origine si l appareil doit être transporté. Pour des raisons de sécurité, il est interdit d apporter une quelconque modification à l unité non spécifiquement autorisée par les parties responsables. Lexique: SCENE: Une scène est un groupement de différentes valeurs de réglage de curseurs, qui décrit une certaine condition a un certain moment. Par exemple: Vous avez réglé les curseurs du SM-1612 pour positionner un appareil dans une certaine direction, avec un certain gobo et une certaine couleur. La combinaison de toutes ces valeurs de réglage est appelée SCENE BANK: Le SM-1612 possède 8 touches de scène (scene) On peut programmer une scène différente sous chaque touche. Pour pouvoir arriver à un total de 240 scènes mémorisées vous devez les stocker dans des banques (BANK) C est pour cela que vous disposez de 30 banques de 8 scènes chacune. (30 x 8 = 240 scènes). Exemple: BANK1 (scene1 ; scene2 ; scene3 ; scene8) BANK2 (scene1 ; scene2 ; scene3 ; scene8) BANK3 (scene1 ; scene2 ; scene3 ; scene8) BANK30 (scene1 ; scene2 ; scene3 ; scene8) CHASE: Le SM-1612 possède 6 «chases» programmables. Un «chase» est une succession de scènes. Cette succession de scènes peut être programmée par l utilisateur dans n importe quel ordre. Un «chase» peut contenir un maximum de 240 scènes. SPEED: Le temps entre 2 scènes quant un «chase» se déroule automatiquement. FADE TIME: Ceci est le temps qu il faut à un appareil (ou plusieurs) pour bouger d une position à la suivante. JB SYSTEMS 17/89 SM-1612 SCANMASTER
20 FRANCAIS MODE D EMPLOI PAN/TILT: PAN = mouvement horizontal ou mouvement dans l axe X. TILT= mouvement vertical ou mouvement dans l axe Y. FONCTIONS (FACE AVANT) 1. Touches FIXTURES: Utilisés pour sélectionner un ou plusieurs appareils. 2. TOUCHES SCENE: Sont utilisés pour charger ou stocker des scènes. 3. CURSEURS: Sont utilisés pour contrôler les valeurs des différents canaux. 4. Touche PAGE SELECT: Chaque appareil peut avoir jusqu à 16 canaux. Ces 16 canaux sont repartis sur 2 pages de 8 canaux chacune (curseurs): PAGE A: canaux 1 8 PAGE B: canaux Touche OVERRIDE: Quant un «chase» est activé, vous pouvez sélectionner 1 ou plusieurs appareils et les commander indépendamment du programme «chase» qui court. 6. Curseur SPEED: Il est utilisé pour sélectionner la vitesse de déroulement du «chase» dans une gamme allant de 0.1secondes à 10minutes. 7. Curseur FADE TIME: il est utilisé pour régler le temps de transition dans une gamme allant de 0 à 30sec. 8. LCD DISPLAY: Affiche l activité en cours d exécution. L écran LCD contient 2 lignes de 8 caractères chacune. Ci-dessous vous trouverez une liste des abréviations affichées: LCD DISPLAY MESSAGE COMPLET SN1 scene1 est activée BK1 bank1 est activée CHASE1 chase1 est activé STEP 009 pas N 9 d un chase DATA 184 valeur DMX du dernier curseur utilisé = 184 (0 255) SP:1m34s Speed (vitesse)est réglé à 1minute, 34 seconds. FT:3.31s Fade time est réglé à 3,31secondes ASS04 05 Le Joystick est assigné aux canaux 4 & 5 (PAN=4 * TILT=5) RES10 13 Les canaux DMX 10 & 13 sont inversés 9. JOYSTICK PAN: Il est utilisé pour contrôler le mouvement horizontal de/des l appareil(s) sélectionné(s) 10. JOYSTICK TILT: Il est utilisé pour contrôler le mouvement «tilt» (haut/bas) de/des l appareil(s) sélectionné(s) JB SYSTEMS 18/89 SM-1612 SCANMASTER
21 FRANCAIS MODE D EMPLOI 11. Touche PROGRAM: Elle est utilisée pour activer ou pour quitter le mode de programmation. 12. Touche MIDI/RECORD: Vous permet d enregistrer des actions dans la mémoire ou pour régler un canal MIDI. 13. Touche AUTO/DELETE: Pendant le déroulement d un programme chase: Vous permet de passer du mode de fonctionnement manuel en automatique ou inversement. Pendant la programmation: Vous permet de supprimer des scènes ou des «chases» 14. Touche MUSIC/BANK COPY: Pendant le déroulement d un programme: Elle est utilisée pour passer du mode manuel en mode musical ou inversement. Pendant la programmation: Elle est utilisée pour copier des banques. 15. Touche BANK UP/DOWN: Vous permet de sélectionner une des 30 banques ou pour sélectionner un des pas d un «chase» 16. Touche TAP/DISPLAY: Vous permet de sélectionner plusieurs modes d affichage. Affichage des valeurs DMX: vous pouvez choisir entre l affichage des valeurs DMX réelles (0 255) ou des valeurs en pourcentage (0 100%) En mode «chase» vous pouvez utiliser la fonction TAP pour régler la vitesse de déroulement du programme : appuyez 2 fois sur cette touche. Le temps écoulé entre les 2 coups définira la vitesse. (alternative au curseur de réglage de vitesse) 17. Touche BLACKOUT: Coupe l envoi des signaux DMX. 18. Touche CHASE: Elle est utilisée pour activer un ou plusieurs «chases» 19. Touche FINE: Contrôle les fonctions PAN/TILT d un appareil par de tout petit pas. Ceci vous offre la possibilité de positionner les appareils avec une grande précision. (parfois il est plus facile de positionner les appareils en utilisant les curseurs) 20. MODE: Appuyez simultanément sur les touches Mode et Fine pour activer l assignation du joystick et les modes «channel reverse» FONCTIONS (arrière) 1. MIDI INPUT: peut être utilise pour recevoir des informations MIDI. 2. DMX POLARITY: Un signal DMX utilise la plupart du temps les connections suivantes: 1=masse * 2=Data- * 3=Data+ Parfois les câbles sont inversés, dans ce cas la connexion DMX ne fonctionnera pas. Ceci peut être résolu en utilisant cet inverseur de polarité. Ci votre connexion JB SYSTEMS 19/89 SM-1612 SCANMASTER
22 FRANCAIS MODE D EMPLOI DMX ne fonctionne pas et que toutes vos appareils DMX sont correctement adressés, vous pouvez essayer cet inverseur. Dans des conditions de fonctionnement normales, mettez toujours cet inverseur tout à fait à gauche. 3. DMX OUTPUT: Cette sortie envoie les signaux DMX aux appareils connectés. 4. FILE DUMP INPUT: cette entrée peut être utilisée pour connecter un deuxième SM-1612 et copier ainsi ses «chases» et ses «scenes» N utilisez pas ce connecteur pour relier en chaîne le signal DMX de 2 contrôleurs! 5. DC INPUT: connectez l adaptateur AC/DC qui est fourni avec l appareil a cette entrée. Si vous devez utiliser un autre adaptateur, vérifiez toujours s il possède les caractéristiques suivantes : 9 ~ 12Vdc et minimum 300mA avec le pôle + au centre. 6. POWER: Utilisez cet interrupteur pour éteindre ou allumer l appareil. 7. Entrée AUDIO: Peut recevoir des signaux de n importe quelle sortie «line» ou «record» (enregistrement) d un appareil audio. Si cette entrée n est pas utilisée, le micro interne du SM-1612 prendra automatiquement la relève. SET UP 1. ADRESSAGE DES APPAREILS (fixtures): Le SM-1612 possède 12 touches «fixtures» Chaque touche représente 16 adresses DMX. (8 curseurs pour la page A et 8 curseurs pour la page B) Dans la plupart des cas le SM-1612 sera utilisé avec des appareils (scans) qui possèdent maximum 8 canaux DMX. Dans ce cas, seul la page A sera utilisée. Le tableau suivant vous aidera régler vos adresses de départ de vos appareils DMX: Appareil (fixture)# Adresse de départ Réglage des Dip Switch On et 5 On et 6 On ,5 et 6 On et 7 On ,5 et 7 On ,6 et 7 On ,5,6 et 7 On et 8 On ,5 et 8 On ,6 et 8 On ,5,6 et 8 On 2. JOYSTICK SETUP: Pour chaque appareil (scan ou autre) 2 adresses peuvent être assignées au joystick pour les fonctions PAN et TILT: Tenez la touche Program enfoncée jusqu à ce que le LED clignote. Appuyez 2 fois simultanément sur les touches Mode et Fine. Le LED «assign» devrait s allumer. (Si le LED «reverse» est allumé : appuyez une deuxième fois simultanément sur les 2 touches) Utilisez les touches UP et DOWN des banques «bank» pour sélectionner l axe que vous voulez assigner (PAN ou TILT) Si votre scan possède plus de 8 adresses DMX, vous pouvez utiliser la touche JB SYSTEMS 20/89 SM-1612 SCANMASTER
23 FRANCAIS MODE D EMPLOI Tap/Display pour sélectionner le mode de fonctionnement en 16 ou 8 canaux. Appuyez sur la touche correspondant à l appareil que vous voulez régler. Pendent que vous tenez la touche «mode» enfoncée, appuyez sur le numéro de scène, correspondant au curseur qui contrôle le mouvement. (Exemple: Si le «pan» est contrôlé par le curseur N 4, tenez la touche «mode» enfoncée pendant que vous appuyez sur la touche de scène 4). Quant PAN et TILT sont assignés, appuyez à nouveau simultanément sur les touches Mode et Fine pour sortir du mode «Assign» Remarque: Vous pouvez toujours utiliser les curseurs au lieu du joystick pour contrôler les mouvements de l appareil (fixture) 3. SUPPRIMER LE SETUP DU JOYSTICK D UN SCAN: Activez le mode de programmation. (Tenez la touche Program enfoncée jusqu à ce que le LED clignote) Appuyez 2 fois simultanément sur les touches Mode et Fine. Le LED «assign» devrait s allumer. (Si le LED «reverse» est allumé :appuyez une deuxième fois simultanément sur les 2 touches) Si votre scan possède plus de 8 adresses DMX, vous pouvez utiliser la touche Tap/Display pour sélectionner le mode de fonctionnement en 16 ou 8 canaux. Appuyez sur la touche correspondant à l appareil que vous voulez régler. Pendant que vous tenez la touche «mode» enfoncée, appuyez sur la touche Auto/Del. Appuyez pendant quelques secondes sur la touche «program» pour arrêter le mode de programmation. 4. REGLAGE DU FADE TIME: Durant le déroulement automatique ou musical d un programme «chase» vous pouvez introduire un temps de transition entre deux pas du programme. Vous pouvez attribuer ce temps de transition à tous les canaux ou uniquement aux canaux PAN/TILT. Si vous sélectionnez les canaux X/Y vous n aurez pas l inconvénient que les gobos et les couleurs changent aussi lentement pendant les mouvements lents PAN/TILT. Appuyez simultanément sur les touches «mode» et Tap/Display pendant que le SM-1612 SCANMASTER est éteint.(alimentation coupée) Allumez l appareil et appuyez sur la touche «Tap/Display» pour choisir soit ONLY X/Y (temps de transition affecte uniquement les canaux PAN/TILT) soit ALL CH (temps de transition affecte tous les canaux) L écran LCD affiche: AL CH ONLY X/Y OR FD TIME FD TIME Tenez d abord la touche «mode» enfoncée, puis appuyez sur la touche Tap/Display pour mémoriser vos réglages. Tous les LED s flasheront 3 fois. Si vous ne voulez pas sauvegarder vos réglages, vous pouvez appuyer sur la touche black-out pour quitter ce mode. Remarque importante: Assignez d abord le PAN/TILT du joystick (voir précédemment) avant de régler les temps de transition. Si vous changez les valeurs d assignation du PAN/TILT d un appareil plus tard, vous devrez recommencer les réglages de temps de transition! JB SYSTEMS 21/89 SM-1612 SCANMASTER
24 FRANCAIS MODE D EMPLOI 5. INVERSION DU MOUVEMENT DU JOYSTICK / CANAL DMX: Les mouvements PAN et/ou TILT, ou même d autres canaux peuvent être inversés. (La valeur DMX est 255 quant le curseur est en position fermé (bas) et 000 quant le curseur est ouvert (haut) Ouvrez le mode de programmation. (Tenez la touche Program enfoncée jusqu à ce que le LED clignote) Appuyez 1 fois simultanément sur les touches Mode et Fine. Le LED «reverse» devrait s allumer. (Si la LED «assign» est allumée, appuyez une seconde fois simultanément sur les 2 touches) Si votre scan possède plus de 8 adresses DMX, vous pouvez utiliser la touche Tap/Display pour sélectionner le mode de fonctionnement en 16 ou 8 canaux. Appuyez sur la touche correspondant à l appareil que vous voulez régler. Pendant que vous tenez la touche «mode» enfoncée, appuyez sur la touche de scène correspondant au canal que vous voulez inverser (Exemple: Vous voulez inverser le mouvement TILT d un appareil. En mode de programmation, appuyez simultanément sur les touches mode et fine jusqu à ce que le LED «reverse» est allumé. Choisissez l appareil que vous voulez modifier (touches scanner) Tenez la touche mode enfoncée et appuyez sur la touche scène du curseur qui corresponds avec le canal des mouvements TILT. Appuyez simultanément sur les touches «mode» et «fine» jusqu à-ce que les 2 LED s de «assign» et «reverse» s éteignent. Appuyez sur la touche «program» pendant quelques secondes pour arrêter le mode de programmation. Remarque: vous pouvez inverser au maximum 48 canaux. 6. SUPPRIMER LA FONCTION REVERSE DU JOYSTICK / CANAL DMX: Ouvrez le mode de programmation. (Tenez la touche Program enfoncée jusqu à ce que le LED clignote) Appuyez 1 fois simultanément sur les touches Mode et Fine. Le LED «reverse» devrait s allumer. (Si le LED «assign» est allumé, appuyez une seconde fois simultanément sur ces 2 touches) Si votre scan possède plus de 8 adresses DMX, vous pouvez utiliser la touche Tap/Display pour sélectionner le mode de fonctionnement en 16 ou 8 canaux. Appuyez sur la touche correspondant à l appareil que vous voulez régler. Pendant que vous tenez la touche «mode» enfoncée, appuyez sur la touche Auto/Del. Appuyez pendant quelques secondes sur la touche «program» pour arrêter le mode de programmation. Remarque: Toutes les adresses inversées de cet appareil seront remis en mode de fonctionnement normal. 7. REGLAGE DES CANAUX MIDI: Tenez la touche MIDI/Rec enfoncée pendant 3 secondes : le display affiche MIDI xx (xx est le canal MIDI: entre 01 et 16) Utilisez les touches Up/Down pour sélectionner les canaux MIDI de 1 à 16 que vous voulez utiliser pour commander votre SM Tenez la touche MIDI/Rec a nouveau enfoncée pendant 3 secondes : le mode d opération en MIDI est maintenant activé. JB SYSTEMS 22/89 SM-1612 SCANMASTER
25 FRANCAIS MODE D EMPLOI FONCTIONS MIDI: BANK (Octave) NUMÉRO DE NOTE FONCTION BANK 1 00 à 07 1 à 8 de Bank 1 on ou off BANK 2 08 à 15 1 à 8 de Bank 2 on ou off BANK 3 16 à 23 1 à 8 de Bank 3 on ou off BANK 4 24 à 31 1 à 8 de Bank 4 on ou off BANK 5 32 à 39 1 à 8 de Bank 5 on ou off BANK 6 40 à 47 1 à 8 de Bank 6 on ou off BANK 7 48 à 55 1 à 8 de Bank 7 on ou off BANK 8 56 à 63 1 à 8 de Bank 8 on ou off BANK 9 64 à 71 1 à 8 de Bank 9 on ou off BANK à 79 1 à 8 de Bank10 on ou off BANK à 87 1 à 8 de Bank11 on ou off BANK à 95 1 à 8 de Bank12 on ou off BANK à à 8 de Bank13 on ou off BANK à à 8 de Bank14 on ou off BANK à à 8 de Bank14 on ou off CHASES 120 à à 6 Chases BLACK-OUT 126 BLACK-OUT Le SM-1612 SCANMASTER ne reçoit que des notes MIDI, il est possible que vous devez transposer votre clavier pour trouver les notes qui correspondent. SCÈNES 1. PROGRAMMER UNE SCÈNE: a. Ouvrez le mode de programmation. (Tenez la touche Program enfoncée jusqu à ce que le LED clignote) b. Vérifiez si le LED de la touche black-out est éteint, si ce n est pas le cas, appuyez 1 fois sur cette touche pour sortir du mode black-out. c. Vérifiez si les curseurs «speed» et «fade time» sont positionnés à zéro. d. Sélectionnez l appareil que vous voulez contrôler. Vous pouvez contrôler plusieurs appareils en même temps en appuyant sur les touches correspondant aux appareils que vous voulez programmer e. Bougez les curseurs et le joystick jusqu à la position désirée. (Si nécessaire, sélectionnez page B pour contrôler les canaux 9 à 16 de l appareil) f. Appuyez sur les touches Up/Down pour choisir la banque dans laquelle vous voulez stocker la scène. Vous disposez de 30 banques au total ; vous pouvez stocker jusqu à 8 scènes dans chaque banque. g. Quant tous les appareils sont réglés dans les positions désirés d une scène, appuyez sur la touche MIDI/Rec. h. Appuyez sur la touche de scène dans laquelle vous voulez stocker la scène. Tous les LED s flasheront pour confirmer l opération. L écran LCD affichera la banque et la scène. i. Répétez les pas de d h jusqu à ce que toutes les scènes soient programmées. j. Si vous ne voulez pas continuer la programmation, tenez la touche «program» enfoncée pendant quelques secondes pour sortir du mode de programmation. Le LED s éteindra. JB SYSTEMS 23/89 SM-1612 SCANMASTER
26 FRANCAIS MODE D EMPLOI 2. EDITER UNE SCÈNE: a. Ouvrez le mode de programmation. (Tenez la touche Program enfoncée jusqu à ce que le LED clignote) b. Vérifiez si le LED de la touche black-out est éteint, si ce n est pas le cas, appuyez 1 fois sur cette touche pour sortir du mode black-out. c. Appuyez sur les touches Bank Up/Down pour sélectionner la banque qui contient la scène que vous voulez éditer. d. Sélectionnez la scène que vous voulez éditer en appuyant sur sa touche de scène désirée. e. Sélectionnez les appareils (scans) et réglez les curseurs et/ou le joystick pour effectuer les nouveaux réglages de la scène. f. Une fois ces réglages terminés, appuyez sur la touche MIDI/Rec. g. Appuyez sur la touche de scène correspondant à la scène que vous éditez. Ceci remplacera l ancienne scène par la nouvelle. h. Tenez la touche «program» enfoncée pendant quelques secondes pour quitter le mode de programmation. Le LED s éteindra. Remarque: Soyez sûr de sélectionner la même scène dans les pas d et g, sinon vous risquez d effacer accidentellement une scène existante 3. COPIER UNE SCÈNE: a. Ouvrez le mode de programmation. (Tenez la touche Program enfoncée jusqu à ce que le LED clignote) b. Si vous voulez vérifier la sortie du signal, il faut que le LED du black-out soit éteint, si ce n est pas le cas, appuyez 1 fois sur la touche pour sortir du mode black-out. c. Appuyez sur les touches Bank Up/Down pour sélectionner la banque qui contient la scène que vous voulez copier. d. Appuyez sur la touche de la scène que vous voulez copier e. Appuyez sur les touches Up/Down pour sélectionner la banque dans laquelle vous voulez copier la scène. f. Appuyez sur la touche MIDI/Rec. g. Appuyez sur la touche de la scène vers laquelle vous voulez envoyer la copie. Si vous voulez copier d autres scènes, vous pouvez répéter les pas c à g. h. Tenez la touche «program» enfoncée pendant quelques secondes pour quitter le mode de programmation. Le LED s éteindra. 4. SUPPRIMER UNE SCÈNE: a. Ouvrez le mode de programmation. (Tenez la touche Program enfoncée jusqu à ce que le LED clignote) b. Si vous voulez vérifier la sortie du signal, il faut que le LED du black-out soit éteint, si ce n est pas le cas, appuyez 1 fois sur la touche pour sortir du mode black-out. c. Appuyez sur les touches Bank Up/Down pour sélectionner la banque qui contient la scène que vous voulez supprimer. d. Tenez la touche Auto/Del enfoncée. Appuyez sur la touche de la scène que vous voulez supprimer. Tous les LED s clignoteront 3 fois. Si la scène est supprimée, tous les niveaux DMX sont mis à zéro. Si vous voulez supprimer d autres scènes, répétez les pas c & d. e. Tenez la touche «program» enfoncée pendant quelques secondes pour quitter le mode de programmation. Le LED s éteindra. JB SYSTEMS 24/89 SM-1612 SCANMASTER
27 FRANCAIS MODE D EMPLOI 5. SUPPRIMER TOUTES LES SCÈNES: a. Éteignez le SM b. Rallumez l appareil pendant que vous tenez les touches «program» et «bank down» enfoncés simultanément. Toutes les scènes devraient être effaces.. Attention: Sachez que toutes les scènes seront perdues, à utiliser avec prudence! 6. COPIER UNE BANQUE DE SCÈNES: a. Ouvrez le mode de programmation. (Tenez la touche Program enfoncée jusqu à ce que le LED clignote) b. Si vous voulez vérifier la sortie du signal, il faut que le LED du black-out soit éteint, si ce n est pas le cas, appuyez 1 fois sur la touche pour sortir du mode black-out. c. Appuyez sur les touches Bank Up/Down pour sélectionner la banque que vous voulez copier d. Appuyez sur la touche MIDI/Rec. e. Appuyez sur les touches Bank Up/Down pour sélectionner la banque vers laquelle vous voulez copier. f. Appuyez sur la touche Music/Bank Copy, tous les LED s clignoteront 3 fois pour signaler que la fonction à été complétée. g. Tenez la touche «program» enfoncée pendant quelques secondes pour quitter le mode de programmation. Le LED s éteindra. CHASES Un «chase» est une succession de scènes dans un certain ordre, ce qui implique que vous devez déjà avoir crée des scènes avant de pouvoir programmer un chase. Avant de programmer des chases pour la première fois il est conseillé d effacer tous les «chases» qui se trouvent dans le SM Voir «Supprimer tous les chases» ci dessous. 1. SUPPRIMER TOUS LES CHASES: a. Eteignez le contrôleur. b. Rallumez le contrôleur en tenant enfoncés les touches «Auto/Del» et «Bank Down» simultanément. Tous les «chases»devraient être effaces. Attention: Sachez que tous vos «chases» seront perdus, à utiliser avec prudence! 2. PROGRAMMER UN CHASE: a. Ouvrez le mode de programmation. (Tenez la touche Program enfoncée jusqu à ce que le LED clignote) b. Si vous voulez vérifier la sortie du signal, il faut que le LED du black-out soit éteint, si ce n est pas le cas, appuyez 1 fois sur la touche pour sortir du mode black-out. c. Appuyez sur la touche du chase que vous voulez programmer. d. Utilisez les touches Bank Up/Down pour sélectionner la banque qui contient les scènes que vous voulez programmer dans votre chase. e. Appuyez sur la touche de la scène désirée. f. Appuyez sur la touche MIDI/Rec. JB SYSTEMS 25/89 SM-1612 SCANMASTER
28 FRANCAIS MODE D EMPLOI g. Répétez les pas d à g jusqu à ce que toutes les scènes soient programmées dans le chase. h. Tenez la touche «program» enfoncée pendant quelques secondes pour quitter le mode de programmation. Le LED s éteindra. 3. INSERER UN PAS DANS UN PROGRAMME CHASE: a. Ouvrez le mode de programmation. (Tenez la touche Program enfoncée jusqu à ce que le LED clignote) b. Si vous voulez vérifier la sortie du signal, il faut que le LED du black-out soit éteint, si ce n est pas le cas, appuyez 1 fois sur la touche pour sortir du mode black-out. c. Appuyez sur la touche correspondant au chase que vous voulez programmer. d. Appuyez sur la touche TAP/Display, l écran LCD affichera le pas actuel du chase. e. Appuyez sur les touches Bank Up/Down jusqu à ce que vous arriviez au pas, derrière lequel vous voulez insérer un nouveau pas f. Appuyez sur la touche MIDI/Rec, les caractères afficheront le pas, un pas plus haut qu avant. L écran LCD affiche le chase actuel, la scène et la banque g. Appuyez sur les touches Bank Up/Down pour sélectionner la banque qui contient la scène que vous voulez insérer dans votre programme «chase» h. Une fois cette scène sélectionnée, appuyez à nouveau sur la touche MIDI/Rec. Tous les LED s clignoteront trois fois pour indiquer que le nouveau pas a été inséré dans le programme «chase» i. Répétez les pas e à h jusqu à ce que toutes les scènes désirées aient été insérées. j. Tenez la touche «program» enfoncée pendant quelques secondes pour quitter le mode de programmation. Le LED s éteindra. 4. SUPPRIMER UN PAS D UN PROGRAMME CHASE: a. Ouvrez le mode de programmation. (Tenez la touche Program enfoncée jusqu à ce que le LED clignote) b. Si vous voulez vérifier la sortie du signal, il faut que le LED du black-out soit éteint, si ce n est pas le cas, appuyez 1 fois sur la touche pour sortir du mode black-out. c. Appuyez sur la touche correspondant au chase que vous voulez supprimer. d. Appuyez sur la touche Tap/Display, l écran LCD affiche le pas actuel. e. Appuyez sur les touches Bank Up/Down jusqu à ce que vous arriviez au pas que vous voulez supprimer. f. Appuyez sur la touche Auto/Del pour supprimer le pas. Tous les LED s clignoteront 3 fois pour indiquer que l opération à été exécutée. g. Répétez si nécessaire les pas e et f afin d effacer tous les pas non-désirés. h. Tenez la touche «program» enfoncée pendant quelques secondes pour quitter le mode de programmation. Le LED s éteindra. 5. AJOUTER UNE BANQUE DE SCÈNES AU CHASE: Remarque: La banque de scènes sera ajoutée à la fin du «chase». a. Ouvrez le mode de programmation. (Tenez la touche Program enfoncée jusqu à ce que le LED clignote) JB SYSTEMS 26/89 SM-1612 SCANMASTER
29 FRANCAIS MODE D EMPLOI b. Si vous voulez vérifier la sortie du signal, il faut que le LED du black-out soit éteint, si ce n est pas le cas, appuyez 1 fois sur la touche pour sortir du mode black-out.. c. Appuyez sur la touche correspondant au chase que vous voulez retravailler. d. Utilisez les touches Bank Up/Down pour sélectionner la banque de scènes que vous voulez ajouter. e. Appuyez sur la touche Music/Bank Copy. f. Appuyez sur la touche MIDI/Rec, tous les LED s clignoteront 3 fois pour indiquer que l opération vient d être exécutée. g. Tenez la touche «program» enfoncée pendant quelques secondes pour quitter le mode de programmation. Le LED s éteindra. PLAYBACK DE SCÈNES Il y a 3 modes de déroulement de scènes possible: 1. Manual Mode: vous pouvez sélectionner et exécuter une ou plusieurs scènes manuellement. a. Quant l appareil est mis sous tension, il démarre automatiquement en mode manuel. b. Vérifiez si le LED Manual mode est allumé. c. Si vous voulez vérifier la sortie du signal, il faut que le LED du black-out soit éteint, si ce n est pas le cas, appuyez 1 fois sur la touche pour sortir du mode black-out. d. Utilisez les touches Bank Up/down pour sélectionner la banque dans laquelle se trouve les scènes que vous voulez exécuter. e. Appuyez sur les touches de scène correspondant aux scènes que vous voulez reproduire. f. Répétez éventuellement les pas d et e pour sélectionner d autres scènes. 2. Auto Mode: Vous pouvez faire dérouler des scènes d une banque en séquence. Vous pouvez aussi utiliser le «Manual override» (voir plus loin pour plus d informations) a. Appuyez sur la touche Auto/Del pour activer le mode Auto. Le LED Auto s allume. b. Utilisez les touches bank Up/Down pour sélectionner la banque des scènes à exécuter. c. Après avoir sélectionné la banque de scènes, vous pouvez utiliser les curseurs de vitesse et du temps de transition pour régler la vitesse d exécution et la progression des scènes. d. Vous pouvez aussi utiliser la touche TAP/Display pour définir la vitesse. Le temps d attente entre 2 tapotements déterminera le temps d attente entre deux pas. Ce réglage restera effectif jusqu à ce que le curseur «speed» soit manipulé. e. Appuyez sur la touche Auto/Display pour sortir du mode Auto. 3. Music Mode: Vous pouvez faire dérouler des scènes d une banque au rythme de la musique. Vous pouvez utiliser pour cela le micro interne ou ajouter un signal audio d une source externe en le branchant à l entrée audio du SM Vous JB SYSTEMS 27/89 SM-1612 SCANMASTER
30 FRANCAIS MODE D EMPLOI pouvez également utiliser la touche «Manual override», voyez plus loin pour plus d informations. a. Appuyez sur la touche Music/Bank copy pour activer le mode Musical. Le LED Music s allume. b. Utilisez les touches bank Up/Down pour sélectionner la banque de scènes que vous voulez exécuter. Les scènes sélectionnées se dérouleront en séquence au rythme de la musique. c. Appuyez à nouveau sur la touche Music/Bank Copy pour quitter le mode musical. PLAYBACK DES CHASES Il y a 3 modes de déroulement de programmes «chase»: 1. Manual Mode: Vous pouvez sélectionner et exécuter un programme «chase» manuellement. a. Quant l appareil est mis sous tension, il démarre automatiquement en mode manuel. b. Vérifiez si le LED «Manual» est allumé. c. Verifiez si le LED de la touche black-out est éteint. S il est allumé, appuyez une fois sur cette touche pour désactiver le mode black-out. d. Sélectionnez le «chase» que vous voulez utiliser. L écran LCD affiche le numéro du chase. e. Appuyez sur la touche TAP/Display, l écran LCD affiche maintenant les numéros des pas du «chase» que vous avez sélectionné. f. Utilisez les touches Bank Up/down pour activer manuellement les différents pas d un «chase» g. Sélectionnez si nécessaire un autre «chase» et répétez les pas e et f (si vous appuyez une deuxième fois la touche du «chase» vous le désactivez) 2. Auto Mode: vous pouvez faire dérouler les pas d un ou de plusieurs «chase» automatiquement tout en contrôlant la vitesse de déroulement. Si vous sélectionnez plus d un chase, ils seront activés automatiquement l un après l autre. Le LED du «chase» actif clignotera. Vous pouvez utiliser la touche «Manual override» (voir plus loin) a. Appuyez sur la touche Auto/Del pour activer le mode automatique. Le LED Auto s allume. b. Sélectionnez un ou plusieurs chases. (Si vous appuyez 2 fois sur le même chase vous le désélectionnez) Les LED s des chases sélectionnés sont allumés. Le «chase» qui est actif clignote et son nom + scène/banque active est affiché sur l écran LCD. c. Utilisez les curseurs «speed» et «Fade Time» pour régler la vitesse de déroulement des «chases» d. Vous pouvez aussi utiliser la touche TAP/Display pour régler la vitesse. Le temps d attente entre 2 tapotements déterminera le temps d attente entre deux pas. Ce réglage restera effectif jusqu à ce que le curseur «speed» soit manipulé. e. Appuyez sur la touche Auto/Display pour sortir du mode automatique. JB SYSTEMS 28/89 SM-1612 SCANMASTER
31 FRANCAIS MODE D EMPLOI 3. Music Mode: vous pouvez faire dérouler un ou plusieurs «chases» au rythme de la musique. Vous pouvez utiliser pour cela le micro interne ou ajouter un signal audio d une source externe en le branchant à l entrée audio du SM Si vous sélectionnez plus d un chase, ils seront activés automatiquement l un après l autre. Le LED du «chase» actif clignotera. Vous pouvez utiliser la touche «Manual override» (voir plus loin) a. Appuyez sur la touche Music/Bank copy pour activer le mode de fonctionnement musical. Le LED Music s allume. b. Sélectionnez un ou plusieurs chases. (Si vous appuyez 2 fois sur le même chase vous le désélectionnez) Les LED s des chases sélectionnés sont allumés. Le «chase» qui est actif clignote et son nom + scène/banque active est affiché sur l écran LCD. c. Appuyez à nouveau sur la touche Music/Bank Copy pour sortir du mode musical. Remarque: Vous pouvez utiliser le curseur «fade time» pour rendre les mouvements un peu moins brusques. Ne rendez pas ce temps de transition trop long, l effet de synchronisation au rythme de la musique pourrait se perdre! FONCTION OVERRIDE Pendant le déroulement de scènes ou de chases en mode automatique ou musicale, il est possible de sélectionner un ou plusieurs appareils et de le/les commander manuellement. Pour cela il vous suffit de sélectionner les appareils que vous voulez sortir du mode de commande automatique et d appuyer sur la touche «override» Maintenant vous pouvez manipuler toutes les fonctions des appareils que vous avez sélectionnés, indépendamment du programme qui est activé. Vous pouvez sélectionner ou désélectionner d autres appareils à n importe quel moment. Dès qu un appareil est désélectionné ou que la fonction «override» est désactivée, les appareils continuent leur programme. FILE DUMP Il est possible de copier la mémoire d un SM-1612 vers un autre SM Ceci peut vous épargner beaucoup de temps de programmation! 1. Préparer l appareil pour envoyer des informations: Ces manipulations doivent se faire sur le Scanmaster qui va envoyer les informations : a. Coupez l alimentation. b. Appuyez simultanément sur les touches suivantes et tenez les enfoncées pendant que vous rallumez l appareil: fixture2 fixture3 scene1 L écran LCD affiche TRANSMIT pour indiquer que le SM-1612 est prêt à envoyer les informations. 2. Préparer l appareil pour recevoir des informations: Ces manipulations doivent se faire sur le Scanmaster qui va recevoir les informations : a. Coupez l alimentation. JB SYSTEMS 29/89 SM-1612 SCANMASTER
32 FRANCAIS MODE D EMPLOI b. Appuyez simultanément sur les touches suivantes et tenez les enfoncées pendant que vous rallumez l appareil: Fixture8 Fixture9 Scene2 L écran LCD affiche RECEIVE pour indiquer que le SM-1612 est prêt à recevoir des informations. 3. Démarrez le transfert des données: Appuyez simultanément sur les touches 7 et 8 du Scanmaster qui affiche TRANSMIT sur l écran LCD. L écran affiche une petite barre de progression. Ne touchez aucun des Scanmasters pendant cette opération. A la fin de l opération, les 2 appareils retourneront automatiquement en mode de fonctionnement normal. Eteignez et rallumez l appareil qui vient de recevoir les données avant de l utiliser! ENTRETIEN Nettoyez l appareil à l aide d un chiffon doux, légèrement humide. Evitez d introduire de l eau à l intérieur de l appareil. N utilisez pas de produits volatiles tels le benzène ou le thinner qui peuvent endommager l appareil. SPÉCIFICATIONS Cet appareil ne produit pas d interférences radio. Il répond aux exigences nationales et européennes. La conformité a été établie et les déclarations et documents correspondants ont été déposés par le fabricant. Alimentation: DC 9 ~ 12V 300mA minimum. Adaptateur AC/DC: AC 240V, 50Hz 12Vdc / 300mA Sorties DMX: 3pin XLR; DMX, canaux Entrée Midi: 5pin Din Entrée Audio: Cinch 0.1V ~ 1Vpp Dimensions: 48.3 x 13.4 x 8.5cm (19 / 3U) Poids: 2.7kg Chacune de ces informations peut être modifiée sans avertissement préalable Vous pouvez télécharger la dernière version du mode d emploi sur notre site web: JB SYSTEMS 30/89 SM-1612 SCANMASTER
33 NEDERLANDS GEBRUIKSAANWIJZING GEBRUIKSAANWIJZING Wij danken U voor het kopen van dit JB Systems product. Om voordeel te halen uit alle mogelijkheden die dit toestel biedt, raden wij U aan deze gebruiksaanwijzing zeer aandachtig te lezen. FEATURES 192 DMX kanalen 12 Fixtures van elk 16 kanalen (wordt het best gebruikt met toestellen tot 8 DMX kanalen) 30 Banken van 8 programmeerbare scènes (totaal = 240 scènes) 6 Programmeerbare chases van 240 scènes 8 Schuifregelaars voor een manuele controle van de kanalen Configureerbare joystick voor een gemakkelijke controle van de kanalen File Dump laat U toe gegevens over te dragen van een SM-1612 naar een andere SM-1612 Automatische programmaweergave met regelbare snelheid en fade time Fade time/assign fade time (configureerbaar) Omkeerbare DMX kanaalwaarden laten U toe om toestellen tegenovergesteld op elkaar te laten reageren in een chase 8-kanaals of 16-kanaals werking Fijne regeling van de joystick voor de pan en tilt bewegingen Black-out master toets Manual Override toets laat U toe om het even welk toestel manueel te bedienen tijdens het lopen van een programma. Ingebouwde microfoon voor een werking op het ritme van de muziek MIDI controle over de banks, chases en black-out DMX Polariteitkeuzeschakelaar Geheugen tegen stroomuitval. VÓÓR GEBRUIK Controleer de inhoud: Kijk na of de verpakking volgende onderdelen bevat: SM-1612 SCANMASTER AC/DC adapter Gebruiksaanwijzing Belangrijke instructies: Stel dit toestel nooit bloot aan regen of zeer vochtige plaatsen, dit om brand en elektrocutie te voorkomen. Om elektrocutie te voorkomen mag U het toestel nooit zelf openmaken. Contacteer uw dealer als er zich een probleem voordoet. JB SYSTEMS 31/89 SM-1612 SCANMASTER
34 NEDERLANDS GEBRUIKSAANWIJZING Plaats nooit metalen voorwerpen en mors geen vloeistoffen in het toestel. Elektrocutie of een slechte werking kunnen hiervan het gevolg zijn. Vermijd stoffige en vochtige plaatsen, reinig het toestel regelmatig. VEILIGHEIDSVOORSCHRIFTEN: WAARSCHUWING: Om het risico op elektrocutie zoveel mogelijk te vermijden mag CAUTION u nooit de behuizing verwijderen. Er bevinden zich geen onderdelen in het toestel die u zelf kan herstellen. Laat de herstellingen enkel uitvoeren door een bevoegde technicus. De bliksempijl die zich in een gelijkbenige driehoek bevindt is bedoeld om u te wijzen op het gebruik of de aanwezigheid van niet-geïsoleerde onderdelen met een gevaarlijke spanning in het toestel die voldoende kracht heeft om een risico van elektrocutie in te houden. Het uitroepteken binnen de gelijkbenige driehoek is bedoeld om de gebruiker erop te wijzen dat er in de meegeleverde literatuur belangrijke gebruik en onderhoudsinstructies vermeld staan betreffende dit onderdeel. Dit symbool betekent: het apparaat mag enkel binnenhuis worden gebruikt. Dit symbool betekent: Lees de handleiding! Dit symbool betekent: Controletoestel voor lamp Stel dit apparaat niet bloot aan regen of vocht, dit om het risico op brand en elektrische schokken te voorkomen. Om de vorming van condensatie binnenin te voorkomen, laat het apparaat aan de omgevingstemperatuur wennen wanneer het, na het transport, naar een warm vertrek is overgebracht. Condensatie kan het toestel soms verhinderen perfect te functioneren. Het kan soms zelfs schade aan het apparaat toebrengen. Gebruik dit apparaat uitsluitend binnenshuis. Plaats geen stukken metaal en mors geen vocht binnen in het toestel om elektrische schokken of storing te vermijden. Objecten gevuld met water, zoals bvb. Vazen, mogen op dit apparaat worden geplaatst. Indien er toch een vreemd voorwerp of water in het apparaat geraakt, moet U het direct van het lichtnet afkoppelen. Open vuur, zoals brandende kaarsen, mogen niet op het apparaat geplaatst worden. Bedek geen enkele ventilatieopening om oververhitting te vermijden. Zorg dat het toestel niet in een stoffige omgeving wordt gebruikt en maak het regelmatig schoon. Houd het apparaat uit de buurt van kinderen. Dit apparaat mag niet door onervaren personen bediend worden. De maximum veilige omgevingstemperatuur is 40 C. Gebruik het apparaat dus niet bij hogere temperaturen. Trek altijd de stekker uit wanneer het apparaat gedurende langere tijd niet wordt gebruikt of alvorens met de onderhoudsbeurt te beginnen. De elektrische installatie behoort uitsluitend uitgevoerd te worden door bevoegd personeel, volgens de in uw land geldende regels betreffende elektrische en mechanische veiligheid. Controleer dat de beschikbare spanning niet hoger is dan die aangegeven op de achterzijde van het toestel. JB SYSTEMS 32/89 SM-1612 SCANMASTER
35 NEDERLANDS GEBRUIKSAANWIJZING Het stopcontact zal steeds vrij toegankelijk blijven zodat de stroomkabel op elk moment kan worden uitgetrokken. De elektrische kabel behoort altijd in uitstekende staat te zijn. Zet het apparaat onmiddellijk af als de elektrische kabel gekneusd of beschadigd is. De kabel moet vervangen worden door de fabrikant zelf, zijn dealer of vergelijkbare bekwame personen om een brand te voorkomen. Laat de elektrische draad nooit in contact komen met andere draden. Om een brand te voorkomen, dient het controletoestel van de lamp enkel gebruikt te worden met de adapter die bij het toestel geleverd werd. Wanneer de adapter beschadigd is, dient een adapter van hetzelfde model gebruikt te worden. Om elektrische schokken te voorkomen, moet U de behuizing niet openen. Afgezien van de zekering zitten er geen onderdelen in die door de gebruiker moeten worden onderhouden. Repareer nooit een zekering en overbrug de zekeringhouder nooit. Vervang een beschadigde zekering steeds door een zekering van hetzelfde type en met dezelfde elektrische kenmerken. Ingeval van ernstige problemen met het bedienen van het toestel, stopt U onmiddellijk het gebruik ervan. Contacteer uw dealer voor een eventuele reparatie. Gebruik best de originele verpakking als het toestel vervoerd moet worden. Om veiligheidsredenen is het verboden om ongeautoriseerde modificaties aan het toestel aan te brengen. WOORDGEBRUIK: SCÈNE: een scène is a set van verschillende schuifregelaarwaarden die een zekere toestand op een zeker moment weergeeft. Voorbeeld: U moet de schuifregelaars van de SM-1612 instellen om een toestel in een zekere positie te zetten, met een zekere gobo en een zeker kleur. De combinatie van al deze waarden noemt men een scène. BANK: Op de SM-1612 staan 8 scènetoetsen. Onder elke scènetoets kan een scène opgeslagen worden. Om een totaal van 240 scène geheugens te verkrijgen moet men die opslaan in banken. Daarom beschikt men over 30 banken van elk 8 scènes: 30 x 8 = 240 scènes. Voorbeeld: BANK1 (scene1 ; scene2 ; scene3 ; scene8) BANK2 (scene1 ; scene2 ; scene3 ; scene8) BANK3 (scene1 ; scene2 ; scene3 ; scene8) BANK30 (scene1 ; scene2 ; scene3 ; scene8) CHASE: De SM-1612 beschikt over 6 programmeerbare chases. Een chase is een opeenvolging van scènes. Deze opeenvolging van scènes kan geprogrammeerd worden door de gebruiker in eender welke volgorde. Een chase kan maximum 240 scènes bevatten. SPEED: de tijd tussen 2 scènes in een chase (automatic mode) FADE TIME: Dit is de tijd die een toestel (of toestellen) nodig heeft om van een positie naar een andere over te gaan. PAN/TILT: PAN staat voor de horizontale beweging op de X-as. TILT staat voor de verticale beweging op de Y-as. JB SYSTEMS 33/89 SM-1612 SCANMASTER
36 NEDERLANDS GEBRUIKSAANWIJZING FUNCTIES (VOORKANT) 1. FIXTURE TOETSEN: gebruik deze toetsen om één of meerdere toestellen te selecteren. 2. SCENE TOETSEN: gebruik deze toetsen om scènes te laden of op te slaan. 3. SCHUIFREGELAARS: gebruik deze regelaars om de waarden van de verschillende kanalen in te stellen. 4. PAGE SELECT TOETS: elk toestel kan over maximum 16 kanalen beschikken. Deze 16 kanalen zijn verdeeld over 2 pagina s van elk 8 kanalen (schuifregelaars): PAGE A: kanalen 1 8 PAGE B: kanalen OVERRIDE TOETS: wanneer een chase loopt kan men 1 of meerdere toestellen (fixtures) selecteren om ze manueel te bedienen, ongeacht de geactiveerde chase. 6. SPEED SCHUIFREGELAAR: wordt gebruikt om de chase speed in te stellen van 0.1seconden tot 10 minuten. 7. FADE TIME SCHUIFREGELAAR: Wordt gebruikt om de fade time (overgangssnelheid) in te stellen van 0 tot 30sec. 8. LCD DISPLAY: geeft de functie of het geactiveerde programma weer. De LCD Display beschikt over 2 lijnen van elk 8 karakters. Hieronder vindt U een lijst van de gebruikte afkortingen: LCD DISPLAY VOLLEDIG BERICHT SN1 scene1 is actief BK1 bank1 is actief CHASE1 chase1 is actief STEP 009 stap 9 van een chase DATA 184 DMX waarde van de laatst gebruikte schuifregelaar= 184 (0 255) SP:1m34s Speed is afgesteld op 1minuut en 34 seconden. FT:3.31s Fade time is afgesteld op 3,31seconden ASS04 05 Joystick is toegewezen aan de kanalen 4 & 5 (PAN=4 * TILT=5) RES10 13 DMX kanalen 10 & 13 werken omgekeerd 9. JOYSTICK PAN: wordt gebruikt om de pan (horizontale bewegingen) van de geselecteerde toestellen te controleren 10. JOYSTICK TILT: wordt gebruikt om de tilt (verticale bewegingen) van de geselecteerde toestellen te controleren 11. PROGRAM TOETS: wordt gebruikt om de programmeerfunctie in of uit te schakelen. JB SYSTEMS 34/89 SM-1612 SCANMASTER
37 NEDERLANDS GEBRUIKSAANWIJZING 12. MIDI/RECORD TOETS: wordt gebruikt om acties in het geheugen op te slaan of om een MIDI kanaal in te stellen 13. AUTO/DELETE TOETS: In Running mode: laat U toe te kiezen tussen de manuele of automatische chase. In Program mode: laat U toe om scènes of chases te wissen. 14. MUSIC/BANK COPY TOETS: In Running mode: laat U toe te kiezen tussen de manuele of de muzikale chase. In Program mode: laat U toe banken te kopiëren. 15. BANK UP/DOWN TOETS: wordt gebruikt om één van de 30 banken te kiezen of om een stap te kiezen in een chase. 16. TAP/DISPLAY TOETS: voor de keuze tussen verschillende weergave mogelijkheden van de display. Men kan kiezen tussen reële DMX waarden (0 255) of waarden in percentage (0 100%) Men kan deze toets ook gebruiken voor de TAP functie in de automatische chase mode om de snelheid in te stellen: druk 2 maal op de TAP toets met een welbepaald tijdsinterval. Dit tijdsinterval bepaalt de nieuwe snelheid van de chase. (alternatief voor de speed schuifregelaar) 17. BLACKOUT TOETS: wordt gebruikt om de DMX uitgangssignalen te stoppen. 18. CHASE TOETS: Wordt gebruikt om 1 of meerdere chases te activeren. 19. FINE TOETS: wordt gebruikt om fijne PAN/TILT bewegingen uit te voeren. Dit laat U toe de toestellen preciezer te positioneren. (soms bekomt men betere resultaten door de kanaalschuifregelaars te gebruiken) 20. MODE: Door tegelijkertijd op de Mode en Fine toetsen te drukken activeert men de toewijzing van de joystick en de kanaalinversie modes. FUNCTIES (achterkant) 1. MIDI INPUT: kan gebruikt worden om MIDI gegevens te ontvangen. 2. DMX POLARITY SCHAKELAAR: een DMX signaal heeft normaal volgende verbindingen: 1=massa * 2= - gegevens * 3= + gegevens In sommige gevallen kan het gebeuren dat de kabel omgekeerd verbonden is, met als resultaat dat de DMX verbinding niet werkt. Dit kan opgelost worden door deze schakelaar te gebruiken. Als uw DMX niet werkt en als alle DMX toestellen correct JB SYSTEMS 35/89 SM-1612 SCANMASTER
38 NEDERLANDS GEBRUIKSAANWIJZING geadresseerd zijn kunt u deze toets proberen. Zet in normale omstandigheden deze schakelaar steeds in zijn uiterst linkse positie. 3. DMX OUTPUT: Zendt DMX signalen naar de verbonden toestellen 4. FILE DUMP INPUT: men kan via deze aansluiting chases en scènes kopiëren van een andere SM Gebruik deze aansluiting niet om de DMX signalen van 2 controllers te linken! 5. DC INPUT: verbindt de meegeleverde AC/DC adapter met deze aansluiting. Indien U om bepaalde redenen een andere adapter moet aansluiten, gebruik dan steeds een 9 ~ 12Vdc adapter van minimum 300mA met + pool in het center. 6. POWER SWITCH: wordt gebruikt om het toestel aan en uit te zetten 7. AUDIO input: kan audio signalen ontvangen van om het even welke line of record uitgang van andere audio toestellen. Als deze ingang niet gebruikt wordt, wordt automatisch de ingebouwde microfoon van SM-1612 ingeschakeld. SET-UP 1. FIXTURE SET-UP: de SM-1612 heeft 12 fixtures toetsen. Elke fixture toets beschikt over 16 DMX adressen. (8 schuifregelaars op page A en 8 schuifregelaars op page B ) In de meeste gevallen zal de SM-1612 gebruikt worden met toestellen van 8 of minder DMX adressen. Dit betekent dat in de meeste gevallen enkel page A gebruikt wordt. De volgende tabel helpt U om de DMX startadressen van uw toestellen in te stellen: Fixture # Digitale Setting Dip Switch Setting On en 5 On en 6 On ,5 en 6 On en 7 On ,5 en 7 On ,6 en 7 On ,5,6 en 7 On en 8 On ,5 en 8 On ,6 en 8 On ,5,6 en 8 On 2. JOYSTICK SET-UP: voor elk toestel kunnen 2 adressen aan de PAN en TILT van de joystick toegewezen worden: Houdt de Program toets ingedrukt tot de LED knippert. Druk 2 x tegelijkertijd op de Mode en Fine toetsen. De assign LED moet branden. (als de reverse LED aan is, druk dan beide toetsen nogmaals tegelijkertijd in) Gebruik de bank UP en DOWN toetsen om de PAN TILT functie te kiezen. Indien het toestel meer dan 8 DMX adressen heeft kan men de Tap/Display toets gebruiken om de 16 of 8-kanaals instelling te kiezen. Druk op de toets die overeenkomt met het toestel dat u wilt instellen. Houdt de mode toets ingedrukt en druk op de scène toets die overeenstemt met de schuifregelaar die de gewenste beweging controleert. (Voorbeeld: Als de pan JB SYSTEMS 36/89 SM-1612 SCANMASTER
39 NEDERLANDS GEBRUIKSAANWIJZING beweging gecontroleerd wordt met schuifregelaar nummer 4, houdt dan de Mode toets ingedrukt terwijl U op scène toets 4 drukt). Wanneer PAN en TILT toegewezen zijn, druk dan terug tegelijkertijd op de Mode en Fine toetsen om de Assign functie te verlaten. Opmerking: men kan steeds de kanaalschuifregelaars gebruiken in plaats van de joystick om de bewegingen van een toestel te controleren. 3. JOYSTICK SET-UP VAN EEN TOESTEL WISSEN: Schakel de program mode in. (Houdt de Program toets ingedrukt tot de LED knippert) Druk 2 x tegelijkertijd op de Mode en Fine toetsen. De assign LED moet branden. (als de reverse LED aan is, druk dan beide toetsen nogmaals tegelijkertijd in) Indien het toestel meer dan 8 DMX adressen heeft kan men de Tap/Display toets gebruiken om de 16 of 8-kanaals werking te kiezen. Druk op de toets die overeenkomt met het toestel dat u wilt instellen. Houd de mode toets ingedrukt en druk op de Auto/Del toets. Houd de program toets gedurende enkele seconden ingedrukt om de programmeerfunctie te stoppen 4. FADE TIME SET-UP: Gedurende de auto en music chase playback kan men de overgangstijd tussen 2 stappen instellen. Men kan deze overgangstijd instellen voor de PAN/TILT kanalen of voor alle kanalen. Als men enkel de X/Y kiest dan heeft men het voordeel dat de gobo s en de kleuren niet traag overschakelen gedurende de trage PAN/TILT bewegingen. Druk tegelijkertijd op de mode en Tap/Display toetsen terwijl het toestel uit staat (power off) Zet het toestel aan en druk op de Tap/Display toets om te kiezen voor ofwel ONLY X/Y (overgangstijd enkel voor PAN/TILT) en ALL CH (overgangstijd beïnvloed alle kanalen) Weergave op het LCD scherm: AL CH ONLY X/Y OR FD TIME FD TIME Houd de Mode toets ingedrukt, druk vervolgens op de Tap/Display om de instellingen in het geheugen op te slaan. Alle LED s zullen 3 keer knipperen. Als men de instellingen niet wil opslaan, druk dan op de black-out toets om deze functie te verlaten. Belangrijke opmerking: voer eerst de toewijzing van de PAN/TILT van de joystick (zie voorgaande) uit voor U de overgangstijden instelt. Als U de toewijzing van de PAN/TILT later uitvoert moet U achteraf de overgangsinstellingen opnieuw uitvoeren! 5. OMKEREN VAN DE JOYSTICK BEWEGING / DMX KANAAL: De PAN en/of de TILT bewegingen, of zelfs andere kanalen kunnen omgekeerd worden (DMX waarde is 255 als de schuifregelaar in zijn gesloten positie is, de DMX waarde is 000 als de schuifregelaar volledig naar boven = open is) Schakel de program mode in. (Houdt de Program toets ingedrukt tot de LED knippert) Druk 1 x tegelijkertijd op de Mode en Fine toetsen. De reverse LED moet aan zijn. (als de assign LED aan is, druk dan beide toetsen nogmaals tegelijkertijd in) Indien het toestel meer dan 8 DMX adressen heeft kan men de Tap/Display JB SYSTEMS 37/89 SM-1612 SCANMASTER
40 NEDERLANDS GEBRUIKSAANWIJZING toets gebruiken om de 16 of 8-kanaalssturing te kiezen. Druk op de toets die overeenkomt met het toestel dat u wilt instellen. Terwijl u de mode toets ingedrukt houdt, drukt u op de scènetoets van het kanaal dat u wilt omkeren. (Bijvoorbeeld: U wilt de TILT beweging van een toestel omkeren. Druk tegelijkertijd op de mode en fine toetsen (in program mode) tot de reverse led aan is. Kies het toestel dat u wilt instellen. Houd de mode toets ingedrukt en druk op de scènetoets van de schuifregelaar die overeenstemt met het kanaal van de TILT bewegingen. Druk tegelijkertijd op de mode en fine toetsen tot de assign en reverse leds uit zijn. Druk gedurende enkele seconden op de program toets om de programmeerfunctie uit te schakelen. Opgelet: men kan maximum 48 kanalen omkeren. 6. OMKEERFUNCTIE VAN DE JOYSTICK BEWEGING / DMX KANAAL VERWIJDEREN: Schakel de program mode in. (Houdt de Program toets ingedrukt tot de LED knippert) Druk 1 x tegelijkertijd op de Mode en Fine toetsen. De reverse LED moet aan zijn. (als de assign LED aan is, druk dan beide toetsen nogmaals tegelijkertijd in) Indien het toestel meer dan 8 DMX adressen heeft kan men de Tap/Display toets gebruiken om de 16 of 8-kanaals modus te kiezen. Druk op de toets die overeenkomt met het toestel dat u wilt instellen. Terwijl u de mode toets ingedrukt houdt, drukt u op de Auto/Del toets. Druk gedurende enkele seconden op de program toets om de programmeerfunctie uit te schakelen Opgelet: alle omgekeerde adressen van dat toestel zullen terug naar hun gewone werking teruggebracht worden. 7. MIDI KANALEN INSTELLEN: Houd de MIDI/Rec toets gedurende 3 seconden ingedrukt: op de display leest men MIDI xx af (xx is het midi kanaal: tussen 01 en 16) Gebruik de Up/Down toetsen om het MIDI kanaal (van 1 tot 16) te kiezen waaronder de SM-1612 moet geactiveerd worden. Houd opnieuw de MIDI/Rec toets gedurende 3 seconden ingedrukt: de MIDI werking is nu ingeschakeld. MIDI CHANNEL SETTING: BANK (Octaaf) NOOT NUMMER FUNCTIE BANK 1 00 TOT 07 1 tot 8 van Bank 1 aan of uit BANK 2 08 TOT 15 1 tot 8 van Bank 2 aan of uit BANK 3 16 TOT 23 1 tot 8 van Bank 3 aan of uit BANK 4 24 TOT 31 1 tot 8 van Bank 4 aan of uit BANK 5 32 TOT 39 1 tot 8 van Bank 5 aan of uit BANK 6 40 TOT 47 1 tot 8 van Bank 6 aan of uit BANK 7 48 TOT 55 1 tot 8 van Bank 7 aan of uit BANK 8 56 TOT 63 1 tot 8 van Bank 8 aan of uit BANK 9 64 TOT 71 1 tot 8 van Bank 9 aan of uit BANK TOT 79 1 tot 8 van Bank10 aan of uit BANK TOT 87 1 tot 8 van Bank11 aan of uit BANK TOT 95 1 tot 8 van Bank12 aan of uit BANK TOT tot 8 van Bank13 aan of uit JB SYSTEMS 38/89 SM-1612 SCANMASTER
41 NEDERLANDS GEBRUIKSAANWIJZING BANK TOT tot 8 van Bank14 aan of uit BANK TOT tot 8 van Bank14 aan of uit CHASES 120 TOT 125 Chases1 tot 6 BLACK-OUT 126 BLACK-OUT De SM-1612 SCANMASTER ontvangt enkel MIDI noten; het is dus mogelijk dat het klavier moeten getransponeerd worden om de juiste noten te vinden SCENES 1. EEN SCENE PROGRAMMEREN: a. Schakel de program mode in. (Houdt de Program toets ingedrukt tot de LED knippert) b. Controleer of de LED van de black-out toets niet aan is, druk anders op deze toets om de black-out functie uit te schakelen. c. Controleer of de speed en de fade time schuifregelaars op nul staan. d. Druk op de fixture toets die overeenkomt met het toestel dat u wilt instellen. U kunt verschillende toestellen tegelijkertijd programmeren door op hun respectievelijke fixture toetsen te drukken. e. Beweeg de schuifregelaars en joystick tot u de gewenste positie bekomt. (In enkele uitzonderlijke gevallen is het nodig om pagina B te selecteren om de kanalen 9 tot 16 in te stellen) f. Druk op de Up/Down toetsen om de bank te kiezen waarin u deze scène wilt opslagen. U kunt in het totaal 30 banken kiezen; In elke bank kunnen tot 8 scènes opgeslagen worden. g. Eens de gewenste posities van alle toestellen ingesteld zijn drukt u op de MIDI/Rec toets. h. Druk op de scène toets waarin u de scène wilt opslagen. Alle LEDs zullen 3 x flitsen om de handeling te bevestigen. Het LCD scherm geeft de bank en de scène weer. i. Herhaal de stappen d h tot alle scènes geprogrammeerd zijn. j. Als u het programmeren niet wenst verder te zetten kunt u de programmeer functie verlaten door de program toets enkele seconden ingedrukt te houden. De LED zal uitgaan. 2. EEN SCENE BEWERKEN: a. Schakel de program mode in. (Houdt de Program toets ingedrukt tot de LED knippert) b. Controleer of de LED van de black-out toets niet aan is, druk anders op deze toets om de black-out functie uit te schakelen. c. Druk op de Bank Up/Down toetsen om de bank te kiezen die de scène bevat die u wilt bewerken. d. Selecteer de scène die u wilt bewerken door op de overeenstemmende scènetoets te drukken. e. Selecteer de toestellen en gebruik de schuifregelaars en/of joystick om de gewenste wijzigingen aan de scène uit te voeren. f. Eenmaal alle wijzigingen uitgevoerd zijn drukt u op de MIDI/Rec toets. g. Druk op de scène toets die overeenstemt met de scène die u aan het bewerken bent. Dit zal de bestaande scène vervangen. JB SYSTEMS 39/89 SM-1612 SCANMASTER
42 NEDERLANDS GEBRUIKSAANWIJZING h. Druk gedurende enkele seconden op de program toets om de programmeerfunctie uit te schakelen. Opgelet: wees er zeker van dat u dezelfde scène toets indrukt als in stap d en g, anders wist u misschien een andere bestaande scène. 3. EEN SCENE KOPIËREN: a. Schakel de program mode in. (Houdt de Program toets ingedrukt tot de LED knippert) b. Controleer of de LED van de black-out toets niet aan is, druk anders op deze toets om de black-out functie uit te schakelen. c. Druk op de Bank Up/Down toetsen om de bank te kiezen die de scène bevat die u wilt kopiëren. d. Druk op de scène toets die overeenstemt met de scène die u wilt kopiëren. e. Druk op de Bank Up/Down toetsen om de bank te kiezen waarnaar u de scène wilt kopiëren. f. Druk op de MIDI/Rec toets. g. Druk op de scène toets waarnaar u de scène wilt kopiëren. Als u andere scènes wilt kopiëren, herhaal dan de stappen c tot g. h. Druk gedurende enkele seconden op de program toets om de program mode uit te schakelen. De LED zal uitgaan. 4. EEN SCENE WISSEN: a. Schakel de program mode in. (Houdt de Program toets ingedrukt tot de LED knippert) b. Controleer of de LED van de black-out toets niet aan is, druk anders op deze toets om de black-out functie uit te schakelen. c. Druk op de Bank Up/Down toetsen om de bank te kiezen die de scène bevat die u wilt wissen. d. Houdt de Auto/Del toets ingedrukt terwijl u op de scène toets drukt die overeen stemt met de scène die u wilt wissen. Alle LEDs zullen 3 x knipperen. Wanneer de scène gewist is worden alle DMX waarden op 0 gezet. Als u andere scènes wilt wissen, herhaal dan de stappen c & d. e. Druk gedurende enkele seconden op de program toets om de program mode uit te schakelen. De LED zal uitgaan. 5. ALLE SCENES WISSEN: a. Zet het toestel uit. b. Houd de Program en Bank Down toetsen tegelijkertijd ingedrukt en zet zo het toestel weer aan. Alle scènes zouden moeten gewist zijn. Opgelet: Alle scènes zijn voorgoed verloren; te gebruiken in alle voorzichtigheid! 6. KOPIEER EEN BANK MET SCÈNES: a. Schakel de program mode in. (Houdt de Program toets ingedrukt tot de LED knippert) b. Controleer of de LED van de black-out toets niet aan is, druk anders op deze toets om de black-out functie uit te schakelen. c. Druk op de Bank Up/Down toetsen om de bank te kiezen die de scènes bevat die u wilt kopiëren. d. Druk op de MIDI/Rec toets. JB SYSTEMS 40/89 SM-1612 SCANMASTER
43 NEDERLANDS GEBRUIKSAANWIJZING e. Druk op de Bank Up/Down toetsen om de bank te selecteren waarnaar u wilt kopiëren. f. Druk op de Music/Bank Copy toets, alle LEDs zullen 3 x knipperen om het uitvoeren van de bewerking te bevestiging. g. Druk gedurende enkele seconden op de program toets om de program mode uit te schakelen. De LED zal uitgaan. CHASES Een chase is een opeenvolging van scènes in een zekere volgorde; de scènes moeten dus al geprogrammeerd zijn vooraleer men een chase kan programmeren. Het is aangeraden alle chases uit het geheugen te verwijderen alvorens men voor de eerste maal chases gaat programmeren in de controller. (Zie Alle Chases verwijderen) 1. ALLE CHASES VERWIJDEREN: a. Zet het toestel uit. b. Houd de Auto/Del en Bank Down toetsen tegelijkertijd ingedrukt en zet zo het toestel weer aan. Alle chases zouden moeten gewist zijn. Opgelet: Alle chases zijn voorgoed verloren, te gebruiken in alle voorzichtigheid! 2. EEN CHASE PROGRAMMEREN: a. Schakel de program mode in. (Houdt de Program toets ingedrukt tot de LED knippert) b. Controleer of de LED van de black-out toets niet aan is, druk anders op deze toets om de black-out functie uit te schakelen. c. Druk op de chase toets die u wilt programmeren. d. Druk op de Bank Up/Down toetsen om de bank te selecteren die de scène(s) bevat die u wilt programmeren in uw chase. e. Druk op de toets van de gewenste scène. f. Druk op de MIDI/Rec toets. g. Herhaal de stappen d tot g tot alle gewenste scènes ingevoerd zijn. h. Druk gedurende enkele seconden op de program toets om de program mode uit te schakelen. De LED zal uitgaan. 3. EEN STAP TOEVOEGEN IN EEN CHASE: a. Schakel de program mode in. (Houdt de Program toets ingedrukt tot de LED knippert) b. Controleer of de LED van de black-out toets niet aan is, druk anders op deze toets om de black-out functie uit te schakelen. c. Druk op de toets van de chase die u wilt programmeren. d. Druk op de TAP/Display toets, de LCD display geeft de chase stap weer. e. Druk op de Bank Up/Down toetsen tot u aan de stap bent gekomen waarachter u de nieuwe stap wilt invoegen. f. Druk op de MIDI/Rec toets, de display zal de stap een stap hoger weergeven dan voordien. Het LCD scherm geeft de chase, scène en bank weer. g. Druk op de Bank Up/Down om de bank te selecteren die de scène bevat die u in de chase wilt bijvoegen. JB SYSTEMS 41/89 SM-1612 SCANMASTER
44 NEDERLANDS GEBRUIKSAANWIJZING h. Eenmaal de scène geselecteerd drukt u terug op de MIDI/Rec toets. Alle LEDs zullen 3 x knipperen om aan te duiden dat de nieuwe stap aan de chase is toegevoegd. i. Herhaal de stappen e tot h tot u alle gewenste scènes hebt toegevoegd. j. Druk gedurende enkele seconden op de program toets om de program mode uit te schakelen. De LED zal uitgaan. 4. EEN STAP WISSEN IN EEN CHASE: a. Schakel de program mode in. (Houdt de Program toets ingedrukt tot de LED knippert) b. Controleer of de LED van de black-out toets niet aan is, druk anders op deze toets om de black-out functie uit te schakelen. c. Druk op de toets van de chase die u wilt wissen. d. Druk op de TAP/Display toets, de LCD display geeft de chase stap weer. e. Druk op de Bank Up/Down toetsen tot u aan de stap bent gekomen die u wilt wissen. f. Druk op de Auto/Del toets om de stap te wissen. Alle LEDs zullen 3 x knipperen om aan te duiden dat de gevraagde handeling is uitgevoerd. g. Herhaal indien nodig de stappen e en f tot alle gewenste stappen zijn gewist. h. Druk gedurende enkele seconden op de program toets om de program mode uit te schakelen. De LED zal uitgaan. 5. EEN BANK MET SCENES TOEVOEGEN AAN EEN CHASE: Opmerking: De bank met scènes zal toegevoegd worden aan het einde van de chase. a. Schakel de program mode in. (Houdt de Program toets ingedrukt tot de LED knippert) b. Controleer of de LED van de black-out toets niet aan is, druk anders op deze toets om de black-out functie uit te schakelen. c. Druk op de toets van de chase die u wilt bewerken. d. Gebruik de Bank Up/Down toetsen om de bank met scènes te kiezen die u wilt toevoegen. e. Druk op de Music/Bank Copy toets. f. Druk op de MIDI/Rec copy toets, alle LEDs zullen 3 x knipperen om weer te geven dat de gevraagde handeling werd uitgevoerd. g. Druk gedurende enkele seconden op de program toets om de program mode uit te schakelen. De LED zal uitgaan PLAYBACK VAN SCENES Er zijn drie manieren om de scènes weer te geven: 1. Manual Mode: men kan 1 of meerdere scènes manueel selecteren en weergeven. a. Bij het aanzetten start het toestel automatisch in manual mode. b. Controleer of de manual mode LED aan is. c. Controleer of de LED van de black-out toets uit is, druk anders op deze toets om de black-out functie uit te schakelen. d. Druk op de Bank Up/down om de bank te selecteren die de scènes bevat die u wilt gebruiken. e. Druk op de scène toets van de scène die u wilt weergeven. JB SYSTEMS 42/89 SM-1612 SCANMASTER
45 NEDERLANDS GEBRUIKSAANWIJZING f. Herhaal indien nodig de stappen d en e om andere scènes te selecteren. 2. Auto Mode: men kan een bank met geprogrammeerde scènes automatisch laten aflopen. Men kan ook de Manual override toets gebruiken (zie verder) a. Druk op de Auto/Del om de Automatische werking in te schakelen. De Auto LED gaat aan. b. Gebruik de Up/Down toetsen om de bank te selecteren die de scènes bevat die men wilt weergeven. c. Daarna kan men de snelheid instellen door gebruik te maken van de speed en Fade Time schuifregelaars. d. Men kan hiervoor ook de TAP/Display toets gebruiken. Druk 2 x op deze toets; het tijdsinterval tussen de 2 momenten bepaalt de snelheid. Deze regeling zal actief blijven tot de speed schuifregelaar bewogen wordt. e. Druk op de Auto/Display toets om de Auto modus te verlaten. 3. Music Mode: men kan een bank met geprogrammeerde scènes op het ritme van de muziek laten aflopen. Men kan hiervoor gebruik maken van de ingebouwde microfoon of van een extern geluidssignaal. Men kan steeds de Manual override inschakelen(zie verder voor meer info) d. Gebruik de Music/Bank copy om de Muzikale werking in te schakelen. De Music LED gaat aan. e. Gebruik de Up/Down toetsen om de bank te selecteren die de scènes bevat die men wilt weergeven. De geselecteerde scènes zullen op het ritme van de muziek weergegeven worden. f. Druk nogmaals op de Music/Bank Copy toets om de muzikale werking te verlaten. PLAYBACK VAN CHASES Er zijn 3 manieren om de chases weer te geven: 1. Manual Mode: Men kan de chases manueel selecteren en weergeven. a. Bij het aanzetten start het toestel automatisch in manual mode. b. Controleer of de manual mode LED aan is. c. Controleer of de LED van de black-out toets uit is, druk anders op deze toets om de black-out functie uit te schakelen d. Selecteer de chase die u wilt gebruiken. Het LCD scherm geeft het chase nummer weer. e. Druk op de TAP/Display toets, het LCD scherm geeft nu de stapnummers van de geselecteerde chase weer. f. Gebruik de Bank Up/down toetsen om manueel de verschillende stappen van de chase weer te geven. g. Selecteer indien nodig een andere chase en herhaal de stappen e en f. (als men een tweede maal op dezelfde chase drukt wordt deze gedeactiveerd) 2. Auto Mode: men kan 1 of meerdere chases laten afspelen aan een bepaalde instelbare snelheid. Indien men meer dan 1 chase selecteert, dan worden ze een na een afgespeeld. De LED van de actieve chase knippert. Men kan steeds de Manual override functie inschakelen (zie verder voor meer info) JB SYSTEMS 43/89 SM-1612 SCANMASTER
46 NEDERLANDS GEBRUIKSAANWIJZING a. Druk op de Auto/Del toets om de automatische werking in te schakelen. De Auto LED gaat aan. b. Selecteer een of meerdere chases. (Als men een tweede maal op dezelfde chase drukt wordt deze gedeactiveerd) De LEDs van de geselecteerde chases zijn aan. De geactiveerde chase knippert en zijn naam + actieve scène/bank worden weergegeven op de display. c. Gebruik de speed en Fade Time schuifregelaars om de snelheid van de chases in te stellen. d. Men kan hiervoor ook de TAP/Display toets gebruiken. Druk 2 x op deze toets; het tijdsinterval tussen de 2 momenten bepaalt de snelheid. Deze regeling zal actief blijven tot de speed schuifregelaar bewogen wordt. e. Druk op de Auto/Display om de Automatische werking te verlaten. 3. Music Mode: men kan 1 of meerdere chases laten afspelen op het ritme van de muziek. Men kan hiervoor gebruik maken van de ingebouwde microfoon of van een extern muzieksignaal. Indien men meer dan 1 chase selecteert, dan worden ze een na een afgespeeld. De LED van de actieve chase knippert. Men kan steeds de Manual override functie inschakelen (zie verder voor meer info) a. Druk op de Music/Bank copy toets om de muzikale werking in te schakelen. De Music LED gaat aan. b. Selecteer 1 of meerdere chases. (Als men een tweede maal op dezelfde chase drukt wordt deze gedeactiveerd) De LEDs van de geselecteerde chases zijn aan. De actieve chase knippert en zijn naam + actieve scène/bank worden weergegeven op de display. c. Druk nogmaals op de Music/Bank Copy toets om de muzikale werking te verlaten. Opmerking: Men kan gebruik maken van de fade time schuifregelaar om de bewegingen zachter laten te verlopen. Maak de fade time niet te groot, de synchronisatie met de muziek zou volledig verloren gaan! OVERRIDE FUNCTIE Tijdens de weergave van scènes en chases in automatische and musicale weergave is het steeds mogelijk 1 of meerdere toestellen te selecteren en hun functies manueel te bedienen. Druk hiervoor gewoon op de toetsen van de toestellen fixtures die u uit het lopende programma wilt halen en druk op de override toets. U hebt nu de mogelijkheid om alle functies manueel te bedienen, volledig onafhankelijk van het lopende programma. Op om het even welk moment kan men bijkomende toestellen selecteren of terug in het programma opnemen. Als men een tweede maal op de toets van een geselecteerd toestel drukt, of als men de override functie uitschakelt gaan de toestellen terug hun plaats in het programma innemen en automatisch verder werken. FILE DUMP Het is mogelijk een geheugenoverdracht uit te voeren tussen twee SM-1612 controllers. Dit kan u heel wat programmeerwerk besparen! 1. Voorbereiding tot verzending van gegevens: deze handelingen moeten uitgevoerd worden op het toestel dat de gegevens gaat verzenden. a. Zet het toestel uit. JB SYSTEMS 44/89 SM-1612 SCANMASTER
47 NEDERLANDS GEBRUIKSAANWIJZING b. Houdt volgende toetsen tegelijkertijd ingedrukt terwijl u het toestel weer aanzet: fixture2 toets fixture3 toets scene1 toets Op de display kan men TRANSMIT aflezen, wat aangeeft dat de SM-1612 klaar is om de gegevens te verzenden. 2. Voorbereiding tot ontvangen van gegevens: deze handelingen moeten uitgevoerd worden op het toestel dat de gegevens gaat ontvangen. a. Zet het toestel uit. b. Houdt volgende toetsen tegelijkertijd ingedrukt terwijl u het toestel weer aanzet: Fixture8 toets Fixture9 toets Scene2 toets Op de display kan men RECEIVE aflezen, wat aangeeft dat de SM-1612 klaar is om de gegevens te ontvangen. 3. Start de gegevensoverdracht: Op het toestel dat TRANSMIT aangeeft drukt u tegelijkertijd op de scène toetsen 7 and 8. Op het scherm verschijnt een kleine progressieaanduiding. Raak nu geen van beide Scanmasters aan gedurende deze handeling. Als de overdracht voltooid is schakelen beide toestellen automatisch terug over naar hun gewone werking. Vooraleer het toestel te gebruiken dat de gegevens ontvangen heeft schakelt u best het toestel even uit en terug aan! ONDERHOUD Reinig het toestel met een zacht, lichtjes bevochtigd doek. Vermijd water te morsen in het toestel. Gebruik nooit vluchtige producten zoals benzeen of thinner, dit kan het toestel beschadigen. EIGENSCHAPPEN Dit apparaat is radio-interferentie onderdrukt. Dit product voldoet aan de gangbare Europese en nationale voorschriften. Het is vastgesteld dat het apparaat er zich aan houdt en de desbetreffende verklaringen en documenten zijn door de fabrikant afgegeven Voeding: DC 9 ~ 12V 300mA minimum. AC/DC Power adapter: AC 240V, 50Hz 12Vdc / 300mA DMX uitgangen: 3pin XLR; DMX, kanalen Midi ingang: 5pin Din Audio ingang: Cinch 0.1V ~ 1Vpp Afmetingen: 48.3 x 13.4 x 8.5cm (19 / 3U) Gewicht: 2.7kg Elke inlichting kan veranderen zonder waarschuwing vooraf. U kan de laatste versie van deze handleiding downloaden via onze website: JB SYSTEMS 45/89 SM-1612 SCANMASTER
48 DEUTSCH BEDIENUNGSANLEITUNG BEDIENUNGSANLEITUNG Danke für den Kauf dieses JB Systems Produkts. Um die Vorteile aller Funktionen vollständig nutzen zu können, lesen Sie diese Bedienungsanleitung bitte sorgfältig. EIGENSCHAFTEN 192 DMX Kanäle Für 12 Scanner mit max. 16 DMX Kanälen 30 Bänke mit jeweils 8 programmierbaren Szenen ( 240 Szenen) 6 Chaser mit 240 Szenen 8 Fader für manuelle DMX Einstellung der Kanäle Assignable joystick for ease of channels File Dump ermöglicht wechselseitiges Senden/Empfangen von Daten zwischen zwei Geräten Automatik Funktion regelbar über Speed und Fade Time Fader Fade Time Einstellung aller DMX Werte 8 oder 16 Kanal Modus Feineinstellung des Joysticks ( pan/tilt) Blackout Master Manuelles überschreiben Eingebautes Mikrofon für Musiksteuerung MIDI Steuerung der Bänke, Chaser und des Black out s DMX Polarisation Umkehrschalter Stromausfallsicherer Speicher VOR DEM GEBRAUCH Inhalt überprüfen: Überprüfen Sie, ob der Karton folgende Teile beinhaltet: SM-1612 SCANMASTER AC/DC Adapter Bedienungsanleitung Wichtige Hinweise: Um Feuer oder Elektroschlägen vorzubeugen, setzten Sie das Gerät nicht Regen oder Feuchtigkeit aus. Um Stromschläge zu vermeiden, öffnen Sie das Gehäuse nicht eigenständig. Sollte ein Problem auftauchen, wenden Sie sich an den Händler. Legen Sie keine magnetischen Metallgegenstände auf das Gerät und lassen Sie keine Flüssigkeit ins Innere kommen, um Stromschläge und Funktionsstörungen zu vermeiden. Vermeiden Sie den Gebrauch in staubigen Umgebungen und reinigen Sie das Gerät regelmäßig. JB SYSTEMS 46/89 SM-1612 SCANMASTER
49 DEUTSCH BEDIENUNGSANLEITUNG SICHERHEITSHINWEISE ACHTUNG: Um sich nicht der Gefahr eines elektrischen Schlags auszusetzen, entfernen Sie keines der CAUTION Gehäuseteile. Im Geräteinneren befinden sich keine vom Benutzer reparierbaren Teile. Überlassen Sie Reparaturen dem qualifizierten Kundendienst. Das Blitzsymbol im Dreieck weist den Benutzer darauf hin, dass eine Berührungsgefahr mit nicht isolierten Teilen im Geräteinneren, die eine gefährliche Spannung führen, besteht. Die Spannung ist so hoch, das hier die Gefahr eines elektrischen Schlages besteht. Das Ausrufezeichen im Dreieck weist den Benutzer auf wichtige Bedienungsund Wartungshinweise in den Dokumenten hin, die dem Gerät beiliegen. Dieses Symbol bedeutet: Nur innerhalb von Räumen verwenden. Dieses Symbol bedeutet: Achtung! Bedienungsanleitung lesen! Dieses Symbol bedeutet: Lampenvorschaltgerät Zur Vermeidung von Stromschlag oder Feuer, Gerät bitte nicht Regen oder Feuchtigkeit aussetzen. Zur Vermeidung von Kondensation lassen sie das Gerät bitte nach dem Transport in einer warmen Umgebung einige Zeit zum Temperaturausgleich stehen. Kondensation kann zu Leistungsverlust des Gerätes oder gar Beschädigung führen. Gerät nicht im Freien und in feuchten Räumen und Umgebungen verwenden. Keine Metallgegenstände oder Flüssigkeiten ins Innere des Geräts gelangen lassen. Keine mit Flüssigkeit gefüllten Gegenstände, z.b. Vasen, auf das Gerät stellen. Kurzschluss oder Fehlfunktion können die Folge sein. Falls es doch einmal vorkommen sollte, bitte sofort Netzstecker ziehen und vom Stromkreis trennen. Offene Brandquellen, wie z.b. brennende Kerzen, sollten nicht auf das Gerät gestellt werden. Ventilationsöffnungen nicht abdecken, da Überhitzungsgefahr! Nicht in staubiger Umgebung verwenden und regelmäßig reinigen. Für Kinder unerreichbar aufbewahren. Unerfahrene Personen sollen das Gerät nicht bedienen. Umgebungstemperatur darf 40ºC nicht überschreiten. Stets Netzstecker ziehen, wenn Gerät für längeren Zeitraum nicht genutzt oder es gewartet wird. Elektrische Anschlüsse nur durch qualifiziertes Fachpersonal überprüfen lassen. Sicherstellen, dass Netzspannung mit Geräteaufkleber übereinstimmt. Die Netzsteckdose sollte immer gut erreichbar sein, um das Gerät vom Netz zu trennen. Gerät nicht mit beschädigtem Netzkabel betreiben. Ist die Zugangsleitung beschädigt, muss diese durch den Hersteller, seinen Vertrieb oder durch eine qualifizierte Person ersetzt werden. Netzkabel nicht mit anderen Kabeln in Berührung kommen lassen! Um eine Gefahr zu vermeiden, soll das Gerät nur mit dem mitgelieferten Adapter benutzt werden. Ist der Adapter beschädigt, darf nur durch einen gleichen Adapter ersetzt werden. Ausschließlich vorschriftsmäßige Kabel zur Installation verwenden. JB SYSTEMS 47/89 SM-1612 SCANMASTER
50 DEUTSCH BEDIENUNGSANLEITUNG Gerät nicht öffnen. Abgesehen vom Tausch der Sicherung sind keine zu wartenden Bauteile im Gerät enthalten. Sicherung niemals reparieren oder überbrücken, sondern immer mit gleichartiger Sicherung ersetzen! Bei Fehlfunktion Gerät nicht benutzen und sich mit dem Händler in Verbindung setzen. Bei Transport bitte Originalverpackung verwenden, um Schäden am Gerät zu vermeiden. Aus Sicherheitsgründen dürfen an dem Gerät keine unbefugten Veränderungen vorgenommen werden. Worterklärungen: SZENE: Eine Szene ist eine Einstellung verschiedener Fader Stellungen, die ein Bild ( Scanner Position X/Y, Farbe, Gobo, etc. ) wiedergeben. BANK: Das SM-1612 hat 8 Szene Tasten. Jede dieser Tasten kann mit einer Szene belegt werden. Um alle 240 Szenen zu speichern, müssen die Szenen in Bänke gespeichert werden. Das SM-1612 besitzt 30 Bänke ( 8 x 30 = 240 Szenen ) Beispiel: BANK1 (scene1 ; scene2 ; scene3 ; scene8) BANK2 (scene1 ; scene2 ; scene3 ; scene8) BANK3 (scene1 ; scene2 ; scene3 ; scene8) BANK30 (scene1 ; scene2 ; scene3 ; scene8) CHASE: Das SM-1612 besitzt 6 programmierbare CHASER. Ein CHASER ist eine Folge von Szenen. Ein CHASER kann mit maximal 240 Szenen programmiert werden. SPEED: Hier stellen Sie die Ablaufzeit zweier Szenen in einem CHASER im Automatik Modus ein. FADE TIME: Hier stellen Sie die Zeit ein, in welcher z.b. der Scanner sich von Punkt A nach Punkt B bewegt. PAN/TILT: PAN = Horizontale Bewegung ( X-Achse ) TILT = Vertikale Bewegung ( Y-Achse ) FUNKTIONEN (FRONTSEITE) JB SYSTEMS 48/89 SM-1612 SCANMASTER
51 DEUTSCH BEDIENUNGSANLEITUNG 1. SCANNER TASTE: zum Auswählen eines oder mehrer Scanner 2. SZENE TASTEN: um Szenen zu Laden oder zu speichern 3. FADERS: Hiermit stellen sie die DMX Werte der jeweiligen Kanäle ein 4. PAGE SELECT BUTTON: Jeder Scanner kann bis zu 16 Kanälen haben. Diese 16 Kanäle sind über zwei Seiten mit je 8 Kanälen (Fader) aufgeteilt: SEITE A: Kanäle 1 8 SEITE B: Kanäle OVERRIDE BUTTON: Läuft ein Chaser, kann man ein oder mehrere Scanner auswählen und diese unabhängig von dem Chaser ansteuern. 6. SPEED SLIDER: Hier stellen Sie die Chase Geschwindigkeit ein ( 0,1 Sekunde 10 Minuten ). 7. FADE TIME SLIDER: Hier stellen Sie die Fade Zeit zwischen zwei Stufen eines Chasers ein ( 0-30 Sekunden ). 8. LCD DISPLAY: Zeigt die aktuelle Einstellung an. Beispiel: LCD DISPLAY FULL MESSAGE SN1 scene1 ist aktiv BK1 bank1 ist aktiv CHASE1 chase1 ist aktiv STEP 009 Schritt 9 von einem Chaser DATA 184 DMX-Wert der letzte fader hat den Wert = 184 (0 255) SP:1m34s Speed Zeit ist 1 Minute und 34 Sekunden FT:3.31s Fade Zeit ist 3,31 Sekunden ASS04 05 Joystick ist Kanal 4 & 5 (PAN=4 * TILT=5) zugeteilt RES10 13 DMX Kanal 10 & 13 sind reserve 9. JOYSTICK PAN: Horizontale Bewegung 10. JOYSTICK TILT: Vertikale Bewegung 11. PROGRAM BUTTON: Aktiviert den Programm Modus 12. MIDI/RECORD BUTTON: Aktiviert die MIDI Funktion oder speichert einen Chaser. 13. AUTO/DELETE BUTTON: Im normalen Modus: Umschalten zwischen manuellem und automatischem Chaser Modus. Im Programm Modus: Löscht Szenen oder Chaser. 14. MUSIC/BANK COPY BUTTON: Im normalen Modus: Umschalten zwischen Automatik und Sound Modus. Im Programm Modus: kopiert Bänke 15. BANK UP/DOWN BUTTON: Hier schalten Sie zwischen den Bänken um ( 1-30 ). 16. TAP/DISPLAY BUTTON: Alternativ zum Speed Fader kann man die Geschwindigkeit im Automatik Modus über die Tap Taste durch mehrmaligem drücken einstellen. Als Display Taste stellt man den DMX Wert ( ) in % (0-100) um. 17. BLACKOUT BUTTON: Alle DMX Ausgänge werden auf Null gesetzt. 18. CHASE BUTTON: Hier rufen Sie einer der sechs Chaser zum Ablauf oder zum programmieren auf. 19. FINE BUTTON: Schaltet den Joystick auf eine höhere Auflösung, um die Position der Abbildung zu optimieren. 20. MODE: Drücken Sie die MODE und FINE Taste gleichzeitig, um zwischen Assign und Reverse Mode umzuschalten. JB SYSTEMS 49/89 SM-1612 SCANMASTER
52 DEUTSCH BEDIENUNGSANLEITUNG FUNKTIONEN (RÜCKSEITE) 1. MIDI INPUT: Kann für den Empfang von MIDI Daten verwendet werden. 2. DMX POLARITY SCHALTER: Ein DMX-Signal hat normalerweise folgende Verbindungen: 1=ground * 2=Data- * 3=Data+ In einigen Fällen kann es sein, dass das Kabel sich im Gerätinneren(inversed) befindet. Dadurch funktioniert die DMX-Verbindung nicht. Dieses Problem wird durch die Verwendung dieses Schalters gelöst. Falls Ihre DMX-Verbindung nicht funktioniert und alle DMX-Empfänger richtig angeschlossen sind, können Sie diesen Schalter verwenden. Stellen Sie den Schalter im Normalfall immer auf die linke Seite. 3. DMX OUTPUT: Sendet DMX-Signale zu den angeschlossenen Scannern. 4. FILE DUMP INPUT: Hier können Sie einen zweiten SM-1612 anschließen, dessen Daten Sie auf diesen Controller überspielen möchten. Gebrauchen Sie diesen Steckplatz nicht dazu, das DMX-Signal zweier Controller zu verketten! 5. DC INPUT: Verbinden Sie den gelieferten AC/DC Adapter mit diesem Input. Falls Sie einen anderen Adapter verwenden sollten, stellen Sie sicher, dass er 9 ~ 12V/DC und minimal 300mA mit + in der Mitte des Steckers hat. 6. POWER SCHALTER: zum Ein- und Ausschalten des Geräts. 7. AUDIO INPUT: Anschluss für die Musikansteuerung. Ist dieser Anschluss nicht belegt, nutzt der SM-1612 sein eingebautes Mikrofon. SET UP 1. SCANNER SETUP: Das SM-1612 hat 12 Scannertasten. Jede Scannertaste besitzt 16 DMX Kanäle ( 8 Fader auf Seite A und weitere 8 Kanäle auf Seite B ). In den meisten Fällen werden nur 8 oder weniger DMX Kanäle genutzt, d.h. die meisten Einstellungen werden auf Seite A vorgenommen. Die folgende Tabelle hilft Ihnen die DMX Startadressen Ihrer Scanner festzulegen: Scanner # Digital Setting Dip Switch Setting On and 5 On and 6 On ,5 and 6 On and 7 On ,5 and 7 On JB SYSTEMS 50/89 SM-1612 SCANMASTER
53 DEUTSCH BEDIENUNGSANLEITUNG ,6 and 7 On ,5,6 and 7 On and 8 On ,5 and 8 On ,6 and 8 On ,5,6 and 8 On 2. JOYSTICK SETUP: Hier werden die beiden DMX Kanäle für PAN und Tilt dem Joystick zugeordnet. Danach können hiermit die Bewegungen des Scanners gesteuert werden. Drücken und halten Sie den Programm-Knopf bis seine LED blinkt. Drücken Sie gleichzeitig die Mode- und Fine-Taste. Das dazugehörige LED sollte leuchten. (wenn das entgegengesetzte LED leuchtet, drücken Sie beide Knöpfe ein zweites Mal zusammen) Mit der Bank UP und DOWN Taste wechseln Sie die Achse zwischen PAN und Tilt. Falls Ihr Scanner mehr als 8 DMX-Adressen hat, können Sie den Tap/Display- Knopf verwenden, um den 8- oder 16-Kanal Modus auszuwählen. Wählen Sie nun den Scanner aus, dem Sie den Joystick zuweisen wollen. Während Sie die Mode Taste halten, drücken Sie zusätzlich die Szene Taste, welche direkt über dem PAN oder TILT liegt. ( Beispiel: Kanalfader 4 steuert PAN, drücken und halten Sie die MODE Taste während Sie die Szene Taste 4 drücken) Sind PAN und Tilt zugewiesen, drücken Sie gleichzeitig die Mode und Fine Taste um dieses Programm zu verlassen. Beachte: Man kann auch die Kanal Fader anstelle des Joysticks benutzen. 3. LÖSCHEN DES JOY STICK SETUP FÜR EINEN SCANNER: Drücken und halten Sie den Programm-Knopf bis seine LED blinkt. Drücken Sie gleichzeitig die Mode - und Fine -Taste. Das dazugehörige LED sollte leuchten. (wenn das entgegengesetzte LED leuchtet, drücken Sie beide Knöpfe ein zweites Mal zusammen) Falls Ihr Scanner mehr als 8 DMX-Adressen hat, können Sie den Tap/Display- Knopf verwenden, um den 8- oder 16-Kanal Modus auszuwählen. Wählen Sie nun den Scanner aus, den Sie bearbeiten wollen. Drücken Sie gleichzeitig die Mode Taste und die Auto/Del Taste. Drücken Sie für einige Sekunden die Programm Taste um den Programmiermodus zu beenden. 4. FADE TIME SETUP: Legt fest, ob die DMX Kanäle auf die Fadezeit Einstellung des Fade-Time-Faders reagieren soll. PAN/TILT reagieren automatisch auf diese Fadezeit, sofern Sie auf den Joystick gelegt sind. Alle weiteren Kanäle werden hier dem Fade-Time-Fader zugewiesen. Ist keine Fadezeit aktiviert, so wird die Änderung des DMX Wertes so schnell wie möglich ausgeführt. Das Gerät ist aus. Halten Sie die MODE und TAP/DISPLAY Taste gedrückt und schalten Sie das Gerät ein. Mit der TAP/DISPLAY Taste bestimmen Sie ob alle DMX Kanäle eine Fadezeit erhalten ( ALL CH FD TIME ) oder nur die PAN/TILT ( ONLY X/Y FDTIME ). Anzeige im LCD Display: JB SYSTEMS 51/89 SM-1612 SCANMASTER
54 DEUTSCH BEDIENUNGSANLEITUNG AL CH ONLY X/Y OR FD TIME FD TIME Drücken Sie gleichzeitig die MODE und TAP/DISPLAY Taste um diese Einstellung zu speichern. Alle LED s blinken 3 mal. Um diesen Vorgang abzubrechen drücken Sie die BLACK/OUT Achtung: Legen Sie zuerst PAN/TILT des Joysticks fest, bevor Sie das Setup für die Fade-Time programmieren. 5. UMKEHRUNG JOYSTICK BEWEGUNG/DMX KANAL: Falls gewünscht kann hier die Bewegung für PAN und TILT umgekehrt werden. ( DMX Wert ist 255 wenn der Fader auf null ist und DMX Wert 000 wenn der Fader voll auf ist ) Programm Mode aktivieren. (Drücken und halten sie die Programm Taste bis die LED blinkt) Drücken Sie gleichzeitig die Tasten MODE und FINE. Die REVERSE LED sollte leuchten. (ist dies nicht der Fall, wiederholen Sie den Vorgang) Hat Ihr Scanner mehr als 8 DMX Kanäle, drücken Sie die TAP/DISPLAY Taste um auf 16 Kanäle zu wechseln. Wählen Sie einen Scanner aus, welchen Sie bearbeiten möchten. Während Sie die Mode Taste halten, drücken Sie zusätzlich die Szenen Taste, welche Sie umkehren möchten. 6. LÖSCHEN DER UMKEHRUNG Bewegung/DMX KANAL: Programm Mode aktivieren. (Drücken und halten sie die Programm Taste bis die LED blinkt) Drücken Sie gleichzeitig die Tasten MODE und FINE. Die REVERSE LED sollte leuchten. (ist dies nicht der Fall, wiederholen sie den Vorgang) Hat Ihr Scanner mehr als 8 DMX Kanäle, drücken Sie die TAP/DISPLAY Taste um auf 16 Kanäle zu wechseln. Wählen Sie einen Scanner aus, welchen Sie bearbeiten möchten Während Sie die MODE Taste halten, drücken Sie die AUTO/DEL Taste. Drücken Sie für einige Sekunden die Programm Taste um den Programmiermodus zu beenden. Achtung: Alle invertierten Adressen für diesen Scanner sind wieder normal. 7. MIDI STEUERUNG: Drücken Sie die MIDI/REC Taste drei Sekunden. Das Display zeigt MIDI xx (xx ist der Midi Kanal zwischen 01 und 16 ). Mit den UP/DOWN Tasten setzen Sie den Midi Kanal (01-16). Drücken Sie die MIDI/Rec Taste wieder für 3 Sekunden um diese Einstellung zu speichern. MIDI KANAL EINSTELLUNG: BANK (Octave) NOTE NUMBER FUNCTION BANK 1 00 TO 07 1 to 8 of Bank 1 on or off BANK 2 08 TO 15 1 to 8 of Bank 2 on or off BANK 3 16 TO 23 1 to 8 of Bank 3 on or off BANK 4 24 TO 31 1 to 8 of Bank 4 on or off BANK 5 32 TO 39 1 to 8 of Bank 5 on or off JB SYSTEMS 52/89 SM-1612 SCANMASTER
55 DEUTSCH BEDIENUNGSANLEITUNG BANK 6 40 TO 47 1 to 8 of Bank 6 on or off BANK 7 48 TO 55 1 to 8 of Bank 7 on or off BANK 8 56 TO 63 1 to 8 of Bank 8 on or off BANK 9 64 TO 71 1 to 8 of Bank 9 on or off BANK TO 79 1 to 8 of Bank10 on or off BANK TO 87 1 to 8 of Bank11 on or off BANK TO 95 1 to 8 of Bank12 on or off BANK TO to 8 of Bank13 on or off BANK TO to 8 of Bank14 on or off BANK TO to 8 of Bank14 on or off CHASES 120 TO to 6 Chases BLACK OUT 126 BLACKOUT SZENE 1. PROGRAMMIEREN EINER SZENE: a. Drücken Sie die Programm Taste bis die Programm LED leuchtet b. Prüfen Sie die Black OUT LED, diese darf nicht leuchten. Drücken Sie die Programm Taste bis die Programm LED leuchtet c. Der Speed und Time Fader soll auf 0 gesetzt sein. d. Wählen Sie den Scanner über die Scanner Tasten aus ( LED leuchtet ). Sie können auch mehrere Scanner gleichzeitig auswählen. e. Mit den Fadern und dem Joystick können Sie jetzt die gewünschte Szene einstellen. Benötigen Sie mehr als 8 DMX Kanäle, drücken Sie die PAGE Taste. f. Drücken Sie die UP/DOWN Taste um die Bank auszuwählen, in welche die Szene gespeichert werden soll. Sie haben 30 Bänke zu Verfügung in der Sie jeweils 8 Szenen Speichern können. g. Sind alle Scanner in der gewünschten Position für die Szene programmiert, drücken Sie die MIDI/REC Taste.. h. Drücken Sie die Szene Taste auf der Sie die Szene ablegen möchten. Als Bestätigung blinken alle LED s dreimal. Im LCD Display wird die gespeicherte Bank und Szene angezeigt. i. Wiederholen Sie die Schritte d h bis alle Szenen programmiert sind. j. Um den Programmier Modus zu verlassen, drücken Sie die Programm Taste für drei Sekunden Die Änderungen sind gespeichert und die LED erlischt. 2. NACHBEARBEITEN EINER SZENE: a. Drücken Sie die Programm Taste bis die Programm LED leuchtet. b. Prüfen Sie die Black OUT LED, diese darf nicht leuchten. c. Drücken Sie die Bank UP/DOWN Taste um die Bank auszuwählen in der die Szene liegt, die sie bearbeiten wollen. d. Wählen Sie die zu bearbeitende Szene aus ( Szene Taste ). e. Wahlen Sie den Scanner aus und ändern Sie die Einstellungen mit den Fadern und dem Joystick. f. Nach den Änderungen drücken Sie die MIDI/REC Taste. g. Drücken Sie erneut die ausgewählte Szene Taste um die Änderung zu speichern. Dieser Vorgang überschreibt die alte Szene. h. Um den Programmier Modus zu verlassen, drücken Sie die Programm Taste für drei Sekunden Die Änderungen sind gespeichert und die LED erlischt. JB SYSTEMS 53/89 SM-1612 SCANMASTER
56 DEUTSCH BEDIENUNGSANLEITUNG Hinweis: Vergewissern Sie sich, dass Sie die Schritte d und g die selbe Szenen Tasten benutzen damit nicht ungewollt Szenen überschrieben werden. 3. KOPIEREN EINER SZENE: a. Drücken Sie die Programm Taste bis die Programm LED leuchtet. b. Prüfen Sie die Black OUT LED, diese darf nicht leuchten. c. Drücken Sie die Bank UP/DOWN Taste um die Bank auszuwählen in der die Szene liegt, die sie kopieren wollen. d. Wählen Sie die Szene aus, die kopiert werden soll ( Szene Taste ). e. Drücken Sie nun die Bank UP/DOWN Taste um die Bank aufzurufen in die Szene hineinkopiert werden soll. f. Drücken Sie die MIDI/Rec Taste. g. Drücken Sie die Szene Taste in die Sie die gewählte Szene kopieren möchten. Möchten Sie weitere Szenen kopieren, wiederholen Sie die Schritte c bis g. h. Um den Programmiermodus zu verlassen, drücken Sie die Programm Taste für drei Sekunden. Die Änderungen sind gespeichert und die LED erlischt 4. LÖSCHEN EINER SZENE: a. Drücken Sie die Programm Taste bis die Programm LED leuchtet. b. Prüfen Sie die Black OUT LED, diese darf nicht leuchten. c. Drücken Sie die Bank UP/DOWN Taste um die Bank auszuwählen in der die Szene liegt, die Sie löschen wollen. d. Drücken Sie gleichzeitig die Auto/Del Taste und Szene Taste in welcher die zu löschenden Szene gespeichert ist. Alle LED s blinken 3 mal. Ist die Szene gelöscht, sind alle DMX Werte des Kanals auf 0. Wollen Sie weitere Szenen löschen, wiederholen Sie die Schritte c und d. e. Um den Programmier Modus zu verlassen, drücken Sie die Programm Taste für drei Sekunden. Die Änderungen sind gespeichert und die LED erlischt. 5. LÖSCHEN ALLER SZENEN: a. Schalten Sie den Controller aus. b. Drücken Sie gleichzeitig die Programm und Bank Abwärts Taste und schalten Sie den Controller ein. ACHTUNG: Alle Szenen sind gelöscht! 6. EINE BANK KOPIEREN : a. Drücken Sie die Programm Taste bis die Programm LED leuchtet. b. Prüfen Sie die Black OUT LED, diese darf nicht leuchten. c. Drücken Sie die Bank UP/DOWN Taste um die Bank auszuwählen, die sie kopieren möchten. d. Drücken Sie die MIDI/Rec Taste. e. Drücken Sie die Bank UP/DOWN Taste um die Bank auszuwählen in die Sie die zuvor ausgewählte Bank hineinkopieren möchten. f. Drücken Sie die Music/Bank Copy Taste. Als Speicherbestätigung blinken alle LED s drei mal. g. Drücken Sie die Programm Taste für drei Sekunden um den Programmier Modus zu verlassen. Die LED erlischt. JB SYSTEMS 54/89 SM-1612 SCANMASTER
57 DEUTSCH BEDIENUNGSANLEITUNG CHASER Ein Chaser ist eine Zusammenstellung verschiedener Szenen, die Sie zuvor programmiert haben. Bevor Sie die Chaser zum ersten Mal programmieren, löschen Sie alle Chaser im Controller. 1. LÖSCHEN ALLER CHASER: a. Schalten Sie den Controller aus. b. Halten Sie die Tasten AUTO/DEL und Bank Abwärts gedrückt und schalten Sie gleichzeitig den Controller ein. Alle Chaser sind nun gelöscht! 2. CHASER PROGRAMMIEREN: a. Drücken Sie die Programm Taste bis die Programm LED leuchtet. b. Prüfen Sie die Black OUT LED, diese darf nicht leuchten. c. Drücken Sie die CHASER Taste die Sie programmieren möchten. d. Drücken Sie die BANK UP/DOWN Taste um die Szene in der Bank auszuwählen, die Sie in den Chaser programmieren möchten. e. Drücken Sie die MIDI/Rec Taste. f. Wiederholen Sie die Schritte d und e bis Sie das gewünschte Programm zusammengestellt haben. Sie können wenn gewünscht alle 240 Szenen in einem Chaser speichern. g. Drücken Sie die Programm Taste für drei Sekunden um den Programmiermodus zu verlassen. Die LED erlischt. 3. EINEN STEP IN EINEN CHASER EINFÜGEN: a. Drücken Sie die Programm Taste bis die Programm LED leuchtet b. Prüfen Sie die Black OUT LED, diese darf nicht leuchten. c. Wählen Sie den CHASER aus, dem Sie einen Step (Schritt) hinzufügen wollen. d. Drücken Sie die TAP/DISPLAY Taste. Im LCD Display wird er aktuelle Step angezeigt. e. Drücken Sie die Bank UP/DOWN Taste bis zu dem Step, nachdem Sie den neuen einfügen möchten. f. Drücken Sie die MIDI/Rec Taste. Im LCD Display wird nun ein Step höher als zuvor angezeigt. g. Drücken Sie die Taste TAP/DISPLAY erneut und im LCD Display wird der aktuelle CHASER, die Szene und die Bank angezeigt. h. Drücken Sie die Taste Up/Down um die Bank auszuwählen welche die Szene enthält die Sie in den Chaser einfügen möchten. i. Wählen Sie die Szene aus, welche Sie einfügen möchten und drücken Sie wieder die MIDI/REC Taste. Als Bestätigung dieses Vorgangs blinken alle LED s 3 mal. j. Wiederholen Sie de Schritte e bis h um weitere um weitere Szenen einzufügen. k. Drücken Sie die Programm Taste für drei Sekunden um den Programmier Modus zu verlassen. Die LED erlischt. 4. EINEN STEP IM CHASER LÖSCHEN: a. Drücken Sie die Programm Taste bis die Programm LED leuchtet. b. Prüfen Sie die Black OUT LED, diese darf nicht leuchten. c. Wählen Sie den gewünschten Chaser der den zu löschenden Step enthält. JB SYSTEMS 55/89 SM-1612 SCANMASTER
58 DEUTSCH BEDIENUNGSANLEITUNG d. Drücken Sie die TAP/DISPLAY Taste bis die Steps des Chasers im LCD Display erscheinen. e. Drücken Sie die Bank Up/Down Tasten bis zu dem Step, den Sie löschen wollen. f. Drücken Sie die Auto/Del Taste um diesen Step zu löschen. Als Bestätigung dieses Vorganges leuchten alle LED s drei mal auf. g. Drücken Sie die Programm Taste für drei Sekunden um den Programmiermodus zu verlassen. Die LED erlischt. 5. EINE BANK MIT SZENEN IN EINE CHASER KOPIEREN: a. Drücken Sie die Programm Taste bis die Programm LED leuchtet. b. Prüfen Sie die Black OUT LED- diese darf nicht leuchten. c. Drücken Sie die gewünschten Chaser Taste. d. Wählen Sie mit den Bank UP/Down Tasten die Bank mit den gewünschten Szenen aus (Die zuvor abgespeichert wurden). e. Drücken Sie die Music/Bank copy Taste. f. Drücken Sie die MIDI/Rec copy Taste, Als Bestätigung dieses Vorganges leuchten alle LED s drei mal auf. g. Drücken Sie die Programm Taste für drei Sekunden um den Programmier Modus zu verlassen. Die LED erlischt. ABSPIELEN VON SZENEN Es gibt drei Möglichkeiten die Szenen abzuspielen: 1. MANUELLER MODUS: a. Nach dem einschaltendes Controllers befinden Sie sich sofort im manuellen Modus. b. Prüfen Sie die Manual Mode LED (soll leuchten). c. Die Blackout LED muss aus sein. d. Benutzen Sie die Bank Up/Down Tasten um die Bank mit den gewünschten Szenen aufzurufen. e. Rufen Sie die gewünschte Szene mit den Szenen Tasten auf. f. Wiederholen Sie die Schritte d und e um weitere Szenen auszuwählen 2. AUTOMATIK MODUS: Diese Funktion ermöglicht es eine Bank von Szenen automatisch in einer Schleife ablaufen zu lassen. a. Drücken Sie die Auto/Del Taste um in den Automatik Modus zu gelangen. Die Auto LED leuchtet. b. Benutzen Sie die Bank Up/Down Tasten um die gewünschte Bank auszuwählen. c. Nach der Auswahl der Bank können Sie mit dem Speed und Fade Time Fader die Ablaufgeschwindigkeit einstellen. d. Sie können auch die TAP/Display Taste nutzen um die Ablaufgeschwindigkeit vorzugeben. Dabei gibt der Takt von zweimaligem Drücken der Taste die Geschwindigkeit vor. e. Drücken Sie die AUTO/DEL Taste um diesen Modus zu verlassen.. JB SYSTEMS 56/89 SM-1612 SCANMASTER
59 DEUTSCH BEDIENUNGSANLEITUNG 3. MUSIK MODUS: Sie können eine Bank mit programmierten Szenen im Takt der Musik ablaufen lassen. Sie können das interne, eingebaute Mikrofon oder ein externes Musiksignal verwenden. a. Drücken Sie die Music/Bank copy Taste um den Musik Modus aufzurufen. Die Musik LED leuchtet. b. Benutzen Sie die Bank Up/Down Tasten um die gewünschte Bank auszuwählen. Die Szenen dieser Bank laufen musikgesteuert nacheinander ab. c. Drücken Sie die Music/Bank copy Taste um den Musik Modus zu verlassen. ABSPIELEN VON CHASERN Es gibt drei Möglichkeiten die Chaser abzuspielen 1. MANUELLER MODUS : a. nach dem einschaltendes Controllers befinden Sie sich sofort im manuellen Modus. b. Prüfen Sie die Manual Mode LED (soll leuchten). c. Die Blackout LED muss aus sein. d. Wählen Sie einen der gewünschten Chaser ( 1-6 ) aus. Durch erneutes drücken deaktivieren Sie ihn wieder. e. Benutzen Sie die Bank Up/Down Tasten um die gewünschten Schritte des Chasers auszuwählen. 2. AUTOMATIK MODUS : Dies Funktion ermöglicht es einen Chaser oder mehrere Chaser automatisch in einer Schleife ablaufen zu lassen a. Drücken Sie die AUTO/DEL Taste um in den Automatik Modus zu gelangen. Die Auto LED leuchtet. b. Wählen Sie einen der gewünschten Chasern aus. Die LED des Chasers leuchtet. Durch nochmaliges drücken deaktivieren Sie den Chaser wieder. c. Mit dem Speed Fader geben Sie nun die Ablaufgeschwindigkeit vor und mit dem Fade Time Fader geben Sie die Zeit vor, wie schnell der nächste Step aufgerufen wird. d. Sie können die TAP/Display Taste nutzen, um die Ablaufgeschwindigkeit zu regeln. Dabei gibt der Takt von zweimaligem Drücken der Taste die Geschwindigkeit vor. Die Ablaufgeschwindigkeit des Speed Reglers wird hierbei überschrieben. e. Drücken Sie die Auto/Display Taste um den Auto Mode zu verlassen. 3. MUSIK MODUS: Sie können einen oder mehrere Chaser im Takt der Musik ablaufen lassen. Sie können das interne, eingebaute Mikrofon oder ein externes Musiksignal verwenden. Wenn Sie mehrere Chaser auswählen, laufen diese nacheinander ab. a. Drücken Sie die Music/Bank copy Taste um diese Funktion aufzurufen. Die Musik LED ist an. b. Wählen Sie einen der gewünschten Chaser ( 1-6 ) aus. Die LED des ausgewählten Chasers leuchtet. Das Display zeigt den Chaser, die aktive Szene und Bank an. c. Drücken Sie die Music/Bank copy Taste wieder um den Musik Modus zu verlassen. JB SYSTEMS 57/89 SM-1612 SCANMASTER
60 DEUTSCH BEDIENUNGSANLEITUNG Hinweis: Mit dem Schieberegler fade time können Sie die Bewegung ein wenig glätten. Bewegen Sie den Schieberegler nicht zu stark, sonst geht die Synchronisierung der Musik verloren. OVERRIDE FUNCTION Während des Ablaufes von Szenen und Chases im Automatik und Musik Modus ist es möglich eine oder mehr Scanner aus dem laufenden Programm herauszunehmen und die Funktionen manuell zu steuern. Wählen Sie den Scanner aus und drücken Sie die override Taste. Nun können Sie diesen Scanner manuell steuern. Zu jedem Zeitpunkt können Sie zusätzliche Scanner auswählen oder verwerfen. Ist ein Scanner verworfen oder ist die Override-Funktion ausgeschaltet, wird die Reihenfolge der Scanner aktualisiert. FILE DUMP ( Datenübertragung ) Es ist möglich einen Speicher eines SM-1612 zu einem anderen SM-1612 zu überspielen. 1. ÜBERSPIELEN DES SPEICHERS: hiermit haben Sie die Möglichkeit Daten eines Scanmasters zu übertragen. a. Schalten Sie das Gerät aus. b. Drücken Sie folgende Tasten gleichzeitig, während sie das Gerät wieder einschalten. Scanner Taste 2 Scanner Taste 3 Szene 1 Taste Das Display zeigt TRANSMIT an. Der SM-1612 ist bereit zu senden. 2. VORBEREITUNG ZUM EMPFANGEN DES SPEICHERS: hiermit haben Sie die Möglichkeit Daten eines Scanmasters zu empfangen. a. Schalten Sie das Gerät aus. b. Drücken Sie folgende Tasten gleichzeitig, während sie das Gerät wieder einschalten. Scanner Taste 8 Scanner Taste 9 Szene 2 Taste Das Display zeigt RECEIVE an. Der SM-1612 ist bereit zu empfangen. 3. STARTEN DES SENDEVORGANGES: Das Display zeigt TRANSMIT, drücken Sie die Szene Tasten 7 und 8 gleichzeitig. Es erscheint eine kleine Lauflichtanzeige. Berühren Sie während dieses Vorgangs die beiden Controller nicht. Am Ende des Vorgangs werden beide Geräteinheiten automatisch wieder in den Normalzustand gesetzt. Schalten Sie die Scanmaster, zu der die Datenübertragung stattgefunden hat, kurz aus und erneut an, bevor Sie sie gebrauchen. JB SYSTEMS 58/89 SM-1612 SCANMASTER
61 DEUTSCH BEDIENUNGSANLEITUNG WARTUNG Die Reinigung des Gerätes erfolgt mit einem leicht mit Wasser angefeuchteten Tuch. Vermeiden Sie, dass Wasser in das Geräteinnere gelangt. Verwenden Sie keine brennbaren Flüssigkeiten wie Benzin oder Verdünner, welche das Gerät beschädigen würden. TECHNISCHE DATEN Das Gerät ist funkentstört und erfüllt die Anforderungen der europäischen und nationalen Bestimmungen. Entsprechende Dokumentation liegt beim Hersteller vor. Power Input: DC 9 ~ 12V 300mA min. AC/DC Power adapter: AC 240V, 50Hz 12Vdc / 300mA DMX outputs: 3pin XLR; DMX, channels Midi input: 5pin DIN Audio input: Cinch 0.1V ~ 1Vpp Maße: 48.3 x 13.4 x 8.5cm (19 / 3U) Gewicht: 2.7kg Technische Änderungen können auch ohne Vorankündigung vorgenommen werden! Sie können sich die neueste Version dieses Benutzerhandbuches von unserer Website herunterladen: JB SYSTEMS 59/89 SM-1612 SCANMASTER
62 ESPAÑOL MANUAL DE INSTRUCCIONES MANUAL DE INSTRUCCIONES Le felicitamos y le agradecemos por la adquisición de este producto JB Systems. Leá atentamente las siguientes instrucciones para saver como utilizar este producto de manera correcta. CARACTERISTICAS 192 canales DMX 12 Scanners de 16 canales cada uno (utilizar de preferencia Scanners de 8 canales como mínimo) 30 bancos ("Banks") de 8 escenas ("Scenes") programables (total = 240 escenas) 6 caruseles ("Chases") programmables de 240 escenas 8 deslizantes ("Sliders") para controlar manualmente los canales joystick asignable para facilitar el uso "File Dump" permite enviar o recivir datos entre dos unidades Programa "Auto mode" controlado con los deslizantes "speed" y "fade time" Fade time/asignación fade time Canales DMX reversibles permiten a un Scanner de reaccionar en oposición a otro en un Chase modo 8 canales o 16 canales Reglaje de precisión para el joystick Botón Blackout master El botón Override permite controlar cualquier scanner manualmente Micro incorporado para reacción al rítmo musical Control MIDI sobre banks, chases y blackout Selección de polaridad DMX Memoria de seguridad ANTES DEL USO Verificar el contenido: Verificar la presencia de las partes siguientes: SM-1612 SCANMASTER Adaptador AC/DC Manual de instrucciones Instrucciones importantes: Para evitar todo riesgo de incendio, evitar la exposición a la humedad y la lluvia. Para evitar todo riesgo de electrocucion, no avrir la tapa. En caso de problema, pongase en contacto con su vendedor. No insertar objetos metalicos ni dejar caerse liquido en el lector. Elecctrocuciones o disfuncionamientos pueden ocurrir. Evitar la exposición al polvo y limpiar la unidad regularmente. JB SYSTEMS 60/89 SM-1612 SCANMASTER
63 ESPAÑOL MANUAL DE INSTRUCCIONES PRECAUCIONES DE USO PRECAUCIÓN: Para reducir el riesgo de CAUTION electrocución, no quite la cubierta superior. Ninguna pieza usable adentro para el utilizador. Dirijase unicamente a personal cualificado El simbolo de un rayo en el interior de un triangulo alerta sobre la presencia o el uso de elementos no isolados donde un voltaje peligroso constituye un riesgo grande para causar una eventual electrocución El punto de exclamación en el interior de un triangulo alerta al usuario sobre la presencia de importantes instrucciones de operación y de mantenimiento tenidas en cuenta en el manual de uso. Este símbolo significa : uso para el interior solamente Este símbolo significa : Lea las instrucciones Este símbolo significa: aparato controla una lámpara Para evitar riesgos de incendio o electrocución, no exponer el aparato a la lluvia o a la humedad. Para evitar que se forme condensación en el interior, permita que el aparato se adapte a las temperaturas circundantes cuando lo lleve a una habitación caliente después de transporte. Condensar algunas veces impide que el aparato funcione a rendimiento pleno o incluso puede causar daños. Este aparato es sólo para uso interior. No coloque objetos metálicos o derrame líquidos dentro del producto. No colocar objectos llenos de liquidos, como jarrónes, encima del aparato. Una descarga eléctrica o mal funcionamiento puede resultar. Si un objeto extraño entrara en el aparato, desconecte inmediatamente la alimentación. No colocar fuentes desnudas de llamas, como velas encendidas, sobre el aparato. No cubra ninguna apertura de ventilación ya que esto podría causar sobrecalentamiento. Evite su uso en ambientes polvorientos y limpie la unidad regularmente. Mantenga la unidad alejada de los niños. Personas sin experiencia no deberían manejar este aparato. La temperatura máxima del aparato es 40 C. No use este producto a temperaturas más elevadas. Siempre desenchufe el aparato cuando no lo use por un periodo largo o antes de cambiar la bombilla o de comenzar una reparación. La instalación eléctrica se debe realizar solamente por personal cualificado, según las regulaciones para la seguridad eléctrica y mecánica en su país. Compruebe que el voltaje disponible no es superior al que aparece en el panel trasero del producto. El enchufe tiene que estar siempre accessible para desconectar la alimentación. El cable de alimentación debería estar siempre en perfectas condiciones: apague el aparato inmediatamente cuando el cable de alimentación esté roto o dañado. Debe ser substituido por el fabricante, su servicio técnico o otra persona cualificada. Nunca deje el cable de alimentación entrar en contacto con otros cables! JB SYSTEMS 61/89 SM-1612 SCANMASTER
64 ESPAÑOL MANUAL DE INSTRUCCIONES Para evitar todo peligro, el aparato debe conectarse a la red mediante el adaptador proporcionado. Si se daña este adaptador de corriente se subsistuira unicamente por otro similar. Para prevenir descargas eléctricas, no abra la tapa. Aparte los fusibles no hay nada que pueda ser reparado por el usuario en el interior el aparato. Nunca repare un fusible o haga un desvio al fusible. Siempre sustituya el fusible dañado por un fusible del mismo tipo y con las mismas especificaciones eléctricas! En caso de problemas serios de manejo, deje de usar el aparato y contacte su vendedor inmediatamente. Por favor, use el embalaje original cuando el aparato deba ser transportado. Debido a motivos de seguridad está prohibido de hacer modificaciones al aparato sin autorización. Alguna explicación sobre el vocabulario: SCENE: La escena es un conjunto de valores de los deslizantes en un momento específico. Ejemplo: Los deslizantes están colocados de manera a darle al scanner una dirección, un gobo y un color. La combinacion de estos valores se llama SCENE. BANK: En cada uno de los 8 botones scene se puede almazenar una escena. Para obtener un total de 240 escenas memorizadas, estas tienen que ser almazenadas en banks (bancos). La SM-1612 tiene 30 banks con 8 scenes (30x8 = 240 scenes). Ejemplo: BANK1 (scene1 ; scene2 ; scene3 ; scene8) BANK2 (scene1 ; scene2 ; scene3 ; scene8) BANK3 (scene1 ; scene2 ; scene3 ; scene8) BANK30 (scene1 ; scene2 ; scene3 ; scene8) CHASE: La SM-1612 tiene 6 chases programables. Un chase es una succesión de escenas. Esta succesión de escenas puede ser programada en cualquier orden. Un chase contiene 240 scenes máximo. SPEED: tiempo entre 2 escenas en un chase en modo automatico. FADE TIME: Cantidad de tiempo que necesita un scanner para moverse de un punto a otro. PAN/TILT: PAN es el movimiento horizontal. TILT es el movimiento vertical. JB SYSTEMS 62/89 SM-1612 SCANMASTER
65 ESPAÑOL MANUAL DE INSTRUCCIONES FUNCIONES (PANEL FRONTAL) 1. BOTONES SCANNERS: Selección de scanners. 2. BOTONES SCENE: Utilizado para cargar o almazenar una escena. 3. DESLIZANTES: Controla el valor de los diferentes canales. 4. BOTONE PAGE SELECT: Cada scanner tiene hasta 16 canales. Estos canales se dividen en 2 paginas de 8 canales (deslizantes). PAGE A: canales 1 8 PAGE B: canales BOTONE OVERRIDE: Permite elijir 1 o varios scanners para controlarlos de manera independiente al chase. 6. DESLIZANTE SPEED: Selección de la velocidad del chase en una gama de 0.1segundo a 10 minutos. 7. DESLIZANTE FADE TIME: Selección del tiempo de fundido en una gama de 0 a 30segundos. 8. PANTALLA LCD: Visualización del estado actual de la programación. Aqui tienen una lista de las abreviaciones utilizadas: PANTALLA LCD MESAJE COMPLETO SN1 scene1 activa BK1 bank1 activo CHASE1 chase1 activo STEP 009 paso 9 del chase DATA 184 valor DMX del ultimo deslizante utilizado = 184 (0 255) SP:1m34s Velocidad de 1minuto y 34 segundos. FT:3.31s Tiempo de fundido de 3,31segundos ASS04 05 Joystick asignado a los canales 4 & 5 (PAN=4 * TILT=5) RES10 13 los canales DMX 10 & 13 están reversados 9. JOYSTICK PAN: Control de los movimientos horizontales (PAN) de los scanners seleccionados 10. JOYSTICK TILT: Control de los movimientos verticales (TILT) de los scanners seleccionados 11. BOTON PROGRAM: Entrar o salir del modo programa. 12. BOTON MIDI/RECORD: Permite memorizar acciones o seleccionar un canal MIDI. 13. BOTON AUTO/DELETE: Modo Running: Pasar el chase de modo manual a automatico. Modo Program: Borrar chases o escenas. JB SYSTEMS 63/89 SM-1612 SCANMASTER
66 ESPAÑOL MANUAL DE INSTRUCCIONES 14. BOTON MUSIC/BANK COPY: Modo Running: Pasar el chase de modo manual a musical. Modo Program: Permite copiar banks. 15. BOTON BANK UP/DOWN: permite seleccionar uno de los 30 banks o seleccionar uno de los pasos en un chase. 16. BOTON TAP/DISPLAY: Selección del modo de visualización. Permite cambiar el tipo de valores del canal DMX: se puede elejir entre valores DMX verdaderos (0 255) o valores en percentajes (0 100%). También permite seleccionar la velocidad del chase en modo auto chase: pulsar 2 veces con un intervalo. (alternativa al deslizante speed) 17. BOTON BLACKOUT: Permite parar todas las salidas DMX. 18. BOTON CHASE: Permite activar uno o varios chases. 19. BOTON FINE: Controla las funciones PAN/TILT de un scanner de manera precísa. (Utilizando los deslizantes se pueden obtener hasta mejores resultados). 20. MODE: Pulsar los botones Mode y Fine para activar la asignación del joystick y el modo de reversión de canales. FUNCIONES (PARTE TRASERA) 1. ENTRADA MIDI: Esta entrada permite recivir datos MIDI. 2. INTERRUPTOR DE POLARIDAD DMX: Las conecciones normales de una señal DMX son las siguientes: 1=masa * 2=Datos- * 3=Datos+ En algunos casos ocurre que este cable sea inversado y que la conección no funcione. Lo siguiente puede resolverse con este interruptor. De manera normal, siempre poner este interruptor hacia la izquierda. 3. SALIDA DMX: Envia la señal DMX hacia los scanners conectados. 4. ENTRADA FILE DUMP: Permite ser conectado a otro SM-1612 y copiar sus chases y scenes. Este conectador no permite encadenar las señales DMX de 2 controladores. 5. ALIMENTACION: conectar el adaptador AC/DC a esta entrada. Al usar otro adaptador, asegurarse que sea de 9 ~ 12Vdc y mínimo 300mA con el + en el centro. 6. INTERRUPTOR DE ENCENDIDO 7. ENTRADA AUDIO: permite recivir señal audio de cualquier salida linea. En este caso, el micro incorporado no es utilizado. JB SYSTEMS 64/89 SM-1612 SCANMASTER
67 ESPAÑOL MANUAL DE INSTRUCCIONES CONFIGURACION 1. CONFIGURACION SCANNERS: SM-1612 tiene 12 botones scanners. Cada uno representa 16 direcciones DMX (8 deslizantes en la pagina A y 8 en la B). En general el SM-1612 sera utilizado con 8 direcciones o menos. Esto significa que generalmente solo la pagina A sera utilizada. El siguiente cuadro le ayudara a configurar la dirección DMX-start al scanner: Scanner # Caracteristica Digital Configuración Interruptor Dip On y 5 On y 6 On ,5 y 6 On y 7 On ,5 y 7 On ,6 y 7 On ,5,6 y 7 On y 8 On ,5 y 8 On ,6 y 8 On ,5,6 and 8 On 2. CONFIGURACION JOYSTICK: Por scanner, 2 direcciones pueden ser asignadas al PAN y TILT del joystick: Pulsar y soltar el botón Program hasta quel testigo se ponga intermitente. Pulsar 2 vezes Mode y Fine juntos. El testigo assign deveria encenderse. (si el testigo reverse se enciende, volver a pulsar los 2 botones juntos) Utilizar UP y DOWN para seleccionar el eje (PAN o TILT) que se quiera asignar. Si el scanner necesita mas de 8 direcciones DMX, utilizar Tap/Display para seleccionar el modo 16 o 8 canales. Pulsar el botón correspondiente al scanner que se quiera editar. Mantener pulsado el botón "mode" y pulsar sobre el numero de scene correspondiente al deslizante que controla el movimiento. (Ejemplo: si el deslizante 4 controla el PAN, mantener "mode" y pulsar el botón "scene 4"). Una vez PAN y TILT asignados, volver a pulsar Mode y Fine juntos para salir del modo "Assign". Nota: se puede seguir utilizando los desliza,tes de canales para controlar los movimientos. 3. BORRAR LA CONFIGURACION JOYSTICK DE UN SCANNER: Ponerse en modo "Program". (Pulsar y soltar Program hasta quel testigo se ponga intermitente) Pulsar 2 vezes Mode y Fine juntos. El testigo "assign" deveria encenderse. (si el testigo "reverse" se enciende, volver a pulsar los 2 botones juntos) Si el scanner necesita mas de 8 direcciones DMX, utilizar Tap/Display para seleccionar el modo 16 o 8 canales. Pulsar el botón correspondiente al scanner que se quiera editar. Mantener pulsado el botón "mode" y pulsar Auto/Del. Pulsar "program" unos segundos para salir del modo "program". JB SYSTEMS 65/89 SM-1612 SCANMASTER
68 ESPAÑOL MANUAL DE INSTRUCCIONES 4. CONFIGURACION FADE TIME: Durante la reproducción de un chase en modo automatico o musical, se puede introducir un tiempo de fundido entre los pasos del chase. Se puede elejir entre afectar solamente los canales PAN/TILT o todos los canales. Seleccionando solamente los canales PAN/TILT se evitara el inconveniente que los gobos y los colores tambien cambien lentamente mientras que los movimientos lentos PAN/TILT se ponen en plaza. Con la unidad apagada, pulsar "mode" y "Tap/Display" juntos. Encender la unidad y pulsar "Tap/Display" para cambiar entre "solo PAN/TILT"(only x/y) o "todos los canales(all ch). La pantalla indica: AL CH ONLY X/Y OR FD TIME FD TIME Primero mantener el botón "Mode" y pulsar Tap/Display al mismo tiempo para memorizar la configuración. Todos los testigos pestillán 3vezes. Para salir de la operación sin memorizar la configuración, pulsar "blackout". Nota Importante: asignar el PAN/TILT del joystick antes de configurar los deslizantes. Al cambiar la asignación PAN/TILT mas tarde, se devera volver a iniciar la configuración del tiempo de fundido! 5. INVERSAR EL MOVIMIENTO DEL JOYSTICK /CANAL DMX: Los movimientos PAN/TILT o ciertos canales pueden ser inversados. (En posición inferior, el valor DMX del deslizante es de 255 y de 000 en posición superior) Ponerse en modo Program. (Pulsar y soltar Program hasta quel testigo se ponga intermitente) Pulsar 1 vez Mode y Fine juntos. El testigo "reverse" deveria encenderse. (si el testigo "assign" se enciende, volver a pulsar los 2 botones juntos) Si el scanner necesita mas de 8 direcciones DMX, utilizar Tap/Display para seleccionar el modo 16 o 8 canales. Pulsar el botón correspondiente al scanner que se quiera editar. Mantener pulsado el botón "mode" y pulsar el botón "scene" correspondiente al canal deseado. (Ejemplo: Para reversar el TILT de un scanner. En modo Program, pulsar mode y fine juntos hasta que se encienda el testigo "reverse". Elejir el scanner. Mantener el botón mode y pulsar el botón scene del deslizante correspondiente al canal de los movimientos TILT. Pulsar "mode" y "fine" juntos hasta apagar los testigos assign y reverse. leds are turned off. Pulsar "program" unos segundos para salir del modo "program".. Nota: Se pueden reversar como máximo 48 canales. 6. BORRAR LA FUNCION "INVERSAR EL MOVIMIENTO DEL JOYSTICK /CANAL DMX": Ponerse en modo "Program". (Pulsar y soltar Program hasta quel testigo se ponga intermitente) Pulsar 1 vez Mode y Fine juntos. El testigo "reverse" deveria encenderse. (si el testigo " assign " se enciende, volver a pulsar los 2 botones juntos) Si el scanner necesita mas de 8 direcciones DMX, utilizar Tap/Display para seleccionar el modo 16 o 8 canales. Pulsar el botón correspondiente al scanner que se quiera editar. Mantener pulsado el botón "mode" y pulsar Auto/Del. JB SYSTEMS 66/89 SM-1612 SCANMASTER
69 ESPAÑOL MANUAL DE INSTRUCCIONES Pulsar "program" unos segundos para salir del modo "program". Nota: todas las direcciones inversadas de este scanner volverán a su posición normal. 7. CONFIGURACION DEL CANAL MIDI: Mantener pulsado 3 segundos el botón "MIDI/Rec" : la pantalla indica MIDI xx (xx es el canal MIDI: entre 01 y 16) Utilizar los botones Up/Down para seleccionar el canal MIDI de 1 a 16 que activará el SM Volver a mantener "MIDI/Rec" 3 segundos : la operación MIDI está activada. CONFIGURACION DEL CANAL MIDI: BANK (Octave) NUMERO DE NOTA FUNCION BANK 1 00 a 07 1 a 8 del Bank 1 on / off BANK 2 08 a 15 1 a 8 del Bank 2 on / off BANK 3 16 a 23 1 a 8 del Bank 3 on / off BANK 4 24 a 31 1 a 8 del Bank 4 on / off BANK 5 32 a 39 1 a 8 del Bank 5 on / off BANK 6 40 a 47 1 a 8 del Bank 6 on / off BANK 7 48 a 55 1 a 8 del Bank 7 on / off BANK 8 56 a 63 1 a 8 del Bank 8 on / off BANK 9 64 a 71 1 a 8 del Bank 9 on / off BANK a 79 1 a 8 del Bank10 on / off BANK a 87 1 a 8 del Bank11 on / off BANK a 95 1 a 8 del Bank12 on / off BANK a a 8 del Bank13 on / off BANK a a 8 del Bank14 on / off BANK a a 8 del Bank14 on / off CHASES 120 a a 6 Chases BLACK OUT 126 BLACKOUT El SCANMASTER 1612 solo recive notas MIDI y se puede quel teclado deva ser configurado para encontrar las notas adecuadas SCENES 1. PROGRAMAR UNA ESCENA (SCENE): a. Ponerse en modo "Program" (Pulsar y soltar Program hasta quel testigo se ponga intermitente) b. Pulsar "blackout" y verificar quel testigo blackout esté apagado. Si está encendido, volver a pulsar "blackout" para salir de ese modo. c. Posicionar los deslizantes speed y fade time sobre zero. d. Pulsar el botón del scanner deseado. Varios scanners pueden ser controlados al pulsar varios botones. e. Mover los deslizantes y joystick hacia la posición deseada. (En ciertos casos, si necesario, seleccionar la pagina B para controlar los canales 9-16.) f. Pulsar Up/Down para elejir el bank para almazenar la escena. Se pueden meter hasta 8 escenas en cada uno de los 30 banks. g. Una vez los scanners programados en la posición deseada para la escena, pulsar MIDI/Rec. JB SYSTEMS 67/89 SM-1612 SCANMASTER
70 ESPAÑOL MANUAL DE INSTRUCCIONES h. Almazenar la escena pulsando el botón "scene" deseado. Todos los testigos pestillán 3 vezes para confirmar la operación. La pantalla indica el bank y la scene. i. Repetir los pasos d h hasta que todas las "scenes" sean programadas. j. Para salir del modo "program", mantener pulsado el botón program unos segundos. El testigo se apagará.. 2. EDICION DE UNA ESCENA (SCENE): a. Ponerse en modo "Program" (Pulsar y soltar Program hasta quel testigo se ponga intermitente) b. Pulsar "blackout" y verificar quel testigo blackout esté apagado. Si está encendido, volver a pulsar "blackout" para salir de ese modo. c. Pulsar Up/Down para seleccionar el bank que contiene la escena que se quiera editar. d. Pulsar el botón correspondiente a la escena deseada para seleccionarla. e. Seleccionar el scanner y utilizar los deslizantes y/o joystick para ajustar la escena. f. Una vez las modificaciones acabadas, pulsar MIDI/Rec. g. Pulsar el botón scene de la escena editada. Esto modificará la escena existente. h. Para salir del modo "program", mantener pulsado el botón program unos segundos. El testigo se apagará.. Nota: Asegurese de seleccionar la misma escena en los pasos "d" y "g", para no borrar accidentalmente otra escena existente. 3. COPIAR UNA ESCENA (SCENE): a. Ponerse en modo "Program" (Pulsar y soltar Program hasta quel testigo se ponga intermitente) b. Par verificar la salida, verificar quel testigo blackout esté apagado. Si está encendido, pulsar "blackout" para salir de ese modo. c. Pulsar Up/Down para seleccionar el bank que contiene la escena que se quiera copiar. d. Pulsar el botón correspondiente a la escena deseada para seleccionarla. e. Pulsar Up/Down para seleccionar el bank en el que se va a copiar la escena. f. Pulsar MIDI/Rec. g. Pulsar el botón scene de la escena en la que se quiera copiar. Para copiar mas escenas, repetir los pasos de "c" a "g". h. Para salir del modo "program", mantener pulsado el botón program unos segundos. El testigo se apagará.. 4. BORRAR UNA ESCENA (SCENE): a. Ponerse en modo "Program" (Pulsar y soltar Program hasta quel testigo se ponga intermitente) b. Par verificar la salida, verificar quel testigo blackout esté apagado. Si está encendido, pulsar "blackout" para salir de ese modo. c. Pulsar Up/Down para seleccionar el bank que contiene la escena que se quiera borrar. d. Mantener pulsado Auto/Del y pulsar el botón scene de la escena que se quiera borrar. Los testigos pestillán 3 vezes. Una vez la escena programada borrada, todos los valores DMX de los canales vuelven a zero. Para borrar mas escenas, repetir los pasos c & d. JB SYSTEMS 68/89 SM-1612 SCANMASTER
71 ESPAÑOL MANUAL DE INSTRUCCIONES e. Para salir del modo "program", mantener pulsado el botón program unos segundos. El testigo se apagará.. 5. BORRAR TODAS LAS ESCENAS (SCENES): a. Apagar la unidad. b. Volver a encenderla manteniendo pulsados los botones Program y Bank Down juntos. Todas las escenas son borradas. Nota: No olvidar que todas las escenas serán perdidas, utilizar con cuidado. 6. COPIAR UN BANK O SCENE: a. Ponerse en modo "Program" (Pulsar y soltar Program hasta quel testigo se ponga intermitente) b. Par verificar la salida, verificar quel testigo blackout esté apagado. Si está encendido, pulsar "blackout" para salir de ese modo. c. Pulsar Up/Down para seleccionar el bank que contiene la escena que se quiera copiar. d. Pulsar MIDI/Rec. e. Pulsar Up/Down para seleccionar el bank en el que se va a copiar la escena. f. Pulsar el botón Music/Bank Copy, los testigos pestillán 3 vezes para indicar que la función está completa. g. Para salir del modo "program", mantener pulsado el botón program unos segundos. El testigo se apagará.. CHASES Un chase es una succesión de escenas (scenes) en un cierto orden. Antes de programar los chases por primera vez le recomendamos borrar todos los chases del controlador. Referirse al punto siguiente. 1. BORRAR TODOS LOS CHASES: a. Apagar la unidad. b. Volver a encenderla manteniendo pulsados los botones Auto/Del y Bank Down juntos. Todos los chases son borradas. Nota: No olvidar que todos los chases serán perdidos, utilizar con cuidado. 2. PROGRAMAR 1 CHASE: a. Ponerse en modo "Program" (Pulsar y soltar Program hasta quel testigo se ponga intermitente) b. Pulsar "blackout" y verificar quel testigo blackout esté apagado. Si está encendido, volver a pulsar "blackout" para salir de ese modo. c. Pulsar el botón del chase que se quiera programar. d. Pulsar Up/Down para elejir el bank que contiene la(s) escena(s) que se quiera programar en el chase. e. Pulsar el botón scene deseado. f. Pulsar MIDI/Rec g. Repetir los pasos "d" a "g" hasta entrar las escenas deseadas. h. Para salir del modo "program", mantener pulsado el botón program unos segundos. El testigo se apagará.. JB SYSTEMS 69/89 SM-1612 SCANMASTER
72 ESPAÑOL MANUAL DE INSTRUCCIONES 3. INSERTAR UN PASO (STEP) A UN CHASE: a. Ponerse en modo "Program" (Pulsar y soltar Program hasta quel testigo se ponga intermitente) b. Pulsar "blackout" y verificar quel testigo blackout esté apagado. Si está encendido, volver a pulsar "blackout" para salir de ese modo. c. Pulsar el botón del chase que se quiera programar. d. Pulsar TAP/Display, la pantalla el paso actual del chase. e. Pulsar Up/Down para elejir el paso anterior al que se quiera insertar. f. Pulsar MIDI/Rec, la pantalla indicará un paso superior. Esta pantalla indica los chase, bank y scene actuales. g. Pulsar Up/Down para seleccionar el bank que almazenará la scene que se quiera insertar en el chase. h. Una vez seleccionada la escena, volver a pulsar MIDI/Rec. Los testigos pestillan 3 vezes para indicar quel nuevo paso a sido correctamente insertado. i. Repetir los puntos "e" a "h" hasta que todas las escenas seán insertadas. j. Para salir del modo "program", mantener pulsado el botón program unos segundos. El testigo se apagará.. 4. BORRAR UN PASO (STEP) A UN CHASE: a. Ponerse en modo "Program" (Pulsar y soltar Program hasta quel testigo se ponga intermitente) b. Pulsar "blackout" y verificar quel testigo blackout esté apagado. Si está encendido, volver a pulsar "blackout" para salir de ese modo. c. Pulsar el botón del chase que se quiera programar. d. Pulsar TAP/Display, la pantalla el paso actual del chase. e. Pulsar Up/Down para elejir el paso que se quiera borrar. f. Pulsar Auto/Del para borrar el paso. Los testigos pestillan 3 vezes para indicar quel paso a sido borrado. g. Repetir eventualmente los punto e & f hasta borrar todos los pasos deseados. h. Para salir del modo "program", mantener pulsado el botón program unos segundos. El testigo se apagará.. 5. AÑADIR UN BANK DE ESCENAS A UN CHASE: Nota: El bank sera añadido al fin del chase. a. Ponerse en modo "Program" (Pulsar y soltar Program hasta quel testigo se ponga intermitente) b. Pulsar "blackout" y verificar quel testigo blackout esté apagado. Si está encendido, volver a pulsar "blackout" para salir de ese modo. c. Pulsar el botón del chase que se quiera editar. d. Pulsar Up/Down para seleccionar el bank de escenas que se quiera añadir. e. Pulsar Music/Bank Copy. f. Pulsar MIDI/Rec copy, los testigos pestillan 3 vezes. g. Para salir del modo "program", mantener pulsado el botón program unos segundos. El testigo se apagará.. REPRODUCCION DE ESCENAS Existen 3 modos de jugar escenas: 1. Modo Manual: Una o varias escenas pueden ser seleccionadas y miradas manualmente. JB SYSTEMS 70/89 SM-1612 SCANMASTER
73 ESPAÑOL MANUAL DE INSTRUCCIONES a. Al encender el programador, este empieza automaticamente en modo manual. b. Verificar quel testigo Manual Mode esté encendido. c. Pulsar "blackout" y verificar quel testigo blackout esté apagado. Si está encendido, volver a pulsar "blackout" para salir de ese modo. d. Pulsar Up/down para seleccionar el bank con las escenas que se quiera jugar. e. Pulsar el botón scene correspondiente a la escena deseada. f. Repetir eventualmente los puntos d & e para seleccionar otras escenas. 2. Modo Auto: Se puede jugar un bank de escenas programadas en sequencia. El botón Manual override puede ser utilizado (referirse al punto "función override"). a. Pulsar Auto/Del para ponerse en modo Auto. El testigo Auto se enciende. b. Pulsar Up/Down para seleccionar un bank de escenas. c. Una vez el bank seleccionado, se pueden utilizar los deslizantes Speed y Fade Time para ajustar la velocidad de la escena. d. El botón TAP/Display tambien puede ser utilizado para definir la velocidad. El tiempo entre 2 pulsaciones sera el tiempo del intervalo entre los pasos. Esta configuración quedara de aplicación hasta la proxima utilización del deslizante Speed. e. Pulsar Auto/Display para salir del modo Auto. 3. Modo Music: Se puede jugar un bank de escenas programadas al rítmo de la musica utilizando el micro interno o cualquier señal musical externa. El botón Manual override puede ser utilizado (referirse al punto "función override"). a. Pulsar el botón Music/Bank copy para ponerse en modo Music. El testigo Music se enciende. b. Pulsar Up/Down para seleccionar un bank de escenas. Las escenas seleccionadas jugarán en sequencias al rítmo de la musica. c. Pulsar Music/Bank Copy para salir del modo Music. REPRODUCCION DE CHASES Existen 3 modos de jugar chases: 1. Modo Manual: Los chases pueden ser seleccionados y mirados manualmente. a. Al encender el programador, este empieza automaticamente en modo manual. b. Verificar quel testigo Manual Mode esté encendido. c. Pulsar "blackout" y verificar quel testigo blackout esté apagado. Si está encendido, volver a pulsar "blackout" para salir de ese modo. d. Pulsar Up/down para seleccionar el chase que se quiera jugar. La pantalla indica el numero del chase. e. Pulsar TAP/Display, la pantalla indica ahora el numero del paso (step) del chase seleccionado. f. Utilizar Bank Up/down para ver manualmente los diferentes pasos del chase. g. Repetir eventualmente los puntos e & f. (Volver a pulsar el mismo chase para deseleccionarlo) h. Pulsar Up/Down para seleccionar un bank de escenas. i. Una vez el bank seleccionado, se pueden utilizar los deslizantes Speed y Fade Time para ajustar la velocidad de la escena. j. Pulsar Auto/Display para salir del modo Auto. JB SYSTEMS 71/89 SM-1612 SCANMASTER
74 ESPAÑOL MANUAL DE INSTRUCCIONES 2. Modo Auto: Se puede jugar uno/varios chases a una velocidad ajustable. Al seleccionar varios chases, seran jugados uno por uno. El testigo del chase activo pestillará. El botón Manual override puede ser utilizado (referirse al punto "función override"). a. Pulsar Auto/Del para ponerse en modo Auto. El testigo Auto se enciende. b. Seleccionar uno/varios chases. (volver a pulsar sobre el mismo chase para deseleccionarlo) Los testigos de los chase seleccionados se encienden. El testigo del chase activo pestilla y su nombre + la escnena + el bank activos son mencionados en la pantalla. c. Se pueden utilizar los deslizantes Speed y Fade Time para ajustar la velocidad del chase. d. El botón TAP/Display tambien puede ser utilizado para definir la velocidad. El tiempo entre 2 pulsaciones sera el tiempo del intervalo entre los pasos. Esta configuración quedara de aplicación hasta la proxima utilización del deslizante Speed. e. Pulsar Auto/Display para salir del modo Auto. 3. Modo Music: Se puede jugar un/varios chases al rítmo de la musica utilizando el micro interno o cualquier señal musical externa. Al seleccionar varios chases, seran jugados uno por uno. El chase activo pestilla. El botón Manual override puede ser utilizado (referirse al punto "función override") a. Pulsar el botón Music/Bank copy para ponerse en modo Music. El testigo Music se enciende. b. Seleccionar uno/varios chases (volver a pulsar sobre el mismo chase para deseleccionarlo). Los testigos de los chase seleccionados se encienden. El testigo del chase activo pestilla y su nombre + la escnena + el bank activos son mencionados en la pantalla. Nota: Se puede utilizar el deslizante fade time para que los movimientos sean mas lentos. No añadir demasiado 'fade time' para no perder la syncronización musical. FUNCION OVERRIDE Durante la reproducción de escenas o chases en modo auto o music, es posible seleccionar uno/varios scanners y manipularlos manualmente. Seleccionar los scanners deseados y pulsar el botón override. De está manera se pueden manipular todas las funciones de estos scanners de manera independiente a la sequencia activa. En cualquier momento, otro(s) scanner(s) pueden ser seleccionado(s) o deseleccionado(s). Al deseleccionar un scanner o al salir de la función override, el scanner continua la sequencia. FILE DUMP Es posible recivir o enviar memoria (file dump) de un SM-1612 a otro SM Esto permite ahorar tiempo! 1. Preparación para enviar memoria: hacer las siguientes operaciones sobre el Scanmaster que envia la memoria. a. Apagar la unidad. b. Pulsar estos botones juntos. Mantener estos botones y encender al mismo tiempo la unidad: Botón fixture2 JB SYSTEMS 72/89 SM-1612 SCANMASTER
75 ESPAÑOL MANUAL DE INSTRUCCIONES Botón fixture3 Botón scene1 La pantalla indica TRANSMIT. Esto significa quel SM-1612 está listo para enviar. 2. Preparación para recivir memoria: hacer las siguientes operaciones sobre el Scanmaster que recive la memoria. a. Apagar la unidad. b. Pulsar estos botones juntos. Mantener estos botones y encender al mismo tiempo la unidad: Botón Fixture8 Botón Fixture9 Botón Scene2 La pantalla indica RECEIVE. Esto significa quel SM-1612 está listo para recivir. 3. Enviar la memoria: Pulsar los botones 7 y 8 juntos del Scanmaster que indica TRANSMIT. La pantalla indica una barra de progresión. No tocar ninguno de los Scanmasters durante la operación. Al final de la operación, las 2 unidades vuelven a un modo de uso normal. Apagar y volver a encender la unidad que a recivido la memoria antes de utilizarla! MANTENIMIENTO Limpie con un paño pulido ligeramente empapado en agua. No deje entrar agua en la unidad. No utilice líquidos volátiles como bencina o diluyente, puesto que dañarán la unidad. ESPECIFICACIONES Esta unidad está a prueba de interferencias de radio. Este producto cumple los requisitos de las directrices nacionales y europeas actuales. Se ha establecido la conformidad y las instrucciones y documentos correspondientes han sido depositados por el fabricante. Alimentación: DC 9 ~ 12V 300mA mimimo. AdaptadorAC/DC: AC 240V, 50Hz 12Vdc / 300mA Salidas DMX: 3pin XLR; DMX, canales Entrada Midi: 5pin Din Entrada Audio: Cinch 0.1V ~ 1Vpp Talla: 48.3 x 13.4 x 8.5cm (19 / 3U) Peso: 2.7kg Toda la información está sujeta a cambios sin previo aviso Puede descargar la última versión de este manual de usuario en nuestra página Web: JB SYSTEMS 73/89 SM-1612 SCANMASTER
76 PORTUGUÊS MANUAL DO UTILIZADOR MANUAL DO UTILIZADOR Obrigado por ter adquirido este produto da JB Systems. De modo a tirar total proveito das possibilidades deste produto, por favor leia este manual com atenção. CARACTERÍSTICAS 192 canais DMX Permite ligar 12 unidades com 16 canais cada (melhor se utilizado com unidades até 8 canais) 30 Bancos de memória cada um com 8 cenas programáveis (total = 240 cenas) 6 Chases (sequências) programáveis de 240 cenas 8 Cursores para controlo manual de canais Atribuição de Joystick para uma utilização mais acessível A função File Dump permite que haja transferencia de informação entre duas unidades Modo Automático com controlo de velocidade e tempo de transição (cursores speed e fade time) Fade time / Atribuição de fade time Canais DMX com inversão permitem que uma unidade reaja em oposição às restantes numa sequência Modo de 8 ou 16 canais Ajuste preciso para funções pan e tilt de joystick Botão master Blackout Botão Manual Override para acesso e controlo rápido de qualquer unidade Microfone incorporado para activação por musica Controlo MIDI nos Bancos de memória, sequências e blackout Selector de polaridade DMX Memória para falha de corrente ANTES DE UTILIZAR Verifique o conteúdo: Certifique-se que a caixa contém os seguintes artigos: Unidade SM-1612 SCANMASTER Adaptador AC/DC Manual do utilizador Algumas instruções importantes: De modo a evitar risco de fogo ou choque eléctrico, não exponha este produto a chuva ou humidade. De forma a evitar o risco de choque eléctrico, não abra a unidade. Em caso de problemas, contacte o seu revendedor. JB SYSTEMS 74/89 SM-1612 SCANMASTER
77 PORTUGUÊS MANUAL DO UTILIZADOR Não introduza objectos de metal nem verta líquidos no interior do produto, correrá risco de choque eléctrico ou poderá danificar o produto. Evite utilização em locais com poeiras, limpe a unidade regularmente. INSTRUÇÕES DE SEGURANÇA: ATENÇÃO: De forma a evitar o risco de CAUTION choque eléctrico, não remova peças da unidade. Não tente fazer reparações. Contacte pessoal qualificado O símbolo composto por um triângulo equilátero com um relâmpago no interior alerta para a presença de voltagem perigosa não isolada no interior do produto que poderá constituir risco de choque eléctrico. O símbolo composto por um triângulo equilátero com um ponto de exclamação alerta o utilizador para a presença de instruções importantes de utilização e manutenção do produto. Este símbolo significa: utilização unicamente em espaços fechados Este símbolo significa: Leia instruções Proteja o ambiente. Recicle o material desta embalagem. De modo a evitar risco de fogo ou choque eléctrico, não exponha este produto a chuva ou humidade. De forma a evitar a formação de condensação no interior da unidade, ao transportála para ambiente quente aguarde algum tempo de modo a que haja uma ambientação à temperatura. A condensação poderá afectar o desempenho da unidade ou até danificá-la. Esta unidade destina-se unicamente a utilização em espaços fechados. Não introduza objectos de metal nem verta líquidos no interior do produto, correrá risco de choque eléctrico ou poderá danificar o produto. Caso algum objecto estranho entre em contacto com o interior da unidade, desligue-a de imediato da corrente. Não cubra os orifícios de ventilação ou a unidade poderá sobreaquecer. Evite locais com poeiras. Limpe a unidade regularmente. Mantenha esta unidade fora do alcance das crianças. Esta unidade deverá ser operada unicamente por pessoas experientes. Temperatura ambiente de funcionamento máxima é de 40ºC. Não utilize esta unidade a temperaturas ambientes mais elevadas. Desligue sempre a unidade da corrente quando não a utilizar durante longos períodos de tempo ou antes de efectuar manutenção. A instalação eléctrica deve ser efectuada unicamente por pessoal qualificado, cumprindo os regulamentos de segurança em instalações eléctricas e mecânicas do seu pais. Certifique-se que a voltagem a utilizar não é superior à voltagem indicada no painel traseiro da unidade. O cabo de alimentação deverá estar sempre em perfeitas condições. Desligue a unidade e substitua imediatamente o cabo caso este apresente algum dano. Deverá ser substituído pelo fabricante, pelo agente autorizado ou pessoal qualificado de modo a evitar um acidente. Nunca permita que este cabo entre em contacto com outros cabos! JB SYSTEMS 75/89 SM-1612 SCANMASTER
78 PORTUGUÊS MANUAL DO UTILIZADOR De modo a evitar um acidente, a unidade deverá ser usada apenas com o adaptador AC fornecido com ela. Se o adaptador estiver danificado, apenas poderá ser usado outro adaptador do mesmo modelo. Não ligue a unidade a reguladores de intensidade. Utilize sempre um cabo de segurança aprovado ao instalar a unidade. De forma a não correr risco de choque eléctrico não abra a cobertura da unidade. Nunca repare um fusível nem tente operar a unidade sem fusível. Substitua sempre um fusível danificado por outro com as mesmas características! Em caso de problemas sérios de funcionamento, interrompa a utilização da unidade e contacte imediatamente o seu revendedor. A cobertura e as lentes deverão ser substituídas caso apresentem danos visíveis. Caso seja necessário transportar a unidade utilize a embalagem original. Por motivos de segurança, são proibidas quaisquer alterações não autorizadas à unidade. Explicações importantes: SCENE (Cena): Conjunto de diferentes valores de fader que descrevem uma certa condição num determinado momento. Exemplo: Os faders do SM-1612 foram definidos para colocar uma unidade numa certa direcção, com um determinado gobo e uma certa cor. A combinação destes diferentes valores de fader é conhecida como SCENE BANK (Banco de memória): No SM-1612 existem 8 botões scene (cena). Em cada botão scene pode ser guardada uma cena. De forma a obter um total de 240 memórias de cena, terá de colocar estas cenas em bancos de memória. É por este motivo que existem 30 bancos de memória, cada um contendo 8 cenas. 30 x 8 = 240 cenas. Exemplo: BANK1 (scene1 ; scene2 ; scene3 ; scene8) BANK2 (scene1 ; scene2 ; scene3 ; scene8) BANK3 (scene1 ; scene2 ; scene3 ; scene8) BANK30 (scene1 ; scene2 ; scene3 ; scene8) CHASE (Sequência): No SM-1612 existem 6 sequências programáveis. Chase é uma sequência de cenas. Esta sequência de cenas pode ser programada pelo utilizador por qualquer ordem. Uma sequência contém um máximo de 240 cenas. SPEED: Tempo entre duas cenas numa sequência a decorrer em modo auto. FADE TIME: Quantidade de tempo que uma ou varias unidades levam a passar de uma posição para outra. PAN/TILT: PAN significa movimento na horizontal ou movimento no eixo-x. TILT significa movimento na vertical ou movimento no eixo-y. JB SYSTEMS 76/89 SM-1612 SCANMASTER
79 PORTUGUÊS MANUAL DO UTILIZADOR FUNÇÕES (FRENTE) 1. BOTÕES DAS UNIDADES (Fixture): Utilizados para seleccionar uma ou mais unidades. 2. BOTÕES SCENE: Permitem carregar ou guardar uma determinada cena. 3. FADERS: Estes cursores permitem ajustar os valores dos diferentes canais. 4. BOTÃO PAGE SELECT: Cada unidade pode conter até 16 canais. Estes 16 canais estão divididos em duas paginas, cada uma com 8 canais (faders): PAGE A: canais 1 8 PAGE B: canais BOTÃO OVERRIDE: Quando uma sequência estiver a decorrer, poderá seleccionar uma ou mais unidades e controlá-las independentemente da sequência. 6. CURSOR SPEED: Utilizado para ajustar a velocidade da sequência numa escala de 0.1 segundos a 10 minutos. 7. CURSOR FADE TIME: Utilizado para ajustar o tempo de transição numa escala de 0 a 30 segundos. 8. DISPLAY LCD: Apresenta a actividade decorrente ou o estado da programação. Este display contém duas linhas de 8 caracteres cada. Em seguida apresenta-se uma lista de abreviaturas utilizadas: DISPLAY LCD FULL MESSAGE SN1 scene1 está activo BK1 bank1 está activo CHASE1 chase1 está activo STEP 009 step (passo) 9 de uma sequência DATA 184 valor DMX que o último fader utilizou = 184 (0 255) SP:1m34s speed definido para 1 minuto e 34 segundos. FT:3.31s fade time definido para 3.31 segundos ASS04 05 Joystick atribuído aos canais 4 & 5 (PAN=4 * TILT=5) RES10 13 canais DMX 10 & 13 estão invertidos 9. JOYSTICK PAN: Utilizado para controlar o pan (movimento horizontal) de uma unidade seleccionada (ou várias) 10. JOYSTICK TILT: Utilizado para controlar o tilt (movimento vertical) de uma unidade seleccionada (ou várias) JB SYSTEMS 77/89 SM-1612 SCANMASTER

80 PORTUGUÊS MANUAL DO UTILIZADOR 11. BOTÃO PROGRAM: Utilizado para aceder ou sair do modo programação (program mode). 12. BOTÃO MIDI/RECORD: Utilizado para gravar definições na memória ou para definir um canal MIDI. 13. BOTÃO AUTO/DELETE: Running mode: Utilizado para alternar entre manual e automatic chase mode (modo sequência manual e automática). Program mode: Utilizado para apagar cenas ou sequências. 14. BOTÃO MUSIC/BANK COPY: Running mode: Utilizado para alternar entre manual e music chase mode (modo sequência manual e sequência com musica). Program mode: Utilizado para copiar bancos de memória. 15. BOTÃO BANK UP/DOWN: Utilizado para seleccionar um dos 30 bancos de memória ou para seleccionar um dos passos numa sequência. 16. BOTÃO TAP/DISPLAY: Permite seleccionar os diferentes modos de display. Utilizado para alterar a leitura dos valores do canal DMX: pode escolher entre valores DMX reais (0 255) ou valores de percentagem (0 100%). Também é utilizado como função TAP no modo de sequência automática para definir a velocidade da sequência: pressione o botão duas vezes com algum intervalo de tempo. (Alternativa ao speed fader) 17. BOTÃO BLACKOUT: Utilizado para parar toda a saída DMX. 18. BOTÃO CHASE: Utilizado para activar uma ou mais sequências. 19. BOTÃO FINE: Permite fazer ajustes precisos nas funções PAN/TILT de uma unidade. Esta função permite posicionar as unidades com grande exactidão. (Por vezes a utilização dos faders de canal permite resultados ainda melhores.) 20. BOTÃO MODE: Se pressionar os botões MODE e FINE em conjunto irá activar os modos de atribuição de joystick e de inversão de canal. FUNÇÕES (PAINEL TRASEIRO) 8. ENTRADA MIDI: Pode ser utilizado para receber informação MIDI. 9. SELECTOR DMX POLARITY: Um sinal DMX regra geral tem as seguintes ligações: 1=ground (terra) * 2=Data- * 3=Data+ JB SYSTEMS 78/89 SM-1612 SCANMASTER
MADE IN LMX1216 192 CHANNELS LIGHT CONSOLE. Manual de Instrucções User Manual MAN143_0
 MADE IN EU LMX1216 192 CHANNELS LIGHT CONSOLE Manual de Instrucções User Manual MAN143_0 1. PRODUCT DESCRIPTIONS: Para facilitar a utilização correcta deste equipamento, criámos este Manual de Instruções.
WATER MATTRESS MASSAGE SYSTEM 20439
 Page 1 of 10 WATER MATTRESS MASSAGE SYSTEM 20439 CONTENTS Massage System with Controller Please note: the above image shows a white unit and a blue unit. The white unit is supplied inside the blue unit
RECHARGEABLE PORTABLE SOUND SYSTEM WITH USB-MP3 & VHF MIC
 RECHARGEABLE PORTABLE SOUND SYSTEM WITH USB-MP3 & VHF MIC SYSTEME DE SONORISATION PORTABLE RECHARGEABLE AVEC LECTEUR USB-MP3 & MICRO VHF SISTEMA DE SOM PORTÁTIL RECARREGÁVEL COM USB-MP3 & MICROFONE VHF
User Guide Manual de Utilizador
 2400 DPI OPTICAL GAMING MOUSE User Guide Manual de Utilizador 2014 1Life Simplify it All rights reserved. www.1-life.eu 2 2400 DPI OPTICAL GAMING MOUSE ENGLISH USER GUIDE...4 MANUAL DE UTILIZADOR PORTUGUÊS...18
Addition of Fields in Line Item Display Report Output for TCode FBL1N/FBL5N
 Addition of Fields in Line Item Display Report Output for TCode FBL1N/FBL5N Applies to: Any business user who uses the transactions FBL1N and FBL5N to display line item reports for vendors and customers.
SATA 3.5. hd:basic. hdd enclosure caixa externa para disco rígido
 SATA 3.5 hd:basic hdd enclosure caixa externa para disco rígido hd:basic USER S GUIDE SPECIFICATIONS HDD support: SATA 3.5 Material: Aluminium Input connections: SATA HDD Output connections: USB 2.0
Parts of the Solar Charger. Charging the Solar Battery. Using the Solar Lamp. Carry in hand. Shows how much light is left. Table light.
 Parts of the Solar Charger Solar Lamp LCD Panel 1 Solar Panel Cell Phone Charger Port Protective Cover Solar Charger Port Lamp Stand Adaptors On/Off Switch Cell Phone Charger Cable Charging the Solar Battery
hdd enclosure caixa externa para disco rígido
 hdd enclosure caixa externa para disco rígido USER S GUIDE SPECIFICATONS HDD Support: SATA 2.5 Material: Aluminium and plastics Input connections: SATA HDD Output connections: USB 3.0 (up to 5.0Gbps)
NOVO SISTEMA DE CORREIO ELETRONICO PARA OS DOMINIOS ic.uff.br & dcc.ic.uff.br
 NOVO SISTEMA DE CORREIO ELETRONICO PARA OS DOMINIOS ic.uff.br & dcc.ic.uff.br A partir de 28/07/2004 (quarta-feira), ás 17:30 hs estaremos trocando nossos servidores de correio para ambos os domínios ic.uff.br
SAP911. Acondicionador de aire portátil Ar condicionado portátil Portable Air Conditioner. Manual do utilizador
 ES PT EN SAP911 Acondicionador de aire portátil Ar condicionado portátil Portable Air Conditioner ES Manual del usuario PT Manual do utilizador EN User Manual ES Gracias por elegir este acondicionador
ÍNDICE PORTUGUÊS INDEX ENGLISH
 ÍNDICE PORTUGUÊS 1. Características... 2 2. Conteúdo da Embalagem... 3 3. Como usar o Receptor de TV Digital... 3 4. Tela de Vídeo... 6 5.Requisitos Mínimos... 6 6. Marcas Compatíveis... 8 INDEX ENGLISH
SISTEMA AUTO-NIVELADOR DE FARÓIS
 INSTRUÇÕES DE MONTAGEM (EN) INSTALL MOUNTING INSTRUCTIONS (ES) INSTRUCCIONES DE MONTAJE (FR) GUIDE D'INSTALLATION SISTEMA AUTO-NIVELADOR DE FARÓIS P/ KITS HID (EN) Auto Leveling System for HID KITS (ES)
Easy Linux! FUNAMBOL FOR IPBRICK MANUAL. IPortalMais: a «brainware» company www.iportalmais.pt. Manual
 IPortalMais: a «brainware» company FUNAMBOL FOR IPBRICK MANUAL Easy Linux! Title: Subject: Client: Reference: Funambol Client for Mozilla Thunderbird Doc.: Jose Lopes Author: N/Ref.: Date: 2009-04-17 Rev.:
Instalação do encosto. Recursos. Como usar os tubos adaptadores. Estrutura do produto. Sistema de Som
 MANUAL Instalação do encosto Sistema de Som Recursos Disponível em preto, cinza Hastes de montagem ajustáveis para encaixe em qualquer assento Hastes ajustáveis a partir de 4 polegadas de distância a 8
Métodos Formais em Engenharia de Software. VDMToolTutorial
 Métodos Formais em Engenharia de Software VDMToolTutorial Ana Paiva apaiva@fe.up.pt www.fe.up.pt/~apaiva Agenda Install Start Create a project Write a specification Add a file to a project Check syntax
Guião N. Descrição das actividades
 Proposta de Guião para uma Prova Grupo: 006 Disciplina: Inglês, Nível de Continuação, 11.º ano Domínio de Referência: Um Mundo de Muitas Culturas Duração da prova: 15 a 20 minutos 1.º MOMENTO Guião N Intervenientes
DS100 Dual Monitor Desk Stand, Vertical
 USA 1-800-888-88 Europe +31 (0)33-600 DS100 Dual Monitor Desk Stand, Vertical ASSEMBLY INSTRUCTIONS INSTRUCCIONES DE INSTALACIÓN NOTICE D ASSEMBLAGE INSTRUÇÕES DE MONTAGEM 1 A B C 1x 2x 2x 8x 8x 7-100mm
11g Wireless Broadband Router (Roteador banda-larga sem fio- Wireless G) Quick Installation Guide
 Quick Installation Guide") LevelOne WBR-3408 11g Wireless Broadband Router (Roteador banda-larga sem fio- Wireless G) Quick Installation Guide English Português Table of Contents English... 3 Português... 16 2 English Package Contents
LevelOne WBR-3408 11g Wireless Broadband Router (Roteador banda-larga sem fio- Wireless G) Quick Installation Guide English Português Table of Contents English... 3 Português... 16 2 English Package Contents
MANUAL PARA ALTO-FALANTE PORTÁTIL
 MANUAL PARA ALTO-FALANTE PORTÁTIL DC-S025 Para o correto funcionamento, favor ler este manual com atenção antes de utilizá-lo. Não somos responsáveis por consequências causadas por falha ou descuido com
Operação de Instalações Marítimas
 ENIDH, Abril 2011 Sumário 1 Steering Gear 2 Bow Thrust 3 Propeller Servo 1 Steering Gear 2 Bow Thrust 3 Propeller Servo Steering Gear System Comprises two identical hydraulic systems. Each system includes:
Instructions. Instruções
 Instructions ENGLISH Instruções PORTUGUÊS This document is to help consumers in understanding basic functionality in their own language. Should you have any difficulty using any of the functions please
Radio / CD. Honolulu CD50. Installation instructions Notice de montage Instrucciones de instalación Instruções de de montagem
 Radio / D Honolulu D50 Installation instructions Notice de montage Instrucciones de instalación Instruções de de montagem Installation instructions Notice de montage Instrucciones de instalación Instruções
Instructions AK-PC 551
 Instructions AK-PC 551 Identification 1,5 m: 080G0075 3,0 m: 080G0076 080G0281 = 230 V a.c. 20 VA 080G0283 = 24 V a.c. / d.c. 17 VA 080G0321 = 230 V a.c. 20 VA 080G0326 = 24 V a.c. / d.c. 17 VA MMIGRS2:
1. Dados Técnicos...3. 2. Utilização...3. 3. Local de Uso...3. 4. Validade...3. 5. Instruções de Uso...3. 6. Indicações de Segurança...
 SUMÁRIO PORTUGUÊS 1. Dados Técnicos...3 2. Utilização...3 3. Local de Uso...3 4. Validade...3 5. Instruções de Uso...3 6. Indicações de Segurança...4 7. Local de Uso...4 8. Manutenção...4 9. Resolução
Télécommande standard non polarisée 0 039 01
 01 Télécommande standard non polarisée R Caractéristiques techniques Alimentation...:230 V± 50/60 Hz 10 ma Capacité des bornes : 2 X 1,5 mm 2 Fixation...:surrailoméga Encombrement.... : 4 modules (70 mm)
MANUAL PARA ALTO-FALANTE PORTÁTIL
 MANUAL PARA ALTO-FALANTE PORTÁTIL DC-S021 Para o correto funcionamento, favor ler este manual com atenção antes de utilizá-lo. Não somos responsáveis por consequências causadas por falha ou descuido com
Para iniciar um agente SNMP, usamos o comando snmpd. Por padrão, aceita requisições na porta 161 (UDP).
.") EN3610 Gerenciamento e interoperabilidade de redes Prof. João Henrique Kleinschmidt Prática SNMP Net-SNMP (http://www.net-snmp.org) é um conjunto de aplicações usado para implementar SNMPv1, SNMPv2 e SNMPv3.
EN3610 Gerenciamento e interoperabilidade de redes Prof. João Henrique Kleinschmidt Prática SNMP Net-SNMP (http://www.net-snmp.org) é um conjunto de aplicações usado para implementar SNMPv1, SNMPv2 e SNMPv3.
1 a M5 x 12mm. Neo-Flex LCD Stand A B C ASSEMBLY INSTRUCTIONS INSTRUCCIONES DE INSTALACIÓN NOTICE D ASSEMBLAGE INSTRUÇÕES DE MONTAGEM.
 Neo-Flex LCD Stand ASSEMBLY INSTRUCTIONS INSTRUCCIONES DE INSTALACIÓN NOTICE D ASSEMBLAGE INSTRUÇÕES DE MONTAGEM 5" (127 mm) height range Rango de ajuste en altura: 5 (127 mm) Ajustement en hauteur sur
Aqui pode escolher o Sistema operativo, e o software. Para falar, faça download do Cliente 2.
 TeamSpeak PORTUGUES ENGLISH Tutorial de registo num servidor de TeamSpeak Registration tutorial for a TeamSpeak server Feito por [WB ].::B*A*C*O::. membro de [WB ] War*Brothers - Non Dvcor Dvco Made by:
CODIGOS CONTROLE RS232 Matrix HDMI 4x2 Control EDID/RS232 (GB.42.2014)
") CODIGOS CONTROLE RS232 Matrix HDMI 4x2 Control EDID/RS232 (GB.42.2014) Versão 2014.04.23 Você acaba de adquirir um produto AV LIFE!!! Não deixe de acessar nosso site www.avlife.com.br para ficar por dentro
CODIGOS CONTROLE RS232 Matrix HDMI 4x2 Control EDID/RS232 (GB.42.2014) Versão 2014.04.23 Você acaba de adquirir um produto AV LIFE!!! Não deixe de acessar nosso site www.avlife.com.br para ficar por dentro
Para iniciar um agente SNMP, usamos o comando snmpd. Por padrão, aceita requisições na porta 161 (UDP).
.") EN3610 Gerenciamento e interoperabilidade de redes Prof. João Henrique Kleinschmidt Prática SNMP 1 MIBs RMON No Linux os arquivos MIB são armazenados no diretório /usr/share/snmp/mibs. Cada arquivo MIB
EN3610 Gerenciamento e interoperabilidade de redes Prof. João Henrique Kleinschmidt Prática SNMP 1 MIBs RMON No Linux os arquivos MIB são armazenados no diretório /usr/share/snmp/mibs. Cada arquivo MIB
Versão: 1.0. Segue abaixo, os passos para o processo de publicação de artigos que envolvem as etapas de Usuário/Autor. Figura 1 Creating new user.
 Órgão: Ministry of Science, Technology and Innovation Documento: Flow and interaction between users of the system for submitting files to the periodicals RJO - Brazilian Journal of Ornithology Responsável:
Welcome to Lesson A of Story Time for Portuguese
 Portuguese Lesson A Welcome to Lesson A of Story Time for Portuguese Story Time is a program designed for students who have already taken high school or college courses or students who have completed other
A machine that blows bubbles at the press of your switch (not included)
") 1. Product Name Bubbles 2. Product Code 20139 3. Colour As shown 4. Brief Description A machine that blows bubbles at the press of your switch (not included) 5. Contents Bubbles machine with cable attached
1. Product Name Bubbles 2. Product Code 20139 3. Colour As shown 4. Brief Description A machine that blows bubbles at the press of your switch (not included) 5. Contents Bubbles machine with cable attached
MANUAL DO USUÁRIO DMX MASTER II Tecnologia de Iluminação Profissional
 MANUAL DO USUÁRIO DMX MASTER II Tecnologia de Iluminação Profissional CONTEÚDO 1. Características 2. Instruções gerais 3. Visão geral 3.1. Visão frontal 3.2. Visão de trás 4. Guia de operação 4.1. Ativar
Manual de montagem do KIT 5E1
 www.altanatubes.com Manual de montagem do KIT 5E1 Partes do seu kit Parabéns por adquirir o KIT 5E1 da Altana Tubes. Com ele você terá não apenas prazer de montar o seu próprio amplificadro, como a certeza
Aceder à plataforma do concurso Accessing the call for applications platform. Submeter documentos Upload documents. Apagar documentos Delete documents
 DRH DIREÇÃO DE RECURSOS HUMANOS HUMAN RESOURCES DIVISION CONCURSOS PARA PESSOAL DOCENTE GUIA RÁPIDO PARA SUBMETER DOCUMENTOS CALL FOR APPLICATIONS FOR FACULTY POSITIONS 01 02 03 04 05 06 07 08 09 10 11
See-and-Calc SEE-AND-CALC. Copyright AureoSoft www.aureosoft.com
 SEE-AND-CALC ENGLISH VERSION VERSÃO EM PORTUGUÊS ENGLISH VERSION USER MANUAL VERSION 1.0 OVERVIEW Thank you for using the See-and-Calc! See-and-Calc is a calculator with large numbers simulating an office
Guia rápido - 1ª PARTE
 Guia rápido - 1ª PARTE Especificações: Marca STAR DMX 512 canais Aloca 40 aparelhos Capacidade 20 memórias x 40 programas/chases/psycho x 40 passos Atalho extra patch fog/strobo/etc. Configura dimmer patch
Guião A. Descrição das actividades
 Proposta de Guião para uma Prova Grupo: Ponto de Encontro Disciplina: Inglês, Nível de Continuação, 11.º ano Domínio de Referência: Um Mundo de Muitas Culturas Duração da prova: 15 a 20 minutos 1.º MOMENTO
Start Here Comece aqui Mise en route Empezar aquí
 Start Here Comece aqui Mise en route Empezar aquí 1 Install the software (required for full functionality). Instale o software (necessário para funcionalidade total). Installez le logiciel (requis pour
Serviços: API REST. URL - Recurso
 Serviços: API REST URL - Recurso URLs reflectem recursos Cada entidade principal deve corresponder a um recurso Cada recurso deve ter um único URL Os URLs referem em geral substantivos URLs podem reflectir
100171058_N369225491 100171074_N369225492 100171084_N369225490 100171066_N369225488 URBAN C
 100171058_N369225491 100171074_N369225492 100171066_N369225488 100171084_N369225490 URBAN C Lea atentamente estas instrucciones antes de comenzar la instalación. - Compruebe el producto por si faltasen
WEIGHTED BLANKET 17689
 WEIGHTED BLANKET 17689 CONTENTS 1 x Weighted Blanket Instructions and maintenance check list USE For indoor use only. Use under supervision. CARE & MAINTENANCE Using the maintenance check list supplied,
ASUS Transformer Pad
 PG7210 Guia de Consulta Rápida do Gestor de ligações 3G TF300TG Instalação do cartão SIM 1. Utilize um clipe aberto para pressionar o botão de ejecção do suporte do cartão SIM. 2. Remova o suporte da ranhura.
ÍNDICE PORTUGUÊS INDEX ENGLISH
 ÍNDICE PORTUGUÊS 1. Introdução...2 2. Características...2 3. Avisos...3 4. Instalação...3 4.1 Alimentação por pilha AAA 4.2 Alimentação pela entrada USB 5. Utilizando o Produto...5 6. Solução de Problemas...5
GUIÃO Domínio de Referência: CIDADANIA E MULTICULTURALISMO
 PROJECTO PROVAS EXPERIMENTAIS DE EXPRESSÃO ORAL DE LÍNGUA ESTRANGEIRA - 2005-2006 Ensino Secundário - Inglês, 12º ano - Nível de Continuação 1 1º Momento GUIÃO Domínio de Referência: CIDADANIA E MULTICULTURALISMO
Turn the lead weight of data into a golden opportunity: manage it, unlock it and extract value from it
 Data - Temenos https://www.temenos.com/en/solutions/technology/data/ 1 of 2 2016-03-30 16:36 Data Turn the lead weight of data into a golden opportunity: manage it, unlock it and extract value from it
Description of the facilities of room 211 - Building 99A Exclusive for Videoconferencing
 Description of the facilities of room 211 - Building 99A Exclusive for Videoconferencing The videoconferencing room only accepts calls from other compatible/app Polycom RealPresence Mobile equipment (see
DONKEY 19689. 2. Using a small cross-head (positive) screwdriver, undo the screw that secures the battery compartment door. Copyright ROMPA Ltd
 screwdriver, undo the screw that secures the battery compartment door. Copyright ROMPA Ltd") DONKEY 19689 CONTENTS 1 x switch-adapted Donkey This product requires, but does not include, 3 AA batteries and a switch See www.rompa.com for a comprehensive range of switches BEFORE USE 1. Locate the
DONKEY 19689 CONTENTS 1 x switch-adapted Donkey This product requires, but does not include, 3 AA batteries and a switch See www.rompa.com for a comprehensive range of switches BEFORE USE 1. Locate the
Manual do usuário. Bluetooth Keyboard BKB10
 Manual do usuário Bluetooth Keyboard BKB10 Índice Noções básicas...3 Visão geral...3 Carregando o teclado...4 Ligando o teclado...5 Configurando o teclado...6 Suporte na Web...7 Informações legais...8
Magnetic Charging Dock
 Manual do usuário Magnetic Charging Dock Índice Introdução...3 Carregamento facilitado...3 Utilizando a Plataforma de carregamento magnética...4 Utilizando os apoios...4 Carregando seu celular...4 Informações
Seu manual do usuário JURA COMPRESSOR COOLER PRO http://pt.yourpdfguides.com/dref/2468329
 Você pode ler as recomendações contidas no guia do usuário, no guia de técnico ou no guia de instalação para JURA COMPRESSOR COOLER PRO. Você vai encontrar as respostas a todas suas perguntas sobre a JURA
Accessing the contents of the Moodle Acessando o conteúdo do Moodle
 Accessing the contents of the Moodle Acessando o conteúdo do Moodle So that all the available files in the Moodle can be opened without problems, we recommend some software that will have to be installed
Guião M. Descrição das actividades
 Proposta de Guião para uma Prova Grupo: Inovação Disciplina: Inglês, Nível de Continuação, 11.º ano Domínio de Referência: O Mundo do trabalho Duração da prova: 15 a 20 minutos 1.º MOMENTO Guião M Intervenientes
Sumário ANATEL PORTUGUÊS ENGLISH
 ANATEL Sumário PORTUGUÊS 1. Introdução...5 2. Tecnologia sem fio Bluetooth...6 3. Entenda sobre seu Fone Bluetooth...7 3.1. Visão Geral...7 3.2. Para Carregar a Bateria...8 3.3. Para Ligar/Desligar os
TACHO DATASMART III the PC version of Special Plus III
 TACHO DATASMART III the PC version of Special Plus III Programador Universal Multimarca para uso Profissional para reset e reparação de painel de instrumentos, Airbag, Imobilizador e Rádios baseado num
Home Theater 5 em 1 SP110
 Home Theater 5 em 1 SP110 ÍNDICE INFORMAÇÕES TÉCNICAS...03 CONTEÚDO DA EMBALAGEM...03 DISPLAY FRONTAL...04 INSTALAÇÃO DOS AUTO FALANTES...05 INSTALAÇÃO DO HOME THEATER...06 COMO USAR O CONTROLE REMOTO...07
Intellectual Property. IFAC Formatting Guidelines. Translated Handbooks
 Intellectual Property IFAC Formatting Guidelines Translated Handbooks AUTHORIZED TRANSLATIONS OF HANDBOOKS PUBLISHED BY IFAC Formatting Guidelines for Use of Trademarks/Logos and Related Acknowledgements
CREPÚSCULO DOS ÍDOLOS. Jarbas Jácome
 CREPÚSCULO DOS ÍDOLOS Jarbas Jácome Mesmo o mais corajoso de nós raras vezes tem a coragem para o que realmente sabe... O que justifica o ser humano é sua realidade ela o justificará eternamente. Pois
HEY PRESTO NOW I CAN TALK SUPER INTERACTIVE SWITCH BOX 18731 (CUSTOMISED 18736)
") Page 1 of 9 Copyright ROMPA Ltd HEY PRESTO NOW I CAN TALK SUPER INTERACTIVE SWITCH BOX 18731 (CUSTOMISED 18736) PRODUCT DESCRIPTION Press the coloured buttons to control the colours and the flow of bubbles
Page 1 of 9 Copyright ROMPA Ltd HEY PRESTO NOW I CAN TALK SUPER INTERACTIVE SWITCH BOX 18731 (CUSTOMISED 18736) PRODUCT DESCRIPTION Press the coloured buttons to control the colours and the flow of bubbles
Roteiro para legendar vídeos
 Colégio Pedro II Unidade Engenho Novo II Informática Educativa 2009 Professora Simone Roteiro para legendar vídeos 1. Neste roteiro você vai aprender a legendar vídeos em formato AVI, a partir do uso de
1. Product Name. 2. Product Code. 3. Colour. 4. Brief Description. 5. Contents. Rapid Water Change Pump. As available (typically orange)
") 1. Product Name Rapid Water Change Pump 2. Product Code 20601 3. Colour As available (typically orange) 4. Brief Description Offers quick, safe and easy means of emptying and filling your bubble tube and
1. Product Name Rapid Water Change Pump 2. Product Code 20601 3. Colour As available (typically orange) 4. Brief Description Offers quick, safe and easy means of emptying and filling your bubble tube and
NORMAS PARA AUTORES. As normas a seguir descritas não dispensam a leitura do Regulamento da Revista Portuguesa de Marketing, disponível em www.rpm.pt.
 NORMAS PARA AUTORES As normas a seguir descritas não dispensam a leitura do Regulamento da Revista Portuguesa de Marketing, disponível em www.rpm.pt. COPYRIGHT Um artigo submetido à Revista Portuguesa
Easy Linux! FUNAMBOL FOR IPBRICK MANUAL. IPortalMais: a «brainmoziware» company www.iportalmais.pt. Manual Jose Lopes
 IPortalMais: a «brainmoziware» company www.iportalmais.pt FUNAMBOL FOR IPBRICK MANUAL Easy Linux! Title: Subject: Client: Reference: Funambol Client for Microsoft Outlook Doc.: Author: N/Ref.: Date: 2009-04-17
para que Software www.aker.com.br Produto: Página: 6.0 Introdução O Aker Firewall não vem com Configuração do PPPoE Solução
 1 de 6 Introdução O não vem com a opção de configuração através do Control Center, para a utilização de discagem/autenticação via PPPoE. Este documento visa demonstrar como é feita a configuração do PPPoE
 Additional details >>> HERE
 START HERE PTB: COMECE AQUI FRA: MISE EN ROUTE ITA: PER COMINCIARE PTG: INICIAR AQUI ESP: EMPEZAR AQUÍ
 START HERE PTB: COMECE AQUI FRA: MISE EN ROUTE ITA: PER COMINCIARE PTG: INICIAR AQUI ESP: EMPEZAR AQUÍ Install the software (required for full webcam functionality). Instale o software (necessário para
SRW 01-HMI. Remote Keypad (HMI) HMI Remoto HMI Remota. Installation Guide Guía de Instalación Guia de Instalação. English / Español / Português
 HMI Remoto HMI Remota. Installation Guide Guía de Instalación Guia de Instalação. English / Español / Português") Motors Automation Energy Transmission & Distribution Coatings Remote Keypad (HMI) HMI Remoto HMI Remota SRW 01-HMI Installation Guide Guía de Instalación Guia de Instalação English / Español / Português
Motors Automation Energy Transmission & Distribution Coatings Remote Keypad (HMI) HMI Remoto HMI Remota SRW 01-HMI Installation Guide Guía de Instalación Guia de Instalação English / Español / Português
Descrição das actividades
 Proposta de Guião para uma Prova Grupo: Em Acção Disciplina: Inglês, Nível de Continuação, 11.º ano Domínio de Referência: O Mundo do Trabalho Duração da prova: 15 a 20 minutos Guião D 1.º MOMENTO Intervenientes
Electronic Complements Second call exam 23 January 2013, 9-12 (Duration: 3 hours) MIEET 5º ano
 MIEET 5º ano") Electronic Complements Second call exam 23 January 2013, 9-12 (Duration: 3 hours) MIEET 5º ano Write your name, student number and course on all sheets you hand in. Talking is not allowed. If you do it,
Electronic Complements Second call exam 23 January 2013, 9-12 (Duration: 3 hours) MIEET 5º ano Write your name, student number and course on all sheets you hand in. Talking is not allowed. If you do it,
Manual do usuário. Xperia P TV Dock DK21
 Manual do usuário Xperia P TV Dock DK21 Índice Introdução...3 Visão geral da parte traseira do TV Dock...3 Introdução...4 Gerenciador do LiveWare...4 Como atualizar o Gerenciador do LiveWare...4 Utilização
PAAES/UFU 2ª Etapa Subprograma 2011-2014
 SERVIÇO PÚBLICO FEDERAL MINISTÉRIO DA EDUCAÇÃO UNIVERSIDADE FEDERAL DE UBERLÂNDIA Pró-Reitoria de Graduação Diretoria de Processos Seletivos PAAES 2ª ETAPA SUBPROGRAMA 2011/2014 24 de fevereiro de 2013
DRIVING BOOK Back Offi ce Front Offi ce Online System
 DRIVING BOOK Back Office Front Office Online System Front Office 1 2 Start Screen Front Office 1 - Next Activities 2 - Categories - Attention - Find Booking Display upcoming activities to have be- All
3 o Treino para Alunos da UFPR 18 de Janeiro de 2013
 3 o Treino para Alunos da UFPR 18 de Janeiro de 2013 Sevidor BOCA: http://maratona.c3sl.ufpr.br/boca/ Organizadores: Vinicius Kwiecien Ruoso e Ricardo Tavares de Oliveira Lembretes: É permitido consultar
Perguntas & Respostas
 Perguntas & Respostas 17 de Abril de 2008 Versão Portuguesa 1. O que é uma Certidão Permanente?...4 2. Como posso ter acesso a uma Certidão Permanente?...4 3. Onde posso pedir uma Certidão Permanente?...4
About Your Pain. Where is your pain? Point to the place on your body where it hurts. Does the pain spread to other parts of your body?
 About Your Pain Pain is the body s way of sending a message to your brain that help is needed. Tell your doctor or nurse about your pain so they can keep you comfortable. These are questions you may be
User interface evaluation experiences: A brief comparison between usability and communicability testing
 User interface evaluation experiences: A brief comparison between usability and communicability testing Kern, Bryan; B.S.; The State University of New York at Oswego kern@oswego.edu Tavares, Tatiana; PhD;
Efficient Locally Trackable Deduplication in Replicated Systems. www.gsd.inesc-id.pt. technology from seed
 Efficient Locally Trackable Deduplication in Replicated Systems João Barreto and Paulo Ferreira Distributed Systems Group INESC-ID/Technical University Lisbon, Portugal www.gsd.inesc-id.pt Bandwidth remains
FAIRTRADE LABELLING ORGANIZATIONS INTERNATIONAL
 A: Tous les acteurs de la filière du Commerce Equitable certifiés pour la mangue, la banane, la pulpe d araza / Produtores e Comerciantes certificados da manga, da banana e da polpa de araza de CJ Tous
2005 2011 O caminho da GMB para aprovação técnica no PMC passou pelo projeto GMB2NLM
 2005 2011 O caminho da GMB para aprovação técnica no PMC passou pelo projeto GMB2NLM Klaus Hartfelder Editor Assistente da GMB editor@gmb.org.br ou klaus@fmrp.usp.br Passo 1: submissão dos dados da revista
Automação. Indústria smart. Indústria smart. Lucas Nülle GmbH Página 1/5 www.lucas-nuelle.pt
 Automação Acquire practical and project-oriented laboratory skills and expertise: Automation trainers, mechatronics trainers, PLC trainers Indústria smart Indústria smart A indústria smart representa,
SmartDock for Xperia ion Manual do usuário
 SmartDock for Xperia ion Manual do usuário Índice Introdução...3 Visão geral do SmartDock...3 Carregando o SmartDock...3 Introdução...5 LiveWare manager...5 Como atualizar o LiveWare manager...5 Como selecionar
Click the + sign to add new server details. Clique no sinal de "+" para adicionar novos detalhes do servidor. Enter a friendly name for your BI Server
 Click the + sign to add new server details Clique no sinal de "+" para adicionar novos detalhes do servidor Enter a friendly name for your BI Server Digite um nome amigável para o seu BI Server Enter the
ICS-GT INTEGRATED CONTROL SYSTEM FOR GAS TURBINE
 ICS-GT INTEGRATED CONTROL SYSTEM FOR GAS TURBINE ICS Gas Turbine Complete Control ICS-GT control system is an plc-based, integrated solution for gas turbine control and protection. The ICS-GT control system
Preposições em Inglês: www.napontadalingua.hd1.com.br
 Preposições na língua inglesa geralmente vem antes de substantivos (algumas vezes também na frente de verbos no gerúndio). Algumas vezes é algo difícil de se entender para os alunos de Inglês pois a tradução
Searching for Employees Precisa-se de Empregados
 ALIENS BAR 1 Searching for Employees Precisa-se de Empregados We need someone who can prepare drinks and cocktails for Aliens travelling from all the places in our Gallaxy. Necessitamos de alguém que possa
MANUAL DE INSTRUÇÕES MGN 108 LED PAN/TILT
 MANUAL DE INSTRUÇÕES MGN 108 LED PAN/TILT Conheça agora todas as funções de um aparelho de ultima geração, navegaremos pelos principais Menus e funcionalidades. Todos os menus estao organizados em Categorias
2 Categorias Categories Todas as categorias de actividade são apresentadas neste espaço All activity categories are presented in this space
 1 Próximas Actividades Next Activities Visualiza as próximas actividades a ter inicio, com a indicação do tempo restante Displays upcoming activities and indicating the remaining time 2 Categorias Categories
MANUAL DMX-192. DMX controller
 MANUAL DMX-192 DMX controller Por favor, leia com atenção este manual de instruções! CONTEÚDO 1. INTRODUÇÃO 2. FUNÇÕES 3. Operação e Instruções 4. Resolução de problemas 1. INTRODUCÃO Obrigado por escolher
Inglês. Guião. Teste Intermédio de Inglês. Parte III Interacção Oral. Teste Intermédio. Duração do Teste: 10 a 15 minutos De 27.04.2011 a 13.05.
 Teste Intermédio de Inglês Parte III Interacção Oral Teste Intermédio Inglês Guião Duração do Teste: 10 a 15 minutos De 27.04.2011 a 13.05.2011 9.º Ano de Escolaridade Decreto-Lei n.º 6/2001, de 18 de
User s Manual ZM-GM3. www.zalman.com. 한 글 / English / français / Español / Português. Ver. 140425
 User s Manual ZM-GM 한 글 / English / français / Español / Português To ensure safe and easy installation, please read the following precautions www.zalman.com Ver. 05 English . Caution A long incorrect
Inglês. Entrelinha 1,5 (Versão única igual à Versão 1) Teste Intermédio de Inglês. Parte III Compreensão do oral. Entrelinha 1,5.
 Teste Intermédio de Inglês. Parte III Compreensão do oral. Entrelinha 1,5.") Teste Intermédio de Inglês Parte III Compreensão do oral Entrelinha 1,5 Teste Intermédio Inglês Entrelinha 1,5 (Versão única igual à Versão 1) Duração do Teste: 15 minutos 22.02.2013 9.º Ano de Escolaridade
Teste Intermédio de Inglês Parte III Compreensão do oral Entrelinha 1,5 Teste Intermédio Inglês Entrelinha 1,5 (Versão única igual à Versão 1) Duração do Teste: 15 minutos 22.02.2013 9.º Ano de Escolaridade
Epidural Pain Relief for Labor and Delivery
 Epidural Pain Relief for Labor and Delivery An epidural is often used for pain relief during labor and delivery. A small flexible tube is put in the lower back. Medicine is injected into the tube to provide
Taking a Temperature
 Taking a Temperature Body heat is measured by taking a temperature with a thermometer. An increase in temperature, called a fever, may be a sign of infection. The common scale used to measure body temperature
Visitor, is this is very important contact with you. WATH DO WE HERE?
 Visitor, is this is very important contact with you. I m Gilberto Martins Loureiro, Piraí s Senior Age Council President, Rio de Janeiro State, Brazil. Our city have 26.600 habitants we have 3.458 senior
Dispositivos de Entrada. Dispositivos de Entrada. Data Glove. Data Glove. Profa. M. Cristina Profa. Rosane março 2006 março 2009
 Dispositivos de Entrada Dispositivos de Entrada Profa. M. Cristina Profa. Rosane março 2006 março 2009 Teclado Mouse Trackball e Spaceball Joystick Digitalizador (tablet) Touch panel Light pen Data Glove
Sistemas Operativos - Mooshak. 1 Mooshak. in http://mooshak.deei. fct.ualg.pt/. mooshak.deei.fct.ualg.pt/.
 Sistemas Operativos - Mooshak 1 Mooshak O Mooshak (Leal and Silva, 2003) é um sistema para gerir concursos de programação. Para a sua utilização no âmbito da unidade curricular de Sistemas Operativos,
APRESENTAÇÃO. ABNT CB-3 Comitê Brasileiro de Eletricidade Comissão de Estudo CE 03:064.01 Instalações Elétricas de Baixa Tensão NBR 5410
 APRESENTAÇÃO ABNT CB-3 Comitê Brasileiro de Eletricidade Comissão de Estudo CE 03:064.01 Instalações Elétricas de Baixa Tensão NBR 5410 Instalações elétricas de baixa tensão NBR 5410:1997 NBR 5410:2004