CTC1000 USER MANUAL 3 GEBRUIKERSHANDLEIDING 38 MODE D'EMPLOI 74 MANUAL DEL USUARIO 110 BEDIENUNGSANLEITUNG 146 MANUAL DO UTILIZADOR 182
|
|
|
- Eugénio Ramalho Furtado
- 6 Há anos
- Visualizações:
Transcrição


1 GSM BASED WIRELESS HOME ALARM SYSTEM DRAADLOOS ALARMSYSTEEM MET GSM-MODULE SYSTÈME D'ALARME SANS FIL AVEC MODULE GSM SISTEMA DE ALARMA INALÁMBRICO CON MÓDULO GSM DRAHTLOSE ALARMANLAGE MIT GSM-MODUL SISTEMA DE ALARME SEM FIOS POR GSM PARA HABITAÇÃO USER MANUAL 3 GEBRUIKERSHANDLEIDING 38 MODE D'EMPLOI 74 MANUAL DEL USUARIO 110 BEDIENUNGSANLEITUNG 146 MANUAL DO UTILIZADOR 182
2 V /02/ Velleman nv


 door contact (order code CTC1000DS) remote keypad (order code CTC1000KP)")


3 USER MANUAL 1. Introduction To all residents of the European Union Important environmental information about this product This symbol on the device or the package indicates that disposal of the device after its lifecycle could harm the environment. Do not dispose of the unit (or batteries) as unsorted municipal waste; it should be taken to a specialized company for recycling. This device should be returned to your distributor or to a local recycling service. Respect the local environmental rules. If in doubt, contact your local waste disposal authorities. Thank you for choosing Velleman! Please read the manual thoroughly before bringing this device into service. If the device was damaged in transit, don't install or use it and contact your dealer. Package contents Control panel Power adapter Ni-Mh rechargeable battery Optional PIR motion sensor (order code CTC1000PIR) door contact (order code CTC1000DS) remote keypad (order code CTC1000KP) remote control (order code CTC1000RC) water sensor (order code CTC1000WS) external bell box (order code CTC1000SO) wireless siren (order code CTC1000SI) 2. Safety Instructions Keep the device away from children and unauthorised users. Indoor use only. Keep this device away from rain, moisture, splashing and dripping liquids. Remove power before opening the cover. Be very careful, touching live wires can cause life-threatening electroshocks. Damage caused by disregard of certain guidelines in this manual is not covered by the warranty and the dealer will not accept responsibility for any ensuing defects or problems. Keep the device away from splashing and dripping liquids. Note that damage caused by user modifications to the device is not covered by the warranty. This system can provide valuable protection for your home and property if used properly. However, it cannot guarantee complete protection against burglary or robbery. Therefore, VELLEMAN nv will not be responsible for any losses or damages which occur during the use of this product. 3. General Guidelines Refer to the Velleman Service and Quality Warranty on the last pages of this manual. Have the system installed by a qualified installer. Respect the legislation in your region when installing an alarm system. If necessary, refer to local authorities. Protect this device from shocks and abuse. Avoid brute force when operating the device. Protected the device against extreme heat, dust and moisture. V /02/ Velleman nv
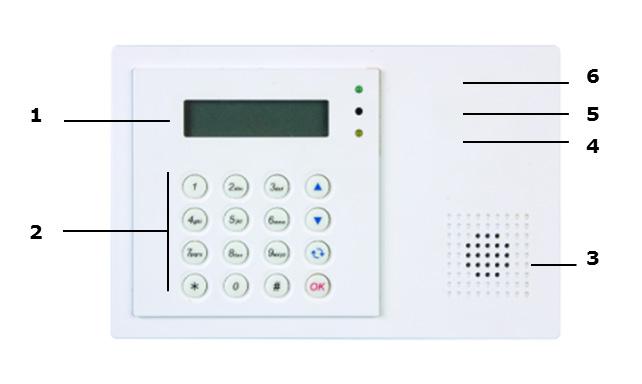
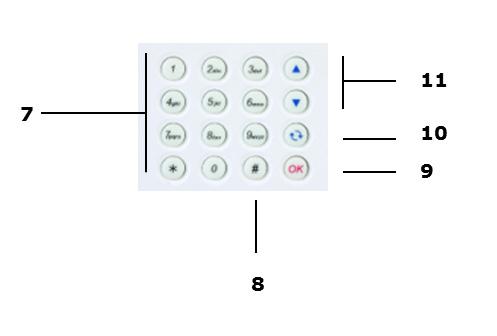
4 Familiarise yourself with the functions of the device before actually using it. All modifications of the device are forbidden for safety reasons. The device does not contain any user-serviceable parts except for the battery. Only use the device for its intended purpose. Using the device in an unauthorised way will void the warranty. 4. Features 30-zone full featured wireless control panel with built-in GSM dialler SMS messages 4 fixed alarm messages for burglar, emergency, fire, and medical alarms listen-in feature allows the call recipient to listen in to what is happening on your side SMS editing: 14 characters x 4 lines = 56 characters in total remote command and access to the system from anywhere via SMS 16 x 2 characters backlit full text LCD display each of the 30 zones can be individually named/edited by the user for quick recognition of designated areas built-in transmitter to activate outdoor bell box or wireless siren "home" arming option offers full protection while you are at home, yet allows you to move freely inside without triggering the alarm full supervision to ensure problem-free operation door open/close monitoring before system arming adds extra security error detection and display tamper detection protects the unit from unauthorized opening or removal from its mounting surface 5. Overview Refer to the illustrations on page 2 of this manual. 1 display 2 keypad 3 buzzer 4 yellow LED - on: an error is detected - off: no errors, the control panel is in normal mode 5 microphone 6 green LED - on: AC power is on - off: AC power failure 7 letters and digits 8 #: used to enter Program mode 9 OK: confirms data or selection 10 Cancel: used in Program mode: cancels a selection, returns to a previous screen up and down arrows: used in Program mode: moves the cursor up and down to select an item 12 2 mounting holes and tamper 13 DC jack 14 battery switch 15 SIM card compartment 6. Installation 6.1 SIM card (optional) You can insert a SIM card in the control panel to send alarm reports to your mobile phone (up to six numbers). V /02/ Velleman nv
5 Before you start CTC1000 Before inserting the SIM card in the control panel and mounting it, it is recommended to test the country code format used by your mobile phone provider. See section Country Code in chapter 10. Use your phone to remove the pin code from the SIM card. Inserting a SIM card The SIM card holder is located at the back of the device. To insert your SIM card: 1. Unscrew the SIM card compartment. 2. Slide the holder to the right to open it (see the OPEN mark on the holder). 3. Open the holder and insert your SIM card. 4. Slide the holder to the left to close it (see the CLOSE mark on the holder). 5. Close the compartment using the screw. 6.2 Power supply Use the included AC power adapter to connect the control panel to a wall outlet. Be sure only to use an adapter with the appropriate AC voltage rating to prevent component damage (see Technical Specifications below for details). Rechargeable battery A rechargeable battery (included, see Technical Specifications below for details) inside the control panel serves as a backup in case of power failure. During normal operation, the AC power adapter is used to supply power to the control panel and at the same time recharge the battery. When the battery is fully charged, it can provide back-up power for at least 8 hours. It takes approximately 48 hours to fully charge the battery. WARNING Do not puncture or throw batteries in fire as they might explode. Keep batteries away from children. Backlit display The device has a backlit LCD display for easy operation in the dark. However, when AC power is missing and for the reason of conservation of rechargeable battery, Backlit feature will be disabled until the AC power is supplied again. 6.3 Mounting the control panel Find a suitable location: requirements Take the following requirements into account when choosing a suitable location for the control panel. The control panel requires mains power. The control panel should be easily accessible. Do not install the control panel in a damp place (bathroom...) Do not install the control panel close to a heat source. Do not install the control panel alongside other radio transmitting devices such as mobile phones, cordless phone or wireless computer network (Wi-Fi) devices. Mounting the control panel The control panel can be mounted on the wall or wherever desired. Make sure the control panel is fitted at approximately chest height where the display can be easily seen and the keypad convenient to operate. 1. Use the 2 holes of the wall bracket to mark off the holes positions. 2. Drill 2 holes and insert the wall plugs if fixing into plaster or brick. 3. Screw the base to the wall 4. Insert the power supply in the power jack before attaching the panel to the wall. 5. Hook the control panel onto the wall bracket (holding the unit with the front facing you). 6.4 Two level passwords In order to provide highest security in operating the system, the control panel has 2 levels of authorization. When you want to program the system, you have to enter your pin code as well as a master code. V /02/ Velleman nv
6 When the control panel asks you to key in ENTER CODE or P-CODE, please enter your user pin code. When the display panel asks you to key in M-CODE, please enter your master code. For details about the pin code, see section 7.4 Pin code. For details about the master code, see section 7.7 Master Code. 6.5 First use Assuming you have found a suitable location: 1. Apply the AC power to the control panel. You will hear a long beep. Alarm On will be displayed on the first line and 00:01 01 Jan displayed on the second line of the screen indicating the system is in Away Mode (this is the default Mode) 2. Press button 1 on the keypad. 3. Key in the pin code for user 1 (default code is 1234) within 30 seconds. You can press to clear the code. 4. Press the OK key (within 30 seconds). You will hear 2 short beeps and the display will show: The system is now in alarm off mode. 5. Wait for 2 to 3 minutes for the system to read it status. If the yellow LED turns on, it indicates that there is an error. Refer to section 14 for details. Notes The control panel has a screen saver function. The Alarm off message will be displayed for 180 seconds. After that, the display shows only current date and time. 7. Configuration To enter Program mode: 1. Make sure the alarm is off (see section 11.4). 2. Press the # key. The display shows: 3. Within 30 seconds, key in 1234 (default User1 pin code) and press OK. The display shows: 4. Within 30 seconds, enter 1111 (default Master Code) and press OK. For 2 seconds, the display shows: 5. Then the program menu will be displayed: It is highly recommended to change the User 1 pin code and the master code on first use. Cursor The cursor is indicated by a flashing dot in the left upper corner. Use the keys and to move the cursor. Press OK to confirm. V /02/ Velleman nv
7 The Program menu contains the following items: Notes A down arrow V indicates that the list can be scrolled down. The arrow disappears when you reach the bottom of the list. An up arrow Λ indicates that the list can be scrolled up. The arrow disappears when you reach the top of the list. Press Cancel to return to the Alarm Off display. In Program mode, if no key is pressed within 5 minutes, the control panel will automatically return to alarm off mode. 7.2 Tel. Setting In the Tel. Setting menu, you can add, change or delete the mobile phone numbers. The control panel will use these numbers to report events. You can add up to 6 numbers. Notes The display only shows the first 11 digits of a number. The numbers are listed in order of priority. The system will connect to the phone numbers in that order. If the control panel fails to connect to the first number, it will try the next one on the list. To add a phone number 1. Enter Program mode and select Tel. Settings from the menu. The display lists the phone numbers. This list is empty on first use. 2. Use the arrow keys to select the letter to which you want to assign a number (A to F) and press OK. 3. Key in the phone number and press OK. o The number can contain up to 20 digits and characters * & #. o When entering a number, the key acts as backspace. To change a phone number 1. Enter Program mode and select Tel. Settings from the menu. The display lists the phone numbers. V /02/ Velleman nv
8 2. Use the arrow keys to select the number you want to change and press OK. This will clear the phone number. 3. Key in the phone number and press OK. o The number can contain up to 20 digits and characters * & #. o When entering a number, the key acts as backspace. To delete a phone number 1. Enter Program mode and select Tel. Settings from the menu. The display lists the phone numbers. 2. Use the arrow keys to select the number you want to delete and press OK. 3. Press OK again. The number is deleted. 7.3 General settings To access the menu item: enter Program mode and select Gen. Settings from the menu. The menu items are 7.4 Pin code Use Required to arm and disarm the alarm system. Required to access Program mode (together with the master code). Default value User 1: 1234 User 2 to 4: not set Properties 4 digits Mandatory The code for user 1 cannot be deleted. Will be reset to default when resetting the system (see chapter System reset) The pin code needs to be different from the master code To set a pin code 1. To access the menu item: enter Program mode, go to Gen. Settings, select Pin code and press OK. V /02/ Velleman nv
9 2. Use the arrow keys to select the code number you want to set and press OK. 3. Key in a 4 digit code and press OK. 4. Repeat the code and press OK. 5. (optional) Enter a name for the code. o This name will be displayed in the list of pin codes and helps you identify the code. o For information about entering text, see section 17 Entering text. o If you do not want to use a name, leave this field blank. 6. Press OK. Notes In the list of codes: a pin code with no name will be displayed as **** a pin code not yet defined will be displayed as To change a pin code 1. To access the menu item: enter Program mode, go to Gen. Settings, select Pin code and press OK. 2. Use the arrow keys to select the code you want to change and press OK. 3. Press. 4. Refer to topic To set a pin code above. To delete a pin code Pin code 1 cannot be deleted. To delete another code: 1. To access the menu item: enter Program mode, go to Gen. Settings, select Pin code and press OK. V /02/ Velleman nv
10 2. Use the arrow keys to select the code you want to delete and press OK. 3. Press OK again. 7.5 Temp. Code Use Used to arm or disarm the alarm system for a temporary user Valid only once for turning the alarm on or off. Once used, the code is automatically erased and needs to be reset if necessary Default value Not set Properties 4 digits Optional Will be cleared when resetting the system (see chapter System reset) To set a temporary code 1. To access the menu item: enter Program mode, go to Gen. Settings, select Temp. Code and press OK. 2. Key in a 4 digit code and press OK. 3. Repeat the code and press OK. 4. Set the option Latch Rpt. (latch key reporting) to on or off. o This option is only visible if the Latch Option is set to ON in the Special Settings. See section Latch Option in chapter 8 Special Settings for detailed information. 5. Press OK. To change a temporary code 1. To access the menu item: enter Program mode, go to Gen. Settings, select Temp. code and press OK. 2. Press. 3. Refer to topic To set a temporary code above. To delete a temporary code 1. To access the menu item: enter Program mode, go to Gen. Settings, select Temp. code and press OK. V /02/ Velleman nv
11 2. Press OK again. 7.6 Duress Code Use Can be used to arm or disarm the alarm system. Default value Not set Properties 4 digits Entering the code when under duress from an assailant triggers a silent alarm and sends a secret message to the programmed mobile phones. No siren will sound for duress alarm. Optional Will be cleared when resetting the system (see chapter System reset) To set a duress code 1. To access the menu item: enter Program mode, go to Gen. Settings, select Duress Code and press OK. 2. Key in a 4 digit code and press OK. 3. Repeat the code and press OK. To change a duress code 1. To access the menu item: enter Program mode, go to Gen. Settings, select Duress Code and press OK. 2. Press. 3. Key in a 4 digit code and press OK. 4. Repeat the code and press OK. To delete a duress code 1. To access the menu item: enter Program mode, go to Gen. Settings, select Duress Code and press OK. 2. Press OK again. 7.7 Master Code Use Required together with the pin code to enter the device s Program mode. Default value 1111 Properties 4 digits Mandatory Cannot be deleted Will be reset to default when resetting the system (see chapter System reset) The master code needs to be different from the pin codes V /02/ Velleman nv
12 To set a master code 1. To access the menu item: enter Program mode, go to Gen. Settings, select Master Code and press OK. 2. Key in a 4 digit code and press OK. 3. Repeat the code and press OK. To change a master code 1. To access the menu item: enter Program mode, go to Gen. Settings, select Master Code and press OK. 2. Press. 3. Key in a 4 digit code and press OK. 4. Repeat the code and press OK. To delete a master code 1. To access the menu item: enter Program mode, go to Gen. Settings, select Master Code and press OK. 2. Press OK again. 7.8 A. Entry Time The option A. Entry Time (away entry time) sets the countdown time you have to provide a pin code after entering the house. Preconditions: Alarm status: away Detection devices involved: door contact or PIR sensor set as Entry or Away Entry (see section 9.3). Action: the countdown starts when the door contact or PIR sensor is triggered. If the pin code has not been given within the time set, the control panel will raise an alarm and send a report. Available timer options: Disable (alarm will be raised without any delay) and delays from 10 to 70 seconds. Factory default is 20 seconds. To access this menu item: enter Program mode, go to Gen. Settings, select A. Entry Time and press OK. 7.9 A. Exit Time The option A. Exit Time (away exit time) sets the countdown time you have to leave the house when the alarm has been set to away by the control panel, a remote control or a remote keypad. Preconditions: Alarm status: set to away by the control panel, a remote control or a remote keypad Action: the countdown starts when the alarm is set to away by the control panel, a remote control or a remote keypad. Available timer options: Disable (no exit timer will be set) and delays from 10 to 70 seconds. Factory default is 30 seconds. To access this menu item: enter Program mode, go to Gen. Settings, select A. Exit Time and press OK. Notes Pressing the Arm button on the remote control will restart the countdown timer. Pressing the Disarm button on the remote control will stop the counter and disarm the alarm. Entering a pin code on the control panel will stop the counter and disarm the alarm H. Entry Time V /02/ Velleman nv
13 The option H. Entry Time (home entry time) sets the countdown time you have to enter the house when the system is set in Home mode. Preconditions: Alarm status: home mode Detection devices involved: door contact or PIR sensor set as Entry or Home Access (see section 9.3). Action: the countdown starts when the door contact or PIR sensor is triggered. If the pin code has not been given within the time set, the control panel will raise an alarm and send a report. Available timer options: Disable (alarm will be raised without any delay) and delays from 10 to 70 seconds. Factory default is 20 seconds. To access this menu item: enter Program mode, go to Gen. Settings, select H. Entry Time and press OK H. Exit Time The option H. Exit Time (home exit time) sets the countdown time you have to leave the house when the system is set in Home mode. Preconditions: Alarm status: set to away by the control panel, remote control or remote keypad Action: the countdown starts when the alarm is set to away by the control panel, a remote control or a remote keypad. Available timer options: Disable (no exit timer will be set) and delays from 10 to 70 seconds. Factory default is 30 seconds. To access this menu item: enter Program mode, go to Gen. Settings, select H. Exit Time and press OK. Notes Pressing the Home button on the remote control will restart the countdown timer. Pressing the Disarm button on the remote control will stop the counter and disarm the alarm. Entering a pin code on the control panel will stop the counter and disarm the alarm Door Chime The option Door Chime sets the door chime on or off while a door contact or PIR sensor is activated in alarm off mode. Preconditions: Alarm status: off Detection devices involved: door contact or PIR sensor set as Entry or Away Entry (see section 9.3). Action: The control panel sounds a door chime while the door contact or PIR sensor is activated in alarm off mode. Factory default is off. To access this menu item: enter Program mode, go to Gen. Settings, select Door Chime and press OK Time The option Time allows setting the current time. 1. To access this menu item: enter Program mode, go to Gen. Settings, select Time and press OK. 2. Use the up and down arrows to set the hours and press OK. 3. Use the up and down arrows to set the minutes and press OK. V /02/ Velleman nv
14 7.14 Date The option Date allows setting the current date. 1. To access this menu item: enter Program mode, go to Gen. Settings, select Date and press OK. 2. Use the up and down arrows to set the month and press OK. 3. Use the up and down arrows to set the day and press OK Panel Siren The option Panel Siren allows setting the siren on the control panel to on or off when an alarm event occurs. 1. To access this menu item: enter Program mode, go to Gen. Settings, select Panel Siren and press OK. 2. Use the up and down arrows to select the option and press OK. 8. Special Settings To access the items from the Spc. Settings menu: Enter Program mode and go to Spc. Settings. Alarm Length Sets the length of the built-in siren when an alarm is activated. Available options are: Disable (no alarm will be set) and 1 to 15 minutes. System default is 3 minutes. Notes If Disable is selected, when the control panel receives an alarm signal, the panel siren and internal & external sirens will not raise an alarm sound. If the outdoor siren alarm length is longer than the control panel s, the system gives priority to the control panel. (for example when the siren s alarm length is set to 3 minutes and the panel s alarm length is set to 1 minute, both alarm siren stop at 1 minute; however, the outdoor siren s LED keeps flashing for 3 minutes. V /02/ Velleman nv
15 A. Exit Sound (=away exit sound) Sets the countdown beeper sounds on or off for the away exit timer. A. Entry Sound (=away entry sound) Sets the countdown beeper sounds on or off for the away entry timer. H. Exit Sound (=home exit sound) Sets the beeper sounds on or off when leaving the house in Home mode. H. Entry Sound (=home entry sound) Sets the beeper sounds on or off when entering the house in Home mode. Siren Delay Sets how long the control panel should delay or suppress audible signals for burglar or entry alarms. Available options are: Off (no sound) and 1 to 10 minutes. System default is set to off. Notes The Siren Delay option only applies to burglar or entry alarms. Other alarms will not be delayed: o Fire alarm o Water alarm o Personal panic alarm o Medical emergency o Tamper alarm o GSM failure The alarm reporting will be sent immediately, even if the audible alarm is delayed. V /02/ Velleman nv
16 Verification Sets the verification sequence for the alarms. Sequential verification on If sequential verification is set to On and If there is more than one sensor (door contacts or PIR) with attribute set to Burglar: o o If the first sensor is triggered, the control panel will send an SMS with burglar. If the second sensor is triggered within 30 minutes, the control panel will send an SMS with Alarm confirm. Sequential verification off If sequential verification is set to Off, the control panel will only send an SMS with Burglar. Final Door If the Final Door option is set to on and If the alarm system is set to away arming and a door contact is set as Entry device The system will automatically full arm once the door contact is detected as closed, even if the countdown period is not yet finished. Interference Allows setting whether the control panel should detect signal jamming or not. When Detection is set to On, whenever the signal jamming period lasted longer than 30 seconds, this error will be logged, reported to the Central Monitoring Station and displayed on the LCD to warn the user. When the Detection Off is selected, control panel will not check interference status. RC Ent E (= remote controller entry enabled) This feature is used to prevent the alarm from being turned off with a remote control without unlocking a door first, for example if the remote has been stolen. To access the function: you need to first activate and entry point device to be able to disarm the alarm system. If the remote controller entry is set to On: a remote control can disarm the alarm system without unlocking a door first. Mobility This option disables or enables the Mobility Timer and sets a countdown period. Options available are Disable, 4 hours, 8 hours and 12 hours. If the Mobility Timer is enabled, it will count down the pre-programmed time length. When the timer times out without being reset, a report will be made to the Programmed phone numbers. V /02/ Velleman nv
17 When the Mobility timer is set with a specified timer, the control panel will report to the Programmed phone numbers when the timer runs out unless one of the following actions occurred in advance to reset the timer: o In Home mode: whenever any Home Omit DC, IR is triggered, or whenever any of the keys of the control panel is pressed; o In Disarm mode: whenever any of the DC or IR (except 24 Hr, Fire, Medical Emergency and Water) is triggered, or whenever any of the keys of the control panel is pressed. When the system is set to Away Arm, the timer automatically stops. When the system enters Home Arm or Disarm mode, the timer automatically starts again. Tamper Alarm Allows setting when the siren will sound when the system is being tampered with. Option Function Away Arm Only The control panel will only raise a local alarm and send a report to the monitoring centre when in Away mode. If the alarm is in Home or Alarm off modes, the control panel will send a report but the siren will not sound. Normal The control panel will raise a local alarm and send a report to the monitoring centre in all modes. Notes Regardless of the siren setting, the panel will report the tamper alarm by SMS to the first telephone number in all modes. When tamper is restored, the panel also will report the tamper restore event by SMS to the first telephone number. Latch Option The Latch Option logs the arming/disarming actions from all users done on the control panel and remote control. Notes If the Latchkey Reporting feature is set to Off, the feature will be hidden from the program menu (see section 7.5 Temp. Code). If the Latchkey Reporting feature is set to On, all arming/disarming actions of all users and the RCs will by default be reported to the Central Monitoring Station. For receiving the SMS-report, set the first telephone number as SMS report. Supervision This option is used to enable system supervision function. When this option is set to ON, the control panel will be able to receive check-in signals from its devices to indicate their proper functioning. Options are: Disable, 8 Hours, 12Hours, and 24Hours. Warning Beep V /02/ Velleman nv
18 Sets the beep to on or off when the control panel displays an error message. The warning beep will disappear when the error message has been read. GSM band Depending on service provider s network settings, you will need to adjust the GSM band setting accordingly. Check with our local telecom service provider for the appropriate setting. Stop Select Stop and press OK key to save your settings and return to the previous menu. 9. Managing devices The menu Devices+/- allows managing (add, configure, change, remove) devices like door contacts, PIR sensors, sirens, etc. in up to 30 zones. Order of installation Indoor and outdoor sirens and universal receivers are considered auxiliary devices by the system. Before adding one of these auxiliary devices, you need to add at least one other device first (a door contact, PIR detector or remote control). 9.2 Add a device To access the function: 1. Enter Program mode, go to Devices+/-, select Add device and press OK. 2. Press the test button on the device you want to add. 3. If the control panel detects the device, it will show the device type: The possible devices are: Door Contact PIR Sensor External PIR Sensor Remote Controller Remote Keypad Water Sensor Outdoor Siren Universal Receiver 4. Press OK to confirm. V /02/ Velleman nv
19 The control panel then displays the unused defense zones (up to 30). 5. Use the arrow keys to select the zone number to which you want to assign the device and press OK. The procedure will now vary depending on the type of device you want to add. 6. Select Stop and press OK key to save your settings and return to the previous menu. Notes If you are trying to add a sensor that has already been added, an error message will appear. To add this device anyway, you will need to remove it first (see section 9.5 Remove a device). Pressing the key cancels the procedure. Depending on the type of device you want to add, different screens will then be displayed accordingly for further configuration purpose. To add a door contact 1. Use the up and down arrows to select a working mode and press OK. For details about the available working modes, see section Provide a zone name. If you do not want to use a name, leave this field blank. 3. Press OK to confirm installation. V /02/ Velleman nv
20 4. Press OK again to finish. To add a PIR sensor Assuming you have assigned a zone number (see section 9.2): 1. Use the up and down arrows to select a working mode and press OK. For details about the available working modes, see section Provide a zone name. If you do not want to use a name, leave this field blank. 3. Press OK to confirm installation. 4. Press OK again to finish. To add an external PIR Sensor Assuming you have assigned a zone number (see section 9.2): 1. Use the up and down arrows to select a PIR type and press OK. o Regular: device will be added as an ordinary PIR o External: device will be added as an external PIR. 2. Use the up and down arrows to select a working mode and press OK. For details about the available working modes, see section Provide a zone name. If you do not want to use a name, leave this field blank. For information about entering text, see section Press OK to confirm installation. 5. Press OK again to finish. To add a remote control Assuming you have assigned a zone number (see section 9.2): V /02/ Velleman nv
21 1. Use the up and down arrows to select the option you want for the remote control. o Personal att: the control panel will give a personal attack alarm when the panic button is pressed for 3 seconds or twice within 3 seconds. o Medical Emg: the control panel will give a medical emergency alarm when the panic button is pressed for 3 seconds or twice within 3 seconds. 2. Use the up and down arrows to select a working mode and press OK. For details about the available working modes, see section Provide a zone name. If you do not want to use a name, leave this field blank. For information about entering text, see section Press OK to confirm installation. 5. Press OK again to finish. To add a remote keypad or water sensor Installation is similar for all these device types. Assuming you have assigned a zone number (see section 9.2): 1. Provide a zone name. If you do not want to use a name, leave this field blank. For information about entering text, see section Press OK. 3. Press OK again to finish. To add an auxiliary device (Program Siren menu) Indoor and outdoor sirens and universal receivers are considered auxiliary devices by the system. Before adding one of these auxiliary devices, you need to add at least one other device first (detector or remote keypad). The system displays an error message if this is not the case. 1. Enter Program mode, go to Devices+/-, select Program Siren, then Learn Siren and press OK. 2. Put the device you want to add into learning mode (see this device s user manual). 3. Press OK. The control panel will sound a long beep and transmit learning code to all devices simultaneously. The outdoor siren should respond by activating its siren and strobe light momentarily. The LED on the universal receiver lights up for 3 seconds. 9.3 Add a device: overview of working modes The overview below lists the possible modes for all devices taken together. The modes that are actually available depend on the type of device you are adding. Mode System status Device behaviour Burglar Home Omit When the system is in Away Arm / Home Arm, or during the Entry Delay or Exit Delay period when the system is in away arm mode (incl. away arm entry) when the system is in home arm mode, if a home omit door contact is triggered during the entry delay or exit delay period, if a home omit door contact is triggered if a burglar door contact is triggered, a burglar alarm will be activated immediately if a home omit door contact is triggered, a burglar alarm will be activated immediately the control panel will not respond the control panel will not respond V /02/ Velleman nv
22 Mode System status Device behaviour Home Access when the system is in away arm mode if a home access door contact is triggered, a burglar alarm will be activated immediately Delay Entry when the system is in home arm mode during the entry delay or exit delay period when the system is in away arm / home arm mode during the entry delay or exit delay period when the system is in away arm / home arm mode after the delay period is expired and no correct pin code is entered to disarm the system when the system is in alarm off mode if a home access door contact is triggered, the control panel will start an entry delay period to give enough time to disarm the system if a home access door contact is triggered, the control panel will not respond if a delay door contact is triggered, a burglar alarm will be activated immediately if a delay zone door contact is triggered, the control panel will not respond if an entry door contact is triggered, the control panel will start an entry period to give enough time to disarm the system the control panel will respond with a burglar alarm after 30 seconds if an entry door contact is triggered, the control panel will sound a door chime (if programmed). Away Entry when the system is in away arm mode if an away entry door contact is triggered, the control panel will start an entry period to give enough time to disarm the system after the delay period is expired and no correct pin code is entered to disarm the system when the system is in alarm off mode when the system is in home arm mode during the entry delay or exit delay period the control panel will respond with a burglar alarm after 30 seconds if an entry door contact is triggered, the control panel will sound a door chime (if programmed). if an away entry door contact is triggered, the control panel will not respond if an away entry door contact is triggered, the control panel will not respond 24 Hour Not applicable the 24 hour door contact is active all the time and does not have to be armed or disarmed Fire Not applicable the fire door contact is active all the time and does not have to be armed or disarmed Medical Emg Not applicable a medical emg door contact is active all the time and does not have to be armed or disarmed Water Not applicable the water door contact is active all the time and does not have to be armed or disarmed 9.4 Edit a device The function varies depending on the type of device you want to edit. Edit a door contact PIR sensor - remote control Enter Program mode, go to Devices+/-, select Edit devices and press OK. The display lists all the devices available. V /02/ Velleman nv
23 1. Use the up and down arrows to select a device and press OK. You can now change the device attribute. To skip this step, press. 2. Use the up and down arrows to select an attribute and press OK. 3. Press OK to confirm. You can now change the device name. To skip this step, press. To continue, press OK. 4. Enter a zone name and press OK. The display returns to the device list. Use the up and down arrows to select another device or press. Edit a remote keypad water sensor 1. Enter Program mode, go to Devices+/-, select Edit devices and press OK. The display lists all the devices available. 2. You can now change the device name. 3. Enter a zone name and press OK. The display returns to the device list. Use the up and down arrows to select another device or press. 9.5 Remove a device 1. Enter Program mode, go to Devices+/-, select Remove device and press OK. The system lists all available devices. 2. Use the up and down arrows to select a device and press OK. For details about the available working modes, see section 9.3. V /02/ Velleman nv
24 3. Press OK again to confirm. 9.6 Program Siren menu other options Learn Siren To add an outdoor bell box, indoor bell box or universal receiver it should be programmed first by the control panel, so that the control panel can communicate with these auxiliary devices. Before adding one of these auxiliary devices, you need to add at least one other device first (a door contact, PIR detector or remote control). To add an outdoor or indoor siren: 1. Put the device or devices you want to add in learn mode. 2. Enter Program mode, go to Devices+/-, select Program Siren and press OK. 3. Use the up and down arrows to select Learn Siren and press OK. o The control panel will then sound a long beep and transmit learning code to all devices simultaneously. o The outdoor siren will respond by activating its siren and strobe light momentarily. 4. Place these auxiliary devices out of Learn mode. Adding them into the system is completed. Siren Tamp. On - Siren Tamp. Off The outdoor siren tamper switch can be enabled and disabled remotely. This is used especially when replacing siren battery. To disable the siren tamper: select Siren Tamp.Off and press OK. All added sirens will temporarity lose their tamper protection simultanously. To enable the siren tamper: select Siren Tamp.Off and press OK. The tamper protection will be set simultaneously for all sirens. Confirm On - Confirm Off When set to on, the outdoor siren will sound a confirmation beep when arming or disarming the system. When set to off, the outdoor siren will not sound a confirmation beep when arming or disarming the system. Select Confirm On or Confirm Off and press OK. Entry Snd On - Entry Snd Off Enables or disables entry delay warning beeps on the siren when you enter the house. Select Entry Snd On or Entry Snd Off and press OK. 10. Other configuration functions SMS Editor The control panel editing the SMS message that will be sent to your mobile phone when an alarm occurs. V /02/ Velleman nv
25 1. Enter Program mode and select SMS Editor from the menu. The Edit Screen appears. 2. Enter an sms message (up to 16x4 characters). For information about entering text, see section Press OK. 4. Select Save and press OK to confirm. SMS Keyword The control panel supports remote commands sent from a mobile phone to the system. Before sending remote commands, you will first need to enter a password called SMS keyword.. To change the pin code for remote commands: 1. Enter Program mode, select SMS Keyword from the menu and press OK. 2. Key in a code between 1 and 10 characters long and press OK. This code must be different from the user code. 3. Repeat the code and press OK. Country Code The display format of the telephone number (with or without country code) may vary depending on the mobile phone provider. If your mobile phone displays numbers without the country code, you can ignore this section. If your mobile phone displays numbers with the country code, you need to change a setting in the control panel. You can ask this to your provider or test it yourself as follows: 1. Insert the SIM card you will use for the control panel in a mobile phone. 2. Turn on the phone. 3. Make sure the number is not assigned to any contact on your phone. 4. Send an sms message to the same number. o If your mobile phone displays numbers without the country code (for example ), you can ignore this section. o If your mobile phone displays numbers with the country code (for example ), proceed as follows. 5. On the control panel, enter Program mode, go to Country Code and press OK. 6. Enter the country code of your country. Example: if the number displayed on your phone was , type 32 (without the + ). 7. Press OK. 8. In the Replacement screen, key in 0. V /02/ Velleman nv
26 9. Press OK to finish. GSM Signal The option GSM signal allows monitoring the signal strength. 1. On the control panel, enter Program mode, go to GSM signal and press OK. The system will display the signal strength (from 0 to 9, 9 being the strongest signal). Walk Test The option Walk Test checks the communication between the control panel and any device. 1. On the control panel, enter Program mode, go to Walk Test and press OK. 2. Press the Test button on the device you want to test. If the control panel receives a signal, it will display the device s name, zone and signal strength. 3. Press to exit. Reset GSM The option Reset GSM resets the mobile phone signal. 1. On the control panel, enter Program mode, go to Reset GSM and press OK. The signal takes about 1 minute to reset. 11. Using the alarm When the alarm is disarmed (off), enter a pin code to access the user menu. From this menu, you can set the alarm on or off. Enter the first digit of your pin code. 1. Within 10 seconds, enter the other digits of the pin code. The display shows: 2. The cursor blinks next to Away Arm. The full menu contains the following items: If the system has detected an error, the first line of the display will show: 11.2 Arming the system If the system is disarmed, you can arm it as follows: V /02/ Velleman nv
27 1. Enter your pin code and press OK. The display shows: 2. The cursor blinks next to Away Arm. Press OK. The display shows: o o The control panel starts the countdown and plays a sound. (The sound and actual exit time depend on your settings, see 7.9.) When the countdown time is up, the system will play a long sound and the system will be armed. Notes The control panel has a screen saver function. The Alarm ON message will be displayed for 180 seconds. After that, the display shows only current date and time. If the Final Door Set Option is set to ON, the control panel will enter Alarm On mode as soon as the door has been closed. If a door contact or PIR sensor has been triggered (for example a door is still open), you cannot arm the system. To arm the system anyway, see section Force arming the system below. The system can also be armed with the (optional) remote control. Stopping the exit delay When you have armed the system and the countdown timer is still running, the exit delay can be stopped by disarming the system. 1. Press key. The screen will ask you to enter the pin code. The counting down delay is displayed on the control panel. 2. Enter your pin code and press OK. Alarm Off will be displayed on the screen and the system returns to Disarmed mode. o The exit delay can also be stopped by pressing the Disarm button on the (optional) remote control. o If the exit delay period times out before the code can be entered, the system will be armed. Extending the exit delay (remote control only) During the exit delay period, the delay time can be extended by pressing the Arm button on the (optional) remote control. Press and hold the Arm button for 1 second and you will hear a long beep to confirm the extension of exit time. Every time you press the Arm button on the remote, the delay time starts counting from the beginning Force arming the system If you are entering your pin code while the system has detected an error, the control panel displays an error message. If you then select Away Arm and press OK, the control panel will play a warning sound indicating arming is prohibited. The display will then alternatively display the actual errors and the message Fault Dsp. You will need to press key to return back to Alarm Off Screen. If an error occurs, you can solve the problems and clear the error display (see section 14) and arm the system (recommended). ignore the errors and arm the system despite the errors, as follows: In the Fault Dsp screen: 1. Enter your pin code and press OK. The display shows: V /02/ Velleman nv
28 2. Press OK to confirm. o o The control panel starts the countdown and plays a sound. (The sound and actual exit time depend on your settings, see 7.9.) When the countdown time is up, the system will play a long sound and the system will be armed. Arming with door opened While you arm the system, if any door was detected to be open, the control panel will also sound a warning to indicate arming is prohibited. The message Fault DSP is displayed in the middle of the top display row and alternates at 2-second intervals with the sensor name that is being triggered. At this moment, you can close the opened door, after which the error display will be cleared automatically and the screen returns to Alarm off. You can the arm the system. If you want to put the system into Arm mode with the door opened, you can use Forced Arming. Notes The Fault DSP screen has a time-out for 5 minutes. It will automatically exit and return to Alarm Off screen after 5 minutes. If a sensor is by-passed (see section Partial Arm mode), the condition of that sensor will not be checked. If a sensor tampered or out-of-order occurs, you can temporarily by-pass it or permanently remove it Disarming the system You can disarm the system if it is either in Away Arm mode or Home Arm mode (Alarm ON): 1. Enter your pin code and press OK. The control panel will sound 2 short beeps and return to disarmed mode. Remote control When the system is in Home mode (see below), pressing the Disarm button on the remote control will disarm the system. When the system is in Away Arm mode, pressing the Disarm button on the remote control can disarm the system when either an Entry device has been triggered, or when the Remote Controller Entry Enable has been set to ON (see section RC Ent E (= remote controller entry enabled) in chapter 8) Home Arm mode The Home mode allows the home to be armed so that no one can get inside without first disarming the system, yet the person already inside the house can move freely without triggering the alarm. You can only enter the Home Arm mode when the system is disarmed. To activate Home mode: 1. Enter your pin code and press OK. 2. Press key to move the cursor down to select Home Arm and press OK. V /02/ Velleman nv
29 o o The control panel starts the countdown and plays a sound. (The sound and actual exit time depend on your settings, see 7.9.) When the countdown time is up, the system will play a long sound and the system will be armed. Notes The system can also be armed with the (optional) remote control To stop the exit delay, see section Stopping the exit delay in chapter To extend the exit delay, see Extending the exit delay (remote control only) in chapter If the system has detected an error and you want to arm the system anyway, see section 11.3 Force arming the system Partial arm mode (by-pass mode) The Partial Arm mode allows the user to de-activate (by-pass) any sensors at their discretion. This feature allows your home to be armed; yet the person inside the house can move freely in the area where the sensor is by-passed. To activate Partial arm mode: 1. Enter your pin code and press OK. 2. Press key to move the cursor down to select Bypass and press OK. 3. Press & keys to select the zone to be by-passed and press OK (for example: DC backdoor). 4. Press OK to confirm. The bypassed zone will be marked with a *. 5. Repeat steps 2-4 to by-pass another device. 6. When done, press key to return to user menu and the cursor stays at Arm. 7. Press OK. Notes If a sensor is by-passed, the control panel will not respond to its triggering in Arm mode. The by-pass setting is effective for only one time, once the system is disarmed, the by-pass setting is cleared automatically. When a sensor is by-passed, the system can be armed directly regardless of its error situation (if any). However, its situation is still being monitored and will be logged and displayed when you access the Log submenu Stopping an alarm During any alarm, the control panel will sound its siren and report to the programmed mobile phone number. The display shows: V /02/ Velleman nv
30 During an alarm, to stop the siren and clear the display: Key in your pin code and press OK. If the pin code is correct, the alarm sounding will be stopped. If you press any key other than the first digit of your pin code, the screen will prompt you to enter your pin code. Reporting The reporting behaviour varies depending on when you stop the alarm Before reporting has started While reporting is on-going After reporting was finished Alarm stopped before reporting has started The system will not send any alarm reports. 1. The display will show the device that triggered the alarm with its zone number. 2. Press OK. If multiple alarms have been raised, the control panel continues displaying the 2nd alarm event with 02). at the beginning of the 2nd line. 3. Repeat pressing OK until the display shows: [meaning: system did not reach any phone numbers] 4. Press OK. The display returns to Alarm off. Or press to review all events. Alarm stopped while reporting is on-going 1. The display will show the device that triggered the alarm with its zone number. 2. Press OK. If multiple alarms have been raised, the control panel continues displaying the 2nd alarm event with 02). at the beginning of the 2nd line. 3. Repeat pressing OK until the display shows: [meaning: system did not reach any phone numbers] 4. Press OK. The display returns to Alarm off. Alarm stopped after reporting was finished 1. The display will show the device that triggered the alarm with its zone number. V /02/ Velleman nv
31 2. Press OK. If multiple alarms have been raised, the control panel continues displaying the 2nd alarm event with 02). at the beginning of the 2nd line. 3. Repeat pressing OK until the display shows: [showing the number reached by the control panel] 4. Press OK. The display returns to Alarm off. Or press to review all events. Remote control When an alarm (other than Panic alarm) is raised, pressing the Disarm button on the (optional) remote control will also stop the alarm. A Panic Alarm cannot be silenced from the remote control but needs to be silenced on the control panel. This is to prevent the remote control from being snatched from the user and silence the alarm using the Disarm button on the remote. Alarm memory If an alarm was raised without being silenced during your absence and the alarm reporting has been carried out, the screen will stay on the Alarm warning display. You cannot reset the display using the remote control. To clear the display, follow the same steps as described in chapter Alarm events and responses The following table lists the alarm events and how the control panel will respond to them. Type of Alarm Burglar Home Omit Disarmed Away Arm Home Arm Exit Timer No response No response Instant Burglar Alarm Instant Burglar Alarm Instant Burglar Alarm No response Instant Burglar Alarm No response Away Arm Entry Timer Instant Burglar Alarm Instant Burglar Alarm Home Arm Entry Timer Instant Burglar Alarm No response Home Access No response Instant Burglar Alarm Start Entry Timer No response No response No response Delay No response Instant Burglar Alarm Instant Burglar Alarm No response No response No response Entry Door Chime Start Entry Timer Start Entry Timer No response No response No response Away Entry Door Chime Start Entry Timer No response No response No response No response 24 HR. Burglar Alarm Burglar Alarm Burglar Alarm Burglar Alarm Burglar Alarm Burglar Alarm V /02/ Velleman nv
32 Fire Fire Alarm Fire Alarm Fire Alarm Fire Alarm Fire Alarm Fire Alarm Medical Emergency Alarm Emergency Alarm Emergency Alarm Emergency Alarm Emergency Alarm Emergency Alarm Water Water Alarm Water Alarm Water Alarm Water Alarm Water Alarm Water Alarm External PIR No response Instant Burglar Alarm Warning Beep No response No response No response (but no reporting) 12. Event log The alarm log memorises the last 20 system events including all alarm events with device ID all error warning events all arming and disarming events The logged events are displayed in reversed chorological order (most recent event first). The log is marked with a Start label before the most recent entry and End after the oldest entry. To view the event log: While in alarm off mode: 1. Key in the user code and press OK to access User s Menu. 2. Press the key repeatedly to select Log and then press OK. The start of the log will be displayed. 3. Use & to scroll through all logged events. 13. False Alarm Management The device features the following false alarm management functions: Twofold entry warning When the system is armed and a device set to entry attribute is triggered, the system will begin an entry countdown timer according to your entry time setting in General Setting. The purpose of the countdown timer is to warn that alarm reports to the programmed telephone number are about to be made. During the entry countdown timer, if another device not set to entry attribute is triggered, or a valid user pin code is not entered before the timer expires, an alarm will be activated. After the alarm is activated, the system will wait another 30 seconds before sending reports to programmed telephone numbers. If a valid user pin code is entered within 30 seconds, the alarm will be aborted and the system returns to normal status. If no valid user pin code is entered, the system will report burglar alarm to programmed telephone numbers. Reporting of arming and disarming actions If the Latch option is set to ON (factory default), all arming and disarming actions with user pin codes or remote controllers will be reported. Sequential verification reporting If Verification is set to ON (factory default is OFF) and a burglar alarm is activated, if another different device set to burglar attribute is triggered within 30 minutes, the system will send an alarm confirm report to the programmed telephone numbers. Refer to section Verification on page 16 for details. The sequential verification report will be sent in addition to the alarm report. If the second device is triggered within the countdown delay, the sequential verification report will not be sent. V /02/ Velleman nv
33 14. Errors The control panel can detect the following errors: control panel Low Battery AC Power Fail Sensor Out-of-order Sensor Low Battery Device and control panel Tamper Interference Detection SIM card missing GSM out of signal If the control panel detects an error, it will display an error. Possible errors Control panel Power supply PIR Sensor Door contact Sensor Low battery Sensor out-of-order Interference SIM Card missing GSM out of signal A tamper switch prevents the device from any removal attempts away from its cross mounting bracket A tamper switch protects the power supply lid from being opened or removed. A tamper switch protects the enclosure from being opened. A back-tamper protects the unit from being removed from its mounting location. A tamper switch protects the enclosure from either being opened or being removed from the mounting surface. The device detects low battery for the PIR sensor, door contact, remote keypad, water sensor, remote controller. The PIR sensor, door contact, water sensor will send signals to the panel at intervals between 30~50 min. The system will send an out-of order report if a device no longer sends a supervision signal. If the control panel does not receive the supervision signal from the device (see section Supervision in Chapter 8 Special Settings), the control panel will sound an alarm and yellow LED will light while an error message can be viewed on the LCD (in the Fault Display menu). The device can detect interference on 868 MHz frequency band. After a continuous interference signal is present for more than 30 seconds, an interference event can be logged, displayed on the LCD (in the Fault Display menu). If the SIM card is missing, a warning message will be shown. If out of signal, change the position of the control panel to get a better signal. Fault message display When any error persists, the control panel will respond as below when it is disarmed: The yellow LED will light to indicate the error The LCD will display the type of error and the source of the error in the Fault Display section of the user menu. A warning beep will sound every 30 seconds. If an error is detected while the system is in full arm mode, the error will not be shown until the system is disarmed. Clearing error message display The yellow LED will turn off automatically once all errors are restored, or any devices in error are removed. It cannot be cleared manually. The error message display remains even if the errors have been restored. The error message can only be cleared manually after the error has been corrected. Viewing/clearing the error message To check the error, when the system is disarmed. 1. Enter your pin code and press OK. V /02/ Velleman nv
34 2. The screen will display Fault Dsp Arm with the cursor next to Fault Dsp. 3. Press OK key to select Fault Dsp. All the errors are listed. 4. Use the & keys to move the cursor up or down. 5. After viewing all the errors, press key, a prompt message is displayed. Clear Fault Dsp (OK?) 6. If the error has been corrected, press OK. The error will be cleared and the screen returns to Alarm off. Notes If the error has not been corrected, the display will not be cleared. It will appear again while you try to arm the system and the error prevents the system from being armed. The error display can be cleared only after the error has been corrected. Even when the error message is cleared, the error will still be retained in the log Error Response When an error is detected, in addition to the error display, the control panel will also respond depending on the nature of the event. Except for sabotage alarms, the control panel and external sirens will not sound audible siren for error. In all modes, when Panel AC power failure or tamper trigger happens, the control panel will send error reports by SMS. For all other errors, the control panel will NOT send error report by SMS. AC Power fail The yellow LED will light and the error message will be displayed. The panel will report the error by SMS to the first telephone number in all modes within minutes. Once AC Power is restored, the panel also will report the restore event by SMS to the first telephone number within minutes. control panel low battery Any time the system detects battery Low on the panel, yellow LED will light while this error message can be viewed on LCD under Fault Display. When control panel is powered by an AC adapter, the control panel is incapable of detecting low battery condition. sensor low battery If the low battery is detected on any sensor, yellow LED will light up at any time. The error message can be viewed on LCD under Fault Display in the user menu. panel sabotaged If the Tamper switch on the control panel is triggered, yellow LED will light. The error message can be viewed on LCD under Fault Display in the user menu. In addition, the panel will report the error by SMS to the first telephone number in all modes. sensor sabotaged If the tamper switch on the PIR sensor, door contact, remote keypad, or outdoor siren is triggered, the yellow LED will light. The error message can be viewed on LCD under Fault Display in the user menu. In addition, the panel will report the error by SMS to the first telephone number in all modes. The siren will sound alarm for tamper-trigger according to the Tamper Alarm setting (see section Tamper Alarm in chapter 8). sensor out-of-order When the control panel has not received the supervisory signal from each individual PIR sensor or door contact, etc. for a period (according to the setting of the Supervision), the yellow LED on V /02/ Velleman nv
35 the panel will light while this error message can be viewed on LCD under Fault Display. No alarm event will be reported. interference When the system is programmed with Interference detection ON and when there is an interference detected for 30 seconds, the yellow LED will light up. The error message can be viewed on LCD under Fault Display in the user menu Error messages The error message is displayed in short form as below: Message displayed AC failure GSM Signal Interference Panel L.B. Panel Tamper (Sensor w/ Zone Name) + L.B. (Sensor w/ Zone Name) + out (Sensor w/ Zone Name) + Tamper Sim Card? Meaning AC Power Fail GSM out of signal interference detected low battery on the control panel sabotage on the control panel low battery on the sensor sensor out-of-order sabotage on a sensor SIM card missing Example: the message DC Z 01 L.B. means Zone 1 Door Contact is low battery. Note While you arm the system, if any of door contact or PIR is triggered, arming is also prohibited and the sensor triggered will be displayed as error message. Message displayed (DC w/ Zone Name) + open (IR w/ Zone Name) + Active Meaning Door Contact triggered PIR triggered 15. Remote commanding via SMS message The unit can be controlled by remote control commands sent via sms messages. Remember to change the Language setting of your mobile phone to English before proceeding. SMS Remote Control Command Table Control Command Action 00 hang up with Confirmation 10 disarm 11 arm 20 UR#1 deactivated 21 UR#1 activated 30 UR#2 deactivated 31 UR#2 activated For 2-digit Remote Control Command Send the SMS message to command the Unit to enter Arm Mode and send a confirmation SMS back to your mobile phone. The format is: MICHAEL MICHAEL SMS keyword V /02/ Velleman nv
36 2222 Programmed user code 11 DTMF command 00 to receive confirmation message Confirmation message A confirmation SMS message will read on your mobile phone as: Confirmed MICHAEL USER1 Arm Send the SMS message to command the Unit to enter Arm Mode without a confirmation SMS back to your mobile phone. The format is 9999 SMS keyword 5678 Programmed user code 11 DTMF command The system will automatically filter through all incoming SMS messages for SMS Keyword and automatically ignores and deletes SMS which does not contain the SMS keyword. For all authorized remote command that comes with proper keyword and pin code, the system will immediately carry out the contained command(s) and delete the SMS message afterward. 16. System reset When resetting the control panel, all programmed parameters (including pin codes) are reset to factory defaults and all devices are removed. You have to do the programming and add the devices one by one again. The control panel can clear all programmed parameters by the following sequence: 1. Remove the power supply and remove the backup battery. 2. Apply power while holding down the key. 3. Release the key when you hear a tone. The control panel will display Enter Code. 4. Enter the following key sequence:, OK key 5. Press OK. If you enter an incorrect key, the unit will revert to normal Alarm On mode. 17. Entering text The keypad can be used to enter text for user names, zone names, SMS texts Locate the numeric key displaying the letter or symbol you want to enter and press it repeatedly until the letter or symbol appears. Release the key and the flashing cursor automatically jumps to the next position for you to continue with the next letter by the same method. 18. Technical Specifications power supply Vac/50-60 Hz - 12 Vdc 500 ma (adapter incl.) back-up battery 7.2 V 600 mah Ni-Mh rechargeable battery (incl.) battery back-up time ± 8 hours sound level ± 104 1m frequency MHz operating temperature -10 to +45 C humidity up to 90 % non-condensing dimensions 185 x 120 x 26 mm weight 420 g V /02/ Velleman nv
37 Use this device with original accessories only. Velleman nv cannot be held responsible in the event of damage or injury resulting from (incorrect) use of this device. For more info concerning this product and the latest version of this manual, please visit our website The information in this manual is subject to change without prior notice. COPYRIGHT NOTICE The copyright to this manual is owned by Velleman nv. All worldwide rights reserved. No part of this manual may be copied, reproduced, translated or reduced to any electronic medium or otherwise without the prior written consent of the copyright holder. V /02/ Velleman nv
38 GEBRUIKERSHANDLEIDING 1. Inleiding Aan alle ingezetenen van de Europese Unie Belangrijke milieu-informatie betreffende dit product Dit symbool op het toestel of de verpakking geeft aan dat, als het na zijn levenscyclus wordt weggeworpen, dit toestel schade kan toebrengen aan het milieu. Gooi dit toestel (en eventuele batterijen) niet bij het gewone huishoudelijke afval; het moet bij een gespecialiseerd bedrijf terechtkomen voor recyclage. U moet dit toestel naar uw verdeler of naar een lokaal recyclagepunt brengen. Respecteer de plaatselijke milieuwetgeving. Hebt u vragen, contacteer dan de plaatselijke autoriteiten betreffende de verwijdering. Dank u voor uw aankoop! Lees deze handleiding grondig voor u het toestel in gebruik neemt. Werd het toestel beschadigd tijdens het transport, installeer het dan niet en raadpleeg uw dealer. Inhoud Controlepaneel Voedingsadapter Oplaadbare Ni-Mh-batterij Optioneel PIR-bewegingsdetector (bestelcode CTC1000PIR) deur-/venstercontact (bestelcode CTC1000DS) bedieningsconsole (bestelcode CTC1000KP) afstandsbediening (bestelcode CTC1000RC) waterdetector (bestelcode CTC1000WS) buitenalarm (bestelcode CTC1000SO) draadloze binnensirene (bestelcode CTC1000SI) 2. Veiligheidsinstructies Houd dit toestel uit de buurt van kinderen en onbevoegden. Gebruik het toestel enkel binnenshuis. Bescherm het toestel tegen regen, vochtigheid en opspattende vloeistoffen. Ontkoppel de voeding alvorens de behuizing te openen. Wees voorzichtig, raak geen kabels aan die onder stroom staan om dodelijke elektroshocks te vermijden. De garantie geldt niet voor schade door het negeren van bepaalde richtlijnen in deze handleiding en uw dealer zal de verantwoordelijkheid afwijzen voor defecten of problemen die hier rechtstreeks verband mee houden. Bescherm tegen opspattende vloeistoffen. Schade door wijzigingen die de gebruiker heeft aangebracht aan het toestel valt niet onder de garantie. Dit systeem kan een waardevolle bescherming zijn voor uw huis en eigendom indien het juist gebruikt wordt. Toch kan dit systeem geen volledige beveiliging bieden tegen inbraak of roof. Daarom kan VELLEMAN nv niet verantwoordelijk worden gesteld voor eventuele verliezen en schade. 3. Algemene richtlijnen Raadpleeg de Velleman service- en kwaliteitsgarantie achteraan deze handleiding. Laat het systeem installeren door een gekwalificeerde installateur. Respecteer de plaatselijke wetgeving bij het installeren van een alarmsysteem. Neem eventueel contact op met de plaatselijke autoriteiten. Bescherm het toestel tegen schokken. Vermijd brute kracht tijdens de bediening van het toestel. V /02/ Velleman nv
39 Bescherm het toestel tegen extreme hitte, stof en vochtigheid. Leer eerst de functies van het toestel kennen voor u het gaat gebruiken. Om veiligheidsredenen mag u geen wijzigingen aanbrengen aan het toestel. Er zijn geen door de gebruiker vervangbare onderdelen in dit toestel, behalve de batterij. Gebruik het toestel enkel waarvoor het gemaakt is. Bij onoordeelkundig gebruik vervalt de garantie. 4. Eigenschappen draadloos bedieningspaneel met 30 zones en ingebouwde gsm-module sms-berichten 4 ingestelde alarmberichten in geval van inbraak- en brandalarm of een medische noodsituatie meeluisterfunctie om van op afstand te beluisteren wat er zich in het huis afspeelt sms-teksten: 14 tekens x 4 lijnen = 56 tekens in totaal wereldwijde toegang en aansturing van uw alarmsysteem via sms LCD-scherm 16 x 2 tekens met achtergrondverlichting de gebruiker kan alle 30 zones individueel benoemen/aanpassen om de toegewezen zones snel te herkennen ingebouwde zender om het buitenalarm of de draadloze sirene in te schakelen door het activeren van de thuisfunctie kunt u zich geheel vrij door uw woning bewegen zonder zelf een alarm te veroorzaken volledige bewaking om een probleemloze werking te garanderen alarmsignaal waarschuwt voor een openstaande deur bij het activeren van het alarmsysteem foutdetectie en -weergave sabotagedetectie bij het openen van de behuizing en bij pogingen tot verwijderen van de montageplaats 5. Overzicht Raadpleeg de afbeeldingen op pagina 2 van deze handleiding. 1 display 2 toetsen 3 zoemer 4 gele led - aan: een fout is gedetecteerd - uit: geen fouten, controlepaneel werkt in normale modus 5 microfoon 6 groene led - aan: stroom is ingeschakeld - uit: stroom is uitgevallen 7 letters en cijfers 8 #: om de programmeermodus te starten 9 OK: bevestigt gegevens of selectie 10 annuleren: gebruikt in programmeermodus: annuleert een selectie, keert terug naar een vorig scherm, enz. 11 pijltjes op en neer: gebruikt in programmeermodus: verplaatst de cursor op en neer om een optie te selecteren 12 2 montagegaten en sabotageschakelaar 13 DC-ingang 14 batterijschakelaar 15 SIM-kaartcompartiment V /02/ Velleman nv
40 6. Installatie 6.1 SIM-kaart (optioneel) U kunt een SIM-kaart plaatsen in het controlepaneel om alarmberichten te versturen naar uw mobiele telefoon (tot 6 nummers). Voor u begint Voor u de SIM-kaart plaatst in het controlepaneel en deze installeert, is het aanbevolen om het formaat van de landcode te testen die door uw telefoonprovider wordt gebruikt. Zie Country Code in hoofdstuk 10. Gebruik uw telefoon om de pincode van de SIM-kaart te verwijderen. Een SIM-kaart installeren De SIM-kaarthouder bevindt zich aan de achterkant van het toestel. Om uw SIM-kaart te installeren: 1. Verwijder de klep van het SIM-kaartcompartiment. 2. Om de houder te openen, schuif deze naar rechts (zie markering OPEN op de houder). 3. Open de houder en plaats uw SIM-kaart. 4. Om de houder te sluiten, schuif deze naar links (zie markering CLOSE op de houder). 5. Schroef het compartiment dicht. 6.2 Voeding Gebruik de meegeleverde voedingsadapter om het controlepaneel te koppelen aan een stopcontact. Gebruik alleen een adapter met het juiste spanningsbereik om schade aan onderdelen te voorkomen (zie Technische specificaties). Oplaadbare batterij Een oplaadbare batterij (meegeleverd, zie Technische Specificaties) in het controlepaneel functioneert als reservebatterij bij stroomuitval. Bij een normale werking wordt de voedingsadapter gebruikt om het controlepaneel van stroom te voorzien en tegelijk de batterij op te laden. Wanneer de batterij volledig is opgeladen, kan deze minstens 8 uur energie leveren. Het duurt ongeveer 48 uur om de batterij volledig op te laden. WAARSCHUWING U mag batterijen nooit doorboren of in het vuur gooien (explosiegevaar). Houd batterijen uit het bereik van kinderen. Display met achtergrondverlichting Het toestel is voorzien van een LCD-display met achtergrondverlichting voor extra bedieningsgemak in het donker. Bij stroomuitval en om de oplaadbare batterij te spraren, functioneert de achtergrondverlichting niet. 6.3 Het controlepaneel monteren Een geschikte installatieplaats kiezen: vereisten Houd rekening met de volgende vereisten bij het kiezen van een geschikte installatieplaats voor het controlepaneel. Het controlepaneel moet aangesloten zijn op het netn Het controlepaneel moet gemakkelijk toegankelijk zijn. Installeer het controlepaneel niet in een ruimte met een hoge luchtvochtigheid (zoals een badkamer). Installeer het controlepaneel niet in de nabijheid van een warmtebron. Installeer het controlepaneel niet in de buurt van apparaten die radiogolven uitzenden zoals een mobiele telefoon, draadloze telefoon of een draadloos netwerkapparaat (WiFi)n Het controlepaneel monteren Het controlepaneel kan bevestigd worden aan de muur of waar u dat wilt. Plaats het controlepaneel ongeveer op borsthoogte zodat de display gemakkelijk leesbaar is en de toetsen gemakkelijk te bedienen zijn. 1. Gebruik de 2 gaten in de muurbeugel om de positie van de boorgaten te markeren. 2. Boor 2 gaten en gebruik de muurpluggen voor het bevestigen aan een gipswand of bakstenen muur. 3. Schroef de basis vast aan de muur. V /02/ Velleman nv
41 4. Sluit de voedingskabel aan voor u het paneel aan de muur bevestigt. 5. Hang het controlepaneel in de muurbeugel (houd het toestel vast met de voorkant naar u gericht). 6.4 Twee niveaus wachtwoorden Om de beste beveiliging bij bediening van het systeem te garanderen, zijn er twee toegangsniveaus voor het controlepaneel. Als u het systeem wilt programmeren, moet u zowel uw pincode als een mastercode ingeven. Als het controlepaneel vraagt om de ENTER CODE of P-CODE in te toetsen, geef dan uw gebruikerspincode in. Als het controlepaneel vraagt om de M-CODE in te toetsen, geef dan uw mastercode in. Voor meer informatie over de pincode, zie 7.4 Pin code. Voor meer informatie over de mastercode, zie 7.7 Master Code. 6.5 Eerste gebruik Nadat u een geschikte montageplaats hebt gekozen: 1. Sluit het toestel aan op het lichtnet. U hoort een lange pieptoon. Op de eerste lijn van het scherm verschijnt "Alarm On", op de tweede lijn verschijnt "00:01 01 Jan" om aan te geven dat het systeem in "Away"-modus (standaardmodus) staat. 2. Druk op toets 1 op het toetsenbord. 3. Geef binnen de 30 seconden de pincode in voor gebruiker 1 (standaardcode is 1234). U kunt op drukken om de code te wissen. 4. Druk op OK (binnen de 30 seconden). U hoort 2 korte pieptonen en de display toont: Het systeem staat nu in "Alarm Off"-modus (alarm uit). 5. Wacht 2 tot 3 minuten totdat de systeemstatus wordt uitgelezen. Brandt de gele led, dan is er een fout opgetreden. Zie 14 voor meer informatie. Opmerkingen Het controlepaneel beschikt over een schermbeveiliging. Het "Alarm Off"-bericht wordt gedurende 180 seconden weergegeven. Daarna worden enkel de huidige datum en tijd getoond. 7. Configuratie Om de programmeermodus te activeren: 1. Zorg ervoor dat het alarm uitgeschakeld is (zie 11.4). 2. Druk op #. De display toont: 3. Toets binnen de 30 seconden 1234 (standaardcode voor gebruiker 1) in en druk op OK. De display toont: 4. Geef binnen de 30 seconden 1111 (standaard mastercode) in en druk op OK. De display toont gedurende 2 seconden: 5. Daarna verschijnt het programmeermenu: V /02/ Velleman nv
42 Wijzig voor het eerste gebruik de pincode voor gebruiker 1 en de mastercode. Cursor De cursor is het knipperende puntje in de linkerbovenhoek. Gebruik de toetsen en om de cursor te verplaatsen. Druk op OK om te bevestigen. Het programmeermenu bestaat uit de volgende opties: Opmerkingen Een pijl naar beneden V geeft aan dat u naar beneden kunt bladeren in de lijst. De pijl verdwijnt als u het laatste item in de lijst hebt bereikt. Een pijl naar boven Λ betekent dat u naar boven kunt bladeren in de lijst. De pijl verdwijnt als u het eerste item in de lijst hebt bereikt. Druk op Annuleren om terug te keren naar het "Alarm Off"-scherm. Het controlepaneel keert automatisch terug van de programmeermodus naar de "Alarm Off"-modus als geen enkele toets wordt ingedrukt binnen 5 minuten. 7.2 Tel. Setting (instellen telefoonnummers) In het menu "Tel. Setting" kunt u gsm-nummers toevoegen, wijzigen of verwijderen. Het controlepaneel zal deze nummers gebruiken om een alarmbericht te sturen. U kunt tot 6 nummers instellen. Opmerkingen U ziet enkel de eerste 11 cijfers van een nummer. De nummers zijn gerangschikt volgens prioriteit. Het systeem belt de telefoonnummers op in deze volgorde. Slaagt het controlepaneel er niet in om verbinding te maken met het eerste nummer, dan zal het proberen om het volgende nummer te bellen. Een telefoonnummer toevoegen 1. Ga naar de programmeermodus en selecteer "Tel. Settings" in het menu. De display geeft de telefoonnummers weer. Bij het eerste gebruik is deze lijst leeg. 2. Selecteer de letter (A tot F) waaraan u een nummer wilt toekennen en druk op OK. 3. Toets het telefoonnummer in en druk op OK. o Het nummer kan maximaal 20 digits en * & #-tekens bevatten. V /02/ Velleman nv
43 o De knop dient als backspace bij het ingeven van een nummer. Een telefoonnummer wijzigen 1. Ga naar de programmeermodus en selecteer "Tel. Settings" in het menu. De display geeft de telefoonnummers weer. 2. Selecteer het nummer dat u wilt instellen met behulp van de pijltjestoetsen en druk op OK. Hiermee wordt het telefoonnummer gewist. 3. Toets het telefoonnummer in en druk op OK. o Het nummer kan maximaal 20 digits en * & #-tekens bevatten. o De knop dient als backspace bij het ingeven van een nummer. Een telefoonnummer verwijderen 1. Ga naar de programmeermodus en selecteer "Tel. Settings" in het menu. De display geeft de telefoonnummers weer. 2. Selecteer het nummer dat u wilt verwijderen met behulp van de pijltjestoetsen en druk op OK. 3. Druk nogmaals op OK. Het nummer is verwijderd. 7.3 General Settings (Algemene instellingen) Om de optie te selecteren: ga naar de programmeermodus en selecteer "Gen. Settings" in het menu. De menuopties zijn: 7.4 Pin Code Gebruik Vereist om het alarmsysteem in en uit te schakelen. Vereist om toegang te krijgen tot de programmeermodus (samen met de mastercode). Standaardwaarde Gebruiker 1: 1234 Gebruiker 2 tot 4: niet ingesteld Eigenschappen 4 cijfers Verplicht V /02/ Velleman nv
44 De code voor gebruiker 1 kan niet worden gewist. Wordt naar de standaardcode teruggezet bij het resetten van het systeem (zie hoofdstuk "Systeem resetten"). De pincode moet verschillend zijn van de mastercode. Een pincode instellen 1. Om de optie te selecteren: ga naar de programmeermodus, ga naar "Gen. Settings", selecteer "Pin Code" en druk op OK. 2. Selecteer het nummer van de pincode die u wilt instellen en druk op OK. 3. Toets een 4-cijferige code in en druk op OK. 4. Herhaal de code en druk op OK. 5. (optioneel) Geef een naam in voor de code. o Deze naam verschijnt in de lijst met pincodes en helpt u om de code te herkennen. o Voor meer informatie, zie 17 "Tekst ingeven". o Laat dit veld leeg als u geen naam wilt gebruiken. 6. Druk op OK. Opmerkingen In de lijst met codes: wordt een pincode zonder naam weergegeven met **** wordt een niet-gedefinieerde pincode weergegeven met Een pincode wijzigen 1. Om de optie te selecteren: ga naar de programmeermodus, ga naar "Gen. Settings", selecteer "Pin Code" en druk op OK. 2. Selecteer de code die u wilt instellen met behulp van de pijltjestoetsen en druk op OK. V /02/ Velleman nv
45 3. Druk op. 4. Zie boven "De pincode instellen" To set a pin code. Een pincode wissen Pincode 1 kan niet worden gewist. Om een andere code te wissen: 1. Om de optie te selecteren: ga naar de programmeermodus, ga naar "Gen. Settings", selecteer "Pin Code" en druk op OK. 2. Selecteer de code die u wilt wissen met behulp van de pijltjestoetsen en druk op OK. 3. Druk nogmaals op OK. 7.5 Temp. Code (tijdelijke code) Gebruik Wordt gebruikt om het alarmsysteem in of uit te schakelen voor een tijdelijke gebruiker. Eén keer geldig voor het in- of uitschakelen van het alarm. Eenmaal gebruikt wordt de code automatisch gewist. U moet ze opnieuw instellen indien nodig. Standaardwaarde Niet ingesteld Eigenschappen 4 cijfers Optioneel Wordt gewist bij het resetten van het systeem (zie hoofdstuk "Systeem resetten") Een tijdelijke code instellen 1. Om de optie te selecteren: ga naar de programmeermodus, ga naar "Gen. Settings", selecteer "Temp. Code" en druk op OK. 2. Toets een 4-cijferige code in en druk op OK. 3. Herhaal de code en druk op OK. 4. Stel de optie "Latch Rpt" ("latch key reporting", sleutelrapportering) in. o Deze optie is enkel zichtbaar indien de "Latch Option"-optie op ON staat in de speciale instellingen. Zie "Sleutelrapport" in hoofdstuk 8 "Special Settings" voor meer informatie. 5. Druk op OK. Een tijdelijke code wijzigen 1. Om de optie te selecteren: ga naar de programmeermodus, ga naar "Gen. Settings", selecteer "Temp. Code" en druk op OK. V /02/ Velleman nv
46 2. Druk op. 3. Zie boven "Een tijdelijke code instellen". Een tijdelijke code wissen 1. Om de optie te selecteren: ga naar de programmeermodus, ga naar "Gen. Settings", selecteer "Temp. Code" en druk op OK. 2. Druk nogmaals op OK. 7.6 Duress Code (dwangcode) Gebruik Kan worden gebruikt om het alarmsysteem in of uit te schakelen. Standaardwaarde Niet ingesteld Eigenschappen 4 cijfers Als u wordt belaagd, kunt u de speciale dwangcode ingeven. Dit triggert een stil alarm en verstuurt een bericht naar de ingestelde telefoonnummers. U hoort geen sirene bij een dwangalarm. Optioneel Wordt gewist bij het resetten van het systeem (zie hoofdstuk "Systeem resetten") Een dwangcode instellen 1. Om de optie te selecteren: ga naar de programmeermodus, ga naar "Gen. Settings", selecteer "Duress Code" en druk op OK. 2. Toets een 4-cijferige code in en druk op OK. 3. Herhaal de code en druk op OK. Een dwangcode wijzigen 1. Om de optie te selecteren: ga naar de programmeermodus, ga naar "Gen. Settings", selecteer "Duress Code" en druk op OK. 2. Druk op. 3. Toets een 4-cijferige code in en druk op OK. 4. Herhaal de code en druk op OK. Een dwangcode wissen 1. Om de optie te selecteren: ga naar de programmeermodus, ga naar "Gen. Settings", selecteer "Duress Code" en druk op OK. V /02/ Velleman nv
47 2. Druk nogmaals op OK. 7.7 Master Code (mastercode) Gebruik Vereist samen met de pincode om toegang te krijgen tot de programmeermodus van het toestel. Standaardwaarde 1111 Eigenschappen 4 cijfers Verplicht Kan niet worden gewist Wordt naar de standaardcode teruggezet bij het resetten van het systeem (zie hoofdstuk "Systeem resetten"). De mastercode moet verschillend zijn van de pincodes. Een mastercode instellen 1. Om de optie te selecteren: ga naar de programmeermodus, ga naar "Gen. Settings", selecteer "Master Code" en druk op OK. 2. Toets een 4-cijferige code in en druk op OK. 3. Herhaal de code en druk op OK. Een mastercode wijzigen 1. Om de optie te selecteren: ga naar de programmeermodus, ga naar "Gen. Settings", selecteer "Master Code" en druk op OK. 2. Druk op. 3. Toets een 4-cijferige code in en druk op OK. 4. Herhaal de code en druk op OK. Een mastercode wissen 1. Om de optie te selecteren: ga naar de programmeermodus, ga naar "Gen. Settings", selecteer "Master Code" en druk op OK. 2. Druk nogmaals op OK. 7.8 A. Entry Time (tijd bij binnenkomen) De optie "A. Entry Time" (away entry time) stelt de tijd in die u hebt om een pincode in te voeren na het betreden van de woning. Randvoorwaarden: Alarmstatus: "away" Detectietoestellen: deurcontact of PIR-detector ingesteld als "Entry" of "Away Entry" (zie 9.3). Actie: het aftellen begint wanneer het deurcontact of de PIR-detector getriggerd wordt. Indien de pincode niet wordt ingegeven binnen de ingestelde tijd, gaat een alarm af en wordt een bericht verstuurd. Beschikbare timer-opties: "Disable" (uitschakelen, het alarm zal onmiddellijk afgaan) of met vertraging van 10 tot 70 seconden. Standaard: 20 seconden. Om deze optie te selecteren: ga naar de programmeermodus, ga naar "Gen. Settings", selecteer "A. Entry Time" en druk op OK. 7.9 A. Exit Time (tijd bij buitengaan) V /02/ Velleman nv
48 De optie "A. Exit Time" (away exit time) stelt de tijd in die u hebt om de woning te verlaten nadat het alarm "away" ingeschakeld werd met het controlepaneel, een afstandsbediening of een bedieningsconsole. Randvoorwaarden: Alarmstatus: ingesteld op "away" met behulp van het controlepaneel, een afstandsbediening of een bedieningsconsole Actie: het aftellen begint wanneer het alarm wordt ingesteld op "away" met behulp van het controlepaneel, een afstandsbediening of een bedieningsconsole. Beschikbare timer-opties: "Disable" (uitschakelen, geen timer bij het buitengaan) of met vertraging van 10 tot 70 seconden. Standaard: 30 seconden. Om deze optie te selecteren: ga naar de programmeermodus, ga naar "Gen. Settings", selecteer "A. Exit Time" en druk op OK. Opmerkingen Wanneer u op de knop "Alarm inschakelen" drukt op de afstandsbediening, zal het aftellen opnieuw beginnen. Wanneer u op de knop "Alarm uitschakelen" drukt op de afstandsbediening, zal de teller stoppen en wordt het alarm uitgeschakeld. Wanneer u een pincode ingeeft op het controlepaneel, zal de teller stoppen en wordt het alarm uitgeschakeld H. Entry Time De optie "H. Entry Time" (home entry time) stelt de tijd in die u hebt om de woning te betreden wanneer het systeem in "Home"-modus staat. Randvoorwaarden: Alarmstatus: "Home"-modus Detectietoestellen: deurcontact of PIR-detector ingesteld op "Entry" of "Home Access" (zie 9.3). Actie: het aftellen begint wanneer het deurcontact of de PIR-detector getriggerd wordt. Indien de pincode niet wordt ingegeven binnen de ingestelde tijd, gaat een alarm af en wordt een bericht verstuurd. Beschikbare timer-opties: "Disable" (uitschakelen, het alarm zal onmiddellijk afgaan) of met vertraging van 10 tot 70 seconden. Standaard: 20 seconden. Om deze optie te selecteren: ga naar de programmeermodus, ga naar "Gen. Settings", selecteer "H. Entry Time" en druk op OK H. Exit Time (tijd bij buitengaan voor home-alarm) De optie "H. Entry Time" (home entry time) stelt de tijd in die u hebt om de woning te verlaten wanneer het systeem in "Home"-modus staat. Randvoorwaarden: Alarmstatus: ingesteld op "away" via het controlepaneel, een afstandsbediening of een bedieningsconsole Actie: het aftellen begint wanneer het alarm wordt ingesteld op "away" met behulp van het controlepaneel, een afstandsbediening of een bedieningsconsole. Beschikbare timer-opties: "Disable" (uitschakelen, geen timer bij het buitengaan) of met vertraging van 10 tot 70 seconden. Standaard: 30 seconden. Om deze optie te selecteren: ga naar de programmeermodus, ga naar "Gen. Settings", selecteer "H. Exit Time" en druk op OK. Opmerkingen Wanneer u drukt op de "Home"-knop op de afstandsbediening, zal het aftellen opnieuw beginnen. V /02/ Velleman nv
49 Wanneer u op de knop "Alarm uitschakelen" drukt op de afstandsbediening, zal de teller stoppen en wordt het alarm uitgeschakeld. Wanneer u een pincode ingeeft op het controlepaneel, zal de teller stoppen en wordt het alarm uitgeschakeld Door Chime (deurbel) De optie "Door Chime" schakelt de deurbel in of uit wanneer een deurcontact of PIR-detector geactiveerd wordt in "Alarm Off"-modus. Randvoorwaarden: Alarmstatus: "Off" Detectietoestellen: deurcontact of PIR-detector ingesteld als "Entry" of "Away Entry" (zie 9.3). Actie: Het controlepaneel laat een bel weerklinken zolang het deurcontact of de PIR-detector geactiveerd is in "Alarm Off"-modus. Standaard "Off". Om deze optie te selecteren: ga naar de programmeermodus, ga naar "Gen. Settings", selecteer "Door Chime" en druk op OK Time (klok) Met de optie "Time" kunt u de huidige tijd instellen. 1. Om deze optie te selecteren: ga naar de programmeermodus, ga naar "Gen. Settings", selecteer "Time" en druk op OK. 2. Gebruik de pijltjestoetsen (omhoog en omlaag) om de uren in te stellen en druk op OK. 3. Gebruik de pijltjestoetsen (omhoog en omlaag) om de minuten in te stellen en druk op OK Date (datum) Met de optie "Date" kunt u de huidige datum instellen. 1. Om deze optie te selecteren: ga naar de programmeermodus, ga naar "Gen. Settings", selecteer "Date" en druk op OK. 2. Gebruik de pijltjestoetsen (omhoog en omlaag) om de maand in te stellen en druk op OK. 3. Gebruik de pijltjestoetsen (omhoog en omlaag) om de dag in te stellen en druk op OK Panel Siren (paneelsirene) Met optie "Panel Sirene" kunt u de sirene op het controlepaneel in- of uitschakelen wanneer er een alarm optreedt. 1. Om deze optie te selecteren: ga naar de programmeermodus, ga naar "Gen. Settings", selecteer "Panel Siren" en druk op OK. 2. Gebruik de pijltjestoetsen om de optie te selecteren en druk op OK. 8. Speciale instellingen Om de speciale instellingen te beheren: Ga naar de programmeermodus en ga naar "Spc. Settings". V /02/ Velleman nv
50 Alarm Length (alarmduur) Instelling alarmduur van de ingebouwde sirene wanneer een alarm geactiveerd wordt. De beschikbare opties zijn: "Disable" (uitschakelen, het alarm zal niet afgaan) of een duur van 1 tot 15 minuten. Standaard: 3 minuten. Opmerkingen Als u "Disable" (uitschakelen) kiest en het controlepaneel ontvangt een alarmsignaal, gaat geen enkele sirene af: noch de paneelsirene, noch de interne en externe sirenes. Als de alarmduur van de buitensirene langer is dan de alarmduur van het controlepaneel, geeft het systeem prioriteit aan het controlepaneel. Voorbeeld: de alarmduur voor de sirene is ingesteld op 3 minuten en de alarmduur van het controlepaneel op 1 minuut. Beide sirenes stoppen na 1 minuut, maar de led van de buitensirene blijft gedurende 3 minuten flitsen. A. Exit Sound (geluid bij buitengaan) (= geluid bij buitengaan) Pieptoon voor de Away Exit Timer in- of uitschakelen A. Entry Sound (geluid bij binnenkomen) (= geluid bij binnenkomen) Pieptoon voor de Away Entry Timer in- of uitschakelen H. Exit Sound (= geluid bij buitengaan voor home-alarm) Pieptoon in- of uitschakelen bij het verlaten van de woning in "Home"-modus. V /02/ Velleman nv
51 H. Entry Sound (= geluid bij binnenkomen voor home-alarm) Pieptoon in- of uitschakelen bij het betreden van de woning in "Home"-modus. Siren Delay (sirenevertraging) Instellen van de tijd voordat de sirene geactiveerd wordt na een inbraakalarm. De beschikbare opties zijn: "Off" (geen geluid) en met vertraging van 1 tot 10 minuten. Standaard: "Off" (geen geluid). Opmerkingen De optie sirenevertraging is enkel van toepassing bij inbraakalarm. Andere alarmen worden niet vertraagd: o Brandalarm o Wateralarm o Paniekalarm o Medisch noodgeval o Sabotagealarm o Gsm-storing Het alarmbericht wordt onmiddellijk verstuurd, zelfs al is het hoorbare alarm vertraagd. Verification (verificatie) Sequentiële alarmverificatie. Sequentiële verificatie aan Als "Seq. Verif." ingesteld staat op "On" en Indien er meer dan één sensor (deurcontact of PIR-detector) is ingesteld op "Burglar": o o Als de eerste sensor getriggerd wordt, dan zal het controlepaneel een sms sturen met "Burglar". Als de tweede sensor binnen 30 minuten getriggerd wordt, zal het controlepaneel een sms sturen met "Alarm confirm". Sequentiële verificatie uit Als "Seq. Verif." ingesteld staat op "Off", dan zal het controlepaneel enkel een sms sturen met "Burglar". Final Door (laatste deur) Als de optie "Final Door" ingesteld staat op "On" en Als het alarmsysteem ingesteld staat op "Away Arming" en een deurcontact ingesteld is als ingangstoestel V /02/ Velleman nv
52 Zodra het deurcontact gedetecteerd wordt als gesloten, zal het systeem automatisch inschakelen zelfs al is het aftellen nog niet afgelopen. Interference (storing) Detectie signaalblokkering in- of uitschakelen Wanneer "Detection" op "On" staat en telkens het signaal langer dan 30 seconden geblokkeerd wordt, dan wordt deze fout geregistreerd en gemeld aan de centrale meldkamer. De fout verschijnt ook op de display om de gebruiker te waarschuwen. Wanneer "Dectection" op "Off" staat, zal het controlepaneel de storingstatus niet nagaan. RC Ent E (= remote controller entry enabled) Deze functie verhindert dat het alarm uitgeschakeld wordt met een afstandsbediening zonder eerst een deur te ontgrendelen, bv. indien de afstandsbediening gestolen is. Om de functie te gebruiken: moet u eerst een toegangstoestel activeren dat het alarmsysteem kan uitschakelen. Indien de optie "RC Ent E" ingesteld staat op "On": kan een afstandsbediening het alarmsysteem uitschakelen zonder eerst een deur te ontgrendelen. Mobility (gsm-timer) Deze optie (de)activeert de gsm-timer en stelt een aftelperiode in. Beschikbare opties zijn "Disable" (uitschakelen), 4 uur, 8 uur en 12 uur. Wanneer de gsm-timer actief is, wordt de programmeerde tijdsduur afgeteld. Wanneer de timer stopt zonder te resetten, wordt een bericht gestuurd naar de geprogrammeerde telefoonnummers. Wanneer de gsm-timer ingesteld is op een bepaalde tijdsduur, stuurt het controlepaneel berichten naar de geprogrammeerde telefoonnummers als de timer op nul staat, tenzij de teller gereset wordt door één van de volgende acties: o In "Home"-modus: wanneer eender welk "Home Omit"-, deurcontact- of bewegingsalarm wordt getriggerd, of wanneer eender welke toets op het controlepaneel wordt ingedrukt; o Als het alarm uitgeschakeld is: wanneer eender welk deurcontact- of bewegingsalarm (behalve 24 uur, brand, medisch noodgeval of water) wordt getriggerd, of wanneer eender welke toets op het controlepaneel wordt ingedrukt. Wanneer het systeem is ingesteld op "Away Arm" (ingeschakeld, niet thuis), stopt de timer automatisch. Wanneer the systeem in de modus "Home Arm" gaat of uitgeschakeld wordt (Disarm), begint de timer automatisch opnieuw. Sabotagealarm Instelling sirene wanneer er het systeem gesaboteerd wordt. Optie Functie Away Arm Only Het controlepaneel geeft enkel in de "Away"-modus een plaatselijk alarmsignaal en stuurt een bericht naar de centrale. Als het alarm werkt in Home of "Alarm Off"-modus, stuurt het controlepaneel een bericht, maar de sirene gaat niet af. Normal Het controlepaneel geeft in alle modi een plaatselijk alarmsignaal en V /02/ Velleman nv
53 stuurt een bericht naar de meldkamer. Opmerkingen Onafhankelijk van de sirene-instelling zal het controlepaneel in alle modi het sabotagealarm melden via een sms naar het eerste telefoonnummer. Als de sabotage hersteld is, zal het paneel dit ook melden via een sms naar het eerste telefoonnummer. Sleutelrapport Het sleutelrapport registreert alle in- en uitschakelingen door alle gebruikers op het controlepaneel en via afstandsbediening. Opmerkingen Als sleutelrapportering is uitgeschakeld ("Latch" staat op "Off"), dan verdwijnt de functie uit het programmeermenu (zie 7.5Temp. Code (tijdelijke code)). Als sleutelrapportering is ingeschakeld ("Latch" staat op "on"), worden alle in- en uitschakelingen van alle gebruikers en afstandsbedieningen standaard geregistreerd en doorgegeven aan de centrale. Om het sms-rapport te ontvangen, stelt u het eerste telefoonnummer in als sms-rapport. Supervision (supervisie) Deze optie (de)activeert de supervisiefunctie. Als deze optie is ingesteld op "ON", kan het controlepaneel controlesignalen ontvangen van de randapparaten om na te gaan of deze goed werken. Opties zijn: "Disable" (uitschakelen), 8 uur, 12 uur en 24 uur. Warning Beep (waarschuwingstoon) (De)activeert de waarschuwingstoon wanneer het controlepaneel een foutmelding weergeeft. Deze waarschuwingstoon stopt wanneer de foutmelding gelezen is. GSM-band Afhankelijk van de netwerkinstellingen van de netbeheerder stelt u de gsm-band in. Neem contact op met uw locale netbeheerder voor de juiste instelling. Stop Selecteer "Stop" en druk op OK om de instellingen te bewaren en terug te keren naar de vorige menuoptie. V /02/ Velleman nv
54 9. Apparaten beheren Via het menu "Devices+/-", beheert (toevoegen, instellen, wijzigen, verwijderen) u alle aangesloten apparaten zoals deurcontacten, PIR-detectoren, sirenes, enz. in maximaal 30 zones. Installatievolgorde Het systeem beschouwt binnen- en buitensirenes en universele ontvangers als aanvullende apparaten. Voor u zo'n aanvullend apparaat toevoegt, moet u minstens één ander apparaat toevoegen (een deurcontact, PIRdetector of afstandsbediening). 9.2 Een apparaat toevoegen Om de functie te gebruiken: 1. Ga naar de programmeermodus, ga naar "Devices+/-", selecteer "Add device" en druk op OK. 2. Druk op de testknop van het apparaat dat u wilt toevoegen. 3. Als het controlepaneel het apparaat detecteert, verschijnt het type apparaat op het scherm: Mogelijke apparaten zijn: Door Contact (deurcontact) PIR Sensor (bewegingsdetector) External PIR Sensor (externe bewegingsdetector) Remote Controller (afstandsbediening) Remote Keypad (bedieningsconsole) Water Sensor (waterdetector) Outdoor Siren (buitensirene) Universal Receiver (universele ontvanger) 4. Druk op OK om te bevestigen. Het controlepaneel toont dan de ongebruikte beveiligingszones (max. 30). 5. Gebruik de pijltjestoetsen om het nummer te kiezen van de zone waaraan u het apparaat wilt toewijzen en druk op OK. De procedure is nu verder afhankelijk van het type apparaat dat u wilt toevoegen. 6. Selecteer "Stop" en druk op OK om de instellingen te bewaren en terug te keren naar de vorige menuoptie. V /02/ Velleman nv
55 Opmerkingen CTC1000 Een foutmelding verschijnt als u probeert een sensor toe te voegen die reeds geregistreerd is. Om dit apparaat toch toe te voegen, moet u het eerst verwijderen (zie 9.5 "Een apparaat verwijderen"). Druk op om de procedure te annuleren. Afhankelijk van het type apparaat dat u wilt toevoegen, verschijnen er verschillende schermen voor de bijhorende instellingen. Een deurcontact toevoegen 1. Gebruik de pijltjestoetsen om een werkmodus te selecteren en druk op OK. Voor meer informatie over de beschikbare werkmodi, zie Voorzie een naam voor de zone. Laat dit veld leeg als u geen naam wilt gebruiken. 3. Druk op OK om de installatie te bevestigen. 4. Druk opnieuw op OK om te beëindigen. Een PIR-detector toevoegen We gaan ervan uit dat u reeds een zonenummer hebt toegewezen (zie 9.2): 1. Gebruik de pijltjestoetsen om een werkmodus te selecteren en druk op OK. Voor meer informatie over de beschikbare werkmodi, zie Voorzie een naam voor de zone. Laat dit veld leeg als u geen naam wilt gebruiken. V /02/ Velleman nv
56 3. Druk op OK om de installatie te bevestigen. 4. Druk opnieuw op OK om te beëindigen. Een externe PIR-detector toevoegen We gaan ervan uit dat u reeds een zonenummer hebt toegewezen (zie 9.2): 1. Gebruik de pijltjestoetsen om een PIR-type te selecteren en druk op OK. o Regular: apparaat wordt toegevoegd als een gewone PIR o External: apparaat wordt toegevoegd als een externe PIR. 2. Gebruik de pijltjestoetsen om een werkmodus te selecteren en druk op OK. Voor meer informatie over de beschikbare werkmodi, zie Voorzie een naam voor de zone. Laat dit veld leeg als u geen naam wilt gebruiken. Voor meer informatie over het invoeren van tekst, zie Druk op OK om de installatie te bevestigen. 5. Druk opnieuw op OK om te beëindigen. Een afstandsbediening toevoegen We gaan ervan uit dat u reeds een zonenummer hebt toegewezen (zie 9.2): 1. Gebruik de pijltjestoetsen om de gewenste optie voor de afstandsbediening te kiezen. o Personal att: het controlepaneel geeft een alarm voor een aanval op personen als de paniekknop gedurende 3 seconden wordt ingedrukt, of twee keer binnen de 3 seconden. o Medical Emg: het controlepaneel geeft een alarm voor een medisch noodgeval als de paniekknop gedurende 3 seconden wordt ingedrukt, of twee keer binnen de 3 seconden. 2. Gebruik de pijltjestoetsen om een werkmodus te selecteren en druk op OK. Voor meer informatie over de beschikbare werkmodi, zie Voorzie een naam voor de zone. Laat dit veld leeg als u geen naam wilt gebruiken. Voor meer informatie over het invoeren van tekst, zie Druk op OK om de installatie te bevestigen. V /02/ Velleman nv
57 5. Druk opnieuw op OK om te beëindigen. Een bedieningsconsole of waterdetector toevoegen De installatie is gelijkaardig voor deze types apparaten. We gaan ervan uit dat u reeds een zonenummer hebt toegewezen (zie 9.2): 1. Voorzie een naam voor de zone. Laat dit veld leeg als u geen naam wilt gebruiken. Voor meer informatie over het invoeren van tekst, zie Druk op OK. 3. Druk opnieuw op OK om te beëindigen. Een aanvullend apparaat toevoegen (Program Siren menu) Het systeem beschouwt binnen- en buitensirenes en universele ontvangers als aanvullende apparaten. Voor u zo'n aanvullend apparaat toevoegt, moet u minstens één ander apparaat toevoegen (detector of bedieningsconsole). Het systeem toont een foutmelding als dit nog niet gebeurd is. 1. Ga naar de programmeermodus, na naar "Devices+/-", selecteer "Program Siren", daarna "Learn Siren" en druk op OK. 2. Zet het apparaat dat u wilt toevoegen in leermodus (zie de gebruikshandleiding van het apparaat). 3. Druk op OK. Het controlepaneel laat een lange pieptoon horen en stuurt tegelijkertijd de programmeercode door naar alle apparaten. De buitensirene moet antwoorden door de sirene en het stroboscooplicht kortstondig te laten werken. De led op de universele ontvanger licht op gedurende 3 seconden. 9.3 Een apparaat toevoegen: overzicht van werkmodi Het overzicht hieronder toont de mogelijke modi voor alle apparaten. Welke modi werkelijk beschikbaar zijn, hangt af van het type apparaat dat u toevoegt. Modus Systeemstatus Werking van het apparaat Burglar Home Omit Home Access Delay (vertraging) Entry (binnenkomen) Wanneer het toestel zich in "Away Arm- /Home Arm-"modus bevindt, of tijdens de ingangsvertragings- of uitgangsvertragingsperiode. Wanneer het toestel zich in "Away Arm"- modus bevindt (incl. Away Arm Entry) Wanneer het toestel zich in Home Omitdeurcontact getriggerd wordt Tijdens de ingangs- of uitgangsvertragingsperiode, wanneer een Home Omit-deurcontact getriggerd wordt Wanneer het toestel zich in "Away Arm"- modus bevindt Wanneer het toestel zich in "Home Arm"- modus bevindt Tijdens de vertraging bij het binnenkomen of buitengaan Wanneer het toestel zich in "Away Arm- / Home Arm"-modus bevindt Tijdens de vertraging bij het binnenkomen of buitengaan Wanneer het toestel zich in "Away Arm- / Home Arm"-modus bevindt Wordt een deur-/venstercontact getriggerd, dan wordt onmiddellijk een inbraakalarm ingeschakeld. Wordt een Home Omit-deurcontact getriggerd, dan wordt onmiddellijk een inbraakalarm ingeschakeld. Het controlepaneel zal niet reageren Het controlepaneel zal niet reageren Wordt een Home Access-deurcontact getriggerd, dan wordt onmiddellijk een inbraakalaarm ingeschakeld. Wordt een Home Access-deurcontact getriggerd, dan start het controlepaneel de ingangsvertragingsperiode, waarbij u genoeg tijd hebt om het systeem uit te schakelen. Wordt een Home Acces-deurcontact getriggerd, dan reageert het controlepaneel niet Wordt een Delay-deurcontact getriggerd, dan wordt onmiddellijk een inbraakalarm ingeschakeld Wordt een Delay Zone-deurcontact getriggerd, dan reageert het controlepaneel niet Wordt een Entry-deurcontact getriggerd, dan start het controlepaneel een ingangsvertragingsperiode, waarbij u voldoende tijd hebt om het systeem uit te schakelen V /02/ Velleman nv
58 Modus Systeemstatus Werking van het apparaat Away Entry (binnenkomen na afwezigheid) 24 Hour (24 uur) Na de vertragingsperiode, en als er geen juiste pincode is ingegeven om het systeem uit te schakelen Wanneer het toestel zich in "Alarm Off"- modus bevindt Wanneer het toestel zich in "Away Arm"- modus bevindt Na de vertragingsperiode, en als er geen juiste pincode is ingegeven om het systeem uit te schakelen Wanneer het toestel zich in "Alarm Off"- modus bevindt Wanneer het toestel zich in "Home Arm"- modus bevindt. Tijdens de vertraging bij het binnenkomen of buitengaan Niet van toepassing Het controlepaneel schakelt van 30 seconden een inbraakalarm in Wordt een Entry-deurcontact getriggerd, dan weerklinkt "Ding-Dong" (indien ingesteld). Wordt een Away Entry-deurcontact getriggerd, dan start het controlepaneel een vertragingsperiode waardoor u voldoende tijd hebt om het systeem uit te schakelen. Het controlepaneel schakelt na 30 seconden een inbraakalarm in Wordt een Entry-deurcontact getriggerd, dan weerklinkt "Ding-Dong" (indien ingesteld). Wordt een Away Entry-deurcontact getriggerd, dan reageert het controlepaneel niet. Wordt een Away Entry-deurcontact getriggerd, dan reageert het controlepaneel niet Dit deurcontact is constant actief en moet niet in- of uitgeschakeld worden Fire (brand) Niet van toepassing Dit deurcontact is constant actief en moet niet in- of uitgeschakeld worden Medical Emg (medisch noodgeval) Niet van toepassing Dit deurcontact is constant actief en moet niet in- of uitgeschakeld worden Water Niet van toepassing Dit deurcontact is constant actief en moet niet in- of uitgeschakeld worden 9.4 Een apparaat wijzigen De procedure is afhankelijk van het type apparaat dat u wilt wijzigen. Een deurcontact PIR-detector afstandsbediening wijzigen Ga naar de programmeermodus, ga naar "Devices+/-", selecteer "Edit devices" en druk op OK. De display toont alle beschikbare apparaten. 1. Gebruik de pijltjestoetsen om een apparaat te selecteren en druk op OK. U kunt nu de instellingen van het apparaat wijzigen. Om deze stap over te slaan, druk op. 2. Gebruik de pijltjestoetsen om een optie te kiezen en druk op OK. V /02/ Velleman nv
59 3. Druk op OK om te bevestigen. U kunt nu de naam van het apparaat wijzigen. Om deze stap over te slaan, druk op druk op OK.. Om verder te gaan, 4. Geef een zonenaam in en druk op OK. De lijst met apparaten verschijnt weer op de display. Gebruik de pijltjestoetsen om een ander apparaat te selecteren of druk op. Een bedieningsconsole waterdetector wijzigen 1. Ga naar de programmeermodus, ga naar "Devices+/-", selecteer "Edit devices" en druk op OK. De display toont alle beschikbare apparaten. 2. U kunt nu de naam van het apparaat wijzigen. 3. Geef een zonenaam in en druk op OK. De lijst met apparaten verschijnt weer op de display. Gebruik de pijltjestoetsen om een ander apparaat te selecteren of druk op. 9.5 Een apparaat verwijderen 1. Ga naar de programmeermodus, ga naar "Devices+/-", selecteer "Remove device" en druk op OK. Het systeem toont alle beschikbare apparaten. 2. Gebruik de pijltjestoetsen om een apparaat te selecteren en druk op OK. Voor meer informatie over de beschikbare werkmodi, zie Druk opnieuw op OK om te bevestigen. 9.6 Program Siren menu andere mogelijkheden Learn Siren Verbind eerst een binnen- of buitenalarm of een universele ontvanger met het controlepaneel via de programmeermodus zodat deze met elkaar kunnen communiceren. Voor u een extra toestel toevoegt, programmeer eerst één van de volgende toestellen: PIR-bewegingsdetector of deur-/venstercontact. Installeer geen sirene, geen alarm en geen DIP-schakelaar. Voor u zo'n aanvullend apparaat toevoegt, moet u minstens één ander apparaat toevoegen (een deurcontact, PIR-detector of afstandsbediening). Een buiten- of binnensirene toevoegen: V /02/ Velleman nv
60 1. Zet het apparaat of de apparaten die u wilt toevoegen in leermodus. 2. Ga naar de programmeermodus, na naar "Devices+/-", selecteer "Program Siren" en druk op OK. 3. Selecteer "Learn Siren" met de pijltjestoetsen en druk op OK. o o Het controlepaneel laat een lange pieptoon horen en stuurt tegelijkertijd de leercode naar alle toestellen. De buitensirene schakelt de sirene en de stroboscooplamp onmiddellijk in. 4. Zorg ervoor dat deze aanvullende apparaten niet in leermodus staan. Het toevoegen is voltooid. Siren Tamp. On - Siren Tamp. Off (sirene met sabotageschakelaar in- of uitschakelen) De sabotageschakelaar van de buitensirene kan met de afstandsbediening in- en uitgeschakeld worden. Deze functie is zeer praktisch wanneer u de batterijen van de sirene moet vervangen. Om de sabotageschakelaar uit te schakelen: selecteer "Siren Tamp.Off" en druk op OK. De sabotageschakelaar van alle aangesloten sirenes wordt gelijktijdig uitgeschakeld. Om de sabotageschakelaar in te schakelen: selecteer "Siren Tamp.Off" en druk op OK. De sabotageschakelaar van alle aangesloten sirenes wordt gelijktijdig ingeschakeld. Confirm On - Confirm Off (bevestigingsgeluid in- of uitschakelen) Is deze optie ingeschakeld, dan weerklinkt een bevestigingsgeluid (buitensirene) bij het in- of uitschakelen van het systeem. Is deze optie uitgeschakeld, dan weerklinkt een bevestigingsgeluid (buitensirene) bij het in- of uitschakelen van het systeem. Selecteer "Confirm ON" of "Confirm Off" en druk op OK. Entry Snd On - Entry Snd Off (waarschuwingssignaal in- of uitschakelen) Is deze optie in- of uitgeschakeld, dan weerklinkt een of geen waarschuwingssignaal (sirene) bij het betreden van de woning. Selecteer "Entry Snd ON" of "Entry Snd OFF" en druk op OK. 10. Andere configuratiefuncties SMS Editor Het controlepaneel wijzigt het sms-bericht, dat bij een alarmevent naar de mobiele telefoon gestuurd wordt. 1. Ga naar de programmeermodus en selecteer "SMS Editor" in het menu. Het venster om het bericht te wijzigen, wordt weergegeven. 2. Geef een sms-bericht in (max. 16 x 4 tekens). Voor meer informatie over het invoeren van tekst, zie Druk op OK. 4. Selecteer "Save' en druk op OK om te bevestigen. V /02/ Velleman nv
61 SMS Keyword CTC1000 Het controlepaneel ondersteunt bevelen die met een mobiele telefoon naar het systeem gestuurd worden. U moet eerst het "SMS keyword" ingeven, voor u een bevel kunt sturen.. De pincode voor bevelen wijzigen 1. Geef een code van 1 tot 10 karakters en druk op OK. Deze code moet verschillen van de gebruikerscode. 2. Toets een 4-cijferige code in en druk op OK. 3. Herhaal de code en druk op OK. Country Code De formaatweergave van het telefoonnummer (met of zonder landcode) varieert en hangt van gsm-provider af. Als uw gsm telefoonnummers weergeeft zonder de landcode, dan kunt u dit hoofdstuk overslaan. Als uw gsm telefoonnummers weergeeft met de landcode (bijvoorbeeld ), moet u de instelling van het controlepaneel wijzigen. Vraag dit aan uw netverdeler of test zelf als volgt: 1. Plaats de SIM-kaart die u zal gebruiken voor het controlepaneel in een gsm. 2. Schakel de mobiele telefoon in. 3. Controleer of het nummer niet is toegewezen aan een andere contactpersoon in uw telefoon. 4. Stuur een sms naar hetzelfde nummer. o Als uw gsm telefoonnummers weergeeft zonder de landcode (bijvoorbeeld ), dan kunt u dit hoofdstuk overslaan. o Als uw gsm telefoonnummers weergeeft met de landcode (bijvoorbeeld ), ga dan als volgt te werk. 5. Op het controlepaneel, ga naar de programmeermodus, ga naar "Country Code" en druk op OK. 6. Geef de landcode van uw land in. Bijvoorbeeld: Is het weergegeven nummer op de telefoon , geef dan 32 in (zonder '+'). 7. Druk op OK. 8. Druk op de toets Druk op OK om te beëindigen. GSM Signal Met deze optie kunt u de signaalsterkte controleren. 1. Op het controlepaneel, ga naar de programmeermodus, ga naar "GSM Signal" en druk op OK. Het systeem geeft de signaalsterkte weer (van 0 tot 9, 9 is het sterkste signaal). Walk Test De optie "Walk Test" controleert de communicatie tussen het controlepaneel en de andere toestellen. V /02/ Velleman nv
62 1. Ga naar de programmeermodus, kies "Walk Test" en druk op OK. 2. Druk op de testknop op het apparaat dat u wilt testen. Wanneer het controlepaneel een signaal ontvangt, dan zal het de naam van het toestel, zone en signaalsterkte weergeven. 3. Druk op om deze functie te verlaten. Reset GSM Met deze optie kunt u het signaal van de mobiele telefoon terugzetten. 1. Op het controlepaneel, ga naar de programmeermodus, ga naar "Reset GSM" en druk op OK. Het duurt ongeveer 1 minuut om het signaal terug te zetten. 11. Het alarm gebruiken Is het alarm uitgeschakeld (Off), geef de pincode in, om naar het gebruikersmenu te gaan. In dit menu kunt u het alarm in- of uitschakelen. Geef het eerste cijfer van uw pincode in. 1. Geef de andere cijfers van de pincode in binnen de 10 seconden. Op de display verschijnt: 2. De cursor knippert naast "Away Arm". He menu bevat de volgende opties: Als het systeem een fout heeft gedetecteerd, verschijnt op de eerste lijn van de display: 11.2 Het systeem inschakelen Als het systeem uitgeschakeld is, kunt u het op deze manier inschakelen: 1. Geef uw pincode in en druk op OK. Op de display verschijnt: 2. De cursor knippert naast "Away Arm". Druk op OK. Op de display verschijnt: o Het aftellen begint en er weerklinkt een pieptoon. (Het geluid en de huidige uitgangstijd hangen van uw instellingen af, zie 7.9.) V /02/ Velleman nv
63 o Na het verstrijken van de aflooptijd, hoort u een lange pieptoon en wordt het systeem ingeschakeld. Opmerkingen Het controlepaneel beschikt over een schermbeveiliging. "Alarm ON" verschijnt 180 seconden op de display. Daarna worden enkel de huidige datum en tijd getoond. Is de optie "Final Door" ingeschakeld, dan schakelt het controlepaneel het alarm in van zodra de deur gesloten is. Wordt een deurcontact of een PIR-detector getriggerd (Bijv. een deur staat nog open), dan kunt u het alarm niet inschakelen. Wil u het systeem toch inschakelen, zie "Geforceerde inschakeling". Het systeem kan ook met de afstandsbediening (optioneel) ingeschakeld worden. De uitgangsvertraging stoppen Hebt u het alarm ingeschakeld en is de afteltijd afgelopen, dan kunt u de uitgangsvertraging stoppen, terwijl u het systeem uitschakelt. 1. Druk op de -knop. Een venster voor het ingeven van de pincode verschijnt. De aftelvertraging verschijnt op de display. 2. Geef uw pincode in en druk op OK. "Alarm Off" verschijnt op de display en het systeem is uitgeschakeld. o De uitgangsvertraging kan ook gestopt worden wanneer u de uitschakelknop op de afstandsbediening (optioneel) indrukt. o Loopt de uitgangsvertragingsperiode voor het ingeven van de code af, dan wordt het systeem ingeschakeld. De uitgangsvertraging verlengen (enkel afstandsbediening) De vertragingstijd wordt verlengd wanneer de inschakelknop op de afstandsbediening (optioneel) wordt ingedrukt. Houd de inschakelknop 1 seconde ingedrukt en u hoort een lange pieptoon, om de verlenging te bevestigen. De vertragingstijd begint te tellen van bij het begin, telkens u op de inschakelknop op de afstandsbediening drukt Het systeem geforceerd inschakelen Als u de pincode ingeeft terwijl het systeem een fout heeft gedetecteerd, geeft het controlepaneel een foutmelding weer. Selecteer "Away Arm" en druk op OK, dan weerklinkt een waarschuwingssignaal om aan te geven dat het inschakelen van het systeem verboden is. De display toont afwisselend de huidige fout en het bericht "Fault Dsp". Druk op om naar "Alarm Off"-modus terug te keren. Als er een fout optreedt, kunt u het probleem oplossen en de foutmelding wissen (zie 14) en het systeem inschakelen (aanbevolen). de fouten negeren en het systeem toch inschakelen, zoals volgt: Met het scherm "Fault Dsp": 1. Geef uw pincode in en druk op OK. Op de display verschijnt: 2. Druk op OK om te bevestigen. V /02/ Velleman nv
64 o o Het aftellen begint en er weerklinkt een pieptoon. (Het geluid en de huidige uitgangstijd hangen van uw instellingen af, zie 7.9.) Na het verstrijken van de aflooptijd, hoort u een lange pieptoon en wordt het systeem ingeschakeld. Het systeem bij een geopende deur inschakelen. Activeert u het systeem wanneer er een deur open staat, dan weerklinkt een waarschuwingssignaal om aan te geven dat het inschakelen verboden is. Het bericht "Fault Dsp" (in het midden, boven) en sensornamen worden afwisselend weergegeven om de 2 seconden. Nadat u de deur gesloten hebt, verdwijnt de foutmelding automatisch en keert het systeem naar "Alarm Off"-modus terug. U kunt het systeem nu inschakelen. Wilt u toch de "Arm"-modus bij het openen van een deur inschakelen, gebruik dan "Forced Arming". Opmerkingen Het "Fault Dsp"-venster is voorzien van een Timeout-functie (5 minuten). Het systeem keert na 5 minuten automatisch naar "Alarm Off"-modus terug. Wordt een sensor gedeactiveerd (zie "Arm"-modus), dan wordt de status niet gecontroleerd. Wordt er met een sensor geknoeid of functioneert deze niet meer correct, dan kunt u deze tijdelijk deactiveren of definitief verwijderen Het systeem uitschakelen Het systeem kan zowel in "Away Arm" als in "Home Arm"-modus (Alarm ON) gedeactiveerd worden. 1. Geef uw pincode in en druk op OK. Er weerklinken 2 korte pieptonen en het systeem keert naar "Disarm"- modus terug. Afstandsbediening "Home"-modus (zie onder): Druk op de uitschakelknop van de afstandsbediening, om het systeem te deactiveren. "Away Arm"-modus: Druk op de uitschakelknop van de afstandsbediening om het systeem te deactiveren wanneer een ingangstoestel getriggerd wordt, of wanneer de "RC Ent E"-functie ingeschakeld is (zie RC Ent E (= remote controller entry enabled) in hoofdstuk 8) "Home Arm"-modus Het systeem is geactiveerd en moet bij het betreden van de woning eerst gedeactiveerd worden. U kunt probleemloos rondlopen in de woning. U kunt enkel "Home"-modus kiezen wanneer het systeem gedeactiveerd is. De "Home"-modus inschakelen: 1. Geef uw pincode in en druk op OK. 2. Druk op de -toets om de cursor naar beneden te verplaatsen en "Home Arm" te selecteren en druk op OK. o o Het aftellen begint en er weerklinkt een pieptoon. (Het geluid en de huidige uitgangstijd hangen van uw instellingen af, zie 7.9.) Na het verstrijken van de aflooptijd, hoort u een lange pieptoon en wordt het systeem ingeschakeld. V /02/ Velleman nv
65 Opmerkingen CTC1000 Het systeem kan ook met de afstandsbediening (optioneel) ingeschakeld worden Om de vertragingstijd te stoppen, zie "De uitgangsvertraging stoppen" in hoofdstuk Om de uitgangsvertraging te verlengen, zie "De uitgangsvertraging verlengen (enkel afstandsbediening in hoofdstuk Wilt u het systeem ondanks een foutmelding toch inschakelen, zie 11.3 "Geforceerd inschakelen" "Partial Arm"-modus (bypass-modus) In "Partial Arm"-modus kunt u om het even welke sensor deactiveren (bypass). Het alarmsysteem is ingeschakeld maar u kunt probleemloos rondlopen in de zone met uitgeschakelde sensor. De "Partial Arm"-modus inschakelen 1. Geef uw pincode in en druk op OK. 2. Druk op de -toets om de cursor naar beneden te verplaatsen en "Bypass" te selecteren en druk op OK. 3. Druk op & om de zone, die u wilt overslaan, te selecteren en druk op OK (bijv. DC achterdeur). 4. Druk op OK om te bevestigen. De gedeactiveerde zone wordt gemarkeerd met een *. 5. Herhaal de stappen 2-4 om een ander apparaat over te slaan. 6. Druk daarna op, om naar het gebruikersmenu terug te keren en de cursor blijft op "Arm" staan. 7. Druk op OK. Opmerkingen Hebt u een bepaalde sensor gedeactiveerd, dan reageert het controlepaneel niet op de trigger in "Arm"- modus. De bypass-functie wordt bij het uitschakelen van het systeem automatisch getriggerd. Wordt een bepaalde sensor gedeactiveerd, dan kunt u het systeem zonder rekening te houden met de foutmelding (indien er een fout is), onmiddellijk inschakelen. Deze situatie wordt geregistreerd en wordt bij de toegang tot het log-submenu weergegeven Het alarm stoppen Tijdens eender welk alarm zal het controlepaneel de sirene laten afgaan en een bericht sturen naar het geprogrammeerde telefoonnummer. Op de display verschijnt: Tijdens een alarm, om de sirene te stoppen en de display te wissen: Geef uw pincode in en druk op OK. Als de pincode correct is, stopt het alarm. Als u een andere toets indrukt dan het eerste cijfer van uw pincode, verschijnt een melding op het scherm die u vraagt om uw pincode in te geven. V /02/ Velleman nv
66 Rapportering Dit hangt van het tijdstip af waarop het alarm gestopt wordt. Voor het zenden van het bericht Tijdens het zenden van het bericht Na het zenden van het bericht Het alarm wordt voor het zenden van het bericht uitgeschakeld Het systeem stuurt geen alarmbericht. 1. De display toont het toestel dat het alarm triggerde en het zonenummer. 2. Druk op OK. Worden meerdere alarmen getriggerd, dan geeft het controlepaneel het tweede alarmevent weer met 02) (begin van de tweede lijn). 3. Druk herhaaldelijk op OK tot de volgende melding op de display verschijnt: [betekenis: systeem heeft geen enkel telefoonnummer kunnen bereiken] 4. Druk op OK. De display keert naar "Alarm Off"-modus terug. Of druk op om alle events te zien. Het alarm wordt tijdens het zenden van het bericht uitgeschakeld 1. De display toont het toestel dat het alarm triggerde en het zonenummer. 2. Druk op OK. Worden meerdere alarmen getriggerd, dan geeft het controlepaneel het tweede alarmevent weer met 02) (begin van de tweede lijn). 3. Druk meermaals op OK tot de volgende melding op de display verschijnt: [betekenis: systeem heeft geen enkel telefoonnummer kunnen bereiken] 4. Druk op OK. De display keert naar "Alarm Off"-modus terug. Het alarm wordt na het zenden van het bericht uitgeschakeld 1. De display toont het toestel dat het alarm triggerde en het zonenummer. 2. Druk op OK. Worden meerdere alarmen getriggerd, dan geeft het controlepaneel het tweede alarmevent weer met 02) (begin van de tweede lijn). 3. Druk meermaals op OK tot de volgende melding op de display verschijnt: V /02/ Velleman nv
67 [het opgebelde telefoonnummer wordt weergegeven] 4. Druk op OK. De display keert naar "Alarm Off"-modus terug. Of druk op om alle events te zien. Afstandsbediening U kunt een alarm (behalve het paniekalarm) ook via de uitschakelknop op de afstandsbediening (optioneel) uitschakelen. Een paniekalarm kan niet met de afstandsbediening uitgeschakeld worden. U kunt deze enkel via het controlepaneel uitschakelen. Dit is om te vermijden dat een inbreker de afstandsbediening neem en het alarm met de uitschakelknop van de afstandsbediening uitschakelt. Alarmgeheugen Wordt een alarm tijdens uw afwezigheid getriggerd en wordt een bericht verzonden, dan wordt het alarmbericht op de display weergegeven. De display kan niet meer met de afstandsbediening teruggezet worden. Om de display te wissen, volg dezelfde stappen als beschreven in hoofdstuk Alarmevents en reacties De onderstaande lijst geeft de alarmevents en de reacties van het controlepaneel weer. Alarmtype Burglar Home Omit Het systeem is uitgeschakeld Onmiddellijk Geen reactie inbraakalarm Onmiddellijk Geen reactie inbraakalarm Away Arm Home Arm Uitgangstimer Onmiddellijk inbraakalarm Geen reactie Onmiddellijk inbraakalarm Geen reactie Away Arm Entrytimer Onmiddellijk inbraakalarm Onmiddellijk inbraakalarm Home Arm Entrytimer Onmiddellijk inbraakalarm Geen reactie Home Access Geen reactie Onmiddellijk inbraakalarm De ingangstimer starten Geen reactie Geen reactie Geen reactie Delay Geen reactie Onmiddellijk inbraakalarm Onmiddellijk inbraakalarm Geen reactie Geen reactie Geen reactie Entry Door Chime De ingangstimer starten De ingangstimer starten Geen reactie Geen reactie Geen reactie Away Entry Door Chime De ingangstimer starten Geen reactie Geen reactie Geen reactie Geen reactie 24 HR. Inbraakalarm Inbraakalarm Inbraakalarm Inbraakalarm Inbraakalarm Inbraakalarm Fire Brandalarm Brandalarm Brandalarm Brandalarm Brandalarm Brandalarm Medical Noodalarm Noodalarm Noodalarm Noodalarm Noodalarm Noodalarm Water Wateralarm Wateralarm Wateralarm Wateralarm Wateralarm Wateralarm V /02/ Velleman nv
68 PIRbuitensensor Geen reactie Onmiddellijk inbraakalarm (maar geen bericht verzenden) Waarschuwingssignaal Geen reactie Geen reactie Geen reactie 12. Eventprotocol Het alarmprotocol slaat de laatste 20 events op, inclusief alle alarmevents met identificatie van het toestel alle foutwaarschuwingen alle inschakel- en uitschakelevents De geregistreerde events worden in omgekeerde chronologische volgorde (meest recente events eerst) weergegeven. Het protocol heeft een start-label voor het meest recente event en een end-label na het oudste event. Een eventprotocol weergeven: In "Alarm Off"-modus: 1. Om het gebruikersmenu te openen, geef de gebruikerscode in en druk op OK. 2. Druk meermaals op, om "Log" te selecteren en druk daarna op OK. Nu worden de geregistreerde events weergegeven. 3. Gebruik &, om door de geregistreerde events te bladeren. 13. Vals alarm voorkomen Het toestel beschikt over de volgende functies: Dubbele ingangswaarschuwing Is het systeem ingeschakeld en wordt een toestel in "Entry"-modus getriggerd, dan start het aftellen (zie "General Settings"). Met de ingangstimer wordt u gewaarschuwd dat het systeem een sms-bericht naar het ingestelde telefoonnummer zal sturen. Tijdens het aftellen: Het alarm wordt ingeschakeld wanneer een ander toestel zich niet in "Entry"-modus bevindt, getriggerd wordt of wanneer u een foutieve pincode ingeeft. Wordt het alarm getriggerd, dan wacht het systeem nog 30 seconden alvorens het een bericht naar de ingestelde telefoonnummers stuurt. Geeft u binnen de 30 seconden een correcte pincode in, dan stopt het alarm en keert het systeem naar normale status terug. Geeft u binnen de 30 seconden geen correcte pincode in, dan wordt het inbraakalarm ingeschakeld en een bericht verzonden naar de ingestelde telefoonnummers. Rapportering van in- en uitschakelen Staat de "Latch"-optie op ON (fabrieksinstelling), dan ontvangt u informatie over alle in- en uitschakelevents met pincode of afstandsbedieningen. Rapportering sequentiële verificatie Is de sequentiële alarmverificatie ingeschakeld (fabrieksinstelling: OFF) en wordt een inbraakalarm ingeschakeld, en wordt een ander toestel in "Burglar"-modus (Inbraak) binnen de 30 minuten getriggerd, dan stuurt het systeem een alarm-bevestigingsbericht naar alle ingestelde telefoonnummers. Voor meer informatie, zie "Verification", pagina 16. Het systeem zendt niet enkel een sequentieel verificatiebericht maar ook een alarmbericht. Wordt het tweede toestel binnen de afteltijd getriggerd, dan zendt het systeem geen sequentieel verificatiebericht. 14. Fouten Eventuele fouten: control panel Low Battery (lage batterijspanning: controlepaneel) AC Power Fail (stroomuitval) Sensor Out-of-order (sensor functioneert niet) Sensor Low Battery (lage batterijspanning: sensor) Device and control panel Tamper (sabotageschakelaar: toestel en controlepaneel) V /02/ Velleman nv
69 Interference Detection (systeem heeft storingen gevonden) SIM card missing (SIM-kaart ontbreekt) Gsm geen bereik Als het controlepaneel een fout detecteert, geeft het een foutmelding weer. Mogelijke fouten Controlepaneel Voeding PIR Sensor (bewegingsdetector) Deurcontact Sensor Low Battery (lage batterijspanning: sensor) Sensor Out-of-order (sensor functioneert niet) Interference (storingen) SIM card missing (SIM-kaart ontbreekt) Gsm geen bereik Een sabotageschakelaar voorkomt dat het apparaat van de beugel wordt verwijderd. Een sabotageschakelaar voorkomt dat het deksel van de voeding wordt geopend of verwijderd. Een sabotageschakelaar voorkomt dat de behuizing geopend wordt. Een sabotageschakelaar vermijdt dat het toestel van de montageplaats geopend wordt. Een sabotageschakelaar voorkomt dat de behuizing geopend of verwijderd wordt van de montageplaats. Legebatterij-indicator, deur-/venstercontact, remote keypad, waterdetector, afstandsbediening. De PIR-bewegingsdetector, het deur-/venstercontact, de waterdetector sturen in een tijdspanne van 30 à 50 min. signalen naar het controlepaneel. Het systeem stuurt een bericht wanneer het geen signalen meer ontvangt van een toestel. Stuurt de bewegingsdetector, het deur-/venstercontact, enz. geen signalen meer (zie "Supervision" in 8 "Special Settings"), dan licht de gele led op en verschijnt een foutmelding in het foutmeldingsmenu. Het toestel kan storingen in 868 MHz-frequentieband herkennen. Is er een ononderbroken storing van meer dan 30 seconden, dan wordt deze op de display weergegeven (in Fault Display"-menu). Als de SIM-kaart ontbreekt, verschijnt een foutmelding. Ontvangt het systeem geen gsm-signaal, verander de positie van het controlepaneel om een beter signaal te ontvangen. Fault message display (foutmeldingsmenu) Is er geen fout, dan ziet u het volgende wanneer u het systeem uitschakelt: De gele led licht op wanneer er geen fout is. De LCD-Display geeft het fouttype en de bron in het foutmeldingsmenu (Fault Display) weer. U hoort een waarschuwingstoon elke 30 seconden. Is er een fout wanneer het systeem zich in "Full Arm"-modus bevindt, dan wordt deze enkel weergegeven wanneer u het systeem uitschakelt. Foutmeldingen wissen De gele led gaat automatisch uit nadat u alle fouten hersteld hebt of een toestel met fouten verwijderd hebt. Foutmeldingen kunnen niet handmatig gewist worden. De foutmelding blijft op de display staan, ook wanneer u de fout hersteld hebt. De foutmelding kan enkel handmatig gewist worden. De foutmelding weergeven/wissen De foutmelding weergeven wanneer het systeem uitgeschakeld is. 1. Geef uw pincode in en druk op OK. 2. Op de display verschijnt Fault Dsp Arm met de cursor naast Fault Dsp V /02/ Velleman nv
70 3. Druk op OK om "Fault Dsp" te selecteren. Alle fouten worden weergegeven. CTC Gebruik & om de cursor naar onder of naar boven te bewegen. 5. Nadat alle fouten weergegeven werden, druk op. Op de display verschijnt: Clear Fault Dsp (OK?) 6. Als de fout hersteld is, druk op OK. De fout wordt gewist en het systeem keert naar "Alarm Off"-modus terug. Opmerkingen Als de fout niet hersteld is, zal de display niet gewist worden. De fout verschijnt opnieuw van zodra u probeert om het systeem in te schakelen en zorgt ervoor dat het systeem niet ingeschakeld kan worden. U kunt de fout enkel wissen nadat u deze gecorrigeerd hebt. Zelfs als de foutmelding gewist is, blijft de fout toch geregistreerd in de log Foutreactie Heeft het systeem een fout gevonden, dan verschijnt deze op de display en reageert het systeem. De reactie hangt van het event af. Noch het controlepaneel noch de buitensirenes weerklinken wanneer er een fout gevonden wordt (behalve: sabotagealarm). Bij stroomuitval of bij inschakeling van de sabotageschakelaar stuurt het controlepaneel een foutmelding via sms. Voor alle andere fouten stuurt het controlepaneel GEEN foutmelding via sms. AC Power Fail (stroomuitval) control panel Low Battery (lage batterijspanning: controlepaneel) Sensor Low Battery (lage batterijspanning: sensor) De gele led licht op en een foutmelding verschijnt. Het controlepaneel zendt binnen minuten een foutmelding via sms naar het eerste telefoonnummer (in alle werkingsmodi). Zodra de stroomtoevoer is hersteld, zal het paneel de herstelling binnen minuten via sms melden aan het eerste telefoonnummer. De gele led licht op en een foutmelding verschijnt in het foutmeldingsmenu van zodra het systeem een lage batterijspanning in het controlepaneel ontdekt. Wordt het controlepaneel met een netadapter gevoed, dan functioneert de lage batterij-indicator niet. De gele led licht op wanneer het controlepaneel de lege batterijspanning van een sensor ontdekt. De foutmelding wordt in het foutmeldingsmenu weergegeven. paneel gesaboteerd Als de sabotageschakelaar op het controlepaneel wordt getriggerd, licht de gele led op. De foutmelding wordt in het foutmeldingsmenu weergegeven. Bovendien zal het paneel in alle modi de fout via sms melden aan het eerste telefoonnummer. sensor gesaboteerd Als de sabotageschakelaar op het deurcontact, de PIR-detector, bedieningsconsole of buitensirene wordt getriggerd, licht de gele led op. De foutmelding wordt in het foutmeldingsmenu weergegeven. Bovendien zal het paneel in alle modi de fout via sms melden aan het eerste telefoonnummer. De sirene weerklinkt wanneer de sabotageschakelaar getriggerd wordt (zie "sabotageschakelaar" 8). Sensor Out-of-order (sensor functioneert niet) Stuurt de bewegingsdetector, het deur-/venstercontact, enz. geen signalen meer (zie "Supervision"), dan licht de gele led op en verschijnt een foutmelding in het foutmeldingsmenu. Er wordt geen alarm gerapporteerd. interference (storingen) Hebt u de functie "Interference detection" ingeschakeld, dan licht de gele led op wanneer het systeem een storing vindt binnen de 30 seconden. De foutmelding wordt in het foutmeldingsmenu weergegeven. V /02/ Velleman nv
71 14.3 Foutmeldingen De foutmelding wordt weergegeven als volgt: Weergegeven bericht AC failure GSM Signal Interference Panel L.B. Panel Tamper (Sensor w/ Zone Name) + L.B. (Sensor w/ Zone Name) + out (Sensor w/ Zone Name) + Tamper Sim Card? Betekenis AC Power Fail (stroomuitval) Gsm geen bereik Het systeem heeft een storing gevonden Bijna lege batterij in het controlepaneel Sabotage van het controlepaneel Bijna lege batterij in de sensor Sensor Out-of-order (sensor functioneert niet) Sabotage van een sensor SIM-kaart ontbreekt Voorbeeld: Het volgende bericht verschijnt bij lage batterijspanning (deur-/venstercontact) in zone 1: DC Z 01 L.B. Opmerking Het alarm kan niet ingeschakeld worden zolang een deur-/venstercontact of de PIR-bewegingsdetector ingeschakeld is (bijv. wanneer een deur nog open staat). Weergegeven bericht (DC w/ Zone Name) + open (IR w/ Zone Name) + Active Betekenis Deur-/venstercontact getriggerd PIR getriggerd 15. Bediening op afstand via sms Het toestel kan met bevelen via sms aangestuurd worden. Denk eraan: zet de taal van uw gsm op Engels voor u verdergaat. Lijst met radiografische besturingen via sms DTMF-bevelen Actie 00 Inhaken met bevestiging 10 uitschakelen 11 arm 20 Universele ontvanger UR#1 uitgeschakeld 21 Universele ontvanger UR#1 ingeschakeld 30 Universele ontvanger UR#2 uitgeschakeld 31 Universele ontvanger UR#2 ingeschakeld Voor 2-cijferige DTMF-bevelen Een sms-bericht sturen om het systeem in "Arm"-modus te zetten en een bevestiging naar uw gsm sturen. Het formaat is: MICHAEL (met spaties) MICHAEL SMS keyword 2222 Geprogrammeerde gebruikerscode 11 DTMF commando 00 ontvang bevestigingsbericht V /02/ Velleman nv
72 Bevestig bericht CTC1000 Op de display van uw gsm verschijnt het bevestigingsbericht als volgt: Confirmed MICHAEL USER1 Arm Een sms-bericht sturen om het systeem in "Arm"-modus te zetten en geen bevestiging naar uw gsm sturen. Het formaat is 9999 SMS keyword 5678 Geprogrammeerde gebruikerscode 11 DTMF commando Het systeem filtert de binnenkomende sms-berichten automatisch en negeert en wist automatisch alle berichten zonder het sleutelwoord. Het systeem voert het bevel (bevelen) onmiddellijk uit nadat het een sms-bericht met het correcte sleutelwoord en pincode ontvangen heeft. Nadien wordt het bericht gewist. 16. Systeem resetten Wanneer u de fabrieksinstellingen van het controlepaneel herstelt, dan worden alle pincodes gewist en alle toestellen verwijderd. Daarna moet u het toestel opnieuw programmeren en alle toestellen opnieuw toevoegen. Wis alle geprogrammeerde instellingen als volgt: 1. Koppel de voeding los en verwijder de reservebatterij. 2. Schakel de stroom in terwijl u de -knop ingedrukt houdt. 3. Wanneer u een pieptoon hoort, laat dan de -knop los. Het controlepaneel geeft "Enter Code" weer. 4. Geef het volgende in:, OK-knop 5. Druk op OK. Geeft u een foutieve code in, dan keert het controlepaneel naar de normale "Alarm ON"-modus terug. 17. Tekst ingeven U kunt de cijfertoetsen gebruiken om tekst in te geven voor de namen van gebruikers of zones, sms-berichten, enz. Druk op de gewenste knop. Druk meermaals indien nodig, tot de gewenste letter of het gewenste symbool verschijnt. Laat de knop los en de knipperende cursor springt automatisch naar de volgende positie zodat u de volgende letter kan ingeven op dezelfde manier. 18. Technische specificaties voeding Vac/50-60 Hz - 12 Vdc 500 ma (adapter meegelev.) reservebatterij oplaadbare Ni-Mh-batterij, 7.2 V mah (meegelev.) autonomie ± 8 uur geluidsniveau ± 104 1m frequentie MHz werktemperatuur -10 tot +45 C vochtigheidsgraad tot 90%, niet-condenserend afmetingen 185 x 120 x 26 mm gewicht 420 g Gebruik dit toestel enkel met originele accessoires. Velleman nv is niet aansprakelijk voor schade of kwetsuren bij (verkeerd) gebruik van dit toestel. Voor meer informatie over dit product en de laatste versie van deze handleiding, zie De informatie in deze handleiding kan te allen tijde worden gewijzigd zonder voorafgaande kennisgeving. V /02/ Velleman nv
73 AUTEURSRECHT Velleman nv heeft het auteursrecht voor deze handleiding. Alle wereldwijde rechten voorbehouden. Het is niet toegestaan om deze handleiding of gedeelten ervan over te nemen, te kopiëren, te vertalen, te bewerken en op te slaan op een elektronisch medium zonder voorafgaande schriftelijke toestemming van de rechthebbende. V /02/ Velleman nv
74 MODE D'EMPLOI 1. Introduction Aux résidents de l'union européenne Informations environnementales importantes concernant ce produit Ce symbole sur l'appareil ou l'emballage indique que l élimination d un appareil en fin de vie peut polluer l'environnement. Ne pas jeter un appareil électrique ou électronique (et des piles éventuelles) parmi les déchets municipaux non sujets au tri sélectif ; une déchèterie traitera l appareil en question. Renvoyer cet appareil à votre fournisseur ou à un service de recyclage local. Il convient de respecter la réglementation locale relative à la protection de l environnement. En cas de questions, contacter les autorités locales pour élimination. Nous vous remercions de votre achat! Lire la présente notice attentivement avant la mise en service de l appareil. Si l appareil a été endommagé pendant le transport, ne pas l installer et consulter votre revendeur. Contenu Panneau de contrôle Adaptateur pile Ni-Mh rechargeable Optionnel détecteur de mouvement PIR (code produit CTC1000PIR) contact de porte/fenêtre (code produit CTC1000DS) clavier de commande (code produit CTC1000KP) télécommande (code produit CTC1000RC) sonde de niveau d'eau (code produit CTC1000WS) alarme extérieure (code produit CTC1000SO) sirène sans fil (code produit CTC1000SI) 2. Consignes de sécurité Garder l'appareil hors de la portée des enfants et des personnes non autorisées. Utiliser cet appareil uniquement à l'intérieur. Protéger de la pluie, de l humidité et des projections d eau. Couper l alimentation avant d ouvrir le boîtier. Etre prudent, toucher un câble sous tension peut causer des électrochocs mortels. La garantie ne s applique pas aux dommages survenus en négligeant certaines directives de cette notice et votre revendeur déclinera toute responsabilité pour les problèmes et les défauts qui en résultent. Protéger des projections d eau. Les dommages occasionnés par des modifications par le client ne tombent pas sous la garantie. Ce système peut offrir une protection valable à votre maison et propriété si on l'utilise correctement. Néanmoins, il ne peut pas vous garantir une protection complète contre le cambriolage et le vol. Toutefois, Velleman SA ne peut être tenu responsable pour des pertes ou endommagements qui pourraient être occasionnés. 3. Directives générales Se référer à la garantie de service et de qualité Velleman en fin de notice. Confier l'installation du système à un installateur qualifié. Respecter la législation en vigueur dans votre région lors de l'installation d'un système d'alarme. Se renseigner auprès des administrations locales si nécessaire. Protéger l appareil des chocs. Traiter l'appareil avec circonspection pendant l opération. V /02/ Velleman nv
75 Protéger l'appareil contre la chaleur extrême, la poussière et l'humidité. Se familiariser avec le fonctionnement de l appareil avant de l utiliser. Il est interdit de modifier l'appareil pour des raisons de sécurité. L'appareil ne contient aucune pièce réparable par l'utilisateur sauf la pile. N utiliser l'appareil qu à sa fonction prévue. Un usage impropre annule d'office la garantie. 4. Caractéristiques panneau de contrôle sans fil à 30 zones avec module GSM intégré pour messages SMS messages SMS 4 messages d'alarme programmés en cas d'intrusion, d'urgence, d'incendie ou médicale la fonction 'listen-in' [écoute] : permet d'écouter à distance ce qui se passe dans l'habitation création SMS : 14 caractères x 4 lignes = 56 caractères en total accès au système d'alarme partout dans le monde via commande DTMF et SMS écran LCD : 16 x 2 caractères avec rétroéclairage chaque zone peut être nommée/éditée séparément par l'utilisateur pour faciliter leur reconnaissance. émetteur intégré pour activer la sirène extérieure ou la sirène sans fil fonction "home" : vous permet de sécuriser le périmètre de votre domicile tout en vous laissant la liberté de vous déplacer surveillance totale pour assurer un fonctionnement sans problèmes avertissement sonore si une porte est ouverte lors de la mise en marche détection et affichage d'erreur détection anti-sabotage protégeant contre toute tentative d'ouverture ou d'arrachement de la surface de montage 5. Description Se référer aux illustrations en page 2 de ce mode d'emploi. 1 afficheur 2 clavier 3 avertisseur 4 LED jaune allumée : le système a détecté une erreur éteinte : aucune erreur, le panneau fonctionne normalement 5 microphone 6 LED verte allumée : alimentation AC branchée éteinte : problème d'alimentation 7 touches d'entrée 8 #: utilisée pour activer le mode de programmation 9 OK : valide une donnée ou une sélection 10 Annuler : utilisé en mode de programmation : annule une sélection, retourne à un écran précédent, etc. 11 flèches : utilisées en mode de programmation : déplace le curseur pour sélectionner une option 12 2 orifices de montage et anti-sabotage 13 prise DC 14 interrupteur pile 15 compartiment de carte SIM 6. Installation 6.1 Carte SIM (optionnelle) Il est possible d'installer une carte SIM dans le panneau. Celle-ci vous permet d'envoyer des rapports à un numéro de téléphone mobile (jusqu'à six numéros). V /02/ Velleman nv
76 Avant de commencer CTC1000 Avant d'insérer la carte dans le panneau et de l'installer, il est recommandé de tester le code pays de votre fournisseur de téléphonie mobile. Voir la section Country Code du chapitre 10. Utiliser un téléphone pour effacer le code pin de la carte SIM. Insérer une carte SIM Le compartiment pour la carte SIM est situé au dos du panneau. Pour insérer une carte SIM : 1. Dévisser le couvercle du compartiment SIM. 2. Glisse le tiroir vers la droite pour l'ouvrir (voir la marque OPEN sur le tiroir). 3. Ouvrir le tiroir et insérer la carte SIM. 4. Glisser le tiroir vers la gauche pour le fermer (voir la marque CLOSE sur le tiroir). 5. Revisser le couvercle du compartiment. 6.2 Alimentation Utiliser l'alimentation fournie pour connecter le panneau au secteur. Utiliser uniquement un adaptateur au voltage AC approprié pour éviter d'endommager le panneau (voir Spécifications techniques). Pile rechargeable Une pile rechargeable (incluse, voir Spécifications Techniques) présente dans le panneau sert de pile de sécurité en cas de coupure de courant. Compte tenu d'un fonctionnement normal, l'adaptateur de courant fournit du courant et assure le chargement de la pile. Une pile complètement chargée fournit un courant de secours pour au moins 8 heures. Il faut compter environ 48 heures pour charger la pile. AVERTISSEMENT Ne jamais perforer les piles et ne pas les jeter au feu (danger d explosion). Garder les piles hors de la portée des enfants. Affichage rétro-éclairé Le panneau dispose d'un écran rétro-éclairé, ce qui facilite son utilisation par faible lumière. En cas d'absence de courant CA et pour épargner la pile, la fonction de rétroéclairage ne sera rétablie qu'au moment où le courant est rétabli. 6.3 Installer le panneau de contrôle Choisir un emplacement approprié : directives Tenir compte des directives suivantes lors du choix d'un emplacement de montage. Le panneau doit être relié au secteur. Le panneau doit être facile d'accès. Ne pas installer le panneau de contrôle dans un endroit humide (salle de bains...). Ne pas installer le panneau de contrôle à proximité d'une source de chaleur. Ne pas installer le panneau à proximité d'autres dispositifs émettant des signaux radio tels que téléphones portables, téléphones sans fil ou réseaux wifi. Installer le panneau de contrôle Il est possible d'installer le panneau à un mur ou n'importe quel endroit de votre choix. Installer le panneau à hauteur d'épaule. Cela facilitera l'utilisation du clavier et la consultation de l'affichage. 1. Utiliser les 2 trous du support pour marquer les positions sur le mur. 2. Forer 2 trous, utiliser des chevilles pour des murs en plâtre ou en briques. 3. Attacher le support au mur. 4. Connecter l'alimentation à la prise avant de fixer le panneau au mur. 5. Glisser le panneau dans le support (clavier et écran orienté vers vous-même). 6.4 Mots de passe à double niveau Afin d'assurer une sécurité maximale lors de son utilisation, le panneau est équipé de 2 niveaux d'autorisation. Pour pouvoir programmer le système, composer un code d'accès et un code maître. V /02/ Velleman nv
77 Lorsque le panneau affiche ENTER CODE ou P-CODE, composer votre code d'accès. Lorsque le panneau affiche M-CODE, composer votre code maître. Pour plus de détails sur le code d'accès, voir 7.4 Pin code. Pour plus de détails sur le code maître, voir 7.7 Master Code. 6.5 Mise en service En supposant que vous avez trouvé un emplacement approprié : 1. Brancher le courant. Le panneau produit un long bip. La première ligne de l'affichage affiche "Alarm On", la seconde ligne affiche 00:01 01 Jan. Ceci signifie que le panneau est en mode "Away Mode" (mode par défaut). 2. Appuyer sur le bouton 1 du clavier. 3. Dans les 30 secondes, composer le code d'utilisateur 1 (le code par défaut est 1234). Appuyer sur pour effacer le code. 4. Appuyer sur la touche OK dans les 30 secondes. Le panneau émet 2 bips courts et affiche : Le système est désarmé. 5. Attendre 2 à 3 minutes pour que le système analyse son état. Si la LED jaune s'allume, il y a une erreur. Voir 14 pour plus de détails. Remarques Le panneau de contrôle à une fonction d'économiseur d'écran. Le message "Alarm Off" s'affiche pendant 180 secondes. Ensuite, l'écran affiche la date et l'heure. 7. Configuration Pour activer le mode de programmation : 1. S'assurer que l'alarme soit désarmée (voir 11.4). 2. Appuyer sur la touche #. L'écran affiche : 3. Dans les 30 secondes, taper le code 1234 (code d'accès Utilisateur 1 par défaut) et appuyer OK. L'écran affiche : 4. Dans les 30 secondes, composer le code maître (code par défaut : 1111) et appuyer sur OK. Pendant 2 secondes, l'écran affiche : 5. Ensuite, il affiche le menu de programmation : Il est recommandé de modifier le code d'utilisateur 1 et le code maître à la première utilisation. Curseur Le curseur est représenté pour un point clignotant en haut à gauche de l'affichage. Utiliser les touches et pour déplacer le curseur. Appuyer sur OK pour valider. V /02/ Velleman nv
78 Le menu de programmation contient les éléments suivants : Remarques Une flèche vers le bas V indique que la liste peut être défilée vers le bas. Cette flèche disparaît après avoir atteint le bas de la liste. Une flèche vers le haut Λ indique que la liste peut être défilée vers le haut. Cette flèche disparaît après avoir atteint le haut de la liste. Appuyer sur pour retourner à l'écran "Alarm Off". Si aucune touche n'est appuyée pendant 5 minutes en mode de programmation, le panneau retourne en mode "Alarm Off". 7.2 Tel. Setting (Configuration Téléphone) Le menu "Tel Setting" permet d'ajouter, de modifier ou de supprimer un numéro de téléphone mobile. Le panneau de contrôle utilise ces numéros pour rapporter des incidents. Il est possible jusqu'à 6 numéros. Remarques L'écran affiche les 11 premiers chiffres du numéro. Les numéros sont affichés en ordre de priorité. Le panneau contactera les numéros de téléphone dans cet ordre. Si le panneau ne parvient pas à établir une communication avec le premier numéro, il prendra le numéro suivant de la liste. Ajouter un numéro de téléphone 1. Activer le mode de programmation et sélectionner "Tel. Settings" dans le menu. L'écran affiche tous les numéros de téléphone. La liste est vide à la première utilisation. 2. Utiliser les touches fléchées pour sélectionner la lettre à laquelle vous souhaiter associer un numéro (A à F) et appuyer sur OK. 3. Composer le numéro de téléphone et appuyer sur OK. o Le numéro peut contenir jusque 20 chiffres et les caractères * et #. o En composant un numéro, la touche fonctionne comme touche backspace. Changer un numéro de téléphone 1. Activer le mode de programmation et sélectionner "Tel. Settings" dans le menu. L'écran affiche tous les numéros de téléphone. V /02/ Velleman nv
79 2. Utiliser les touches fléchées pour sélectionner le numéro à modifier et appuyer sur OK. Ceci supprime le numéro de téléphone. 3. Composer le numéro de téléphone et appuyer sur OK. o Le numéro peut contenir jusque 20 chiffres et les caractères * et #. o En composant un numéro, la touche fonctionne comme touche backspace. Supprimer un numéro de téléphone 1. Activer le mode de programmation et sélectionner "Tel. Settings" dans le menu. L'écran affiche tous les numéros de téléphone. 2. Utiliser les touches fléchées pour sélectionner le numéro à supprimer et appuyer sur OK. 3. Appuyer à nouveau sur OK. Le numéro est supprimé. 7.3 General Settings (Paramètres généraux) Pour accéder à cette option : activer le mode de programmation et sélectionner "Gen. Settings" dans le menu. Le menu contient les éléments 7.4 Code pin Utilisation Requis pour armer ou désarmer le système d'alarme. Valeur par défaut Requis pour accéder au mode de programmation (avec le code maître). Utilisateur 1 : 1234 Propriétés 4 chiffres Utilisateurs 2 à 4 : non définis Obligatoire Il est impossible de supprimer le code pour l'utilisateur 1. Sera remis à sa valeur par défaut en cas d'initialisation (voir le chapitre Initialisation du système) Le code d'accès doit différer du code maître. V /02/ Velleman nv
80 Pour définir un code d'accès CTC Pour accéder à cette option : activer le mode de programmation, accéder à l'option "Gen. Settings", sélectionner "Pin code" et appuyer sur OK. 2. Utiliser les touches fléchées pour sélectionner le code à définir et appuyer sur OK. 3. Composer un code de 4 chiffres et appuyer sur OK. 4. Répéter le code et appuyer sur OK. 5. (optionnel) Entrer un nom pour le code. o Ce nom sera affiché dans la liste des codes et facilite leur identification. o Pour plus de détails sur la saisie de texte, voir 17 Saisie de texte. o Ne taper aucune donnée si vous ne souhaitez pas utiliser de nom. 6. Appuyer sur OK. Remarques Dans la liste des codes : un code d'accès sans nom est représenté par **** un code d'accès non défini est représenté par Changer un code d'accès 1. Pour accéder à cette option : activer le mode de programmation, accéder à l'option "Gen. Settings", sélectionner "Pin code" et appuyer sur OK. 2. Utiliser les touches fléchées pour sélectionner le code à modifier et appuyer sur OK. 3. Appuyer sur. 4. Voir ci dessus To set a pin code. V /02/ Velleman nv
81 Supprimer un code d'accès CTC1000 Le code d'accès 1 ne peut pas être supprimé. Pour supprimer un autre code : 1. Pour accéder à cette option : activer le mode de programmation, accéder à l'option "Gen. Settings", sélectionner "Pin code" et appuyer sur OK. 2. Utiliser les touches fléchées pour sélectionner le code à supprimer et appuyer sur OK. 3. Appuyer à nouveau sur OK. 7.5 Temp. Code (code temporaire) Utilisation Utilisé pour armer ou désarmer le système par un utilisateur temporaire Utilisable une seule fois pour brancher ou débrancher l'alarme. Une fois utilisé, le code est automatiquement supprimé et doit être redéfini si nécessaire Valeur par Non défini défaut Propriétés 4 chiffres Optionnel Sera effacé en cas d'initialisation (voir "Initialisation du système") Définir un code temporaire 1. Pour accéder à cette option : activer le mode de programmation, accéder à l'option "Gen. Settings", sélectionner "Temp. Code" et appuyer sur OK. 2. Composer un code de 4 chiffres et appuyer sur OK. 3. Répéter le code et appuyer sur OK. 4. Activer ou désactiver l'option "Latch Rpt." (latch key reporting = suivi des actions d'armement et de désarmement). o Cette option est visible uniquement si l'option" Latch" est mise sur "ON" dans le menu "Special Settings". Voir "Latch" dans le chapitre 8"Special Settings" pour plus de détails. 5. Appuyer sur OK. Modifier un code temporaire 1. Pour accéder à cette option : activer le mode de programmation, accéder à l'option "Gen. Settings", sélectionner "Temp. Code" et appuyer sur OK. V /02/ Velleman nv
82 2. Appuyer sur. 3. Voir "Définir un code temporaire" ci-dessus. Supprimer un code temporaire 1. Pour accéder à cette option : activer le mode de programmation, accéder à l'option "Gen. Settings", sélectionner "Temp. Code" et appuyer sur OK. 2. Appuyer à nouveau sur OK. 7.6 Code de contrainte Utilisation S'utilise pour armer ou désarmer le système. La saisie d'un code de contrainte active une alarme silencieuse et envoie un message au numéro de téléphone portable défini dans le système. Aucune sirène ne sera activée lors d'une alarme de contrainte. Valeur par Non définie défaut Propriétés 4 chiffres Optionnel Sera effacé en cas d'initialisation (voir "Initialisation du système") Définir un code de contrainte 1. Pour accéder à cette option : activer le mode de programmation, accéder à l'option "Gen. Settings", sélectionner "Duress Code" et appuyer sur OK. 2. Composer un code de 4 chiffres et appuyer sur OK. 3. Répéter le code et appuyer sur OK. Modifier un code de contrainte 1. Pour accéder à cette option : activer le mode de programmation, accéder à l'option "Gen. Settings", sélectionner "Duress Code" et appuyer sur OK. 2. Appuyer sur. 3. Composer un code de 4 chiffres et appuyer sur OK. 4. Répéter le code et appuyer sur OK. Supprimer un code de contrainte 1. Pour accéder à cette option : activer le mode de programmation, accéder à l'option "Gen. Settings", sélectionner "Duress Code" et appuyer sur OK. V /02/ Velleman nv
83 2. Appuyer à nouveau sur OK. 7.7 Code maître Utilisation Requis avec le code d'accès pour accéder au mode de programmation du panneau. Valeur par défaut 1111 Propriétés 4 chiffres Obligatoire Ne peut pas être supprimé Sera remis à sa valeur par défaut en cas d'initialisation (voir le chapitre Initialisation du système) Le code maître doit différer des codes pin. Définir un code maître 1. Pour accéder à cette option : activer le mode de programmation, accéder à l'option "Gen. Settings", sélectionner "Master Code" et appuyer sur OK. 2. Composer un code de 4 chiffres et appuyer sur OK. 3. Répéter le code et appuyer sur OK. Modifier un code maître 1. Pour accéder à cette option : activer le mode de programmation, accéder à l'option "Gen. Settings", sélectionner "Master Code" et appuyer sur OK. 2. Appuyer sur. 3. Composer un code de 4 chiffres et appuyer sur OK. 4. Répéter le code et appuyer sur OK. Supprimer un code maître 1. Pour accéder à cette option : activer le mode de programmation, accéder à l'option "Gen. Settings", sélectionner "Master Code" et appuyer sur OK. 2. Appuyer à nouveau sur OK. 7.8 A. Entry Time L'option "A. Entry Time" (away entry time) règle le délai pour entrer un code d'accès après être introduit dans votre habitation. Conditions préalables : Etat de l'alarme : absent Dispositifs concernés : contact de porte/fenêtre ou détecteur de mouvement définis comme "Entrée" ou "Entrée Surveillance" (voir 9.3). Action : le compte à rebours est lancé au moment où le contact de porte/fenêtre ou le détecteur de mouvement est déclenché. Si le code d'accès n'est pas composé dans le délai défini, le panneau déclenche une alarme et fait rapport. Les options pour le minuteur sont : "Disable" (l'alarme sera déclenchée sans délai) et des délais de 10 à 70 secondes. Le délai par défaut est de 20 secondes. Pour accéder à cette option : activer le mode de programmation, ouvrir l'option "Gen. Settings", sélectionner" A. Entry Time" et appuyer sur OK. V /02/ Velleman nv
84 7.9 A. Exit Time L'option "A. Exit Time" (away exit time) règle le délai pour quitter l'habitation après que le système a été mis en mode "Away" depuis le panneau ou une commande ou un clavier à distance. Conditions préalables : Etat de l'alarme : mise en mode "Away" depuis le panneau ou une commande ou un clavier à distance Action : le compte à rebours est lancé dès que l'alarme est mise en mode "Away" depuis le panneau ou une commande ou un clavier à distance. Les options pour le minuteur sont : "Disable" (pas de minuteur) et des délais de 10 à 70 secondes. Le délai par défaut est de 30 secondes. Pour accéder à cette option : activer le mode de programmation, ouvrir l'option "Gen. Settings", sélectionner "A. Exit Time" et appuyer sur OK. Remarques Appuyer sur le bouton "Arm" de la télécommande pour redémarrer le compte à rebours. Appuyer sur le bouton "Disarm" de la télécommande pour arrêter le compte à rebours et désarmer le système. Composer un code d'accès pour arrêter le compte à rebours et désarmer l'alarme Délai d'entrée en mode "Home" L'option "H. Entry Time" (délai d'entrée en mode "Home" règle le délai pour quitter l'habitation après que le système a été mis en mode "Home". Conditions préalables : Etat de l'alarme : mode "Home" Dispositifs concernés : contact de porte/fenêtre ou détecteur de mouvement définis comme "Entrée" ou "Home Access" (voir 9.3). Action : le compte à rebours est lancé au moment où le contact de porte/fenêtre ou le détecteur de mouvement est déclenché. Si le code d'accès n'est pas composé dans le délai défini, le panneau déclenche une alarme et envoie un rapport. Les options pour le minuteur sont : Disable (l'alarme sera déclenchée sans délai) et des délais de 10 à 70 secondes. Le délai par défaut est de 20 secondes. Pour accéder à cette option : activer le mode de programmation, ouvrir l'option "Gen. Settings", sélectionner "H. Entry Time" et appuyer sur OK Délai de sortie en mode "Home" L'option "H. Exit Time" (délai de sortie en mode "Home") règle le délai pour quitter l'habitation après que le système a été mis en mode "Home". Conditions préalables : Etat de l'alarme : mise en mode "Away" depuis le panneau ou une commande ou un clavier à distance Action : le compte à rebours est lancé dès que l'alarme est mise en mode "Away" depuis le panneau ou une commande ou un clavier à distance. Les options pour le minuteur sont : Disable (pas de minuteur) et des délais de 10 à 70 secondes. Le délai par défaut est de 30 secondes. Pour accéder à cette option : activer le mode de programmation, ouvrir l'option "Gen. Settings", sélectionner "H. Exit Time" et appuyer sur OK. V /02/ Velleman nv
85 Remarques CTC1000 Appuyer sur le bouton "Home" sur la télécommande pour redémarrer le compte à rebours. Appuyer sur le bouton "Disarm" sur la télécommande pour arrêter le compte à rebours et désarmer le système. Composer un code d'accès pour arrêter le compte à rebours et désarmer l'alarme Carillon de porte L'option "Door Chime" branche ou débranche le carillon de porte lorsqu'un contact de porte/fenêtre ou de mouvement est déclenché en mode "Disarm". Conditions préalables : Etat de l'alarme : débranché Dispositifs concernés : contact de porte/fenêtre ou détecteur de mouvement définis comme Entrée ou Entrée Surveillance (voir 9.3). Action : si un contact de porte/fenêtre ou détecteur de mouvement est déclenché en mode "Disarm", le panneau émet un son de carillon de porte. Le réglage par défaut est OFF. Pour accéder à cette option: activer le mode de programmation, ouvrir l'option "Gen. Settings", sélectionner "Door Chime" et appuyer sur OK Heure L'option "Time" permet de régler l'heure. 1. Pour accéder à cette option : activer le mode de programmation, ouvrir l'option "Gen. Settings", sélectionner "Time" et appuyer sur OK. 2. Utiliser les touches fléchées pour définir l'heure et appuyer sur OK. 3. Utiliser les touches fléchées pour définir les minutes et appuyer sur OK Date L'option "Time" permet de régler la date. 1. Pour accéder à cette option : activer le mode de programmation, ouvrir l'option "Gen. Settings", sélectionner "Date" et appuyer sur OK. 2. Utiliser les touches fléchées pour définir le mois et appuyer sur OK. 3. Utiliser les touches fléchées pour définir le jour et appuyer sur OK Sirène du panneau L'option "Panel Siren" (sirène du panneau) permet de brancher ou de débrancher l'alarme sur le panneau si un événement se produit. 1. Pour accéder à cette option : activer le mode de programmation, ouvrir l'option "Gen. Settings", sélectionner "Panel Siren" et appuyer sur OK. 2. Utiliser les touches fléchées pour sélectionner l'option et appuyer sur OK. 8. Special Settings Pour accéder aux options du menu "Spc. Settings" : Activer le mode de programmation et ouvrir l'option "Spc. Settings". V /02/ Velleman nv
86 Alarm Length (longueur de l'alarme) Règle la longueur de la sirène intégrée au panneau quand une alarme est déclenchée. Les options sont : Disable (aucune alarme) et 1 à 15 minutes. La valeur par défaut est 3 minutes. Remarques Si l'option "Disable" est sélectionnée et que le panneau reçoit un signal d'alarme, ni la sirène du panneau ni les sirènes internes et externes n'émettront de signal. Si la durée de l'alarme de la sirène extérieure est supérieure à celle du panneau, la durée du panneau prévaut. par exemple, si la longueur de l'alarme est réglée à 3 minutes et l'alarme du panneau à 1 minute, les deux alarmes s'arrêteront au bout d'une minute; cependant, les LEDs de la sirène clignoteront pendant 3 minutes. A. Exit Sound (=away exit sound) Branche ou débranche le signal de sortie du minuteur (away exit timer). A. Entry Sound (=away entry sound) Branche ou débranche le signal d'entrée du minuteur (away entry timer). H. Exit Sound (signal de sortie en mode "Home") Branche ou débranche le signal de sortie du minuteur en mode "Home" V /02/ Velleman nv
87 H. Entry Sound (signal d'entrée en mode "Home") Branche ou débranche le signal d'entrée du minuteur en mode "Home" Temporisation de sirène Détermine si le panneau doit retarder ou ne pas émettre les signaux pour les alarmes d'intrusion et d'entrée. Les options sont : Off (pas de son) et des délais de 1 à 10 minutes. Le réglage par défaut est OFF. Remarques La temporisation de la sirène s'applique uniquement aux alarmes d'intrusion et d'entrée. Les autres types d'alarmes ne seront pas retardés : o o o o o o Alarme d'incendie Alarme de présence d'eau Alarme panique Urgence médicale Alarme sabotage Erreur GSM Même si les signaux auditifs sont retardés, le rapport d'alarme sera envoyé sans délai. Vérification Règle l'ordre de vérification pour les alarmes. Seq. verif. on [vérification séquentielle branchée] Si la vérification séquentielle est mise sur ON et Si l'installation comporte plus d'un détecteur (contact de porte/fenêtre ou détecteur PIR ) avec attribut Intrusion o o Si le premier détecteur est déclenché, le panneau envoie un message signalant l'intrusion. Si le deuxième détecteur est déclenché dans les 30 secondes, le panneau envoie un message de confirmation. Seq. verif. off [vérification séquentielle débranchée] Si la vérification séquentielle est OFF, le panneau de contrôle envoie uniquement un message signalant l'intrusion. Final Door (dernière porte) Si l'option "Final Door" (dernière porte) se trouve sur ON V /02/ Velleman nv
88 Si le système d'alarme est mis en mode "Away Arming" et Si un contact de porte/fenêtre a été défini comme dispositif d'entrée Le système activera automatiquement la surveillance dès qu'il a détecté la fermeture du contact de porte/fenêtre, et ce même si le délai de sortie n'est pas écoulé. Interférence Détermine si le panneau doit ou non détecter les interférences causées par des signaux extérieurs. Si la détection est branchée et que le système détecte une interférence de plus de 30 secondes, l'erreur sera consignée, signalée au système de rapportage central et affichée. Si la détection est débranchée, le système ne vérifiera pas les signaux d'interférence. RC Ent E (= entrée avec télécommande) Cette option évite que l'alarme ne soit débranchée à l'aide d'une télécommande avant qu'une porte n'ait été ouverte, par exemple en cas de vol de la télécommande. Pour accéder à la fonction: il faut d'abord activer dispositif du point d'entrée pour pouvoir désarmer l'alarme. Si la télécommande est mise sur ON : une télécommande peut désarmer l'alarme sans qu'une porte n'ait été ouverte. Mobility Cette option branche ou débranche le minuteur "Mobility" et permet de définir le délai. Les options sont Disable, 4 heures, 8 heures et 12 heures. Si le minuteur "Mobility" est actif, le système comptera la durée définie. Si le minuteur expire sans être remis à zéro, un rapport sera envoyé aux numéros de téléphone programmés. Si le minuteur "Mobility" est réglé avec délai spécifié, le panneau fera rapport aux numéros de téléphone programmés lorsque le délai expire, à moins que l'une des actions suivantes ne se produise avant la remise à zéro du minuteur : o En mode "Home" : chaque fois qu'un détecteur Home Omit DC, ou de mouvement est déclenché, ou à chaque fois appui sur une des touches du panneau; o En mode "Disarm" : chaque fois qu'un contact de porte/fenêtre ou détecteur de mouvement est déclenché (sauf 24 h, incendie, urgence médicale et détection d'eau), ou chaque fois que l'une des touches du panneau de commande est pressée. Si le système se trouve en mode "Away Arm", le minuteur s'arrête automatiquement. Si le système est mis en mode "Home Arm" ou "Disarm", le minuteur se remet en marche. Alarme anti-sabotage Permet de définir si la sirène retentira en cas de tentative de sabotage. Option Fonction Away Arm Only Le panneau déclenche une alarme locale et envoie un rapport s'il se trouve en mode "Away". Si l'alarme se trouve en mode "Home" ou "Alarm Off", le système enverra un rapport mais la sirène ne retentira pas. V /02/ Velleman nv
89 Normal Le panneau déclenche une alarme locale et envoie un rapport dans tous les modes. Remarques Indépendamment du réglage de la sirène, le panneau enverra un rapport de sabotage par SMS au premier numéro de téléphone de la liste, et ce dans tous les modes. Dès que la situation de sabotage est rétablie, le panneau adressera un SMS au premier numéro de téléphone. Option "Latch" [suivi des actions d'armement et de désarmement] L'option "Latch" enregistre toutes les actions d'armement et de désarmement effectués par tous les utilisateurs depuis le panneau et les commandes à distance. Remarques Si la fonction de rapportage Latch est mise sur OFF, l'option ne sera pas visible dans le menu de maintenance (voir 7.5). Si la fonction de rapportage Latch est mise sur ON, toute action d'armement ou de désarmement sur le panneau et les commandes à distances seront rapportées au système de suivi central. Pour pouvoir recevoir des rapports par SMS, définir le premier numéro comme rapport SMS. Supervision L'option "Supervision" permet une supervision du système. Si l'option est mise sur ON, le panneau de contrôle peut recevoir des signaux d'identification émis par les dispositifs et indiquant leur bon fonctionnement. Les options sont : Disable, 8 heures, 12 heures, et 24 heures. Signal d'avertissement Active ou désactive le signal sonore lorsque le panneau affiche un message d'erreur La lecture du message d'erreur débranche le signal. Bande GSM Modifier l'option "GSM band" (réseau GSM) en fonction des paramètres de bande passante du fournisseur d'accès. Consulter votre fournisseur pour le réglage correct. Stop Sélectionner "Stop" et appuyer sur OK pour valider et retourner au menu précédent. V /02/ Velleman nv
90 9. Gestion des dispositifs Le menu "Devices+/-" permet la gestion des dispositifs (ajout, configuration, modification, suppression) tels que contacts de porte/fenêtre et détecteurs de mouvement, sirènes, dans 30 zones maximum. Ordre d'installation Le système considère les sirènes intérieures et extérieures ainsi que les récepteurs universels comme des dispositifs auxiliaires. Avant d'ajouter un dispositif auxiliaire, ajouter au moins un autre type de dispositif (par exemple un contact de porte/fenêtre ou détecteur de mouvement ou une télécommande). 9.2 Ajouter un dispositif Pour accéder à la fonction : 1. Activer le mode de programmation, accéder à l'option "Devices+/-", sélectionner "Add device" et appuyer sur OK. 2. Appuyer le bouton de test sur le dispositif à ajouter. 3. Si le panneau détecte un dispositif, il affiche le type : Les dispositifs possibles sont : Door Contact [contact de porte/fenêtre] PIR Sensor [détecteur de mouvement] External PIR Sensor [détecteur de mouvement extérieur] La télécommande Remote Keypad [clavier de commande] Sonde de niveau d'eau Outdoor Siren [sirène extérieure] Récepteur universel 4. Appuyer sur OK pour valider. Le panneau affiche alors les zones de défense inutilisées (30 zones maximum). 5. Utiliser les touches fléchées pour sélectionner le numéro de zone auquel vous voulez associer le dispositif et appuyer sur OK. La procédure varie en fonction du dispositif à ajouter. 6. Sélectionner "Stop" et appuyer sur OK pour valider et retourner au menu précédent. V /02/ Velleman nv
91 Remarques CTC1000 En essayant d'ajouter un détecteur qui est déjà présent, un message d'erreur apparaît. Pour l'ajouter quand même, il vous faudra d'abord le supprimer (voir 9.5 Supprimer un dispositif). Appuyer sur le bouton pour annuler la procédure. Les affichages qui suivent varient en fonction du dispositif à ajouter. Ajouter un contact de porte/fenêtre 1. Utiliser les touches fléchées pour sélectionner un mode de fonctionnement et appuyer sur OK. Pour plus de détails sur les modes de fonctionnement disponibles, voir Entrer un nom pour la zone. Ne taper aucune donnée si vous ne souhaitez pas utiliser de nom. 3. Appuyer à nouveau sur OK pour valider l'installation. 4. Appuyer à nouveau sur OK pour terminer. Ajouter un détecteur de mouvement En supposant que vous avez associé un numéro de zone (voir 9.2): 1. Utiliser les touches fléchées pour sélectionner un mode de fonctionnement et appuyer sur OK. Pour plus de détails sur les modes de fonctionnement disponibles, voir Entrer un nom pour la zone. Ne taper aucune donnée si vous ne souhaitez pas utiliser de nom. V /02/ Velleman nv
92 3. Appuyer à nouveau sur OK pour valider l'installation. 4. Appuyer à nouveau sur OK pour terminer. Ajouter un détecteur de mouvement externe En supposant que vous avez associé un numéro de zone (voir 9.2): 1. Utiliser les touches fléchées pour sélectionner un type de détecteur et appuyer sur OK. o Regular : le dispositif sera ajouté comme détecteur normal o External : le dispositif sera ajouté comme détecteur extérieur. 2. Utiliser les touches fléchées pour sélectionner un mode de fonctionnement et appuyer sur OK. Pour plus de détails sur les modes de fonctionnement disponibles, voir Entrer un nom pour la zone. Ne taper aucune donnée si vous ne souhaitez pas utiliser de nom. Pour plus de détails sur la saisie de texte, voir Appuyer à nouveau sur OK pour valider l'installation. 5. Appuyer à nouveau sur OK pour terminer. Ajouter une télécommande En supposant que vous avez associé un numéro de zone (voir 9.2): 1. Utiliser les touches fléchées pour sélectionner l'option souhaitée pour la télécommande. o Personal att : le panneau émet une alarme urgence médicale si quelqu'un appuie sur le bouton de détresse pendant 3 secondes ou appuie sur le bouton 2 fois dans les 3 secondes. o Medical Emg : le panneau émet une alarme urgence médicale si quelqu'un appuie sur le bouton de détresse pendant 3 secondes ou appuie sur le bouton 2 fois dans les 3 secondes. 2. Utiliser les touches fléchées pour sélectionner un mode de fonctionnement et appuyer sur OK. Pour plus de détails sur les modes de fonctionnement disponibles, voir Entrer un nom pour la zone. Ne taper aucune donnée si vous ne souhaitez pas utiliser de nom. Pour plus de détails sur la saisie de texte, voir Appuyer à nouveau sur OK pour valider l'installation. V /02/ Velleman nv
93 5. Appuyer à nouveau sur OK pour terminer. Ajouter un clavier de commande ou une sonde de niveau d'eau Ces dispositifs s'installent de façon similaire. En supposant que vous avez associé un numéro de zone (voir 9.2): 1. Entrer un nom pour la zone. Ne taper aucune donnée si vous ne souhaitez pas utiliser de nom. Pour plus de détails sur la saisie de texte, voir Appuyer sur OK. 3. Appuyer à nouveau sur OK pour terminer. Ajouter un dispositif auxiliaire (menu Program Siren) Le système considère les sirènes intérieures et extérieures ainsi que les récepteurs universels comme des dispositifs auxiliaires. Avant d'ajouter un dispositif auxiliaire, ajouter au moins un autre dispositif (détecteur ou clavier de commande). Le système affiche une erreur si ce n'est pas le cas. 1. Activer le mode de programmation, accéder à l'option "Devices+/-", sélectionner "Program Siren", puis "Learn Siren" et appuyer sur OK. 2. Mettre le dispositif à ajouter en mode d'apprentissage (voir le manuel du dispositif). 3. Appuyer sur OK. Le panneau émet un long bip et transmet le code d'apprentissage à tous les dispositifs à la fois. La sirène extérieure produira un son et clignotera. La LED sur le récepteur universel clignote 3 fois. 9.3 Ajouter un dispositif : aperçu des modes de fonctionnement L'aperçu ci-dessous contient tous les modes possibles pour tous les dispositifs. Le type de dispositif détermine quels sont les modes qui sont d'application. Mode de fonctionnement Burglar (Intrusion) Home Omit (Ignorer Maison) Home Access Délai Entrée Etat du système Si le système se trouve en mode "Away Arm/Home Arm" ou pendant les délais d'entrée et de sortie le système d'alarme est en mode "Away Arm" (y compris "Away Arm Entry)" si un détecteur de mouvement home omit et déclenché alors que le système se trouve en mode "Home Arm". pendant le délai d'entrée ou de sortie, si un contact de mouvement Home Omit (Ignorer Maison) est déclenché le système d'alarme est en mode "Away Arm" le système d'alarme est en mode "Home Arm" pendant le délai d'entrée ou de sortie le système d'alarme est en mode "Away Arm/Home Arm" pendant le délai d'entrée ou de sortie le système d'alarme est en mode "Away Arm/Home Arm" après expiration de la période de délai et qu'aucun code d'accès n'a été donné pour désarmer le système Comportement du dispositif si un contact de porte/fenêtre d'intrusion est déclenché, le système activera immédiatement une alarme intrusion si un détecteur de mouvement home omit est déclenché, le système active immédiatement une alarme intrusion le panneau ne réagit pas le panneau ne réagit pas si un détecteur de mouvement Accès Maison est déclenché, le système émet immédiatement une alarme intrusion si un détecteur de mouvement Accès Maison est déclenché, le panneau initie une période d entrée qui laisse assez de temps pour désarmer le système si un détecteur de mouvement Accès Maison est déclenché, le panneau ne réagit pas si un contact de porte/fenêtre délai est déclenché, le système activera immédiatement une alarme intrusion si un détecteur de mouvement zone de délai est déclenché, le panneau ne réagit pas si un détecteur de mouvement Entrée est déclenché, le panneau initie une période d entrée qui laisse assez de temps pour désarmer le système le panneau émet une alarme intrusion après 30 secondes V /02/ Velleman nv
94 Mode de fonctionnement Away Entry 24 Hour (24 Heures) Etat du système le système d'alarme est désarmé CTC1000 le système d'alarme est en mode "Away Arm" après expiration de la période de délai et qu'aucun code d'accès n'a été donné pour désarmer le système le système d'alarme est désarmé le système d'alarme est en mode "Home Arm" pendant le délai d'entrée ou de sortie pas applicable Comportement du dispositif si un détecteur de mouvement Entrée est déclenché, le panneau émet un son de carillon (si le panneau est programmé comme tel). si un détecteur de mouvement Entrée Surveillance est déclenché, le panneau initie une période d entrée qui laisse assez de temps pour désarmer le système le panneau met une alarme intrusion après 30 secondes si un détecteur de mouvement Entrée Surveillance est déclenché, le panneau émet un son de carillon (si le panneau est programmé comme tel). si un détecteur de mouvement Entrée Surveillance est déclenché, le panneau ne réagit pas si un détecteur de mouvement Entrée Surveillance est déclenché, le panneau ne réagit pas le contact de porte/fenêtre est actif en permanence et ne doit pas être armé ni désarmé Fire (Incendie) pas applicable le détecteur d'incendie est actif en permanence et ne doit pas être armé ni désarmé Medical Emg (Urgence médicale) pas applicable une alarme d'urgence médicale est active en permanence et ne doit pas être armée ou désarmée Water (Eau) pas applicable le détecteur d'eau est actif en permanence et ne doit pas être armé ni désarmé 9.4 Modifier un dispositif La fonction varie en fonction du type de dispositif. Modifier un contact de porte/fenêtre - détecteur de mouvement - télécommande Activer le mode de programmation, accéder à l'option "Devices+/-", sélectionner "Edit devices" et appuyer sur OK. L'écran affiche les dispositifs disponibles. 1. Utiliser les touches fléchées pour sélectionner un dispositif et appuyer sur OK. Maintenant, il est possible de changer l'attribut du dispositif. Pour passer cette étape, appuyer sur. V /02/ Velleman nv
95 2. Utiliser les touches fléchées pour sélectionner un attribut et appuyer sur OK. 3. Appuyer sur OK pour valider. Maintenant, il est possible de changer ne nom du dispositif. Pour passer cette étape, appuyer sur. Appuyer sur OK pour continuer. 4. Taper un nom de zone et appuyer sur OK. L'écran retourne à la liste des dispositifs. Utiliser les touches fléchées pour sélectionner un autre dispositif ou appuyer sur. Modifier un clavier de commande - une sonde de niveau d'eau 1. Activer le mode de programmation, accéder à l'option "Devices+/-", sélectionner "Edit devices" et appuyer sur OK. L'écran affiche les dispositifs disponibles. 2. Maintenant, il est possible de changer le nom du dispositif. 3. Taper un nom de zone et appuyer sur OK. L'écran retourne à la liste des dispositifs. Utiliser les touches fléchées pour sélectionner un autre dispositif ou appuyer sur. 9.5 Supprimer un dispositif 1. Activer le mode de programmation, accéder à l'option "Devices+/-", sélectionner "Remove device" et appuyer sur OK. Le panneau affiche tous les dispositifs disponibles. V /02/ Velleman nv
96 2. Utiliser les touches fléchées pour sélectionner un dispositif et appuyer sur OK. Pour plus de détails sur les modes de fonctionnement disponibles, voir Appuyer à nouveau sur OK pour valider. 9.6 Menu Program Siren - autres options Learn Siren (apprentissage d'une sirène) Pour ajouter une sirène interne ou externe, le dispositif doit d'abord être programmé par le panneau, pour permettre la communication entre le panneau et les dispositifs auxiliaires. Avant d'ajouter un dispositif auxiliaire, ajouter au moins un autre type de dispositif (par exemple un contact de porte/fenêtre ou détecteur de mouvement, mais pas de sirène interne ou externe). Avant d'ajouter un dispositif auxiliaire, ajouter au moins un autre type de dispositif (par exemple un contact de porte/fenêtre ou détecteur de mouvement ou une télécommande). Pour ajouter une sirène externe ou interne 1. Mettre le ou les dispositifs concernés en mode d'apprentissage. 2. Activer le mode de programmation, accéder à l'option "Devices+/-", sélectionner "Program Siren" et appuyer sur OK. 3. Utiliser les touches fléchées pour sélectionner "Learn Siren" et appuyer sur OK. o Le panneau émet un long bip et transmet le code d'apprentissage à tous les dispositifs à la fois. o La sirène extérieure produira un son et clignotera. 4. Arrêter le mode d'apprentissage sur les dispositifs auxiliaires. Les dispositifs ont été ajoutés au système. Siren Tamp. On - Siren Tamp. Off (anti-sabotage sirène) L'anti-sabotage de la sirène peut être activé et désactivé à distance. Cette fonction est utile quand on remplace les piles. Pour désactiver l'anti-sabotage de la sirène : sélectionner "Siren Tamp.Off" et appuyer sur OK. La protection anti-sabotage sera simultanément désactivée sur toutes les sirènes. Pour activer l'anti-sabotage de la sirène : sélectionner "Siren Tamp.Off" et appuyer sur OK. La protection anti-sabotage sera simultanément réactivée sur toutes les sirènes. Confirm On - Confirm Off Avec l'option ON, la sirène émettra un bip de confirmation lors de l'armement ou du désarmement du système. Avec l'option OFF, la sirène n'émettra pas de bip de confirmation lors de l'armement ou du désarmement du système. Sélectionner l'option "Confirm On" ou "Confirm Off" et appuyer sur OK. Entry Snd On - Entry Snd Off Active ou désactive les bips de délai d'entrée en entrant dans votre habitation. Sélectionner l'option "Entry Snd On" ou "Entry Snd Off" appuyer sur OK. V /02/ Velleman nv
97 10. Autres fonctions de configuration SMS Editor [éditeur SMS] Cette fonction permet de définir le message qui sera envoyé au téléphone portable en cas d'alarme. 1. Activer le mode de programmation et sélectionner "SMS Editor "dans le menu. L'écran d'édition apparaît. 2. Composer un message SMS (jusqu'à 16 x 4 caractères). Pour plus de détails sur la saisie de texte, voir Appuyer sur OK. 4. Sélectionner "Save" et appuyer sur OK pour valider. SMS Keyword [mot-clé SMS] Le panneau fonctionne avec des commandes envoyées depuis un téléphone portable. Avant de pouvoir envoyer une commande DTMF, fournir d'abord un mot-clé (SMS keyword).. Pour modifier le code d'accès pour les messages à distance 1. Activer le mode de programmation, sélectionner l'option "SMS Keyword" du menu et appuyer sur OK. 2. Entrer un code entre 1 et 10 caractères et appuyer sur OK. Le code doit être différent du code utilisateur. 3. Répéter le code et appuyer sur OK. Country Code [code pays] Le format d'affichage du numéro de téléphone (avec ou sans préfixe national) peut varier en fonction du fournisseur de téléphonie mobile. Si votre téléphone affiche les numéros sans code pays, vous pouvez ignorer ce point. Si votre téléphone affiche les numéros avec code pays, il vous faudra modifier un paramètre dans le panneau. Demander cette donnée à votre fournisseur ou effectuer le test suivant : 1. Insérer la carte concernée dans un téléphone mobile. 2. Brancher le téléphone. 3. S'assurer que le numéro ne soit associé à aucun contact sur votre téléphone. 4. Envoyer un SMS au même numéro. o Si votre téléphone affiche les numéros sans code pays (par exemple ), ignorer ce point. o Si votre téléphone affiche les numéros avec code pays (par exemple ), procéder comme suit. 5. Sur le panneau de contrôle, activer le mode de programmation, sélectionner l'option "Country Code" et appuyer sur OK. 6. Composer le code de votre pays. Exemple : si le numéro affiché était le , taper 32 (sans le '+'). V /02/ Velleman nv
98 7. Appuyer sur OK. 8. Dans l'écran suivant, taper Appuyer sur OK pour terminer. GSM Signal (signal GSM) L'option "GSM signal" permet de vérifier la puissance du signal GSM. 1. Sur le panneau de contrôle, activer le mode de programmation, sélectionner l'option "GSM signal" et appuyer sur OK. L'écran affiche la puissance du signal (de 0 à 9, 9 indiquant le signal le plus puissant). Walk Test [test de communication] L'option "Walk Test" permet de vérifier la communication entre le panneau et un dispositif. 1. Sur le panneau de contrôle, activer le mode de programmation, sélectionner l'option" Walk Test" et appuyer sur OK. 2. Appuyer le bouton de test sur le dispositif à tester. Si le panneau de contrôle reçoit un signal, il affichera le nom, la zone et la force du signal. 3. Appuyer sur pour quitter. Reset GSM [Initialisation GSM] L'option "Reset GSM" initialise le signal GSM. 1. Sur le panneau de contrôle, activer le mode de programmation, accéder à "Reset GSM" et appuyer sur OK. L'initialisation du signal prend environ 1 minute. 11. Utiliser le système d'alarme En supposant que l'alarme est désarmée : taper votre code d'accès pour accéder au menu utilisateur. Depuis ce menu, il est possible d'armer ou de désarmer l'alarme. Taper le premier chiffre de votre code d'accès. 1. Dans les 10 secondes, composer les autres chiffres du code. L'écran affiche : 2. Le curseur clignote à côté de l'option "Away Arm". Le menu contient les éléments suivants : V /02/ Velleman nv
99 Si le système détecte une erreur, la première ligne de l'écran affiche : 11.2 Brancher l'alarme Si le système est désarmé, il est possible de l'armer comme suit : 1. Taper votre code d'accès et appuyer sur OK. L'écran affiche : 2. Le curseur clignote à côté de l'option "Away Arm". Appuyer sur OK. L'écran affiche : o o Le panneau lance le compte à rebours et émet un son. (Le son et le délai de sortie dépendent de votre configuration, voir 7.9.) Une fois le délai de sortie écoulé, le système émet un long son et passe en mode "Arm". Remarques Le panneau de contrôle à une fonction d'économiseur d'écran. Le message "Alarm ON" s'affiche pendant 180 secondes. Ensuite, l'écran affiche la date et l'heure. Si l'option "Final Door" est à ON, le panneau armera le système dès que la porte a été fermée. Il n'est pas possible d'armer le système si un contact de porte/fenêtre ou détecteur de mouvement a été déclenché (par exemple : une porte restée ouverte). Pour quand même armer le système, voir "Armement forcé" ci-dessous. Le système peut aussi être armé à l'aide de la télécommande (en option). Arrêter le délai de sortie Après avoir armé le système et le compte à rebours est toujours en cours, le délai de sortie peut être arrêté en désarmant le système. 1. Appuyer sur la touche. Le système demande d'entrer votre code d'accès. L'écran affiche le compte à rebours. 2. Taper votre code d'accès et appuyer sur OK. "Alarm Off" sera affiché sur l'écran et le système revient en mode "Disarm". o Le délai de sortie peut également être arrêté en appuyant sur le bouton de désarmement de la télécommande (en option). o Si le délai de sortie expire avant qu'un code n'ait été donné, le système sera armé. Prolonger le délai de sortie (télécommande uniquement) Pendant le délai de sortie, il est possible de prolonger ce délai ou appuyant sur le bouton Armer de la télécommande (en option) Enfoncer le bouton d'armement pendant 1 seconde. Le panneau émet un long bip confirmant le prolongement. Le temps de délai est remis à zéro à chaque appui sur le bouton d'armement Armement forcé du système En introduisant votre code d'accès alors que le système a détecté une erreur, l'écran affiche une erreur. V /02/ Velleman nv
100 Si dans ce cas, choisir l'option "Away Arm", le panneau émettra un avertissement indiquant que l'armement est impossible. L'écran affiche alternativement le message "Fault Dsp". suivi du message d'erreur concerné. Appuyer sur la touche pour retourner à l'écran "Alarm Off". En cas d'erreur, solutionner les problèmes et effacer les messages d'erreur (voir 14 et armer le système (recommandé). ignorer les erreurs et quand-même armer le système, comme suit : Dans l'écran "Fault Dsp" : 1. Taper votre code d'accès et appuyer sur OK. L'écran affiche : 2. Appuyer sur OK pour valider. o o Le panneau lance le compte à rebours et met un son. (Le son et le délai de sortie dépendent de votre configuration, voir 7.9.) Une fois le délai de sortie écoulé, le système émet un long son et passe en mode "Arm". Armement avec porte ouverte Si le système détecte l'ouverture d'une porte pendant l'armement, le panneau émettra un son indiquant que l'armement est impossible. L'écran affiche le texte "Fault DSP" alternant avec le nom du détecteur concerné. Après avoir fermée la porte ouverte, les messages d'erreurs seront effacés et l'écran retourne en mode "Alarm Off". Maintenant, il est possible d'armer le système. Pour quand même armer le système si une porte est ouverte, utiliser "Forced Arming". Remarques L'écran "Fault Dsp" disparaît après 5 minutes. Après cela, il retourne à l'écran "Alarm Off". Si un détecteur est contourné (voir "Partial Arm"), l'état de ce détecteur ne sera pas contrôlé. En cas de sabotage ou de panne d'un détecteur, il est possible de le contourner temporairement ou le supprimer définitivement Désarmer le système Il est possible de désarmer le système si celui-ci se trouve soit en mode "Away Arm" soit en "Home Arm" (Alarm ON) : 1. Taper votre code d'accès et appuyer sur OK. Le panneau émet 2 bips et retourne en mode "Disarm". Commande à distance Si l'alarme est en mode "Home", il est possible de la désarmer en appuyant sur le bouton de désactivation de la télécommande. Si l'alarme est en "Away Arm", appuyer sur le bouton de désactivation pour soit désarmer le système (si un dispositif d'entrée a été déclenché) ou si la fonction RC Ent E (= entrée avec télécommande) se trouve sur ON (voir RC Ent E) du chapitre 8) Mode "Home Arm" Le mode "Home" vous permet d'armer la maison afin que personne ne puisse y pénétrer sans avoir d'abord désarmé le système, mais la personne qui est déjà à l'intérieur de la maison peut se déplacer librement sans déclencher l'alarme. Il est possible d'activer le mode "Home Arm" si le système est en mode 'Disarm". Pour activer le mode "Home" : V /02/ Velleman nv
101 1. Taper votre code d'accès et appuyer sur OK. 2. Appuyer sur la touche pour sélectionner l'option "Home Arm" et appuyer sur OK. o o Le panneau lance le compte à rebours et émet un son. (Le son et le délai de sortie dépendent de votre configuration, voir 7.9.) Une fois le délai de sortie écoulé, le système émet un long son et passe en mode "Arm". Remarques Le système peut aussi être armé à l'aide de la télécommande (en option). Pour arrêter le délai de sortie, voir "Arrêter le délai de sortie" dans le chapitre Pour prolonger le délai de sortie, voir "Prolonger le délai de sortie" (télécommande uniquement) dans le chapitre Si le système a détecté une erreur mais que vous voulez quand même armer le système, voir 11.3 "Armement forcé" ci-dessous Mode "Partiel Arm" (contournement) Le mode "Partiel Arm" permet de contourner un détecteur selon vos besoins. Cette fonction permet d'activer la surveillance de votre habitation tandis qu'une personne à l'intérieur peut se déplacer librement dans la zone contournée. Pour activer le mode "Partial Arm" : 1. Taper votre code d'accès et appuyer sur OK. 2. Appuyer sur la touche pour sélectionner l'option "Bypass" et appuyer sur OK. 3. Appuyer sur les touches et pour sélectionner les zones que vous voulez contourner et appuyer sur OK (par exemple : DC porte arrière). 4. Appuyer sur OK pour valider. La zone contournée est marquée d'un *. 5. Répéter les étapes 2-4 pour contourner un autre dispositif. 6. Une fois terminé, appuyer sur la touche pour retourner au menu utilisateur. Le curseur reste sur la position "Arm". 7. Appuyer sur OK. V /02/ Velleman nv
102 Remarques CTC1000 Si un détecteur est contourné, le panneau ne réagit pas en cas de déclenchement du détecteur. La fonction de contournement ne vaut qu'une seule fois. Dès que le système a été désarmé, la fonction de contournement est effacée. Si un détecteur est contourné, le système peut être armé directement indépendamment de sa situation d'erreur (le cas échéant). Cependant, sa situation est toujours surveillée et sera enregistrée et affiché en accédant au menu "Log" Arrêter une alarme Au cours d'une alarme, le panneau fera entendre sa sirène et fera rapport au numéro de téléphone mobile programmé. L'écran affiche : Lors d'une alarme, pour arrêter la sirène et effacer l'affichage : Composer votre code d'accès et appuyer sur OK. Si le code d'accès est correct, l'alarme s'arrêtera. En appuyant sur une touche autre que le premier chiffre de votre code d'accès, l'affichage vous invite à entrer votre code. Rapportage Le rapportage varie en fonction du moment où l'alarme est débranchée. Avant exécution du rapportage Pendant l'exécution du rapportage Après exécution du rapportage Alarme arrêtée avant exécution du rapportage Le système n'enverra pas de rapports. 1. L'écran affiche l'objectif qui a déclenché l'alarme et le numéro de la zone concernée. 2. Appuyer sur OK. Si plusieurs alarmes ont été déclenchées, le panneau continue d'afficher la deuxième alarme précédée des caractères 02). 3. Appuyer plusieurs fois sur OK jusqu'à ce que l'écran affiche : [signification : le système n'a pu toucher aucun numéro] 4. Appuyer sur OK. L'écran retourne en mode "Alarm Off". Ou appuyer sur pour visualiser tous les incidents. Alarme arrêtée pendant l'exécution du rapportage 1. L'écran affiche l'objectif qui a déclenché l'alarme et le numéro de la zone concernée. 2. Appuyer sur OK. Si plusieurs alarmes ont été déclenchées, le panneau continue d'afficher la deuxième alarme précédée des caractères 02). 3. Appuyer plusieurs fois sur OK jusqu'à ce que l'écran affiche : V /02/ Velleman nv
103 [signification : le système n'a pu toucher aucun numéro] 4. Appuyer sur OK. L'écran retourne en mode "Alarm Off". Alarme arrêtée après exécution du rapportage 1. L'écran affiche l'objectif qui a déclenché l'alarme et le numéro de la zone concernée. 2. Appuyer sur OK. Si plusieurs alarmes ont été déclenchées, le panneau continue d'afficher la deuxième alarme précédée des caractères 02). 3. Appuyer plusieurs fois sur OK jusqu'à ce que l'écran affiche : [affiche le numéro que le panneau a touché] 4. Appuyer sur OK. L'écran retourne en mode "Alarm Off". Ou appuyer sur pour visualiser tous les incidents. Télécommande Si une alarme (sauf une alarme panique) est déclenchée, il est possible de l'arrêter en appuyant sur le bouton de la télécommande (optionnelle). Une alarme panique ne peut être débranchée à l'aide d'une télécommande mais doit être débranchée depuis le panneau. Ceci empêche que quelqu'un n'arrache la télécommande à l'utilisateur et de faire taire l'alarme avec la télécommande. Mémoire d'alarme Si pendant votre absence une alarme a été déclenchée sans avoir été coupée et que le rapportage a été effectué, l'écran reste sur l'écran signalant une alarme. L'écran ne peut être initialisé avec la télécommande. Pour effacer l'écran, suivre la procédure telle que décrite au chapitre Evénements d'alarme et réponses Le tableau ci-dessous répertorie les événements d'alarme et comment le panneau de contrôle répondra à eux. Type d'alarme Disarmed Away Arm Home Arm Délai de sortie Minuteur "Away Arm Entry" Minuteur "Home Arm Entry" Intrusion Aucune réponse Alarme intrusion Alarme intrusion Alarme intrusion Alarme intrusion Alarme intrusion Home Omit (Ignorer Maison) Aucune réponse Alarme intrusion Aucune réponse Aucune réponse Alarme intrusion Aucune réponse Accès Maison Aucune réponse Alarme intrusion Lancement du minuteur d'entrée Aucune réponse Aucune réponse Aucune réponse Délai Aucune réponse Alarme intrus Alarme intrusion Aucune réponse Aucune réponse Aucune réponse V /02/ Velleman nv
104 Entrée Carillon de porte Lancement du minuteur d'entrée Lancement du minuteur d'entrée Aucune réponse Aucune réponse Aucune réponse Surveillance Entrée Carillon de porte Lancement du minuteur d'entrée Aucune réponse Aucune réponse Aucune réponse Aucune réponse 24 h. Alarme Intrusion Alarme Intrusion Alarme Intrusion Alarme Intrusion Alarme Intrusion Alarme Intrusion Incendie Alarme d'incendie Alarme d'incendie Alarme d'incendie Alarme d'incendie Alarme d'incendie Alarme d'incendie Alarme médicale Alarme d'urgence Alarme d'urgence Alarme d'urgence Alarme d'urgence Alarme d'urgence Alarme d'urgence Eau Alarme de présence d'eau Alarme de présence d'eau Alarme de présence d'eau Alarme de présence d'eau Alarme de présence d'eau Alarme de présence d'eau Détecteur de mouvement externe Aucune réponse Alarme intrusion (mais pas de rapportage) Signal d'avertissement Aucune réponse Aucune réponse Aucune réponse 12. Journal des évènements Le journal enregistre les 20 derniers événements, y compris les événements avec identifiant des dispositifs les événements relatifs aux erreurs les événements d'armement et de désarmement Les événements enregistrés sont affichés par ordre chronologique inversé (l'événement le plus récent d'abord). Le journal est marqué d'un libellé Start avant l'entrée la plus récente et d'un libellé End après l'entrée la plus ancienne. Pour consulter le journal des évènements : En supposant que l'alarme est débranchée : 1. Entrer le code d'accès et appuyer sur OK pour accéder au menu de l'utilisateur. 2. Appuyer plusieurs fois sur la touche pour sélectionner l'option "Log" et appuyer sur OK. Le début du journal sera affiché. 3. Utiliser les touches et pour visualiser tous les incidents. 13. Gestion des fausses alertes Le dispositif gère les types suivants de fausse alerte : Double avertissement d'entrée Lorsque le système est armé et un dispositif réglé à l'attribut "entrée" est déclenché, le système commencera un compte à rebours de l'entrée en fonction de votre réglage de l'heure d'entrée dans les réglages généraux. Le but du minuteur est d'avertir que les rapports d'alarme au numéro de téléphone programmé sont sur le point d'être exécutés. Pendant le compte à rebours d'entrée, si un autre appareil n'est pas réglé sur l'attribut "entrée" est déclenché, ou un code d'accès valide n'est pas entré avant l'expiration du minuteur, une alarme sera activée. Après que l'alarme est activée, le système attend encore 30 secondes avant l'envoi de rapports à des numéros de téléphone programmés. Si un code d'accès est fourni dans les 30 secondes, l'alarme sera annulée et le système retourne en état régulier. V /02/ Velleman nv
105 Si aucun code d'accès valide n'est introduit, le système envoie un rapport d'alarme intrusion aux numéros programmés. Rapportage d'actions d'armement et de désarmement Si l'option "Latch" est activée (par défaut), toutes les actions d'armement et de désarmement avec codes d'accès ou télécommandes seront rapportées. Rapportage vérification séquentielle Si l'option "Verification" est réglée sur ON (réglage par défaut est OFF) et qu'une alarme intrusion est activée, et si un autre dispositif d'intrusion est déclenché dans les 30 minutes, le système enverra un rapport de confirmation d'alarme confirment rapport aux numéros de téléphone programmés. Voir "Vérification" à la page 16 pour plus de détails. Le rapport de vérification sera envoyé en plus du rapport d'alarme. Si le second dispositif est déclenché dans le délai, le système n'envoie pas de rapport de vérification séquentielle. 14. Erreurs Le panneau peut détecter les erreurs suivantes : pile faible dans le panneau Erreur de l'alimentation AC Détecteur hors service Détecteur pile faible Sabotage d'un dispositif ou du panneau Détection d'interférence Carte SIM manquante Problème de signal GSM Si le panneau détecte une erreur, l'écran affichera un message. Erreurs possibles Panneau de contrôle Alimentation Détecteur de mouvement Contact de porte/fenêtre Détecteur pile faible Détecteur hors service Interférence carte SIM manquante problème de signal GSM L'interrupteur anti-sabotage empêche l'enlèvement de l'appareil de son support de montage. L'interrupteur anti-sabotage empêche l'ouverture ou l'enlèvement du couvercle de l'alimentation. L'interrupteur anti-sabotage empêche l'ouverture du boîtier. L'interrupteur anti-sabotage arrière empêche l'enlèvement de l'appareil. L'interrupteur anti-sabotage empêche l'ouverture ou l'enlèvement de l'appareil. Le panneau détecte la pile faible pour le détecteur de mouvement, le contact de porte/fenêtre, le clavier de commande, la sonde de niveau d'eau et la télécommande. Les détecteurs de mouvement, contact de porte/fenêtre et la sonde de niveau d'eau transmettent des signaux au panneau à intervalles de 30 à 50 minutes. Le système enverra un rapport si le dispositif n'émet plus de signal de supervision. Si le panneau ne reçoit pas le signal de contrôle de l'appareil (voir "Supervision" dans 8 "Special Settings"), le panneau émet une alarme et la LED jaune s'allume et un message d'erreur s'affiche à l'écran (dans le menu "Fault Display"). Le panneau peut détecter des interférences sur la fréquence 868 MHz. Si un signal d'interférence dure plus de 30 secondes, un événement d'interférence peut être enregistré dans le journal et s'affiche à l'écran (dans le menu "Fault Display"). Si la carte SIM manque, le système affiche un message. En cas de problème de signal, changer la position du panneau pour améliorer la réception. Affichage des messages d'erreur Si une erreur persiste, le panneau répondra comme ci-dessous quand il est désarmé : V /02/ Velleman nv
106 La LED jaune s'allume pour indiquer l'erreur CTC1000 L'écran affiche le type d'erreur et sa la source de l'erreur dans le menu "Fault Display" du menu utilisateur. Un avertissement retentira toutes les 30 secondes. Si une erreur est détectée alors que le système est entièrement armé, l'erreur ne sera pas affichée tant que le système n'a pas été désarmé. Effacer les messages d'erreur La LED jaune s'éteint automatiquement une fois que toutes les erreurs sont corrigées, ou que les appareils concernés ont été supprimés du système. L'écran ne peut être effacé manuellement. L'affichage du message d'erreur reste même si les erreurs ont été corrigées. Le message d'erreur ne peut être effacé manuellement qu'après que l'erreur a été corrigée. Visualiser/effacer le message d'erreur Pour consulter l'erreur, si le système est désarmé. 1. Taper votre code d'accès et appuyer sur OK. 2. L'écran affiche Fault Dsp Arm avec le curseur en regard de l'option "Fault Dsp". 3. Appuyer sur OK pour sélectionner "Fault Dsp". Toutes les erreurs sont affichées. 4. Utiliser les touches & pour déplacer le curseur. 5. Après avoir visualisé toutes les erreurs, appuyer sur la touche. L'écran affichera. Clear Fault Dsp (OK?) 6. Si l'erreur a été corrigée, appuyer sur OK. L'erreur sera effacée et l'écran retourne en mode "Alarm Off". Remarques Si l'erreur n'a pas été corrigée, l'écran ne sera pas effacé. Elle apparaîtra à nouveau en essayant d'armer le système et que l'erreur en empêche l'armement. Le message d'erreur peut être effacé seulement après que l'erreur a été corrigée. Même si le message d'erreur est effacé, l'erreur sera maintenue dans le journal Réponses aux erreurs Quand une erreur est détectée, en plus de l'affichage de l'erreur, le panneau de contrôle répondra également en fonction de la nature de l'événement. Sauf pour les alarmes de sabotage, le panneau et les sirènes extérieures n'émettront pas de sirène audible pour l'erreur. Dans tous les modes, quand une panne de courant ou une erreur de sabotage se produit, le panneau transmet les rapports d'erreurs par SMS. Pour toute autre erreur, le panneau n'enverra pas de rapport SMS. erreur de l'alimentation AC La LED jaune s'allume et le message d'erreur sera affiché. Le panneau signale l'erreur par SMS au premier numéro de téléphone dans tous les modes et ce dans un délai de 15 à 30 minutes. Une fois l'alimentation rétablie, le panneau signalera également l'événement de correction par SMS au premier numéro de téléphone dans les 15 à 30 minutes. pile faible dans le panneau Dès que le système détecte une pile faible sur le panneau, la LED jaune s'allume et le panneau affichera un message d'erreur sous la fonction "Fault Display". Lorsque le panneau est alimenté par un adaptateur secteur, le panneau est incapable de détecter une batterie faible. détecteur pile faible Si le système détecte une pile faible sur un détecteur, la LED V /02/ Velleman nv
107 jaune s'allume. Le message d'erreur peut être visualisé sous l'option "Fault Display" dans le menu d'utilisateur. sabotage du panneau Si l'interrupteur anti-sabotage sur le panneau est déclenché, la LED jaune s'allume. Le message d'erreur peut être visualisé sous l'option "Fault Display" dans le menu d'utilisateur. De plus, quel que soit le mode de fonctionnement, le panneau signalera l'erreur via SMS au premier numéro de téléphone. sabotage du détecteur En cas d'activation de l'interrupteur anti-sabotage sur un détecteur de mouvement ou contact de porte/fenêtre, sur un clavier à distance ou sur la sirène extérieure, la LED jaune s'allume. Le message d'erreur peut être visualisé sous l'option "Fault Display" dans le menu d'utilisateur. De plus, quel que soit le mode de fonctionnement, le panneau signalera l'erreur via SMS au premier numéro de téléphone. La sirène retentira en cas de sabotage selon le réglage de l'alarme anti-sabotage (voir "Alarme anti-sabotage" dans 8). détecteur en panne Lorsque le panneau n'a pas reçu le signal de contrôle de chaque détecteur de mouvement ou contact de porte/fenêtre, etc. pour une période (en fonction du réglage de Supervision), la LED sur le panneau jaune s'allume et un message d'erreur peut être consulté sur LCD sous "Fault Display". Aucun incident ne sera rapporté. interférence Si la détection d'interférence est mise sur ON et qu'il y a une interférence pendant 30 secondes, la LED jaune s'allume. Le message d'erreur peut être visualisé sous "Fault Display" dans le menu d'utilisateur Messages d'erreur Le message est affiché comme suit : Message affiché AC failure GSM Signal Interférence Panel L.B. Panel Tamper (détecteur avec nom de zone) + L.B. (détecteur avec nom de zone) + out (détecteur avec nom de zone) + Tamper Sim Card? Signification erreur de l'alimentation AC problème de signal GSM interférence détectée pile faible sur le panneau sabotage du panneau pile faible sur le détecteur détecteur en panne sabotage sur un détecteur carte SIM manquante Exemple : le message DC Z 01 L.B. signifie que le contact de porte/fenêtre de la zone 1 a une pile faible. Remarque Durant l'armement du système, et si un contact de porte/fenêtre ou détecteur de mouvement est déclenché, l'armement est également interdit et le capteur déclenché sera affiché comme message d'erreur. Message affiché (DC avec nom de zone) + open (IR avec nom de zone) + Active Signification Contact de porte/fenêtre déclenché Détecteur de mouvement déclenché 15. Commande à distance via SMS Il est possible de contrôler le système à l'aide de commandes envoyées par SMS. Mettre la langue de votre téléphone sur Anglais avant de continuer. V /02/ Velleman nv
108 Commandes à distance SMS Commande DTMF Action 00 raccrocher avec confirmation 10 disarm 11 armer 20 récepteur universel#1 désactivé 21 récepteur universel#1 activé 30 récepteur universel#2 désactivé 31 récepteur universel#2 activé Pour commande DTMF à 2 chiffres Envoyer un message sms mettant le panneau en mode Armé avec envoi d'une confirmation à votre téléphone portable. Le format est : MICHAEL (avec espaces) MICHAEL SMS Keyword [mot-clé SMS] 2222 Code utilisateur choisi 11 commande DTMF 00 pour recevoir un message de confirmation Message de confirmation Sur votre téléphone, le message de confirmation s'affiche comme suit : Confirmed MICHAEL USER1 Arm Envoyer un message SMS mettant le panneau en mode "Arm" sans envoi d'une confirmation à votre téléphone portable. Le format est 9999 SMS Keyword [mot-clé SMS] 5678 Code utilisateur choisi 11 commande DTMF Le système va automatiquement filtrer tous les SMS entrants à la recherche des mots-clés SMS et ignore et supprime automatiquement tout SMS qui ne contient pas le mot-clé. Pour toute commande transmise avec mot-clé et code d'accès corrects, le système effectue immédiatement la ou les commandes contenues et supprimer le message SMS par la suite. 16. Initialisation du système L'initialisation du panneau implique que tous les paramètres (y compris les codes d'accès) seront remis à leur valeur par défaut. Il faut redéfinir tous les paramètres et ajouter tous les dispositifs. Pour effacer tous les paramètres définis, taper la séquence suivante sur le panneau : 1. Enlever l'alimentation et la pile interne. 2. Connecter le courant tout en maintenant la touche enfoncée. 3. Lâcher la touche dès que le système émet un son. Le panneau affiche le texte Enter Code. 4. Taper la séquence suivante :, touche OK 5. Appuyer sur OK. En cas de code incorrect, le panneau retourne au mode "Alarm On". V /02/ Velleman nv
109 17. Saisie de texte Il est possible d'utiliser le clavier pour saisir des noms d'utilisateurs, noms de zones, textes SMS, etc. Appuyer autant de fois qu'il le faut sur la touche jusqu'à ce que la lettre concernée apparaisse. Lâcher la touche, le curseur passe automatiquement sur la position suivante. 18. Spécifications techniques alimentation Vca/50-60 Hz - 12 Vcc 500 ma (adaptateur incl.) pile de secours pile Ni-Mh rechargeable, 7.2 V mah (incl.) autonomie pile de secours ± 8 heures niveau sonore ± 104 1m fréquence MHz température de service -10 à +45 C taux d'humidité jusqu'à 90%, sans condensation dimensions 185 x 120 x 26 mm poids 420 g N employer cet appareil qu avec des accessoires d origine. La SA Velleman ne peut, dans la mesure conforme au droit applicable être tenue responsable des dommages ou lésions (directs ou indirects) pouvant résulter de l utilisation de cet appareil. Pour plus d information concernant cet article et la dernière version de cette notice, visiter notre site web Les spécifications et le contenu de cette notice peuvent être modifiés sans avis préalable. DROITS D AUTEUR SA Velleman est l ayant droit des droits d auteur pour cette notice. Tous droits mondiaux réservés. Toute reproduction, traduction, copie ou diffusion, intégrale ou partielle, du contenu de cette notice par quelque procédé ou sur tout support électronique que ce soit est interdite sans l accord préalable écrit de l ayant droit. V /02/ Velleman nv
110 MANUAL DEL USUARIO 1. Introducción A los ciudadanos de la Unión Europea Importantes informaciones sobre el medio ambiente concerniente a este producto Este símbolo en este aparato o el embalaje indica que, si tira las muestras inservibles, podrían dañar el medio ambiente. No tire este aparato (ni las pilas, si las hubiera) en la basura doméstica; debe ir a una empresa especializada en reciclaje. Devuelva este aparato a su distribuidor o a la unidad de reciclaje local. Respete las leyes locales en relación con el medio ambiente. Si tiene dudas, contacte con las autoridades locales para residuos. Gracias por elegir Velleman! Lea atentamente las instrucciones del manual antes de usar el aparato. Si ha sufrido algún daño en el transporte no lo instale y póngase en contacto con su distribuidor. incluye Panel de control Adaptador de red pila Ni-Mh recargable Opcional sensor de movimento PIR (referencia CTC1000PIR) contacto de puerta/ventana (referencia CTC1000DS) teclado de control (referencia CTC1000KP) mando a distancia (referencia CTC1000RC) detector de agua (referencia CTC1000WS) alarma exterior (referencia CTC1000SO) sirena inalámbrica (referencia CTC1000SI) 2. Instrucciones de seguridad Mantenga el aparato lejos del alcance de personas no capacitadas y niños. Utilice el aparato sólo en interiores. No exponga este equipo a lluvia, humedad ni a ningún tipo de salpicadura o goteo. Desconecte el aparato de la red eléctrica antes de abrir la tapa. Cuidado durante la instalación: puede sufrir una peligrosa descarga eléctrica al tocar un cable conectado a la red eléctrica. Los daños causados por descuido de las instrucciones de seguridad de este manual invalidarán su garantía y su distribuidor no será responsable de ningún daño u otros problemas resultantes. No exponga este equipo a ningún tipo de salpicadura o goteo. Los daños causados por modificaciones no autorizadas, no están cubiertos por la garantía. Este sistema protege su casa y sus posesiones de manera muy eficaz si lo utiliza correctamente. Sin embargo, no garantiza una protección completa contra robos. Por tanto, VELLEMAN nv no será responsable de daños o pérdidas causados durante un robo. 3. Normas generales Véase la Garantía de servicio y calidad Velleman al final de este manual del usuario. La instalación debe ser realizada por un técnico cualificado. Respete las leyes locales al instalar este sistema. Si fuera necesario, contacte con las autoridades locales. No agite el aparato. Evite usar excesiva fuerza durante el manejo y la instalación. No exponga el aparato a temperaturas extremas, polvo y humedad. Familiarícese con el funcionamiento del aparato antes de utilizarlo. V /02/ Velleman nv
111 Por razones de seguridad, las modificaciones no autorizadas del aparato están prohibidas. El usuario no habrá de efectuar el mantenimiento de ninguna pieza salvo la batería. Utilice sólo el aparato para las aplicaciones descritas en este manual. Su uso incorrecto anula la garantía completamente. 4. Características panel de control inalámbrico de 30 zonas con módulo GSM incorporado mensajes SMS 4 mensajes preprogramados: robo, emergencia, incendio, asistencia médica función 'listen in': es posible oír lo que pasa editor de SMS: 14 caracteres x 14 líneas = 56 caracteres es posible controlar el sistema con SMS, esté donde esté pantalla LCD: retroiluminación, 16 x 2 caracteres es posible editar y dar un nombre a cada una de las 30 zonas emisor incorporado para activar la alarma exterior o la sirena inalámbrica función 'Home': protección completa si está en casa sin que se active la alarma vigilancia completa no es posible activar la alarma mientras esté abierta la puerta detección de errores y visualización contacto antisabotaje: es imposible abrir la carcasa o desmontarla 5. Descripción Véase las figuras en la página 2 de este manual del usuario. 1 pantalla 2 teclado 3 zumbador 4 LED amarillo - on: se ha detectado un error - off: no hay errores, el panel de control panel está en el modo de funcionamiento normal 5 micrófono 6 LED verde - on: El aparato está conectado a la red eléctrica - off: interrupción del suministro eléctrico 7 letras y dígitos 8 #: entrar en el modo de programación 9 OK: confirmar el dato o la selección 10 Cancelar: se utiliza en el modo de programación: cancelar la selección, volver a la pantalla anterior, etc. 11 teclas de flecha: se utiliza en el modo de programación: desplaza el cursor hacia arriba y hacia abajo para seleccionar una opción 12 2 agujeros de montaje y el interruptor de manipulación 13 conector DC 14 interruptor de batería 15 compartimento de la tarjeta SIM 6. Instalación 6.1 tarjeta SIM (opcional) Introduzca una tarjeta SIM si quiere que el panel de control envíe informes de alarma a su teléfono móvil (máx. seis números). V /02/ Velleman nv
112 Antes de empezar CTC1000 Pruebe el formato del código de país utilizado por su operador de telefonía móvil antes de introducir la tarjeta SIM y antes de instalar el panel de control. Véase la sección Country Code en capítulo 10. Utilice su teléfono móvil para borrar el código PIN de la tarjeta SIM. Introducir la tarjeta SIM El compartimento de la tarjeta SIM está en la parte trasera del aparato. Para introducir la tarjeta SIM: 1. Desatornille el tornillo del compartimento de la tarjeta SIM. 2. Deslice la bandeja hacia la derecha para abrirla (OPEN). 3. Abra la bandeja e introduzca la tarjeta SIM. 4. Deslice la bandeja hacia la izquierda para cerrarla (CLOSE) 5. Vuelva a cerrar el compartimento con el tornillo. 6.2 Alimentación Conecte el aparato a la red eléctrica con el adaptador de red AC incluido. Para evitar daños, utilice siempre un adaptador de red AC adecuado (véase «Especificaciones»). Batería recargable La batería recargable (incl., véase «Especificaciones») incorporada sirve de batería de repuesto en caso de interrupción del suministro eléctrico. El adaptador de red AC no sólo sirve para alimentar el panel de control sino también para recargar la batería durante un funcionamiento normal. El aparato tiene una autonomía de mín. 8 horas si la batería está completamente cargada. La batería tarda aproximadamente 48 horas en cargarse completamente. ADVERTENCIA Nunca perfore las pilas y no las eche al fuego (peligro de explosión). Mantenga las pilas lejos del alcance de niños. Pantalla retroiluminada El aparato está equipado con una pantalla LCD retroiluminada para un fácil uso a oscuras. Sin embargo, la retroiluminación no funciona en caso de interrupción del suministro eléctrico y para ahorrar la batería. 6.3 Montar el panel de control Seleccionar un lugar de montaje adecuado: requisitos Tenga en cuenta los siguientes requisitos al seleccionar un lugar de montaje. El aparato requiere una conexión a la red eléctrica. Asegúrese de que pueda acceder fácilmente al panel de control. No instale el aparato en un lugar húmedo (cuarto de baño...). No instale el aparato cerca de una fuente de calor. No instale el aparato cerca de aparatos que emiten señales de radio (p.ej. teléfono móvil, teléfono inalámbrico, aparatos que funcionan con la red inalámbrica (Wi-Fi)). Montar el panel de control Es posible fijar el aparato a la pared o en cualquier lugar. Instale el aparato aproximadamente a la altura del pecho para poder manejar y ver el teclado y la pantalla fácilmente. 1. Utilice los dos agujeros del soporte de pared para marcar la posición de los agujeros. 2. Taladre dos agujeros y utilice los tacos incluidos si quiere fijar el aparato a una pared de yeso o de ladrillos.. 3. Fije la base a la pared. 4. Introduzca el conector del adaptador de red en la conexión de alimentación antes de fijar el panel de control a la pared. 5. Fije el panel de control al soporte de pared (con la parte frontal hacia usted). 6.4 Contraseñas de dos niveles El panel de control está equipado con dos niveles de autorización para garantizar una seguridad máxima. Es obligatorio entrar tanto el código PIN como el código maestro para programar el sistema. V /02/ Velleman nv
113 Introduzca su código PIN de usuario si el panel de control visualiza ENTER CODE o P-CODE. Introduzca su código maestro si el panel de control visualiza M-CODE. Para más información sobre el código PIN, véase 7.4 Pin code. Para más información sobre el código maestro, véase 7.7 Master Code. 6.5 Primer uso Después de haber seleccionado un lugar de montaje adecuado: 1. Conecte el aparato a la red eléctrica. El aparato emite un tono largo. «Alarm On» se visualiza en la primera línea y 00:01 01 Jan se visualiza en la segunda línea de la pantalla para indicar que el sistema está en el modo «Away» (modo por defecto). 2. Pulse el botón con el número «1». 3. Introduzca el código PIN para el usuario 1 (código por defecto: 1234) dentro de los 30 segundos. Pulse para borrar el código. 4. Pulse el botón OK (dentro de los 30 segundos). El aparato emitirá 2 tonos cortos y la pantalla visualizará: Ahora, el aparato está en el modo «alarm off» (alarma desactivado). 5. Espere unos 2 ó 3 minutos hasta que se visualice el estado. Hay un error si el LED amarillo se ilumina. Véase 14 para más información. Observaciones El panel de control está equipado con la función «salvapantallas». El mensaje «alarm off» se visualiza unos 180 segundos. Luego, la pantalla visualizará sólo la fecha y la hora actuales. 7. Configuración Entrar en el modo de programación: 1. Asegúrese de que la alarma esté desactivada (véase 11.4). 2. Pulse el botón #. La pantalla visualiza: 3. Introduzca 1234 (código PIN por defecto para usuario 1) dentro de los 30 segundos y pulse OK. La pantalla visualiza: 4. Introduzca 1111 (código maestro por defecto) dentro de los 30 segundos y pulse OK. Durante 2 segundos, la pantalla visualiza: 5. Luego, se visualiza el menú de programación: Cambie el código PIN de usuario 1 y el código maestro antes del primer uso. Cursor El cursor es el punto intermitente de la esquina superior izquierda. Utilice la tecla y para desplazar el cursor. Pulse OK para confirmar V /02/ Velleman nv
114 El menú de programación incluye las siguientes opciones: Observaciones El símbolo V indica que puede desplazarse hacia abajo. Este símbolo desaparece al llegar al final de la lista. El símbolo Λ indica que puede desplazarse hacia arriba. Este símbolo desaparece al llegar al principio de la lista. Pulse el botón de cancelar para volver a la pantalla «Alarm Off». En el modo de programación: el panel de control vuelve automáticamente al modo «Alarm Off» si no se pulsa ninguna tecla dentro de los 5 minutos. 7.2 Tel. Setting En el menú «Tel. Setting», puede añadir, modificar o borrar los números de teléfono. El panel de control utiliza estos números para informar sobre eventos. Es posible añadir hasta 6 números. Observaciones La pantalla sólo visualiza los primeros 11 dígitos de un número. Los números se visualizan por orden de prioridad. El sistema marca los números de teléfono por este orden. El sistema llama al segundo número de la lista si el primer número no contesta. Añadir un número de teléfono 1. Entre en el modo de programación y seleccione «Tel. Setting». Los números de teléfono se visualizan en la pantalla. La lista no incluye ningún número después de la primera puesta en marcha. 2. Utilice las teclas de flecha para seleccionar la letra a la que quiere atribuir un número (de A a F) y pulse OK. 3. Introduzca el número de teléfono y pulse OK. o El número puede contener hasta 20 dígitos y caracteres * & #. o El botón sirve de tecla de retroceso al introducir un número. Modificar un número de teléfono 1. Entre en el modo de programación y seleccione «Tel. Setting». Los números de teléfono se visualizan en la pantalla. V /02/ Velleman nv
115 2. Utilice las teclas de flecha para seleccionar el número que quiere cambiar y pulse OK. El número de teléfono está modificado. 3. Introduzca el número de teléfono y pulse OK. o El número puede contener hasta 20 dígitos y caracteres * & #. o El botón sirve de tecla de retroceso al introducir un número. Borrar un número de teléfono 1. Entre en el modo de programación y seleccione «Tel. Setting». Los números de teléfono se visualizan en la pantalla. 2. Utilice las teclas de flecha para seleccionar el número que quiere borrar y pulse OK. 3. Vuelva a pulsar OK. El número de teléfono se borra. 7.3 General settings (configuración general) Para entrar en el menú: Entre en el modo de programación y seleccione «Gen. Settings». Opciones: 7.4 Pin code (código PIN) Uso Con este código puede armar y desarmar el sistema. Valor por defecto Con este código (y el código maestro) puede entrar en el modo de programación. Usuario 1: 1234 Características 4 dígitos Usuario de 2 a 4: No aplicable obligatorio No es posible borrar el código de usuario 1. Se restablecen los ajustes de fábrica al restablecer el sistema (Véase «Reinicializar el sistema») Asegúrese de que el código PIN no coincida con el código maestro. V /02/ Velleman nv
116 Introducir un código PIN CTC Para entrar en el menú: Entre en el modo de programación. Diríjase a «Gen. Settings», seleccione «Pin Code» y pulse OK. 2. Introduzca el número de código deseado con las teclas de flecha y pulse OK. 3. Introduzca un código de 4 dígitos y pulse OK 4. Repita el código y pulse OK. 5. (opcional) Introduzca un nombre para el código. o Este nombre se visualiza en la lista de códigos PIN y le ayuda a identificar el código. o Para más información, véase 17 «Introducir un texto». o Si no quiere utilizar un nombre, deje este campo en blanco. 6. Pulse OK. Observaciones En la lista de códigos: Un código PIN sin nombre se visualiza como **** Un código PIN que todavía no ha sido determinado se visualiza como Modificar el código PIN 1. Para entrar en el menú: Entre en el modo de programación. Diríjase a «Gen. Settings», seleccione «Pin Code» y pulse OK. 2. Seleccione el código que quiere cambiar y pulse OK 3. Pulse. 4. Véase arriba To set a pin code «Introducir un código PIN». V /02/ Velleman nv
117 Borrar un código PIN CTC1000 No es posible borrar el código PIN 1. Para borrar otro código: 1. Para entrar en el menú: Entre en el modo de programación. Diríjase a «Gen. Settings», seleccione «Pin Code» y pulse OK. 2. Seleccione el código que quiere borrar y pulse OK 3. Vuelva a pulsar OK. 7.5 Temp. Code (código temporal) Uso Un usuario temporal puede armar y desarmar el sistema con este código. Valor por defecto Se puede utilizar sólo una vez para activar o desactivar la alarma. Este código se borra automáticamente después de haberlo utilizado una vez. Si fuera necesario, debe volver a introducir un código. No aplicable Características 4 dígitos Opcional Se borra al reinicializar el sistema (véase «Reinicializar el sistema») Introducir un código temporal 1. Para entrar en el menú: Entre en el modo de programación. Diríjase a «Gen. Settings», seleccione «Temp. Code» y pulse OK. 2. Introduzca un código de 4 dígitos y pulse OK 3. Repita el código y pulse OK. 4. Active o desactive la opción «Latch Rpt» (latch key reporting). o Esta opción sólo se puede ver si la opción «Latch Rpt» está activada (véase «Special Settings»). véase «Latch option» en 8 «Special Settings». 5. Pulse OK. Cambiar un código temporal 1. Para entrar en el menú: Entre en el modo de programación. Diríjase a «Gen. Settings», seleccione «Temp. Code» y pulse OK. V /02/ Velleman nv
118 2. Pulse. 3. Véase arriba «Introducir un código temporal» Borrar un código temporal 1. Para entrar en el menú: Entre en el modo de programación. Diríjase a «Gen. Settings», seleccione «Temp. Code» y pulse OK. 2. Vuelva a pulsar OK. 7.6 Duress Code (código de coacción) Uso Con este código puede armar o desarmar el sistema. Valor por defecto Una alarma silenciosa se activa al introducir el código de coacción y el sistema envía un mensaje a los teléfonos móviles programados. Después de haber introducido el código de coacción no suena una sirena. No aplicable Características 4 dígitos Opcional Se borra al reinicializar el sistema (véase «Reinicializar el sistema») Introducir un código de coacción 1. Para entrar en el menú: Entre en el modo de programación. Diríjase a «Gen. Settings», seleccione «Duress Code» y pulse OK. 2. Introduzca un código de 4 dígitos y pulse OK 3. Repita el código y pulse OK. Modificar un código de coacción 1. Para entrar en el menú: Entre en el modo de programación. Diríjase a «Gen. Settings», seleccione «Duress Code» y pulse OK. 2. Pulse. 3. Introduzca un código de 4 dígitos y pulse OK 4. Repita el código y pulse OK. Borrar un código de coacción 1. Para entrar en el menú: Entre en el modo de programación. Diríjase a «Gen. Settings», seleccione «Duress Code» y pulse OK. 2. Vuelva a pulsar OK. V /02/ Velleman nv
119 7.7 Master Code (código maestro) Uso Es obligatorio tanto el código PIN como el código maestro para entrar en el modo de programación. Valor por defecto 1111 Características 4 dígitos obligatorio No es posible borrar el código maestro. Se restablecen los ajustes de fábrica al restablecer el sistema (Véase «Reinicializar el sistema») Asegúrese de que el código maestro no coincida con el código PIN. Introducir un código maestro 1. Para entrar en el menú: Entre en el modo de programación. Diríjase a «Gen. Settings», seleccione «Master Code» y pulse OK. 2. Introduzca un código de 4 dígitos y pulse OK 3. Repita el código y pulse OK. Modificar un código maestro 1. Para entrar en el menú: Entre en el modo de programación. Diríjase a «Gen. Settings», seleccione «Master Code» y pulse OK. 2. Pulse. 3. Introduzca un código de 4 dígitos y pulse OK 4. Repita el código y pulse OK. Borrar un código maestro 1. Para entrar en el menú: Entre en el modo de programación. Diríjase a «Gen. Settings», seleccione «Master Code» y pulse OK. 2. Vuelva a pulsar OK. 7.8 A. Entry Time Con la función «A. Entry Time» (away entry time) puede ajustar el intervalo de tiempo que tiene para introducir el código PIN después de haber entrado en la casa. Prerrequisitos: Estado de la alarma: away Aparato conectado: El contacto de puerta o el detector PIR está en el modo «Entry» o «Away Entry» (véase 9.3). Acción: La cuenta atrás se inicia en cuanto el contacto de puerta o el detector PIR esté activado. El panel de control activa la alarma y envía un mensaje al no introducir el código PIN correcto dentro del tiempo programado. Opciones disponibles: «Disable» (la alarma se activa inmediatamente sin temporización) y temporizaciones entre 10 y 70 segundos. Valor por defecto: 20 segundos. Para acceder al menú: Entre en el modo de programación. Diríjase a «Gen. Settings», seleccione «A. Entry Time» y pulse OK. 7.9 A. Exit Time V /02/ Velleman nv
120 Con la opción «A. Exit Time» (away exit time) puede ajustar el intervalo de tiempo que tiene para salir después de haber activado el modo «away». Prerrequisitos: Estado de la alarma: es posible ajustar el modo «away» con el panel de control, un mando a distancia o un teclado de control remoto. Acción: La cuenta atrás se inicia en cuanto ponga la alarma en el modo «away» con el panel de control, un mando a distancia o un teclado de control remoto. Opciones disponibles: «Disable» (la alarma se activa inmediatamente sin temporización) y temporizaciones entre 10 y 70 segundos. Valor por defecto: 20 segundos. Para acceder al menú: Entre en el modo de programación. Diríjase a «Gen. Settings», seleccione «A. Exit Time» y pulse OK. Observaciones Pulsando el botón para activar la alarma del mando a distancia se reinicia el temporizador. Pulsando el botón para desactivar la alarma del mando a distancia se para el temporizador y se desactiva la alarma. Entrando un código PIN en el panel de control se para el temporizador y se desactiva la alarma H. Entry Time (tiempo para entrar) Con la opción H. Entry Time (home entry time) puede ajustar el intervalo de tiempo que tiene para entrar en la casa si el sistema está en el modo «Home». Prerrequisitos: Estado de la alarma: modo «home» Aparato conectado: El contacto de puerta o el detector PIR está en el modo «Entry» o «Home Access» (véase 9.3). Acción: La cuenta atrás se inicia en cuanto el contacto de puerta o el detector PIR esté activado. El panel de control activa la alarma y envía un mensaje al no introducir el código PIN correcto dentro del tiempo programado. Opciones disponibles: «Disable» (la alarma se activa inmediatamente sin temporización) y temporizaciones entre 10 y 70 segundos. Valor por defecto: 20 segundos. Para acceder al menú: Entre en el modo de programación. Diríjase a «Gen. Settings», seleccione «H. Entry Time» y pulse OK H. Exit Time (tiempo para salir) Con la opción A H. Exit Time (home exit time) puede ajustar el intervalo de tiempo que tiene para salir de la casa si el sistema está en el modo «Home». Prerrequisitos: Estado de la alarma: es posible ajustar el modo «away» con el panel de control, un mando a distancia o un teclado de control remoto. Acción: La cuenta atrás se inicia en cuanto ponga la alarma en el modo «away» con el panel de control, un mando a distancia o un teclado de control remoto. Opciones disponibles: «Disable» (la alarma se activa inmediatamente sin temporización) y temporizaciones entre 10 y 70 segundos. Valor por defecto: 20 segundos. Para acceder al menú: Entre en el modo de programación. Diríjase a «Gen. Settings», seleccione «H. Eixt Time» y pulse OK. Observaciones El temporizador se reinicia al pulsar el botón «Home» del mando a distancia. V /02/ Velleman nv
121 Pulsando el botón para desactivar la alarma del mando a distancia se para el temporizador y se desactiva la alarma. Entrando un código PIN en el panel de control se para el temporizador y se desactiva la alarma Door Chime (timbre) Con la opción «Door Chime» puede activar o desactivar el timbre en cuanto el contacto de puerta o el detector PIR esté activado en el modo «alarm off». Prerrequisitos: Estado de la alarma: off Aparato conectado: El contacto de puerta o el detector PIR está en el modo «Entry» o «Away Entry» (véase 9.3). Acción: El timbre se activa en cuanto el contacto de puerta o el detector PIR esté activado en el modo «alarm off». Valor por defecto: off. Para acceder al menú: Entre en el modo de programación. Diríjase a «Gen. Settings», seleccione «Door Chime» y pulse OK Time (hora) La opción «Time» le permite ajustar la hora actual. 1. Para acceder al menú: Entre en el modo de programación. Diríjase a «Gen. Settings», seleccione «Time» y pulse OK. 2. Utilice las teclas de flecha para introducir las horas y pulse OK. 3. Utilice las teclas de flecha para introducir los minutos y pulse OK Date (fecha) La opción «Date» le permite ajustar la fecha actual. 1. Para acceder al menú: Entre en el modo de programación. Diríjase a «Gen. Settings», seleccione «Date» y pulse OK. 2. Utilice las teclas de flecha para introducir el mes y pulse OK. 3. Utilice las teclas de flecha para introducir el día y pulse OK Panel Siren (sirena del panel de control) La opción «Panel Siren» le permite activar o desactivar la sirena del panel de control en caso de alarma. 1. Para acceder al menú: Entre en el modo de programación. Diríjase a «Gen. Settings», seleccione «Panel Siren» y pulse OK. 2. Utilice las teclas de flecha para seleccionar la opción y pulse OK. 8. Spc. Settings (Ajustes especiales) Para acceder al menú: Entre en el modo de programación y diríjase a «Spc. Settings». V /02/ Velleman nv
122 Alarm Length (duración de la alarma) Con esta opción puede ajustar la duración de la sirena incorporada en caso de alarma. Opciones disponibles: «Disable» (sirena desactivada) y de 1 a 15 minutos. Valor por defecto: 3 minutos Observaciones En caso de alarma, la sirena del panel de control y las sirenas interiores y exteriores no sonarán si se ha seleccionado la opción «Disable». La sirena del panel de control tiene prioridad sobre la sirena exterior aunque haya seleccionado una duración de activación más larga para la sirena exterior. Por ejemplo, la sirena exterior y la sirena del panel de control sonarían durante 1 minuto aunque se hubiera puesto la sirena exterior en 3 minutos. Sin embargo, el LED seguiría parpadeando durante tres minutos. A. Exit Sound (=away exit sound) Para activar o desactivar el tono de cuenta atrás del temporizador de salida (away exit timer). A. Entry Sound (=away entry sound) Para activar o desactivar el tono de cuenta atrás del temporizador de entrada (away entry timer). H. Exit Sound (=home exit sound) Para activar o desactivar el tono de cuenta atrás si sale de la casa en el modo «Home». V /02/ Velleman nv
123 H. Entry Sound (=home entry sound) Para activar o desactivar el tono de cuenta atrás si entra en la casa en el modo «Home». Siren Delay Con esta opción puede ajustar la duración de temporización o supresión de alarmas sonoras en caso de alarma. Opciones disponibles: Off (sonido desactivado) y de 1 a 10 minutes. Valor por defecto: Off. Observaciones Esta opción sólo vale para alarmas de entrada o alarmas de robo. La temporización no vale para: o Alarma de incendio o Alarma de agua o Alarma de pánico o Alarma de emergencia médica o Alarma de manipulación o Fallo GSM El sistema enviará inmediatamente un mensaje, incluso si la señal acústica está temporizada. Verification Para activar o desactivar la verificación secuencial. Verificación secuencial activada Si la verificación secuencial está activada y Si varios sensores (contacto de puerta o detector PIR) están en el modo «Burglar» (robo): o o El panel de control envía un mensaje SMS con «Burglar» (robo) al activarse el primer sensor. El panel de control envía un mensaje SMS con «Alarm confirm» (alarma confirmada) al activarse el segundo sensor dentro de los 30 minutos. Verificación secuencial desactivada El panel de control envía sólo un mensaje SMS con «Burglar» (robo) si la verificación secuencial está desactivada. Final Door Si la opción «Final Door» está activada y si el sistema de alarma está en el modo «Away» y si un contacto de puerta está en el modo «Entry» V /02/ Velleman nv
124 La alarma se activa automáticamente en cuanto se cierre el contacto de puerta, incluso si todavía no se ha terminado la cuenta atrás. Interference Con esta función puede activar o desactivar la detección de interferencias. La detección de interferencias está activada: El error se registra y una advertencia aparece en la pantalla LCD si el panel de control detecta interferencias de más de 30 segundos. La detección de interferencias está desactivada: el panel de control no detecta interferencias. RC Ent E (= remote controller entry enabled) Esta función impide que se pueda desactivar la alarma con un mando a distancia (p.ej. si ha sido robado) sin abrir antes alguna puerta. Acceder a esta función: Para mayor seguridad, no es posible desarmar el sistema de alarma con un mando a distancia sin abrir antes alguna puerta La opción «RC Ent E» está desactivada: Es posible desarmar el sistema de alarma con un mando a distancia sin abrir antes alguna puerta. Mobility Con esta función puede activar o desactivar el temporizador «Mobility» y ajustar un período de cuenta atrás. Opciones disponibles: «Disable» (desactivar), 4 horas, 8 horas y 12 horas. Si esta función está activada, se inicia la cuenta regresiva preprogramada. El sistema envía un mensaje a los números de teléfono programados si la cuenta regresiva se termina sin reinicialización. Si el temporizador «Mobility» está ajustado con un temporizador específico, el sistema envía un mensaje a los números de teléfono programados si la cuenta regresiva se termina salvo si se ocurre una de las siguientes acciones antes: o En el modo «Home»: Si se activa el modo «Home Omit DC, IR» o si se pulsa uno de los botones del panel de control. o En el modo «Disarm»: Si se activa el modo DC o IR (salvo 24 Hr, Fire, Medical Emergency y Water) o si se pulsa uno de los botones del panel de control. El temporizador se para automáticamente al activar el modo «Away Arm» El temporizador se inicia automáticamente si el modo «Home Arm» o «Disarm» está activado. Interruptor de manipulación Para ajustar la activación de la sirena si alguien está manipulando el sistema. Opción Función Away Arm Only El panel de control sólo activa una alarma local y envía un mensaje si está en el modo «Away» El panel de control envía un mensaje pero la sirena no suena si el sistema está en el modo «Home» o «Alarm off» Normal El panel de control activará una alarma local y enviará un mensaje en todos los modos. V /02/ Velleman nv
125 Observaciones Sea cual sea el ajuste de la sirena, el panel de control enviará un mensaje al primer número de teléfono en todos los modos. El panel de control enviará también un mensaje al primer número de teléfono si se restaura el interruptor de manipulación. Latch Option La función «Latch» registra las acciones (armar/desarmar) de todos los usuarios realizadas tanto en el panel de control como en el mando a distancia. Observaciones Si la función «Latch» está desactivada, no aparece en el menú de programación (véase 7.5 Temp. Code). Si la función «Latch» está activada, todas las acciones (armar/desarmar) de todos los usuarios se registran. Si quiere recibir un mensaje SMS, ponga el primer número de teléfono como informe SMS. Supervision Con esta función puede activar o desactivar la función de supervisión. Si esta función está activada, el panel de control recibirá señales de control de los aparatos conectados para demostrar que funcionan correctamente. Opciones disponibles: «Disable» (desactivar), 8 horas, 12 horas y 24 horas. Warning Beep Con esta opción puede activar o desactivar la señal acústica si el panel de control visualiza un mensaje de error. El tono de aviso se desactive en cuanto haya leído el mensaje de error. GSM band Los ajustes de la banda de frecuencia dependen de los ajustes del operador de telefonía móvil. Es posible que necesite adaptarlos. Contacte con el operador local para los ajustes adecuados. Stop Seleccione Stop y pulse OK para guardar los ajustes y para volver al menú anterior. 9. Manejar aparatos El menú «Devices+/-» permite añadir, configurar, cambiar, borrar aparatos (p.ej. contacto de puerta, sensor PIR, sirena, etc.) en máx. 30 zonas. V /02/ Velleman nv
126 Orden de la instalación La sirena interior y exterior y los receptores universales son dispositivos auxiliares para el sistema. Instale por lo menos un detector o un mando a remoto antes de añadir un dispositivo auxiliar. 9.2 Añadir un dispositivo Acceder a esta función: 1. Entre en el modo de programación. Diríjase a «Devices+/-», seleccione «Add device» y pulse OK. 2. Pulse el botón de prueba en el aparato que quiere añadir. 3. Si el panel de control detecta el aparato, visualizará el tipo. Aparatos: contacto de puerta sensor PIR sensor PIR para exteriores mando a distancia teclado de control detector de agua sirena para exteriores receptor universal 4. Pulse OK para confirmar Luego, el panel de control visualiza las zonas no utilizadas (máx. 30). 5. Seleccione el número de la zona a la que quiere atribuir el aparato y pulse OK. Ahora, el procedimiento puede variar. Esto depende del tipo de aparato que quiere añadir. 6. Seleccione Stop y pulse OK para guardar los ajustes y para volver al menú anterior. Observaciones Un error de mensaje aparece si intenta añadir un sensor que ya ha añadido. V /02/ Velleman nv
127 No obstante, si quiere añadir este aparato, quítelo antes (véase 9.5 Quitar un aparato). Pulse el botón si quiere cancelar el procedimiento. Las pantallas que se visualizan ahora dependen del tipo de dispositivo que quiere añadir. Añadir un contacto de puerta 1. Utilice las teclas de flecha para seleccionar un modo de funcionamiento y pulse OK. Para más información sobre los modos de funcionamiento, véase Introduzca un nombre para la zona. Si no quiere utilizar un nombre, deje este campo en blanco. 3. Pulse OK para confirmar la instalación. 4. Vuelva a pulsar OK para terminar. Añadir un sensor PIR Después de haber atribuido un número de zona (véase 9.2): 1. Utilice las teclas de flecha para seleccionar un modo de funcionamiento y pulse OK. Para más información sobre los modos de funcionamiento, véase Introduzca un nombre para la zona. Si no quiere utilizar un nombre, deje este campo en blanco. 3. Pulse OK para confirmar la instalación. 4. Vuelva a pulsar OK para terminar. Añadir un detector PIR exterior Después de haber atribuido un número de zona (véase 9.2): V /02/ Velleman nv
128 1. Utilice las teclas de flecha para seleccionar un tipo de detector PIR y pulse OK. o Regular: añadir el aparato como detector PIR normal o External: añadir el aparato como detector PIR exterior 2. Utilice las teclas de flecha para seleccionar un modo de funcionamiento y pulse OK. Para más información sobre los modos de funcionamiento, véase Introduzca un nombre para la zona. Si no quiere utilizar un nombre, deje este campo en blanco. Para más información sobre introducir un texto, véase Pulse OK para confirmar la instalación. 5. Vuelva a pulsar OK para terminar. Añadir un mando a distancia Después de haber atribuido un número de zona (véase 9.2): 1. Utilice las teclas de flecha para seleccionar la opción deseada para el mando a distancia. o Personal att (ataque personal): el panel de control activa la alarma al pulsar el botón de pánico durante 3 segundos o dos veces dentro de 3 segundos. o Medical Emg (emergencia médica): El panel de control activa la alarma al pulsar el botón de pánico durante 3 segundos o dos veces dentro de 3 segundos. 2. Utilice las teclas de flecha para seleccionar un modo de funcionamiento y pulse OK. Para más información sobre los modos de funcionamiento, véase Introduzca un nombre para la zona. Si no quiere utilizar un nombre, deje este campo en blanco. Para más información sobre introducir un texto, véase Pulse OK para confirmar la instalación. 5. Vuelva a pulsar OK para terminar. Añadir un teclado remoto o un detector de agua La instalación es similar para todos estos tipos de aparatos. Después de haber atribuido un número de zona (véase 9.2): 1. Introduzca un nombre para la zona. Si no quiere utilizar un nombre, deje este campo en blanco. Para más información sobre introducir un texto, véase 17. V /02/ Velleman nv
129 2. Pulse OK. 3. Vuelva a pulsar OK para terminar. Añadir un dispositivo auxiliar (menú «Program Siren») La sirena interior y exterior y los receptores universales son dispositivos auxiliares para el sistema. Instale por lo menos un detector o un mando a remoto antes de añadir un dispositivo auxiliar. Un mensaje de error se visualiza si no es el caso. 1. Entre en el modo de programación. Diríjase a «Devices+/-», seleccione «Program Siren» y «Learn Siren» y pulse OK. 2. Asegúrese de que el aparato que quiere programar está en el modo de programación (véase el manual del usuario del aparato). 3. Pulse OK. El panel de control emite un tono largo y transmite el código de programación a todos los aparatos simultáneamente. La sirena exterior activa la sirena & la lámpara estroboscópica inmediatamente al recibir el código de programación. El LED del receptor universal se ilumina durante 3 segundos. 9.3 Añadir un aparato: resumen de los modos de funcionamiento El siguiente resumen visualiza los modos posibles para todos los aparatos. Los modos disponibles dependen del tipo de aparato que quiere añadir. Modo Estado del sistema Comportamiento del aparato Burglar Home Omit Home Access Delay (temporización) Entry Si el sistema está en el modo «Away Arm» / «Home Arm» o durante el período de temporización de entrada o salida Si el sistema está en el modo «Away Arm» (modo «away arm entry» incl.) Si el sistema está en el modo «Home Arm» o si un contacto de puerta «home omit» salta durante la temporización de entrada o salida si un contacto de puerta «home omit» se activa si el sistema está en el modo «away arm» si el sistema está en el modo «home arm» durante el período de temporización de entrada o el período de temporización de salida si el sistema está en el modo «Away Arm» / «Home Arm» durante el período de temporización de entrada o el período de temporización de salida si el sistema está en el modo «Away Arm» / «Home Arm» después de que el período de temporización se haya expirado y después de haber introducido un código PIN incorrecto para desarmar el sistema si el sistema está en el modo «alarm OFF» Una alarma de robo se activará inmediatamente si el contacto de puerta de robo salta. Una alarma de robo se activará inmediatamente si el contacto de puerta «Home omit» salta. el panel de control no contestará el panel de control no contestará Una alarma de robo se activa inmediatamente si un contacto de puerta «home access» salta. El panel de control activa un período de temporización de entrada para que tenga suficiente tiempo para desactivar el sistema si un contacto de puerta «home access» salta. el panel de control no contestará si un contacto de puerta «home access» salta Una alarma de robo se activará inmediatamente si el contacto de puerta «delay» salta el panel de control no contestará si un contacto de puerta «delay zone» salta El panel de control activa un período de temporización de entrada para que tenga suficiente tiempo para desactivar el sistema si un contacto de puerta «entry» salta. el panel de control contestará con una alarma de robo después de 30 segundos Oirá «ding-dong» (si está programado) si un contacto de puerta «entry» salta. V /02/ Velleman nv
130 Modo Estado del sistema Comportamiento del aparato Away Entry si el sistema está en el modo «away arm» después de que el período de temporización se haya expirado y después de haber introducido un código PIN incorrecto para desarmar el sistema si el sistema está en el modo «alarm OFF» si el sistema está en el modo «home arm» durante el período de temporización de entrada o el período de temporización de salida El panel de control activa un período de temporización de entrada para que tenga suficiente tiempo para desactivar el sistema si un contacto de puerta «away entry» salta. el panel de control contestará con una alarma de robo después de 30 segundos Oirá «ding-dong» (si está programado) si un contacto de puerta «entry» salta. el panel de control no contestará si un contacto de puerta «away entry» salta el panel de control no contestará si un contacto de puerta «away entry» salta 24 Hour No aplicable Este contacto de puerta (24 horas) se queda activado permanentemente. No es necesario armar o desarmarlo. Fire No aplicable Este contacto de puerta (incendio) se queda activado permanentemente. No es necesario armar o desarmarlo. Medical Emg (urgencia médica No aplicable Este contacto de puerta (emergencia médica) se queda activado permanentemente. No es necesario armar o desarmarlo. Water No aplicable Este contacto de puerta (agua) se queda activado permanentemente. No es necesario armar o desarmarlo. 9.4 Modificar un aparato Esta función varía y depende del tipo de aparato que quiere modificar. Modificar un contacto de puerta un sensor PIR - un mando a distancia Entre en el modo de programación. Diríjase a «Devices+/-», seleccione «Edit devices» y pulse OK. La pantalla visualiza todos los aparatos disponibles. 1. Seleccione un aparato con las teclas de flecha y pulse OK. Ahora puede modificar el aparato Para omitir este paso, pulse. 2. Utilice las teclas de flecha para seleccionar una opción y pulse OK. V /02/ Velleman nv
131 3. Pulse OK para confirmar Ahora, puede cambiar el nombre del aparato. Para omitir este paso, pulse. Para continuar, pulse OK. 4. Introduzca un nombre de zona y pulse OK. La pantalla vuelve a la lista de aparatos. Seleccione otro aparato con las teclas de flecha o pulse. Modificar un teclado de control remoto - un detector de agua 1. Entre en el modo de programación. Diríjase a «Devices+/-», seleccione «Edit devices» y pulse OK. La pantalla visualiza todos los aparatos disponibles. 2. Ahora, puede cambiar el nombre del aparato. 3. Introduzca un nombre de zona y pulse OK. La pantalla vuelve a la lista de aparatos. Seleccione otro aparato con las teclas de flecha o pulse. 9.5 Quitar un aparato 1. Entre en el modo de programación. Diríjase a «Devices+/-», seleccione «Remove device» y pulse OK. El sistema visualiza todos los dispositivos disponibles. 2. Seleccione un aparato las teclas de flecha y pulse OK. Para más información sobre los modos de funcionamiento, véase Vuelva a pulsar OK para confirmar. 9.6 Menú «Program Siren other options» Learn Siren (programar una sirena) Primero, conecte una alarma para exteriores o interiores o un receptor universal al panel de control con el modo de programación para que puedan comunicar. Antes de añadir un aparato auxiliar, programe por lo menos uno de los siguientes aparatos: un contacto de puerta/ventana o un detector PIR de movimientos. No programe una sirena, una alarma o un interruptor DIP antes. Antes de añadir un aparato auxiliar, añade por lo menos uno de los siguientes aparatos: un contacto de puerta/ventana, un detector PIR de movimientos o un mando a distancia. Añadir una sirena para exteriores o interiores: 1. Asegúrese de que el aparato que quiere añadir esté en el modo de programación. V /02/ Velleman nv
132 2. Entre en el modo de programación. Diríjase a «Devices+/-», seleccione «Program Siren» y pulse OK. 3. Utilice las teclas de flecha para seleccionar «Learn Siren» y pulse OK. o El panel de control emitirá un tono largo y transmite el código de programación a todos los aparatos simultáneamente. o La sirena para exteriores activará la sirena & la lámpara estroboscópica. 4. Desactive el modo de programación en los aparatos auxiliares. Ahora, los aparatos han sido añadidos. Siren Tamp. On - Siren Tamp. Off (activar - desactivar la sirena con protección contra manipulaciones) Es posible activar y desactivar a distancia la sirena para exteriores con protección contra manipulaciones. Esta función es muy práctica si quiere reemplazar las pilas de la sirena. Para desactivar la sirena con protección contra manipulaciones: seleccione «Siren Tamp.Off» y pulse OK. La protección contra manipulaciones de todas las sirenas conectadas se desactivará temporalmente. Para activar la sirena con protección contra manipulaciones: select «Siren Tamp.On» y pulse OK. La protección contra manipulaciones de todas las sirenas conectadas se activará simultáneamente. Confirm On - Confirm Off (activar - desactivar el tono de confirmación) Si esta opción está activada, la sirena para exteriores emitirá un tono de confirmación al armar o desarmar el sistema. Si esta opción está desactivada, la sirena no emitirá un tono de confirmación al armar o desarmar el sistema. Seleccione «Confirm On» o «Confirm Off» y pulse OK. Entry Snd On - Entry Snd Off (activar - desactivar el tono de aviso) Si esta opción está activada o desactivada, la sirena emitirá un tono de aviso al entrar en la casa. Seleccione «Entry Snd ON» o «Entry Snd OFF» y pulse OK. 10. Otras funciones de configuración SMS Editor El panel de control edita el mensaje SMS que se envía al teléfono móvil en caso de alarma. 1. Entre en el modo de programación y seleccione «SMS Editor» La pantalla para editar el mensaje se visualiza. 2. Introduzca un mensaje (máx. 16x4 caracteres). Para más información sobre introducir un texto, véase Pulse OK. 4. Seleccione «Save» y pulse OK para confirmar. V /02/ Velleman nv
133 SMS Keyword CTC1000 El panel de control soporta órdenes enviadas de un teléfono móvil al sistema. Introduzca un «SMS keyword» (palabra clave SMS) antes de enviar una orden. Modificar el código PIN para mandos remotos: 1. Entre en el modo de programación, seleccione «SMS Keyword» y pulse OK. 2. Introduzca un código con mín. 1 y máx. 10 caracteres y pulse OK. Asegúrese de que este código no coincida con el código de usuario. 3. Repita el código y pulse OK. Country Code La visualización del formato del número de teléfono (sin o con código de país) puede variar y depende del operador de telefonía móvil. Si el teléfono móvil visualiza los números sin código de país, puede ignorar esta sección. Si el teléfono móvil visualiza los números con código de país, modifique un ajuste en el panel de control. Puede preguntarle a su operador de telefonía móvil o puede probarlo usted mismo de la siguiente manera: 1. Introduzca la tarjeta SIM que quiere utilizar para el panel de control en un teléfono móvil. 2. Active el teléfono. 3. Asegúrese de que el número no está atribuido a un contacto de su teléfono móvil. 4. Envíe un mensaje SMS al mismo número. o Si su teléfono móvil visualiza los números sin el código de país (p.ej ), puede ignorar esta sección. o Si su teléfono móvil visualiza los números con el código de país (p.ej ), proceda de la forma siguiente. 5. En el panel de control: Entre en el modo de programación. Diríjase a «Country Code» y pulse OK. 6. Introduzca su código de país. Ejemplo: si el número visualizado en el teléfono móvil es , introduzca 32 (sin + ). 7. Pulse OK. 8. Introduzca 0 en la pantalla. 9. Pulse OK para terminar. GSM Signal Con esta opción puede controlar la intensidad de la señal. 1. En el panel de control: Entre en el modo de programación. Diríjase a «GSM signal» y pulse OK. La pantalla visualiza la intensidad de la señal (de 0 a 9, 9 es la señal más intensa). V /02/ Velleman nv
134 Walk Test La prueba «Walk Test» controla la comunicación entre el panel de control y cualquier otro aparato. 1. En el panel de control: Entre en el modo de programación. Diríjase a «Walk Test» y pulse OK. 2. Pulse el botón de prueba en el aparato que quiere probar. El nombre, la zona y la intensidad de la señal del aparato se visualizan en la pantalla si el panel de control recibe una señal. 3. Pulse para salir. Reset GSM Con esta opción puede reinicializar la señal del teléfono móvil. 1. En el panel de control: Entre en el modo de programación. Diríjase a «Reset GSM» y pulse OK. Tarda aproximadamente 1 minuto en reinicializarse. 11. Utilizar la alarma Introduzca el código PIN para entrar en el menú de usuarios si la alarma está desactivada (off). En este menú puede activar o desactivar la alarma. Introduzca el primer dígito del código PIN. 1. Introduzca los otros dígitos del código PIN dentro de los 10 segundos. La pantalla visualiza: 2. El cursor parpadea al lado de «Away Arm». El menú incluye las siguientes opciones: Si el sistema ha detectado un error, la primera línea de la pantalla visualiza lo siguiente: 11.2 Armar el sistema Si el sistema está desactivado, puede armarlo de la siguiente manera: 1. Introduzca el código PIN y pulse OK. La pantalla visualiza: 2. El cursor parpadea al lado de «Away Arm». Pulse OK. La pantalla visualiza: V /02/ Velleman nv
135 o o El panel de control inicia la cuenta regresiva y emite un tono. (El tono y el tiempo de salida actual depende de sus ajustes, véase 7.9.) Después de que se haya expirado la cuenta regresiva, el sistema emitirá un tono largo y se activará. Observaciones El panel de control está equipado con la función «salvapantallas». «Alarm ON» se visualiza durante 180 segundos. Luego, la pantalla visualizará sólo la fecha y la hora actuales. Si la opción «Final Door» está activada, el panel de control activará la alarma en cuanto se cierre la puerta. No es posible armar la alarma mientras esté activado un contacto de puerta o un sensor PIR (p.ej. si una puerta todavía está abierta). No obstante, si quiere armar el sistema, véase «Activación forzada». También es posible activar el sistema con el mando a distancia (opcional). Desactivar la temporización de salida Si ha activado la alarma y si la cuenta regresiva todavía está activada, puede parar la temporización de salida al desactivar el sistema. 1. Pulse. Una pantalla para introducir el código PIN se visualiza. La temporización se visualiza en el panel de control. 2. Introduzca el código PIN y pulse OK. «Alarm Off» se visualiza en la pantalla y el sistema está desactivado. o También puede parar la temporización de salida al pulsar el botón de desactivación del mando a distancia (opcional). o Si se expira el período de la temporización de salida antes de que haya introducido el código, el sistema se activa. Extender la temporización de salida (sólo mando a distancia) Es posible extender la temporización de salida al pulsar el botón de activación del mando a distancia (opcional). Mantenga pulsado el botón de activación 1 segundo y oirá un tono largo para confirmar la extensión. La temporización se reinicializa cada vez que pulsa el botón de activación del mando a distancia Activación forzada Si el sistema ha detectado un error, la pantalla visualizará un mensaje de error al introducir el código PIN. Si selecciona «Away Arm» y si pulsa OK, el panel de control emitirá un tono de aviso para indicar que está prohibido armar el sistema. La pantalla visualizará los errores actuales y el mensaje «Fault Dsp» por turnos. Pulse para volver a la pantalla «Alarm Off». Si se produce un error, puede solucionar los problemas, borrar la pantalla de errores (véase 14) y armar el sistema (recomendado). ignorar los errores y armar el sistema a pesar de los errores de la siguiente manera: En la pantalla «Fault Dsp»: 1. Introduzca el código PIN y pulse OK. La pantalla visualiza: 2. Pulse OK para confirmar V /02/ Velleman nv
136 o o El panel de control inicia la cuenta regresiva y emite un tono. (El tono y el tiempo de salida actual depende de sus ajustes, véase 7.9.) Después de que se haya expirado la cuenta regresiva, el sistema emitirá un tono largo y se activará. Armar el sistema si una puerta está abierta Si quiere armar el sistema mientras esté abierta una puerta, el panel de control emitirá un tono para indicar que está prohibido. El mensaje «Fault Dsp» (en la parte superior, central) y el nombre del sensor se visualizan por turnos cada 2 seg. El mensaje de error desaparece automáticamente y el sistema vuelve al modo «Alarm Off» después de haber cerrado la puerta. Ahora, es posible armar el sistema. Sin embargo, si quiere activar el modo «Arm» mientras está abierta la puerta, utilice «Forced Arming». Observaciones La pantalla «Fault Dsp» está equipada con la función «time-out» (5 minutos). Después de 5 minutos, vuelve automáticamente al modo «Alarm Off». No se controle el estado de un sensor que ha sido invalidado (véase Modo «Partial Arm»). Es posible invalidad un sensor temporalmente o puede quitarlo definitivamente si ha sido manipulado o si no funciona correctamente Desarmar el sistema Es posible desarmar el sistema tanto en el modo «Away Arm» como en el modo «Home Arm» (Alarm ON): 1. Introduzca el código PIN y pulse OK. El panel de control emitirá 2 tonos cortos y vuelve al modo «Disarm» Mando a distancia Modo «Home» (véase a continuación): Pulse el botón de desactivación del mando a distancia para desactivar el sistema. Modo «Away Arm»: Pulse el botón de desactivación del mando a distancia para desactivar el sistema si se ha activado un dispositivo de entrada o si la función «RC Ent E» está activada (véase RC Ent E (= remote controller entry enabled) en capítulo 8) Modo «Home Arm» El sistema está activado y es necesario desactivarlo al entrar en la casa. No obstante, puede desplazarse sin problemas dentro de la casa. Puede sólo entrar en el modo «Home» si el sistema está desactivado. Activar el modo «Home» 1. Introduzca el código PIN y pulse OK. 2. Pulse para seleccionar «Home Arm» y pulse OK. o o El panel de control inicia la cuenta regresiva y emite un tono. (El tono y el tiempo de salida actual depende de sus ajustes, véase 7.9.) Después de que se haya expirado la cuenta regresiva, el sistema emitirá un tono largo y se activará. V /02/ Velleman nv
137 Observaciones CTC1000 También es posible activar el sistema con el mando a distancia (opcional). Para desactivar la temporización de salida, consulte 11.2 Desactivar la temporización de salida. Para desactivar la temporización de salida, consulte 11.2 Extender la temporización de salida (sólo mando a distancia). Si el sistema ha detectado un error y si quiere armarlo de todas formas, véase 11.3 «Activación forzada» Modo «Partial Arm» (modo bypass) En este modo puede desactivar (bypass) cualquier sensor deseado. El sistema de alarma está activado pero puede desplazarse sin problemas en la zona con sensor desactivado. Activar el modo «Partial Arm» 1. Introduzca el código PIN y pulse OK. 2. Pulse para seleccionar «Bypass» y pulse OK. 3. Pulse & para seleccionar la zona que quiere omitir y pulse OK (p.ej. puerta trasera). 4. Pulse OK para confirmar La zona omitida está marcada con un asterisco (*). 5. Repita los pasos 2-4 para desactivar otro aparato. 6. Luego, pulse para volver al menú de usuarios y el cursor se queda en «Arm». 7. Pulse OK. Observaciones En caso de que haya omitido un sensor, el panel de control no reacciona a su activación en el modo «Arm». La función de omisión (bypass) se borra automáticamente en cuanto desarme el sistema. Si un sensor ha sido omitido, es posible armar el sistema directamente a pesar de los mensajes de error (si hay). No obstante, la situación se registra y se visualiza en el submenú «Log» Parar una alarma En caso de alarma, la sirena suena y el panel de control envía un mensaje al número de teléfono móvil programado. La pantalla visualiza: Desactivar la sirena y borrar la pantalla en caso de alarma: Introduzca el código PIN y pulse OK. La sirena se desactiva después de haber introducido el código PIN correcto. La pantalla le pedirá que introduzca su código PIN si pulse cualquier tecla y no pulse el primer dígito del código PIN. V /02/ Velleman nv
138 Enviar un mensaje Esto depende del momento en que ha desactivado la alarma Antes del envío de un mensaje Durante el envío de un mensaje Después del envío de un mensaje La alarma ha sido desactivada antes del envío de un mensaje El sistema no envía ningún mensaje. 1. La pantalla visualiza el aparato que ha activado la alarma y el número de la zona. 2. Pulse OK. Si se activan varias alarmas, el panel de control continúa visualizando la segunda alarma con 02). al principio de la segunda línea. 3. Pulse OK hasta que la pantalla visualice: [significado: el sistema no ha podido ponerse en contacto con ningún número de teléfono] 4. Pulse OK. La pantalla vuelve al modo «Alarm Off» O pulse para visualizar todos los eventos. La alarma ha sido desactivada durante el envío de un mensaje 1. La pantalla visualiza el aparato que ha activado la alarma y el número de la zona. 2. Pulse OK. Si se activan varias alarmas, el panel de control continúa visualizando la segunda alarma con 02). al principio de la segunda línea. 3. Pulse OK hasta que la pantalla visualice: [significado: el sistema no ha podido ponerse en contacto con ningún número de teléfono] 4. Pulse OK. La pantalla vuelve al modo «Alarm Off» La alarma ha sido desactivada después del envío de un mensaje 1. La pantalla visualiza el aparato que ha activado la alarma y el número de la zona. 2. Pulse OK. Si se activan varias alarmas, el panel de control continúa visualizando la segunda alarma con 02). al principio de la segunda línea. 3. Pulse OK hasta que la pantalla visualice: V /02/ Velleman nv
139 [se visualiza el número de teléfono que el panel de control ha llamado] 4. Pulse OK. La pantalla vuelve al modo «Alarm Off» O pulse para visualizar todos los eventos. Mando a distancia También puede pulsar el botón de desactivación del mando a distancia (opcional) para desactivar una alarma (salvo la alarma de pánico). No es posible desactivar la alarma de pánico con el mando a distancia. Puede sólo desactivarla en el panel de control. Esto sirve para evitar que un ladrón coja el mando a distancia y desactive la alarma con el botón de desactivación del mando a distancia. Memoria de alarma Si se ha activado una alarma durante su ausencia y si el sistema ha enviado un mensaje, el panel de control visualiza la pantalla de aviso de alarma. No puede reiniciar la pantalla con el mando a distancia. Para borrar la pantalla, siga los pasos descritos en capítulo Eventos de alarma y reacciones La siguiente lista visualiza los eventos y la reacción del panel de control. Tipo de alarma Burglar Home Omit El sistema está desactivado no reacciona no reacciona Away Arm Alarma de robo instantánea Alarma de robo instantánea Home Arm Alarma de robo instantánea no reacciona Temporizador de entrada Alarma de robo instantánea no reacciona Temporizador «Away Arm Entry» Alarma de robo instantánea Alarma de robo instantánea Temporizador «Home Arm Entry» Alarma de robo instantánea no reacciona Home Access no reacciona Alarma de robo instantánea Iniciar el temporizador de entrada no reacciona no reacciona no reacciona Delay (temporización) no reacciona Alarma de robo instantánea Alarma de robo instantánea no reacciona no reacciona no reacciona Entry Door Chime (timbre) Iniciar el temporizador de entrada Iniciar el temporizador de entrada no reacciona no reacciona no reacciona Away Entry Door Chime (timbre) Iniciar el temporizador de entrada no reacciona no reacciona no reacciona no reacciona 24 HR. Alarma de robo Alarma de robo Alarma de robo Alarma de robo Alarma de robo Alarma de robo Fire Alarma de fuego Alarma de fuego Alarma de fuego Alarma de fuego Alarma de fuego Alarma de fuego Medical Alarma de emergencia Alarma de emergencia Alarma de emergencia Alarma de emergencia Alarma de emergencia Alarma de emergencia V /02/ Velleman nv
140 Water Alarma de agua Alarma de agua Alarma de agua Alarma de agua Alarma de agua Alarma de agua Sensor PIR exterior no reacciona Alarma de robo instantánea (sin enviar un mensaje) tono de aviso no reacciona no reacciona no reacciona 12. Registro de eventos El registro de alarmas guarda los 20 últimos eventos incluyendo todos los eventos con identificación del dispositivo todos los avisos de error todos los eventos de activación y desactivación Los eventos registrados se visualizan en orden inverso cronológico (el más reciente arriba). El registro está marcado con una etiqueta START delante del evento más reciente y una etiqueta END detrás del evento más viejo. Visualizar un registro de eventos: En el modo «Alarm Off»: 1. Introduzca el código de usuario y pulse OK para acceder al menú de usuarios. 2. Pulse varias veces para seleccionar «Log» y pulse OK. Ahora, se visualizan los eventos registrados. 3. Utilice & para desplazarse por los eventos registrados. 13. Evitar falsas alarmas El aparato está equipado con las siguientes funciones: doble aviso de entrada Si el sistema está armado y si un dispositivo en el modo «Entry» está activado, la cuenta regresiva se iniciará (véase «General Settings»). El temporizador de entrada sirve para avisarle que el sistema está a punto de enviar un mensaje al número de teléfono programado. Durante la cuenta regresiva: La alarma se activará si se activa otro aparato que no está en el modo «Entry» o si se introduce un código PIN incorrecto. Después de que se haya activado la alarma, el sistema espere otro 30 segundos antes de enviar informes a los números de teléfono programados. Al introducir un código PIN correcto dentro de los 30 segundos, la alarma se desactivará y el sistema vuelve a su estado normal. El sistema activará la alarma de robo y enviará un mensaje a los números de teléfonos programados al introducir un código PIN incorrecto. Información sobre las acciones de activación y desactivación El sistema le informará sobre todas las acciones de activación y desactivación con código PIN o mando a distancia si la opción «Latch» está activada (ajuste por defecto). Aviso de alarma: verificación secuencial Si la función de verificación secuencial está activada (ajuste de fábrica: OFF) y si se activa una alarma de robo, y si otro aparato en el modo «Burglar» (robo) se activa dentro de los 30 minutos, el sistema enviará un mensaje de confirmación de alarma a los números de teléfono programados. Para más información, véase «Verification» en la página 16. El sistema enviará un informe de verificación secuencial y un informe de alarma. El sistema no enviará un informe de verificación secuencial si se activa un segundo aparato dentro de la cuenta regresiva. 14. Errores El panel de control puede detectar los siguientes errores: control panel Low Battery (batería baja: panel de control) AC Power Fail (interrupción del suministro eléctrico) Sensor Out-of-order (sensor no funciona) V /02/ Velleman nv
141 Sensor Low Battery (batería baja: sensor) Device and control panel Tamper (protección contra manipulaciones: aparato y panel de control) Interference Detection (detección de interferencias) SIM card missing (no se ha introducido una tarjeta SIM) GSM out of signal (no señal del teléfono móvil) Si el panel de control detecta un error, visualiza un error. Errores posibles Panel de control Alimentación Sensor PIR contacto de puerta Sensor Low Battery (batería baja: sensor) Sensor Out-of-order (sensor no funciona) Interference (interferencias) SIM card missing (no se ha introducido una tarjeta SIM) GSM out of signal (no señal del teléfono móvil) Un interruptor de manipulación impide que se saque el aparato del soporte. Un interruptor de manipulación impide que se abra o se saque la tapa de la alimentación. Un interruptor de manipulación impide que se abra la carcasa. Un interruptor de manipulación impide que se desmonte el aparato. Un interruptor de manipulación impide que se abra o se desmonte el aparato. Detección de batería baja para el sensor PIR, el contacto de puerta/ventana, el teclado de control remoto, el detector de agua, el mando a distancia. El detector PIR de movimientos, el contacto de puerta/ventana, el detector de agua, enviarán en un intervalo entre 30~50 min. señales al panel de control. El sistema enviará un mensaje para comunicar que ya no recibe señales de supervisión de un aparato. Si el panel de control ya no recibe señales de control de un aparato (véase «Supervision» en 8 «Special Settings»), el LED amarillo se iluminará y el mensaje de error se visualizará en el menú de mensajes de error («Fault Display»). El aparato puede detectar interferencias en la banda de frecuencia de 868 MHz. Una notificación se visualizará en la pantalla LCD (en el menú «Fault Display» si el sistema detecta unas interferencias de más de 30 segundos. El sistema visualizará un mensaje si falta la tarjeta SIM. Cambie la posición del panel de control para obtener una buena señal al no recibir ninguna señal del teléfono móvil. Fault message display (menú de los mensajes de error) En caso de error, el panel de control visualiza lo siguiente si está desactivado: El LED amarillo se ilumina en caso de error. La pantalla LCD visualizará el tipo y la fuente del error in el menú de los mensajes de error. Un tono de aviso suena cada 30 segundos. El error no se visualizará hasta que haya desactivado el sistema si ha detectado un error mientras está en el modo «Arm». Borrar mensajes de error El LED amarillo se apaga automáticamente después de haber corregido todos los errores o después de haber quitado un aparato con errores. No es posible apagar el LED de forma manual. La pantalla siga visualizando el mensaje de error, incluso después de haber corregido el error. Sólo es posible borrar el mensaje de error de manera manual después de haberlo corregido. Visualizar/borrar el mensaje de error Controlar el error si el sistema está desactivado. 1. Introduzca el código PIN y pulse OK. 2. La pantalla visualizará Fault Dsp V /02/ Velleman nv
142 Arm con el cursor al lado de «Fault Dsp». 3. Pulse OK para seleccionar «Fault Dsp». Todos los errores se visualizarán 4. Utilice el botón & para desplazar el cursor hacia abajo y hacia arriba. 5. Después de haber visualizado todos los errores, pulse el botón. La pantalla visualizará: Clear Fault Dsp (OK?) 6. Después de haber corregido el error, pulse OK. El error se borra y la pantalla vuelve al modo «Alarm Off». Observaciones La pantalla sigue visualizando los errores si no ha corregido el error. El error vuelve a visualizarse en cuanto intente activar el sistema e impidirá la activación. Sólo es posible borrar el error después de haberlo corregido. El mensaje de error queda registrado, incluso después de haberlo borrado Respuesta de error Después de haber detectado un error, el panel de control lo visualizará y contestará. La respuesta depende del tipo de evento. En caso de error, ni el panel de control ni las sirenas exteriores emitirán un tono (excepción: alarma de sabotaje). En caso de interrupción del suministro eléctrico o en caso de activación de la protección contra manipulaciones, el panel de control enviará un informe de errores por SMS. Para cualquier otro error, el panel de control NO enviará un informe de errores por SMS. AC Power Fail (interrupción del suministro eléctrico) control panel Low Battery (batería baja: panel de control) Sensor Low Battery (batería baja: sensor) Manipulación del panel de control El LED amarillo se iluminará y un mensaje de error se visualizará. El panel de control enviará dentro de los minutos un mensaje SMS al primer número de teléfono en todos los modos. Después de que se haya restaurado el suministro eléctrico, el panel de control enviará un mensaje SMS al primer número de teléfono dentro de los minutos. El LED amarillo se iluminará y un mensaje de error se visualizará en el menú de mensajes de error en cuanto el sistema detecte una batería baja en el panel de control. El panel de control no puede detectar una batería bajo si funciona con un adaptador de red. El LED amarillo se iluminará en cuanto el sistema detecte una pila baja en un sensor. El mensaje de error se visualizará en el menú de mensajes de error. El LED amarillo se iluminará en caso de activación de la protección contra manipulaciones. El mensaje de error se visualizará en el menú de mensajes de error. Además, el panel de control enviará un mensaje SMS al primer número de teléfono en todos los modos. Manipulación de un sensor El LED amarillo se iluminará si se activa la protección contra manipulaciones del detector de movimientos, el contacto de puerta/ventana, el teclado de control remoto o la sirena. El mensaje de error se visualizará en el menú de mensajes de error. Además, el panel de control enviará un mensaje SMS al primer número de teléfono en todos los modos. La sirena emitirá un tono en caso de activación del interruptor de manipulación (véase «Interruptor de manipulación» 8). Sensor Out-of-order (sensor no funciona) Si el panel de control ya no recibe señales de control de un detector de movimientos, un detector de puerta/ventana, etc. (véase «Supervision»), el LED amarillo se iluminará y el V /02/ Velleman nv
143 interference (interferencias) mensaje de error se visualizará en el menú de mensajes de error («Fault Display»). El sistema no enviará ningún informe. Si la función de detección de interferencias («Interference detection») está activada, el LED amarillo se iluminará en caso de detección de interferencias durante 30 segundos. El mensaje de error se visualizará en el menú de mensajes de error Mensajes de error El mensaje de error se visualiza de la siguiente manera: mensaje de error AC failure GSM Signal Interference Panel L.B. Panel Tamper (Sensor w/ Zone Name) + L.B. (Sensor w/ Zone Name) + out (Sensor w/ Zone Name) + Tamper Sim Card? Significado AC Power Fail (interrupción del suministro eléctrico) GSM out of signal (no señal del teléfono móvil) detección de interferencias batería baja (panel de control) la protección contra manipulaciones ha sido activada en el panel de control batería baja (detector) Sensor Out-of-order (sensor no funciona) la protección contra manipulaciones ha sido activada en un detector SIM card missing (no se ha introducido una tarjeta SIM) Ejemplo: el siguiente mensaje se visualiza si la pila del contacto de puerta/ ventana de la zona 1 está agotada: DC Z 01 L.B. Observación No es posible armar la alarma mientras esté activado un contacto de puerta o un sensor PIR (p.ej. si una puerta todavía está abierta). mensaje de error (DC w/ Zone Name) + open (IR w/ Zone Name) + Active Significado Contacto de puerta/ventana activado Detector PIR de movimientos activado 15. Orden a distancia con mensaje SMS Es posible controlar el sistema con órdenes enviados por SMS. Seleccionar inglés como idioma para el teléfono móvil antes de continuar Lista de órdenes a distancia con mensaje SMS Órdenes Acción 00 colgar con confirmación 10 disarm 11 activar 20 receptor universal #1 desactivado 21 receptor universal #1 activado 30 receptor universal #2 desactivado 31 receptor universal #2 activado Para los órdenes a distancia de dos dígitos Enviar un mensaje SMS para poner el sistema en el modo «Arm» y enviar una confirmación al teléfono móvil. El formato es: V /02/ Velleman nv
144 MICHAEL (con espacios) MICHAEL palabra clave de SMS 2222 Código de usuario programado 11 comando DTMF 00 recibir un mensaje de confirmación Mensaje de confirmación En el teléfono móvil, el mensaje de confirmación se visualiza de la forma siguiente: Confirmed MICHAEL USER1 Arm Enviar un mensaje SMS para poner el sistema en el modo «Arm» sin enviar una confirmación al teléfono móvil. El formato es 9999 palabra clave de SMS 5678 Código de usuario programado 11 comando DTMF El sistema filtra automáticamente todos los mensajes SMS entrantes e ignora y borra automáticamente todos los mensajes sin la palabra clave. El sistema efectúa inmediatamente la orden (las órdenes) en cuanto reciba un mensaje SMS con la palabra clave y el código PIN correctos. Luego, borra el mensaje. 16. Reinicializar el sistema Si restablece los ajustes de fábrica, los códigos PIN se borrarán y todos los aparatos se quitarán también. Luego, tendrá que volver a programar el panel de control y añadir los aparatos uno a uno. Para reinicializar el panel de control, siga los siguientes pasos: 1. Desconecte el aparato de la red eléctrica y saque la batería de repuesto. 2. Conecte el aparato a la red eléctrica mientras mantiene pulsado el botón. 3. Suelte el botón en cuanto oiga un tono. El panel de control visualiza «Enter Code». 4. Introduzca lo siguiente:, botón OK 5. Pulse OK. El aparato vuelve al modo «Alarm On» normal al introducir un código incorrecto. 17. Introducir un texto Utilice el teclado para introducir nombres de usuario, nombres de zona, mensajes SMS, etc. Pulse el botón deseado. Si fuera necesario, púlselo varias veces hasta que aparezca la letra o el símbolo deseado. El cursor salta a la siguiente posición al soltar el botón para poder seguir a introducir el texto. 18. Especificaciones alimentación batería de repuesto autonomía nivel sonoro frecuencia temperatura de funcionamiento humedad dimensiones Vac/50-60 Hz - 12 Vdc 500 ma (adaptador incl.) batería recargable 7.2 V 600 mah Ni-Mh (incl.) ± 8 horas ± 104 1m MHz de -10 a +45 C hasta el 90 % sin condensado 185 x 120 x 26 mm V /02/ Velleman nv
145 peso 420 g Utilice este aparato sólo con los accesorios originales. Velleman NV no será responsable de daños ni lesiones causados por un uso (indebido) de este aparato. Para más información sobre este producto y la versión más reciente de este manual del usuario, visite nuestra página Se pueden modificar las especificaciones y el contenido de este manual sin previo aviso. DERECHOS DE AUTOR Velleman NV dispone de los derechos de autor para este manual del usuario. Todos los derechos mundiales reservados. Está estrictamente prohibido reproducir, traducir, copiar, editar y guardar este manual del usuario o partes de ello sin previo permiso escrito del derecho habiente. V /02/ Velleman nv
146 BEDIENUNGSANLEITUNG 1. Einführung An alle Einwohner der Europäischen Union Wichtige Umweltinformationen über dieses Produkt Dieses Symbol auf dem Produkt oder der Verpackung zeigt an, dass die Entsorgung dieses Produktes nach seinem Lebenszyklus der Umwelt Schaden zufügen kann. Entsorgen Sie die Einheit (oder verwendeten Batterien) nicht als unsortiertes Hausmüll; die Einheit oder verwendeten Batterien müssen von einer spezialisierten Firma zwecks Recycling entsorgt werden. Diese Einheit muss an den Händler oder ein örtliches Recycling-Unternehmen retourniert werden. Respektieren Sie die örtlichen Umweltvorschriften. Falls Zweifel bestehen, wenden Sie sich für Entsorgungsrichtlinien an Ihre örtliche Behörde. Vielen Dank, dass Sie sich für Velleman entschieden haben! Lesen Sie diese Bedienungsanleitung vor Inbetriebnahme sorgfältig durch. Überprüfen Sie, ob Transportschäden vorliegen. Sollte dies der Fall sein, verwenden Sie das Gerät nicht und wenden Sie sich an Ihren Händler. Lieferumfang Bedienfeld Netzteil wiederaufladbare Ni-Mh-Batterie Optional PIR-Bewegungsmelder (Bestell-Nr. CTC1000PIR) Tür-/Fensterkontakt (Bestell-Nr. CTC1000DS) Ferntastatur (Bestell-Nr. CTC1000KP) Fernbedienung (Bestell-Nr. CTC1000RC) Wassermelder (Bestell-Nr. CTC1000WS) Außenalarm (Bestell-Nr. CTC1000SO) drahtlose Sirene (Bestell-Nr. CTC1000SI) 2. Sicherheitshinweise Halten Sie Kinder und Unbefugte vom Gerät fern. Verwenden Sie das Gerät nur im Innenbereich. Schützen Sie das Gerät vor Regen und Feuchte. Setzen Sie das Gerät keiner Flüssigkeit wie z.b. Tropf- oder Spritzwasser, aus. Trennen Sie das Gerät vom Netz bevor Sie es öffnen. Seien Sie während der Installation des Gerätes sehr vorsichtig: das Berühren von unter Spannung stehenden Leitungen könnte zu lebensgefährlichen elektrischen Schlägen führen. Bei Schäden, die durch Nichtbeachtung der Bedienungsanleitung verursacht werden, erlischt der Garantieanspruch. Für daraus resultierende Folgeschäden übernimmt der Hersteller keine Haftung. Schützen Sie das Gerät vor Regen und Feuchte. Bei Schäden verursacht durch eigenmächtige Änderungen erlischt der Garantieanspruch. Dieses System bietet wertvollen Schutz für Ihr Haus und Eigentum, wenn Sie es korrekt verwenden. Es kann aber keinen vollständigen Schutz vor Diebstahl oder Raub gewährleisten. VELLEMAN nv übernimmt keine Haftung für entstandene Schäden oder Verlust. 3. Allgemeine Richtlinien Siehe Velleman Service- und Qualitätsgarantie am Ende dieser Bedienungsanleitung. Lassen Sie dieses Gerät von einem Fachmann installieren Installieren Sie das System hinsichtlich der örtlichen geltenden Vorschriften und Gesetze. Wenn nötig, wenden Sie sich an die zuständige Behörde. V /02/ Velleman nv
147 Vermeiden Sie Erschütterungen. Vermeiden Sie rohe Gewalt während der Installation und Bedienung des Gerätes. Schützen Sie das Gerät vor extremen Temperaturen, Staub und Feuchte. Nehmen Sie das Gerät erst in Betrieb, nachdem Sie sich mit seinen Funktionen vertraut gemacht haben. Eigenmächtige Veränderungen sind aus Sicherheitsgründen verboten. Außer der Batterie gibt es keine zu wartenden Teile. Verwenden Sie das Gerät nur für Anwendungen beschrieben in dieser Bedienungsanleitung sonst kann dies zu Schäden am Produkt führen und erlischt der Garantieanspruch. 4. Eigenschaften drahtloses 30-Zonen-Bedienfeld mit eingebauter GSM-Telefonwähleinheit SMS-Nachrichten 4 vorprogrammierte Nachrichten: Einbruch, Notfall, Brand, ärztliche Hilfe 'listen in'-funktion: Sie können hören was da passiert SMS-Editor: 14 Zeichen x 4 Zeilen = 56 Zeichen Sie können das System über SMS bedienen, egal wo Sie sich befinden LCD-Display: Hintergrundbeleuchtung, 16 x 2 Zeichen Sie können jede Zone (30 Zonen insgesamt) editieren und namentlich benennen eingebauter Sender, um den Außenalarm oder die drahtlose Sirene einzuschalten Home-Funktion: vollständiger Schutz wenn Sie Zuhause sind, ohne dass der Alarm ausgelöst wird vollständige Überwachung der Alarm kann nicht eingeschaltet werden solange die Tür geöffnet ist Fehlererkennung und Anzeige Sabotagekontakt: das Gerät kann weder entfernt noch geöffnet werden 5. Beschreibung Siehe Abbildungen, Seite 2 dieser Bedienungsanleitung. 1 Display 2 Tastatur 3 Summer 4 gelbe LED - on: es gibt einen Fehler - off: keine Fehler, das Bedienfeld befindet sich im normalen Betriebsmodus 5 Mikrofon 6 grüne LED - on: Das Gerät ist mit dem Netz verbunden - off: Stromausfall 7 Buchstaben und Ziffern 8 #: um in den Programmiermodus zu gelangen 9 OK: Daten oder die Auswahl bestätigen 10 Abbrechen: wird im Programmiermodus verwendet: die Auswahl aufheben, zum vorigen Schirm zurückkehren, usw. 11 Pfeiltasten: wird im Programmiermodus verwendet: bewegt den Cursor nach unten und nach oben, um eine Option auszuwählen 12 2 Montagelöcher und Sabotagekontakt 13 DC-Anschluss 14 Batterieschalter 15 SIM-Kartenfach V /02/ Velleman nv
148 6. Installation 6.1 SIM-Karte (optional) Legen Sie eine SIM-Karte ein, wenn Sie im Alarmfall SMS-Nachrichten empfangen möchten (max. 6 Rufnummern). Bevor Sie starten Bevor Sie die SIM-Karte in die Alarmanlage einlegen und diese montieren, testen Sie bitte das Format der Landesvorwahl, die Ihren GSM-Netzbetreiber verwendet. Siehe Country Code in 10. Verwenden Sie Ihr Telefon, um den SIM-Code zu löschen. Die SIM-Karte einlegen Das SIM-Kartenfach befindet sich auf der Rückseite des Gerätes. Um die SIM-Karte einzulegen: 1. Lockern Sie das SIM-Kartenfach. 2. Schieben Sie das Fach nach rechts, um es zu öffnen (OPEN). 3. Öffnen Sie das Fach und legen Sie die SIM-Karte ein. 4. Schieben Sie das Fach nach links, um es zu schließen (CLOSE) 5. Schließen Sie das SIM-Kartenfach wieder mit der Schraube. 6.2 Stromversorgung Verbinden Sie das Gerät über das mitgelieferte AC-Netzteil mit dem Netz. Um Schäden zu vermeiden, verwenden Sie immer ein geeignetes AC-Netzteil (siehe «Technische Daten») Wiederaufladbare Batterie Eine wiederaufladbare Batterie (mitgeliefert, siehe «Technische Daten») im Gerät dient als Pufferbatterie bei Stromausfall. Bei normalem Betrieb versorgt das AC-Netzteil das Gerät mit Strom und lädt gleichzeitig die Batterie auf. Ist die Batterie völlig aufgeladen, dann hat das Gerät eine Autonomie von mindestens 8 Stunden. Es dauert etwa 48 Stunden, um die Batterie völlig aufzuladen. ACHTUNG Durchbohren Sie nie die Batterien und werfen Sie diese nicht ins Feuer (Explosionsgefahr). Halten Sie die Batterien von Kindern fern. Display mit Hintergrundbeleuchtung Das Gerät verfügt über ein LCD-Display für eine einfache Bedienung im Dunkeln. Bei Stromausfall und um die wiederaufladbare Batterie zu schonen, funktioniert die Hintergrundbeleuchtung aber nicht. 6.3 Das Bedienfeld montieren Einen geeigneten Montageort auswählen: Voraussetzungen Beachten Sie folgende Hinweise bei der Auswahl eines geeigneten Montageortes. Das Bedienfeld benötigt Strom. Beachten Sie, dass das Bedienfeld leicht zugänglich ist. Installieren Sie das Gerät nicht in feuchten Räumen (Badezimmer, usw.) Installieren Sie das Gerät nicht in der Nähe von Wärmequellen. Installieren Sie das Gerät nicht in unmittelbarer Nähe von Störquellen (z.b. Mobiltelefon, drahtloses Telefon oder Geräte die über das drahtlose Netzwerk (Wi-Fi) funktionieren) Das Bedienfeld montieren Das Bedienfeld kann an der Wand oder überall wo Sie möchten installiert werden. Montieren Sie das Bedienfeld in Brusthöhe (ungefähr) damit Sie das Display und die Tastatur einfach sehen und bedienen können. 1. Verwenden Sie die zwei Löcher der Wandhalterung, um die Position der Löcher zu markieren. 2. Bohren Sie zwei Löcher und verwenden Sie die Dübel bei Befestigung an einer Gips- oder Betonwand. 3. Befestigen Sie die Basis an der Wand 4. Stecken Sie den Stromversorgungsstecker in die Stromversorgungbuchse, bevor Sie das Gerät an der Wand befestigen. V /02/ Velleman nv
149 5. Befestigen Sie das Bedienfeld an der Wandhalterung (Vorderseite zu Ihnen gerichtet). 6.4 Passwörter auf 2 Ebenen Das Bedienfeld hat 2 Berechtigungsstufen, um die höchste Sicherheit zu gewährleisten. Möchten Sie das System programmieren, dann müssen Sie nicht nur einen PIN-Code, sondern auch einen Mastercode eingeben. Geben Sie den Benutzer-PIN-Code ein, wenn ENTER CODE oder P-CODE auf dem Display erscheint. Geben Sie den Mastercode ein, wenn M-CODE auf dem Display erscheint. Für mehr Informationen über den PIN-Code, siehe 7.4 Pin code. Für mehr Informationen über den Mastercode, siehe 7.7 Master Code. 6.5 Erste Inbetriebnahme Nachdem Sie einen geeigneten Montageort ausgewählt haben: 1. Verbinden Sie das Gerät mit dem Netz Ein langer Piepton ertönt. «Alarm On» erscheint auf der ersten Zeile und 00:01 01 Jan erscheint auf der zweiten Zeile des Displays, um anzuzeigen, dass das System sich im Away-Modus befindet (Standard-Modus). 2. Drücken Sie auf «1». 3. Geben Sie den PIN-Code für Benutzer 1 innerhalb von 30 Sekunden ein (standardmäßig 1234) Drücken Sie, um den Code zu löschen. 4. Drücken Sie auf OK (innerhalb von 30 Sekunden). 2 kurze Pieptöne ertönen und auf dem Display erscheint: Das System befindet sich nun im Alarm OFF-Modus. 5. Warten Sie nun 2 bis 3 Minuten, bis der Status auf dem Display angezeigt wird. Leuchtet die gelbe LED, dann gibt es einen Fehler. Siehe 14 für mehr Informationen. Bemerkungen Das Bedienfeld hat einen Bildschirmschoner-Funktion. Der Alarm Off-Nachricht erscheint etwa 180 Sekunden. Danach wird nur noch die aktuelle Uhrzeit und das aktuelle Datum angezeigt. 7. Konfiguration Um in den Programmiermodus zu gelangen: 1. Beachten Sie, dass der Alarm ausgeschaltet ist (siehe 11.4). 2. Drücken Sie auf #. Im Display erscheint: 3. Geben Sie 1234 (Standard PIN-Code Benutzer 1) innerhalb von 30 Sekunden ein und drücken Sie auf OK. Im Display erscheint: 4. Geben Sie 1111 (Standard-Mastercode) innerhalb von 30 Sekunden ein und drücken Sie auf OK. Im Display erscheint 2 Sekunden: 5. Danach wird das Programmiermenü angezeigt: V /02/ Velleman nv
150 Ändern Sie den PIN-Code von Benutzer 1 und den Mastercode vor der ersten Inbetriebnahme. Cursor Der Cursor ist das blinkende Pünktchen oben links. Verwenden Sie und, um den Cursor zu bewegen. Drücken Sie auf OK, um zu bestätigen. Das Programmiermenü enthält folgende Optionen: Bemerkungen Das V-Symbol bedeutet, dass Sie nach unten scrollen können. Der Pfeil verschwindet wenn Sie das Ende der Liste erreicht haben. Das Λ-Symbol bedeutet, dass Sie nach oben scrollen können. Der Pfeil verschwindet wenn Sie sich am Anfang der Liste befinden. Drücken Sie auf um zum Alarm Off-Display zurückzukehren. Im Programmiermodus kehrt das Bedienfeld automatisch zum Alarm Off-Modus zurück wenn innerhalb von 5 Minuten keine Taste gedrückt wird. 7.2 Tel. Setting Im Tel. Setting-Menü können Sie Mobiltelefonnummern hinzufügen, ändern oder löschen. Das Bedienfeld verwendet diese Telefonnummern, um über Ereignisse zu informieren. Sie können max. 6 Nummern speichern. Bemerkungen Das Display zeigt nur die ersten elf Ziffern an. Die Nummern sind nach Priorität geordnet. Das System ruft diese Telefonnummern in dieser Reihenfolge an. Kann das System die erste Telefonnummer nicht erreichen, dann ruft es die zweite Nummer der Liste an. Eine Telefonnummer hinzufügen 1. Gehen Sie zum Programmiermodus und wählen Sie «Tel. Settings». Die Telefonnummern werden angezeigt. Bei der ersten Inbetriebnahme ist diese Liste leer. 2. Weisen Sie einer Nummer mit den Pfeiltasten einen Buchstaben zu (A bis F) und drücken Sie auf OK. 3. Geben Sie die Telefonnummer ein und drücken Sie auf OK. o Die Nummer kann bis zu 20 Digits und Zeichen * & # enthalten. V /02/ Velleman nv
151 o Beim Eingeben einer Nummer dient die -Taste als Leerstelle. Eine Telefonnummer ändern 1. Gehen Sie zum Programmiermodus und wählen Sie «Tel. Settings». Die Telefonnummern werden angezeigt. 2. Wählen Sie die Nummer, die Sie ändern möchten, mit den Pfeiltasten aus und drücken Sie auf OK. Hierdurch wird die Telefonnummer gelöscht. 3. Geben Sie die Telefonnummer ein und drücken Sie auf OK. o Die Nummer kann bis zu 20 Digits und Zeichen * & # enthalten. o Beim Eingeben einer Nummer dient die -Taste als Leerstelle. Eine Telefonnummer löschen 1. Gehen Sie zum Programmiermodus und wählen Sie «Tel. Settings». Die Telefonnummern werden angezeigt. 2. Wählen Sie die Nummer, die Sie löschen möchten, mit den Pfeiltasten aus und drücken Sie auf OK. 3. Drücken Sie wieder auf OK. Die Nummer wird gelöscht. 7.3 General settings (allgemeine Einstellungen) Zugriff auf das Menü: Gehen Sie zum Programmiermodus und wählen Sie «Gen. Settings». Optionen 7.4 Pin code (PIN-Code) Anwendung Mit diesem Code schalten Sie das Alarmsystem scharf und unscharf. Mit diesem Code (und den Mastercode) gelangen Sie in den Programmiermodus. Standardwert Benutzer 1: 1234 Benutzer 2 bis 4: Es gibt keinen Standardwert Eigenschaften 4-stellig Obligatorisch Der Code für Benutzer 1 kann nicht gelöscht werden. V /02/ Velleman nv
152 Wird bei einer Systemrücksetzung auf Werkseinstellungen zurückgesetzt (siehe Systemrücksetzung) Beachten Sie, dass der Mastercode und der PIN-Code nicht übereinstimmen. Den PIN-Code einstellen 1. Zugriff auf das Menü: Gehen Sie im Programmiermodus zu «Gen. Settings», wählen Sie «Pin Code» und drücken Sie auf OK. 2. Geben Sie den gewünschten Code mit den Pfeiltasten ein und drücken Sie auf OK. 3. Geben Sie einen 4-stelligen Code ein und drücken Sie auf OK. 4. Wiederholen Sie den Code und drücken Sie auf OK. 5. (optional) Geben Sie einen Namen für den Code ein. o Dieser Name wird in der Pin-Code-Liste angezeigt und hilft Ihnen, den Code zurückzufinden. o Für mehr Informationen, siehe 17 Einen Text eingeben. o Möchten Sie keinen Namen eingeben, lassen Sie dieses Feld leer. 6. Drücken Sie auf OK. Bemerkungen In der Liste mit Codes: Ein PIN-Code ohne Namen wird als **** angezeigt Ein noch nicht definierter PIN-Code wird als angezeigt. Einen PIN-Code ändern 1. Zugriff auf das Menü: Gehen Sie im Programmiermodus zu «Gen. Settings», wählen Sie «Pin Code» und drücken Sie auf OK. 2. Wählen Sie den Code, den Sie ändern möchten, aus und drücken Sie auf OK. V /02/ Velleman nv
153 3. Drücken. 4. Siehe oben «Den PIN-Code einstellen» To set a pin code. Einen PIN-Code löschen PIN-Code 1 kann nicht gelöscht werden. Einen anderen Code löschen: 1. Zugriff auf das Menü: Gehen Sie im Programmiermodus zu «Gen. Settings», wählen Sie «Pin Code» und drücken Sie auf OK. 2. Wählen Sie den Code, den Sie löschen möchten, aus und drücken Sie auf OK. 3. Drücken Sie wieder auf OK. 7.5 Temp. Code (zeitlicher Code) Anwendung Mit diesem Code kann ein zeitlicher Benutzer das Alarmsystem scharf und unscharf schalten. Gilt nur ein Mal, um das Gerät ein- oder auszuschalten. Nach Gebrauch wird der Code automatisch gelöscht und müssen Sie, wenn nötig, einen neuen einstellen. Standardwert Es gibt keinen Standardwert Eigenschaften 4-stellig Optional Wird bei einer Systemrücksetzung auf Werkseinstellungen zurückgesetzt (siehe Systemrücksetzung) Einen zeitlichen Code einstellen 1. Zugriff auf das Menü: Gehen Sie im Programmiermodus zu «Gen. Settings», wählen Sie «Temp. code» und drücken Sie auf OK. 2. Geben Sie einen 4-stelligen Code ein und drücken Sie auf OK. 3. Wiederholen Sie den Code und drücken Sie auf OK. 4. Schalten Sie die Option «Latch Rpt» (latch key reporting) ein oder aus. o Diese Option ist nur sichtbar wenn die Option «Latch Rpt» eingeschaltet ist (siehe «Special Settings»). Siehe «Latch option» in 8 Special Settings für mehr Informationen. 5. Drücken Sie auf OK. V /02/ Velleman nv
154 Einen zeitlichen Code ändern CTC Zugriff auf das Menü: Gehen Sie im Programmiermodus zu «Gen. Settings», wählen Sie «Temp. code» und drücken Sie auf OK. 2. Drücken. 3. Siehe oben «Einen zeitlichen Code einstellen». Einen zeitlichen Code löschen 1. Zugriff auf das Menü: Gehen Sie im Programmiermodus zu «Gen. Settings», wählen Sie «Temp. code» und drücken Sie auf OK. 2. Drücken Sie wieder auf OK. 7.6 Duress code (Zwangscode) Anwendung Mit diesem Code schalten Sie das Alarmsystem scharf und unscharf. Wird dieser Code eingegeben, dann wird ein stiller Alarm ausgelöst und eine Nachricht an die programmierten Mobiltelefone gesendet. Nach Eingabe der Zwangscode ertönt keine Sirene. Standardwert Es gibt keinen Standardwert Eigenschaften 4-stellig Optional Wird bei einer Systemrücksetzung auf Werkseinstellungen zurückgesetzt (siehe Systemrücksetzung) Einen Zwangscode einstellen 1. Zugriff auf das Menü: Gehen Sie im Programmiermodus zu «Gen. Settings», wählen Sie «Duress Code» und drücken Sie auf OK. 2. Geben Sie einen 4-stelligen Code ein und drücken Sie auf OK. 3. Wiederholen Sie den Code und drücken Sie auf OK. Einen Zwangscode ändern 1. Zugriff auf das Menü: Gehen Sie im Programmiermodus zu «Gen. Settings», wählen Sie «Duress Code» und drücken Sie auf OK. 2. Drücken. 3. Geben Sie einen 4-stelligen Code ein und drücken Sie auf OK. 4. Wiederholen Sie den Code und drücken Sie auf OK. V /02/ Velleman nv
155 Einen Zwangscode löschen CTC Zugriff auf das Menü: Gehen Sie im Programmiermodus zu «Gen. Settings», wählen Sie «Duress Code» und drücken Sie auf OK. 2. Drücken Sie wieder auf OK. 7.7 Master Code Anwendung Mit diesem Code und dem PIN-Code gelangen Sie in den Programmiermodus. Standardwert 1111 Eigenschaften 4-stellig Obligatorisch kann nicht gelöscht werden Wird bei einer Systemrücksetzung auf Werkseinstellungen zurückgesetzt (siehe Systemrücksetzung) Beachten Sie, dass der Mastercode und der PIN-Code nicht übereinstimmen. Einen Mastercode einstellen 1. Zugriff auf das Menü: Gehen Sie im Programmiermodus zu «Gen. Settings», wählen Sie «Master Code» und drücken Sie auf OK. 2. Geben Sie einen 4-stelligen Code ein und drücken Sie auf OK. 3. Wiederholen Sie den Code und drücken Sie auf OK. Einen Mastercode ändern 1. Zugriff auf das Menü: Gehen Sie im Programmiermodus zu «Gen. Settings», wählen Sie «Master Code» und drücken Sie auf OK. 2. Drücken. 3. Geben Sie einen 4-stelligen Code ein und drücken Sie auf OK. 4. Wiederholen Sie den Code und drücken Sie auf OK. Einen Mastercode löschen 1. Zugriff auf das Menü: Gehen Sie im Programmiermodus zu «Gen. Settings», wählen Sie «Master Code» und drücken Sie auf OK. 2. Drücken Sie wieder auf OK. 7.8 A. Entry Time Mit der Option «A. Entry Time» (away entry time) stellen Sie die Zeit ein, die Sie nach Betreten des Hauses haben, um den PIN-Code einzugeben. Voraussetzungen: Alarmstatus: Away Angeschlossenes Gerät: Türkontakt oder PIR-Melder ist auf «Entry» oder «Away Entry» eingestellt (siehe 9.3). Handlung: Der Countdown startet wenn der Türkontakt oder der PIR-Melder aktiviert wird. Geben Sie einen falschen PIN-Code innerhalb der eingestellten Zeit ein, dann schaltet das Bedienfeld den Alarm ein und sendet eine Nachricht. Verfügbare Timer-Optionen: «Disable» (der Alarm wird ohne Verzögerung eingeschaltet) und Verzögerungen zwischen 10 und 70 Sekunden. Standard: 20 Sekunden. Zugriff auf das Menü: Gehen Sie im Programmiermodus zu «Gen. Settings», wählen Sie «A. Entry Time» und drücken Sie auf OK. V /02/ Velleman nv
156 7.9 A. Exit Time Mit der Option «A. Exit Time» (away exit time) stellen Sie die Zeit ein, die Sie haben, um das Haus zu verlassen, nachdem Sie den Away-Modus aktiviert haben. Voraussetzungen: Alarmstatus: mit dem Bedienfeld, eine Fernbedienung oder ein Fernbedienfeld auf «Away» eingestellt. Handlung: Der Countdown startet wenn der Alarm mit dem Bedienfeld, eine Fernbedienung oder ein Fernbedienfeld auf «Away» eingestellt wird. Verfügbare Timer-Optionen: «Disable» (der Alarm wird ohne Verzögerung eingeschaltet) und Verzögerungen zwischen 10 und 70 Sekunden. Standard: 30 Sekunden. Zugriff auf das Menü: Gehen Sie im Programmiermodus zu «Gen. Settings», wählen Sie «A. Exit Time» und drücken Sie auf OK. Bemerkungen Drücken Sie auf die Taste zum Einschalten des Alarms (Fernbedienung), um den Countdown-Timer wieder zu starten. Drücken Sie auf die Taste zum Ausschalten des Alarms (Fernbedienung), um den Countdown-Timer zu stoppen und den Alarm auszuschalten. Geben Sie einen PIN-Code (Bedienfeld) ein, um den Countdown-Timer zu stoppen und den Alarm auszuschalten H. Entry Time Mit der Option «H. Entry Time» (home entry time) stellen Sie die Zeit ein, die Sie haben, um das Haus zu betreten, wenn das System auf Home-Modus eingestellt ist. Voraussetzungen: Alarmstatus: Home-Modus Angeschlossenes Gerät: Türkontakt oder PIR-Melder ist auf «Entry» oder «Home Access» eingestellt (siehe 9.3). Handlung: Der Countdown startet wenn der Türkontakt oder der PIR-Melder aktiviert wird. Geben Sie einen falschen PIN-Code innerhalb der eingestellten Zeit ein, dann schaltet das Bedienfeld den Alarm ein und sendet eine Nachricht. Verfügbare Timer-Optionen: «Disable» (der Alarm wird ohne Verzögerung eingeschaltet) und Verzögerungen zwischen 10 und 70 Sekunden. Standard: 20 Sekunden. Zugriff auf das Menü: Gehen Sie im Programmiermodus zu «Gen. Settings», wählen Sie «H. Entry Time» und drücken Sie auf OK H. Exit Time Mit der Option «H. Exit Time» (home exit time) stellen Sie die Zeit ein, die Sie um das Haus zu verlassen, wenn das System auf Home-Modus eingestellt ist. Voraussetzungen: Alarmstatus: mit dem Bedienfeld, eine Fernbedienung oder ein Fernbedienfeld auf «Away» eingestellt. Handlung: Der Countdown startet wenn der Alarm mit dem Bedienfeld, eine Fernbedienung oder ein Fernbedienfeld auf «Away» eingestellt wird. Verfügbare Timer-Optionen: «Disable» (der Alarm wird ohne Verzögerung eingeschaltet) und Verzögerungen zwischen 10 und 70 Sekunden. Standard: 30 Sekunden. V /02/ Velleman nv
157 Zugriff auf das Menü: Gehen Sie im Programmiermodus zu «Gen. Settings», wählen Sie «H. Exit Time» und drücken Sie auf OK. Bemerkungen Drücken Sie auf die Home-Taste (Fernbedienung), um den Countdown-Timer wieder zu starten. Drücken Sie auf die Taste zum Ausschalten des Alarms (Fernbedienung), um den Countdown-Timer zu stoppen und den Alarm auszuschalten. Geben Sie einen PIN-Code (Bedienfeld) ein, um den Countdown-Timer zu stoppen und den Alarm auszuschalten Door Chime Mit der Option «Door Chime» (Klingel) schalten Sie die Klingel ein oder aus wenn ein Türkontakt oder ein PIR- Melder im «Alarm OFF»-Modus aktiviert wird. Voraussetzungen: Alarmstatus: off Angeschlossenes Gerät: Türkontakt oder PIR-Melder ist auf «Entry» oder «Away Entry» eingestellt (siehe 9.3). Handlung: das Bedienfeld aktiviert die Klingel wenn ein Türkontakt oder ein PIR-Melder im «Alarm OFF»- Modus aktiviert wird. Standard: off. Zugriff auf das Menü: Gehen Sie im Programmiermodus zu «Gen. Settings», wählen Sie «Door Chime» und drücken Sie auf OK Time Mit der Option «Time» (Uhrzeit) stellen Sie die aktuelle Uhrzeit ein. 1. Zugriff auf das Menü: Gehen Sie im Programmiermodus zu «Gen. Settings», wählen Sie «Time» und drücken Sie auf OK. 2. Verwenden Sie die Pfeiltasten, um die Stunden einzustellen und drücken Sie auf OK. 3. Verwenden Sie die Pfeiltasten, um die Minuten einzustellen und drücken Sie auf OK Date Mit der Option «Date» (Datum) stellen Sie das aktuelle Datum ein. 1. Zugriff auf das Menü: Gehen Sie im Programmiermodus zu «Gen. Settings», wählen Sie «Date» und drücken Sie auf OK. 2. Verwenden Sie die Pfeiltasten, um den Monat einzustellen und drücken Sie auf OK. 3. Verwenden Sie die Pfeiltasten, um den Tag einzustellen und drücken Sie auf OK Panel Siren Mit der Option «Panel Siren» schalten Sie die Sirene des Bedienfelds im Alarmfall ein oder aus. 1. Zugriff auf das Menü: Gehen Sie im Programmiermodus zu «Gen. Settings», wählen Sie «Panel Siren» und drücken Sie auf OK. 2. Verwenden Sie die Pfeiltasten, um diese Option auszuwählen und drücken Sie auf OK. V /02/ Velleman nv
158 8. Special Settings (erweiterte Einstellungen) Zugriff auf das Menü: Gehen Sie zum Programmiermodus und wählen Sie «Spc. Settings» aus. Alarm Length Mit dieser Option können Sie die Dauer der Sirene im Alarmfall einstellen. Optionen: «Disable» (Sirene ausgeschaltet) und von 1 bis 15 Minuten. Standard: 3 Minuten. Bemerkungen Haben Sie «Disable» gewählt, so ertönt keine Sirene im Alarmfall (weder von der Bedienfeld-Sirene noch von der Innen- oder Außensirene). Ist die Dauer der Außensirene länger als die der Bedienfeld-Sirene, dennoch gibt das System der Bedienfeld-Sirene Priorität. Zum Beispiel: Die Außensirene und die Bedienfeld-Sirene heulen beide 1 Minute, obwohl Sie die Außensirene auf 3 Minuten eingestellt haben. Die LED bleibt aber 3 Minuten aber blinken. A. Exit Sound (=away exit sound) Um den Countdown-Piepton für den Away Exit Timer ein- oder auszuschalten. A. Entry Sound (=away entry sound) Um den Countdown-Piepton für den Away Entry Timer ein- oder auszuschalten. H. Exit Sound (=home exit sound) Um den Countdown-Piepton ein- oder auszuschalten wenn Sie das Haus im Home-Modus verlassen. V /02/ Velleman nv
159 H. Entry Sound (=home entry sound) Um den Countdown-Piepton ein- oder auszuschalten wenn Sie das Haus im Home-Modus betreten. Siren Delay Mit dieser Option stellen Sie ein, wie lange das Bedienfeld die akustischen Alarmsignale im Alarmfall verzögert oder unterdrückt. Optionen: Off (Sirene ausgeschaltet) und 1 bis 10 Minuten. Standard: off. Bemerkungen Diese Option gilt nur für Einbruch- oder Eingangsalarme. Die Verzögerung gilt nicht für: o o o o o o Feueralarm Wasseralarm Panikalarm Alarm für medizinischen Notfall Manipulationsalarm GSM Ausfall Die Nachricht wird sofort gesendet, auch wenn der hörbare Alarm verzögert ist. Verification Um die sequentielle Alarmverifizierung ein- oder auszuschalten. sequentielle Alarmverifizierung eingeschaltet Ist die sequentielle Alarmverifizierung eingeschaltet und Befinden sich mehrere Melder (Türkontakt oder PIR-Melder) im Burglar-Modus: o Wird der ersten Melder ausgelöst, dann sendet das Bedienfeld eine SMS-Nachricht mit «Burglar» (Einbruch). o Wird der zweiten Melder innerhalb von 30 Minuten aktiviert, dann sendet das Bedienfeld eine SMS- Nachricht mit «Alarm confirm» (bestätigter Alarm). sequentielle Alarmverifizierung ausgeschaltet Ist die sequentielle Alarmverifizierung ausgeschaltet, dann sendet das Bedienfeld nur eine SMS-Nachricht mit «Burglar» (Einbruch). Final Door Ist die Final Door-Option eingeschaltet und V /02/ Velleman nv
160 Befindet sich die Alarmanlage im Away Arming-Modus und Befindet sich ein Türkontakt im Entry-Modus dann aktiviert sich die Alarmanlage automatisch nach dem Schließen des Türkontaktes, auch wenn der Countdown noch nicht beendet ist. Interference Mit dieser Funktion können Sie die Erkennung von Störsignalen ein- oder ausschalten. Die Erkennung von Störsignalen ist eingeschaltet: Dauert die Störung länger als 30 Sekunden, so wird der Fehler protokolliert und es erscheint eine Warnung im LCD-Display. Die Erkennung von Störsignalen ist ausgeschaltet: Das Bedienfeld erkennt keine Störungen. RC Ent E (= remote controller entry enabled) Mit dieser Funktion wird verhindert, dass der Alarm mit einer Fernbedienung ausgeschaltet werden kann ohne, dass da zuerst eine Tür geöffnet werden muss. Zum Beispiel: Diebstahl der Fernbedienung. Zugriff auf diese Funktion: Es ist unmöglich die Alarmanlage mit einer Fernbedienung auszuschalten, ohne, dass da zuerst eine Tür geöffnet werden muss. Die Option «RC Ent E» ist eingeschaltet: die Alarmanlage kann mit einer Fernbedienung ausgeschaltet werden, ohne, dass da zuerst eine Tür geöffnet werden muss. Mobility Mit dieser Option können Sie den Mobility Timer ein- oder ausschalten und eine Countdown-Periode einstellen. Verfügbare Optionen: «Disable» (ausschalten), 4 Stunden, 8 Stunden und 12 Stunden. Ist der Mobility Timer eingeschaltet, dann startet der vorprogrammierten Countdown. Läuft der Timer ohne Rücksetzung ab, dann sendet das Bedienfeld eine Nachricht an die programmierten Telefonnummern. Ist der Mobility Timer mit einem spezifischen Timer eingestellt, dann sendet das Bedienfeld eine Nachricht an die programmierten Telefonnummern wenn der Timer abläuft, außer wenn eines der folgenden Ereignisse vor der Rücksetzung geschieht: o Im Home-Modus: Bei Auslösung vom Modus «Home Omit DC, IR» oder beim Drücken einer der Tasten des Bedienfelds. o Im Disarm-Modus: Bei Auslösung vom Modus «DC oder «IR» (außer 24 Hr, Fire, Medical Emergency und Water) oder beim Drücken einer der Tasten des Bedienfelds. Aktivieren Sie den Away Arm-Modus, dann stoppt der Timer automatisch. Wird der Home Arm- oder Disarm-Modus eingeschaltet, dann startet der Timer automatisch wieder. Sabotagekontakt Um einzustellen wenn die Sirene bei Manipulation der Alarmanlage eingeschaltet wird. Option Funktion Away Arm Only Im Away-Modus schaltet das Bedienfeld nur einen lokalen Alarm ein und sendet einen Bericht an die Zentrale. Im Home-Modus oder im Alarm Off-Modus sendet das Bedienfeld einen Bericht. Die Sirene ertönt aber nicht. V /02/ Velleman nv
161 Normal Das Bedienfeld schaltet einen lokalen Alarm ein und sendet einen Bericht an die Zentrale in allen Modi. Bemerkungen Ohne Berücksichtigung der Sirene-Einstellung sendet das Bedienfeld eine Nachricht an die erste Telefonnummer in allen Modi. Wird der Sabotagekontakt wiederhergestellt, dann sendet das Bedienfeld ebenfalls eine Nachricht an die erste Telefonnummer. Latch Option Die Latch-Option protokolliert die Handlungen (scharf/unscharf stellen) aller Benutzer sowohl für das Bedienfeld als auch für die Fernbedienung. Bemerkungen Ist die Latch-Option ausgeschaltet, dann erscheint diese nicht im Programmiermenü (siehe 7.5 Temp. Code). Ist die Latch-Option eingeschaltet, dann werden alle Handlungen (scharf/unscharf stellen) aller Benutzer standardmäßig protokolliert. Möchten Sie eine SMS-Nachricht empfangen, so stellen Sie die erste Telefonnummer als SMS-Bericht ein. Supervision Mit dieser Option schalten Sie die Aufsichtsfunktion ein oder aus. Ist diese Option eingeschaltet, dann empfängt das Bedienfeld Kontrollsignale der angeschlossenen Geräte, um anzuzeigen, dass diese korrekt funktionieren. Verfügbare Optionen: «Disable» (ausschalten), 8 Stunden, 12 Stunden und 24 Stunden. Warning Beep Mit dieser Option schalten Sie den Piepton ein oder aus wenn das Bedienfeld eine Fehlermeldung anzeigt. Das akustische Warnsignal wird ausgeschaltet wenn Sie die Fehlermeldung gelesen haben. GSM band Die GSM-Band-Einstellungen hängen von den Einstellungen des GSM-Netzbetreibers ab. Es ist möglich, dass Sie diese anpassen müssen. Setzen Sie sich mit dem lokalen Netzbetreiber in Verbindung für die geeigneten Einstellungen. Stop Wählen Sie «stop» und drücken Sie auf OK, um die Einstellungen zu speichern und zum vorherigen Menü zurückzukehren. V /02/ Velleman nv
162 9. Geräte bedienen Im Menü «Devices+/-» können Sie ein Gerät (z.b. Türkontakt, PIR-Melder, Sirene, usw.) in max. 30 Zonen hinzufügen, ändern, entfernen. Montagereihenfolge Innen- und Außensirenen und Universalempfänger sind zusätzliche Geräte für das System. Installieren Sie zuerst mindestens einen Melder oder eine Fernbedienung bevor Sie ein zusätzliches Gerät hinzufügen. 9.2 Ein Gerät hinzufügen Zugriff auf diese Funktion: 1. Gehen Sie im Programmiermodus zu «Devices+/-», wählen Sie «Add device» und drücken Sie auf OK. 2. Drücken Sie die Test-Taste des Gerätes, das Sie hinzufügen möchten. 3. Erkennt das Bedienfeld das Gerät, dann zeigt es den Gerätetyp an: Geräte: Türkontakt PIR-Sensor externer PIR-Sensor Fernbedienung Fern-Bedienfeld Wassermelder Außensirene Universal-Empfänger 4. Drücken Sie auf OK, um zu bestätigen. Das Bedienfeld zeigt dann die Zonen die nicht verwendet werden (max. 30). 5. Wählen Sie die Zonennummer, der Sie das Gerät zuweisen möchten, aus und drücken Sie auf OK. Das Verfahren hängt nun vom Gerätetyp, das Sie hinzufügen möchten, ab. 6. Wählen Sie «stop» und drücken Sie auf OK, um die Einstellungen zu speichern und zum vorherigen Menü zurückzukehren. V /02/ Velleman nv
163 Bemerkungen CTC1000 Versuchen Sie, einen schon hinzugefügten Melder, hinzuzufügen, dann erscheint eine Fehlermeldung. Möchten Sie das Gerät trotzdem hinzufügen, dann müssen Sie es zuerst entfernen (siehe 9.5 Ein Gerät entfernen). Drücken Sie auf dann wird das Verfahren aufgehoben. Die Fenster, die nun erscheinen, hängen vom Gerätetyp, den Sie hinzufügen möchten, ab. Einen Türkontakt hinzufügen 1. Verwenden Sie die Pfeiltasten, um einen Betriebsmodus auszuwählen und drücken Sie auf OK. Für mehr Informationen über die Betriebsmodi, siehe Geben Sie einen Zonennamen ein. Möchten Sie keinen Namen eingeben, lassen Sie dieses Feld leer. 3. Drücken Sie auf OK, um die Installation zu bestätigen. 4. Drücken Sie wieder auf OK, um zu beenden. Einen PIR-Melder hinzufügen Nach Eingabe einer Zonennummer (siehe 9.2): 1. Verwenden Sie die Pfeiltasten, um einen Betriebsmodus auszuwählen und drücken Sie auf OK. Für mehr Informationen über die Betriebsmodi, siehe Geben Sie einen Zonennamen ein. Möchten Sie keinen Namen eingeben, lassen Sie dieses Feld leer. V /02/ Velleman nv
164 3. Drücken Sie auf OK, um die Installation zu bestätigen. 4. Drücken Sie wieder auf OK, um zu beenden. Einen PIR-Melder für den Außenbereich hinzufügen Nach Eingabe einer Zonennummer (siehe 9.2): 1. Verwenden Sie die Pfeiltasten, um einen Bewegungsmeldertyp auszuwählen und drücken Sie auf OK. o Regular: das Gerät als normales PIR-Gerät hinzufügen. o External: das Gerät als PIR-Gerät für den Außenbereich hinzufügen. 2. Verwenden Sie die Pfeiltasten, um einen Betriebsmodus auszuwählen und drücken Sie auf OK. Für mehr Informationen über die Betriebsmodi, siehe Geben Sie einen Zonennamen ein. Möchten Sie keinen Namen eingeben, lassen Sie dieses Feld leer. Für mehr Informationen über die Eingabe eines Textes, siehe Drücken Sie auf OK, um die Installation zu bestätigen. 5. Drücken Sie wieder auf OK, um zu beenden. Eine Fernbedienung hinzufügen Nach Eingabe einer Zonennummer (siehe 9.2): 1. Verwenden Sie die Pfeiltasten, um die gewünschte Option für die Fernbedienung zu wählen. o Personal att (persönlicher Angriff): das Bedienfeld aktiviert den Alarm wenn die Paniktaste 3 Sekunden oder zwei Mal innerhalb von 3 Sekunden gedrückt wird. o Medical Emg (medizinischer Notfall): das Bedienfeld aktiviert den Alarm wenn die Paniktaste 3 Sekunden oder zwei Mal innerhalb von 3 Sekunden gedrückt wird. 2. Verwenden Sie die Pfeiltasten, um einen Betriebsmodus auszuwählen und drücken Sie auf OK. Für mehr Informationen über die Betriebsmodi, siehe Geben Sie einen Zonennamen ein. Möchten Sie keinen Namen eingeben, lassen Sie dieses Feld leer. Für mehr Informationen über die Eingabe eines Textes, siehe Drücken Sie auf OK, um die Installation zu bestätigen. V /02/ Velleman nv
165 5. Drücken Sie wieder auf OK, um zu beenden. Ein Fernbedienfeld oder einen Wassermelder hinzufügen Die Installation ist für diese Geräte ähnlich. Nach Eingabe einer Zonennummer (siehe 9.2): 1. Geben Sie einen Zonennamen ein. Möchten Sie keinen Namen eingeben, lassen Sie dieses Feld leer. Für mehr Informationen über die Eingabe eines Textes, siehe Drücken Sie auf OK. 3. Drücken Sie wieder auf OK, um zu beenden. Ein zusätzliches Gerät hinzufügen (Menü «Program Siren») Innen- und Außensirenen und Universalempfänger sind zusätzliche Geräte für das System. Installieren Sie zuerst mindestens einen Melder oder ein Fernbedienfeld bevor Sie ein zusätzliches Gerät hinzufügen. Ist dies nicht der Fall, dann erscheint eine Fehlermeldung. 1. Gehen Sie im Programmiermodus zu «Devices+/-», wählen Sie «Program Siren» und dann «Learn Siren» und drücken Sie auf OK. 2. Wählen Sie den Lernmodus für das Gerät, das Sie hinzufügen möchten (siehe Bedienungsanleitung des Gerätes). 3. Drücken Sie auf OK. Ein langer Piepton ertönt und das Bedienfeld sendet den Lerncode gleichzeitig an alle Geräte. Empfängt die Außensirene den Lerncode, dann aktiviert diese sofort die Sirene und das Blitzlicht. Die LED des Universalempfängers leuchtet 3 Sekunden. 9.3 Ein Gerät hinzufügen: Übersicht der Betriebsmodi Nachfolgender Überblick zeigt die möglichen Modi für alle Geräte an. Die verfügbaren Modi hängen vom Gerätetyp, den Sie hinzufügen möchten, ab. Modus Systemstatus Verhalten des Gerätes Burglar Wenn das Gerät sich im Away Arm- / Home Arm-Modus befindet, oder während der Eingangsverzögerungs- oder Ausgangsverzögerungsperiode Home Omit Wenn das Gerät sich im Away Arm-Modus befindet (inkl. Away Arm Entry) Home Access Wenn das Gerät sich im Home Arm- Modus befindet, wenn ein Home Omit- Türkontakt ausgelöst wird Während der Eingangs- oder Ausgangsverzögerungsperiode, wenn ein Home Omit-Türkontakt ausgelöst wird Wenn das Gerät sich im Away Arm-Modus befindet Wenn das Gerät sich im Home Arm- Modus befindet Während der Eingangs- oder Ausgangsverzögerungsperiode Delay Wenn das Gerät sich im Away Arm- / Home Arm-Modus befindet Während der Eingangs- oder Ausgangsverzögerungsperiode Entry Wenn das Gerät sich im Away Arm- / Home Arm-Modus befindet Wird ein Einbruch-Türkontakt ausgelöst, dann wird sofort ein Einbruchalarm eingeschaltet. Wird ein Home Omit-Türkontakt ausgelöst, dann wird sofort ein Einbruchalarm eingeschaltet. Das Bedienfeld antwortet nicht Das Bedienfeld antwortet nicht Wird ein Home Access-Türkontakt ausgelöst, dann wird sofort ein Einbruchalarm eingeschaltet. Wird ein Home Access-Türkontakt ausgelöst, dann startet das Bedienfeld eine Eingangsverzögerungsperiode, damit Sie genügend Zeit haben, um das System auszuschalten Wird ein Home Access-Türkontakt ausgelöst, dann antwortet das Bedienfeld nicht Wird ein Delay-Türkontakt ausgelöst, dann wird sofort ein Einbruchalarm eingeschaltet Wird ein Delay Zone-Türkontakt ausgelöst, dann antwortet das Bedienfeld nicht Wird ein Entry-Türkontakt ausgelöst, dann startet das Bedienfeld eine Eingangsverzögerungsperiode, damit Sie genügend Zeit haben, um das System auszuschalten V /02/ Velleman nv
166 Modus Systemstatus Verhalten des Gerätes Away Entry Nach Ablauf der Verzögerungszeit und wenn ein falscher PIN-Code eingegeben worden ist, um das System auszuschalten Wenn das Gerät sich im Alarm Off-Modus befindet Wenn das Gerät sich im Away Arm-Modus befindet Nach Ablauf der Verzögerungszeit und wenn ein falscher PIN-Code eingegeben worden ist, um das System auszuschalten Wenn das Gerät sich im Alarm Off-Modus befindet Wenn das Gerät sich im Home Arm- Modus befindet Während der Eingangs- oder Ausgangsverzögerungsperiode Das Bedienfeld schaltet nach 30 Sekunden einen Einbruchalarm ein Wird ein Entry-Türkontakt ausgelöst, dann ertönt «Ding-Dong» (wenn programmiert). Wird ein Away Entry-Türkontakt ausgelöst, dann startet das Bedienfeld eine Eingangsverzögerungsperiode, damit Sie genügend Zeit haben, um das System auszuschalten Das Bedienfeld schaltet nach 30 Sekunden einen Einbruchalarm ein Wird ein Entry-Türkontakt ausgelöst, dann ertönt «Ding-Dong» (wenn programmiert). Wird ein Away Entry-Türkontakt ausgelöst, dann reagiert das Bedienfeld nicht Wird ein Away Entry-Türkontakt ausgelöst, dann reagiert das Bedienfeld nicht 24 Hour Nicht zutreffend Dieser Türkontakt ist ständig aktiv und muss nicht ein- oder ausgeschaltet werden Fire Nicht zutreffend Dieser Türkontakt ist ständig aktiv und muss nicht ein- oder ausgeschaltet werden Medical Emg Nicht zutreffend Dieser Türkontakt ist ständig aktiv und muss nicht ein- oder ausgeschaltet werden Water Nicht zutreffend Dieser Türkontakt ist ständig aktiv und muss nicht ein- oder ausgeschaltet werden 9.4 Ein Gerät ändern Diese Funktion variiert abhängig vom Gerätetyp ab. Einen Tür-/Fensterkontakt - einen PIR-Bewegungsmelder - eine Fernbedienung ändern Gehen Sie im Programmiermodus zu «Devices+/-», wählen Sie «Edit devices» und drücken Sie auf OK. Das Display zeigt alle verfügbaren Geräte an: 1. Wählen Sie ein Gerät mit den Pfeiltasten und drücken Sie auf OK. Sie können die Geräteoption nun ändern. Möchten Sie diesen Schritt überspringen, drücken Sie. 2. Wählen Sie eine Option mit den Pfeiltasten und drücken Sie auf OK. V /02/ Velleman nv
167 3. Drücken Sie auf OK, um zu bestätigen. Sie können den Gerätenamen nun ändern. Möchten Sie diesen Schritt überspringen, drücken Sie weiterzuführen, drücken Sie. Um 4. Geben Sie einen Zonennamen ein und drücken Sie auf OK. Das Display kehrt zum Geräteliste zurück. Wählen Sie ein anderes Gerät mit den Pfeiltasten oder drücken Sie auf. Ein Fern-Bedienfeld - einen Wassermelder ändern 1. Gehen Sie im Programmiermodus zu «Devices+/-», wählen Sie «Edit devices» und drücken Sie auf OK. Das Display zeigt alle verfügbaren Geräte an: 2. Sie können den Gerätenamen nun ändern. 3. Geben Sie einen Zonennamen ein und drücken Sie auf OK. Das Display kehrt zum Geräteliste zurück. Wählen Sie ein anderes Gerät mit den Pfeiltasten oder drücken Sie auf. 9.5 Ein Gerät entfernen 1. Gehen Sie im Programmiermodus zu «Devices+/-», wählen Sie «Remove device» und drücken Sie auf OK. Alle verfügbaren Geräte werden angezeigt. 2. Wählen Sie ein Gerät mit den Pfeiltasten und drücken Sie auf OK. Für mehr Informationen über die Betriebsmodi, siehe Drücken Sie wieder auf OK, um zu bestätigen. 9.6 Menü «Program Siren other options» Learn Siren (Sirene lernen) Verbinden Sie einen Innen- oder einen Außenalarm oder einen Universalempfänger zuerst über den Programmiermodus mit dem Bedienfeld damit diese miteinander kommunizieren können. Bevor Sie ein zusätzliches Gerät hinzufügen, programmieren Sie zuerst mindestens eines der folgenden Geräte: PIR-Bewegungsmelder oder Tür-/Fensterkontakt. Installieren Sie aber keine Sirene, keinen Alarm oder keinen DIP-Schalter. Programmieren Sie aber keine Sirene, keinen Alarm oder keinen DIP-Schalter. V /02/ Velleman nv
168 Bevor Sie ein zusätzliches Gerät hinzufügen, fügen Sie zuerst mindestens eines der folgenden Geräte hinzu: Tür-/Fensterkontakt, PIR-Bewegungsmelder oder Fernbedienung). Eine Außen- oder Innensirene hinzufügen: 1. Beachten Sie, dass das Gerät oder die Geräte, die Sie hinzufügen möchten, sich im Lernmodus befinden. 2. Gehen Sie im Programmiermodus zu «Devices+/-», wählen Sie «Program Siren» und drücken Sie auf OK. 3. Wählen Sie «Learn Siren» mit den Pfeiltasten und drücken Sie auf OK. o o Ein langer Piepton ertönt und das Bedienfeld sendet den Lerncode gleichzeitig an alle Geräte. Die Außensirene schaltet die Sirene und das Blitzlicht sofort ein. 4. Deaktivieren Sie den Lernmodus für alle zusätzliche Geräte. Die Geräte sind nun hinzugefügt. Siren Tamp. On - Siren Tamp. Off (Sirene mit Sabotagekontakt ein- oder ausschalten) Der Sabotagekontakt der Außensirene kann über Fernbedienung ein- und ausgeschaltet werden. Diese Funktion ist sehr praktisch wenn Sie die Batterien der Sirene ersetzen möchten. Der Sabotagekontakt ausschalten: wählen Sie «Siren Tamp.Off» und drücken Sie auf OK. Der Sabotagekontakt aller angeschlossenen Sirenen wird zeitlich ausgeschaltet. Der Sabotagekontakt einschalten: wählen Sie «Siren Tamp.On» und drücken Sie auf OK. Der Sabotagekontakt aller angeschlossenen Sirenen wird gleichzeitig eingeschaltet. Confirm On - Confirm Off (Bestätigungston ein- oder ausschalten) Ist diese Option eingeschaltet, dann ertönt ein Bestätigungston (Außensirene) beim Ein- oder Ausschalten des Systems. Ist diese Option ausgeschaltet, dann ertönt kein Bestätigungston (Außensirene) beim Ein- oder Ausschalten des Systems. Wählen Sie «Confirm On» oder «Confirm Off» und drücken Sie auf OK. Entry Snd On - Entry Snd Off (Warnsignal ein- oder ausschalten) Ist diese Option ein- bzw. ausgeschaltet, dann ertönt ein bzw. kein Warnsignal (Sirene) wenn Sie das Haus betreten. Wählen Sie «Entry Snd ON» oder «Entry Snd OFF» und drücken Sie auf OK. 10. Andere Konfigurationsfunktionen SMS Editor Das Bedienfeld editiert die SMS-Nachricht, die im Alarmfall an das Mobiltelefon gesendet wird. 1. Gehen Sie im Programmiermodus zu «SMS Editor» Das Fenster, um die Nachricht zu editieren wird angezeigt. 2. Geben Sie eine SMS-Nachricht ein (max. 16x4 Zeichen). Für mehr Informationen über die Eingabe eines Textes, siehe Drücken Sie auf OK. V /02/ Velleman nv
169 4. Wählen Sie «Save» und drücken Sie auf OK, um zu bestätigen. SMS Keyword Das Bedienfeld unterstützt Befehle, die mit einem Mobiltelefon an das System gesendet werden. Sie müssen zuerst das «SMS keyword» eingeben, bevor Sie einen Befehl senden können.. Der PIN-Code für Befehle ändern: 1. Gehen Sie im Programmiermodus zu «SMS Keyword» und drücken Sie auf OK. 2. Geben Sie einen Code mit min. 1 und max. 10 Zeichen ein und drücken Sie auf OK. Dieser Code muss sich vom Benutzercode unterscheiden. 3. Wiederholen Sie den Code und drücken Sie auf OK. Country Code Die Format-Anzeige der Telefonnummer (mit oder ohne Ländercode) variiert und hängt vom GSM-Netzbetreiber ab. Zeigt ihr Mobiltelefon die Nummern ohne Ländercode an, so ignorieren Sie dieses Kapitel. Zeigt ihr Mobiltelefon die Nummern mit Ländercode an, dann ändern Sie eine Einstellung im Bedienfeld. Fragen Sie es Ihren Netzbetreiber oder testen Sie es selber wie folgt: 1. Stecken Sie die SIM-Karte, die Sie für das Bedienfeld verwenden möchten, in ein Mobiltelefon. 2. Schalten Sie das Mobiltelefon ein. 3. Beachten Sie, dass die Nummer keiner Person in Ihrem Mobiltelefon zuweisen. 4. Senden Sie eine SMS an dieselbe Nummer. o Zeigt das Mobiltelefon die Nummer ohne Ländercode (z.b ) an, so ignorieren Sie dieses Kapitel. o Zeigt das Mobiltelefon die Nummer mit Ländercode (z.b ) an, gehen Sie wie folgt vor. 5. Bedienfeld: Gehen Sie im Programmiermodus zu «Country Code» und drücken Sie auf OK. 6. Geben Sie Ihren Ländercode ein. Zum Beispiel: Ist die angezeigte Nummer auf dem Telefon , dann geben Sie 32 ein (ohne + ). 7. Drücken Sie auf OK. 8. Geben Sie 0 ein. 9. Drücken Sie auf OK, um zu beenden. GSM Signal Mit dieser Option können Sie die Signalstärke kontrollieren. 1. Bedienfeld: Gehen Sie im Programmiermodus zu «GSM signal» und drücken Sie auf OK. Das System zeigt die Signalstärke an (von 0 bis 9, 9 ist das stärkste Signal). V /02/ Velleman nv
170 Walk Test CTC1000 Die Option «Walk Test» (Gehtest) überprüft die Kommunikation zwischen dem Bedienfeld und die anderen Geräte. 1. Gehen Sie zum Programmiermodus, wählen Sie «Walk Test» und drücken Sie auf OK. 2. Drücken Sie auf die Test-Taste des Gerätes, das Sie überprüfen möchten. Empfängt das Bedienfeld ein Signal, dann werden der Name, die Zone und die Signalstärke angezeigt. 3. Drücken Sie auf um diese Funktion zu verlassen. Reset GSM Mit dieser Option können Sie das Signal des Mobiltelefons zurücksetzen. 1. Bedienfeld: Gehen Sie im Programmiermodus zu «Reset GSM» und drücken Sie auf OK. Es dauert etwa 1 Minute, um das Signal zurückzusetzen. 11. Den Alarm verwenden Ist der Alarm ausgeschaltet (off), geben Sie dann der PIN-Code ein, um in das Benutzermenü zu gelangen. In diesem Menü können Sie den Alarm ein- oder ausschalten. Geben Sie die erste Ziffer des PIN-Codes ein. 1. Geben Sie die anderen Ziffern des PIN-Codes innerhalb von 10 Sekunden ein. Im Display erscheint: 2. Der Cursor blinkt neben «Away Arm». Das Menü enthält folgende Optionen: Hat das System einen Fehler gefunden, dann erscheint auf der ersten Linie des Display das Folgende: 11.2 Das System einschalten Ist das System ausgeschaltet, dann können Sie es einschalten wie folgt: 1. Geben Sie Ihren Pin-Code ein und drücken Sie auf OK. Im Display erscheint: 2. Der Cursor blinkt neben «Away Arm». Drücken Sie auf OK. Im Display erscheint: V /02/ Velleman nv
171 o o Der Countdown startet und es ertönt ein Piepton. (Der Ton und die aktuelle Ausgangszeit hängen von Ihren Einstellungen ab, siehe 7.9.) Nach Ablauf des Countdowns hören Sie einen langen Piepton und wird das System eingeschaltet. Bemerkungen Das Bedienfeld hat einen Bildschirmschoner-Funktion. «Alarm ON» erscheint 180 Sekunden im Display. Danach wird nur noch die aktuelle Uhrzeit und das aktuelle Datum angezeigt. Ist die Option «Final Door» eingeschaltet, dann schaltet das Bedienfeld den Alarm ein sobald die Tür geschlossen ist. Wird ein Türkontakt oder ein PIR-Melder ausgelöst (z.b. eine Tür ist noch offen), dann können Sie den Alarm nicht einschalten. Möchten Sie das System trotzdem einschalten, siehe «Zwangseinschaltung». Das System kann auch mit der Fernbedienung (optional) eingeschaltet werden. Die Ausgangsverzögerung stoppen Haben Sie den Alarm eingeschaltet und ist der Countdown abgelaufen, dann können Sie die Ausgangsverzögerung stoppen, indem Sie das System ausschalten. 1. Drücken Sie auf. Ein Fenster zur Eingabe des PIN-Codes wird angezeigt. Der Countdown-Verzögerung erscheint auf dem Display. 2. Geben Sie Ihren Pin-Code ein und drücken Sie auf OK. «Alarm Off» erscheint auf dem Display und das System ist nun deaktiviert. o Die Ausgangsverzögerung kann auch gestoppt werden, indem Sie die Ausschalttaste auf der Fernbedienung (optional) drücken. o Läuft die Ausgangsverzögerungsperiode vor Eingabe der Code ab, dann wird das System eingeschaltet. Die Ausgangsverzögerung erweitern (nur Fernbedienung) Erweitern Sie die Verzögerungszeit, indem Sie die Einschalttaste auf der Fernbedienung (optional) drücken. Halten Sie die Einschalttaste 1 Sekunde gedrückt und Sie hören einen langen Piepton, um die Erweiterung zu bestätigen. Die Verzögerungszeit startet von Anfang an, jedes Mal, wenn Sie die Einschalttaste auf der Fernbedienung drücken Zwangseinschaltung Hat das System einen Fehler gefunden, dann erscheint eine Fehlermeldung im Display wenn Sie den PIN-Code eingeben. Wählen Sie «Away Arm» und drücken Sie OK, dann ertönt ein Warnsignal, um anzuzeigen, dass das Einschalten des Systems verboten ist. Das Display zeigt die aktuellen Fehler und die Nachricht «Fault Dsp» wechselweise an. Drücken Sie auf um zum «Alarm Off»-Modus zurückzukehren. Tritt ein Fehler auf, dann können Sie die Probleme lösen, das Fehlerdisplay löschen (siehe 14) und das System aktivieren (empfohlen). ignorieren Sie die Fehler und aktivieren Sie das System, trotz der Fehler wie folgt: Im «Fault Dsp»-Fenster: 1. Geben Sie Ihren Pin-Code ein und drücken Sie auf OK. Im Display erscheint: 2. Drücken Sie auf OK, um zu bestätigen. V /02/ Velleman nv
172 o o Der Countdown startet und es ertönt ein Piepton. (Der Ton und die aktuelle Ausgangszeit hängen von Ihren Einstellungen ab, siehe 7.9.) Nach Ablauf des Countdowns hören Sie einen langen Piepton und wird das System eingeschaltet. Das System bei geöffneter Tür einschalten. Aktivieren Sie das System wenn irgendeine Tür noch nicht geschlossen ist, dann ertönt ein Warnsignal, um anzuzeigen, dass das Einschalten verboten ist. Die Nachricht «Fault Dsp» (in der Mitte, oben) und der Sensornamen werden wechselweise alle 2 Sekunden angezeigt. Nachdem Sie die Tür geschlossen haben, verschwindet die Fehlermeldung automatisch und das System kehrt zum «Alarm Off»-Modus zurück. Sie können das System nun einschalten. Möchten Sie dennoch den «Arm»-Modus bei offener Tür einschalten, verwenden Sie dann «Forced Arming». Bemerkungen Das «Fault Dsp»-Fenster verfügt über eine Timeout-Funktion (5 Minuten). Das System kehrt nach 5 Minuten automatisch zum «Alarm Off»-Modus zurück. Wird ein Sensor deaktiviert (siehe Partial Arm-Modus), dann wird sein Status nicht kontrolliert. Wird ein Sensor manipuliert oder funktioniert er nicht mehr korrekt, dann können Sie ihn zeitlich deaktivieren oder definitiv entfernen Das System deaktivieren Das System kann sowohl im «Away Arm»- als auch im «Home Arm»-Modus (Alarm ON) deaktiviert werden. 1. Geben Sie Ihren Pin-Code ein und drücken Sie auf OK. Es ertönen zwei kurze akustische Signale und das System kehrt zum Disarm-Modus zurück. Fernbedienung Home-Modus (siehe unten): Drücken Sie die AUS-Taste auf der Fernbedienung, um das System zu deaktivieren. Away Arm-Modus: Drücken Sie die AUS-Taste auf der Fernbedienung, um das System zu deaktivieren wenn ein Eingangsgerät ausgelöst worden ist, oder wenn die «RC Ent E»-Funktion eingeschaltet ist (siehe RC Ent E (= remote controller entry enabled) in Kapitel 8) Home Arm-Modus Das System ist aktiviert und muss beim Betreten des Hauses zuerst deaktiviert werden. Sie können im Haus aber problemlos herumlaufen. Sie können nur zum Home-Modus gehen wenn das System deaktiviert ist. Den Home-Modus einschalten: 1. Geben Sie Ihren Pin-Code ein und drücken Sie auf OK. 2. Drücken Sie auf um Home Arm auszuwählen und drücken Sie auf OK. o o Der Countdown startet und es ertönt ein Piepton. (Der Ton und die aktuelle Ausgangszeit hängen von Ihren Einstellungen ab, siehe 7.9.) Nach Ablauf des Countdowns hören Sie einen langen Piepton und wird das System eingeschaltet. V /02/ Velleman nv
173 Bemerkungen CTC1000 Das System kann auch mit der Fernbedienung (optional) aktiviert werden. Um die Ausgangsverzögerung zu stoppen, siehe «Die Ausgangsverzögerung stoppen» in Kapitel Um die Ausgangsverzögerung zu stoppen, siehe «Die Ausgangsverzögerung erweitern (nur Fernbedienung)» in Kapitel Möchten Sie das System trotz eines Fehlers dennoch einschalten, siehe 11.3 «Zwangseinschaltung» Partial Arm-Modus (Bypass-Modus) Im Partial Arm-Modus können Sie egal welchen gewünschten Sensor deaktivieren (bypass). Das Alarmsystem ist eingeschaltet aber Sie können in der Zone mit ausgeschaltetem Sensor problemlos herumlaufen. Den Partial Arm-Modus einschalten 1. Geben Sie Ihren Pin-Code ein und drücken Sie auf OK. 2. Drücken Sie um «Bypass» auszuwählen und drücken Sie auf OK. 3. Drücken Sie auf & um die Zone, die Sie überspringen möchten, auszuwählen und drücken Sie auf OK (z.b.: DC Hintertür). 4. Drücken Sie auf OK, um zu bestätigen. Die deaktivierte Zone wird mit * versehen. 5. Wiederholen Sie Schrit 2-4, um ein anderes Gerät zu deaktivieren. 6. Drücken Sie danach auf, um zum Benutzermenü zurückzukehren und den Cursor bleibt auf «Arm» stehen. 7. Drücken Sie auf OK. Bemerkungen Haben Sie einen bestimmten Sensor deaktiviert, dann reagiert das Bedienfeld nicht auf seine Auslösung im Arm-Modus. Die Bypass-Funktion wird beim Ausschalten des Systems automatisch gelöscht. Wird ein bestimmter Sensor deaktiviert, dann können Sie das System, ohne Berücksichtigung der Fehlermeldung (wenn es eine gibt), sofort einschalten. Diese Situation wird aber protokolliert und wird bei Zugriff auf das Log-Submenü angezeigt Einen Alarm stoppen Im Alarmfall ertönt die Sirene und sendet das Bedienfeld eine Nachricht an die programmierte Telefonnummer. Im Display erscheint: Die Sirene ausschalten und das Display im Alarmfall löschen: Geben Sie Ihren Pin-Code ein und drücken Sie auf OK. Die Sirene wird nach Eingabe des korrekten PIN-Codes ausgeschaltet. V /02/ Velleman nv
174 Das System fordert Sie auf, den korrekten PIN-Code einzugeben wenn Sie nicht die erste Ziffer des PIN- Codes drücken. Eine Nachricht senden Dies hängt vom Zeitpunkt, an dem der Alarm gestoppt wird, ab. Vor dem Senden der Nachricht Während des Sendens der Nachricht Nach dem Senden der Nachricht Der Alarm wurde vor dem Senden der Nachricht ausgeschaltet Das System sendet keine Alarmnachricht. 1. Das Display zeigt das Gerät, das der Alarm ausgelöst hat und die Zonennummer an. 2. Drücken Sie auf OK. Werden verschiedene Alarme ausgelöst, dann zeigt das Bedienfeld das zweite Alarmereignis mit 02). an (Anfang der zweiten Zeile). 3. Drücken Sie auf OK bis das Folgende im Display erscheint: [Bedeutung: Das System hat keine Telefonnummer erreicht] 4. Drücken Sie auf OK. Das Display kehrt zum Alarm Off-Modus zurück. oder drücken Sie auf um alle Ereignisse zu sehen. Der Alarm wurde während des Sendens der Nachricht ausgeschaltet 1. Das Display zeigt das Gerät, das der Alarm ausgelöst hat und die Zonennummer an. 2. Drücken Sie auf OK. Werden verschiedene Alarme ausgelöst, dann zeigt das Bedienfeld das zweite Alarmereignis mit 02). an (Anfang der zweiten Zeile). 3. Drücken Sie auf OK bis das Folgende im Display erscheint: [Bedeutung: Das System hat keine Telefonnummer erreicht] 4. Drücken Sie auf OK. Das Display kehrt zum Alarm Off-Modus zurück. Der Alarm wurde nach dem Senden der Nachricht ausgeschaltet 1. Das Display zeigt das Gerät, das der Alarm ausgelöst hat und die Zonennummer an. 2. Drücken Sie auf OK. Werden verschiedene Alarme ausgelöst, dann zeigt das Bedienfeld das zweite Alarmereignis mit 02). an (Anfang der zweiten Zeile). 3. Drücken Sie auf OK bis das Folgende im Display erscheint: V /02/ Velleman nv
175 [die angerufene Telefonnummer wird angezeigt] 4. Drücken Sie auf OK. Das Display kehrt zum Alarm Off-Modus zurück. oder drücken Sie auf um alle Ereignisse zu sehen. Fernbedienung Sie können einen Alarm (außer dem Panikalarm) auch über die AUS-Taste auf der Fernbedienung (optional) ausschalten. Ein Panikalarm kann nicht mit der Fernbedienung ausgeschaltet werden. Sie können ihn nur über das Bedienfeld ausschalten. Dies ist um zu vermeiden, dass ein Einbrecher die Fernbedienung nimmt und den Alarm über die AUS-Taste auf der Fernbedienung ausschaltet. Alarmspeicher Wird ein Alarm während Ihrer Abwesenheit ausgelöst und wird eine Nachricht gesendet, dann wird die Alarmwarnung auf das Display angezeigt. Das Display kann nicht mit der Fernbedienung zurückgesetzt werden. Um das Display zu löschen, befolgen Sie dieselben Schritte als beschriben in Kapitel Alarmereignisse und Reaktionen Nachfolgend Liste zeigt die Alarmereignisse und die Reaktionen des Bedienfelds an. Alarmtyp Burglar Home Omit Das System ist ausgeschaltet keine Reaktion keine Reaktion Away Arm Home Arm Ausgangstimer Sofortiger Einbruchalarm Sofortiger Einbruchalarm Sofortiger Einbruchalarm keine Reaktion Sofortiger Einbruchalarm keine Reaktion Away Arm Entry- Timer Sofortiger Einbruchalarm Sofortiger Einbruchalarm Home Arm Entry- Timer Sofortiger Einbruchalarm keine Reaktion Home Access keine Reaktion Sofortiger Einbruchalarm Den Eingangstimer starten keine Reaktion keine Reaktion keine Reaktion Delay keine Reaktion Sofortiger Einbruchalarm Sofortiger Einbruchalarm keine Reaktion keine Reaktion keine Reaktion Entry Door Chime Den Eingangstimer starten Den Eingangstimer starten keine Reaktion keine Reaktion keine Reaktion Away Entry Door Chime Den Eingangstimer starten keine Reaktion keine Reaktion keine Reaktion keine Reaktion 24 HR. Einbruchalarm Einbruchalarm Einbruchalarm Einbruchalarm Einbruchalarm Einbruchalarm Fire Feueralarm Feueralarm Feueralarm Feueralarm Feueralarm Feueralarm V /02/ Velleman nv
176 Medical Notrufalarm Notrufalarm Notrufalarm Notrufalarm Notrufalarm Notrufalarm Water Wasseralarm Wasseralarm Wasseralarm Wasseralarm Wasseralarm Wasseralarm PIR- Außensensor keine Reaktion Sofortiger Einbruchalarm (es wird keine Nachricht gesendet) akustisches Signal keine Reaktion keine Reaktion keine Reaktion 12. Ereignisprotokoll Das Alarmprotokoll speichert die 20 letzten Ereignisse, inklusive alle Ereignisse mit Identifizierung des Gerätes alle Fehlerwarnungen alle Einschalt- und Ausschaltereignisse Die protokollierte Ereignisse werden in umgekehrter chronologischer Reihenfolge (neueste Ereignis zuerst) angezeigt. Das Protokoll hat ein START-Etikett vor dem neuesten Ereignis und ein END-Etikett nach dem ältesten Ereignis. Ein Ereignisprotokoll anzeigen: Im Alarm Off-Modus: 1. Geben Sie den Benutzercode ein und drücken Sie auf OK, um in das Benutzermenü zu gelangen. 2. Drücken Sie wiederholt auf, um «Log» auszuwählen und drücken Sie danach auf OK. Nun werden die protokollierten Ereignisse angezeigt. 3. Verwenden Sie &, um durch die protokollierten Ereignisse zu blättern. 13. Anti-Fehlalarm Das Gerät verfügt über folgende Funktionen: doppelte Eingangswarnung Ist das System eingeschaltet und wird ein Gerät im Entry-Modus ausgelöst, dann startet der Countdown (siehe «General Settings») Mit dem Eingangstimer werden Sie benachrichtigt, dass das System eine SMS-Nachricht an die programmierte Telefonnummer schicken wird. Während des Countdowns: Der Alarm wird eingeschaltet wenn ein anderes Gerät, das sich nicht im Entry- Modus befindet, ausgelöst wird oder wenn Sie eine falsche PIN-Code eingeben. Wird der Alarm ausgelöst, dann wartet das System noch 30 Sekunden bevor es Berichte an die programmierten Telefonnummern sendet. Geben Sie innerhalb von 30 Sekunden einen korrekten PIN-Code ein, so wird der Alarm gestoppt und das System kehrt zum normalen Status zurück. Geben Sie innerhalb von 30 Sekunden keinen korrekten PIN-Code ein, dann wird der Einbruchalarm eingeschaltet und eine Nachricht an die programmierten Telefonnummern gesendet. Berichterstattung über Ein- und Ausschalthandlungen Steht die «Latch»-Option auf ON (Werkseinstellung), dann empfangen Sie Informationen über alle Ein- und Ausschalthandlungen mit PIN-Code oder Fernbedienung. Alarmmeldung: Sequentielle Alarmverifizierung Ist die sequentielle Alarmverifizierung eingeschaltet (Werkseinstellung: OFF) und wird ein Einbruchalarm eingeschaltet, und wird ein anderes Gerät im Burglar-Modus (Einbruch) innerhalb von 30 Minuten ausgelöst, dann sendet das System eine Alarm-Bestätigungsnachricht an die programmierten Telefonnummern. Für mehr Informationen, siehe «Verification», Seite 16. Das System sendet nicht nur einen Bericht zur sequentiellen Verifizierung sondern auch einen Alarmbericht. Wird das zweite Gerät innerhalb der Countdownzeit ausgelöst, dann sendet das System keinen Bericht zur sequentiellen Verifizierung. V /02/ Velleman nv
177 14. Fehler Mögliche Fehler: control panel Low Battery (niedrige Batteriespannung: Bedienfeld) AC Power Fail (Stromausfall) Sensor Out-of-order (Sensor funktioniert nicht) Sensor Low Battery (niedrige Batteriespannung: Sensor) Device and control panel Tamper (Sabotagekontakt: Gerät und Bedienfeld) Interference Detection (System ha Störungen gefunden) SIM card missing (SIM-Karte fehlt) GSM out of signal (das System empfängt kein GSM-Signal) Hat das Bedienfeld einen Fehler gefunden, dann wird dieser angezeigt. Mögliche Fehler Bedienfeld Stromversorgung PIR-Sensor (Bewegungsmelder) Türkontakt Sensor Low Battery (niedrige Batteriespannung: Sensor) Sensor Out-of-order (Sensor funktioniert nicht) Interference (Störungen) SIM card missing (SIM-Karte fehlt) GSM out of signal (das System empfängt kein GSM- Signal) Ein Sabotagekontakt vermeidet, dass das Gerät aus der Halterung entfernt wird. Ein Sabotagekontakt vermeidet, dass der Deckel der Stromversorgung geöffnet oder entfernt wird. Ein Sabotagekontakt vermeidet, dass das Gehäuse geöffnet wird. Ein Sabotagekontakt vermeidet, dass das Gerät vom Montageort entfernt wird. Ein Sabotagekontakt vermeidet, dass dass Gehäuse geöffnet oder von der Montageoberfläche entfernt wird. Lo-Bat-Anzeige für PIR-Bewegungsmelder, Tür-/Fensterkontakt, Ferntastatur, Wassermelder, Fernbedienung. Der PIR-Bewegungsmelder, der Tür-/Fensterkontakt, der Wassermelder senden in einer Zeitspanne von 30~50 Min. Signale an das Bedienfeld. Das System sendet eine Meldung wenn es von einem Gerät keine Signale mehr empfängt. Sendet der Bewegungsmelder, der Tür-/Fensterkontakt, usw. keine Signale mehr (siehe «Supervision» in 8 «Special Settings»), dann leuchtet die gelbe LED und erscheint eine Fehlermeldung im Fehlermeldungsmenü. Das Gerät kann Störungen im 868 MHz-Frequenzband erkennen. Gibt es eine ununterbrochene Störung von über 30 Sekunden, dann wird dies im LCD-Display angezeigt (im Fault Display-Menü). Fehlt die SIM-Karte, dann wird dies im Display angezeigt. Empfängt das System kein GSM-Signal, so änderen Sie die Position des Bedienfelds, um ein besseres Signal zu empfangen. Fault message display (Fehlermeldungsmenü) Gibt es einen Fehler, dann sehen Sie das Folgende wenn Sie das System ausschalten: Die gelbe LED leuchtet wenn es einen Fehler gibt. Das LCD-Display zeigt den Fehlertyp und die Quelle im Fehlermeldungsmenü (Fault Display) an. Ein Warnsignal ertönt alle 30 Sekunden. Gibt es einen Fehler wenn das System sich im Full Arm-Modus befindet, dann wird dieser nur angezeigt wenn Sie das System ausschalten. Fehlermeldungen löschen Die gelbe LED erlischt automatisch nachdem Sie alle Fehler behoben haben oder ein Gerät mit Fehlern entfernt haben. Fehlermeldungen können nicht manuell gelöscht werden. Die Fehlermeldung bleibt im Display stehen, auch wenn Sie die Fehler behoben haben. Die Fehlermeldung kann nur manuell gelöscht werden. V /02/ Velleman nv
178 Die Fehlermeldung anzeigen/löschen CTC1000 Die Fehlermeldung anzeigen wenn das System ausgeschaltet ist. 1. Geben Sie Ihren Pin-Code ein und drücken Sie auf OK. 2. Auf dem Display erscheint Fault Dsp Arm mit dem Cursor neben Fault Dsp 3. Drücken Sie auf OK, um Fault Dsp auszuwählen. Alle Fehler werden angezeigt. 4. Verwenden Sie & um den Cursor nach unten oder nach oben zu bewegen. 5. Nachdem alle Fehler angezeigt worden sind, drücken Sie auf. Auf dem Display erscheint: Clear Fault Dsp (OK?) 6. Haben Sie den Fehler behoben, dann drücken Sie OK. Der Fehler wird gelöscht und das System kehrt zum Alarm Off-Modus zurück. Bemerkungen Haben Sie die Fehler nicht behoben, dann werden diese nicht gelöscht. Der Fehler erscheint wieder sobald Sie versuchen, das System einzuschalten und sorgt dafür, dass Sie das System nicht einschalten können. Sie können den Fehler nur löschen, nachdem Sie ihn korrigiert haben. Der Fehler bleibt aber protokolliert, auch wenn Sie die Fehlermeldung gelöscht haben Fehlerreaktion Hat das System einen Fehler gefunden, dann erscheint es im Display und antwortet das System. Die Antwort hängt vom Ereignis ab. Weder das Bedienfeld noch die Außensirenen ertönen wenn ein Fehler gefunden wird (Ausnahme: Sabotage-Alarm). Bei Stromausfall oder bei Einschaltung des Sabotagekontakts sendet das Bedienfeld eine Fehlermeldung über SMS. Für alle anderen Fehler sendet das Bedienfeld KEINE Fehlermeldung über SMS. AC Power Fail (Stromausfall) control panel Low Battery (niedrige Batteriespannung: Bedienfeld) Sensor Low Battery (niedrige Batteriespannung: Sensor) Die gelbe LED leuchtet und eine Fehlermeldung erscheint. Das Bedienfeld sendet innerhalb von Minuten eine Fehlermeldung über SMS an die erste Telefonnummer (in allen Betriebsmodi). Wird das System wieder mit dem Netz verbunden, dann sendet das Bedienfeld innerhalb von Minuten eine SMS-Nachricht an die erste Telefonnummer. Die gelbe LED leuchtet und eine Fehlermeldung erscheint im Fehlermeldungsmenü sobald das System eine niedrige Batteriespannung im Bedienfeld entdeckt. Wird das Bedienfeld mit einem Netzteil betrieben, dann funktioniert die Lo-Bat-Anzeige nicht. Die gelbe LED leuchtet wenn das Bedienfeld die niedrige Batteriespannung eines Sensors entdeckt. Die Fehlermeldung wird im Fehlermeldungsmenü angezeigt. Sabotage des Bedienfelds Wird der Sabotagekontakt vom Bedienfeld ausgelöst, dann leuchtet die gelbe LED. Die Fehlermeldung wird im Fehlermeldungsmenü angezeigt. Außerdem sendet das Bedienfeld eine SMS-Nachricht an die erste Telefonnummer (in allen Betriebsmodi). V /02/ Velleman nv
179 Sabotage eines Sensors Wird der Sabotagekontakt von einem PIR-Bewegungsmelder, Tür-/Fensterkontakt, Fern-Bedienfeld oder einer Außensirene ausgelöst, dann leuchtet die gelbe LED. Die Fehlermeldung wird im Fehlermeldungsmenü angezeigt. Sensor Out-of-order (Sensor funktioniert nicht) Außerdem sendet das Bedienfeld eine SMS-Nachricht an die erste Telefonnummer (in allen Betriebsmodi). Die Sirene ertönt wenn der Sabotagekontakt ausgelöst wird (siehe «Sabotagekontakt» 8). Sendet der Bewegungsmelder, der Tür-/Fensterkontakt, usw. keine Signale mehr (siehe «Supervision»), dann leuchtet die gelbe LED und erscheint eine Fehlermeldung im Fehlermeldungsmenü. Das System sendet keine Berichte. interference Haben Sie die Funktion «Interference detection» eingeschaltet, dann leuchtet die gelbe LED wenn das System eine Störung während 30 Sekunden findet. Die Fehlermeldung wird im Fehlermeldungsmenü angezeigt Fehlermeldungen Die Fehlermeldung wird angezeigt wie folgt: Fehlermeldung AC failure GSM Signal Interference Panel L.B. Panel Tamper (Sensor w/ Zone Name) + L.B. (Sensor w/ Zone Name) + out (Sensor w/ Zone Name) + Tamper Sim Card? Bedeutung AC Power Fail (Stromausfall) GSM out of signal (das System empfängt kein GSM- Signal) Das System hat eine Störung gefunden Niedrige Batteriespannung (Bedienfeld) Sabotage des Bedienfelds Niedrige Batteriespannung (Sensor) Sensor Out-of-order (Sensor funktioniert nicht) Sabotage des Sensors SIM card missing (SIM-Karte fehlt) Beispiel: Folgende Nachricht erscheint bei niedriger Batteriespannung (Tür-/Fensterkontakt) in Zone 1: DC Z 01 L.B. Bemerkung Der Alarm kann nicht eingeschaltet werden solange ein Tür-/Fensterkontakt oder PIR-Bewegungsmelder eingeschaltet ist(z.b. wenn eine Tür noch offen steht). Fehlermeldung (DC w/ Zone Name) + open (IR w/ Zone Name) + Active Bedeutung Tür-/Fensterkontakt eingeschaltet PIR-Bewegungsmelder eingeschaltet 15. Fernsteuerung über SMS-Nachricht Das Gerät kann mit Befehlen über SMS angesteuert werden. Stellen Sie die Sprache des Handys auf English, bevor sie fortfahren. Liste mit Fernsteuerungen über SMS DTMF-Befehl Handlung 00 aufhängen mit Bestätigung 10 disarm 11 einschalten 20 Universalempfänger #1 ausgeschaltet 21 Universalempfänger #1 eingeschaltet V /02/ Velleman nv
180 30 Universalempfänger #2 ausgeschaltet 31 Universalempfänger #2 eingeschaltet Für 2-stellige DTMF-Befehle Eine SMS-Nachricht senden, um das System in den Arm-Modus zu stellen und eine Bestätigung an das Handy senden. Das Format ist: MICHAEL (mit Leerzeichen) MICHAEL SMS-Stichwort 2222 programmierter Benutzercode 11 DTMF-Befehl 00 eine Bestätigungsnachricht empfangen Bestätigungsnachricht Auf dem Display vom Handy erscheint die Bestätigungsnachricht wie folgt: Confirmed MICHAEL USER1 Arm Eine SMS-Nachricht senden, um das System in den Arm-Modus zu stellen und keine Bestätigung an das Handy senden. Das Format ist 9999 SMS-Stichwort 5678 programmierter Benutzercode 11 DTMF-Befehl Das System filtert die eingehenden SMS-Nachrichte automatisc und ignoriert und löscht automatisch alle Nachrichte ohne das Schlüsselwort. Das System erledigt den Befehl (die Befehle) sofort nachdem es eine SMS- Nachricht mit dem korrekten Schlüsselwort und PIN-Code empfangen hat. Luego, borra el mensaje. 16. Das System zurücksetzen Setzen Sie das Bedienfeld auf Werkseinstellungen zurück, dann werden auch alle PIN-Codes gelöscht und alle Geräte entfernt. Danach müssen Sie das Gerät wieder programmieren und die Geräte eins nach dem anderen hinzufügen. Löschen Sie alle programmierten Einstellungen wie folgt: 1. Trennen Sie das Gerät vom Netz und entfernen Sie die Pufferbatterie. 2. Verbinden Sie das Gerät mit dem Netz während Sie die -Taste gedrückt halten. 3. Lassen Sie die -Taste los wenn ein Signal ertönt. Das Bedienfeld zeigt «Enter Code» an. 4. Geben Sie das Folgende ein:, OK-Taste 5. Drücken Sie auf OK. Geben Sie einen falschen Code ein, dann kehrt das Bedienfeld zum normalen Alarm On-Modus zurück. 17. Einen Text eingeben Verwenden Sie die Tastatur, um Benutzernamen, Zonennamen, SMS-Texte, usw. einzugeben. Drücken Sie die gewünschte Taste. Drücken Sie diese wenn nötig verschieden Male, bis die gewünschte Buchstabe oder das gewünschte Symbol erscheint. Lassen Sie die Taste los, dann geht der Cursor zur nächsten Position und können Sie den folgenden Buchstaben eingeben. V /02/ Velleman nv
181 18. Technische Daten Stromversorgung Vac/50-60 Hz - 12 Vdc 500 ma (Netzteil mitgeliefert) Pufferbatterie wiederaufladbare Batterie 7.2 V 600 mah Ni-Mh (mitgeliefert) Autonomie ± 8 Stunden Schallpegel ± 104 1m Frequenz MHz Betriebstemperatur -10 bis +45 C Feuchte bis zu 90 % nicht-kondensierend Abmessungen 185 x 120 x 26 mm Gewicht 420 g Verwenden Sie dieses Gerät nur mit originellen Zubehörteilen. Velleman NV übernimmt keine Haftung für Schaden oder Verletzungen bei (falscher) Anwendung dieses Gerätes. Für mehr Informationen zu diesem Produkt und die neueste Version dieser Bedienungsanleitung, siehe Alle Änderungen ohne vorherige Ankündigung vorbehalten. URHEBERRECHT Velleman NV besitzt das Urheberrecht für diese Bedienungsanleitung. Alle weltweiten Rechte vorbehalten. Ohne vorherige schriftliche Genehmigung des Urhebers ist es nicht gestattet, diese Bedienungsanleitung ganz oder in Teilen zu reproduzieren, zu kopieren, zu übersetzen, zu bearbeiten oder zu speichern. V /02/ Velleman nv
182 MANUAL DO UTILIZADOR 1. Introdução Aos cidadãos da União Europeia Importantes informações sobre o meio ambiente no que respeita a este produto Este símbolo no aparelho ou na embalagem indica que, enquanto desperdícios, poderão causar danos no meio ambiente. Não deite o aparelho (nem as pilhas, se as houver) no lixo doméstico; dirija-se a uma empresa especializada em reciclagem. Devolva o aparelho ao seu distribuidor ou ao posto de reciclagem local. Respeite a legislação local relativa ao meio ambiente. Em caso de dúvidas, contacte com as autoridades locais para os resíduos. Agradecemos o facto de ter adquirido este aparelho. Leia atentamente as instruções do manual antes de usar o aparelho. Caso o aparelho tenha sofrido algum dano durante o transporte não o instale e entre em contacto com o seu distribuidor. conteúdo da embalagem Painel de controlo Adaptador Bateria recarregável Ni-Mh Opcional sensor de movimento PIR (referência CTC1000PIR) contacto de porta (referência CTC1000DS) teclado à distância (referência CTC1000KP) mando a distancia (referência CTC1000RC) sensor de água (referência CTC1000WS) campaínha exterior (referência CTC1000SO) sirene sem fios (referência CTC1000SI) 2. Instruções de segurança Mantenha o aparelho fora do alcance de crianças e pessoas não autorizadas. Usar apenas em interiores. Proteger o aparelho contra a chuva e humidade ou qualquer tipo de salpicos ou gotas. Desligar da corrente antes de abrir a tampa. Cuidado durante durante a instalação pois pode sofrer alguma descarga eléctrica ao tocar num cabo que está ligado à corrente. Danos causados pelo não cumprimento das normas de segurança referidas neste manual anulam a garantia e o seu distribuidor não será responsável por qualquer danos ou outros problemas daí resultantes. Mantenha o dispositivo afastado de gotas e salpicos. Os danos causados por modificações feitas no aparelho não estão cobertos pela garantia. O sistema proporciona uma protecção considerável da sua casa ou propriedade desde que usado correctamente. No entanto, não garante completa protecção contra assalto ou roubo. Assim, a VELLEMAN nv não será responsável por quaisquer perdas ou danos que possam ocorrer durante a utilização deste produto. 3. Normas gerais Consulte a Garantia de serviço e qualidade Velleman na parte final deste manual do utilizador. O sistema deve ser instalado por um técnico qualificado. Respeite a legislação local relativamente à instalação de sistemas de alarme. Se necessário, consulte as autoridades locais. Proteja o aparelho de quedas e má utilização. Evite usar força excessiva ao utilizar o aparelho. V /02/ Velleman nv
183 Proteja o dispositivo de temperaturas extremas, pó e humidade. Familiarize-se com o funcionamento do aparelho antes de o utilizar. Por razões de segurança, estão proibidas quaisquer modificações do aparelho desde que não autorizadas. O dispositivo não possui quaisquer peças cuja manutenção seja feita pelo o utilizador, excepto a bateria. Utilize o aparelho apenas para as aplicações descritas neste manual. Uma utilização incorrecta anula a garantia completamente. 4. Características painel de controlo sem fios com comunicador GSM incorporado para as 30 zonas Mensagens SMS 4 mensagens de alarme fixas para assalto, emergência, fogo e alarmes médicos. função que permite ao receptor da chamada ouvir o que se está a passar à sua volta. Editar SMS: 14 caracteres x 4 linhas = 56 caracteres no total comando à distância e acesso ao sistema a partir de qualquer local através de SMS. ecrã LCD retroiluminado e texto completo 16 x 2 caracteres cada uma das 30 zonas podem ser nomeadas/editadas individualmente pelo utilizador para rápido reconhecimento das áreas em causa. transmissor incorporado para activar a campaínha exterior ou a sirene sem fios. a activação da função "em casa" oferece total protecção enquanto está em casa, permitindo que se desloque livremente no seu interior sem disparar o alarme. supervisão total para garantir um funcionamento sem problemas. monitorização da porta aberta/fechada antes de armar o alarme oferece segurança extra. detecção de erro e visualização a detecção de modificações protege a unidade da abertura não autorizada ou da sua remoção do local de instalação. 5. Descrição Ver as figuras da página 2 deste manual do utilizador. 1 ecrã 2 teclado 3 sirene 4 LED amarelo - on: foi detectado um erro - off: não existem erros, o painel de controlo está no modo normal 5 microfone 6 LED verde - on: alimentação AC ligada - off: falha na alimentação AC 7 letras e algarismos 8 #: usar para entrar no modo Program 9 OK: confirma dados ou selecção 10 Cancel: usado no modo Program: cancela uma selecção, volta a ao ecrã anterior setas acima e abaixo: usadas no modo Program: movem o cursor para cima ou para baixo para seleccionar um item furos de montagem e protecção contra violação 13 Jack DC 14 bateria 15 compartimento do cartão SIM V /02/ Velleman nv
184 6. Instalação 6.1 Cartão SIM (opcional) Pode inserir um cartão SIM no painel de controlo para enviar relatórios de alarme para o seu telemóvel (até seis números). Antes de iniciar Antes de inserir o cartão SIM no painel de controlo e de o montar, recomenda-se que teste o formato do código do país usado pelo operador do seu telemóvel. Ver secção Country Code no capítulo10. Use o seu telemóvel para remover o código pin do cartão SIM. Inserir um cartão SIM O compartimento para o cartão SIM está localizado na parte de trás do dispositivo. Inserir o cartão SIM: 1. Desaparafuse o compartimento do cartão SIM. 2. Faça deslizar para o lado direito para o abrir (veja a indicação OPEN na parte lateral). 3. Abra o compartimento e insira o cartão SIM. 4. Faça deslizar o compartimento para a esquerda para fechar (veja a indicação CLOSE no compartimento). 5. Feche o compartimento apertando o parafuso. 6.2 Alimentação Use o adaptador AC incluído para ligar o painel de controlo a uma tomada de corrente. Certifique-se de que utiliza apenas o adaptador com a voltagem AC adequada para evitar danificar os componentes (ver Especificações Técnicas mais abaixo). Bateria recarregável Existe uma bateria recarregável (incluída, ver Especificações Técnicas mais abaixo) no interior do painel de controlo para segurança em casa de falha de energia. Durante o funcionamento normal, o adaptador AC é utilizado para fornecer energia ao painel de controlo e ao mesmo tempo recarregar a bateria. Quando a bateria está totalmente carregada, pode fornecer energia durante pelo menos 8 horas. São necessárias aproximadamente 48 horas para carregar completamente a bateria. ADVERTÊNCIA Nunca perfura as pilhas nem jogá-las no fogo, pois elas podem explodir. Mantenha as pilhas fora do alcance das crianças. Visor com retroiluminação O dispositivo tem um visor LCD com retroiluminação para fácil utilização no escuro. No entanto, em caso de falta de energia AC e para poupar a bateria recarregável, a função de retroiluminação fica inactiva até a energia AC ser novamente reposta. 6.3 Montar o painel de controlo Escolhar um local apropriado: requisitos Tenha os seguintes requisitos em conta ao escolher um local apropriado para montar o painel de controlo. O painel de controlo necessita de uma tomada de corrente. O painel de controlo deve estar num local de fácil acesso. Não instale o painel de controlo num local húmido (casa de banho...) Não instale o painel de controlo perto de uma fonte de calor. Não instale o painel de controlo no alinhamento de outros dispositivos de radio transmissão tais como telemóveis, telefones sem fios ou computadores wireless (Wi-Fi). Montar o painel de controlo O painel de controlo pode ser montado numa parede ou onde desejar. Certifique-se de que o painel de controlo é fixado mais ou menos à altura do peito para que o visor possa ser visto e o teclado convenientemente utilizado. 1. Use os 2 furos do suporte de parede para marcar a posição dos furos. 2. Faça 2 furos e introduza as buchas em plástico no caso de paredes de gesso ou tijolo. V /02/ Velleman nv
185 3. Aparafuse a base à parede CTC Ligue a fonte de alimentação no jack antes de fixar o painel à parede. 5. Pendure o painel de controlo no suporte de parede (com a frente do dispositivo virada para si). 6.4 Dois níveis de palavra-passe De forma a garantir máxima segurança no funcionamento do sistema, o painel de controlo tem 2 níveis de autorização. Quando pretende programar o sistema, tem de introduzir o código pin bem como o código principal. Se o painel de controlo lhe pede para introduzir o ENTER CODE ou P-CODE, deve introduzir o código pin de utilizador. Se o painel de controlo lhe pede para introduzir o M-CODE, deve digitar o código principal. Para mais informação sobre o código pin, veja a secção 7.4 Pin code. Para mais informação sobre o código principal, veja a secção 7.7 Master Code. 6.5 Primeira utilização Assumindo que já escolheu um local apropriado: 1. Ligue o painel de controlo à corrente AC. Ouvirá um longo beep. Alarm On aparece na primeira linha e 00:01 01 Jan na segunda linha do ecrã, indicando que o sistema está no modo Away (o modo por defeito) 2. Pressione o botão 1 do teclado. 3. Digite o código pin do utilizador 1 (o código por defeito á 1234) no período de 30 segundos. Pode pressionar para apagar o código. 4. Pressione a tecla OK (no período de 30 segundos). Ouvirá 2 beeps curtos e no ecrã aparecerá: O sistema está agora no modo Alarm Off. 5. Aguarde 2 a 3 minutos até o sistema verificar o seu estado. Se o LED amarelo acender, é sinal de que existe um erro. Consulte a secção 14 para mais informação. Notas O painel de controlo tem a função de protecção de ecrã. A mensagem de Alarm Off será exibida durante 180 segundos. Depois, o ecrá apresentará apenas a data e a hora. 7. Configuração Entrar no modo Programação: 1. Verifique se o alarme está desligado (ver secção 11.4). 2. Pressione a tecla #. No ecrã aparece: 3. No período de 30 segundos, digitar 1234 (código pin utilizador 1 por defeito) e pressione OK. No ecrã aparece: 4. No período de 30 segundos, digitar 1111 (Código Principal por defeito) e pressione OK. Durante 2 segundos aparece no ecrã: 5. Depois o menu de programação será exibido: V /02/ Velleman nv

186 Recomenda-se a alteração do código pin do utilizador 1 e do código principal na primeira utilização. Cursor O cursor é indicado por um ponto intermitente no canto superior esquerdo. Use as teclas e para mover o cursor. Pressione OK para confirmar. O menu Program contem os seguintes items: Notas Uma seta para baixo V indica que a lista pode ser arrastada para baixo. A seta desaparece ao chegar ao fim da lista. Uma seta para cima Λ indica que a lista pode ser arrastada para cima. A seta desaparece ao chegar ao topo da lista. Pressione Cancel para voltar ao ecrã de Alarm Off. No modo Program, se nenhuma tecla for pressionada durante 5 minutos, o painel de controlo volta automaticamente ao modo alarm off. 7.2 Tel. Setting (configurar tel.) No menu Tel. Setting, pode adicionar, alterar ou apagar números de telemóvel. O painel de controlo usa estes números para enviar relatórios de ocorrências. Pode adicionar até 6 números. Notas O ecrã mostra apenas os primeiros 11 dígitos de um número. Os números são listados por ordem de prioridade. O sistema liga para os números de telefone por essa mesma ordem. Caso o sistema não consiga ligar para o primeiro número, tenta o que vem a seguir na lista. Adicionar um número de telefone 1. Entrar no modo Program e seleccionar Tel. Settings no menu. O ecrã mostra os números de telefone. A lista está em branco na primeira utilização. 2. Use as teclas de seta para seleccionar as letras que pretende associar ao número (A a F) e pressione OK. V /02/ Velleman nv

187 3. Digite o número de telefone e pressione OK. CTC1000 o O número pode conter até 20 algarismos e caracteres * & #. o Ao digitar um número, a tecla funciona com tecla de retrocesso. Alterar um número de telefone 1. Entrar no modo Program e seleccionar Tel. Settings no menu. O ecrã mostra os números de telefone. 2. Use as teclas de seta para seleccionar o número que pretende alterar e pressione OK. Isto apaga o número de telefone. 3. Digite o novo número de telefone e pressione OK. o O número pode conter até 20 algarismos e caracteres * & #. o Ao digitar um número, a tecla funciona com tecla de retrocesso. Apagar um número de telefone 1. Entrar no modo Program e seleccionar Tel. Settings no menu. O ecrã mostra os números de telefone. 2. Use as teclas de seta para seleccionar o número que pretende apagar e pressione OK. 3. Pressione OK novamente. O número é apagado. 7.3 Definições gerais Aceder à opção de menu: entrar no modo Program e seleccionar Gen. Settings no menu. As opções de menu são: 7.4 Código Pin Utilização É necessário para armar ou desarmar o sistema. Código por defeito É necessário para aceder ao modo Program (juntamente com o código principal). Utilizador 1: 1234 Propriedades 4 dígitos Utilizador 2 a 4: não definido V /02/ Velleman nv
188 Obrigatório O código para o utilizador 1 não pode ser apagado. Será restaurado o código por defeito ao fazer a reinicialização do sistema (ver o capítulo Restaurar Sistema) O código pin tem de ser diferente do código principal Definir um código pin 1. Para aceder à opção de menu: entrar no modo Program, ir a Gen. Settings, seleccionar Pin Code e pressionar OK. 2. Use as teclas de seta para seleccionar o número de código que pretende definir e pressione OK. 3. Introduza um código de 4 dígitos e pressione OK. 4. Repita o código e pressione OK. 5. (opcional) Digitar um nome para o código. o Este nome aparecerá na lista dos códigos pin e ajudá-lo-á a indentificar o código. o Para mais informação sobre a digitação de texto, ver secção 17 Digitar Texto. o Caso não pretenda usar um nome, deixe este campo em branco. 6. Pressione OK. Notas Na lista de códigos um código pin sem nome é apresentado como **** um código pin ainda por definir é apresenado como Alterar um código pin 1. Para aceder à opção de menu: entrar no modo Program, ir a Gen. Settings, seleccionar Pin Code e pressionar OK. 2. Use as teclas de seta para seleccionar o código que pretende alterar e pressione OK. V /02/ Velleman nv
189 3. Pressionar. 4. Consulta o tópico To set a pin code abaixo. Apagar um código pin O código pin 1 não pode ser apagado. Apagar outro código: 1. Aceder à opção de menu: entrar no modo Program, ir a Gen. Settings, seleccionar Pin Code e pressionar OK. 2. Use as teclas de seta para seleccionar o código que pretende apagar e pressione OK. 3. Pressione OK novamente. 7.5 Temp. Code (código temporário) Utilização Usado para armar ou desarmar o sistema de alarme por um utilizador temporário Válido para apenas uma vez para ligar ou desligar o alarme. Uma vez usado, o código é automaticamente apagado e tem de voltar a ser definido caso seja necessário. Código por Não definido defeito Propriedades 4 dígitos Opcional Será apagado ao reinicializar o sistema (ver capítulo Reinicialização do Sistema) Definir um código temporário 1. Aceder à opção de menu entrar no modo Program, ir a Gen. Settings, seleccionar Temp.Code e pressionar OK. 2. Introduza um código de 4 dígitos e pressione OK. 3. Repita o código e pressione OK. 4. Coloque a opção Latch Rpt na posição On ou Off. o Esta opção só aparece se a opção Latch estiver ON nas Special Settings (definições especiais). Consulte a secção opção Latch no capítulo 8 Definições Especiais para informação mais detalhada. 5. Pressione OK. V /02/ Velleman nv
190 Alterar o código temporário. CTC Aceder à opção de menu: entrar no modo Program, ir a Gen. Settings, seleccionar Temp.Code e pressionar OK. 2. Pressionar. 3. Consulte o tópico Definir Código Temporário mais abaixo. Apagar um código temporário 1. Aceder à opção de menu: entrar no modo Program, ir a Gen. Settings, seleccionar Temp.Code e pressionar OK. 2. Pressionar OK novamente. 7.6 Código Ameaça Utilização Pode ser usado para armar ou desarmar o sistema de alarme. Introduzir o código quando está sob ameaça de um assaltante dispara um alarme silencioso e envia uma mensagem secreta para os números de telemóvel programados. Não toca qualquer sirene em caso de um alarme de ameaça. Código por Não definido defeito Propriedades 4 dígitos Opcional Será apagado ao reinicializar o sistema (ver capítulo Reinicialização do Sistema) Definir o código para alarme de ameaça 1. Aceder à opção de menu: entrar no modo Program, ir a Gen. Settings, seleccionar Duress Code e pressionar OK. 2. Introduzir um código de 4 diígitos e pressionar OK. 3. Repita o código e pressione OK. Alterar o código de alarme de ameaça 1. Aceder à opção de menu: entrar no modo Program, ir a Gen. Settings, seleccionar Duress Code e pressionar OK. 2. Pressionar. 3. Introduzir um código de 4 diígitos e pressionar OK. 4. Repita o código e pressione OK. V /02/ Velleman nv
191 Apagar o código de alarme de ameaça CTC Aceder à opção de menu: entrar no modo Program, ir a Gen. Settings, seleccionar Duress Code e pressionar OK. 2. Pressionar OK novamente. 7.7 Master Code (código principal) Utilização Necessário juntamente com o código pin para entrar no modo de programação do dispositivo. Código por 1111 defeito Propriedades 4 dígitos Obrigatório Não pode ser apagado É restaurado o código por defeito ao reinicializar o sistema (ver o capítulo Reinicialização do Sistema) O código principal tem de ser diferente dos códigos pin. Definir o código principal 1. Aceder à opção de menu: entrar no modo Program, ir a Gen. Settings, seleccionar Master Code e pressionar OK. 2. Introduzir um código de 4 diígitos e pressionar OK. 3. Repita o código e pressione OK. Alterar o código principal 1. Aceder à opção de menu: entrar no modo Program, ir a Gen. Settings, seleccionar Master Code e pressionar OK. 2. Pressionar. 3. Introduzir um código de 4 diígitos e pressionar OK. 4. Repita o código e pressione OK. Apagar o código principal 1. Aceder à opção de menu: entrar no modo Program, ir a Gen. Settings, seleccionar Master Code e pressionar OK. 2. Pressionar OK novamente 7.8 A. Entry Time A opção A. Entry Time (tempo para entrada) define o tempo de contagem decrescente que tem para introduzir o código pin após entrar em casa. Pré-requisitos: Estado do alarme: sair contacto de porta ou sensor PIR definido como Entry (entrada) ou Away Entry (entrada) (ver secção 9.3) Acção: a contagem decrescente é iniciada quando o contacto de porta ou o sensor PIR dispararam. Caso o código pin não tenha sido introduzido dentro do tempo definido, o painel de controlo dispara um alarme e envia um relatório. Opções de temporização disponíveis: Desactivar (o alarme será disparado de imediato) e períodos entre os 10 e os 70 segundos. A pré-definição de fábrica são 20 segundos. V /02/ Velleman nv
192 Para aceder a esta opção de menu: Entrar no modo Program, ir a Gen. Settings, seleccionar A. Entry Time e pressionar OK. 7.9 A. Exit Time A opção A. Exit Time (tempo para saída) define o tempo em contagem decrescente que tem para sair da casa após o alarme ter sido armado através do painel de controlo, controlo remoto ou teclado remoto. Pré-requisitos: Estado do alarme: armado para sair através do painel de controlo, controlo remoto ou teclado remoto Acção: a contagem decrescente é iniciada assim que o alarme é armado para sair através do painel de controlo, controlo remoto ou teclado remoto. Opções de temporização disponíveis: Desactivar (não será definido um período de tempo) ou períodos entre os 10 e os 70 segundos. A pré-definição de fábrica são 30 segundos. Aceder a esta opção de menu: entrar no modo Program, ir a Gen. Settings, seleccionar A. Exit Time e pressionar OK. Notas Pressionando o botão Arm (armar) no controlo remoto reinicia a contagem decrescente. Pressionando o botão Disarm (desarmar) do controlo remoto interrompe a contagem decrescente e desarma o alarme. Ao introduzir um código pin o painel de controlo interrompe a contagem e desarma o alarme H. Entry Time A opção H. Entry Time (tempo para entrada) define o tempo em contagem decrescente que tem para entrar na casa quando o sistema está no modo Home (Casa). Pré-requisitos: Estado do alarme: modo home Dispositivos de detecção envolvidos: contacto de porta ou sensor PIR definido como Entry (entrada) ou Home Access (acesso casa) (ver secção 9.3) Acção: a contagem decrescente é iniciada quando o contacto de porta ou o sensor PIR dispararem. Caso o código pin não tenha sido introduzido no tempo definido, o painel de controlo dispara um alarme e envia um relatório. Opções de temporização disponíveis: Desactivar (o alarme dispara de imediato) ou períodos entre os 10 e os 70 segundos. A pré-definição de fábrica são 20 segundos. Aceder a esta opção de menu: entrar no modo Program, ir a Gen. Settings, seleccionar H. Entry Time e pressionar OK H. Exit Time A opção H. Exit Time (tempo para sair) define o tempo em contagem decrescente que tem para sair da casa quando o sistema está no modo Home (Casa). Pré-requisitos: Estado do alarme: armado para sair através do painel de controlo, controlo remoto ou teclado remoto Acção: a contagem decrescente é iniciada assim que o alarme é armado para sair através do painel de controlo, controlo remoto ou teclado remoto. Opções de temporização disponíveis: Desactivar (não é definido qualquer período de tempo) ou períodos entre os 10 e os 70 segundos. V /02/ Velleman nv
193 A pré-definição de fábrica são 30 segundos. CTC1000 Aceder a esta opção de menu: entrar no modo Program, ir a Gen. Settings, seleccionar H. Exit Time e pressionar OK. Notas Pressionando o botão Home (casa) do controlo remoto reinicia a contagem decrescente. Pressionando o botão Disarm (desarmar) do controlo remoto interrompe a contagem e desarma o alarme. Ao introduzir um código pin no painel de controlo interrompe a contagem e desarma o alarme Door Chime (Campaínha) A opção Door Chime permite ligar ou desligar a campaínha enquanto o contacto de porta ou o sensor PIR é activado no modo alarme desligado. Pré-requisitos: Estado do alarme: off (desligado) Dispositivos de detecção envolvidos: contacto de porta ou sensor PIR na opção Entry ou Away Entry (ver secção 9.3) Acção: O painel de controlo toca uma campaínha enquanto o contacto de porta ou o sensor PIR é activado no modo alarme desligado. A pré-definição de fábrica é off (desligado). Aceder a esta opção de menu: entrar no modo Program, ir a Gen. Settings, seleccionar Door Chime e pressionar OK Hora A opção Time permite definir a hora actual. 1. Aceder a esta opção de menu: entrar no modo Program, ir a Gen. Settings, seleccionar Time e pressionar OK. 2. Use as setas acima e abaixo para escolher a hora e pressione OK. 3. Use as setas acima e abaixo para escolher os minutos e pressione OK Data a opção Date permite definir a data actual. 1. Aceder a esta opção de menu: entrar no modo Program, ir a Gen. Settings, seleccionar Date e pressionar OK. 2. Use as setas acima e abaixo para escolher o mês e pressione OK. 3. Use as setas acima e abaixo para escolher o dia e pressione OK Panel Siren (sirene do painel) A opção Panel Siren permite configurar a siren no painel de controlo para o modo on/off (ligado/desligado) ao ocorrer um evento. 1. Aceder a esta opção de menu: entrar no modo Program, ir a Gen. Settings, seleccionar Panel Siren e pressionar OK. 2. Use as setas acima e abaixo para escolher a opção e pressione OK. V /02/ Velleman nv
 e 1 a 15 minutos- A definição do sistema são 3 minutos.")
194 8. Special Settings (Definições Especiais) Para aceder opções do menu Spc. Settings: Entrar no modo Program e ir a Spc. Settings. Duração do Alarme Para definir a duração da sirene incorporada sempre que o alarme é activado. As opções disponíveis são: Desactivar (sem alarme) e 1 a 15 minutos- A definição do sistema são 3 minutos. Notas Se seleccionar a opção Disable (desactivar), quando o painel de controlo receber um sinal de alarme, a sirene do painel e as sirenes interior & exterior não emitem qualquer sinal sonoro. Se a duração da sirene de alarme exterior for superior à do painel de controlo, o sistema dá prioridade ao painel de controlo. (por exemplo que a duração da sirene de alarme está definida com 3 mintuso e a duração da do painel é de 1 minuto, ambas as sirenes ficarão em silêncio ao fim de 1 minuto; no entanto o LED da sirene exterior ficará a piscar durante 3 minutos. A. Exit Sound (som de saída) (=som de saída) Configuração dos beeps sonoros para a contagem decrescente (on/off) para o temporizador de saída. A. Entry Sound (som de entrada) (=som de entrada) Configuração dos beeps sonoros para a contagem decrescente (on/off) para o temporizador de entrada. H. Exit Sound (som saída no modo casa) (=som saída no modo casa) V /02/ Velleman nv
195 Configuração dos beeps sonoros (on/off) para o temporizador de saída no modo Home (Casa). H. Entry Sound (som entrada no modo casa) (=som entrada no modo casa) Configuração dos beeps sonoros (on/off) para o temporizador de entrada no modo Home (Casa). Siren Delay (adiar sirene) Define o período de tempo que o painel de controlo deve adiar ou suspender os sinais sonoros dos alarmes de entrada e intrusão. As opções disponíveis são: Off (sem som) e 1 a 10 minutos. Por defeito o sistema está em off. Notas A opção Siren Delay só se aplica aos alarmes de entrada e arrombamento. Os outros alarmes não serão desactivados: o Alarme Fogo o Alarme Água o Alarme Pânico o Alarme Emergência Médica o Alarme Sabotagem o Falha GSM O relatório de alarme será enviado imediatamente, mesmo que o alarme sonoro esteja desactivado. Verificação Definição da sequência de verificação dos alarmes. Verificação sequencial ligada Se a verificação sequencial estiver na opção On e Se existir mais do que um sensor (contacto de porta ou PIR) associado a Arrombamento: o Se o primeiro sensor disparar, o painel de controlo envia uma SMS indicando Arrombamento. o Se o segundo sensor disparar no período de 30 minutos, o painel de controlo envia uma SMS com a confirmação do alarme. Verificação Sequencial desligada Se a verificação sequencial estiver Off, o painel de controlo apenas enviará uma SMS indicando Arrombamento. Final Door V /02/ Velleman nv
196 Se a opção Final Door está na posição On e CTC1000 se os sistema de alarme está definido para away arming e o contacto de porta está definido como dispostivo de Entrada O sistema entra no modo armado total automaticamente logo que o o contacto de porta seja detectado como fechado, mesmo que o período de contagem decrescente ainda não tenha terminado. Interferência Permite definier se o painel de controlo deve detectar o bloqueio de sinal ou não. Quand a opção Detection (detecção) está On, sempre que o bloqueio de sinal durar mais de 30 segundos, o erro será registado, reportado à Estação de Monitorização Central e exibido no LCD para alertar o utilizador. Quando está seleccionada a opção Detection Off (detecção desligada), o painel de controlo não detecta interferências. RC Ent E (= entrada do controlador remoto activada) Esta função é usada para impedir que o alarme seja desligado a partir do controlo remoto sem primeiro fechar a porta caso, por exemplo, o controlo remoto tenha sido roubado. Para aceder à função : necessita de activar primeiro o dispositivo de entrada para ser possível desarmar o sistema de alarme. Se a entrada de controlador remoto estiver ON: um controlo remoto pode dearmar o sistema de alarm sem destrancar a porta primeiro. Mobilidade Esta opção desactiva ou activa o Mobility Timer (temporizador de mobilidade) e define o período de contagem decrescente. As opções disponíveis são Disable (desactivar), 4 horas, 8 horas e 12 horas. Se o Mobility Timer estiver activo, fará a contagem decrescente do período de tempo definido. Quando a contagem do temporizador termina sem ser desligada, será enviado um relatório para os números de telefone programados. Quando o Mobility Timer (temporizador de mobilidade) tem um determinado tempo definido, o painel de controlo envia um relatório para os números de telefone programados caso o tempo termine, a menos que se verifique alguma das seguintes operações a fim de interromper a contagem. o No modo Home (casa): sempre que qualquer Home Omit DC IR disparar, ou sempre que alguma das teclas do painel de controlo for pressionada; o No modo Disarm (desarmado): sempre que algum dos DC ou IR (excepto 24h, Foto, Emergência Médica e Água) dispara, ou sempre que alguma as teclas do painel de controlo é pressionada. Quando o sistema é está no modo Away Arm (armado sair), o temporizador pára automaticamente. Quando o sistema entra no modo Home Arm (armar casa) ou Disarm (desarmado) o temporizador inicia automaticamente. Alarme Sabotagem Permite definir quando tocará a sirene em caso de sabotagem do sistema. Opção Função Apenas no modo Away Arm O painel de controlo apenas activará um alarme local e enviará um relatório para o centro de monitorização se estiver no modo Away. V /02/ Velleman nv

197 Se o alarme estiver nos modos Home ou Alarm Off, o painel de controlo envia um relatório mas a sirene não toca. Normal O painel de controlo dispara um alarme local e envia um relatório ao centro de monitorização em qualquer modo. Notas Independentemente das definições da sirene, o painel enviará um relatório de alarme de sabotagem por SMS para o primeiro número de telefone da lista. Quando a ocorrência de sabotagem é restaurada, o painel de controlo enviará também uma SMS para o primeiro número de telefone da lista. Opção Latch A opção Latch regista as operações de armar/desarmar de todos os utilizadores feitas no painel de controlo e no controlo remoto. Notas Se a função Latchkey Reporting estiver Off, a função será omitida do menu de programação (ver secção 7.5 Temp. Code) Se a opção Latchkey Reporting estiver On, todas as operações de armar/desarmar de todos os utilizadores and RCs serão, por defeito, reportadas à Estação de Monitorização Central. Para receber um relatório via SMS defina o primeiro número de telefone com o relatório SMS. Supervisão Esta opção é usada para activar a função de supervisão do sistema. Quando esta opção está ON, o painel de controlo é capaz de receber sinais de verificação dos dispositivos a indicar o seu correcto funcionamento. As opções são: Desactivar, 8 horas, 12 horas e 24 horas. Aviso Sonoro Coloca a opção de aviso sonoro on ou off sempre que o painel de controlo exibe uma mensagem de erro. O aviso sonoro desaparece assim que a mensagem de erro for lida. Banda GSM Dependendo das configuração do operador de rede, terá necessidade de ajustar as definições de banda GSM em conformidade. Contacte com o operador de telecomunicações local para obter as definições correctas. V /02/ Velleman nv
 dispositivos como contactos de porta, sensores PIR, sirenes, etc, até 30 zonas.")
. 9.")
198 Stop CTC1000 Seleccione Stop e pressione OK para guardar as definições e voltar ao menu anterior. 9. Gestão de dispositivos O menu Devices+/- permite gerir (adicionar, configurar, alterar, remover) dispositivos como contactos de porta, sensores PIR, sirenes, etc, até 30 zonas. Ordem de instalação Sirenes interiores e exteriores e receptores universais são consideradiso dispositivos auxiliares pelo sistema. Antes de adicionar um destes dispositivos auxiliares, é necessário adicionar um dos outros dispositivos primeiro (contacto porta, detector PIR ou controlo remoto). 9.2 Adicionar um dispositivo Aceder à função: 1. Entrar no modo Program, ir a Devices+/-, seleccionar Add Device e pressionar OK. 2. Pressione o botão de teste no dispositivo que pretende adicionar. 3. Se o painel de controlo detectar o dispositivo, apresentará o tipo de dispositivo: Os dispositivos possíveis são: Contacto de Porta Sensor PIR Sensor PIR Exterior Controlador Remoto Teclado Remoto Sensor de Água Sirene Exterior Receptor Universal 4. Pressione OK para confirmar. O painel de controlo indica as zonas de defesa não utilizadas (até 30). V /02/ Velleman nv


199 5. Use as teclas de seta para seleccionar o número da zona à qual pretende atribuir o dispositivo e pressione OK. O procedimento varia dependendo do tipo de dispositivo que pretende adicionar. 6. Seleccione Stop e pressione OK para salvar as definições e voltar ao menu anterior. Notas Se estiver a tentar adicionar um sensor que já foi adicionado, aparece uma mensagem de erro. Para adicionar o dispositivo na mesma, terá de o remover primeiro (ver secção 9.5 Remover um dispositivo). Pressionar a tecla cancela o procedimento. Dependendo do tipo de dispositivo que pretende adicionar, aparecerão diferentes ecrãs tendo em conta o tipo de configuração. Adicionar um contacto de porta 1. Use as teclas acima e abaixo para seleccionar o modo de funcionamento e pressione OK. Para mais informação acerca dos modos de funcionamento disponíveis, veja a secção Atribua um nome à zona Se não pretende atribuir um nome, deixe este campo em branco. 3. Pressione OK para confirmar a instalação. 4. Pressione OK novamente para concluir. Adicionar um sensor PIR Presumindo que atribuíu um número à zona (ver secção 9.2): 1. Use as teclas acima e abaixo para seleccionar o modo de funcionamento e pressione OK. Para mais informação acerca dos modos de funcionamento disponíveis, veja a secção 9.3. V /02/ Velleman nv
200 2. Atribuir um nome à zona. Se não pretende atribuir um nome, deixe este campo em branco. 3. Pressione OK para confirmar a instalação. 4. Pressione OK novamente para concluir. Adicionar um Sensor PIR externo Presumindo que atribuíu um número à zona (ver secção 9.2): 1. Use as teclas acima e abaixo para seleccionar o tipo de PIR e pressione OK. o Regular: o dispositivo será adicionado com o PIR vulgar. o Externo: o dispositivo será adicionado como um PIR externo. 2. Use as teclas acima e abaixo para seleccionar o modo de funcionamento e pressione OK. Para mais informação acerca dos modos de funcionamento disponíveis, veja a secção Atribua um número à zona. Se não pretende atribuir um nome, deixe este campo em branco. Para informação acerca da digitação de texto, veja a secção Pressione OK para confirmar a instalação. 5. Pressione OK novamente para concluir. Adicionar um controlo remoto Presumindo que atribuíu um número à zona (ver secção 9.2): 1. Use as teclas acima e abaixo para seleccionar a opção que pretende para o controlo remoto. o Personal att (ataque pessoal): painel de controlo activa um alarme de ataque pessoal sempre que o botão de pânico é pressionado durante 3 segundos ou 2 vezes no período de 3 segundos. o Medical Emg (emergência médica): painel de controlo activa um alarme de emergência médica sempre que o botão de pânico é pressionado durante 3 segundos ou 2 vezes no período de 3 segundos. 2. Use as teclas acima e abaixo para seleccionar o modo de funcionamento e pressione OK. Para mais informação acerca dos modos de funcionamento disponíveis, veja a secção 9.3. V /02/ Velleman nv
201 3. Atribua um nome à zona. Se não pretende atribuir um nome, deixe este campo em branco. Para informação acerca da digitação de texto, veja a secção Pressione OK para confirmar a instalação. 5. Pressione OK para concluir. Adicionar um teclado remoto ou um sensor de água A instalação é similar para todos estes tipos de dispositivo. Presumindo que atribuíu um número à zona (ver secção 9.2): 1. Atribuir um nome à zona. Se não pretende atribuir um nome, deixe este campo em branco. Para informação acerca da digitação de texto, veja a secção Pressione OK. 3. Pressione OK para concluir. Adicionar um dispositivo auxiliar (Menu Programar Sirene) As sirenere interiores e exteriores e o receptores universais são considerados dispositivos auxiliares pelo sistema. Antes de adicionar um destes dispositivos auxiliares, terá de adicionar primeiro pelo menos um outro dispositivo (detector ou teclado remoto) O sistema dá uma mensagem de erro se não for esse o caso. 1. Entre no modo Program, vá a Devices+/-, seleccione Program Siren, depois Instalar Sirene e pressione OK. 2. Coloque o dispositivo que prentede adicionar no modo instalação (ver o manual do utilizador do dispositivo). 3. Pressione OK. O painel de controlo emitirá um longo beep e transmite o código de instalação para todos os dispositivos em simultâneo. A sirene exterior deverá responder activando a sirene e a luz estroboscópica momentaneamente. O LED do receptor universal acende durante 3 segundos. 9.3 Adicionar um dispositivo: apresentação dos modos de funcionamento A apresentação que se segue lista os possíveis modos de funcionamento para os vários dispositivos, em conjunto. Os modos estão de facto disponíveis dependendo do tipo de dispositivo que está a adicionar. Modo Estado do sistema Comportamento do dispositivo Arrombamento Home Omit Home Acesso (Acesso Casa) Quando o sistema está no modo Away Arm / Home Arm ou durante o período Entry Delay ou Exit Delay quando o sistema está no modo away arm (inc. away arm entry) quando o sistema está no modo home arm, se um contacto de porta home omit disparar durante o período de tempo para entrar ou sair, se um contacto de porta "home omit" disparar quando o sistema está no modo Away Arm quando o sistema está no modo Home Arm durante o período de tempo para entrar ou para sair Temporização quando o sistema está no modo arm / home arm se um contacto de porta contra arrombamento disparar, será activado de imediato um alarme de arrombamento. se um contacto de porta home omit disparar, será activado de imediato um alarme de arrombamento o painel de controlo não responderá o painel de controlo não responderá se um contacto de porta de acesso a casa disparar, será activado imediatamente um alarme de intrusão. se um contacto de porta de acesso a casa disparar, o painel de controlo inicia o período de tempo para entrada para dar tempo de desarmar o sistema. se um contacto de porta de acesso a casa disparar, o painel de controlo não responderá se um contacto de porta temporizado disparar, o alarme de intrusão dispara automaticamente. V /02/ Velleman nv

202 Modo Estado do sistema Comportamento do dispositivo Entry (Entrada) Away Entry durante o período de tempo para entrar ou para sair quando o sistema está no modo Away Arm / Home Arm assim que o período de tempo expirar e não tiver sido introduzido um código pin correcto para desarmar o sistema quando o sistema está no modo Alarm Off quando o sistema está no modo Away Arm assim que o período de tempo expirar e não tiver sido introduzido um código pin correcto para desarmar o sistema quando o sistema está no modo Alarm Off quando o sistema está no modo Home Arm durante o período de tempo para entrar ou para sair se um contacto de porta temporizado para uma zona disparar, o painel de controlo não responde se um contacto de porta para entrada disparar, o painel de controlo inicia o período de tempo para entrada para dar tempo suficiente para desarmar o sistema. o painel de controlo responde com uma alarme de intrusão após 30 segundos se um contacto de porta para entrada dispsarar, o painel de controlo emitirá um som ding-dong (se estiver programado). se um contacto de porta para entrada disparar, o painel de controlo inicia o período de tempo para entrada para dar tempo suficiente para desarmar o sistema. o painel de controlo responde com uma alarme de intrusão após 30 segundos se um contacto de porta para entrada dispsarar, o painel de controlo emitirá um som ding-dong (se estiver programado). se um contacto de porta de acesso a casa disparar, o painel de controlo não responderá se um contacto de porta de entrada for disparado, o painel de controlo não responde 24 horas Não se aplica o contacto de porta 24 horas está activo o tempo todo e não tem de ser armado ou desarmado Fogo Não se aplica o contacto de porta para fogo está activo o tempo todo e não tem de ser armado ou desarmado Emergência Médica Não se aplica o contacto de porta para emergência médica está activo o tempo todo e não tem de ser armado ou desarmado Água Não se aplica o contacto de porta para água está activo o tempo todo e não tem de ser armado ou desarmado 9.4 Editar um dispositivo Esta função varia dependendo do tipo de dispositivo que pretende editar. Editar um contacto de porta - sensor PIR - controlo remoto Entrar no modo Program, ir a Devices+/-, seleccioar Edit Devices e pressionar OK. No ecrã aparecem todos os dispositivos disponíveis. 1. Use as setas acima e abaixo para seleccionar o dispositivo e pressione OK. Pode agora alterar as atribuições do dispositivo. Para saltar este passo, pressione. V /02/ Velleman nv

203 2. Use as setas acima e abaixo para seleccionar um atributo e pressione OK. 3. Pressione OK para confirmar. Pode agora alterar o nome do dispositivo. Para saltar este passo, pressione OK.. Para continuar, pressione 4. Digite um nome de zona e pressione OK. O ecrã volta à lista dos dispositivos. Use as teclas acima e abaixo para seleccionar outro dispositivo e pressione. Editar um teclado remoto - sensor de água 1. Entrar no modo Program, ir a Devices+/-, seleccioar Edit Devices e pressionar OK. No ecrã aparecem todos os dispositivos disponíveis. 2. Pode agora alterar o nome do dispositivo. 3. Digite um nome de zona e pressione OK. O ecrã volta à lista dos dispositivos. Use as teclas acima e abaixo para seleccionar outro dispositivo e pressione. 9.5 Remover um dispositivo 1. Entrar no modo Program, ir a Devices+/-, seleccioar Remove Devices e pressionar OK. No ecrã aparecem todos os dispositivos disponíveis. 2. Use as teclas acima e abaixo para seleccionar outro dispositivo e pressione OK. Para mais informação sobre os modos de funcionamento disponíveis, ver secção 9.3. V /02/ Velleman nv

204 3. Pressione OK para confirmar. 9.6 Menu Program Siren - outras opções Adicionar Sirene Para adicionar uma sirene exterior, sirene interior ou receptor universal... e estes serem incluídos no sistema, devem ser primeiro programados pelo painel de controlo para que este consiga comunicar com os respectivos dispositivos auxiliares. Antes de adicionar um dispositivo auxiliar, pelo menos um outro tipo de dispositivo deve estar já programado (por ex. Contacto Porta ou PIR, mas não uma Sirene, Campaínha ou PSS) Antes de adicionar um destes dispositivo auxiliares, tem de adicionar primeiro pelo menos outro dispositivo (contacto de porta, PIR, detector ou controlo remoto). Adicionar uma sirene exterior ou interior: 1. Coloque o dispositivo ou dispositivos no modo de programação. 2. Entrar no modo Program, ir a Devices+/-, seleccionar Program Siren e pressionar OK. 3. Use as teclas acima e abaixo para seleccionar Learn Siren e pressione OK. o O painel de controlo emitirá um longo beep e transmitirá o código de instalação para todos os dispositivos em simultâneo. o A sirene exterior deverá responder activando a sirene e a luz estroboscópica momentaneamente. 4. Retire os dispositivos auxiliares do modo de programação. Já foram adicionados no sistema. Siren Tamp. On - Siren Tamp. Off O interrupor contra violação da sirene exterior pode ser activado ou desactivado remotamente. Utiliza-se sobretudo para substituir a bateria da sirene. Para desactivar o interruptor contra violação: seleccione Siren Tamp.Off e pressione OK. Todas as sirenes adicionadas ficarão simultânea e temporariamente sem protecção contra violação. Para activar o interruptor contra violação: seleccione Siren Tamp.On e pressione OK. A protecção contra violação serã restaurada em simultândo para todas as sirenes. Confirm On - Confirm Off (confirmação on/off) Ao escolher a opção On, a sirene exterior emite um beep de confirmação ao armar ou desarmar o sistema. Ao escolher a opção Off, a sirene exterior não emite qualquer beep de confirmação ao armar ou desarmar o sistema. Seleccione Confirm On ou Confirm Off e pressione Ok. Entry Snd On - Entry Snd Off (som de entrada on/off) Activa ou desactiva os beeps de aviso da sirene para o perído de tempo para entrada na casa. Seleccione Entry Snd On ou Entry Snd Off e pressione OK. V /02/ Velleman nv
205 10. Outras funções de confirmação Editor de SMS CTC1000 O painel de controlo permite editar a mensagem SMS que será enviada para o seu telemóvel em caso de ocorrência de alarme. 1. Entrar no modo Program e seleccionar SMS Editor no menu. Aparece o Ecrã de Edição. 2. Digite a mensagem de texto (até 16x4 caracteres). Para mais informação sobre digitação de texto, ver secção Pressione OK. 4. Seleccione Save e pressione OK para confirmar. Palavra-passe SMS O painel de controlo aceita instruções remotas enviadas a partir do seu telemóvel para o sistema. Antes de enviar instruções remotas, primeiro necessita de introduzir uma palavra-passe chamada palavra-passe SMS.. Alterar a palavra-passe para instruções remotas: 1. Entrar no modo Program, seleccionar SMS Keyword no menu e pressionar OK. 2. Introduza um código de 1 a 10 caracteres e pressione OK. Este código tem de ser diferente do código de utilizador. 3. Repita o código e pressione OK. Código do País O formato do número de telefone (com ou sem código do país) pode variar consoantes o operador do serviço. Se o seu telemóvel exibe os números de telemóvel sem o código do país, pode ignorar esta secção. Se o seu telemóvel exibe os número com o código do país, terá de alterar uma definição no painel de controlo. Pode colocar a questão ao seu operador de telemóvel ou fazer o teste da seguinte forma: 1. Introduza o cartão SIM que irá utilizar com o painel de controlo no seu telemóvel. 2. Ligue o telemóvel. 3. Certifique-se de que o número não está associado a nenhum contacto no seu telemóvel. 4. Envie uma mensagem sms para o mesmo número. o Se o seu telemóvel mostrar o número sem o código do país (por exemplo ), pode ignorar esta secção. o Se o seu telemóvel mostrar o número com o código do país (por exemplo ), proceda da seguinte forma: 5. No painel de controlo, entre no modo Program, vá a Country Code e pressione OK. 6. Introduza o código do seu país. Exemplo: se o número que aparecia no seu telemóvel era , digite 32 (sem o + ). V /02/ Velleman nv
206 7. Pressione OK. 8. No ecrã de Substituição, introduza Pressione OK para concluir. GSM Signal A opção GSM Signal (sinal GSM) permite monitorizar a força do sinal. 1. No painel de controlo, entre no modo Program, ir a GSM Signal e pressionar OK. O sistema indicará a força do sinal (de 0 a 9, sendo 9 o sinal mais forte). Walk Test (teste de comunicação A opção Walk Test verifica a comunicação entre o painel e qualquer outro dispositivo. 1. No painel de controlo, entrar no modo Program, ir a Walk Test e pressionar OK. 2. Pressione o botão de teste no dispositivo que pretende testar. Se o painel de controlo receber o sinal, apresentará o nome do dispositivo, a zona e a força de sinal. 3. Pressione para sair. Reset GSM (apagar sinal GSM) A opção Reset GSM apaga o sinal do telemóvel. 1. No painel de controlo, entrar no modo Program, ir a Reset GSM e pressionar OK. O sinal demora cerca de 1 minuto a ser apagado. 11. Usar o alarme Quando o alarme está desarmado (off), introduza um código pin para aceder ao menu do utilizador. A partir deste menu, pode ligar ou desligar o alarme. Introduza o primeiro dígito do seu código pin. 1. No período de 10 segundos, introduza os outros dígitos do código. No ecrã aparece: 2. O cursor pisca junto a Away Arm. O menu completo contem os seguintes items: V /02/ Velleman nv

207 Se o sistema detectar algum erro, na primeira linha do ecrã aparece: 11.2 Armar o sistema Se o sistema estiver desarmado, pode armá-lo da seguinte forma: 1. Introduza o seu código pin e pressione OK. No ecrã aparece: 2. O cursor pisca junto a Away Arm. Pressione OK. No ecrã aparece: o o O painel de controlo inicia a contagem decrescente e emite um som. (O som e o tempo para saída dependem das definições, ver 7.9.) Quando a contagem termina o sistema emitirá um som prolongado e o sistema ficará armado. Notas O painel de controlo tem uma função de protecção de ecrã. A mensagem para Alarm ON será apresentada durante 180 segundos. Depois, no ecrã aparecerá apenas a data e a hora. Se a opção Final Door Set Option estiver ON, o painel de controlo entra no modo Alarm On assim que a porta estiver fechada. Se enquanto arma o sistema, o contacto de porta ou sensor PIR dispararem (por exemplo uma porta que continua aberta) não conseguirá armar o sistema. Para armar o sistema na mesma, veja a secção Force Arming (armar forçado) mais abaixo. O sistema também poderá ser arma com o controlo remoto (opcional). Interromper o período de tempo para saída Se já armou o sistema e a contagem decrescente está a decorrer, pode interromper a contagem ao desarmar o sistema. 1. Pressione a tecla. O ecrã pede-lhe para introduzir o código pin. A contagem decrescente do tempo é apresentada no painel de controlo. 2. Introduza o seu código pin e pressione OK. No ecrã aparece Alarm Off e o sistema volta ao modo Disarmed (desarmado). o A contagem do tempo para saída pode também ser interrompida pressionando o botão Disarm do controlo remoto (opcional). o Se o período de tempo para saída terminar antes do código pin ser introduzido, o sistema ficará armado. Prolongar o período de tempo para saída (apenas com o controlo remoto) Durante a contagem do período de tempo para saída, este pode ser prolongado pressionado o botão Arm do controlo remoto (opcional). Mantenha o botão Arm pressionado durante 1 segundo e ouvirá um longo beep para confirmar o prolongamento do tempo. Sempre que pressionar o botão Arm do controlo remoto, a contagem começa desde o início. V /02/ Velleman nv
208 11.3 Forçar o armação do sistema Se estiver a introduzir o seu código pin enquanto o sistema detecta um erro, o painel de controlo exibe uma mensagem de erro. Se seleccionar Away Arm e pressionar Ok, o painel de controlo emitirá um som de aviso para indicar que não é possível armar. O ecrá exibirá alternadamente os erros detectados e a mensagem Fault Dsp. Terá de pressionar a tecla para voltar ao ecrã de Alarm Off. Se ocorre um erro, pode resolver o problema e limpar a mensagem de erro(ver secção 14) e armar o sistema (recomendado). o ignorar os erros e armar o sistema, apesar dos erros, da forma que se segue: No ecrã Fault Dsp: 1. Introduzir o seu código pin e pressionar OK. No ecrã aparece: 2. Pressione OK para confirmar. o o O painel de controlo inicia a contagem decrescente e emite um som. (o som e o tempo de contagem para saída dependem das definições, ver 7.9.) Ao terminar a contagem, o sistema emitirá um som prolongado e o sistema fica armado. Armar com a porta aberta Ao armar o sistema, se for detectada uma porta aberta, o painel de controlo emite um som de aviso para indicar que é impossível armar. A mensagem Fault DSP aparece a meio da parte superior do ecrã e alterna a cada 2 segundos com a indicação do nome do sensor que disparou. Neste momento, pode fechar a porta aberta, após o que a mensagem de erro desaparece automaticamente e o ecrã volta a Alarm Off. Agora poderá armar o sistema. Se pretende colocar o sistema no modo Arm com a porta aberta, poderá usar a função Forced Arming (armar forçado). Notas O ecrã Fault DSP tem uma duração de 5 minutos. Após este período de 5 minutos, volta automaticamente o ecrã Alarm Off. Se o sensor está suspenso(ver secção modo Partial Arm), o estado desse sensor não será verificado. Se ocorre violação ou erro num dos sensores, pode suspendê-lo temporariamente ou removê-lo permanentemente Desarmar o sistema Pode desarmar o sistema se este estiver no modo Away Arm ou Home Arm (Alarm ON): 1. Introduza o seu código pin e pressione OK. O painel de controlo emite 2 beeps breves e volta ao modo desarmado. Controlo remoto Quando o sistema está no modo Home (ver abaixo), pressionar o botão Disarm do controlo remoto desarma o sistema. V /02/ Velleman nv
 no capítulo8). 11.")
209 Quando o sistema está no modo Away Arm, pressionar o botão Disarm do controlo remoto pode desarmar o sistema no caso de um dispositivo de Entrada ter sido activado, ou no caso de o Remote Controller Entry Enable tenha sido colocado na posição ON (ver secção RC Ent E (= activar entrada do controlador remoto) no capítulo8) Modo Home Arm O modo Home permite armar o sistema de forma a que ninguém possa entrar em casa sem primeiro desarmar o sistema, muito embora a pessoa que está dentro de casa se possa mover livremente sem disparar o alarme. Só poderá entrar no modo Home Arm quando o sistema está desarmado. Activar o modo Home: 1. Introduza o seu código pin e pressione OK. 2. Pressione a tecla para mover o cursor para baixo e seleccionar Home Arm e pressionar OK. o o O painel de controlo inicia a contagem decrescente e emite um som. (O som e o tempo para sair dependem das definições, ver 7.9.) Quando a contagem decrescente termina, o sistema emite um som prolongado e o sistema fica armado. Notas O sistema pode também ser armado com o controlo remoto (opcional). Para interromper o tempo de saída, veja a secção Parar o Tempo de Saída no capítulo Para prolongar o tempo para saída, veja a secção Prolongar o Tempo para Saída (apenas controlo remoto) no capítulo Caso o sistema tenha detectado um erro e pretenda armar o sistema na mesma, veja a secção 11.3 Forçar Armação do Sistema Modo Partial Arm (armar parcial) (modo by-pass/suspenso) O modo Partial Arm permite ao utilizador desactivar (by-pass) os sensores que pretender. Esta função permite que a casa tenha o sistema armado; ainda assim a pessoa que está dentro da casa poderá mover-se livremente na área em que o sensor está desactivado. Activar o modo Partial Arm: 1. Introduza o seu código pin e pressione OK. 2. Pressione a tecla para mover o cursor para baixo e seleccionar Bypass e pressione OK. 3. Pressione as teclas & para seleccionar a zona que pretende desactivar e pressione OK (por exemplo: DC porta das traseiras). V /02/ Velleman nv
VGM. VGM information. ALIANÇA VGM WEB PORTAL USER GUIDE June 2016
 Overview The Aliança VGM Web portal is an application that enables you to submit VGM information directly to Aliança via our e-portal Web page. You can choose to enter VGM information directly, or to download
User Manual. Linksys PAP2 Broadband Phone Service. Linhagratuita grupo csdata
 User Manual Linksys PAP2 Broadband Phone Service Linhagratuita grupo csdata www.linhagratuita.com.br Please follow the step-by-step guide below to set up your Linksys PAP2 for use with Linhagratuita Broadband
VGM. VGM information. ALIANÇA VGM WEB PORTAL USER GUIDE September 2016
 Overview The Aliança VGM Web portal is an application that enables you to submit VGM information directly to Aliança via our e-portal Web page. You can choose to enter VGM information directly, or to download
Quick user guide. (réf )
") Quick user guide (réf. 34889) Download the app «mobile eye door +» How to SETUP, for the first time, your Chacon IP VDP Connect the cables with the same color to each other, of both units. Connect the
Quick user guide (réf. 34889) Download the app «mobile eye door +» How to SETUP, for the first time, your Chacon IP VDP Connect the cables with the same color to each other, of both units. Connect the
Stick Up Cam Battery
 Stick Up Cam Battery 1. Charge and insert the battery. Charge the provided battery. First, fully charge the battery by plugging it into a USB port using the provided orange cable. The battery is fully
Uma solução possível para garantir, em ambiente APEX, a consistência duma estrutura ISA total e disjuntiva.
 Uma solução possível para garantir, em ambiente APEX, a consistência duma estrutura ISA total e disjuntiva. A possible solution to ensure, in APEX environment, the consistency of a total and disjunctive
Trabalho de AMSR. Especificação e Verificação de uma Câmara Fotográfica Digital. Problema a Resolver FEUP/MRSC/AMSR MPR. » Problema a concurso
 VF 1 Especificação e Verificação de uma Câmara Fotográfica Digital Trabalho de AMSR FEUP/MRSC/AMSR MPR VF 2 Problema a Resolver» Problema a concurso 12 th SDL Forum, 20-24 Junho 2005, Grimstad, Noruega
Wi-Fi Range Extender Add-on Device Quickstart Guide
 Wi-Fi Range Extender Add-on Device Quickstart Guide Model No. WRP1220 What s inside: 1x Wi-Fi Range Extender 1x Power Adapter All Home8 add-on devices have to work with Home8 systems. português Passo 1:
Wi-Fi Camera Add-on Device Quickstart Guide
 Wi-Fi Camera Add-on Device Quickstart Guide Model No. IPC1200 What s inside: 1x Wi-Fi Camera 1x Power Adapter 1x Extension Cable Mounting Accessories All Home8 add-on devices have to work with Home8 systems.
Thank you for using Shepherd 240 Biometric Fingerprint Lock. Please read this Installation Manual carefully before attempting
 Preface Thank you for using Shepherd 240 Biometric Fingerprint Lock Please read this Installation Manual carefully before attempting to install your new lock. This manual covers installation procedures
português Passo 1: Monte seu hardware Passo 2: Configure seu Smartphone
 português Passo 1: Monte seu hardware Desembale todo hardware a uma distância de 3 metros de seu router doméstico. Conecte o Shuttle de Segurança ao router activado para DHCP com o incluso Cabo de Ethernet.
Fire + CO Alarm Sensor Add-on Device Quickstart Guide
 Fire + CO Alarm Sensor Add-on Device Quickstart Guide Model No. SNH1300 What s inside: 1x Fire + CO Alarm Sensor 2x Double-Sided Tapes 1x Battery (CR123A) Mounting Accessories All Home8 add-on devices
Valuable Tracking Sensor Add-on Device Quickstart Guide
 Valuable Tracking Sensor Add-on Device Quickstart Guide Model No. ADS1303 What s inside: 1x Valuable Tracking Sensor All Home8 add-on devices have to work with Home8 systems. português Passo 1: instalando
Wi-Fi 3-in-1 Trio Sensor Add-on Device Quickstart Guide
 Wi-Fi 3-in-1 Trio Sensor Add-on Device Quickstart Guide Model No. WTS3100 What s inside: 1 x Wi-Fi 3-in-1 Trio Sensor 7 x Double-sided Tapes 4 x Mounting Screws 1 x Battery (CR123A) All Home8 add-on devices
Infrared Motion Sensor Add-on Device Quickstart Guide
 Infrared Motion Sensor Add-on Device Quickstart Guide Model No. PIR1301 What s inside: 1x Infrared Motion Sensor 1x Double-Sided Tape 1x Battery (CR123A) All Home8 add-on devices have to work with Home8
How to use the system. Meike Borstelmann
 Technical ca Document Generatore Training: How to use the system Meike Borstelmann Trainings overview Why should we localize l the TDS with the Technical Document Generator? Keyword database Search for
Statecharts Yakindu Tool
 Statecharts Yakindu Tool 1 Agenda Introduction Installing Modeling Simulation Practice 2 https://www.itemis.com/en/yakindu/statechart-tools/ 3 Features Modeling Syntax checking Simulation Integration with
1. Product Name. 2. Product Code. 3. Colour. 4. Brief Description. 5. Contents. Peek A Boo Bear. Light brown bear the colour of the blanket may vary
 1. Product Name Peek A Boo Bear 2. Product Code 20837 3. Colour Light brown bear the colour of the blanket may vary 4. Brief Description Activate your switch to make this adorable bear play peek a boo.
Outdoor External Strobe Siren. ADD-ON DEVICE Quickstart Guide. What's inside: 1x Outdoor External Strobe Siren
 ADD-ON DEVICE Quickstart Guide Outdoor External Strobe Siren Model No. OSR1300 What's inside: 1x Outdoor External Strobe Siren 1x Power Adapter Mounting Accessories Broadband internet connection, ios or
Addition of Fields in Line Item Display Report Output for TCode FBL1N/FBL5N
 Addition of Fields in Line Item Display Report Output for TCode FBL1N/FBL5N Applies to: Any business user who uses the transactions FBL1N and FBL5N to display line item reports for vendors and customers.
Water Leak Sensor Add-on Device Quickstart Guide
 Water Leak Sensor Add-on Device Quickstart Guide Model No. WLS1300 What s inside: 1x Water Leak Sensor 2x Double-Sided Tapes 1x Battery (CR123A) Mounting Accessories All Home8 add-on devices have to work
Como Mudar a Senha do Roteador Pelo IP o.1.1. Configure e Altere a Senha do seu Roteador acessando o IP Acesse o Site e Confira!
 Como Mudar a Senha do Roteador Pelo IP 192.168.o.1.1. Configure e Altere a Senha do seu Roteador acessando o IP 192.168.1.1. Acesse o Site e Confira! If you are using the IP address 192.168.0.1.1, take
Uma solução possível para garantir, em ambiente APEX, a consistência duma estrutura ISA, total e disjuntiva.
 Uma solução possível para garantir, em ambiente APEX, a consistência duma estrutura ISA, total e disjuntiva. A possible solution to ensure, in APEX environment, the consistency of a total and disjunctive
português Passo 1: Monte seu hardware Passo 2: Configure seu Smartphone
 português Passo 1: Monte seu hardware Desembale todo hardware a uma distância de 3 metros de seu router doméstico. Conecte o Shuttle de Segurança ao router activado para DHCP com o incluso Cabo de Ethernet.
As 100 melhores piadas de todos os tempos (Portuguese Edition)
") As 100 melhores piadas de todos os tempos (Portuguese Edition) Click here if your download doesn"t start automatically As 100 melhores piadas de todos os tempos (Portuguese Edition) As 100 melhores piadas
As 100 melhores piadas de todos os tempos (Portuguese Edition) Click here if your download doesn"t start automatically As 100 melhores piadas de todos os tempos (Portuguese Edition) As 100 melhores piadas
Dropbox Quick Start. What is Dropbox? The Dropbox Folder
 Dropbox Quick Start What is Dropbox? Dropbox is a free service that lets you bring all your photos, docs, and videos anywhere. Any file you save to your Dropbox will also automatically save to all your
ADD-ON DEVICE Quickstart Guide. Alarm Keypad. What's inside: 1x Alarm Keypad. 2x Double-Sided Tapes. Mounting Accessories. Model No.
 ADD-ON DEVICE Quickstart Guide Alarm Keypad Model No. KYP1300 What's inside: 1x Alarm Keypad 2x Double-Sided Tapes Mounting Accessories Broadband internet connection, ios or Android phone and home router
Medication Tracking Sensor Add-on Device Quickstart Guide
 Medication Tracking Sensor Add-on Device Quickstart Guide Model No. ADS1302 What s inside: 1x Medication Tracking Sensor All Home8 add-on devices have to work with Home8 systems. português Passo 1: instalando
Tutorial para Phred/Phrap/Consed Tutorial
 Tutorial para Phred/Phrap/Consed Tutorial Preparando a estrutura de diretórios O pacote vem com um script phredphrap que permite rodar automaticamente todos os programas necessários. O script pode ser
Operator Manual Thermoplan AG, Subject to change REV-0
 1 Overview Control panel Foamer head Cup platform Liner pouch 8 Overview Heating basin Milk foam tube Level controller Milk container Cover Hood 9 Putting into operation Plug the appliance into a suitable
PURCHASE-TO-PAY SOLUTIONS
 PURCHASE-TO-PAY SOLUTIONS May 2015 SaphetyDoc - RELEASE NOTES 6.1.4.8 Offer Management SaphetyDoc - RELEASE NOTES 6.1.4.8. SaphetyDoc s release 6.1.4.8 will start production phase in 13/05/2015. PDF format:
Vendors Enquiries for RFP 003/2015
 Date: 22/10/2015 Vendors Enquiries for RFP 003/2015 1) Question I am afraid the terms of the RFP cannot be complied by none of the companies we work with, the terms have limited the underwriters ability
Meditacao da Luz: O Caminho da Simplicidade
 Meditacao da Luz: O Caminho da Simplicidade Leonardo Boff Click here if your download doesn"t start automatically Meditacao da Luz: O Caminho da Simplicidade Leonardo Boff Meditacao da Luz: O Caminho da
Door + Window Sensor Add-on Device Quickstart Guide
 Door + Window Sensor Add-on Device Quickstart Guide Model No. DWM1301 What s inside: 1x Door + Window Sensor 2x Double-Sided Tapes 1x Battery (CR123A) All Home8 add-on devices have to work with Home8 systems.
CANape/vSignalyzer. Data Mining and Report Examples Offline Analysis V
 CANape/vSignalyzer Data Mining and Report Examples Offline Analysis V16.0 2018-07-30 Offline Evaluation Tools On-line Tools CANalyzer. Messages CANoe. Messages CANape. Signals Off-line Tools vsignalyzer
2/4 BD8201FM. Lot No. REV. A
 1/4 2/4 BD8201FM Lot No. 3/4 Ω Function Description 4/4 Appendix Notes No technical content pages of this document may be reproduced in any form or transmitted by any means without prior permission of
ATLAS DE ACUPUNTURA VETERINáRIA. CãES E GATOS (EM PORTUGUESE DO BRASIL) BY CHOO HYUNG KIM
 BY CHOO HYUNG KIM") Read Online and Download Ebook ATLAS DE ACUPUNTURA VETERINáRIA. CãES E GATOS (EM PORTUGUESE DO BRASIL) BY CHOO HYUNG KIM DOWNLOAD EBOOK : ATLAS DE ACUPUNTURA VETERINáRIA. CãES E GATOS Click link bellow
Read Online and Download Ebook ATLAS DE ACUPUNTURA VETERINáRIA. CãES E GATOS (EM PORTUGUESE DO BRASIL) BY CHOO HYUNG KIM DOWNLOAD EBOOK : ATLAS DE ACUPUNTURA VETERINáRIA. CãES E GATOS Click link bellow
GERENCIAMENTO PELAS DIRETRIZES (PORTUGUESE EDITION) BY VICENTE FALCONI
 BY VICENTE FALCONI") Read Online and Download Ebook GERENCIAMENTO PELAS DIRETRIZES (PORTUGUESE EDITION) BY VICENTE FALCONI DOWNLOAD EBOOK : GERENCIAMENTO PELAS DIRETRIZES (PORTUGUESE Click link bellow and free register to
Read Online and Download Ebook GERENCIAMENTO PELAS DIRETRIZES (PORTUGUESE EDITION) BY VICENTE FALCONI DOWNLOAD EBOOK : GERENCIAMENTO PELAS DIRETRIZES (PORTUGUESE Click link bellow and free register to
Better Cotton Tracer. Instructions for ABRAPA S Farms Instruções para Fazendas da ABRAPA. April 2018
 Better Cotton Tracer Instructions for ABRAPA S Farms Instruções para Fazendas da ABRAPA April 2018 1 Your account in the Better Cotton Tracer Sua conta no BCT The Better Cotton Tracer (BCT) is an online
Guia para criar aplicações simples em APEX/ Guide to create simple Apex applications (parte II)
") Guia para criar aplicações simples em APEX/ Guide to create simple Apex applications (parte II) Segundo nível / Second level Criar duas funções: uma que dê quantos alugueres foram feitos por um socio.
Guia para criar aplicações simples em APEX/ Guide to create simple Apex applications (parte II) Segundo nível / Second level Criar duas funções: uma que dê quantos alugueres foram feitos por um socio.
Comportamento Organizacional: O Comportamento Humano no Trabalho (Portuguese Edition)
") Comportamento Organizacional: O Comportamento Humano no Trabalho (Portuguese Edition) John W. Newstrom Click here if your download doesn"t start automatically Comportamento Organizacional: O Comportamento
Comportamento Organizacional: O Comportamento Humano no Trabalho (Portuguese Edition) John W. Newstrom Click here if your download doesn"t start automatically Comportamento Organizacional: O Comportamento
MySQL: Comece com o principal banco de dados open source do mercado (Portuguese Edition)
") MySQL: Comece com o principal banco de dados open source do mercado (Portuguese Edition) Click here if your download doesn"t start automatically MySQL: Comece com o principal banco de dados open source
MySQL: Comece com o principal banco de dados open source do mercado (Portuguese Edition) Click here if your download doesn"t start automatically MySQL: Comece com o principal banco de dados open source
O PRíNCIPE FELIZ E OUTRAS HISTóRIAS (EDIçãO BILíNGUE) (PORTUGUESE EDITION) BY OSCAR WILDE
 (PORTUGUESE EDITION) BY OSCAR WILDE") Read Online and Download Ebook O PRíNCIPE FELIZ E OUTRAS HISTóRIAS (EDIçãO BILíNGUE) (PORTUGUESE EDITION) BY OSCAR WILDE DOWNLOAD EBOOK : O PRíNCIPE FELIZ E OUTRAS HISTóRIAS (EDIçãO Click link bellow and
Read Online and Download Ebook O PRíNCIPE FELIZ E OUTRAS HISTóRIAS (EDIçãO BILíNGUE) (PORTUGUESE EDITION) BY OSCAR WILDE DOWNLOAD EBOOK : O PRíNCIPE FELIZ E OUTRAS HISTóRIAS (EDIçãO Click link bellow and
Manual de instruções para Caixa Coletora Johnson Pump
 Manual de instruções para Caixa Coletora Johnson Pump Em caso dúvidas na instalação após a leitura do manual, favor entrar em contato com nosso departamento técnico através do telefone: (11) 3477-5655
Controles de entrada : caixas de seleção, botões de opção, listas suspensas, caixas de lista, botões, alternar, campos de texto, campo de data
 Elementos da interface do usuário Ao projetar sua interface, tente ser consistente e previsível em sua escolha de elementos de interface. Se eles estão conscientes disso ou não, os usuários se familiarizaram
Ligações Entre NANDA, NOC e NIC. Diagnósticos, Resultados e Intervenções (Em Portuguese do Brasil)
") Ligações Entre NANDA, NOC e NIC. Diagnósticos, Resultados e Intervenções (Em Portuguese do Brasil) Marion Johnson Click here if your download doesn"t start automatically Ligações Entre NANDA, NOC e NIC.
Ligações Entre NANDA, NOC e NIC. Diagnósticos, Resultados e Intervenções (Em Portuguese do Brasil) Marion Johnson Click here if your download doesn"t start automatically Ligações Entre NANDA, NOC e NIC.
1. Product Name. 2. Product Code. 3. Colour. 4. Brief Description. 5. Contents. 6. Snoezelen Stimulations. Switch Adapted Fibre Optic Lamp
 1. Product Name Switch Adapted Fibre Optic Lamp 2. Product Code 20709 3. Colour Clear base; white fibres 4. Brief Description Activate your switch to activate the light through the fibres and in the base.
Introdução A Delphi Com Banco De Dados Firebird (Portuguese Edition)
") Introdução A Delphi Com Banco De Dados Firebird (Portuguese Edition) Ricardo De Moraes / André Luís De Souza Silva Click here if your download doesn"t start automatically Introdução A Delphi Com Banco
Introdução A Delphi Com Banco De Dados Firebird (Portuguese Edition) Ricardo De Moraes / André Luís De Souza Silva Click here if your download doesn"t start automatically Introdução A Delphi Com Banco
User's Guide. Manual de Utilizador
 User's Guide Manual de Utilizador USER'S GUIDE HDD/SSD Support: SATA 2.5 (up to 12.5mm height) Material: Aluminium and Plastic External interface: USB 3.0 (compatible with USB 2.0/1.1) Internal interface:
Torre Purificadora de Ar MCP-
 Filtro de cartuchos compacto com pulsos de limpeza A torre de purificação de ar MCP-16 RC é um filtro de cartuchos compacto para limpeza e reciclagem do ar interior. A unidade filtrante compacta é fornecida
LIGHT PANEL CONTENTS Light Panel Power supply Fixtures (brackets, screws)
") Page 1 of 8 LIGHT PANEL 20367 CONTENTS Light Panel Power supply Fixtures (brackets, screws) ABOUT THIS PRODUCT The Light Panel may be used on a table top as a free-standing object, or mounted either horizontally
Page 1 of 8 LIGHT PANEL 20367 CONTENTS Light Panel Power supply Fixtures (brackets, screws) ABOUT THIS PRODUCT The Light Panel may be used on a table top as a free-standing object, or mounted either horizontally
Livro do Desassossego
 Livro do Desassossego Fernando Pessoa Click here if your download doesn"t start automatically Livro do Desassossego Fernando Pessoa Livro do Desassossego Fernando Pessoa [...] Download Livro do Desassossego...pdf
ATLAS DE ACUPUNTURA VETERINáRIA. CãES E GATOS (EM PORTUGUESE DO BRASIL) BY CHOO HYUNG KIM
 BY CHOO HYUNG KIM") Read Online and Download Ebook ATLAS DE ACUPUNTURA VETERINáRIA. CãES E GATOS (EM PORTUGUESE DO BRASIL) BY CHOO HYUNG KIM DOWNLOAD EBOOK : ATLAS DE ACUPUNTURA VETERINáRIA. CãES E GATOS Click link bellow
Read Online and Download Ebook ATLAS DE ACUPUNTURA VETERINáRIA. CãES E GATOS (EM PORTUGUESE DO BRASIL) BY CHOO HYUNG KIM DOWNLOAD EBOOK : ATLAS DE ACUPUNTURA VETERINáRIA. CãES E GATOS Click link bellow
UNIT 5: Review (UNIDADE 5: Revisão)
") CHAPTER 4: Business Communication (CAPÍTULO 4: Comunicação de Negócios) UNIT 5: Review (UNIDADE 5: Revisão) I. LET S BEGIN (I. VAMOS COMEÇAR) Answer the questions below. (Responda às questões abaixo.)
CHAPTER 4: Business Communication (CAPÍTULO 4: Comunicação de Negócios) UNIT 5: Review (UNIDADE 5: Revisão) I. LET S BEGIN (I. VAMOS COMEÇAR) Answer the questions below. (Responda às questões abaixo.)
BR localization: Hotfix 002. Technical documentation Documentação Técnica Version Nov 27, de novembro de 2018
 ENTERPRISE MANAGEMENT BR localization: Hotfix 002 Technical documentation Documentação Técnica Version 11.10.0 Nov 27, 2018 27 de novembro de 2018 Contents Prerequisites 3 Patch Installation 4 Instructions
Biscuit - potes (Coleção Artesanato) (Portuguese Edition)
 (Portuguese Edition)") Biscuit - potes (Coleção Artesanato) (Portuguese Edition) Regina Panzoldo Click here if your download doesn"t start automatically Biscuit - potes (Coleção Artesanato) (Portuguese Edition) Regina Panzoldo
Biscuit - potes (Coleção Artesanato) (Portuguese Edition) Regina Panzoldo Click here if your download doesn"t start automatically Biscuit - potes (Coleção Artesanato) (Portuguese Edition) Regina Panzoldo
NORMAS DE FUNCIONAMENTO DOS CURSOS DE LÍNGUAS (TURMAS REGULARES E INTENSIVAS) 2015/2016
 2015/2016") NORMAS DE FUNCIONAMENTO DOS CURSOS DE LÍNGUAS (TURMAS REGULARES E INTENSIVAS) 2015/2016 1. Tipos de turma e duração: O CLECS oferece dois tipos de turma: regular e intensivo. Além destas turmas, o CLECS
NORMAS DE FUNCIONAMENTO DOS CURSOS DE LÍNGUAS (TURMAS REGULARES E INTENSIVAS) 2015/2016 1. Tipos de turma e duração: O CLECS oferece dois tipos de turma: regular e intensivo. Além destas turmas, o CLECS
Um olhar que cura: Terapia das doenças espirituais (Portuguese Edition)
") Um olhar que cura: Terapia das doenças espirituais (Portuguese Edition) Padre Paulo Ricardo Click here if your download doesn"t start automatically Um olhar que cura: Terapia das doenças espirituais (Portuguese
Um olhar que cura: Terapia das doenças espirituais (Portuguese Edition) Padre Paulo Ricardo Click here if your download doesn"t start automatically Um olhar que cura: Terapia das doenças espirituais (Portuguese
Ganhar Dinheiro Em Network Marketing (Portuguese Edition)
") Ganhar Dinheiro Em Network Marketing (Portuguese Edition) Click here if your download doesn"t start automatically Ganhar Dinheiro Em Network Marketing (Portuguese Edition) Ganhar Dinheiro Em Network Marketing
Ganhar Dinheiro Em Network Marketing (Portuguese Edition) Click here if your download doesn"t start automatically Ganhar Dinheiro Em Network Marketing (Portuguese Edition) Ganhar Dinheiro Em Network Marketing
Receitas na Pressão - Vol. 01: 50 Receitas para Panela de Pressão Elétrica (Portuguese Edition)
") Receitas na Pressão - Vol. 01: 50 Receitas para Panela de Pressão Elétrica (Portuguese Edition) Click here if your download doesn"t start automatically Receitas na Pressão - Vol. 01: 50 Receitas para Panela
Receitas na Pressão - Vol. 01: 50 Receitas para Panela de Pressão Elétrica (Portuguese Edition) Click here if your download doesn"t start automatically Receitas na Pressão - Vol. 01: 50 Receitas para Panela
Como testar componentes eletrônicos - volume 1 (Portuguese Edition)
") Como testar componentes eletrônicos - volume 1 (Portuguese Edition) Renato Paiotti Newton C. Braga Click here if your download doesn"t start automatically Como testar componentes eletrônicos - volume 1
Como testar componentes eletrônicos - volume 1 (Portuguese Edition) Renato Paiotti Newton C. Braga Click here if your download doesn"t start automatically Como testar componentes eletrônicos - volume 1
Vaporpunk - A fazenda-relógio (Portuguese Edition)
") Vaporpunk - A fazenda-relógio (Portuguese Edition) Octavio Aragão Click here if your download doesn"t start automatically Vaporpunk - A fazenda-relógio (Portuguese Edition) Octavio Aragão Vaporpunk - A
Vaporpunk - A fazenda-relógio (Portuguese Edition) Octavio Aragão Click here if your download doesn"t start automatically Vaporpunk - A fazenda-relógio (Portuguese Edition) Octavio Aragão Vaporpunk - A
Medicina Integrativa - A Cura pelo Equilíbrio (Portuguese Edition)
") Medicina Integrativa - A Cura pelo Equilíbrio (Portuguese Edition) Click here if your download doesn"t start automatically Medicina Integrativa - A Cura pelo Equilíbrio (Portuguese Edition) Medicina Integrativa
Medicina Integrativa - A Cura pelo Equilíbrio (Portuguese Edition) Click here if your download doesn"t start automatically Medicina Integrativa - A Cura pelo Equilíbrio (Portuguese Edition) Medicina Integrativa
Manual do usuário. User s Manual JS052. Super band - guitarra sem fio PS2 / PS3 / Wii Super band - wireless guitar PS2 / PS3 / Wii
 Super band - guitarra sem fio Manual do usuário User s Manual Super band - guitarra sem fio PS2 / PS3 / Wii Super band - wireless guitar PS2 / PS3 / Wii 1 JS052 ÍNDICE CARACTERÍSTICAS DO PRODUTO...03 peças
Parts of the Solar Charger. Charging the Solar Battery. Using the Solar Lamp. Carry in hand. Shows how much light is left. Table light.
 Parts of the Solar Charger Solar Lamp LCD Panel 1 Solar Panel Cell Phone Charger Port Protective Cover Solar Charger Port Lamp Stand Adaptors On/Off Switch Cell Phone Charger Cable Charging the Solar Battery
Manual de instruções para Alarme de Alagamento Johnson Pump
 Manual de instruções para Alarme de Alagamento Johnson Pump Em caso dúvidas na instalação após a leitura do manual, favor entrar em contato com nosso departamento técnico através do telefone: (11) 3477-5655
COMPUTAÇÃO E PROGRAMAÇÃO
 COMPUTAÇÃO E PROGRAMAÇÃO º Semestre 205/206 MEMec, LEAN Ficha da Aula Prática 3: Estruturas de repetição. Sumário das tarefas e objectivos da aula:. Estruturas de repetição controladas por contador 2.
Editorial Review. Users Review
 Download and Read Free Online Java SE 8 Programmer I: O guia para sua certificação Oracle Certified Associate (Portuguese Edition) By Guilherme Silveira, Mário Amaral Editorial Review Users Review From
Abraçado pelo Espírito (Portuguese Edition)
") Abraçado pelo Espírito (Portuguese Edition) Charles Swindoll Click here if your download doesn"t start automatically Abraçado pelo Espírito (Portuguese Edition) Charles Swindoll Abraçado pelo Espírito
Abraçado pelo Espírito (Portuguese Edition) Charles Swindoll Click here if your download doesn"t start automatically Abraçado pelo Espírito (Portuguese Edition) Charles Swindoll Abraçado pelo Espírito
IDE 2.5" hd:basic. hdd enclosure caixa externa para disco rígido
 IDE 2.5" hd:basic hdd enclosure caixa externa para disco rígido IDE 2.5" hd:basic USER S GUIDE SPECIFICATONS HDD Support: IDE 2.5 Material: Aluminium Input connections: IDE HDD Output connections: USB
Quick Setup Guide bluesound.com
 Quick Setup Guide bluesound.com Included Accessories 120V AC Power Cord 230V AC Power Cord Ethernet Cable Mini Jack to Toslink Adaptor 1 CONNECT ZO POWER 2 CONNECT TO WiFi A Select the AC Power Cord appropriate
NOVO SISTEMA DE CORREIO ELETRONICO PARA OS DOMINIOS ic.uff.br & dcc.ic.uff.br
 NOVO SISTEMA DE CORREIO ELETRONICO PARA OS DOMINIOS ic.uff.br & dcc.ic.uff.br A partir de 28/07/2004 (quarta-feira), ás 17:30 hs estaremos trocando nossos servidores de correio para ambos os domínios ic.uff.br
WI FI INTERACTIVE MAT SWITCH SET 19939
 Page 1 of 6 WI FI INTERACTIVE MAT SWITCH SET 19939 CONTENTS 1 x Control Box with 9V battery 9 x carpet switches: 1 x pink vinyl 1 x purple carpet 1 x blue non-slip mat 1 x green Soft & Silky 1 x light
Self-Service Date. Online User Guide. aia.com.au. Sub heading
 Main Adviser heading Site Sub heading Self-Service Date Online User Guide aia.com.au Adviser Site Self-Service 2 Contents What is Self-Service? 3 Access to Self Service 3 Search Functionality 4 Policy
América Andina: integração regional, segurança e outros olhares (Portuguese Edition)
") América Andina: integração regional, segurança e outros olhares (Portuguese Edition) Renata Peixoto de Oliveira, Silvia Garcia Nogueira, Filipe Reis Melo Click here if your download doesn"t start automatically
América Andina: integração regional, segurança e outros olhares (Portuguese Edition) Renata Peixoto de Oliveira, Silvia Garcia Nogueira, Filipe Reis Melo Click here if your download doesn"t start automatically
Futebol em Transmissão. Football is on the Air.
 Futebol em Transmissão. Football is on the Air. Estamos prontos. We re ready. Informação sobre a gestão do espectro n0 UEFA Euro 2004. Information on spectrum management during UEFA Euro 2004. Entre em
Pesquisa Qualitativa do Início ao Fim (Métodos de Pesquisa) (Portuguese Edition)
 (Portuguese Edition)") Pesquisa Qualitativa do Início ao Fim (Métodos de Pesquisa) (Portuguese Edition) Robert K. Yin Click here if your download doesn"t start automatically Pesquisa Qualitativa do Início ao Fim (Métodos de
Pesquisa Qualitativa do Início ao Fim (Métodos de Pesquisa) (Portuguese Edition) Robert K. Yin Click here if your download doesn"t start automatically Pesquisa Qualitativa do Início ao Fim (Métodos de
Adoção: guia prático doutrinário e processual com as alterações da Lei n , de 3/8/2009 (Portuguese Edition)
") Adoção: guia prático doutrinário e processual com as alterações da Lei n. 12010, de 3/8/2009 (Portuguese Edition) Luiz Antonio Miguel Ferreira Click here if your download doesn"t start automatically Adoção:
Adoção: guia prático doutrinário e processual com as alterações da Lei n. 12010, de 3/8/2009 (Portuguese Edition) Luiz Antonio Miguel Ferreira Click here if your download doesn"t start automatically Adoção:
Gerenciamento Pelas Diretrizes (Portuguese Edition)
") Gerenciamento Pelas Diretrizes (Portuguese Edition) Vicente Falconi Click here if your download doesn"t start automatically Gerenciamento Pelas Diretrizes (Portuguese Edition) Vicente Falconi Gerenciamento
Gerenciamento Pelas Diretrizes (Portuguese Edition) Vicente Falconi Click here if your download doesn"t start automatically Gerenciamento Pelas Diretrizes (Portuguese Edition) Vicente Falconi Gerenciamento
DIBELS TM. Portuguese Translations of Administration Directions
 DIBELS TM Portuguese Translations of Administration Directions Note: These translations can be used with students having limited English proficiency and who would be able to understand the DIBELS tasks
Gestão da comunicação - Epistemologia e pesquisa teórica (Portuguese Edition)
") Gestão da comunicação - Epistemologia e pesquisa teórica (Portuguese Edition) Maria Cristina Castilho Costa, Maria Aparecida Baccega Click here if your download doesn"t start automatically Download and
Gestão da comunicação - Epistemologia e pesquisa teórica (Portuguese Edition) Maria Cristina Castilho Costa, Maria Aparecida Baccega Click here if your download doesn"t start automatically Download and
COMO ESCREVER PARA O ENEM: ROTEIRO PARA UMA REDAçãO NOTA (PORTUGUESE EDITION) BY ARLETE SALVADOR
 BY ARLETE SALVADOR") Read Online and Download Ebook COMO ESCREVER PARA O ENEM: ROTEIRO PARA UMA REDAçãO NOTA 1.000 (PORTUGUESE EDITION) BY ARLETE SALVADOR DOWNLOAD EBOOK : COMO ESCREVER PARA O ENEM: ROTEIRO PARA UMA SALVADOR
Read Online and Download Ebook COMO ESCREVER PARA O ENEM: ROTEIRO PARA UMA REDAçãO NOTA 1.000 (PORTUGUESE EDITION) BY ARLETE SALVADOR DOWNLOAD EBOOK : COMO ESCREVER PARA O ENEM: ROTEIRO PARA UMA SALVADOR
A ENTREVISTA COMPREENSIVA: UM GUIA PARA PESQUISA DE CAMPO (PORTUGUESE EDITION) BY JEAN-CLAUDE KAUFMANN
 BY JEAN-CLAUDE KAUFMANN") Read Online and Download Ebook A ENTREVISTA COMPREENSIVA: UM GUIA PARA PESQUISA DE CAMPO (PORTUGUESE EDITION) BY JEAN-CLAUDE KAUFMANN DOWNLOAD EBOOK : A ENTREVISTA COMPREENSIVA: UM GUIA PARA CLAUDE KAUFMANN
Read Online and Download Ebook A ENTREVISTA COMPREENSIVA: UM GUIA PARA PESQUISA DE CAMPO (PORTUGUESE EDITION) BY JEAN-CLAUDE KAUFMANN DOWNLOAD EBOOK : A ENTREVISTA COMPREENSIVA: UM GUIA PARA CLAUDE KAUFMANN
Observação: Na seqüência temos exercícios mais complexos cuja solução completa se encontra no manual do SYSCON incluído no anexo A desta apostila.
 Exercício 2 3.4.3 Exercícios de configuração No exercício 1 realizamos um controle simples de vazão. Utilize o mesmo exercício como referência e incremente a função de totalização da vazão disponibilizandoa
CRIMP OD & PRODUCT GUIDE HOSE ID
 .50 0.58 0.660.049 05022C50** E05C E05E 0.60 0.676.049 05022CS** 05C 05E 0.62 0.692.049 (.688 ) CF50C CF50E 0.64 0.707.049 05024C50** 0.66 0.723.049 05024CS** 0.68 0.738.049 (.750 ) 0.70 0.754.049 05026C50**
Units 3 and 4. 3rd Bimester Content. Future Predictions. Life events. Personality adjectives. English - Leonardo Bérenger and Aline Martins
 3rd Bimester Content Life events Be going to Future Predictions Be going to x Will Units 3 and 4 First Conditional Personality adjectives EVALUATION CRITERIA CONTENT TOPICS EVALUATION CRITERIA 3rd Bimester
GUIÃO F. Grupo: Minho. 1º Momento. Intervenientes e Tempos. Descrição das actividades
 GUIÃO F Prova construída pelos formandos e validada pelo GAVE, 1/7 Grupo: Minho Disciplina: Inglês, Nível de Continuação 11.º ano Domínio de Referência: Um Mundo de Muitas Culturas 1º Momento Intervenientes
1 WC System. Instrução Técnica Instrucción Técnica Technical Instruction
 WC System . WC SYSTEM Technical characteristics: Electro-pneumatic system The toilet mechanism works with pneumatic energy supplied by the chassis's pneumatic system. The water timer is done by a relay,
User Guide Manual de Utilizador
 2400 DPI OPTICAL GAMING MOUSE User Guide Manual de Utilizador 2014 1Life Simplify it All rights reserved. www.1-life.eu 2 2400 DPI OPTICAL GAMING MOUSE ENGLISH USER GUIDE...4 MANUAL DE UTILIZADOR PORTUGUÊS...18
O VAZIO DA MáQUINA: NIILISMO E OUTROS ABISMOS (TRILOGIA DO NADA LIVRO 2) (PORTUGUESE EDITION) BY ANDRE CANCIAN
 (PORTUGUESE EDITION) BY ANDRE CANCIAN") Read Online and Download Ebook O VAZIO DA MáQUINA: NIILISMO E OUTROS ABISMOS (TRILOGIA DO NADA LIVRO 2) (PORTUGUESE EDITION) BY ANDRE CANCIAN DOWNLOAD EBOOK : O VAZIO DA MáQUINA: NIILISMO E OUTROS ABISMOS
Read Online and Download Ebook O VAZIO DA MáQUINA: NIILISMO E OUTROS ABISMOS (TRILOGIA DO NADA LIVRO 2) (PORTUGUESE EDITION) BY ANDRE CANCIAN DOWNLOAD EBOOK : O VAZIO DA MáQUINA: NIILISMO E OUTROS ABISMOS
Easy Linux! FUNAMBOL FOR IPBRICK MANUAL. IPortalMais: a «brainware» company www.iportalmais.pt. Manual
 IPortalMais: a «brainware» company FUNAMBOL FOR IPBRICK MANUAL Easy Linux! Title: Subject: Client: Reference: Funambol Client for Mozilla Thunderbird Doc.: Jose Lopes Author: N/Ref.: Date: 2009-04-17 Rev.:
Os 7 Hábitos das Pessoas Altamente Eficazes (Portuguese Edition)
") Os 7 Hábitos das Pessoas Altamente Eficazes (Portuguese Edition) Click here if your download doesn"t start automatically Os 7 Hábitos das Pessoas Altamente Eficazes (Portuguese Edition) Os 7 Hábitos das
Os 7 Hábitos das Pessoas Altamente Eficazes (Portuguese Edition) Click here if your download doesn"t start automatically Os 7 Hábitos das Pessoas Altamente Eficazes (Portuguese Edition) Os 7 Hábitos das
Biscuit - potes (Coleção Artesanato) (Portuguese Edition)
 (Portuguese Edition)") Biscuit - potes (Coleção Artesanato) (Portuguese Edition) Regina Panzoldo Click here if your download doesn"t start automatically Biscuit - potes (Coleção Artesanato) (Portuguese Edition) Regina Panzoldo
Biscuit - potes (Coleção Artesanato) (Portuguese Edition) Regina Panzoldo Click here if your download doesn"t start automatically Biscuit - potes (Coleção Artesanato) (Portuguese Edition) Regina Panzoldo
Princípios de Direito Previdenciário (Portuguese Edition)
") Princípios de Direito Previdenciário (Portuguese Edition) Wladimir Novaes. Martinez Click here if your download doesn"t start automatically Princípios de Direito Previdenciário (Portuguese Edition) Wladimir
Princípios de Direito Previdenciário (Portuguese Edition) Wladimir Novaes. Martinez Click here if your download doesn"t start automatically Princípios de Direito Previdenciário (Portuguese Edition) Wladimir
GEAR PUMPS RECOMMENDATIONS BEFORE START-UP
 GEAR PUMPS RECOMMENDATIONS BEFORE START-UP CTI Gear pumps recommendations before start-up 0811-0 Attention: The application of ABER gear pumps must follow all the instructions hereby mentioned in order
Atividade extra. Questão 01. Lingua Estrangeira Inglês
 Atividade extra Questão 01 http://www.sxc.hu/photo/1406799 We hear a list of problems affecting the environment almost every day: pollution, acid rain, global warming, and the destruction of rain forest,
Conceitos de Linguagens de Programação (Portuguese Edition)
") Conceitos de Linguagens de Programação (Portuguese Edition) Click here if your download doesn"t start automatically Conceitos de Linguagens de Programação (Portuguese Edition) Conceitos de Linguagens de
Conceitos de Linguagens de Programação (Portuguese Edition) Click here if your download doesn"t start automatically Conceitos de Linguagens de Programação (Portuguese Edition) Conceitos de Linguagens de