Lifting Systems CH, CHE, CHS, CHD, CHP, CHNM
|
|
|
- Izabel Chagas Mirandela
- 6 Há anos
- Visualizações:
Transcrição


1 Lifting Systems CH, CHE, CHS, CHD, CHP, CHNM Owners Manual - Safety plate lifting clamp Användarhandbok - Lyfthandskar Gebrauchsanleitung - Sicherheits-greifklemmen Manual do Utilizador - Pinça de segurança de elevação 1
2 English Please carefully read the safety instructions of this owner s manual before using the safety lifting clamp. In case of any doubts, please refer to your dealer! Our manuals are intended to be a reference source throughout the lifetime of your product.we appreciate any suggestions, and/or comments regarding this manual. Due to continuing research and development activities, product specifications are subject to change without notice. Svenska Läs anvisningarna i denna användarhandbok noggrant innan du använder lyfthandsken. Vid frågor, rådgör med återförsäljaren. Våra handböcker är avsedda att vara en referenskälla under produktens livslängd. Vi uppskattar förslag och/eller kommentarer angående denna handbok. På grund av kontinuerligt undersöknings- och utvecklingsarbete, kan produktspecifikationer ändras utan föregående meddelande. Deutsch Lesen Sie die Gebrauchsanleitung vor Benutzung des Produkts sorgfältig durch. Bei Fragen wenden Sie sich bitte an Ihren Zulieferer. Die Gebrauchsanleitung dient während der gesamten Lebensdauer des Produkts als ständige Informationsquelle. Für Hinweise oder Anmerkungen zur Verbesserung des Inhalts dieser Gebrauchsanleitung sind wir dankbar. Aufgrund kontinuierlicher Forschungs- und Entwicklungsprozesse behalten wir uns technische Änderungen und/oder Änderungen äußerlicher Português Leia atentamente as instruções de segurança deste manual do utilizador antes de utilizar a pinça de segurança de elevação. Em caso de dúvida, consulte o seu revendedor! Os nossos manuais devem ser um ponto de referência ao longo da vida útil do seu produto. Agradecemos quaisquer sugestões e/ou comentários relativos a este manual. Devido às contínuas actividades de investigação e desenvolvimento, as especificações do produto estão sujeitas a alterações sem aviso prévio. 2
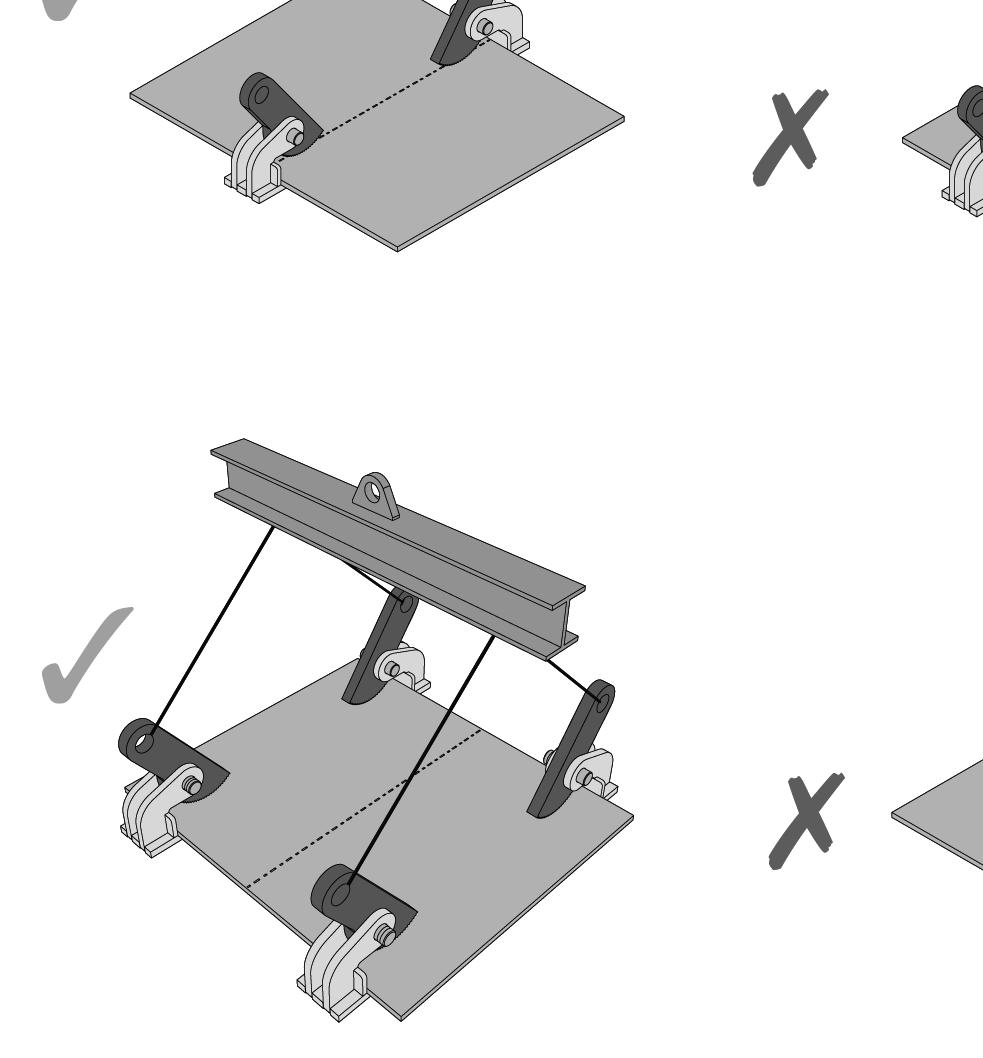
3 Contents 1 General 3 2 Operating principle 3 3 Permitted applications 3 4 Safety instructions 4 5 Lifting 5 - CH, CHE, CHD, CHNM - CHP 6 Maintenance 6 7 Disassembling/Assembling 6 - CH, CHE, CHS, CHD - CHP - CHNM 8 Overhauling 7 9 Disposal 7 10 Troubleshooter s checklist 8 11 Warranty 8 English 1 General Congratulations with the acquisition of a Gunnebo Lifting safety plate lifting clamp.the quality systems of management and services of Gunnebo Lifting fully comply with ISO 9001 standards. The many years of vast experience are a guarantee of optimum quality and safety. Gunnebo Lifting Clamps are made of top quality steel and fully comply with European standards as laid down in Machine Directive 2006/42/EG. 2 Operating Principle The CH, CHE, CHS, CHNM and CHP horizontal safety lifting clamps have specifically been designed for the horizontal lifting and transporting of non-bending steel plates. The clamps consist of a body, cam, and cam pin. The cam also functions as a lifting shackle and ensures that the load is held firm-ly while it is being lifted. 3 Permitted Applications CH, CHE, CHS and CHNM Gunnebo Lifting CH, CHE and CHNM lifting clamps are only suitable for lifting and horizontal movement of non-bending steel plates and structures where it is possible to position the clamp on a flat point of contact. The clamps should always be used in pairs, or multiples thereof. In the latter case, however, preferably with a load spreader beam. CHD Gunnebo Lifting CHD lifting clamps are only suitable for lifting and horizontal movement of both bending steel plates and formed steel plates, where it is possible to position the clamp on a flat point of contact. CHD clamps should always be used in pairs, or multiples thereof. CHP Gunnebo Lifting CHP clamps are only suitable for horizontal movement of steel plates and packages of steel plates, where it is possible to position the clamp on a flat point of contact. The clamps should always be used in pairs, or multiples thereof. In the latter case, however, preferably with a load equalising beam. Provided that the steel plate of plates do net bend (deflect), one or more plates can be hoisted at once per Iift. When pairs or multiple clamps are used, each damp should carry en equal part of the load. 3
4 4 Safety Instructions Safety first! Guarantee your personal safety by carefully reading the following safety instructions first. Ensure your own safety and continue to benefit from our product safety by having the clamp inspected, tested and, if necessary, overhauled at least once a year by Gunnebo Lifting or a recognized mechanical repair and service centre. See also Chapter 8 - Overhauling. Contact Gunnebo Lifting for further information. Avoid situations dangerous to life Prevent dangerous situations by seriously taking care of the following precautions: - Never work with an untested clamp. - Keep your distance when lifting and never stand under the load. - Do not use the clamp if (it has been) damaged; have the clamp immediately repaired by Gunnebo Lifting or a recognized mechanical repair centre. If in doubt consult your supplier. - Never lift more than one plate or a package of plates at a time. - Never lift plates heavier than the working load limit (W.L.L.), as indicated on the clamp and in the test certificate. - Do not lift plates which are thicker or thinner than the jaw opening, as indicated on the clamp and in the test certificate. - When using a number of lifting damps at the same time, please provide lifting slings or chains of a sufficient length to ensure that the angle between the slings or chains never exceeds When simultaneously operating a number of lifting clamps time side by side, please use a lifting beam (equalizer) and lifting slings or chains of a sufficient length to ensure that the lifting shackles on the clamps are never subjected to lateral load. - Do not place the clamp on tapered or conical sections of the plate or structure to be lifted. - Remove all grease, oil, dirt, corrosion and mill scale from the plate at the point where the clamp is to be attached. - Ensure that the damp(s) is (are) positioned so as to balance the load when it is being lifted. - The surface hardness of the plate must not exceed 37 HrC (345 Hb, 1166 N/mm2). - The clamp is only suitable for use in normal atmospheric conditions. Safety precautions Ensure that the cam can never be subjected to lateral load. - A free fall or uncontrolled swaying at the crane hook resulting in objects being struck, may cause impact damage to the clamp. If this happens check whether the clamp is still in good working order before using it. - Lifting clamps are not suitable for creating permanent joints. - Maintenance of the clamp should take place on a regular monthly basis, see Chapter 6 - Maintenance. - Do not modify the clamp (by welding, grinding, etc.), as this can adversely affect its operation and safety, thereby nullifying any forms of guarantee and product liability. - For the very same reason, use only original Gunnebo Lifting components. - Any improper use of the clamp and/or failure to observe any directions and warnings in these operating instructions concerning the use of this product may endanger the health of the user and/or bystanders. The following additional safety precautions are applicable to the CH, CHE CHS, CHNM CHD and CHP model The clamps can be loaded laterally at a maximum angle of 15, only when they are not loaded more than the maximum W.L.L. and the permitted top angle. The capacity of the clamps has been calculated on basis of a maximum top angle of 60. In case of situations with larger top angles, then 4
5 the WL.L. should be reduced proportionally, according the following loading drawing. With shored up usage, a maximum top angle of 60 is applicable and the W.L.L. is 50% of the maxi-mum permissible working Ioad. The environmental temperature for use of the standard lifting clamps is between minus 40 and 100 C. The clamps can be loaded laterally at a maximum angle of 15. English 5a Lifting with CH, CHE, CHS, CHD and CHNM Clamps - Check whether the working load limit (W.L.L.) of the clamp is sufficient for the load created in the lifting situation. Note: The working load limit (W.L.L.) is shown on the lifting clamp. - Attach the lifting clamp to the hoisting mechanism either by means of a: - Safety shackle directly to a crane hook, - Coupling link or D-shackle, - Sling or chain, if necessary in conjunction with a coupling link or D-shackle. - Ensure that all attachments have been tested and are of the correct tonnage. Make sure that coupling links and shackles are large enough to allow the clamp to move freely in the hook. - Check whether the clamp has any visible damage. Check whether the cam opens and closes smoothly. - Check whether the teeth of the cam are free from dirt, and if necessary clean with a wire brush. - Remove any grease, dirt and mill scale from the plate at the site of the lifting clamp. - Open the clamp. - Place the jaws as far as they will go over the plate, making sure that the clamp is positioned so as to balance the load when it is being lifted. - Lift gently so that the lifting force can be applied; check whether the clamp is rotating or tilting. - If the clamp is rotating or tilting read the fore mentioned remarks on lifting again. - Ensure that the load is in a stable position. 5b Lifting with CHP Clamps - Place the clamp onto the plate (cable or chain already attached to the tooth segment; and take care that the chain of cable is not twisted); - Tighten the clamps firmly by hand; 5
6 - Tension the cables or chains with the crane hook, while the inside of the jaws presses firmy against the edge of the plate (note: due to the fact that the clamp does not have a con-stant pre-tension available on the tooth segment, it will be necessary to watch the position of the clamps until the cables are tensioned: make sure the clamps stay in the correct posi-tion). - The load can now be lifted carefully. - During the transport of the load, take care that a constant tension is maintained on chains or slings. - To unhook, the crane hook should be lowered so far that the clamp is completely free of any load (note: make sure that when the load is lowered, there are no obstacles underneath where the load could rest on during lowering and whereby the clamps will become unloaded to early by accident). - The clamps can now be removed from the load. 6 Maintenance - Check the general condition of the clamp at least once a month, see Chapter 7 - Disassembling/ Assembling. - Do not use the clamp if: - the body is split or deformed, in particular in way of the jaw corners, - the cam has been visibly deformed, - the cam teeth are no longer sharp, - the shackle pins have visibly been deformed, - any retaining pins are missing, - the marking on the clamp is no longer legible. Depending on the defects noted: Disassemble and clean the clamp (see Chapter 7 - Disassembling/Assembling) or have the clamp overhauled by Gunnebo Lifting or another recognized mechanical repair center (see Chapter 8 - Overhauling). 7a Disassembling/Assembling CH, CHE, CHS, CHD, Clamps The clamps can be easily disassembled for cleaning and inspection purposes. Please make use of the following procedure. - Remove the retaining pin (4) and the cam pin (3). - Remove the cam (2). - Clean all parts with a stan-dard degreasant. - Grease the cam pin (3) with bearing grease. - Assembling the clamp is in reverse order. - Always insert new original retaining pins (4) with the aid of a hammer, combination pliers and pin punch. - Always use original Gunnebo Lifting components when replacing parts. - Remove any burr with a file. 6
 with the use of a pin driver from the tooth segment shaft (5). - The tooth segment shaft can now be pushed out of the frame and the tooth segment (3) can be removed.")

7 7b Disassembling/Assembling CHP Clamps The CHP clamp can be easily disassembled for cleaning and inspection. Please make use of the following procedure. - Remove the tension pin (6) with the use of a pin driver from the tooth segment shaft (5). - The tooth segment shaft can now be pushed out of the frame and the tooth segment (3) can be removed. - Remove the hairpin pegs (7) and the pins (4), and the two side plates (2) can be taken from the clamp. - Clean all the parts with a standard degreasant. - Assembling of the clamp is in reverse order. - Always use original Gunnebo Lifting components when replacing parts. - Remove any burr with a file. English 7c Disassembling/Assembling CHNM Clamps The CHNM clamp can be easily disassembled for cleaning and inspection. Please make use of the following procedure. - Remove the retaining pin (9) and the cam pin (5). - Remove the cam (2). - Remove the small retaining pin (9) and the cam pin (4). - Clean all parts with a stan-dard degreasant. - If necessary you can remove the fabric pads (6 & 7) by removing the bolts (8) - Grease the cam pin (4 & 5) with bearing grease. - Assembling the clamp is in reverse order. - Always insert new original retaining pins (9) with the aid of a hammer, combination pliers and pin punch. - Always use original Gunnebo Lifting components when replacing parts. - Remove any burr with a file. 8 Overhauling At least once a year or in case of any damage to the clamp, the clamp should be inspected, tested and if necessary overhauled by Gunnebo Lifting or a recognized mechanical repair centre. 9 Disposal Once it has reached the end of its useful life the clamp can be treated as scrap iron, provided that the clamp is rendered unfit for further use. 7
8 10 Troubleshooters Checklist Failure/malfunction Possible Cause Action Load slipping Load dirty Pivot and/or cam dirty Pivot and/or cam blunt Jaws bent open Clean load Clean clamp Overhaul clamp Reject clamp Cam pivoting badly Cam overloaded Reject clamp Body bent Clamp overloaded Reject clamp Cam shackle oval Clamp overloaded Reject clamp Cam pin bent Clamp overloaded Renew cam pin Adjustable pins bent Clamp overloaded Reject clamp Retaining pins missing Incorrectly assembled Fit new retaining pins Clamp difficult to open/close 11 Warranty Clamp worn out Clamp contaminated Reject clamp Clean clamp Gunnebo Lifting provides a 5 year warranty on its lifting clamps. This warranty is applicable to the original end user of the lifting clamps. Only if the clamp has been inspected, checked and maintained by this instructions and by an official dealer. This warranty period of 5 years is valid from the day of purchase, and is liable to all conditions and measurements stated in this document. 11a Conditions This warranty only covers failures in the lifting tools which is the consequence of production errors which occur during normal use. The warranty covers no wear to components such as pivots, cam assemblies, lock springs etc. Should there be any kind of failure within this guarantee period, the lifting tool will be replaced or repaired to insight of the producer No warranty is given to clamps due to the following failures: - Regular wear - Overload. - Wrong and/or carelessly use - Damages - Not following procedures and measures - Hoisting differing material other then indicated on clamp or stated in the user-manual - Adapting and/or modifying of the Gunnebo Lifting clamp. - The injudicious use of the clamp, and not succeeding all indications which are stated in the users manual. - When maintenance and/or revision has not been carried out by an authorised Gunnebo Lifting distributor. The producer is not responsible for incidental damage or damage due to use of the lifting tools as well as from violation of this manual. 8
9 11b Procedure Safety Inspection All inspections and repairings must be written down in the maintenance diagram. This counts not only for your own inspections but also for inspections which are carried out by your authorised Gunnebo Lifting distributor. When the clamp is handed in for maintenance and inspection you always must provide the maintenance diagram. Defective Lifting Clamps When a form of wear or damage is indicated, you must take the following measures. 1 Take the lifting clamp out of use. (Note the date of failure of the lifting clamp) 2 Try to recover the cause of the failure, for example (complete list is available in chapter 1): - Overload - Wrong and/or carelessly use - etc These claims stated in no.2 do not fall under the guarantee! To guarantee the security of you and your colleagues you are obliged to follow up this procedure. 3 Return your lifting clamp (with the maintenance history) to your authorised Gunnebo Lifting distributor. 4 If the lifting clamp has been revised / repaired by your distributor, you can safely use your clamp again. Please note this date in your maintenance chart (see page 35). English 11c Inspection Schedule Months Years Safety inspections by your own inspector Maintenance by a official Gunnebo Lifting distributor Revision by a official Gunnebo Lifting distributor 9
10 Innehåll 1 Allmänt 10 2 Arbetsprincip 10 3 Tillåtna applikationer 10 4 Säkerhetsanvisningar 11 5 Lyfta 12 - CH,CHE, CHD, CHNM - CHP 6 Underhåll 13 7 Demontering/Montering 13 - CH,CHE, CHS, CHD - CHP - CHNM 8 Service 14 9 Kassation Checklista för felsökning Garanti 15 1 Allmänt Grattis till köpet av ny Gunnebo Lifting lyfthandske för balkar. Kvalitetssystemen för hantering och tjänster från Gunnebo Lifting är helt i enlighet med ISO 9001-krav. Många års omfattande erfarenhet är en garanti för optimal kvalitet och säkerhet. Gunnebo Liftings lyfthandskar är tillverkade av legerat stål av bästa kvalitet och uppfyller europeiska normer och krav som fastställs i Maskindirektivet 2006/42/EG. 2 Arbetsprincip Horisontella lyfthandskarna CH, CHE, CHS, CHNM och CHP har särskilt utformats för horisontella lyft och transport av oböjliga stålplåtar. Lyfthandskarna består av en stomme, en kam och en kambult. Kammen fungerar även som en lyftbygel och garanterar att lasten hålls fast ordentligt när den lyfts. 3 Tillåtna Applikationer CH, CHE, CHS and CHNM Gunnebo Liftings lyfthandskar CH, CHE och CHNM är endast lämpliga för lyft och horisontell förflyttning av oböjliga stålplåtar och strukturer där det är möjligt att placera handsken på en plan kontaktpunkt. Lyfthandskarna skall alltid användas i par, eller flera par. I det senare fallet rekommenderas dock användning med en lastfördelare. CHD Gunnebo Liftings lyfthandskar CHD är endast lämpliga för lyft och horisontell transport av böjliga och formade stålplåtar, där det är möjligt att placera handsken på en plan kontaktpunkt. CHD-lyfthandskarna skall alltid användas i par, eller flera par. CHP Gunnebo Liftings lyfthandskar CHP är endast lämpliga för horisontell transport av stålplåtar och paket av stålplåtar, där det är möjligt att placera handsken på en plan kontaktpunkt. Lyfthandskarna skall alltid användas i par, eller flera par. I det senare fallet rekommenderas dock användning med en lastutjämnare. En eller flera plåtar kan lyftas på en gång per lyft under förutsättning att stålplåten eller -plåtarna inte böjs (deflekterar). När par eller flera lyfthandskar används, skall lasten fördelas lika över lyfthandskarna. 10
11 4 Säkerhetsanvisningar Säkerheten främst! Garantera din personliga säkerhet genom att först läsa igenom säkerhetsanvisningarna noggrant. Garantera din egen säkerhet och fortsätt att dra nytta av vår produktsäkerhet genom att låta lyfthandsken inspekteras, testas och, om nödvändigt, servas minst en gång om året av Gunnebo Lifting eller ett auktoriserat mekaniskt reparations- eller servicecenter. Se även kapitel 8 - Service. Kontakta Gunnebo Lifting för mer information. Undvik livshotande situationer Förebygg farliga situationer genom att iakttaga följande försiktighetsåtgärder: - Arbeta aldrig med en otestad lyfthandske. - Håll avståndet när du lyfter och stå aldrig under lasten. - Använd inte lyfthandsken om den är skadad; låt lyfthandsken repareras omgående av Gunnebo Lifting eller ett auktoriserat mekaniskt reparationscenter. Rådgör med leverantören om du är osäker. - Lyft aldrig mer än en plåt eller ett paket med plåtar åt gången. - Lyft aldrig plåtar tyngre än den tillåtna arbetsbelastningen (W.L.L.), som anges på lyfthandsken och i testcertifikatet. - Lyft aldrig plåtar som är tjockare eller tunnare än gripklons öppning, som anges på lyfthandsken och i testcertifikatet. - När du använder flera lyfthandskar samtidigt, nyttja lyftslingor eller -kättingar av tillräcklig längd för att garantera att vinkeln mellan lyftslingorna eller - kättingarna aldrig överskrider När du använder ett antal lyfthandskar samtidigt sida vid sida, använd en lyftbom (utjämnare) och lyftslingor eller - kättingar som har en tillräcklig längd för att garantera att lyftbyglarna på lyfthandskarna aldrig utsätts för sidobelastning. - Placera inte lyfthandsken på avsmalnande eller koniska delar på plåten eller strukturen som skall lyftas. - Avlägsna fett, olja, smuts, korrosion och glödspån från plåten där lyfthandsken skall fästas. - Se till att lyfthandsken/lyfthandskarna är placerade så att lasten är balanserad när den lyfts. - Plåtytans hårdhet får inte överskrida 37 HrC (345 Hb, 1166 N/mm²). - Lyfthandsken är endast lämplig för användig under normala atmosfäriska förhållanden. Svenska Säkerhetsanvisningar - Kontrollera att kammen aldrig kan utsättas för sidobelastning. - Fritt fall eller okontrollerad svajning från lyftkroken som leder till att föremål fastnar, kan leda till stötskador på lyfthandsken. Om detta händer, kontrollera om lyfthandsken fortfarande är i användbart skick innan du använder den igen. - Lyfthandskar är inte lämpliga för att skapa permanenta fogar. - Underhåll av lyfthandsken skall ske regelbundet varje månad, se kapitel 6 - Underhåll. - Ändra inte lyfthandsken (genom svetsning, slipning, etc.), då detta kan påverka dess funktion och säkerhet negativt, och därmed upphäva garanti och produktansvar.13 - Av samma skäl får endast Gunnebo Lifting originalkomponenter användas. - Felaktig användning av lyfthandsken och/eller underlåtenhet att iakttaga anvisningar och varningar i denna handbok som gäller användningen av denna produkt kan utsätta användarens och/eller kringståendes hälsa för fara. 11
12 Nedanstående ytterligare säkerhetsföreskrifter gäller modellerna CH, CHE CHS, CHNM CHD och CHP Lyfthandskarna kan endast lastas från sidan med en maximal vinkel på 15, när de inte lastas mer än den tillåtna arbetsbelastningen (W.L.L) och den tillåtna toppvinkeln. Lyfthandskarnas kapacitet har beräknats på grundval av en maximal toppvinkel på 60. I situationer med större toppvinklar, skall den tillåtna arbetsbelastningen (W.L.L.) minskas i motsvarande grad, enligt följande lastritning. Vid stöttande användning, gäller en maximal toppvinkel på 60 och den tillåtna arbetsbelastningen (W.L.L.) är 50 % av den högsta tillåtna nyttiga lasten. Omgivningstemperaturen vid användning av standardlyfthandskar är mellan -40 och +100 C. Lyfthandskarna kan sidolastas vid en maximal vinkel på 15 5a Lyfta med lyfthandskar CH, CHE, CHS, CHD och CHNM - Kontrollera att lyfthandskens tillåtna arbetsbelastning (W.L.L.) klarar belastningen som uppstår i lyftsituationen. Obs! Den tillåtna arbetsbelastningen (W.L.L.) anges på lyfthandsken. - Fäst lyfthandsken på lyftmekanismen antingen med hjälp av: - en säkerhetsbygel direkt på en lyftkrok, - en kopplingslänk eller en D-bygel, - en slinga eller en kätting, om nödvändigt tillsammans med en kopplingslänk eller en D-bygel. - Se till att alla tillsatser har testats och har rätt lastförmåga. Kontrollera att kopplingslänkarna och byglarna är tillräckligt stora så att lyfthandsken kan röra sig fritt i kroken. - Kontrollera om lyfthandsken har synliga skador. Kontrollera om kammen kan öppnas och stängas utan problem. - Kontrollera att kamtänderna är fria från smuts. Rengör om nödvändigt med en stålborste. - Avlägsna fett, smuts och glödspån från plåten där lyfthandsken skall sitta. - Öppna lyfthandsken. - Placera gripklorna så långt de kommer över plåten. Kontrollera att lyfthandsken är placerad så att lasten balanseras när den lyfts. - Lyft försiktigt så att lyftkraften kan tillämpas. Kontrollera om lyfthandsken roterar eller lutar. - Om lyfthandsken roterar eller lutar, läs ovanstående anmärkningar igen om lyft. - Kontrollera att lasten är stabil. 12

13 5b Lyft med CHP -- Placera lyfthandsken på plåten (kabel eller kätting redan fäst på tanddelen; var försiktig att kättingen eller kabeln inte vrids); - Dra åt lyfthandskarna ordentligt för hand; - Spänn kablarna eller kättingarna med lyftkroken, medan klornas insida trycker hårt mot plåtens kant (Obs! På grund av att lyfthandsken saknar en konstant förspänning i tanddelen, är det nödvändigt att kontrollera lyfthandskarnas position tills kablarna är spända: Kontrollera att lyfthandskarna stannar kvar i rätt läge). - Lasten kan nu lyftas försiktigt. - Se till att kättingarna eller slingorna är konstant spända under transporten av lasten. - För att kroka av, skall lyftkranen sänkas så lågt att lyfthandsken är helt fri från belastning (Obs! Kontrollera att det inte finns några föremål under som lasten kan den kan vila på när den sänks och lyfthandskarna därmed blir obelastade för tidigt av misstag). - Lyfthandskarna kan nu avlägsnas från lasten. 6 Underhåll - Kontrollera lyfthandskens allmänna skick minst en gång i månaden. Se kapitel 7 - Demontering/ Montering. - Använd inte lyfthandsken om: - stommen är delad eller deformerad, särskilt vad gäller klohörnen, - kammen har deformerats visuellt, - kamtänderna inte längre är vassa, - bygelskruvarna har deformerats visuellt, - fästskruvar saknas, - markeringen på lyfthandsken inte längre kan läsas. Svenska Beroende på observerade defekter: Demontera och rengör lyfthandsken (se kapitel 7 - Demontering/Montering) eller låt lyfthandsken servas av Gunnebo Lifting eller annat auktoriserat mekaniskt reparationscenter (se kapitel 8 - Service). 7a Demontering/Montering av lyfthandskar CH, CHE, CHS, CHD Lyfthandskarna kan enkelt demonteras för rengöring och inspektion. Använd nedanstående procedur. -Avlägsna fästbulten (4) och kambulten (3). -Avlägsna kammen (2). -Rengör alla delar med ett vanligt avfettningsmedel. -Smörj kambulten (3) med lager fett. -Sätt ihop lyfthandsken i om vänd ordning. -Sätt alltid i nya originalfästbul tar (4) med hjälp av en hammare, tillsammans med en tång och dorn. -Använd alltid Gunnebo Lifting originalkomponenter när du byter delar. - Avlägsna eventuellt borrskägg med en fil. 13
14 7b Demontering/Montering av lyfthandskar CHP CHP-lyfthandsken kan enkelt demonteras för rengöring och inspektion. Använd nedanstående procedur. - Avlägsna spänningsbulten (6) med hjälp av en stiftindrivare från tanddelsaxeln (5). - Tanddelsaxeln kan nu tryckas ut ur ramen och tanddelen (3) kan avlägsnas. - Avlägsna hårnålssprintarna (7) samt bultarna (4) och de två sidoplåtarna (2) kan avlägsnas från lyfthandsken. - Rengör alla delar med ett vanligt avfettningsmedel. - Sätt ihop lyfthandsken i omvänd ordning. - Använd alltid Gunnebo Lifting originalkomponenter när du byter delar. - Avlägsna eventuellt borrskägg med en fil. 7c Demontering/Montering av CHNM lyfthandskar Lyfthandsken CHNM kan enkelt demonteras för rengöring och inspektion. Använd nedanstående procedur. - Avlägsna fästbulten (9) och kambulten (5). - Avlägsna kammen (2). - Avlägsna den lilla fästbulten (9) och kambulten (4). - Rengör alla delar med ett vanligt avfettningsmedel. - Om nödvändigt kan du avlägsna mellanläggen (6 & 7) genom att avlägsna bultarna (8) - Smörj kambulten (4 & 5) med lagerfett. - Sätt ihop lyfthandsken i omvänd ordning. - Sätt alltid i nya originalfästbultar (9) med hjälp av en hammare, tillsammans med en tång och dorn. - Använd alltid Gunnebo Lifting originalkomponenter när du byter delar. - Avlägsna eventuellt borrskägg med en fil. 8 Service Minst en gång om året eller vid skador, skall lyfthandsken inspekteras, testas och, om nödvändigt, servas av Gunnebo Lifting eller ett auktoriserat mekaniskt reparationscenter. Rådgör med leverantören om du är osäker. 9 Kassation När lyfthandsken når slutet av sin livslängd, kan den betraktas som järnskrot, under förutsättning att lyfthandsken inte längre kan användas. 14
15 10 Checklista för felsökning Fel/funktionsstörning Möjlig orsak Åtgärd Last glider Last smutsig Kam smutsig Kam trubbig Gripklor har krökts upp Rengör last Rengör kam Serva lyfthandske Kassera lyfthandske Kaml pivoterar dåligt Kam överbelastad Kassera lyfthandske Stomme krökt Lyfthanske överbelastad Kassera lyfthandske Kambygel oval Lyfthandske överbelastad Kassera lyfthandske Kambult krökt Lyfthandske överbelastad Byt kambult Justerbara bultar krökta Lyfthandke överbelastad Kassera lyfthandske Fästbultar saknas Felaktig montering Sätt i nya fästbultar Lyfthandske svår att öppna/ stänga Lyfthandske utsliten Lyfthandske förorenad Kassera lyfthandske Rengör kam Svenska 11 Garanti Gunnebo Lifting tillhandahåller en 5 års garanti på sina lyfthandskar. Denna garanti gäller den ursprungliga slutanvändaren av lyfthandskarna. Endast om lyfthandsken har inspekterats, kontrollerats och underhållits enligt dessa anvisningar och av en officiell återförsäljare. Garantiperioden på 5 år gäller från inköpsdagen och gäller alla villkor och åtgärder som nämns detta dokument. 11a Villkor Denna garanti täcker endast fel på lyftutrustning till följd av produktionsfel som inträffar vid normal användning. Garantin täcker inte slitage på komponenter som pivoter, kamdelar, låsfjädrar, etc. Om fel uppstår inom garantiperioden, kommer lyftutrustningen att ersättas eller repareras enligt tillverkarens anvisningar. Ingen garanti ges till lyfthandskar på grund av följande fel: - Regelbundet slitage. - Överbelastning. - Felaktig och/eller vårdslös användning. - Skador. - Handlingsplan och återgärder har ej följts. - Lyft av andra material än de som anges på lyfthandsken eller i användarhandboken. - Anpassning och/eller förändring av lyfthandsken. - Omdömeslös användning av lyfthandsken och inte följa alla anvisningar som anges i användarhandboken. - När underhåll och/eller revidering inte har utförts av en auktoriserad Gunnebo Lifting återförsäljare. Tillverkaren ansvarar inte för oavsiktlig skada eller skada till följd av användning av lyftutrustningen samt om anvisningarna i denna handbok försummas. 15
16 11b Handlingsplan för skyddsinspektion Alla inspektioner och reparationer skall skrivas ned i underhållstabellen. Detta gäller inte bara dina egna inspektioner, utan även inspektioner som utförs av auktoriserade Gunnebo Lifting återförsäljare. När lyfthandsken lämnas in för underhåll och inspektion, måste du alltid tillhandahålla underhållstabellen. Defekta lyfthandskar När slitage eller skada uppkommer, skall följande åtgärder vidtagas: 1. Ta lyfthandsken ur bruk. (Notera datumet när lyfthandsken uppvisade felet) 2. Försök att ta reda på felets orsak, till exempel (fullständig lista finns i kapitel 1): - Överbelastning - Felaktig och/eller vårdslös användning - etc. Anspråken som anges under punkt 2 omfattas inte av garantin! För att garantera din och dina kollegors säkerhet, skall denna handlingsplan följas upp. 3. Lämna tillbaka lyfthandsken (med underhållsbakgrund) till auktoriserad Gunnebo Lifting återförsäljare. 4. Om lyfthandsken har reviderats/reparerats av återförsäljaren, kan lyfthandsken användas igen utan fara. Notera detta datum i underhållstabellen. 11c Inspektionsschema Månad År Skyddsinspektioner av egen inspektör Underhåll av auktoriserad Gunnebo Lifting återförsäljare Revision av auktoriserad Gunnebo Lifting återförsäljare 16
17 Gebrauchsanleitung 1 Allgemeines 17 2 Funktionsbeschreibung 17 3 Bestimmungsgemäße Verwendung 17 4 Sicherheitshinweise 18 5 Heben 20 6 Wartung/ Inspektion 7 Richtlinien zur Demontage/Montage 20 - CH, CHE, CHS, CHD - CHP - CHNM 8 Überprüfung 21 9 Entsorgung Checkliste zur Fehlersuche Garantie 22 1 Allgemeines Herzlichen Glückwunsch zum Erwerb Ihrer neuen Gunnebo Lifting Sicherheits-Greifklemme. Gunnebo Lifting verbürgt sich aufgrund jahrelanger Erfahrung für optimale Qualität und Sicherheit. Gunnebo Lifting Lastaufnahmemittel werden aus hochwertigen Stahlsorten gefertigt und entsprechen der EG-Maschinenrichtlinie 2006/42/EG. 2 Funktionsbeschreibung CH, CHE, CHS, CHD und CHNM Greifklemmen dienen ausschließlich zum horizontalen Transport von Stahltafeln und Stahltafelpaketen und bestehen aus Gehäuse, Segment und Segmentstift. Das Segment dient gleichzeitig als Kranöse und sorgt während des Transports für sicheren Halt des Produkts. Die CHP Greifklemme dient ebenso wie die CHS Greifklemme ausschließlich zum horizontalen Heben und Transport von Stahltafeln und Stahltafelpaketen. Die CHP besteht aus einem in der Höhe verstellbaren Gehäuse und Segment. Das Segment dient gleichzeitig als Kranöse und hat die gleiche Funktion wie die oben beschriebene FH(S)(X) Klemme. Deutsch 3 Bestimmungsgemäße verwendung CH, CHE, CHS und CHNM Terrier FHS, CHE, CH-V & CHNM Greifklemmen sind speziell entwickelte Lastaufnehmer, die ausschließlich zum Heben und horizontalen Transport von nicht durchbiegenden Stahltafeln/- konstruktionen mit gleichmäßig flachem Befestigungspunkt dienen. Die Greifklemmen sind stets paarweise zu verwenden. NB: Die Klemme dient ausschließlich zum Heben und horizontalen Tansport von Stahltafeln. CHD Terrier CHD Greifklemmen sind speziell entwickelte Lastaufnehmer, die ausschließlich zum Heben und horizontalen Transport von durchbiegenden und geformten Stahltafeln mit gleichmäßig flachem Befestigungspunkt dienen. CHD Greifklemmen sind stets paarweise zu verwenden. 17
18 CHP Gunnebo Lifting CHP-Sicherheits-Greifklemmen dienen ebenfalls ausschließlich zum horizontalen Transport von Stahltafeln/-paketen bei gleichmäßig flachem Befestigungspunkt. CHP Klemmen können paarweise oder mittels Traverse auch satzweise verwendet werden. CHP Sicherheitsklemmen sind auch in senkrechter Position unterhalb einer Traverse verwendbar. Pro Hebevorgang können ein oder mehrere Tafeln gehoben werden, vorausgesetzt, dass sich diese nicht durchbiegen. NB: Bei Verwendung mehrerer Klemmen sind alle Klemmen gleichermaßen zu belasten. 4 Sicherhetishinweise Denken Sie stets an Ihre eigene Sicherheit und die von Dritten! Lesen Sie vor Benutzung des Produkts sorgfältig die Gebrauchsanleitung durch! Zur Gewährleistung Ihrer eigenen Sicherheit und der unserer Produkte sollte die Klemme minimal einmal (1x) pro Jahr durch Gunnebo Lifting oder einen anderen Fachbetrieb überprüft, getestet und bei Bedarf überholt werden. Siehe auch Kapitel 8 - Überholung. Für weitere Informationen wenden Sie sich bitte an Gunnebo Lifting. Vermeidung lebensgefährlicher situationen - Verwenden Sie keine Klemmen, die nicht geprüft sind oder deren Prüfungstermin überschritten ist. - Den Sicherheitsabstand unbedingt einhalten! Der Aufenthalt unter schwebenden Lasten ist verboten. - Verwenden Sie keine beschädigten Klemmen. - Lassen Sie Klemmen, die eine Beschädigung aufweisen, umgehend durch Gunnebo Lifting oder einen anderen Fachbetrieb reparieren. - Die Klemmen sind (soweit nicht anders vermerkt) ausschließlich zum Transport einzelner Tafeln und nicht für Pakete vorgesehen. - Transportieren Sie keine Stahltafeln, die den Sicherheitsbereich der Lastaufnahme (W.L.L.) übersteigen (siehe Angaben auf Klemme, Zertifikat und in Tabelle). - Transportieren Sie keine Stahltafeln, die dicker oder dünner sind als die Maulöffnung (siehe Angaben auf Klemme, Zertifikat und in Tabelle). - Achten Sie bei gleichzeitiger Verwendung mehrerer gegenüber liegender Klemmen auf ausreichende Länge der Gurte oder Ketten, so dass ein Neigungswinkel von 60º nicht überschritten wird. - Benutzen Sie bei gleichzeitiger Verwendung mehrerer nebeneinander liegender Greifklemmen eine Traverse und ausreichend lange Gurte oder Ketten, so dass die Kranösen der Klemmen nicht seitlich belastet werden. - Der Befestigungspunkt ist so auszuwählen, dass die Klemme nicht auf einem konischen Teil des Lastgutes greift. - Befreien Sie Tafel und Befestigungspunkt von Verschmutzungen wie Schmiermittel, Korrosion, Walzzunder u.ä.. - Achten Sie bei Platzierung der Klemmen auf optimales Gleichgewicht des Lastgutes. - Die zulässige Lastoberflächenhärte darf 37 HrC (345 Hb, 1166 N/mm2) nicht überschreiten. - Alle Klemmen sind ausschließlich zum Gebrauch unter normalen Umgebungstemperaturen geeignet. Warnung - Eine seitliche Belastung des Segments ist zu vermeiden. - Werden Gegenstände durch freien Fall oder unkontrolliertes Pendeln des Lasthakens getroffen, kann dies zu Beschädigungen der Klemme führen. In diesem Fall ist die Klemme vor weiterer Benutzung auf eventuelle Beschädigung zu überprüfen. - Greifklemmen sind nicht für dauerhafte Verbindungen geeignet. - Die Klemme sollte 1x monatlich gewartet werden (siehe Kapitel 6 Wartung/Inspektion). - Durch Veränderungen der Klemme, z.b. durch Schweißen, Schleifen etc., kann die Funktion und Sicherheit des Produkts beeinträchtigt werden. In diesem Fall verfällt die Garantie und wird 18
19 keinerlei Haftung übernommen. - Es sind ausschließlich Originalersatzteile und Zubehörteile der Firma Gunnebo Lifting zu verwenden. Weitere Sicherheitshinweise bei Verwendung der CH, CHE,CDH und CHP Greifklemme Die seitliche Belastung der Klemmen darf 15º nicht überschreiten (siehe unten stehende Zeichnung). Bei der Berechnungsgrundlage der Klemmen wurde von einem Neigungswinkel von 60º ausgegangen. Bei größeren Neigungswinkeln ist die zulässige Tragfähigkeit (W.L.L.) laut unten stehender Zeichnung proportional zu verringern. Beim Anschlag mit Schnürgang beträgt der maximale Neigungswinkel 60º und die zulässige Tragfähigkeit (W.L.L.) 50% der maximal zulässigen Tragfähigkeit (W.L.L.). Die Einsatztemperatur der Standardklemmen liegt zwischen -40 C und +100º C. 5 Heben - Bei Verwendung der Klemme ist darauf zu achten, dass die zulässige Tragfähigkeit (W.L.L) nicht überschritten wird (siehe Angaben auf der Klemme). - Befestigung der Greifklemme am Anschlagpunkt: - direkt am Lasthaken mit Sicherheitsverschluss; - in Verbindung mit Anker oder Kettenschäkel; - in Verbindung mit Gurt oder Kette, eventuell in Kombination mit Anker oder Kettenschäkel. - Achten Sie darauf, dass alle Lastaufnahmemittel geprüft und für die Last geeignet sind. Bei der Größe der Befestigungsglieder und verschlüsse ist zu darauf zu achten, dass sich die Klemme im Haken frei bewegen kann. - Überprüfen Sie die Klemme auf sichtbare Schäden. - Überprüfen Sie das Segment auf einfaches Öffnen und Schließen. - Kontrollieren Sie die Spannbacken auf Verschmutzung. Bei Bedarf ist zur Reinigung eine Drahtbürste zu verwenden. - Befreien Sie den Befestigungspunkt von Verschmutzungen wie Schmiermittel,Walzzunder u.ä.. - Öffnen Sie die Klemme.- Schieben Sie die Maulöffnung vollständig über die Tafel und kontrollieren Sie die Position der Klemme um sicherzugehen, dass das Lastgut während des Transports ein stabiles Gleichgewicht hat. - Beginnen Sie mit dem Heben langsam, so dass die Anpressbacken gut greifen können und kontrollieren Sie die Klemme auf Dreh,-oder Kippbewegung. - Bei Dreh,-oder Kippbewegung der Klemme vorhergehende Regeln erneut zu Rate ziehen. - Kontrollieren Sie das Lastgut auf seine sichere und stabile Position. Deutsch 19
20 6 Wartung Einmal pro Monat ist die Klemme zu überprüfen (siehe Kapitel 7 Demontage/Montage). Die Klemme darf nicht mehr verwendet werden bei: - Riss oder Vervormung des Gehäuses, insbesondere an den Ecken der Maulöffnung. - Verformung der Anpressbacken. - abgenutztem Zahnprofil der Anpressbacken. - Verformung der Achsen. - fehlenden Spannstiften. - unleserlichen Markierungen auf der Klemme. Abhängig von konstatierten Mängeln: Demontage und Reinigung der Klemme (siehe Kapitel 7 Demontage/Montage) oder Überholung der Klemme mit erneuter Prüfung durch Gunnebo Lifting oder einem anderen Fachbetrieb (siehe Kapitel 8 Überprüfung). 7a Richtlinien zur demontage/montage der CH, CHE, CHS, CHD Greifklemmen Die CH, CHE, CHS und CHD Greifklemmen können zur Reinigung und Wartung auf einfache Weise wie folgt demontiert werden. - Spannstift (4) und Segmentachse (3) entfernen. - Segment (2) entfernen. - Reinigung der Teile mit handelsüblichem Entfettungsmittel. - Segmetachse (3) mit Lagerfett einschmieren. - Eventuell entstandene Metallgrate mit einer Feile entfernen. Der Zusammenbau der Klemme erfolgt in umgekehrter Reihenfolge. Stets die Spannstifte erneuern und ausschließlich Orginalersatzteile von Gunnebo Lifting verwenden. 7b Richtlinien zur demontage/montage der CHP Greifklemme Die CHP Greifklemme kann zur Reinigung und Wartung auf infache Weise wie folgt demontiert werden: - Mit einem Durchschlag den Spannstift (6) aus der Segmentachse (5) entfernen. - Die Segmentachse aus der Führung schieben und das Zahnsegment (3) entfernen. - Nach dem Entfernen der Stiftfedern (7) und den zwei Stiften (4) können die zwei Seitenplatten (2) aus der Klemme (1) entfernt werden. Der Zusammenbau der Klemme erfolgt in umgekehrter Reihenfolge. Stets die Spannstifte erneuern. Nach der Wartung und/oder Reperatur muss die Klemme auf einer Zugprüfmaschine getestet werden. 20
21 7c Richtlinien zur demontage/montage der CHNM Greifklemmen Die CHNM Greifklemmen können zur Reinigung und Wartung auf einfache Weise wie folgt demontiert werden. - Spannstift (9) und Segmentachsen (5 & 4) entfernen. - Segment (2) entfernen. - Reinigung der Teile mit handelsüblichem Entfettungsmittel. - Segmetachse (5 & 4) mit Lagerfett einschmieren. - Eventuell entstandene Metallgrate mit einer Feile entfernen. Der Zusammenbau der Klemme erfolgt in umgekehrter Reihenfolge. Stets die Spannstifte erneuern und ausschließlich Orginalersatzteile von Gunnebo Lifting verwenden. 8 Überprüfung Mindestens einmal (1x) pro Jahr (gesetzlich vorgeschrieben) oder bei Beschädigung der Klemme muss diese durch Gunnebo Lifting oder einem anderen Fachbetrieb kontrolliert, getestet und überprüft werden. 9 Entsorgung Die Klemme kann, vorausgesetzt sie ist unbenutzbar, den örtlichen Vorschriften entsprechend entsorgt werden. 10 Checkliste zur fehlersuche Störung Mögliche Ursache Abhilfe Lastgut rutscht Lastgut verschmutzt Zwinge u/o Segment verschmutzt Zwinge u/o Segment stumpf Maulöffnung verbogen Reinigen Reinigen Austauschen Austauschen Segment schwer beweglich Segment überlastet Ausmustern Gehäuse verbogen Klemme überlastet Ausmustern Deutsch Kranöse oval Klemme überlastet Ausmustern Segmentachse verbogen Klemme überlastet Ausmustern Verstellstifte verbogen Klemme überlastet Ausmustern Spannstifte fehlen Falsche Montage Spannstifte montieren Klemme öffnet/schließt schwer Verschleiß der Klemme Klemme verschmutzt Ausmustern Reinigen 21
22 11 5 Jahre Garantie Gunnebo Lifting gewährt Endbenutzern 5 Jahre Garantie auf ihre Hebeklemmen. Diese Garantie gilt nur für den ursprünglichen Endbenutzer der Hebeklemme und unter der Voraussetzung, dass das Hebemittel während der gesamten Garantiefrist den Anweisungen des Herstellers und Verkäufers gemäß inspiziert, geprüft und gewartet wird. Die Garantiefrist beträgt 5 Jahre ab Verkaufsdatum. Die Garantie unterliegt den hier genannten Bestimmungen und Bedingungen. 11a Bedingungen und Bestimmungen Nur Mängel als Folge von Herstellungsfehlern, die bei normalem Gebrauch auftreten, werden von der Garantie abgedeckt. Von der Garantie ausgeschlossen ist Verschleiß an Teilen wie z. B. Zahnkreisen, Zahnsegmenten, Spannfedern usw. Wenn innerhalb der Garantiefrist ein Mangel festgestellt wird, wird die Hebeklemme nach Ermessen des Herstellers ersetzt oder repariert. Von der Garantie ausgeschlossen sind Klemmen mit Mängeln die auf Folgendes zurückzuführen sind: - Normaler Verschleiß - Überlastung - Unsachgemäßer oder nachlässiger Gebrauch - Beschädigungen - Nichteinhaltung der vorgeschriebenen Verfahren und Maßnahmen - Heben von anderem Hebegut als auf der Klemme oder in der Bedienungsanleitung angegeben - Modifikationen/Änderungen an der Gunnebo Lifting-Klemme - Unsachkundiger Gebrauch der Klemme und Nichteinhaltung der Anweisungen in der betreffenden Bedienungsanleitung - Wartungs- und/oder Revisionsarbeiten, die nicht von einem anerkannten Gunnebo Lifting-Händler durchgeführt wurden Der Hersteller haftet nicht für Nebenschäden oder Schäden, die sich aus dem Gebrauch der Hebeklemme oder einem Verstoß gegen die Garantie ergeben. 11b Sicherheitsinspektion Alle Inspektionen und Reparaturen müssen in das Inspektionsschema eingetragen werden. Dies gilt nicht nur für die eigenen Inspektionen, sondern auch für Inspektionen, die von einem anerkannten Gunnebo Lifting-Händler vorgenommen werden. Wenn die Einheit zur Inspektion oder Wartung gegeben wird, muss das Wartungsheft immer mitgeliefert werden. Schäden an der Hebeklemme Werden Verschleiß oder Beschädigungen in irgendeiner Form festgestellt, ist folgendermaßen vorzugehen: 1 Die Klemme außer Betrieb nehmen (Datum der Außerbetriebnahme notieren). 2 Versuchen, die Ursache des Defekts zu ermitteln, z. B. (die vollständige Liste finden Sie in Kap. 1): - Überlastung - Unsachgemäßer Gebrauch (die Klemme ist nicht zum Ziehen oder Schleppen von Objekten geeignet) - Unsachkundiger Gebrauch - Grober oder nachlässiger Gebrauch 22
23 Deutsch Derartige Beschädigungen sind von der Garantie ausgeschlossen! Um Ihre Sicherheit und die Sicherheit Ihrer Kollegen/Mitarbeiter zu gewährleisten, muss dieses Verfahren dennoch eingehalten werden. 3 Die Hebeklemme zusammen mit dem Wartungsheft bei einem anerkannten Gunnebo Lifting-Reparaturfachmann abgeben. 4 Nach der Revision/Reparatur die Klemme wieder in Betrieb nehmen. Datum der Inbetriebnahme im Wartungsheft notieren (auf Seite 35). 11c Kontrollenzeitplan Monate Jahre Vom eigenen Sicherheitsbeauftragten durchzuführende Inspektionen Wartung durch einen anerkannten Gunnebo Lifting Reparaturfachmann Revision durch einen anerkannten Gunnebo Lifting Reparaturfachmann 23
24 Indice 1 Geral 24 2 Princípio de funcionamento 24 3 Aplicações permitidas 24 4 Instruções de segurança 25 5 Elevação 26 - CH, CHE, CHD, CHNM - CHP 6 Manutenção 27 7 Desmontagem/Montagem 28 - CH,CHE, CHS, CHD - CHP - CHNM 8 Reparação 29 9 Eliminação Lista de verificação da resolução de problemas Garantia 30 1 Geral Agradecemos a aquisição da pinça de segurança de elevação de placas da Gunnebo Lifting. Os sistemas de gestão e serviços de qualidade da Gunnebo Lifting estão em conformidade com as normas ISO Os muitos anos de vasta experiência são uma garantia de segurança e qualidade óptima. As pinças de elevação da Gunnebo Lifting são fabricadas com aço de qualidade superior e estão em conformidade com as normas europeias conforme descrito na Directiva de Máquinas 2006/42/EG. 2 Principio de funcionamento As pinças de segurança de elevação horizontal CH, CHE, CHS, CHNM e CHP foram concebidas especificamente para o transporte e elevação horizontal de placas de aço não dobráveis. As pinças são compostas por um corpo, pelo excêntrico e o pino do excêntrico. O excêntrico funciona também como um olhal de elevação e garante que a carga se mantém firmemente segura enquanto está a ser levantada. 3 Aplicaçãos permitidas CH, CHE, CHS and CHNM As pinças de elevação CH, CHE e CHNM da Gunnebo Lifting são adequadas apenas para movimentos horizontais e de elevação de estruturas e placas de aço não dobráveis em que seja possível posicionar a pinça num ponto de contacto plano. As pinças devem ser sempre utilizadas aos pares ou em conjuntos. No entanto, no último caso, preferencialmente com uma viga de distribuição da carga. CHD As pinças de elevação CHD da Gunnebo Lifting só são adequadas para movimentos horizontais e de elevação de placas de aço dobráveis e placasde aço moldado, em que seja possível posicionar a pinça num ponto de contacto plano. As pinças CHD devem ser sempre utilizadas aos pares ou em conjuntos. 24
25 CHP As pinças de elevação CHP da Gunnebo LIfting só são adequadas para movimentos horizontais de placas de aço e conjuntos de placas de aço, em que seja possível posicionar a pinça num ponto de contacto plano. As pinças devem ser sempre utilizadas aos pares ou em conjuntos. No entanto, no último caso, preferencialmente com uma viga de distribuição da carga. Desde que a chapa ou chapas de aço não dobrem (deflictam), pode içar uma ou mais placas de cada vez. Quando utilizar pares ou várias pinças, cada pinça deve transportar uma parte igual da carga. 4 Istruções de Segurança Segurança em primeiro lugar! Garanta a sua segurança pessoal lendo cuidadosamente as seguintes instruções de segurança. Garanta a sua própria segurança e continue a beneficiar da segurança do nosso produto ao mandar efectuar inspecções, testes e, se necessário, reparações, pelo menos uma vez por ano, pela Gunnebo Lifting ou um centro de assistência e manutenção mecânica reconhecido. Consulte também o Capítulo 8 - Reparação. Para mais informações, contacte a Gunnebo Lifting. Evite situações de perigo de vida Evite situações perigosas tomando as seguintes precauções: - Nunca trabalhe com uma pinça que não tenha sido testada. - Mantenha a distância de segurança durante o levantamento e nunca fique debaixo da carga. - Não utilize a pinça se estiver danificada; mande reparar a pinça imediatamente pela Gunnebo Lifting ou por um centro de assistência mecânica reconhecido. Em caso de dúvida, consulte o seu fornecedor. - Nunca levante mais do que uma placa ou um conjunto de placas de cada vez. - Nunca levante placas mais pesadas do que o limite de carga de trabalho (W.L.L.), conforme indicado na pinça e no certificado de teste. - Não levante placas mais grossas ou mais finas do que a abertura das garras, conforme indicado na pinça e no certificado de teste. - Quando utilizar várias pinças de elevação simultaneamente, utilize correntes ou eslingas de elevação com um comprimento suficiente para garantir que o ângulo entre as eslingas ou as correntes nunca excede os Quando operar simultaneamente várias pinças de elevação em paralelo, utilize uma viga de elevação (distribuição) e correntes ou eslingas de elevação com um comprimento suficiente para garantir que os olhais de elevação das pinças nunca são sujeitos a carga lateral. - Não coloque a pinça em secções afuniladas ou cónicas da placa ou estrutura que pretende levantar. - Retire toda a massa lubrificante, óleo, sujidade, corrosão e calamina da placa no ponto em que a pinça se vai prender. - Certifique-se de que a(s) pinça(s) está(ão) posicionada(s) de forma a equilibrar a carga quando esta for levantada. - A rigidez da superfície da placa não deve exceder 37 HrC (345 Hb, 1166 N/mm²). - A pinça é adequada apenas para utilização em condições atmosféricas normais. Português 25

26 Precações de segurança - Certifique-se de que o excêntrico nunca é sujeito a uma carga lateral. - Uma queda livre ou uma oscilação descontrolada no gancho do guindaste que resulte no embate dos objectos pode provocar danos por impacto na pinça. Se isto ocorrer, verifique se a pinça está em boas condições de funcionamento antes de a utilizar. - As pinças de elevação não são adequadas para serem utilizadas como juntas permanentes. - A manutenção da pinça deve ser efectuada numa base mensal regular, consulte o Capítulo 6 - Manutenção. - Não modifique a pinça (através de soldadura, rectificação, etc.), dado que isto pode comprometer o seu funcionamento e segurança e, por isso, anular todas as formas de garantia e responsabilidade do produto. - Pelo mesmo motivo, utilize apenas componentes originais da Terrier. - Qualquer utilização incorrecta da pinça e/ou o incumprimento das instruções e avisos destas instruções de funcionamento, no que respeita à utilização deste produto, podem colocar em perigo a saúde do utilizador e/ou das pessoas presentes. As precauções de segurança adicionais que se seguem são aplicáveis aos modelos CH, CHE CHS, CHNM, CHD e CHP As pinças podem ser carregadas lateralmente num ângulo máximo de 15, apenas quando não tiverem uma carga superior ao limite de carga de trabalho (W.L.L.) máximo e ao ângulo superior permitido. A capacidade das pinças foi calculada com base num ângulo superior máximo de 60. No caso de situações com ângulos superiores maiores, o limite de carga de trabalho (W.L.L.) deve ser reduzido proporcionalmente, de acordo com o seguinte esquema de carga. Aquando do uso para sustentação, é aplicável um ângulo superior máximo de 60 e o limite de carga de trabalho (W.L.L.) é 50% da carga de trabalho máxima permitida. A temperatura ambiente para a utilização de pinças de elevação standard é entre -40 C e 100 C. As pinças podem ser carregadas lateralmente num ângulo máximo de 15. 5a Elevação com as pinças CH, CHE, CHS, CHD e CHNM - Verifique se o limite de carga de trabalho (W.L.L.) da pinça é suficiente para a carga criada na situação de elevação. Nota: O limite de carga de trabalho (W.L.L.) é indicado na Português 14 pinça de elevação. - Instale a pinça de elevação no mecanismo de içamento através de um: 26
27 - olhal de segurança directamente no gancho do guindaste, - manilha ou olhal em D, - eslinga ou corrente, se necessário juntamente com uma manilha ou um olhal em D. - Certifique-se de que todos os acessórios foram testados e têm a tonelagem correcta. Certifiquese de que as manilhas e os olhais são suficientemente largos para permitir que a pinça se mova livremente no gancho. - Verifique se a pinça tem algum dano visível. Verifique se o excêntrico abre e fecha suavemente. - Verifique se os dentes do excêntrico não têm sujidade e, se necessário, limpe-os com uma escova de arame. - Retire toda a massa lubrificante, sujidade e calamina da placa no local da pinça de elevação. - Abra a pinça. - Coloque as garras até onde for possível sobre a placa, certificando-se de que a pinça está posicionada de forma a equilibrar a carga quando esta estiver a ser levantada. - Levante suavemente para que a força de elevação possa ser aplicada; verifique se a pinça está a rodar ou a inclinar-se. - Se a pinça estiver a rodar ou a inclinar-se, leia novamente as indicações supracitadas relativas à elevação. - Certifique-se de que a carga está numa posição estável. 5b Elevação com as pinças CHP - Instale a pinça na placa (cabo ou corrente já fixado no segmento dentado; e certifiquese de que o cabo ou corrente não está torcido); - Aperte as pinças firmemente à mão; - Aplique tensão nos cabos ou correntes com o gancho do guindaste, enquanto o interior das pinças pressiona firmemente a borda da placa (nota: visto que a pinça não possui uma pré-tensão constante disponível no segmento dentado, será necessário observar a posição das pinças até que os cabos estejam tensos: certifique-se de que as pinças permanecem na posição correcta). - A carga pode agora ser levantada cuidadosamente. - Durante o transporte da carga, certifique-se de que uma tensão constante é mantida nas correntes ou eslingas. - Para desenganchar, o gancho do guindaste deve ser baixado até que a pinça esteja completamente livre de qualquer carga (nota: certifique-se de que, quando a carga for baixada, não existem obstáculos por baixo onde a carga possa pousar durante a descida, fazendo com que as pinças fiquem livres de carga cedo demais por acidente). - As pinças podem agora ser removidas da carga. 6 Manutenção - Verifique a condição geral da pinça pelo menos uma vez por mês, consulte o Capítulo 7 - Desmontagem/Montagem. - Não utilize a pinça se: - o corpo estiver rachado ou deformado, em particular nos cantos das garras, - o excêntrico estiver visivelmente deformado, - os dentes do excêntrico já não estiverem afiados, - os pinos do olhal estiverem visivelmente deformados, - faltarem pinos retentores, - as especificações da pinça já não forem legíveis. Dependendo dos defeitos identificados: desmonte e limpe a pinça (consulte o Capítulo 7 Desmontagem/Montagem) ou mande reparar a pinça pela Gunnebo Lifting ou por outro centro de assistência mecânica reconhecido (consulte o Capítulo 8 - Reparação). Português 27
. - Limpe todas as peças com um desengordurante normal. - Lubrifique o pino do excêntrico (3) com massa lubrificante de rolamentos. - Monte a pinça pela sequência inversa.")

28 7a Desmontagem/Montagem de pinças CHE, CHS CHD As pinças podem ser facilmente desmontadas para limpeza e inspecção. Siga o procedimento abaixo. - Retire o pino retentor (4) e o pino do excêntrico (3). - Remova o excêntrico (2). - Limpe todas as peças com um desengordurante normal. - Lubrifique o pino do excêntrico (3) com massa lubrificante de rolamentos. - Monte a pinça pela sequência inversa. - Introduza sempre pinos retentores novos e originais (4) com a ajuda de um martelo, um alicate combinado e um punção de pinos. - Utilize sempre componentes originais da Gunnebo Lifting quando substituir as peças. - Retire qualquer rebarba com uma lima. 7b Desmontagem/Montagem das pinças CHP A pinça CHP pode ser desmontada facilmente para limpeza e inspecção. Siga o procedimento abaixo. - Retire o pino de aperto (6), utilizando um saca-pinos, do veio do segmento dentado (5). - O veio do segmento dentado pode agora ser empurrado para fora da estrutura e o segmento dentado (3) pode ser retirado. - Retire as cavilhas em U (7) e os pinos (4) e as duas placas laterais (2) podem ser retiradas da pinça. - Limpe todas as peças com um desengordurante standard. - Monte a pinça pela sequência inversa. - Utilize sempre componentes originais da Gunnebo Lifting quando substituir as peças. - Retire qualquer rebarba com uma lima. 28
29 Português 7c Desmontagem/Montagem modelos de pinças CHNM A pinça CHNM pode ser facilmente desmontada para limpeza e inspecção. Siga o procedimento abaixo. - Retire o pino retentor (9) e o pino do excêntrico (5). - Remova o excêntrico (2). - Retire o pino retentor (9) pequeno e o pino do excêntrico (4). - Limpe todas as peças com um desengordurante standard. - Se necessário, pode remover as almofadas (6 e 7) retirando os parafusos (8) - Lubrifique o pino do excêntrico (4 e 5) com massa lubrificante de rolamentos. - Monte a pinça pela sequência inversa. - Introduza sempre pinos retentores novos e originais (9) com a ajuda de um martelo, um alicate combinado e um punção de pinos. - Utilize sempre componentes originais da Gunnebo Lifting quando substituir as peças. - Retire qualquer rebarba com uma lima. 8 Reparação Pelo menos uma vez por ano, ou em caso de danos na pinça, a pinça de elevação deve ser inspeccionada, testada e, se necessário, reparada pela Gunnebo Lifting ou por um centro de assistência e manutenção mecânica reconhecido. Em caso de dúvida consulte o seu fornecedor. 9 Eliminação Assim que chegar ao fim da vida útil, a pinça pode ser tratada como sucata, desde que se tenha procedido à sua inutilização. 29
30 10 Lista de verificação da resolução de problemas Falha/avaria Causa possível Solução Carga a deslizar Carga suja Excêntrico sujo Excêntrico gasto Garras dobradas e abertas Limpar a carga Limpar a carga Reparar a pinça Rejeitar a pinça Pivô do excêntrico em más Excêntrico Rejeitar a pinça Corpo dobrado Pinça sobrecarregada Rejeitar a pinça Olhal do excêntrico oval Pinça sobrecarregada Rejeitar a pinça Pino do excêntrico dobrado Pinça sobrecarregada Substituir pino do Pinos ajustáveis dobrados Pinça sobrecarregada Rejeitar a pinça Pinos retentores em falta Montados Instalar pinos retentores Abertura/fecho difícil da pinça 11 Garantia Pinça desgastada Pinça contaminada Rejeitar a pinça Limpar a pinça A Gunnebo Lifting oferece uma garantia de 5 anos para as suas pinças de elevação. Esta garantia aplica-se ao utilizador final original das pinças de elevação. Apenas se a inspecção, verificação e manutenção da pinça tiverem sido efectuadas segundo estas instruções e por um revendedor oficial. Este período de 5 anos da garantia é válido a partir do dia da compra e abrange todas as condições e medidas referidas neste documento. 11a Condições Esta garantia cobre apenas as falhas de ferramentas de elevação que sejam consequência de erros de produção que ocorreram durante a sua utilização normal. Esta garantia não cobre o desgaste de componentes tais como pivôs, conjuntos dos excêntricos, molas de bloqueio, etc. Caso ocorra qualquer tipo de falha dentro deste período de garantia, a substituição ou reparação da ferramenta de elevação ficará ao critério do fabricante. Não é atribuída garantia às pinças devido às seguintes falhas: - Desgaste normal - Sobrecarga. - Utilização errada e/ou descuidada - Danos - Não observância dos procedimentos e das medidas - Içamento de materiais que não os indicados na pinça ou referidos no manual do utilizador - Adaptação e/ou modificação da pinça da Gunnebo Lifting. - A utilização imprudente da pinça e o não cumprimento de todas as indicações referidas no manual do utilizador. - Quando a manutenção e/ou revisão não tiver sido efectuada apenas por um distribuidor autorizado da Gunnebo Lifting. O fabricante não é responsável por danos acidentais nem por danos decorrentes da utilização das ferramentas de elevação e da violação deste manual. 30
31 Português 11b Procedimento de inspecção de segurança Todas as inspecções e reparações devem ser registadas no diagrama de manutenção. Isto é válido não só para as suas próprias inspecções mas também para as inspecções efectuadas pelo seu distribuidor autorizado da Gunnebo Lifting. Quando a pinça é entregue para manutenção e inspecção, deve sempre apresentar o diagrama de manutenção. Pinças de elevação com defeito Quando é indicado algum tipo de desgaste ou dano, deve tomar as seguintes medidas. 1 Inutilize a pinça de elevação. (Tome nota da data da falha da pinça de elevação) 2 Tente apurar a causa da falha, como por exemplo (lista completa disponível no capítulo 1): - Sobrecarga - Utilização errada e/ou descuidada - etc. As reclamações indicadas no N.º 2 não são abrangidas pela garantia! Para garantir a sua se gurança e a dos seus colegas, é obrigatório seguir estes procedimentos. 3 Devolva a sua pinça de elevação (com o historial de manutenção) ao seu distribuidor autorizado da Gunnebo Lifting. 4 Se a pinça de elevação tiver sido revista/reparada pelo seu distribuidor, pode utilizar a sua pinça novamente em segurança. Tome nota desta data no seu diagrama de manutenção. 11c Registo de Inspecção Meses Anos Inspecções de segurança pelo seu próprio inspector Manutenção por um distribuidor oficial da Gunnebo Lifting Revisão por um distribuidor oficial da Gunnebo Lifting 31

32 32
Lifting Systems CDV, CDH
 Lifting Systems CDV, CDH Owners Manual - Drum clamp Användarhandbok - Lyfthandske Gebrauchsanleitung - Faßklemmen Manual do Utilizador - A pinça de segurança de elevação de vigas www.gunnebolifting.com
Lifting Systems CVNM.
 Lifting Systems CVNM Owners Manual - safety lifting clamp for non-ferrous plates and constructions Användarhandbok - Lyfthandske för skivor och konstruktioner i icke-metall Gebrauchsanleitung - Sicherheitshebegreifer
Lifting Systems CV/CVS, CVEU, CVHP, CVU / CVSU, CVUS, CVHPU
 Lifting Systems CV/CVS, CVEU, CVHP, CVU / CVSU, CVUS, CVHPU Owners Manual - Safety plate lifting clamp Användarhandbok - Lyfthandskar Gebrauchsanleitung - Sicherheits-greifklemmen Manual do Utilizador
VGM. VGM information. ALIANÇA VGM WEB PORTAL USER GUIDE June 2016
 Overview The Aliança VGM Web portal is an application that enables you to submit VGM information directly to Aliança via our e-portal Web page. You can choose to enter VGM information directly, or to download
Thank you for using Shepherd 240 Biometric Fingerprint Lock. Please read this Installation Manual carefully before attempting
 Preface Thank you for using Shepherd 240 Biometric Fingerprint Lock Please read this Installation Manual carefully before attempting to install your new lock. This manual covers installation procedures
CRIMP OD & PRODUCT GUIDE HOSE ID
 .50 0.58 0.660.049 05022C50** E05C E05E 0.60 0.676.049 05022CS** 05C 05E 0.62 0.692.049 (.688 ) CF50C CF50E 0.64 0.707.049 05024C50** 0.66 0.723.049 05024CS** 0.68 0.738.049 (.750 ) 0.70 0.754.049 05026C50**
1. Product Name. 2. Product Code. 3. Colour. 4. Brief Description. 5. Contents. Hip Hop Jumping Cushion. Colours may vary
 1. Product Name Hip Hop Jumping Cushion 2. Product Code 19229 3. Colour Colours may vary 4. Brief Description Provides hours of healthy fun for children. Has a strong padding and has no frame or edges.
Vendors Enquiries for RFP 003/2015
 Date: 22/10/2015 Vendors Enquiries for RFP 003/2015 1) Question I am afraid the terms of the RFP cannot be complied by none of the companies we work with, the terms have limited the underwriters ability
Manual de instruções para Caixa Coletora Johnson Pump
 Manual de instruções para Caixa Coletora Johnson Pump Em caso dúvidas na instalação após a leitura do manual, favor entrar em contato com nosso departamento técnico através do telefone: (11) 3477-5655
MySQL: Comece com o principal banco de dados open source do mercado (Portuguese Edition)
") MySQL: Comece com o principal banco de dados open source do mercado (Portuguese Edition) Click here if your download doesn"t start automatically MySQL: Comece com o principal banco de dados open source
MySQL: Comece com o principal banco de dados open source do mercado (Portuguese Edition) Click here if your download doesn"t start automatically MySQL: Comece com o principal banco de dados open source
VGM. VGM information. ALIANÇA VGM WEB PORTAL USER GUIDE September 2016
 Overview The Aliança VGM Web portal is an application that enables you to submit VGM information directly to Aliança via our e-portal Web page. You can choose to enter VGM information directly, or to download
2/4 BD8201FM. Lot No. REV. A
 1/4 2/4 BD8201FM Lot No. 3/4 Ω Function Description 4/4 Appendix Notes No technical content pages of this document may be reproduced in any form or transmitted by any means without prior permission of
NORMAS DE FUNCIONAMENTO DOS CURSOS DE LÍNGUAS (TURMAS REGULARES E INTENSIVAS) 2015/2016
 2015/2016") NORMAS DE FUNCIONAMENTO DOS CURSOS DE LÍNGUAS (TURMAS REGULARES E INTENSIVAS) 2015/2016 1. Tipos de turma e duração: O CLECS oferece dois tipos de turma: regular e intensivo. Além destas turmas, o CLECS
NORMAS DE FUNCIONAMENTO DOS CURSOS DE LÍNGUAS (TURMAS REGULARES E INTENSIVAS) 2015/2016 1. Tipos de turma e duração: O CLECS oferece dois tipos de turma: regular e intensivo. Além destas turmas, o CLECS
Installation Instructions
 page 1 of 7 Description This 3-piece shield is designed to further reduce side-lobe radiation levels of high-performance, parabolic antennas. The instructions given in this bulletin apply to a shield for
LIGHT PANEL CONTENTS Light Panel Power supply Fixtures (brackets, screws)
") Page 1 of 8 LIGHT PANEL 20367 CONTENTS Light Panel Power supply Fixtures (brackets, screws) ABOUT THIS PRODUCT The Light Panel may be used on a table top as a free-standing object, or mounted either horizontally
Page 1 of 8 LIGHT PANEL 20367 CONTENTS Light Panel Power supply Fixtures (brackets, screws) ABOUT THIS PRODUCT The Light Panel may be used on a table top as a free-standing object, or mounted either horizontally
25 Monate Garantiebedingungen 25 mois conditions de garantie 25 months warranty conditions
 Smart Connect de Bedienungsanleitung en Instructions for use fr Mode d emploi it Istruzioni per l uso nl Gebruiksaanwijzing es Modo de empleo pt Manual de instruções sv Bruksanvisning ru Руководство по
OPTI-GARD. Eye Protector. Rx Only Read complete instructions before use. REF REF OPTI-GARD
 Nome técnico: Protetores (ocular, de mamilo e outras partes do PRODUTO MÉDICO NÃO ESTÉRIL. NÃO ESTERILIZAR ANTES DO USO. O FABFRICANTE RECOMENDA O USO ÚNICO. Não é feito com látex de borracha natural.
Princípios de Direito Previdenciário (Portuguese Edition)
") Princípios de Direito Previdenciário (Portuguese Edition) Wladimir Novaes. Martinez Click here if your download doesn"t start automatically Princípios de Direito Previdenciário (Portuguese Edition) Wladimir
Princípios de Direito Previdenciário (Portuguese Edition) Wladimir Novaes. Martinez Click here if your download doesn"t start automatically Princípios de Direito Previdenciário (Portuguese Edition) Wladimir
Biscuit - potes (Coleção Artesanato) (Portuguese Edition)
 (Portuguese Edition)") Biscuit - potes (Coleção Artesanato) (Portuguese Edition) Regina Panzoldo Click here if your download doesn"t start automatically Biscuit - potes (Coleção Artesanato) (Portuguese Edition) Regina Panzoldo
Biscuit - potes (Coleção Artesanato) (Portuguese Edition) Regina Panzoldo Click here if your download doesn"t start automatically Biscuit - potes (Coleção Artesanato) (Portuguese Edition) Regina Panzoldo
O PRíNCIPE FELIZ E OUTRAS HISTóRIAS (EDIçãO BILíNGUE) (PORTUGUESE EDITION) BY OSCAR WILDE
 (PORTUGUESE EDITION) BY OSCAR WILDE") Read Online and Download Ebook O PRíNCIPE FELIZ E OUTRAS HISTóRIAS (EDIçãO BILíNGUE) (PORTUGUESE EDITION) BY OSCAR WILDE DOWNLOAD EBOOK : O PRíNCIPE FELIZ E OUTRAS HISTóRIAS (EDIçãO Click link bellow and
Read Online and Download Ebook O PRíNCIPE FELIZ E OUTRAS HISTóRIAS (EDIçãO BILíNGUE) (PORTUGUESE EDITION) BY OSCAR WILDE DOWNLOAD EBOOK : O PRíNCIPE FELIZ E OUTRAS HISTóRIAS (EDIçãO Click link bellow and
Pesquisa Qualitativa do Início ao Fim (Métodos de Pesquisa) (Portuguese Edition)
 (Portuguese Edition)") Pesquisa Qualitativa do Início ao Fim (Métodos de Pesquisa) (Portuguese Edition) Robert K. Yin Click here if your download doesn"t start automatically Pesquisa Qualitativa do Início ao Fim (Métodos de
Pesquisa Qualitativa do Início ao Fim (Métodos de Pesquisa) (Portuguese Edition) Robert K. Yin Click here if your download doesn"t start automatically Pesquisa Qualitativa do Início ao Fim (Métodos de
Powerfix D A RADMUTTERNSCHLÜSSEL KH4055 E P. IB_KH4055_0706_EP :05 Uhr Seite 1
 IB_KH4055_0706_EP 18.09.2006 14:05 Uhr Seite 1 Powerfix D A RADMUTTERNSCHLÜSSEL KH4055 E P LLAVE PARA TUERCA DE RUEDA KH4055 CHAVE DE PORCAS PARA RODAS DE VEÍCULOS KH4055 IB_KH4055_0706_EP 18.09.2006 14:05
Vaporpunk - A fazenda-relógio (Portuguese Edition)
") Vaporpunk - A fazenda-relógio (Portuguese Edition) Octavio Aragão Click here if your download doesn"t start automatically Vaporpunk - A fazenda-relógio (Portuguese Edition) Octavio Aragão Vaporpunk - A
Vaporpunk - A fazenda-relógio (Portuguese Edition) Octavio Aragão Click here if your download doesn"t start automatically Vaporpunk - A fazenda-relógio (Portuguese Edition) Octavio Aragão Vaporpunk - A
A dança do corpo vestido: Um estudo do desenvolvimento do figurino de balé clássico até o século XIX (Portuguese Edition)
") A dança do corpo vestido: Um estudo do desenvolvimento do figurino de balé clássico até o século XIX (Portuguese Edition) Francisca Dantas Mendes Click here if your download doesn"t start automatically
A dança do corpo vestido: Um estudo do desenvolvimento do figurino de balé clássico até o século XIX (Portuguese Edition) Francisca Dantas Mendes Click here if your download doesn"t start automatically
DIBELS TM. Portuguese Translations of Administration Directions
 DIBELS TM Portuguese Translations of Administration Directions Note: These translations can be used with students having limited English proficiency and who would be able to understand the DIBELS tasks
Units 3 and 4. 3rd Bimester Content. Future Predictions. Life events. Personality adjectives. English - Leonardo Bérenger and Aline Martins
 3rd Bimester Content Life events Be going to Future Predictions Be going to x Will Units 3 and 4 First Conditional Personality adjectives EVALUATION CRITERIA CONTENT TOPICS EVALUATION CRITERIA 3rd Bimester
Mitologia - Deuses, Heróis e Lendas (Portuguese Edition)
") Mitologia - Deuses, Heróis e Lendas (Portuguese Edition) By Maurício Horta, José Francisco Botelho, Salvador Nogueira Mitologia - Deuses, Heróis e Lendas (Portuguese Edition) By Maurício Horta, José Francisco
Mitologia - Deuses, Heróis e Lendas (Portuguese Edition) By Maurício Horta, José Francisco Botelho, Salvador Nogueira Mitologia - Deuses, Heróis e Lendas (Portuguese Edition) By Maurício Horta, José Francisco
A necessidade da oração (Escola da Oração) (Portuguese Edition)
 (Portuguese Edition)") A necessidade da oração (Escola da Oração) (Portuguese Edition) Click here if your download doesn"t start automatically A necessidade da oração (Escola da Oração) (Portuguese Edition) A necessidade da
A necessidade da oração (Escola da Oração) (Portuguese Edition) Click here if your download doesn"t start automatically A necessidade da oração (Escola da Oração) (Portuguese Edition) A necessidade da
Meditacao da Luz: O Caminho da Simplicidade
 Meditacao da Luz: O Caminho da Simplicidade Leonardo Boff Click here if your download doesn"t start automatically Meditacao da Luz: O Caminho da Simplicidade Leonardo Boff Meditacao da Luz: O Caminho da
Buscai as coisas do alto (Portuguese Edition)
") Buscai as coisas do alto (Portuguese Edition) Padre Léo SCJ Click here if your download doesn"t start automatically Buscai as coisas do alto (Portuguese Edition) Padre Léo SCJ Buscai as coisas do alto
Buscai as coisas do alto (Portuguese Edition) Padre Léo SCJ Click here if your download doesn"t start automatically Buscai as coisas do alto (Portuguese Edition) Padre Léo SCJ Buscai as coisas do alto
As 10 bobagens mais comuns que as pessoas inteligentes cometem (Portuguese Edition)
") As 10 bobagens mais comuns que as pessoas inteligentes cometem (Portuguese Edition) Arthur Freeman, Rose Dewolf Click here if your download doesn"t start automatically As 10 bobagens mais comuns que as
As 10 bobagens mais comuns que as pessoas inteligentes cometem (Portuguese Edition) Arthur Freeman, Rose Dewolf Click here if your download doesn"t start automatically As 10 bobagens mais comuns que as
GERENCIAMENTO PELAS DIRETRIZES (PORTUGUESE EDITION) BY VICENTE FALCONI
 BY VICENTE FALCONI") Read Online and Download Ebook GERENCIAMENTO PELAS DIRETRIZES (PORTUGUESE EDITION) BY VICENTE FALCONI DOWNLOAD EBOOK : GERENCIAMENTO PELAS DIRETRIZES (PORTUGUESE Click link bellow and free register to
Read Online and Download Ebook GERENCIAMENTO PELAS DIRETRIZES (PORTUGUESE EDITION) BY VICENTE FALCONI DOWNLOAD EBOOK : GERENCIAMENTO PELAS DIRETRIZES (PORTUGUESE Click link bellow and free register to
1. Product Name 2. Product Code 3. Colour 4. Brief Description 5. Contents 6. Snoezelen Stimulations
 1. Product Name Wheel Rotator 2. Product Code 13170, 16570, 20685 3. Colour Black 4. Brief Description A wheel rotator is needed to rotate the effect wheel in the ROMPA Projector. 5. Contents 1 x Wheel
Livro do Desassossego
 Livro do Desassossego Fernando Pessoa Click here if your download doesn"t start automatically Livro do Desassossego Fernando Pessoa Livro do Desassossego Fernando Pessoa [...] Download Livro do Desassossego...pdf
Certificação PMP: Alinhado com o PMBOK Guide 5ª edição (Portuguese Edition)
") Certificação PMP: Alinhado com o PMBOK Guide 5ª edição (Portuguese Edition) Armando Monteiro Click here if your download doesn"t start automatically Certificação PMP: Alinhado com o PMBOK Guide 5ª edição
Certificação PMP: Alinhado com o PMBOK Guide 5ª edição (Portuguese Edition) Armando Monteiro Click here if your download doesn"t start automatically Certificação PMP: Alinhado com o PMBOK Guide 5ª edição
Editorial Review. Users Review
 Download and Read Free Online Java SE 8 Programmer I: O guia para sua certificação Oracle Certified Associate (Portuguese Edition) By Guilherme Silveira, Mário Amaral Editorial Review Users Review From
ATLAS DE ACUPUNTURA VETERINáRIA. CãES E GATOS (EM PORTUGUESE DO BRASIL) BY CHOO HYUNG KIM
 BY CHOO HYUNG KIM") Read Online and Download Ebook ATLAS DE ACUPUNTURA VETERINáRIA. CãES E GATOS (EM PORTUGUESE DO BRASIL) BY CHOO HYUNG KIM DOWNLOAD EBOOK : ATLAS DE ACUPUNTURA VETERINáRIA. CãES E GATOS Click link bellow
Read Online and Download Ebook ATLAS DE ACUPUNTURA VETERINáRIA. CãES E GATOS (EM PORTUGUESE DO BRASIL) BY CHOO HYUNG KIM DOWNLOAD EBOOK : ATLAS DE ACUPUNTURA VETERINáRIA. CãES E GATOS Click link bellow
Hailo ( )
") Hailo 1-2-3 500 (9459-551) Aluminium-Gerüst Aufbauanleitung Aluminium scaffolding Assembly instructions Echafaudage aluminium Instructions de montage Andamio de aluminio Instrucciones de montaje Ponteggio
Hailo 1-2-3 500 (9459-551) Aluminium-Gerüst Aufbauanleitung Aluminium scaffolding Assembly instructions Echafaudage aluminium Instructions de montage Andamio de aluminio Instrucciones de montaje Ponteggio
Breve Histórico do Pensamento Geográfico Brasileiro nos Séculos XIX e XX: 1 (Portuguese Edition)
") Breve Histórico do Pensamento Geográfico Brasileiro nos Séculos XIX e XX: 1 (Portuguese Edition) Click here if your download doesn"t start automatically Breve Histórico do Pensamento Geográfico Brasileiro
Breve Histórico do Pensamento Geográfico Brasileiro nos Séculos XIX e XX: 1 (Portuguese Edition) Click here if your download doesn"t start automatically Breve Histórico do Pensamento Geográfico Brasileiro
EXCEL PARA FINANçAS PESSOAIS (PORTUGUESE EDITION) BY FABRíCIO AUGUSTO FERRARI
 BY FABRíCIO AUGUSTO FERRARI") Read Online and Download Ebook EXCEL PARA FINANçAS PESSOAIS (PORTUGUESE EDITION) BY FABRíCIO AUGUSTO FERRARI DOWNLOAD EBOOK : EXCEL PARA FINANçAS PESSOAIS (PORTUGUESE EDITION) Click link bellow and free
Read Online and Download Ebook EXCEL PARA FINANçAS PESSOAIS (PORTUGUESE EDITION) BY FABRíCIO AUGUSTO FERRARI DOWNLOAD EBOOK : EXCEL PARA FINANçAS PESSOAIS (PORTUGUESE EDITION) Click link bellow and free
As 100 melhores piadas de todos os tempos (Portuguese Edition)
") As 100 melhores piadas de todos os tempos (Portuguese Edition) Click here if your download doesn"t start automatically As 100 melhores piadas de todos os tempos (Portuguese Edition) As 100 melhores piadas
As 100 melhores piadas de todos os tempos (Portuguese Edition) Click here if your download doesn"t start automatically As 100 melhores piadas de todos os tempos (Portuguese Edition) As 100 melhores piadas
Da Emoção à Lesão: um Guia de Medicina Psicossomática (Portuguese Edition)
") Da Emoção à Lesão: um Guia de Medicina Psicossomática (Portuguese Edition) Geraldo José Ballone, Ida Vani Ortolani, Eurico Pereira Neto Click here if your download doesn"t start automatically Download
Da Emoção à Lesão: um Guia de Medicina Psicossomática (Portuguese Edition) Geraldo José Ballone, Ida Vani Ortolani, Eurico Pereira Neto Click here if your download doesn"t start automatically Download
Complimentary Reference Material
 Complimentary Reference Material This PDF has been made available as a complimentary service for you to assist in evaluating this model for your testing requirements. TMG offers a wide range of test equipment
Um olhar que cura: Terapia das doenças espirituais (Portuguese Edition)
") Um olhar que cura: Terapia das doenças espirituais (Portuguese Edition) Padre Paulo Ricardo Click here if your download doesn"t start automatically Um olhar que cura: Terapia das doenças espirituais (Portuguese
Um olhar que cura: Terapia das doenças espirituais (Portuguese Edition) Padre Paulo Ricardo Click here if your download doesn"t start automatically Um olhar que cura: Terapia das doenças espirituais (Portuguese
BR localization: Hotfix 003. Technical documentation Documentação Técnica Version Dec 12, de Dezembro de 2018
 ENTERPRISE MANAGEMENT BR localization: Hotfix 003 Technical documentation Documentação Técnica Version 11.10.0 Dec 12, 2018 12 de Dezembro de 2018 Contents Prerequisites 3 Patch Installation 4 Instructions
A ENTREVISTA COMPREENSIVA: UM GUIA PARA PESQUISA DE CAMPO (PORTUGUESE EDITION) BY JEAN-CLAUDE KAUFMANN
 BY JEAN-CLAUDE KAUFMANN") Read Online and Download Ebook A ENTREVISTA COMPREENSIVA: UM GUIA PARA PESQUISA DE CAMPO (PORTUGUESE EDITION) BY JEAN-CLAUDE KAUFMANN DOWNLOAD EBOOK : A ENTREVISTA COMPREENSIVA: UM GUIA PARA CLAUDE KAUFMANN
Read Online and Download Ebook A ENTREVISTA COMPREENSIVA: UM GUIA PARA PESQUISA DE CAMPO (PORTUGUESE EDITION) BY JEAN-CLAUDE KAUFMANN DOWNLOAD EBOOK : A ENTREVISTA COMPREENSIVA: UM GUIA PARA CLAUDE KAUFMANN
SONDA CASCATA. Avisos preliminares CONTEÚDO FERRAMENTAS RECOMENDADAS NEXPOLAR
 SONDA CASCATA PT Avisos preliminares Estas instruções são parte integrante do manual do aparelho no qual o KIT é instalado. Consulte este manual para as ADVERTÊNCIAS GERAIS e REGRAS FUNDAMENTAIS DE SEGURANÇA.
Biscuit - potes (Coleção Artesanato) (Portuguese Edition)
 (Portuguese Edition)") Biscuit - potes (Coleção Artesanato) (Portuguese Edition) Regina Panzoldo Click here if your download doesn"t start automatically Biscuit - potes (Coleção Artesanato) (Portuguese Edition) Regina Panzoldo
Biscuit - potes (Coleção Artesanato) (Portuguese Edition) Regina Panzoldo Click here if your download doesn"t start automatically Biscuit - potes (Coleção Artesanato) (Portuguese Edition) Regina Panzoldo
Pesquisa de Marketing: Uma Orientação Aplicada (Portuguese Edition)
") Pesquisa de Marketing: Uma Orientação Aplicada (Portuguese Edition) By Naresh K. Malhotra Pesquisa de Marketing: Uma Orientação Aplicada (Portuguese Edition) By Naresh K. Malhotra Ilustra a interação entre
Pesquisa de Marketing: Uma Orientação Aplicada (Portuguese Edition) By Naresh K. Malhotra Pesquisa de Marketing: Uma Orientação Aplicada (Portuguese Edition) By Naresh K. Malhotra Ilustra a interação entre
Conversação Para Viagem - Inglês (Michaelis Tour) (Portuguese Edition)
 (Portuguese Edition)") Conversação Para Viagem - Inglês (Michaelis Tour) (Portuguese Edition) Antonio Carlos Vilela Click here if your download doesn"t start automatically Conversação Para Viagem - Inglês (Michaelis Tour) (Portuguese
Conversação Para Viagem - Inglês (Michaelis Tour) (Portuguese Edition) Antonio Carlos Vilela Click here if your download doesn"t start automatically Conversação Para Viagem - Inglês (Michaelis Tour) (Portuguese
SONDA DE ÁGUA QUENTE SANITÁRIA
 SONDA DE ÁGUA QUENTE SANITÁRIA PT Avisos preliminares Estas instruções são parte integrante do manual do aparelho no qual o KIT é instalado. Consulte este manual para as ADVERTÊNCIAS GERAIS e REGRAS FUNDAMENTAIS
Pesquisa de Marketing: Uma Orientação Aplicada (Portuguese Edition)
") Pesquisa de Marketing: Uma Orientação Aplicada (Portuguese Edition) Naresh K. Malhotra Click here if your download doesn"t start automatically Pesquisa de Marketing: Uma Orientação Aplicada (Portuguese
Pesquisa de Marketing: Uma Orientação Aplicada (Portuguese Edition) Naresh K. Malhotra Click here if your download doesn"t start automatically Pesquisa de Marketing: Uma Orientação Aplicada (Portuguese
Uma solução possível para garantir, em ambiente APEX, a consistência duma estrutura ISA total e disjuntiva.
 Uma solução possível para garantir, em ambiente APEX, a consistência duma estrutura ISA total e disjuntiva. A possible solution to ensure, in APEX environment, the consistency of a total and disjunctive
Planejamento de comunicação integrada (Portuguese Edition)
") Planejamento de comunicação integrada (Portuguese Edition) Click here if your download doesn"t start automatically Planejamento de comunicação integrada (Portuguese Edition) Planejamento de comunicação
Planejamento de comunicação integrada (Portuguese Edition) Click here if your download doesn"t start automatically Planejamento de comunicação integrada (Portuguese Edition) Planejamento de comunicação
Medicina Integrativa - A Cura pelo Equilíbrio (Portuguese Edition)
") Medicina Integrativa - A Cura pelo Equilíbrio (Portuguese Edition) Click here if your download doesn"t start automatically Medicina Integrativa - A Cura pelo Equilíbrio (Portuguese Edition) Medicina Integrativa
Medicina Integrativa - A Cura pelo Equilíbrio (Portuguese Edition) Click here if your download doesn"t start automatically Medicina Integrativa - A Cura pelo Equilíbrio (Portuguese Edition) Medicina Integrativa
Aprendi A Fazer Sexo Na Bíblia (Portuguese Edition)
") Aprendi A Fazer Sexo Na Bíblia (Portuguese Edition) Salomão Silva Click here if your download doesn"t start automatically Aprendi A Fazer Sexo Na Bíblia (Portuguese Edition) Salomão Silva Aprendi A Fazer
Aprendi A Fazer Sexo Na Bíblia (Portuguese Edition) Salomão Silva Click here if your download doesn"t start automatically Aprendi A Fazer Sexo Na Bíblia (Portuguese Edition) Salomão Silva Aprendi A Fazer
Manual de instruções para Sifões VETUS e Johnson Pump
 Manual de instruções para Sifões VETUS e Johnson Pump Em caso dúvidas na instalação após a leitura do manual, favor entrar em contato com nosso departamento técnico através do telefone: (11) 3477-5655
Abraçado pelo Espírito (Portuguese Edition)
") Abraçado pelo Espírito (Portuguese Edition) Charles Swindoll Click here if your download doesn"t start automatically Abraçado pelo Espírito (Portuguese Edition) Charles Swindoll Abraçado pelo Espírito
Abraçado pelo Espírito (Portuguese Edition) Charles Swindoll Click here if your download doesn"t start automatically Abraçado pelo Espírito (Portuguese Edition) Charles Swindoll Abraçado pelo Espírito
PURCHASE-TO-PAY SOLUTIONS
 PURCHASE-TO-PAY SOLUTIONS May 2015 SaphetyDoc - RELEASE NOTES 6.1.4.8 Offer Management SaphetyDoc - RELEASE NOTES 6.1.4.8. SaphetyDoc s release 6.1.4.8 will start production phase in 13/05/2015. PDF format:
GERENCIAMENTO DA ROTINA DO TRABALHO DO DIA-A-DIA (EM PORTUGUESE DO BRASIL) BY VICENTE FALCONI
 BY VICENTE FALCONI") Read Online and Download Ebook GERENCIAMENTO DA ROTINA DO TRABALHO DO DIA-A-DIA (EM PORTUGUESE DO BRASIL) BY VICENTE FALCONI DOWNLOAD EBOOK : GERENCIAMENTO DA ROTINA DO TRABALHO DO DIA-A- Click link bellow
Read Online and Download Ebook GERENCIAMENTO DA ROTINA DO TRABALHO DO DIA-A-DIA (EM PORTUGUESE DO BRASIL) BY VICENTE FALCONI DOWNLOAD EBOOK : GERENCIAMENTO DA ROTINA DO TRABALHO DO DIA-A- Click link bellow
PL/SQL: Domine a linguagem do banco de dados Oracle (Portuguese Edition)
") PL/SQL: Domine a linguagem do banco de dados Oracle (Portuguese Edition) Eduardo Gonçalves Click here if your download doesn"t start automatically PL/SQL: Domine a linguagem do banco de dados Oracle (Portuguese
PL/SQL: Domine a linguagem do banco de dados Oracle (Portuguese Edition) Eduardo Gonçalves Click here if your download doesn"t start automatically PL/SQL: Domine a linguagem do banco de dados Oracle (Portuguese
DO SILêNCIO DO LAR AO SILêNCIO ESCOLAR: RACISMO, PRECONCEITO E DISCRIMINAçãO NA EDUCAçãO INFANTIL (
 DO SILêNCIO DO LAR AO SILêNCIO ESCOLAR: RACISMO, PRECONCEITO E DISCRIMINAçãO NA EDUCAçãO INFANTIL ( DOWNLOAD EBOOK : DO SILêNCIO DO LAR AO SILêNCIO ESCOLAR: RACISMO, Click link bellow and free register
Direito Processual Civil (Coleção Sucesso Concursos Públicos e OAB) (Portuguese Edition)
 (Portuguese Edition)") Direito Processual Civil (Coleção Sucesso Concursos Públicos e OAB) (Portuguese Edition) Marina Vezzoni Click here if your download doesn"t start automatically Direito Processual Civil (Coleção Sucesso
Direito Processual Civil (Coleção Sucesso Concursos Públicos e OAB) (Portuguese Edition) Marina Vezzoni Click here if your download doesn"t start automatically Direito Processual Civil (Coleção Sucesso
SOUTHPAW WEIGHTED SHOE POCKETS MEDIUM 18792
 SOUTHPAW WEIGHTED SHOE POCKETS MEDIUM 18792 CONTENTS 2 x shoe pockets (blue) (each 11cmL x 7cmW) 2 x 4oz weights (each 6.5cmL x 5.5cmW) 2 x 6oz weights (each 7.5cmL x 5.5cmW) 2 x 8oz weights (each 9cmL
Manual Instructions for SAP Note Version 1
 Manual Instructions for SAP Note 1973349 Version 1 TABLE OF CONTENTS 1 CHANGES TO CONTENT OF TABLE VIEW V_T596G... 3 2 CHANGES TO CONTENT OF TABLE VIEW V_T596I... 4 2 To perform the following changes,
Direito Processual Civil (Coleção Sucesso Concursos Públicos e OAB) (Portuguese Edition)
 (Portuguese Edition)") Direito Processual Civil (Coleção Sucesso Concursos Públicos e OAB) (Portuguese Edition) Marina Vezzoni Click here if your download doesn"t start automatically Direito Processual Civil (Coleção Sucesso
Direito Processual Civil (Coleção Sucesso Concursos Públicos e OAB) (Portuguese Edition) Marina Vezzoni Click here if your download doesn"t start automatically Direito Processual Civil (Coleção Sucesso
O som dos acordes (Portuguese Edition)
") O som dos acordes (Portuguese Edition) Lulu Martin Click here if your download doesn"t start automatically O som dos acordes (Portuguese Edition) Lulu Martin O som dos acordes (Portuguese Edition) Lulu
O som dos acordes (Portuguese Edition) Lulu Martin Click here if your download doesn"t start automatically O som dos acordes (Portuguese Edition) Lulu Martin O som dos acordes (Portuguese Edition) Lulu
Mitologia - Deuses, Heróis e Lendas (Portuguese Edition)
") Mitologia - Deuses, Heróis e Lendas (Portuguese Edition) Maurício Horta, José Francisco Botelho, Salvador Nogueira Click here if your download doesn"t start automatically Mitologia - Deuses, Heróis e Lendas
Mitologia - Deuses, Heróis e Lendas (Portuguese Edition) Maurício Horta, José Francisco Botelho, Salvador Nogueira Click here if your download doesn"t start automatically Mitologia - Deuses, Heróis e Lendas
Como Mudar a Senha do Roteador Pelo IP o.1.1. Configure e Altere a Senha do seu Roteador acessando o IP Acesse o Site e Confira!
 Como Mudar a Senha do Roteador Pelo IP 192.168.o.1.1. Configure e Altere a Senha do seu Roteador acessando o IP 192.168.1.1. Acesse o Site e Confira! If you are using the IP address 192.168.0.1.1, take
Esboços e Sermões Completos para Ocasiões e Datas Especiais: Mensagens Bíblicas para Todas as Datas da Vida Cristã (Portuguese Edition)
") Esboços e Sermões Completos para Ocasiões e Datas Especiais: Mensagens Bíblicas para Todas as Datas da Vida Cristã (Portuguese Edition) Adelson Damasceno Santos Click here if your download doesn"t start
Esboços e Sermões Completos para Ocasiões e Datas Especiais: Mensagens Bíblicas para Todas as Datas da Vida Cristã (Portuguese Edition) Adelson Damasceno Santos Click here if your download doesn"t start
Gestão de Projetos: As Melhores Práticas (Portuguese Edition)
") Gestão de Projetos: As Melhores Práticas (Portuguese Edition) By Harold R. Kerzner Gestão de Projetos: As Melhores Práticas (Portuguese Edition) By Harold R. Kerzner Desde que a primeira edição foi publicada,
Gestão de Projetos: As Melhores Práticas (Portuguese Edition) By Harold R. Kerzner Gestão de Projetos: As Melhores Práticas (Portuguese Edition) By Harold R. Kerzner Desde que a primeira edição foi publicada,
Ganhar Dinheiro Em Network Marketing (Portuguese Edition)
") Ganhar Dinheiro Em Network Marketing (Portuguese Edition) Click here if your download doesn"t start automatically Ganhar Dinheiro Em Network Marketing (Portuguese Edition) Ganhar Dinheiro Em Network Marketing
Ganhar Dinheiro Em Network Marketing (Portuguese Edition) Click here if your download doesn"t start automatically Ganhar Dinheiro Em Network Marketing (Portuguese Edition) Ganhar Dinheiro Em Network Marketing
BABY WATER MATTRESS 20440
 Page 1 of 9 BABY WATER MATTRESS 20440 CONTENTS Elasticated fur cover PVC covered mat Water bag Foam frame with raised walls Heater Pad Safety sheet Conditioner Elasticated fur cover Page 2 of 9 Water bag
1. Product Name. 2. Product Code. 3. Colour. 4. Brief Description. 5. Contents. 6. Snoezelen Stimulations. Switch Adapted Fibre Optic Lamp
 1. Product Name Switch Adapted Fibre Optic Lamp 2. Product Code 20709 3. Colour Clear base; white fibres 4. Brief Description Activate your switch to activate the light through the fibres and in the base.
Já Chegou Aos Confins Da Terra. E Agora? (Portuguese Edition)
") Já Chegou Aos Confins Da Terra. E Agora? (Portuguese Edition) Click here if your download doesn"t start automatically Já Chegou Aos Confins Da Terra. E Agora? (Portuguese Edition) Já Chegou Aos Confins
Já Chegou Aos Confins Da Terra. E Agora? (Portuguese Edition) Click here if your download doesn"t start automatically Já Chegou Aos Confins Da Terra. E Agora? (Portuguese Edition) Já Chegou Aos Confins
Fundamentos Básicos e Avançados de SEO (Portuguese Edition)
") Fundamentos Básicos e Avançados de SEO (Portuguese Edition) Click here if your download doesn"t start automatically Fundamentos Básicos e Avançados de SEO (Portuguese Edition) Fundamentos Básicos e Avançados
Fundamentos Básicos e Avançados de SEO (Portuguese Edition) Click here if your download doesn"t start automatically Fundamentos Básicos e Avançados de SEO (Portuguese Edition) Fundamentos Básicos e Avançados
Gestão da comunicação - Epistemologia e pesquisa teórica (Portuguese Edition)
") Gestão da comunicação - Epistemologia e pesquisa teórica (Portuguese Edition) Maria Cristina Castilho Costa, Maria Aparecida Baccega Click here if your download doesn"t start automatically Download and
Gestão da comunicação - Epistemologia e pesquisa teórica (Portuguese Edition) Maria Cristina Castilho Costa, Maria Aparecida Baccega Click here if your download doesn"t start automatically Download and
Instruções de Montagem Assembly instructions
 Instruções de Montagem Assembly instructions Material que você precisará Material you'll need 1. Cola branca White glue 2. Canetas ou lápis coloridos Color markers or pencils Dicas úteis Useful tips Leia
Futebol em Transmissão. Football is on the Air.
 Futebol em Transmissão. Football is on the Air. Estamos prontos. We re ready. Informação sobre a gestão do espectro n0 UEFA Euro 2004. Information on spectrum management during UEFA Euro 2004. Entre em
CIS 500 Software Foundations Fall September(continued) IS 500, 8 September(continued) 1
 IS 500, 8 September(continued) 1") CIS 500 Software Foundations Fall 2003 8 September(continued) IS 500, 8 September(continued) 1 Polymorphism This version of issaidtobepolymorphic,becauseitcanbeapplied to many different types of arguments.
CIS 500 Software Foundations Fall 2003 8 September(continued) IS 500, 8 September(continued) 1 Polymorphism This version of issaidtobepolymorphic,becauseitcanbeapplied to many different types of arguments.
Aus Satz 222 (5) (Folie 6) wissen wir, dass
 (Folie 6) wissen wir, dass") V 3 = V 4 : Sei Zu zeigen ist, dass Es gilt, dass ( ) fn n 0 V 3. ( ) fn n 0 V 4. F (z) = k g i (z) (1 α i z) d i i=1 deg ( g i (z) ) < d i. Aus Satz 222 (5) (Folie 6) wissen wir, dass 1 (1 x) c = ( )
V 3 = V 4 : Sei Zu zeigen ist, dass Es gilt, dass ( ) fn n 0 V 3. ( ) fn n 0 V 4. F (z) = k g i (z) (1 α i z) d i i=1 deg ( g i (z) ) < d i. Aus Satz 222 (5) (Folie 6) wissen wir, dass 1 (1 x) c = ( )
CAPLE EXAMS 2018 WHAT ARE CAPLE EXAMS?
 WHAT ARE CAPLE EXAMS? CAPLE exams constitute the Evaluation and Certification System of Portuguese as a Foreign Language, which certifies the general communicative competence of young and adult speakers
Espionagem e Vigilância Eletrônica (Portuguese Edition)
") Espionagem e Vigilância Eletrônica (Portuguese Edition) Newton C. Braga Click here if your download doesn"t start automatically Espionagem e Vigilância Eletrônica (Portuguese Edition) Newton C. Braga Espionagem
Espionagem e Vigilância Eletrônica (Portuguese Edition) Newton C. Braga Click here if your download doesn"t start automatically Espionagem e Vigilância Eletrônica (Portuguese Edition) Newton C. Braga Espionagem
Como Falar no Rádio - Prática de Locução Am e Fm (Portuguese Edition)
") Como Falar no Rádio - Prática de Locução Am e Fm (Portuguese Edition) Cyro César Click here if your download doesn"t start automatically Como Falar no Rádio - Prática de Locução Am e Fm (Portuguese Edition)
Como Falar no Rádio - Prática de Locução Am e Fm (Portuguese Edition) Cyro César Click here if your download doesn"t start automatically Como Falar no Rádio - Prática de Locução Am e Fm (Portuguese Edition)
Atlas de Acupuntura Veterinária. Cães e Gatos (Em Portuguese do Brasil)
") Atlas de Acupuntura Veterinária. Cães e Gatos (Em Portuguese do Brasil) Atlas de Acupuntura Veterinária. Cães e Gatos (Em Portuguese do Brasil) O Atlas de Acupuntura Veterinária é um livro completo, em
Atlas de Acupuntura Veterinária. Cães e Gatos (Em Portuguese do Brasil) Atlas de Acupuntura Veterinária. Cães e Gatos (Em Portuguese do Brasil) O Atlas de Acupuntura Veterinária é um livro completo, em
Curso Completo de Memorização (Portuguese Edition)
") Curso Completo de Memorização (Portuguese Edition) Silvio Luiz Matos Click here if your download doesn"t start automatically Curso Completo de Memorização (Portuguese Edition) Silvio Luiz Matos Curso Completo
Curso Completo de Memorização (Portuguese Edition) Silvio Luiz Matos Click here if your download doesn"t start automatically Curso Completo de Memorização (Portuguese Edition) Silvio Luiz Matos Curso Completo
Minhas lembranças de Leminski (Portuguese Edition)
") Minhas lembranças de Leminski (Portuguese Edition) Domingos Pellegrini Click here if your download doesn"t start automatically Minhas lembranças de Leminski (Portuguese Edition) Domingos Pellegrini Minhas
Minhas lembranças de Leminski (Portuguese Edition) Domingos Pellegrini Click here if your download doesn"t start automatically Minhas lembranças de Leminski (Portuguese Edition) Domingos Pellegrini Minhas
1. Product Name. 2. Product Code. 3. Colour. 4. Brief Description. 5. Contents. 6. Snoezelen Stimulations. Fibre Optic UFO
 1. Product Name Fibre Optic UFO 2. Product Code 16692 3. Colour Transparent base*; white fibres * Base may be silver-coloured, subject to availability 4. Brief Description Captivating, fine fibre optics.
O sistema único de assistência social no Brasil: uma realidade em movimento (Portuguese Edition)
") O sistema único de assistência social no Brasil: uma realidade em movimento (Portuguese Edition) Click here if your download doesn"t start automatically O sistema único de assistência social no Brasil:
O sistema único de assistência social no Brasil: uma realidade em movimento (Portuguese Edition) Click here if your download doesn"t start automatically O sistema único de assistência social no Brasil:
MANUAL PRATICO DO PLANO DE PROJETO: UTILIZANDO O PMBOK GUIDE BY RICARDO VIANA VARGAS
 Read Online and Download Ebook MANUAL PRATICO DO PLANO DE PROJETO: UTILIZANDO O PMBOK GUIDE BY RICARDO VIANA VARGAS DOWNLOAD EBOOK : MANUAL PRATICO DO PLANO DE PROJETO: UTILIZANDO Click link bellow and
Wiedersehen mit Nando Reencontro com Nando
 Folge 1: Wiedersehen mit Nando Reencontro com Nando Kitty: Hallo Freunde. Wie geht es euch? Hallo Nando. Wie geht es dir? Kitty: Oi, amigos. Como vai? Oi, Nando. Como vai você? Nando: Hallo Kitty. Schön,
Pesquisa Qualitativa do Início ao Fim (Métodos de Pesquisa) (Portuguese Edition)
 (Portuguese Edition)") Pesquisa Qualitativa do Início ao Fim (Métodos de Pesquisa) (Portuguese Edition) Robert K. Yin Click here if your download doesn"t start automatically Pesquisa Qualitativa do Início ao Fim (Métodos de
Pesquisa Qualitativa do Início ao Fim (Métodos de Pesquisa) (Portuguese Edition) Robert K. Yin Click here if your download doesn"t start automatically Pesquisa Qualitativa do Início ao Fim (Métodos de
Receitas na Pressão - Vol. 01: 50 Receitas para Panela de Pressão Elétrica (Portuguese Edition)
") Receitas na Pressão - Vol. 01: 50 Receitas para Panela de Pressão Elétrica (Portuguese Edition) Click here if your download doesn"t start automatically Receitas na Pressão - Vol. 01: 50 Receitas para Panela
Receitas na Pressão - Vol. 01: 50 Receitas para Panela de Pressão Elétrica (Portuguese Edition) Click here if your download doesn"t start automatically Receitas na Pressão - Vol. 01: 50 Receitas para Panela
Step by step to make the appointment at the Federal Police
 Step by step to make the appointment at the Federal Police Before you start, check if you have these documents with you: Visa Application Form; Birth Certificate (original); Passport; Brazilian home address
User's Guide. Manual de Utilizador
 User's Guide Manual de Utilizador USER'S GUIDE HDD/SSD Support: SATA 2.5 (up to 12.5mm height) Material: Aluminium and Plastic External interface: USB 3.0 (compatible with USB 2.0/1.1) Internal interface:
1. Product Name. 2. Product Code. 3. Colour. 4. Brief Description. 5. Contents. Switch Adapted Clip On Fan. Colours may vary
 1. Product Name Switch Adapted Clip On Fan 2. Product Code 20489 3. Colour Colours may vary 4. Brief Description Connects to your switch for switch activation. 5. Contents Fan with cable with 3.5mm jack
SUMÁRIO PORTUGUÊS INDEX ENGLISH
 SUMÁRIO PORTUGUÊS Componentes do produto...2 Sugestões de uso: pescoço, ombro, perna, braço, cintura...2 Os defeitos mais comuns e como resolvê-los...3 Utilização:...3 INDEX ENGLISH Product Components...6
Stick Up Cam Battery
 Stick Up Cam Battery 1. Charge and insert the battery. Charge the provided battery. First, fully charge the battery by plugging it into a USB port using the provided orange cable. The battery is fully
GUIA DE CONVERSAçãO PORTUGUêS- ITALIANO E VOCABULáRIO TEMáTICO 3000 PALAVRAS (PORTUGUESE EDITION) BY AND
 BY AND") Read Online and Download Ebook GUIA DE CONVERSAçãO PORTUGUêS- ITALIANO E VOCABULáRIO TEMáTICO 3000 PALAVRAS (PORTUGUESE EDITION) BY AND DOWNLOAD EBOOK : GUIA DE CONVERSAçãO PORTUGUêS-ITALIANO E VOCABULáRIO
Read Online and Download Ebook GUIA DE CONVERSAçãO PORTUGUêS- ITALIANO E VOCABULáRIO TEMáTICO 3000 PALAVRAS (PORTUGUESE EDITION) BY AND DOWNLOAD EBOOK : GUIA DE CONVERSAçãO PORTUGUêS-ITALIANO E VOCABULáRIO