dlan WiFi ac Installation The Network Innovation
|
|
|
- Marcela Coimbra Barroso
- 5 Há anos
- Visualizações:
Transcrição


1 dlan WiFi ac Installation The Network Innovation

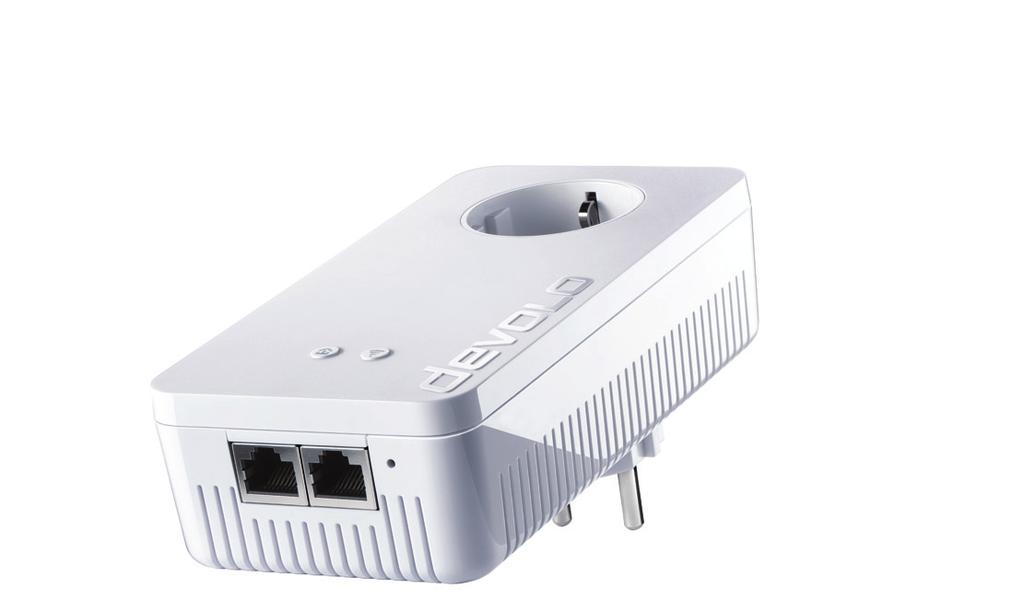
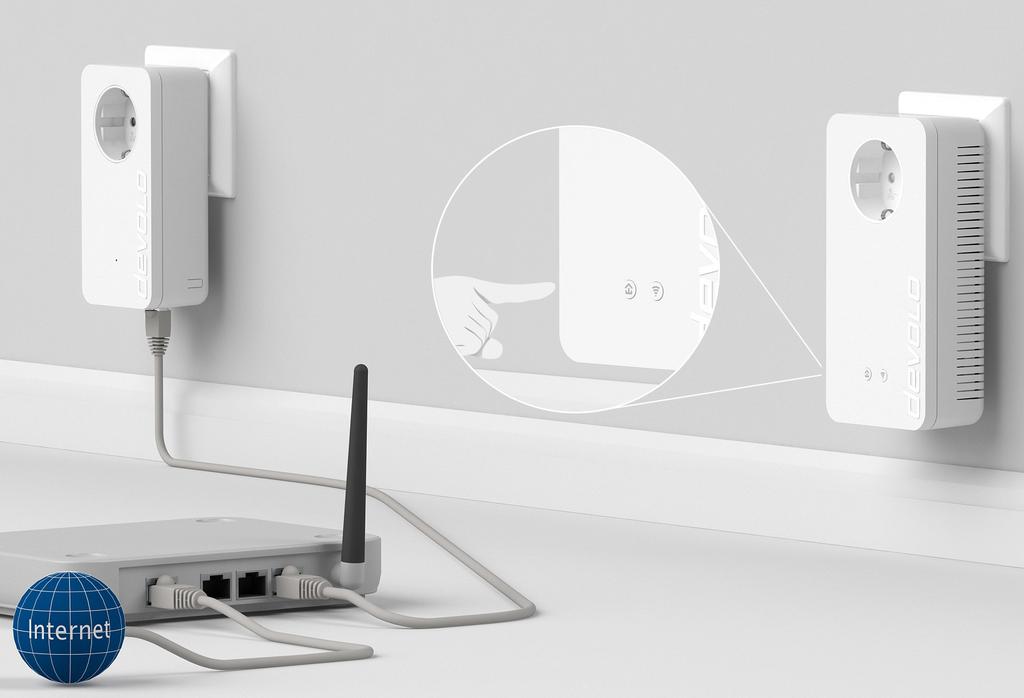
2 1 dlan 1200+
3 Erste Schritte: Stecken Sie den dlan Adapter in die Steckdose und verbinden Sie ihn mit dem beiliegenden LAN- Kabel mit Ihrem Router. First steps: Plug the dlan adapter into the power socket and connect it to router with the LAN cable included. Premiers pas: Insérez l adaptateur dlan dans la prise de courant et reliez-le à votre routeur au moyen du câble Ethernet fourni. Eerste stap: Steek de dlan adapter in het stopcontact en sluit deze met bijgevoegde LAN-kabel aan op uw router. Primeros pasos: Enchufe el adaptador dlan en la toma de corriente eléctrica y conéctelo al router con el cable LAN incluido. Primeiros passos: Introduza o adaptador dlan na tomada e ligue-o ao seu router através do cabo LAN que vai junto. Primi passi: Innestare l adattatore dlan nella presa elettrica e collegarlo al proprio router utilizzando il cavo LAN presente in dotazione.
4 2 dlan WiFi ac WiFi key: xxxxxxxxxxxxxxxx
5 Erste Schritte: Notieren Sie sich den WiFi Schlüssel (WiFi key) von der Rückseite des dlan WiFi ac Adapters. First steps: Note the Wi-Fi key (WiFi key) on the back of the dlan WiFi ac adapter. Premiers pas: Notez la clé Wi-Fi (WiFi key) figurant au dos du adaptateur dlan WiFi ac. Eerste stap: Noteer de WiFi code (WiFi key) zoals vermeld op de achterzijde van de dlan WiFi ac adapter. Primeros pasos: Apunte la clave Wi-Fi (WiFi key) situada en la parte trasera del adaptador dlan WiFi ac. Primeiros passos: Anote o código Wi-Fi (WiFi key) que se encontra no lado de trás do adaptador dlan WiFi ac. Primi passi: Annotarsi la password WiFi (WiFi key) presente sul retro del adattatore dlan WiFi ac.

6 3 dlan WiFi ac 50 sec.
7 Sichern Sie Ihr dlan -Netzwerk (Verschlüsselung): Stecken Sie diesen dlan WiFi ac Adapter in eine freie Wandsteckdose und warten Sie bis die LED leuchtet (ca. 50 Sekunden). Drücken Sie den Knopf an Ihrem eingesteckten dlan WiFi ac Adapter. Secure your dlan network (encryption): Plug this dlan WiFi ac adapter into an available power socket and wait until the LED lights (approx. 50 seconds). Press the button on your plugged-in dlan WiFi ac adapter. Sécurisez votre réseau dlan (cryptage): Insérez cet adaptateur dlan WiFi ac dans une prise de courant murale libre et attendez que la DEL s allume (env. 50 secondes). Appuyez sur le bouton de votre adaptateur dlan WiFi ac branché. Beveilig uw dlan -netwerk (beveiliging): Steek deze dlan WiFi ac adapter in een vrij stopcontact en wacht tot de LED brandt (ca. 50 seconden). Druk op de knop op uw geplaatste dlan WiFi ac adapter. Asegure su red dlan (codificación): Enchufe este adaptador dlan WiFi ac en una toma de corriente eléctrica que esté libre y espere hasta que el LED se encienda (aprox. 50 segundos). Pulse el botón de su adaptador dlan WiFi ac conectado. Proteja a sua rede dlan (codificação): Introduza este adaptador dlan WiFi ac numa tomada de parede livre e aguarde até que o LED acenda (aprox. 50 segundos). Prima o botão no seu adaptador dlan WiFi ac introduzido. Mettere al sicuro la rete dlan (crittografia): Innestare l adattatore dlan WiFi ac in una presa elettrica libera e attendere fino a quando il LED non s illumina (ca. 50 secondi). Premere il pulsante dell adattatore dlan WiFi ac innestato.

8 4 dlan min.
9 Sichern Sie Ihr dlan -Netzwerk (Verschlüsselung): Drücken Sie, innerhalb von 2 Minuten, den Knopf zur Datenverschlüsselung an der Seite Ihres dlan Adapters, welcher mit dem Router verbunden ist. Secure your dlan network (encryption): Within 2 minutes, press the button for data encryption on the side of your dlan adapter, which is connected to the router. Sécurisez votre réseau dlan (cryptage) : Dans un délai de 2 minutes, appuyez sur le bouton de cryptage des données à côté de votre adaptateur dlan relié avec votre routeur. Beveilig uw dlan -netwerk (beveiliging): Druk dan binnen 2 minuten op de knop voor de dataversleuteling aan de kant van uw dlan adapter, welke met de router is verbonden. Asegure su red dlan (codificación): En un intervalo de dos minutos, pulse el botón de encriptación de datos situado al lado de su adaptador dlan 1200+, que está conectado al router. Proteja a sua rede dlan (codificação): No espaço de 2 minutos, prima o botão para a codificação de dados ao lado do seu adaptador dlan 1200+, o qual está ligado ao router. Mettere al sicuro la rete dlan (crittografia): Premere entro due minuti il pulsante per la crittografia dei dati, collocato sul lato dell adattatore dlan collegato al router.


10 5a WiFi key: xxxxxxxxxxxxxxxx
11 Verbinden Sie Ihre WLAN-Geräte mit dem Internet: Richten Sie die WLAN-Verbindung auf Ihrem Smartphone und/oder Tablet ein... Connect your Wi-Fi device to the Internet: Set up the Wi-Fi connection on your smartphone and/or tablet... Connectez vos appareils Wi-Fi à Internet: Configurez la connexion Wi-Fi sur votre smartphone et/ou votre tablette... Verbindt uw Wi-Fi-apparaten met het internet: Configureer de Wi-Fi-verbinding op uw smartphone en/of tablet... Conecte sus dispositivos Wi-Fi a Internet: Configure la conexión Wi-Fi en su smartphone o tablet... Ligue os seus dispositivos Wi-Fi à Internet: Instale a ligação Wi-Fi no seu smartphone e/ou tablet... Collegamento a Internet degli apparecchi WiFi: Configurare la connessione WiFi sullo smartphone o tablet...


12 5b WiFi key: xxxxxxxxxxxxxxxx
13 Verbinden Sie Ihre WLAN-Geräte mit dem Internet:...oder richten Sie die WLAN-Verbindung auf Ihrem Laptop ein. Connect your Wi-Fi device to the Internet:...or set up the Wi-Fi connection on your laptop. Connectez vos appareils Wi-Fi à Internet:...ou configurez la connexion Wi-Fi sur votre ordinateur portable. Verbindt uw Wi-Fi-apparaten met het internet:...of configureer de Wi-Fi-verbinding op uw laptop. Conecte sus dispositivos Wi-Fi a Internet:...o configure la conexión Wi-Fi en su portátil. Ligue os seus dispositivos Wi-Fi à Internet:...ou instale a ligação Wi-Fi no seu portátil. Collegamento a internet degli apparecchi Wi-Fi:...oppure sul proprio laptop.

14 Fertig! That s it! Terminé! Klaar!


15 Y listo! E pronto! È tutto!


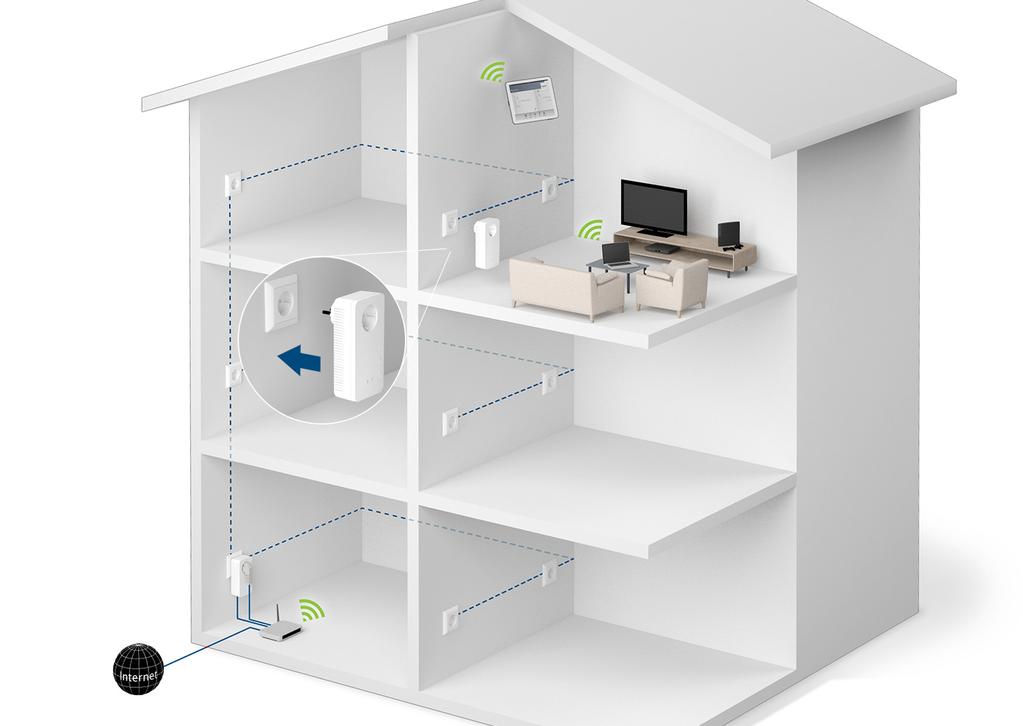
16 Use the devolo Cockpit software for a simple monitoring of your dlan home network.


17 Use the devolo Cockpit App for a simple monitoring of your dlan home network. devolo Cockpit App
18 WiFi Clone >>>WiFi-Name>>>Password>>>WiFi-Name>>>Password>>
19 Mit WiFi Clone können Sie Ihr WLAN-Signal des Routers mit den dlan WiFi ac vereinfachen und erweitern. Hierbei werden die WLAN-Zugangsdaten per Knopfdruck sicher vom WLAN-Router auf den dlan WiFi ac übertragen. Das WLAN ist so in jedem Raum in bester Qualität verfügbar. WiFi Clone lets you simplify and expand your router s Wi-Fi signal with the dlan WiFi ac. While doing this, the Wi-Fi access data will be securely transferred from the Wi-Fi router to the dlan WiFi ac at the touch of a button. The Wi-Fi is then available in any room in the highest quality. WiFi Clone permet l extension de votre signal Wi-Fi du routeur facilement au moyen des dlan WiFi ac. Les données d accès Wi-Fi sont transmises du routeur Wi-Fi à l adaptateur dlan WiFi ac en toute sécurité par simple pression de bouton. Le Wi-Fi est ensuite disponible dans chaque pièce en qualité maximale. Met WiFi Clone kunt u uw Wi-Fi-signaal van de router met de dlan WiFi ac vereenvoudigen en uitbreiden. Hierbij worden de Wi-Fi-toegangsgegevens met een druk op de knop veilig van de Wi-Firouter naar de dlan WiFi ac overgedragen. De Wi-Fi is zo in elke kamer met optimale kwaliteit beschikbaar. Con WiFi Clone puede simplificar y ampliar la señal Wi-Fi del router mediante el dlan WiFi ac. Con él, los datos de acceso Wi-Fi se transfieren de forma segura del router Wi-Fi al dlan WiFi ac con solo pulsar un botón. Así, el Wi-Fi estará disponible en cualquier estancia con la mejor calidad. V Com WiFi Clone pode simplificar e expandir o seu sinal Wi-Fi do router com o dlan WiFi ac. Nesta situação, os dados de acesso Wi-Fi são transmitidos de forma segura, por pressão de botão, do router Wi-Fi para o dlan WiFi ac. O Wi-Fi está assim disponível na melhor qualidade em todas as divisões. WiFi Clone consente di semplificare e di potenziare il segnale Wi-Fi del router con il dlan WiFi ac. Premendo il pulsante, i dati di accesso al Wi-Fi verranno trasferiti in tutta sicurezza dal router Wi-Fi al dlan WiFi ac, rendendo così disponibile il Wi-Fi in ogni ambiente e nella migliore qualità.

20 1 max. 10m 50 sec.
21 Richten Sie WiFi Clone ein: Nehmen Sie den dlan WiFi ac Adapter, stecken Sie ihn in eine freie Wandsteckdose in der Nähe Ihres Routers (max. 10 Meter Entfernung) und warten Sie dann ca. 50 Sekunden bis die LED leuchtet. Set up WiFi Clone: Take the dlan WiFi ac adapter, plug it into an available power socket near your router (max. distance of 10 metres) and then wait approx. 50 seconds until the LED lights up. Configurez WiFi Clone: Prenez l adaptateur dlan WiFi ac et insérez-le dans une prise de courant murale à proximité de votre routeur (à 10 mètres maxi) et attendez env. 50 secondes jusqu à ce que la DEL s allume. Configureer de WiFi Clone: Neem de dlan WiFi ac adapter, steek deze in een beschikbaar stopcontact in de buurt van uw router (op max. 10 m afstand) en wacht dan ca. 50 seconden tot de LED brandt. Configure WiFi Clone: Tome el adaptador dlan WiFi ac, enchúfelo en una toma de corriente eléctrica que esté libre cerca del router (como máx. a 10 metros de distancia) y espere unos 50 segundos hasta que el LED se encienda. V Instale o WiFi Clone: Pegue no adaptador dlan WiFi ac, introduza-o numa tomada de parede livre próximo do seu router (no máx. a uma distância de 10 metros) e aguarde, em seguida, aprox. 50 segundos até o LED acender. Installazione di WiFi Clone: Prendere l adattatore dlan WiFi ac, inserirlo in una presa elettrica libera, posta nelle vicinanze del router (distanza max. 10 metri) e attendere per ca. 50 secondi fino a quando il LED non s illumina.
22 2
23 Richten Sie WiFi Clone ein: Drücken Sie den Knopf an Ihrem dlan WiFi ac Adapter. Set up WiFi Clone: Press the button on your dlan WiFi ac adapter. Configurez WiFi Clone: Appuyez sur le bouton de votre adaptateur dlan WiFi ac. Configureer de WiFi Clone: Druk op de knop op uw dlan WiFi ac adapter. Configure WiFi Clone: Pulse el botón de su adaptador dlan WiFi ac. V Instale o WiFi Clone: Prima o botão no seu adaptador dlan WiFi ac. Installazione di WiFi Clone: Premere il pulsante dell adattatore dlan WiFi ac.

24 3 WPS 2 min.
25 Richten Sie WiFi Clone ein: Drücken Sie die WPS-Taste innerhalb von 2 Minuten auf Ihrem Router. Bitte entnehmen Sie die Länge des Tastendruckes aus der Anleitung Ihres WLAN-Routers. Set up WiFi Clone: Press the WPS key on your router within 2 minutes. For how long to press the button, refer to the instructions for your Wi-Fi router. Configurez WiFi Clone: Dans un délai de 2 minutes, appuyez sur le bouton WPS de votre routeur. La durée de la pression sur le bouton est précisée dans la documentation de votre routeur Wi-Fi. Configureer de WiFi Clone: Druk binnen 2 minuten op de WPS-toets op uw router. Raadpleeg voor de duur waarmee de knop ingedrukt moet worden a.u.b. de handleiding van uw Wi-Fi-router. Configure WiFi Clone: En un intervalo de 2 minutos, pulse la tecla WPS de su router. Consulte en la guía de su router Wi-Fi cuánto tiempo debe mantener pulsada la tecla. Instale o WiFi Clone: Prima a tecla WPS no espaço de 2 minutos no seu router. Consulte o manual do seu router Wi-Fi para saber durante quanto tempo deve premir o botão. Installazione di WiFi Clone: Premere il tasto WPS del proprio router, entro due minuti. Il tempo in cui il tasto viene tenuto premuto è indicato nel manuale del vostro router Wi-Fi.
26 4
27 Richten Sie den WiFi Clone ein: Sie dürfen Ihren dlan WiFi ac Adapter nun ausstecken und an den von Ihnen gewünschten Ort platzieren. Set up WiFi Clone: You can now unplug your dlan WiFi ac adapter and place it at your desired location. Configurez WiFi Clone: Débranchez maintenant votre adaptateur dlan WiFi ac et mettez-le en place à l endroit souhaité où vous voulez l utiliser. Configureer de WiFi Clone: U kunt uw dlan WiFi ac adapter nu uit het stopcontact halen en dan op de door u gewenste plek plaatsen. Configure WiFi Clone: A continuación, puede desenchufar su adaptador dlan WiFi ac y colocarlo en el lugar que quiera. Instale o WiFi Clone: Pode agora retirar o seu adaptador dlan WiFi ac e colocá-lo no local por si pretendido. Installazione di WiFi Clone: Ora è possibile staccare l adattatore dlan WiFi ac e collocarlo nel luogo che desiderate.
28 Wi-Fi Name: ABC Password: 1234 >>>WiFi-Name>>>Password>>>WiFi-Name>>>Password>> Wi-Fi Name: ABC Password: 1234
29 Fertig! Nun ist Ihr WiFi Clone eingerichtet und Ihr WLAN ist so in jedem Raum in bester Qualität verfügbar. That s it! Now your WiFi Clone is set up and your Wi-Fi is available in any room in the highest quality. Terminé! Votre Wi-Fi Clone est à présent configuré et votre Wi-Fi est disponible dans chaque pièce en qualité maximale. Klaar! Nu is uw WiFi Clone geconfigureerd en uw Wi-Fi is zo in elke ruimte met de best mogelijk kwaliteit beschikbaar. Y listo! Ahora se ha configurado su WiFi Clone y tiene Wi-Fi disponible en cualquier estancia con la mejor calidad. V E pronto! O seu WiFi Clone está agora instalado e o seu Wi-Fi está assim disponível em todas as divisões na melhor qualidade. È tutto! Il vostro WiFi Clone è installato; il Wi-Fi è ora disponibile in ogni ambiente e nella migliore qualità.
30 Garantie: 3 Jahre Wenden Sie sich bei einem Defekt innerhalb der Garantiezeit bitte an die Service Hotline. Die vollständigen Garantiebedingungen finden Sie auf unserer Webseite Eine Annahme Ihres Gerätes ohne RMA-Nummer sowie eine Annahme unfrei eingesandter Sendungen ist nicht möglich! Garantie: 3 Jahre Ist Ihr devolo-gerät bei der ersten Inbetriebnahme oder innerhalb der Garantiezeit defekt, wenden Sie sich bitte an Ihren Lieferanten, bei dem Sie das devolo-produkt gekauft haben. Dieser wird den Umtausch bzw. die Reparatur bei devolo für Sie erledigen. Die vollständigen Garantiebedingungen finden Sie auf unserer Webseite
31 Garantie: 3 ans Si votre appareil devolo présente un défaut lors de la première mise en service ou pendant la période de garantie, veuillez vous adresser au fournisseur chez lequel vous avez acheté le produit devolo. Celui-ci se chargera pour vous du remplacement ou de la réparation auprès de devolo. Vous trouverez l ensemble des conditions de garantie sur notre site Internet Warranty: 3 years If your devolo device is found to be defective during initial installation or within the warranty period, please contact the vendor who sold you the product. The vendor will take care of the repair or warranty claim for you. The complete warranty conditions can be found at
32 Garanzia: 3 anni Se l apparecchio devolo alla prima messa in funzione è guasto o si guasta durante il periodo di garanzia, rivolgersi al fornitore presso il quale si è acquistato il prodotto. Questi si occuperà poi della sostituzione o della riparazione presso devolo. Potete trovare le condizioni di garanzia complete sul nostro sito Garantie: 3 jaar Is uw devolo-product bij de eerste ingebruikname (DOA) of in de garantietermijn defect geraakt, neem dan contact op met uw leverancier waar u het devolo product heeft gekocht. Deze zal het product omruilen, of laten repareren bij devolo. De volledige garantievoorwaarden vindt u op onze website
33 Garantia: 3 años Si su dispositivo devolo presenta algún defecto en la primera puesta en marcha o durante el período de garantía, póngase en contacto con el distribuidor donde adquirió el producto. Éste se encargará de la sustitución o reparación del producto devolo. Encontrará las condiciones para la garantía completas en nuestra página web Garantia: 3 anos Se o seu dispositivo devolo apresentar um defeito na primeira colocação em funcionamento ou dentro do período de garantia, dirija-se ao fornecedor onde adquiriu o produto devolo. Este irá, em seu nome, solicitar à devolo que efectue a troca ou reparação do equipamento. Poderá encontrar as condições de garantia completas na nossa página web:
34 Support Deutschland Österreich Schweiz/Suisse/Svizzera Great Britain France Italia España Portugal Nederlands Belgien/Belgique/Belgie Sweden Other countries
35 notes:
36 devolo AG Charlottenburger Allee Aachen Germany Engineered in Germany The Network Innovation 43743/0617
dlan DINrail WiFi ac Installation
 dlan 1200+ DINrail WiFi ac Installation 1 dlan 1200 DINrail 02 03 2 dlan 1200+ WiFi ac WiFi key: xxxxxxxxxxxxxxxx 3 dlan 1200+ WiFi ac 50 Sec. 04 05 4 dlan 1200 DINrail 1 sec. 2 min. 5 dlan 1200+ WiFi
dlan 500 WiFi Installation The Network Innovation
 dlan 500 WiFi Installation The Network Innovation 1 dlan 500 duo Erste Schritte: Stecken Sie den dlan 500 duo Adapter in die Steckdose und verbinden Sie ihn mit dem beiliegenden LAN- Kabel mit Ihrem Router.
dlan 550 WiFi Installation
 dlan 550 WiFi Installation DE Erste Schritte: Ihre vorhandene dlan -Verbindung. GB First steps: Your existing dlan connection. FR Premiers pas: Votre connexion dlan existante. NL Eerste stap: Uw bestaande
dlan WiFi ac Installation The Network Innovation
 dlan 1200+ WiFi ac Installation The Network Innovation 1 dlan 1200+ Erste Schritte: Stecken Sie den dlan 1200+ Adapter in die Steckdose und verbinden Sie ihn mit dem beiliegenden LAN- Kabel mit Ihrem Router.
dlan WiFi ac Installation The Network Innovation
 dlan 1200+ WiFi ac Installation The Network Innovation 1 dlan 1200+ Erste Schritte: Stecken Sie den dlan 1200+ Adapter in die Steckdose und verbinden Sie ihn mit dem beiliegenden LAN- Kabel mit Ihrem Router.
dlan 550+ WiFi Starter Kit Installation
 dlan 550+ WiFi Starter Kit Installation 1 dlan 550 duo+ DE Erste Schritte Stecken Sie den dlan 550 duo+ Adapter in die Steckdose und verbinden Sie ihn mit dem beiliegenden LAN-Kabel mit Ihrem Router. GB
dlan 550+ WiFi Starter Kit Installation
 dlan 550+ WiFi Starter Kit Installation 1 dlan 550 duo+ DE Erste Schritte Stecken Sie den dlan 550 duo+ Adapter in die Steckdose und verbinden Sie ihn mit dem beiliegenden LAN-Kabel mit Ihrem Router. GB
dlan 550+ WiFi Starter Kit Installation
 dlan 550+ WiFi Starter Kit Installation 1 1 DE Erste Schritte Stecken Sie den dlan 550 duo+ Adapter in die Steckdose und verbinden Sie ihn mit dem beiliegenden LAN-Kabel mit Ihrem Router. dlan 550 duo+
dlan 550 WiFi Starter Kit
 dlan 550 WiFi Starter Kit Installationlation 1 dlan 550 duo+ DE Erste Schritte: Stecken Sie den dlan 550 duo+ Adapter in die Steckdose und verbinden Sie ihn mit dem beiliegenden LAN-Kabel mit Ihrem Router.
dlan 500 WiFi Installation The Network Innovation
 dlan 500 WiFi Installation The Network Innovation 1 dlan 500 duo Erste Schritte: Stecken Sie den dlan 500 duo Adapter in die Steckdose und verbinden Sie ihn mit dem beiliegenden LAN- Kabel mit Ihrem Router.
dlan 500 WiFi Installation The Network Innovation
 dlan 500 WiFi Installation The Network Innovation 1 dlan 500 duo Erste Schritte: Stecken Sie den dlan 500 duo Adapter in die Steckdose und verbinden Sie ihn mit dem beiliegenden LAN- Kabel mit Ihrem Router.
dlan 550+ WiFi Installation
 dlan 550+ WiFi Installation 1 DE Erste Schritte Ihre vorhandene dlan -Verbindung. GB First steps Your existing dlan connection. FR Premiers pas Votre connexion dlan existante. NL Eerste stappen Uw bestaande
dlan 550 WiFi Installation
 dlan 550 WiFi Installation DE Erste Schritte: Ihre vorhandene dlan -Verbindung. GB First steps: Your existing dlan connection. FR Premiers pas: Votre connexion dlan existante. NL Eerste stap: Uw bestaande
dlan 500 WiFi The Network Innovation
 dlan 500 WiFi Installation The Network Innovation 1 Erste Schritte: Stecken Sie den dlan 500 duo Adapter in die Steckdose und verbinden Sie ihn mit dem beiliegenden LAN- Kabel mit Ihrem Router. dlan 500
Installation. devolo WiFi Repeater
 Installation devolo WiFi Repeater Installationshinweise: Methode 1 - Konfiguration über WPS-Knopf (Seite 3-9) Methode 2 - Konfiguration über Webbrowser (Seite 10-23) Ihr WLAN muss sichtbar sein (SSID)
TCO REFERENCE: WIFI REPEATER CODIC:
 TCO MARQUE: DEVOLO REFERENCE: WIFI REPEATER CODIC: 4083300 devolo WiFi Repeater Installation The Network Innovation Installationshinweise: Methode 1 - Konfiguration über WPS-Knopf (Seite 3-9) Methode 2
Installation devolo Magic LAN 1-1-1
 Installation devolo Magic LAN 1-1-1 Download now! DE Mit der neuen und intuitiven devolo App ist die Einrichtung, Leistungsübersicht und Einstellung der devolo Magic-Adapter ganz einfach. GB Set up, extend,
1. DESCARGA DEL SOFTWARE DE BLUETOOTH EN EL SMARTPHONE
 MANUAL DEL USUARIO PARA BLUETOOTH ES 1. DESCARGA DEL SOFTWARE DE BLUETOOTH EN EL SMARTPHONE Entre en Apple Store o Google Play y busque: - BH Premium - BH Lite BH Premium BH Lite 2. FIJACIÓN DEL MÓDULO
devolo WiFi Repeater Installation The Network Innovation
 devolo WiFi Repeater Installation The Network Innovation Installationshinweise: Methode 1 - Konfiguration über WPS-Knopf (Seite 3-9) Methode 2 - Konfiguration über Webbrowser (Seite 10-23) Ihr WLAN muss
devolo WiFi Stick ac Installation
 devolo WiFi Stick ac Installation 1 Stecken Sie den devolo WiFi Stick ac in einen freien USB-Anschluss an Ihrem Notebook oder PC. Stellen Sie sicher, dass Ihr Gerät mit dem Internet verbunden ist. Plug
Installation devolo Magic WiFi 2-1-1
 Installation devolo Magic WiFi 2-1-1 Download now! DE Mit der neuen und intuitiven devolo App ist die Einrichtung, Leistungsübersicht und Einstellung der devolo Magic-Adapter ganz einfach. GB Set up, extend,
devolo WiFi Stick ac Installation
 devolo WiFi Stick ac Installation 1 Installation steps for Windows systems DE Erste Schritte: Stecken Sie den devolo WiFi Stick ac in einen freien USB-Anschluss an Ihrem Notebook oder PC. Stellen Sie sicher,
Installation devolo Magic WiFi 2-1-2
 Installation devolo Magic WiFi 2-1-2 Download now! DE Mit der neuen und intuitiven devolo App ist die Einrichtung, Leistungsübersicht und Einstellung der devolo Magic-Adapter ganz einfach. GB Set up, extend,
devolo WiFi Repeater Installation The Network Innovation
 devolo WiFi Repeater Installation The Network Innovation Installationshinweise: Methode 1 - Konfiguration über WPS-Knopf (Seite 3-9) Methode 2 - Konfiguration über Webbrowser (Seite 10-23) Ihr WLAN muss
Installation devolo Magic WiFi 2-1-3
 Installation devolo Magic WiFi 2-1-3 Download now! DE Mit der neuen und intuitiven devolo App ist die Einrichtung, Leistungsübersicht und Einstellung der devolo Magic-Adapter ganz einfach. GB Set up, extend,
AC1200 Dual Band Wireless USB Network Adapter Quick Installation Guide
 LevelOne WUA-1810 AC1200 Dual Band Wireless USB Network Adapter Quick Installation Guide English Deutsch Français Português Italiano Español This guide covers only the most common situations. All detail
Wi-Fi. Smart Plug. Paso1 Instalación de App. Guía Rápida de Uso. Método 1. Método 2. Una vez instalada
 ES Paso1 Instalación de App Wi-Fi Smart Plug Método 1 Busque la App en Apple Store o Google Play, descárguela e instálela. Guía Rápida de Uso App Store o Play Store Servicio Atención al Cliente 902 19
1. DESCARGA DEL SOFTWARE DE BLUETOOTH EN EL SMARTPHONE
 M AN UAL DEL USUARIO PARA BLUETOOT H ES 1. DESCARGA DEL SOFTWARE DE BLUETOOTH EN EL SMARTPHONE Entre en Apple Store o Google Play y busque: - BH Premium BH Premium 2. FIJACIÓN DEL MÓDULO BLUETOOTH Fije
Ewpe Smart App Operation Manual
 Ewpe Smart App Operation Manual Control Flow Chart intelligent home appliances Home Wi-Fi Cellular/ Other Wi-FI Home wireless router Home Wi-Fi APP Operating Systems Requirement for User's smart phone:
START HERE PTB: COMECE AQUI FRA: MISE EN ROUTE ITA: PER COMINCIARE PTG: INICIAR AQUI ESP: EMPEZAR AQUÍ
 START HERE PTB: COMECE AQUI FRA: MISE EN ROUTE ITA: PER COMINCIARE PTG: INICIAR AQUI ESP: EMPEZAR AQUÍ Install the software (required for full webcam functionality). Instale o software (necessário para
PROXIMA PLUS - 4 Rue François Arago Plaisance-du-Touch
 PROXIMA PLUS - 4 Rue François Arago - 31830 Plaisance-du-Touch FR MISE À JOUR DU PILOTE PS4TM MANETTE SANS FIL VIA PC La mise à jour de la mane e PS4TM se fait automa quement avec la console, cependant
Rockbox Round manual
 www.freshnrebel.com Rockbox Round manual Get connected!. Fully charge your Rockbox Round before use. Turn on your Rockbox Round by switching the /Off button.. Enable Bluetooth on your smartphone or tablet..
Paso1 Instalación de App
 ES My Wi-Fi Smart Plug Nombre: Enchufe Inteligente Wifi con Monitor de Energía Modelo: MIOSMP002 Ratio: 230V AC, 50/60Hz, 16A Importado por: ascendeo Iberia, S.L. Fabricado en China Telf: 902 19 19 00
Installation guide. Android or ios
 Installation guide Android or ios Things you need EN + Wi-Fi Home Cam Mini + Power cable Wi-Fi (modem) router Connecting your camera Power socket ios or Android smartphone / tablet 1. Download the Sitecom
DISTRIBUCIÓN DE HABITACIONES
 DISTRIBUCIÓN DE HABITACIONES Cada una de las habitaciones del apartamento son dobles (para dos personas). y se habilitarán el número de habitaciones en función del numero de huéspedas a alojar. Ejemplos:
DISTRIBUCIÓN DE HABITACIONES
 DISTRIBUCIÓN DE HABITACIONES Cada una de las habitaciones del apartamento son dobles (para dos personas). y se habilitarán el número de habitaciones en función del numero de huéspedas a alojar. Ejemplos:
Platinum Electric Griddle. Children should be supervised to ensure that they do not play with the appliance.
 Platinum Children should be supervised to ensure that they do not play with the appliance. 1 2 ELECTRIC GRIDDLE 1. Receptacle for power probe 2. Side handle 3. Non-stick heating plate 4. Power cable with
QUICK INSTALLATION GUIDE
 Wireless AC1200 Dual Band ACCess Point QUICK INSTALLATION GUIDE GUIA DE INSTALAÇÃO CONTEÚDO DA EMBALAGEM Wireless AC1200 Dual Band Access Point Nota: Com duas antenas destacáveis. ADAPTADOR DE CORRENTE
devolo WiFi Repeater ac Installation
 devolo WiFi Repeater ac Installation 1a DE Erste Schritte Methode A Konfiguration mit WPS-Knopf (Seite 4-9). Methode B Konfiguration im Webbrowser (Seite 10-19). Das WLAN (SSID) Ihres Routers muss sichtbar
Rockbox manual
 www.freshnrebel.com Rockbox Chunk manual Get connected! 1. Fully charge your Rockbox Chunk before use. 2. Turn on your Rockbox Chunk by switching the /Off button.. Enable Bluetooth on your smartphone or
Security Kit. Security Kit. Security Kit. Security Kit. See Reverse Side For Security Installation Instructions 8811-000008
 Security Kit Security Kit See Reverse Side For 8811-000008 See Reverse Side For 8811-000008 Security Kit Security Kit See Reverse Side For 8811-000008 See Reverse Side For 8811-000008 1. Using security
Análise PowerLine dlan 200 AV Wirerless N Parte I
 Análise PowerLine dlan 200 AV Wirerless N Parte I Date : 15 de Fevereiro de 2011 Taxas de transferência de 200 Mbps em qualquer lugar Este artigo tem como objectivo a análise do Kit dlan 200 AVsmart+ Powerline
Quickstart Guide. WiPry-Pro Combo
 Quickstart Guide CONNECT TO APPLE DEVICE ACCESSORY EXTERNAL TRIGGER 2.4-2.5GHz ANTENNA WARNING DO NOT APPLY MORE THAN 20DBM TO THE ANTENNA WITHOUT EXTERNAL ATTENUATION WARNING DO NOT APPLY MORE THAN -0.5/+3.8V
Quick Setup Guide bluesound.com
 Quick Setup Guide bluesound.com Included Accessories 120V AC Power Cord 230V AC Power Cord Ethernet Cable Mini Jack to Toslink Adaptor 1 CONNECT ZO POWER 2 CONNECT TO WiFi A Select the AC Power Cord appropriate
Conteúdo da embalagem
 Marcas comerciais NETGEAR, o logotipo NETGEAR e Connect with Innovation são marcas registradas e/ou marcas comerciais registradas da NETGEAR, Inc. e/ou suas subsidiárias nos Estados Unidos e/ou em outros
Radio / Cassette. Long Beach C31. Installation instructions Notice de montage Instrucciones de instalación Instruções de montagem
 Radio / assette Long each 3 Installation instructions Notice de montage Instrucciones de instalación Instruções de montagem Installation instructions Notice de montage Instrucciones de instalación Instruções
DOCUMENTAZIONE. +39/
 DOCUMENTAZIONE Moonwalk Service c/o Claudio Giulio Prencipe Noleggio Audio e Luci Installazioni per Eventi via Camogli 11/3 - Rivoli frazione Cascine Vica, 10098 (TO) +39/3477822465 moonwalkservice@gmail.com
PROTOCOLO DE R EABILITAÇÃO
 Orteq_rehab_booklet_PR 31/10/08 15:08 Page 1 Rehabilitation protocol in other languages can be downloaded from the website www.orteq.com or can be ordered at Orteq via your physician. Het rehabilitatieprotocol
Ology Bench - In-Fill Panel Banc Ology - Panneau Banco Ology - Panel de relleno Bancada Ology - Panel integrado intern
 Ology Bench - In-Fill Panel Banc Ology - Panneau Banco Ology - Panel de relleno Bancada Ology - Panel integrado intern If you have a problem, question, or request, call your local dealer, or Steelcase
Guia de Instalação Rápida. TE100-S800i TE100-S810Fi
 Guia de Instalação Rápida TE100-S800i TE100-S810Fi Índice Português... 1. Antes de Iniciar... 2. Como Conectar... 3. Usando o Switch... Troubleshooting... 1 1 2 3 5 Version 05.22.2007 1. Antes de Iniciar
Guia de Início Rápido
 HGW - 2501GNP-NV 80 2.11n W i r e l e ss G a t e wa y wi th 1 1 ac & HPNA Guia de Início Rápido Detalhes do login padrão IP Address http://192.168.1.1 User Name super visor Password z yad1234 Louças Firm
Ligue o seu eletrodoméstico ao futuro. Guia de Iniciação Rápida
 Ligue o seu eletrodoméstico ao futuro. Guia de Iniciação Rápida No seu lar, o futuro começa agora! Obrigado por utilizar a Home Connect * Muitos parabéns pelo seu frigorífico do futuro que já hoje facilita
Dallas RMD 169 Texas DJ
 Radio / MD Dallas RMD 69 Texas DJ Installation instructions Notice de montage Instrucciones de instalación Instruções de montagem G Safety precautions Installation and connection regulations In the event
Guia de Instalação Rápida TPL-210AP
 Guia de Instalação Rápida TPL-210AP Table Índice of Contents Português... 1. Antes de Iniciar... 2. Instalação de Hardware... 3. Configure o Ponto de Acesso... 1 1 2 3 Troubleshooting... 6 Version 10.16.2007
MARQUE: MICROSOFT REFERENCE: NATURAL ERGO 4000 CODIC:
 MARQUE: MICROSOFT REFERENCE: NATURAL ERGO 4000 CODIC: 4327829 NOTICE ENG: Microsoft wired keyboard Teclado com fio da Microsoft Clavier avec fil Microsoft Teclado alámbrico de Microsoft ENG: Install the
Wi-Fi Range Extender Add-on Device Quickstart Guide
 Wi-Fi Range Extender Add-on Device Quickstart Guide Model No. WRP1220 What s inside: 1x Wi-Fi Range Extender 1x Power Adapter All Home8 add-on devices have to work with Home8 systems. português Passo 1:
Installation guide. Android or ios
 Installation guide Android or ios Things you need EN + Wi-Fi Home Cam Twist + Power cable Wi-Fi (modem) router Connecting your camera Power socket ios or Android smartphone / tablet 1. Download the Sitecom
Wi-Fi. Switch Descargue la App. Guía Rápida de Uso
 ES Wi-Fi Switch Guía Rápida de Uso Servicio Atención al Cliente +4 9 44 9 9 Website: www.ascendeoiberia.com Service: iot@ascendeoiberia.com ascendeo Iberia, S.L. Add: C/ Les Planes, - 4. Polígono Fontsanta
Guia de Instalação Rápida TEW-450APB
 Guia de Instalação Rápida TEW-450APB Table Índice of Contents Português... 1. Antes de Iniciar... 2. Instalação de Hardware... 3. Configure o Ponto de Acesso... 1 1 2 3 Troubleshooting... 6 Version 09.27.2007
SR2 COM01 Quick start
 SR COM0 Quick start Aim: SR COM0 alarm message on your mobile phone. Objectif : réception sur votre téléphone mobile d'un message d'alarme provenant du SR COM0. Zweck: Empfang einer Alarmmeldung vom SR
Guia de Instalação Rápida TEW-434APB
 Guia de Instalação Rápida TEW-434APB Table Índice of Contents... 1. Antes de Iniciar... 2. Instalação de Hardware... 3. Instalação Power-over-Ethernet... 4. Configure o Ponto de Acesso... 1 1 2 3 5 Troubleshooting...
DLST 9+1. Art.-Nr.: I.-Nr.: Anleitung DLST 9+1 SPK :58 Uhr Seite 1
 Anleitung DLST 9+1 SPK 2 19.01.2005 13:58 Uhr Seite 1 Manual de instruções Tambor de mangueira de ar comprimido Art.-Nr.: 41.380.00 I.-Nr.: 01014 DLST 9+1 Anleitung DLST 9+1 SPK 2 19.01.2005 13:58 Uhr
25 Monate Garantiebedingungen 25 mois conditions de garantie 25 months warranty conditions
 Smart Connect de Bedienungsanleitung en Instructions for use fr Mode d emploi it Istruzioni per l uso nl Gebruiksaanwijzing es Modo de empleo pt Manual de instruções sv Bruksanvisning ru Руководство по
Guia de Instalação Rápida TE100-PCIWN TE100-PCIWA
 Guia de Instalação Rápida TE100-PCIWN TE100-PCIWA Table Índice of Contents Português... 1. Antes de Iniciar... 2. Como Instalar... 1 1 2 Troubleshooting... 3 Version 04.10.2006 1. Antes de Iniciar Conteúdo
Guia de Instalação Rápida TEW-430APB
 Guia de Instalação Rápida TEW-430APB Table Índice of Contents Português... 1. Antes de Iniciar... 2. Instalação de Hardware... 3. Configure o Ponto de Acesso... 1 1 2 3 Troubleshooting... 6 Version 08.07.2006
Verb Markerboard Bracket Assembly for a Desk or a Universal Worksurface
 Verb Markerboard Bracket Assembly for a Desk or a Universal Worksurface # If you have a problem, question, or request, call your local dealer, or Steelcase Line at 888.STEELCASE (888.78.5) for immediate
IAN 93902 1/22. Washing machine cabinet. Mobile lavatrice Istruzioni per il montaggio. Armario saledizo de máquina lavadora Instrucciones de montaje
 Washing machine cabinet ES PT DE AT CH Armario saledizo de máquina lavadora Instrucciones de montaje Armário para montar por cima da máquina de lavar a roupa Instruções de montagem Waschmaschinenüberbauschrank
Guia de Instalação Rápida TE100-PCBUSR
 Guia de Instalação Rápida TE100-PCBUSR Table Índice of Contents Português... 1. Antes de Iniciar... 2. Como Instalar... 1 1 2 Troubleshooting... 3 Version 07.27.2007 1. Antes de Iniciar Conteúdo da Embalagem
Wi-Fi Camera Add-on Device Quickstart Guide
 Wi-Fi Camera Add-on Device Quickstart Guide Model No. IPC1200 What s inside: 1x Wi-Fi Camera 1x Power Adapter 1x Extension Cable Mounting Accessories All Home8 add-on devices have to work with Home8 systems.
Ligue o seu eletrodoméstico ao futuro.
 Ligue o seu eletrodoméstico ao futuro. Guia de Iniciação Rápida PT_PCG_Oefen_SE_9001270046.indd 1 17.11.16 17:39 No seu lar, o futuro começa agora! Obrigado por utilizar a Home Connect * Muitos parabéns
Start Here Comece aqui Mise en route Empezar aquí
 Start Here Comece aqui Mise en route Empezar aquí 1 Install the software (required for full functionality). Instale o software (necessário para funcionalidade total). Installez le logiciel (requis pour
Quick Installation Guide
 Quick Installation Guide Guia de Instalação Rápida PowerLine AV 500 Wireless Extender Kit (DHP-308AV & DHP-W310AV) Version 4.00 January 4, 2016 Wi-Fi Configuration Note Conteúdo da Embalagem DHP-W310AV
Complimentary Reference Material
 Complimentary Reference Material This PDF has been made available as a complimentary service for you to assist in evaluating this model for your testing requirements. TMG offers a wide range of test equipment
Guia de Início Rápido
 HGW - 2501GNP-RC 80 2.11n W i r e l e ss G a t e wa y wi th 1 1 ac & HPNA Guia de Início Rápido Detalhes do Login padrão IP Address http://192.168.1.1 User Name super visor Password z yad1234 Louças Firm
Quick user guide. (réf )
") Quick user guide (réf. 34889) Download the app «mobile eye door +» How to SETUP, for the first time, your Chacon IP VDP Connect the cables with the same color to each other, of both units. Connect the
Quick user guide (réf. 34889) Download the app «mobile eye door +» How to SETUP, for the first time, your Chacon IP VDP Connect the cables with the same color to each other, of both units. Connect the
m 6 LICHT d o w h a t y o u l i k e
 1-2012 d o w h a t y o u l i k e Select a frame and glass shade to create your favorite lamp Kombinieren Sie Ihre Wunschleuchte aus Gestell und Gläsern Créez votre propre éclairage en combinant l armature
EM7410 Transmissor de música WiFi
 EM7410 Transmissor de música WiFi 2 PORTUGUÊS EM7410 Transmissor de música WiFi Índice 1.0 Introdução... 2 1.1 Funções e funcionalidades... 2 2.0 Explicação das ligações... 3 3.0 Ligar o transmissor de
User Manual. Linksys PAP2 Broadband Phone Service. Linhagratuita grupo csdata
 User Manual Linksys PAP2 Broadband Phone Service Linhagratuita grupo csdata www.linhagratuita.com.br Please follow the step-by-step guide below to set up your Linksys PAP2 for use with Linhagratuita Broadband
Conteúdo da embalagem
 Marcas comerciais NETGEAR, o logotipo NETGEAR e Connect with Innovation são marcas registradas e/ou marcas comerciais registradas da NETGEAR, Inc. e/ou suas subsidiárias nos Estados Unidos e/ou em outros
dlan WiFi ac The Network Innovation
 dlan 1200+ WiFi ac The Network Innovation devolo dlan 1200+ WiFi ac 2017 devolo AG Aquisgrão (Alemanha) Todos os dados nesta documentação foram reunidos após uma verificação cuidadosa, não sendo, no entanto,
Ligue o seu eletrodoméstico ao futuro. Guia de Iniciação Rápida
 Ligue o seu eletrodoméstico ao futuro. Guia de Iniciação Rápida No seu lar, o futuro começa agora! Obrigado por utilizar a Home Connect * Muitos parabéns pela sua máquina de café do futuro, que já hoje
MARQUE: MOULINEX REFERENCE: OX OPTIMO CODIC:
 MARQUE: MOULINEX REFERENCE: OX484100 OPTIMO CODIC: 4257138 NOTICE FR NL Optimo 39L DE EN ES IT PT 1 2 3 4 5 6 7 8 9 10 * * 11 * 12 * 13 * 2 * selon modèle - afhankelijk van het model - je nach Modell -
LC1 F115...F800. Contacteurs Contactors Schutze Contattori Contactores LC1 F115 LC1 F150 LC1 F185 LC1 F225 LC1 F265 LC1 F330
 www.telemecanique.com LC F5...F800 Contacteurs Contactors Schutze Contattori Contactores LC F5 LC F50 LC F85 LC F2 LC F265 LC F330 LC F00 LC F500 LC F630 LC F800 "For Motor Starting Use Telemecanique Overload
Powerfix D A RADMUTTERNSCHLÜSSEL KH4055 E P. IB_KH4055_0706_EP :05 Uhr Seite 1
 IB_KH4055_0706_EP 18.09.2006 14:05 Uhr Seite 1 Powerfix D A RADMUTTERNSCHLÜSSEL KH4055 E P LLAVE PARA TUERCA DE RUEDA KH4055 CHAVE DE PORCAS PARA RODAS DE VEÍCULOS KH4055 IB_KH4055_0706_EP 18.09.2006 14:05
Guia de Instalação Rápida TEW-631BRP
 Guia de Instalação Rápida TEW-631BRP Table Índice of Contents Português... 1. Antes de Iniciar... 2. Instalação de Hardware... 3. Configure o Roteador Wireless... 1 1 2 3 Troubleshooting... 5 Version 05.23.2007
QUICK INSTALLATION GUIDE
 POWERLINE AV WIRELESS N150 MINI STARTER KIT DHP-W221AV QUICK INSTALLATION GUIDE GUIA DE INSTALAÇÃO RÁPIDA CONTEÚDO DA EMBALAGEM MINI ADAPTADOR POWERLINE AV200 DHP-208AV MINI ADAPTADOR N150 POWERLINE AV200
DISTRIBUCIÓN DE HABITACIONES
 DISTRIBUCIÓN DE HABITACIONES El alojamiento cuenta con dos habitaciones, una de las habitaciones es triple (para tres personas), y la otra doble (para dos personas). Se habilitarán el número de habitaciones
Router Wi-Fi 5.0 Guia de instalação rápida
 Router Wi-Fi 5.0 Guia de instalação rápida Índice Apresentação Como ligar o router Serviço de internet Serviço de telefone Instalação e configuração Wi-Fi 5 5 6 Apresentação Router Wi-Fi 5.0 Principais
Guia de Instalação Rápida TEW-AO12O
 Guia de Instalação Rápida TEW-AO12O Table Índice of Contents Português... 1. Antes de Iniciar... 2. Instalação de Hardware... 3. Montagem... Troubleshooting... 1 1 2 4 6 Version 10.04.2007 1. Antes de
Guia de Instalação Rápida TEW-435BRM H/W: VD1.1R
 Guia de Instalação Rápida TEW-435BRM H/W: VD1.1R Table Índice of Contents Português... 1 1. Antes de Iniciar... 1 2. Instalação de Hardware... 2 3. Configure o Modem... 3 4. Configurando Criptografia...
Guia de Instalação Rápida TWG-BRF114
 Guia de Instalação Rápida TWG-BRF114 Table Índice of Contents Português... 1. Antes de Iniciar... 2. Instalação de Hardware... 3. Configurando o Roteador... 1 1 2 3 Troubleshooting... 5 Version 09.24.2008
Q7834A/Q7835A. Install Installation Installazione Instalación. Instalação
 Q7834A/Q7835A 1 Install Installation Installazione Instalación Instalação 2 1 3 4 5 6 1 2 2 7 8 3 9 English 9 Français To confirm that the device is installed correctly print a configuration page. 1. From
Guia de Instalação da Edição Powerline -Extensão da WiFi Universal (XAVN2001)
") Guia de Instalação da Edição Powerline -Extensão da WiFi Universal (XAVN2001) Suporte Técnico Agradecemos por escolher os produtos NETGEAR. Após instalar o dispositivo, localize o número de série no rótulo
Guia de Instalação da Edição Powerline -Extensão da WiFi Universal (XAVN2001) Suporte Técnico Agradecemos por escolher os produtos NETGEAR. Após instalar o dispositivo, localize o número de série no rótulo
Radio / CD. Honolulu CD50. Installation instructions Notice de montage Instrucciones de instalación Instruções de de montagem
 Radio / D Honolulu D50 Installation instructions Notice de montage Instrucciones de instalación Instruções de de montagem Installation instructions Notice de montage Instrucciones de instalación Instruções
Instalação. Ponto de acesso sem fios NETGEAR ac WAC120. Conteúdo da embalagem. NETGEAR, Inc. 350 East Plumeria Drive San Jose, CA USA
 Marcas comerciais NETGEAR, o logótipo NETGEAR e Connect with Innovation são marcas registadas e/ou marcas comerciais registadas da NETGEAR, Inc. e/ou das suas subsidiárias nos Estados Unidos e/ou em outros
Guia de Instalação Rápida TW100-S4W1CA
 Guia de Instalação Rápida TW100-S4W1CA Table Índice of Contents Português... 1. Antes de Iniciar... 2. Instalação de Hardware... 3. Configure o Roteador... 1 1 2 3 Troubleshooting... 5 Version 06.01.2007
Guia de Instalação Rápida TEW-432BRP
 Guia de Instalação Rápida TEW-432BRP Table Índice of Contents Português... 1. Antes de Iniciar... 2. Instalar Roteador... 3. Bônus... Troubleshooting... 1 1 2 4 5 Version 08.07.2006 1. Antes de Iniciar
Guia de Instalação Rápida. TEG-224WSplus
 Guia de Instalação Rápida TEG-224WSplus Table Índice of Contents Português... 1. Antes de Iniciar... 2. Instalação de Hardware... 3. Utilitário de Gerenciamento Web... Troubleshooting... 1 1 2 3 6 Version