WHAT S INCLUDED INSTRUCTIONS
|
|
|
- William Pedroso Neto
- 6 Há anos
- Visualizações:
Transcrição
1
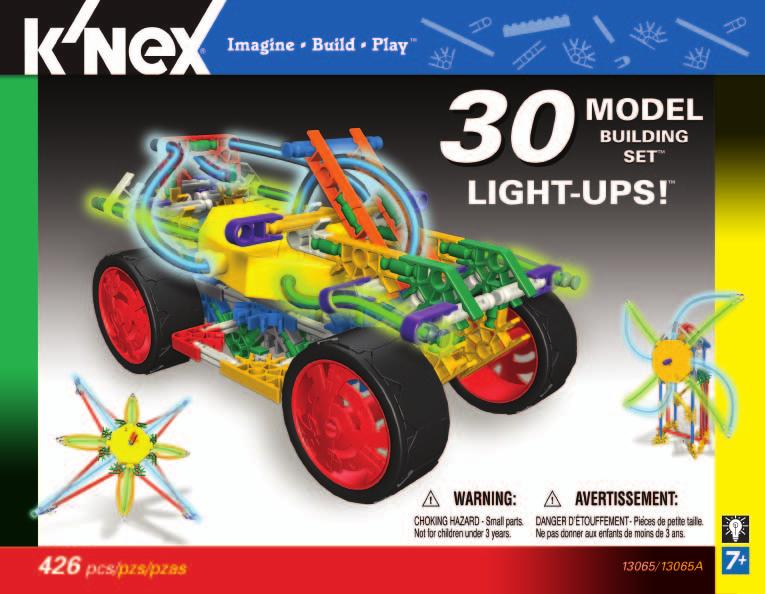
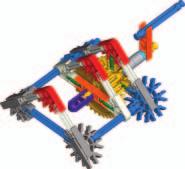
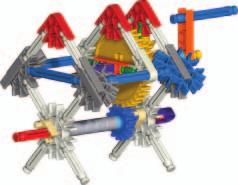
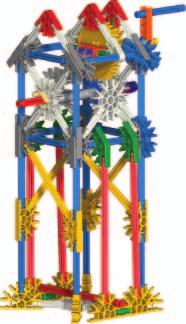
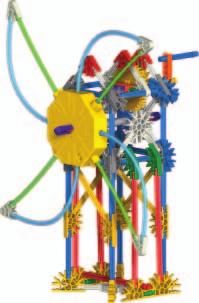
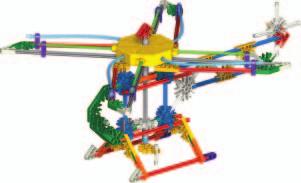
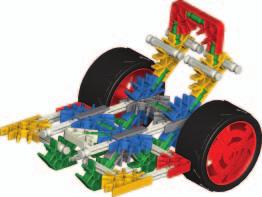
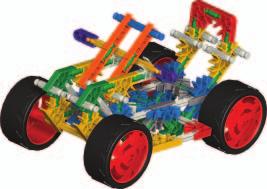
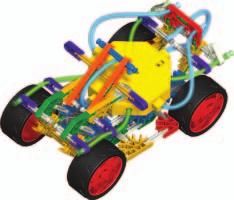
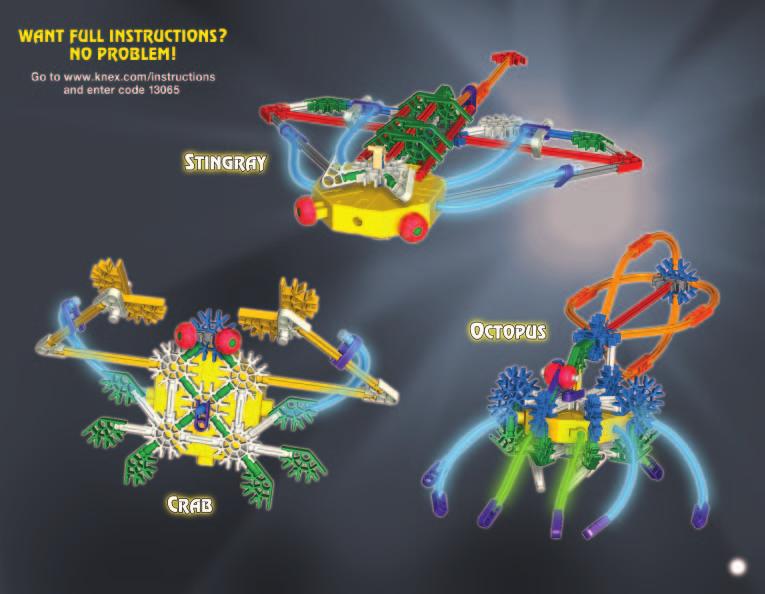
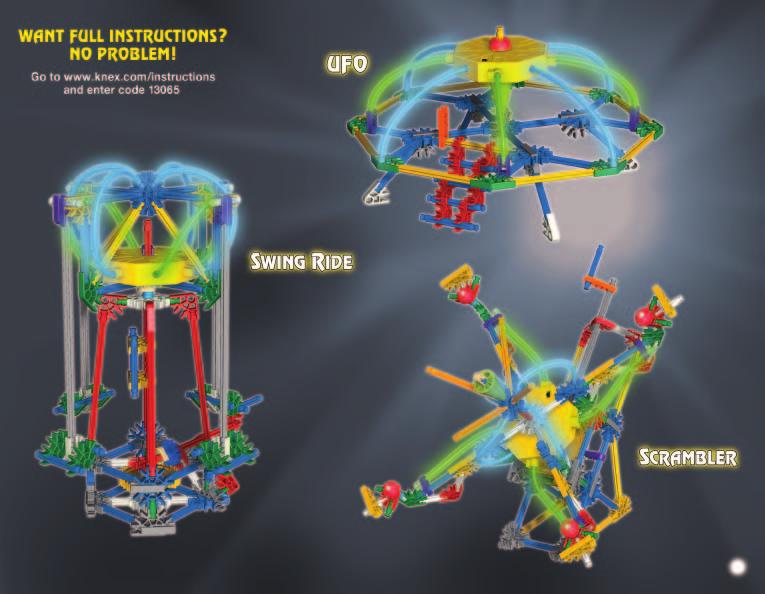
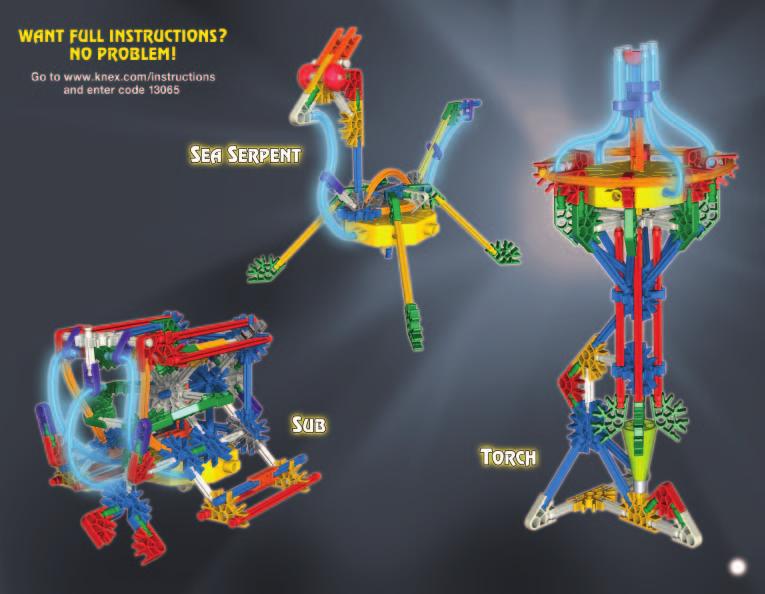
2 2 WHAT S INCLUDED INSTRUCTIONS FLOWER POT BAT OWL ROBOT CELL PHONE STAR WINDMILL HELICOPTER ATV FIRE ENGINE INSPIRATIONAL MODELS BUTTERFLY FIREPLACE LIGHTHOUSE STINGRAY CRAB OCTOPUS AIRPLANE GHOST VIDEO CAMERA MOON RACER SWING RIDE UFO SCRAMBLER FIREFLY SPACESHIP SUV PUMPKIN SEA SERPENT SUB TORCH Keep these instructions in a handy location. They contain important safety information. WARNING: CHOKING HAZARD - Small parts. Not for children under 3 years. CAUTION: Keep hands, face, hair and clothing away from all moving parts. CAUTION: As with all small batteries, the batteries used in this toy should be kept away from small children, who still put things in their mouths. If they are swallowed, promptly see a doctor and have the doctor phone collect. (US only) In Canada, have the doctor call your Provincial Poison Control Center. Be sure to insert the batteries correctly and always follow the toy and battery manufacturers instructions. Do not mix old and new batteries or alkaline, standard (carbon-zinc) or rechargeable (nickelcadmium) batteries. Only batteries of the same or equivalent type recommended should be used. Always remove weak or dead batteries from the product; do not short-circuit supply terminals. Insert batteries with correct polarity (+/-) as shown. Important Tips Alkaline batteries are recommended. Rechargeable batteries are not recommended. Remove rechargeable batteries from toy before charging; they must be charged only under adult supervision. BATTERY INFORMATION Non-rechargeable batteries must not be recharged. Keep components free of dust; do not immerse or use in water. Do not dispose of batteries in a fire; they could leak or explode and cause injury. Remove all batteries if the toy will not be used for a long period of time. How to Insert and Remove Batteries Use a small Phillips head screwdriver - to loosen the screw. Insert 2 + fresh AAA (LR03) + into the Light Module compartment with the - correct polarity (+/-) as shown here. Your K NEX Building Set includes Light-Up pieces specially designed to work with the K NEX system. Inspect the Light-Ups components before each use. Do not use if insulation is cut, frayed or torn. Do not put anything but the Light-Up Rods or K NEX Rods into the sockets of the Light Module. Keep all Light-Up Rods and Light Module components dry. Do not immerse in water. Be sure to turn the Light Module switch OFF when finished. Do not leave the Light Module on when not in use. A slight humming noise is normal for the Light Module. Test the Lights: Insert 2 AAA (LR03) batteries into the Light Module and test your lights before building. Plug the metal ends (contacts) of the Light-Up Rods firmly into the Light Module. Turn the Light Module switch to the continuous ON and BLINK positions. There are 3 switch positions on the Light Module. Lights not working? Check to see if you have fresh batteries inserted with the correct polarity. Check to see if the metal ends of Light-Up Rods are fully plugged into the Light Module. (The ends with the metal tips must be inserted all the way into the Light Module to make contact.) Turn the Light Module switch to the continuous ON or BLINK positions. If the lights are still not working, call our Consumer Hotline at KID-KNEX (USA and Canada only). Or see the next page for ways to contact us. We re here to help! ON OFF BLINK

3 READY, SET, BUILD To begin your model, find the numbers. Each piece has its own shape and color. Just look at the picture, find the pieces in your set that match what you see, and snap them together. Try to hold your model in the same direction as in the picture so you ll attach your pieces to the right place. BUILDING BASICS HI! I m your K NEX Building Buddy. Need help... I m here! Look for me to guide you as you select models with the right level of challenge. 2 SPACERS 1 FLEXI-RODS and follow the 3 1 There are places in your model where you need to add blue and silver Spacers. Be sure to count them carefully. A Flexi-rod is a Rod that you bend to make curves. It will be easier to attach to your model if you bend it back and forth first. PARTS CHECKLIST LIGHT-UP RODS Be sure to use the correct ends of the Light-Up Rods when building. There are two different ends on the Light-Up Rods. The end with the metal tip (contacts), must fit tightly into the Light Module. Push the metal ends of the Light-Up Rods firmly into the Light Module to make contact. The other end fits into the K NEX Connectors. MOVIN ON The faded colors tell you this section is already built. You ll want to connect the new section to the place where the arrows are pointing. These pieces will be in full color CONNECTORS There are blue and silver Connectors with special long slots. They slide together as you see in the pictures. Push the parts together until you hear a click KID-KNEX USA /Canada only (English only) @knex.com FCC Statements: WARNING: Changes or modifications to this unit not expressly approved by the party responsible for the compliance could void the users right to operate the equipment. This device complies with Part 15 of the FCC Rules. Operation is subject to the following two conditions: 1. This device may not cause harmful interference and 2. This device must accept any interference received, including interference that may cause undesired operation. This model is tested to comply with FCC standards - FOR HOME OR OFFICE USE. This equipment has been tested and found to comply with the limits for a Class B digital device, pursuant to part 15 of the FCC Rules. HOW TO CONTACT US IF ANYTHING IS MISSING: Consumer Services K'NEX Industries, Inc. P.O. Box 700 Hatfield, PA Customer Service outside the USA, CAN, GBR please contact local distributor. Distributor information can be found at: Le Service clients hors d USA et CAN,s il vous plaît contacter le distributeur local. L information de distributeur peut être trouvée à These limits are designed to provide reasonable protection against harmful interference in a residential installation. This equipment generates, uses and can radiate radio frequency energy, and, if not installed and used in accordance with the instructions, may cause harmful interference to radio communications. However, there is no guarantee that interference will not occur in a particular installation. If this equipment does cause harmful interference to radio or television reception, which can be determined by turning the equipment off and on, the user is encouraged to try to correct the interference by one or more of the following measures: (1) Reorient or relocate the receiving antenna. (2) Increase the separation between the equipment and receiver. (3) Consult the dealer or an experienced radio/tv technician. This Class B ditigal apparatus complies with Canadian ICES


4 FLOWER POT FRIENDLY CHALLENGE 1 EN FR ES DE NL IT PT Models are illustrated to show lights are on. Les modèles sont illustrés de manière à indiquer que les lumières sont allumées. Los Modelos se han ilustrado con las luces encendidas. Auf den Abbildungen sind die Modelle mit eingeschaltetem Licht gezeigt. Modellen worden geïllustreerd met de lichten aan. I modelli illustrati hanno le luci accese. Os modelos estão ilustrados para mostrar que as luzes estão ligadas
 dans le module d'éclairage? Has puesto 2 pilas AAA (LR03) en el Módulo de Luz?")
 batterijen in de lichtmodulus gestoken?")
5 3 1-3 EN FR ES DE Did you install 2 AAA (LR03) batteries into the Light Module? As-tu mis 2 piles AAA (LR03) dans le module d'éclairage? Has puesto 2 pilas AAA (LR03) en el Módulo de Luz? Hast du 2 Batterien vom Typ AAA (LR03) in das Leuchtmodul eingesetzt? NL IT PT Heb je 2 AAA (LR03) batterijen in de lichtmodulus gestoken? Hai installato 2 batterie AAA (LR03) nel modulo luci? Foram instaladas 2 pilhas AAA (LR03) no Módulo da Luz? 1-2 5
6 BAT FRIENDLY CHALLENGE 1 6

7

8

9


10 OWL FRIENDLY CHALLENGE

11

12

13


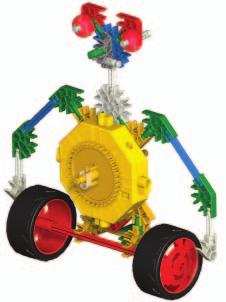
14 ROBOT 3 MODERATE CHALLENGE

15

16

17


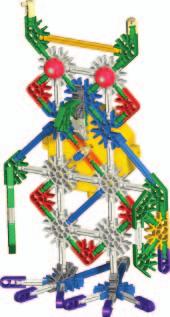
18 CELL PHONE 1 MODERATE CHALLENGE

19

20

21


22 STAR x4 MODERATE CHALLENGE
23
24

25


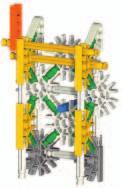
26 WINDMILL 3 MODERATE CHALLENGE

27

28

29

30

31


32 2 HELICOPTER MODERATE CHALLENGE

33

34

35

36


37 ATV GREATER CHALLENGE

38

39

40

41


42 FIRE ENGINE GREATER CHALLENGE

43

44


45


46

47

48 EN FR ES DE NL IT PT Models are illustrated to show lights are on. Les modèles sont illustrés de manière à indiquer que les lumières sont allumées. Los Modelos se han ilustrado con las luces encendidas. Auf den Abbildungen sind die Modelle mit eingeschaltetem Licht gezeigt. Modellen worden geïllustreerd met de lichten aan. I modelli illustrati hanno le luci accese. Os modelos estão ilustrados para mostrar que as luzes estão ligadas. 48
49 49

50 EN FR ES DE NL IT PT Models are illustrated to show lights are on. Les modèles sont illustrés de manière à indiquer que les lumières sont allumées. Los Modelos se han ilustrado con las luces encendidas. Auf den Abbildungen sind die Modelle mit eingeschaltetem Licht gezeigt. Modellen worden geïllustreerd met de lichten aan. I modelli illustrati hanno le luci accese. Os modelos estão ilustrados para mostrar que as luzes estão ligadas. 50
51 51

52 EN FR ES DE NL IT PT Models are illustrated to show lights are on. Les modèles sont illustrés de manière à indiquer que les lumières sont allumées. Los Modelos se han ilustrado con las luces encendidas. Auf den Abbildungen sind die Modelle mit eingeschaltetem Licht gezeigt. Modellen worden geïllustreerd met de lichten aan. I modelli illustrati hanno le luci accese. Os modelos estão ilustrados para mostrar que as luzes estão ligadas. 52
53 53
54 FR (Page 2) Français Garde ces instructions à portée de la main. Elles comportent d'importantes informations de sécurité. AVERTISSEMENT : DANGER D'ÉTOUFFEMENT - Petites pièces. Ne convient pas aux enfants de moins de 3 ans. ATTENTION : Garde les cheveux, les doigts, la figure et les vêtements à l'écart de toutes les pièces mobiles. Informations Pile ATTENTION : Comme c est le cas pour toutes les piles de petite taille, les piles utilisées dans ce jouet doivent être tenues hors de la portée des jeunes enfants, qui sont à l âge où ils mettent encore des choses dans la bouche. Dans l éventualité où un enfant les avalerait, consulter un médecin sans tarder. Dans le Canada, avoir le médecin appelle votre centre de contrôle de poison provincial. S assurer d installer les piles correctement et de suivre toujours les directives des fabricants du jouet et des piles. Ne pas mélanger des piles neuves avec des piles usées. Ne pas mélanger des pilesalcalines avec des piles standard (Leclanché), ou des piles rechargeables (au nickelcadmium). Il convient d utiliser uniquement des piles du type recommandé ou d un type équivalent. Retirer toujours les piles faibles ou mortes du produit ; ne pas faire court-circuiter lesterminaux. Installer les piles en respectant la polarité (+/-) comme l indique le schéma. Conseils importants Les piles alcalines sont recommandées. l est déconseillé d utiliser des piles rechargeables. Retirer les piles rechargeables du jouet avant de les recharger; elles doivent être chargéesexclusivement en présence d un adulte. Les piles qui ne sont pas rechargeables ne doivent pas être rechargées. Veiller à ce que les éléments restent à l abri de la poussière ; ne pas les plonger dans l eau ; ne pas utiliser dans l eau. Ne pas jeter les piles dans le feu ; elles risqueraient de fuir ou d exploser et d entraîner des blessures. Retirer toutes les piles si le jouet restera inutilisé pendant longtemps. Comment mettre et retirer des piles Introduis deux piles AAA (ou LR03) comme l indique le schéma. Votre série de construction K'NEX comprend des éléments magnétiques tout spécialement conçus pour fonctionner avec le système K'NEX. Inspecte les éléments qui s'allument avant chaque utilisation. Si tu constates qu'il y en a qui sont abîmés, ne les utilise pas. Ne mets rien dans les prises du module d'éclairage, si ce n'est les tiges qui s'allument ou les tiges K NEX. Veille à ce que toutes les tiges qui s'allument et les éléments du module d'éclairage soient toujours bien secs. Veille à éteindre le module d'éclairage lorsque tu as fini de jouer. Ne laisse pas le module d'éclairage allumé si tu ne t'en sers pas. Il est normal d'entendre un léger bourdonnement lorsque le module d'éclairage est allumé. Teste les lumières : Introduis 2 piles AAA (LR03) dans le module d'éclairage et teste tes lumières avant de te mettre à construire. Branche les extrémités en métal (contacts) des tiges qui s'allument en les enfonçant bien dans le module d'éclairage. Place l'interrupteur du module d'éclairage en position de marche continue (ON) et de clignotement (BLINK). Les lumières ne fonctionnent pas? Vérifie et vois si ce sont bien des piles neuves qui se trouvent dans le module et que la polarité est respectée. Vérifie et vois si les extrémités en métal des tiges qui s'allument sont bien branchées dans le module d'éclairage. (Pour que le contact puisse se faire, il faut que les bouts en métal des tiges soient introduits à fond dans le module d'éclairage.) Place l'interrupteur du module d'éclairage en position de marche continue (ON) ou de clignotement (BLINK). Si les lumières ne marchent toujours pas, appelle notre ligne d'assistance clientèle KID-KNEX (USA et Canada seulement). (Page 3) Notions de base K'NEX pour le montage BONJOUR! Je suis ton camarade de montage K'NEX. Si tu as besoin d un coup de main Je suis là! Cherche-moi que je puisse te guider et t aider à sélectionner les modèles correspondant à ton niveau. PRÊT À MONTER Pour commencer ton modèle, trouve le 1 et suis les chiffres. Chaque pièce a sa propre forme et sa propre couleur. Il suffit de regarder les illustrations pour retrouver les pièces correspondantes dans le jeu et de les connecter ensemble. Essaye de situer ton modèle dans le même sens que les instructions durant le montage. SUITE Les couleurs dégradées indiquent que cette section est déjà montée. Tu dois connecter la section suivante à l'endroit indiqué par les flèches. Les nouvelles pièces ajoutées auront une couleur vive. CONNECTEURS Tu trouveras des connecteurs bleus et argentés comportant des fentes extra-longues. Ils se glissent l'un dans l'autre tel qu'illustré. Pousse les pièces ensemble jusqu'à ce que tu entendes un déclic. PIÈCES D'ÈCARTEMENT Il y a des endroits dans ton modèle où tu dois ajouter des pièces d'écartement bleues et argentées. Assure-toi d'utiliser la couleur exacte et de compter les pièces avec soin. TIGES FLEXIBLES Un Flexi-rod est une tige que tu peux courber pour faire des courbes. Elle pourra être attachée plus aisément à ton modèle si tu la plies en avant et en arrière plusieurs fois. TIGES QUI S'ALLUMENT Il y a deux différents types d'extrémités sur les tiges qui s'allument. L'extrémité avec le bout en métal (contacts), doit être fermement enfoncée dans le module d'éclairage. L'autre extrémité s'engage dans les connecteurs K NEX. Lorsque tu construis, veille à utiliser les bonnes extrémités des tiges qui s'allument. Pour établir le contact, pousse les extrémités en métal des tiges qui s'allument à fond dans le module d'éclairage. 54
55 ES (Página 2) Español Guarda estas instrucciones en un sitio conveniente. Contienen información importante de seguridad. ADVERTENCIA: PELIGRO DE ASFIXIA - Piezas pequeñas. No es para niños menores de 3 años. PRECAUCIÓN: Mantén el cabello, los dedos, la cara y la ropa alejada de las piezas móviles. Información acerca de las pilas PRECAUCIÓN: Como con todas las pilas pequeñas, las pilas que se usan en este juguete se deben tener lejos del alcance de los niños, quienes todavía están en edad de ponerse cosas en la boca. Si estas pilas son tragadas, inmediatamente vea a un médico. Asegúrese de insertar las pilas correctamente y de siempre seguir las instrucciones del fabricante del juguete y de las pilas. No mezcle pilas viejas con nuevas, ni pilas alcalinas, estándar (carbón-cinc) o recargables (níquel-cadmio). Se debe usar solamente pilas del mismo tipo, o las que se recomienden como equivalentes. Siempre retire las pilas débiles o gastadas del producto; no forme cortocircuito en los puntos de intercambio. Inserte las pilas de acuerdo con los esquemas de polaridad (+/-). Consejos importantes Se recomiendan las pilas alcalinas. No se recomiendan las pilas recargables. Retire las pilas recargables del juguete antes de cargarlas; éstas deben ser cargadas solamente bajo la supervisión de un adulto. No se debe recargar las pilas que no son recargables. Mantenga los componentes sin polvo; no sumerja ni use en agua. No deseche las pilas en el fuego ya que pueden tener fugas, explotar y causar lesiones personales. Retire todas las pilas si el juguete no se usará por mucho tiempo. Cómo insertar y quitar las pilas Insertar 2 pilas AAA (o LR03) tal como se muestra. Tu conjunto de construcción K NEX incluye piezas magnéticas especialmente diseñadas para trabajar con el sistema K NEX. Inspecciona los componentes de las Varillas que se Iluminan antes de cada uso. En caso de encontrar algún daño, no uses ese componente. Sólo pon las Varillas que se Iluminan o las Varillas K'NEX en los enchufes del Módulo de Luz; no pongas otra cosa. Cuida que todos los componentes de las Varillas que se Iluminan y del Módulo de Luz estén secos. Cuando termines, asegúrate de poner el Módulo de Luz en la posición de APAGADO. No dejes el Módulo de Luz encendido cuando no lo estés usando. Un suave ruido como murmullo es normal en el Módulo de Luz. Prueba las luces: Inserte 2 pilas AAA (LR03) en el Módulo de Luz y prueba las luces antes de construir. Enchufa firmemente en el Módulo de Luz las puntas de metal (contactos) de las Varillas que se Iluminan. Mueve el interruptor que ves en el Módulo de Luz a las posiciones de continuo encendido (ON) e intermitente (BLINK). No funcionan las luces? Observa si has puesto pilas nuevas y si están insertadas en la polaridad correcta. Observa si los finales de metal de las Varillas que se Iluminan están completamente enchufados en el Módulo de Luz. (Los finales con puntas de metal deben estar insertados completamente dentro del Módulo de Luz para hacer contacto.) Mueve el interruptor que ves en el Módulo de Luz a las posiciones de continuo encendido (ON) o intermitente (OFF). Si aún así las luces no funcionan, llama a nuestra línea de Servicio al Cliente al KID-KNEX (EE.UU. y Canadá solamente). (Página 3) Consejos básicos de construcción de K'NEX HOLA! Soy tu compañero en la construcción. Si necesitas ayuda... aquí estoy! Búscame para que te guíe mientras eliges modelos que corresponden al nivel de tus capacidades. TODO LISTO, COMIENZA A CONSTRUIR Para comenzar tu modelo, busca el 1 y sigue los números. Cada pieza tiene su propia forma y color. Simplemente mira los dibujos, busca las piezas correspondientes en tu juego y después conéctalas. Mientras construyes, trata de colocar tu modelo en la misma dirección que se muestra en las instrucciones. CONTINÚA Los colores desteñidos muestran que esta sección ya está construida. Conecta las nuevas secciones en los lugares señalados por las flechas. Las nuevas piezas que agregues estarán en colores vivos. CONECTORES Hay conectores azules y plateados con ranuras largas especiales. Se enganchan deslizándose como ves en los dibujos. Conecta estas piezas empujándolas hasta que oigas clic. ESPACIADORES Hay lugares en tu modelo donde tendrás que agregar Espaciadores azules y plateados. Cerciórate de usar el color correcto y cuéntalos con cuidado. VARILLAS FLEXIBLES Una Varilla Flexible es una Varilla que se puede doblar para formar curvas. Serán más fáciles de conectar a tu modelo si primero las doblas hacia atrás y hacia adelante. VARILLAS QUE SE ILUMINAN Las Varillas que se Iluminan tienen dos diferentes puntas. La punta de metal (contactos) debe insertarse firmemente dentro del Módulo de Luz. La otra punta se inserta dentro de los Conectores K NEX. Mientras estés construyendo, asegúrate de usar las puntas correctas. Empuja las puntas de metal de las Varillas que se Iluminan firmemente dentro del Módulo de Luz para poder hacer el contacto. 55
56 DE (Seite 2) Deutsch Halte diese Anleitungen stets griffbereit. Sie enthalten alle wichtigen Sicherheitshinweise. WARNHINWEIS: ERSTICKUNGSGEFAHR - Vorsicht Kleinteile! Nicht für Kinder unter 3 Jahren geeignet. VORSICHT: Haare, Finger, Gesicht und Kleidungsstücke nicht mit beweglichen Teilen in Berührung kommen lassen. Informationen zu den Batterien VORSICHT: Wie alle anderen kleinen Batterien sollten auch die in diesem Spielzeug verwendeten Batterien aus der Reichweite kleiner Kinder, die noch dazu neigen, Kleinteile in den Mund zu stecken, ferngehalten werden. Nach Verschlucken sofort einen Arzt konsultieren. Achte darauf dass die Batterien korrekt eingelegt werden und folge den Anweisungen der Spielzeug- und Batterienfabrikanten. Mische keine alten und neuen Batterien oder alkaline Batterien, Standardbatterien (Kohle-Zink) oder wiederaufladbare Batterien (Nickel-Cadmium). Verwende nur Batterien des gleichen Typs oder des empfohlenen äquivalenten Typs. Leere oder verbrauchte Batterien aus dem Spielzeug entfernen; darauf achten, dass die Pole der Batterie nicht kurzgeschlossen werden. Beim Einlegen der Batterien auf die korrekte Polarität (+/-), wie dargestellt, achten. Wichtige Tipps Alkaline Batterien werden empfohlen. Wiederaufladbare Batterien sind nicht empfohlen. Bei Verwendung von wiederaufladbaren Batterien müssen diese aus dem Spielzeug entfernt werden, bevor sie wieder aufgeladen werden; das Wiederaufladen darf nur unter Aufsicht eines Erwachsenen stattfinden. Nichtwiederaufladbare Batterien dürfen nicht wieder aufgeladen werden. Die Komponenten von Staub freihalten; nicht in Wasser tauchen. Zu entsorgende Batterien nicht ins Feuer werfen; sie können auslaufen oder explodieren und Körperverletzungen verursachen. Wenn das Spielzeug längere Zeit nicht verwendet werden soll, alle Batterien entfernen. Anweisungen zum Einlegen und Entfernen der Batterien 2 AAA (Mignon oder LR03) Batterien gemäß Abbildung einlegen. Dein Bausatz von K NEX enthält magnetische Teile, die speziell für das K NEX-System entwickelt wurden. Die Komponenten für die Leuchtkörper müssen vor jeder Verwendung überprüft werden. Falls sie beschädigt sind, sollten sie nicht verwendet werden. Die Komponenten für die Leuchtkörper müssen vor jeder Verwendung überprüft werden. Falls sie beschädigt sind, sollten sie nicht verwendet werden. Achte darauf, dass nur Stäbe oder Leuchtstäbe von K'NEX in die Fassung des Leuchtmoduls gesteckt werden. Achte darauf, dass die Leuchtstäbe und Komponenten des Leuchtmoduls nicht nass werden. Achte darauf, dass du das Leuchtmodul ausschaltest (Schalter auf OFF), wenn du fertig bist. Schalte das Leuchtmodul aus, wenn du es nicht verwendest. Ein leises Summen ist normal für das Leuchtmodul. So werden die Leuchtkörper überprüft: Lege vor dem Bauen 2 Batterien vom Typ AAA (LR03) in das Leuchtmodul ein und überprüfe, ob die Leuchtkörper aufleuchten. Stecke die Metallenden (Kontakte) der Leuchtstäbe fest in das Leuchtmodul. Lege den Schalter am Leuchtmodul auf ON (Dauerlicht) und BLINK (blinken). Funktionieren die Leuchtkörper nicht? Überprüfe, ob du volle Batterien mit der richtigen Polarität eingesetzt hast. Überprüfe, ob die Metallenden der Leuchtstäbe ganz ins Leuchtmodul eingestecked sind. (Die Enden mit den Metallstiften müssen ganz in das Leuchtmodul eingestecked sein, um Kontakt zu haben.) Lege den Schalter am Leuchtmodul auf ON (Dauerlicht) oder BLINK (blinken). Falls die Leuchtkörper immer noch nicht funktioniert, kannst du innerhalb der USA und Kanadas unsere Hotline anrufen (Tel KID KNEX). (Seite 3) Grundlegende Bauanleitungen für K'NEX HALLO, ich bin dein K'NEX-Bauhelfer. Ich helfe dir jederzeit! Zum Beispiel bei der Auswahl der Modelle mit dem richtigen Schwierigkeitsgrad. AUF DIE PLÄTZE, FERTIG, LOS! DAS BAUEN BEGINNT Um mit dem Bauen deines Modells zu beginnen, suche die Nummer 1 und folge den laufenden Nummern. Jedes Teil hat seine eigene Form und Farbe. Schau dir einfach die Abbildungen an, such die Teile in deinem Bausatz, die so aussehen wie das, was du auf der Abbildung siehst und steck sie ineinander. Versuche, dein Modell beim Zusammenbauen so zu orientieren, dass es in die gleiche Richtung weist, wie es in den Anleitungen beschrieben und gezeigt wird. UND WEITER GEHT'S Blasse Farben weisen darauf hin, dass dieser Streckenabschnitt bereits zusammengebaut ist. Der neue Streckenabschnitt wird dort befestigt, worauf die Pfeile deuten. Die neuen Teile, die du anbaust, sind knallbunt angezeigt. STECKANSCHLÜSSE Blaue und silberfarben Steckanschlüsse haben besonders lange Schlitze. Wie du auf der Abbildung sehen kannst, lassen sie sich ineinander schieben. Achte beim Aneinanderfügen dieser Teile darauf, dass du ein Klickgeräusch hörst. Erst dann sind die Teile fest miteinander verbunden. ABSTANDSSTÜCKE An bestimmten Stellen in deinem Modell musst du Abstandshalter, sogenannte Spacer, einbauen. Diese Abstandshalter sind blau und silberfarben. Achte darauf, dass du die richtige Farbe wählst und dass du die richtige Anzahl davon verwendest. FLEXI-LASCHEN Eine Flexi-Lasche ist eine Lasche, die du zu einer Kurve zurechtbiegen kannst. Sie lassen sich leichter an dein Modell anschließen, wenn du sie mehrmals hin- und herbiegst, um sie flexibler zu machen, bevor du sie das erste Mal benutzt. LEUCHTSTÄBE Die Leuchtstäbe haben zwei verschiedene Enden. Das Ende mit den Metallstiften (Kontakten) muss fest in das Leuchtmodul eingestecked werden. Das andere Ende passt in die Verbindungsstücke von K NEX. Achte darauf, beim Bau die Enden der Leuchtstäbe nicht miteinander zu verwechseln. Schiebe die Metallenden der Leuchtstäbe fest in das Leuchtmodul, um den Kontakt herzustellen. 56
57 NL (Bladzijde 2) Nederlands Bewaar deze aanwijzingen op een gemakkelijk bereikbare plaats. Ze bevatten belangrijke veiligheidsgegevens. WAARSCHUWING: VERSTIKKINGSGEVAAR - Kleine onderdelen. Niet geschikt voor kinderen onder 3 jaar. OPGEPAST: Hou het haar, de vingers, het gezicht en kledij verwijderd van alle bewegende onderdelen. Batterijgegevens OPGEPAST: Zoals het geval is voor alle kleine batterijen, moeten de batterijen voor dit speelgoed buiten het bereik gehouden worden van kleine kinderen die nog steeds voorwerpen in de mond steken. Ingeval een batterij wordt ingeslikt, neem onmiddellijk contact op met een dokter. Verzeker je ervan dat de batterijen er op de juiste manier in te steken en volg steeds de aanduidingen van de speelgoed- en batterijenfabrikanten. Meng geen oude en nieuwe batterijen of alkalische, gewone (koolstof-zink) of herlaadbaarse (nikkel-cadmium) batterijen met mekaar. Uitsluitend batterijen van dezelfde of van een aanbevolen equivalente soort dienen gebruikt te worden. Verwijder steeds uitgeputte of ontladen batterijen uit het produkt; veroorzaak geen kortsluiting van de voedingspolen. Steek de batterijen erin volgens de juiste polariteit (+/-) zoals afgebeeld. Belangrijke tips Alkalische batterijen worden aanbevolen. Herlaadbare batterijen worden niet aanbevolen. Verwijder herlaadbare batterijen uit het speelgoed alvorens ze te herladen; ze moeten slechts herladen worden onder het toezicht van een volwassene. Niet-herlaadbare batterijen mogen niet herladen worden. Bescherm onderdelen tegen stof; dompel ze niet of gebruik ze niet in water. Werp de batterijen niet in het vuur; ze zouden kunnen lekken of ontploffen en verwondingen veroorzaken. Verwijder alle batterijen wanneer het speelgoed gedurende lange tijd niet gebruikt zal worden. Anweisungen zum Einlegen und Entfernen der Batterien 2 AAA (Mignon oder LR03) Batterien gemäß Abbildung einlegen. Je K NEX bouwgeheel bevat magneetstukken die speciaal ontworpen zijn om met je K NEX systeem te werken. Kijk de verlichtende onderdelen na alvorens ze te gebruiken. Ingeval van schade zouden de onderdelen niet mogen gebruikt worden. Steek uitsluitend de verlichtende stangen of de K NEX stangen in de contactdoos van de lichtmodulus. Hou alle verlichtende stangen en lichtmodulusonderdelen droog. Verzeker je ervan van de lichtmodulusschakelaar in de UIT stand te zetten wanneer je gedaan hebt. Laat de lichtmodulus niet aan staan wanneer niet in gebruik. Een licht gezoem is normaal voor de lichtmodulus. Toets de lichten: Steek 2 AAA (LR03) batterijen in de lichtmodulus en toets je lichten alvorens te beginnen met het opbouwen. Steek de metalen uiteinden (contacten) van de verlichtende stangen goed in de lichtmodulus. Zet de lichtmodulusschakelaar op de ononderbroken AAN (ON) en op de KNIPPER (BLINK) stand. Werken de lichten niet? Kijk na of je er nieuwe batterijen met de juiste polariteit ingestoken hebt. Kijk na of de metalen uiteinden van de verlichtende stangen volledig in de lichtmodulus steken. (De uiteinden met de metalen punten moeten volledig in de lichtmodulus aangebracht worden om contact te maken). Zet de lichtmodulusschakelaar op de ononderbroken AAN (ON) of KNIPPER (BLINK) stand. Werken de lichten nog steeds niet, bel je Consumer Hotline op aan KID-KNEX (uitsluitend in de VS en Canada). (Bladzijde 3) Basisstappen voor K'NEX bouwen HOI! Ik ben je K'NEX bouwvriend. Heb je hulp nodig Hier ben ik dan. Kijk naar me uit voor inlichtingen wanneer je modellen kiest met de gepaste moeilijkheidsgraad. KLAAR OM TE BOUWEN Om met je model te beginnen, vind eerst het nummer 1 en volg de nummers. Elk stuk heeft zijn eigen vorm en kleur. Kijk gewoonweg naar de afbeeldingen, vind de overeenstemmende stukken terug in je geheel en maak ze aan mekaar vast. Tracht je model in dezelfde richting te plaatsen als de aanwijzingen terwijl je bouwt en monteert. VERDER NOG De vervaagde kleuren duiden aan dat dit deel reeds is opgebouwd. Gelieve het nieuwe deel vast te koppelen op de plaats aangeduid door de pijlen. De nieuwe delen die je toevoegt verschijnen in volle kleur. KOPPELSTUKKEN Er zijn blauwe en zilveren koppelstukken met speciale lange gleuven. Ze schuiven in mekaar zoals je kunt zien op de afbeeldingen. Duw deze onderdelen in mekaar tot je een klik hoort. TUSSENSTUKKEN In je model zijn er plaatsen waar blauwe en zilveren tussenstukken moeten toegevoegd worden. Verzeker je ervan de juiste kleur te gebruiken en tel ze zorgvuldig. FLEXI-RODS Een Flexi-rod is een stang die kan gebogen worden om bochten of curves te maken. Ze maken zich gemakkelijker vast aan je model wanneer je ze eerst een paar keer heen en weer buigt. VERLICHTENDE STANGEN Er zijn twee verschillende uiteinden aan de lichtstangen. Het uiteinde met de metalen punt (contacten) moeten goed passen in de lichtmodulus. Het andere uiteinde past in de K NEX koppelstukken. Verzeker je ervan de juiste uiteinden van de verlichtende stangen te gebruiken wanneer je opbouwt. Druk de metalen uiteinden van de verlichtende stangen goed in de lichtmodulus om contact te maken. 57
58 IT (Pagina 2) Italiano Tenere queste istruzioni a portata di mano. Contengono importanti informazioni di sicurezza. AVVERTENZA: PERICOLO DI SOFFOCAMENTO - Piccole parti. Non adatto a bambini di età inferiore ai 3 anni. ATTENZIONE: tenere i capelli, le dita, il viso e i vestiti lontano da tutte le parti in movimento. Informazioni sulle batterie ATTENZIONE: Come per tutte le batterie piccole, le batterie utilizzate in questo giocattolo devono essere tenute lontano dalla portata dei bambini piccoli, che mettono ancora oggetti in bocca. Accertarsi di inserire le batterie correttamente e seguire sempre le istruzioni del produttore delle batterie e del giocattolo. Non mettere insieme batterie nuove e vecchie o alcaline, standard (carbonio-zinco) e ricaricabili (nichel-cadmio). Usare sempre batterie raccomandate dello stesso tipo o di tipo equivalente. Rimuovere sempre batterie quasi scariche o completamente scariche dal prodotto; non causare corto circuito ai terminali di alimentazione. Inserire le batterie con la polarità corretta (+/-) come illustrato. Consigli importanti Si raccomanda l'uso di batterie alcaline. Non si raccomanda l'uso di batterie ricaricabili. Rimuovere le batterie ricaricabili dal giocattolo prima della carica: devono essere caricate solo sotto la supervisione di un adulto. Le batterie non ricaricabili non devono essere ricaricate. Mantenere i componenti privi di polvere; non immergere o usare in acqua. Non gettare le batterie nel fuoco, poiché potrebbero perdere o esplodere e causare lesioni. Rimuovere tutte le batterie se il giocattolo non verrà usato per un lungo periodo di tempo. Come inserire e rimuovere le batterie Inserire 2 batterie AAA (o LR03) come illustrato. Il set di costruzione K NEX include pezzi magnetici creati appositamente per funzionare con il sistema K NEX. Controlla tutti i componenti prima dell uso. Nel caso in cui si dovessero osservare danni, i componenti non devono essere usati. Inserisci soltanto aste che si illuminano o aste K'NEX nelle prese del modulo luci. Mantieni tutte le aste che si illuminano e i componenti del modulo luci asciutti. Quando hai finito, accertati di aver messo l interruttore del modulo luci in posizione OFF. Non lasciare il modulo luci acceso quando non lo usi. Il modulo luci produce normalmente un leggero ronzio quando è acceso. Controlla le luci: Inserisci 2 batterie AAA (LR03) nel modulo luci e controlla le luci prima di iniziare la costruzione. Inserisci le estremità di metallo (contatti) delle aste che si illuminano nel modulo luci. Poni l interruttore del modulo luci in posizione ON per luce continua e BLINK per luce intermittente. Le luci non funzionano? Controlla che le batterie siano nuove e che siano inserite con la corretta polarità. Controlla che le estremità di metallo delle aste che si illuminano siano completamente inserite nel modulo luci. (Le estremità con le punte di metallo devono essere inserite completamente nel modulo luci per fare contatto). Poni l interruttore del modulo luci in posizione ON per luce continua o BLINK per luce intermittente. Se le luci ancora non dovessero funzionare, chiama il numero di assistenza ai clienti KID-KNEX (USA e Canada soltanto). (Pagina 3) Istruzioni di base per costruire con K NEX CIAO, sono il tuo amico costruttore K NEX. Troverai modelli per tre livelli di costruzione. Cercami ogni volta che vuoi iniziare a costruire qualcosa e mi troverai con un segnale che mostra la difficoltà di ogni modello. PRONTI, PARTENZA, VIA ALLA COSTRUZIONE Per iniziare il modello, cerca il numero 1 e segui i numeri. Ogni pezzo ha una sua forma e un suo colore. Guarda la figura, trova i pezzi corrispondenti nel set e mettili insieme. Cerca di tenere il modello nella stessa direzione della figura e in tal modo sarà più semplice attaccare i pezzi nei posti giusti. ANDIAMO AVANTI I colori spenti ti dicono che questa sezione è già stata costruita. Dovrai collegare la nuova sezione al punto indicato dalla punta della freccia. Questo pezzo avrà un colore brillante. CONNETTORI È molto importante posizionare i connettori blu e argento in una specifica direzione. Presta molta attenzione alle istruzioni e posiziona i connettori orizzontalmente o verticalmente proprio come illustrato. Spingi con forza fino ad udire un clic. SPAZIATORI Ci sono punti nel tuo modello a cui dovrai aggiungere spaziatori blu e argento. Accertati si contarli attentamente. ASTE FLESSIBILI Un'asta flessibile può essere piegata per fare le curve. Sarà più facile attaccarla al modello se prima la pieghi per alcune volte. ASTE CHE SI ILLUMINANO Le aste che si illuminano hanno due estremità differenti. L estremità con la punta di metallo (contatti), deve essere completamente inserita nel modulo luci. L altra estremità si collega ai connettori K NEX. Fai attenzione ad usare le estremità giuste delle aste che si illuminano durante la costruzione. Inserisci le estremità di metallo delle aste che si illuminano nel modulo luci per fare contatto. 58
59 PT (Página 2) Português Mantenha estas instruções num local de fácil acesso, pois contêm informações importantes de segurança. AVISO: PERIGO DE SUFOCAÇÃO - Peças pequenas. Não se destina a crianças com menos de 3 anos de idade. CUIDADO: Mantém o cabelo, os dedos, a cara e a roupa afastados de todas as peças móveis. Informações sobre as pilhas CUIDADO: Como acontece com toda as pilhas pequenas, as pilhas usadas neste brinquedo devem ser mantidas fora do alcance de crianças pequenas, que estejam ainda em idade de pôr objectos na boca. No caso destas pilhas terem sido engolidas, consulte imediatamente um médico. Certifique-se de que introduz as pilhas correctamente e siga sempre as instruções do fabricante da bateria e do brinquedo. Não combine pilhas usadas com pilhas novas, pilhas alcalinas, padrão (carbonozinco) ou pilhas recarregáveis (níquel-cádmio). Deverão ser usadas apenas pilhas do mesmo tipo ou equivalentes ao tipo recomendado. Retire sempre as pilhas fracas ou gastas do produto; não provoque um curtocircuito nos terminais de alimentação. Introduza as pilhas com a polaridade correcta (+/-), conforme se mostra. Conselhos importantes Recomenda se o uso de pilhas alcalinas. Não se recomenda o uso de pilhas recarregáveis. Retire as pilhas recarregáveis do brinquedo antes de as carregar; estas pilhas devem ser recarregadas apenas sob vigilância de adultos. As pilhas não recarregáveis não devem ser carregadas. Mantenha os componentes livres de poeiras; não mergulhe em água nem use água. Não elimine as pilhas queimando-as; estas podem apresentar fugas ou explodir causando lesões. Retire todas as pilhas do brinquedo se não tencionar usá-lo durante um longo período de tempo. Como inserir e remover as pilhas Introduza 2 pilhas AAA (ou LR03), conforme se mostra. O teu Jogo de Construção K NEX inclui peças magnéticas especialmente concebidas para adaptação ao sistema K NEX. Inspecciona os componentes de Iluminação antes de cada utilização. Os componentes não deverão ser utilizados no caso de se observarem danos. Não introduzas nada nas tomadas do Módulo da Luz excepto as Hastes de Iluminação ou as Hastes K NEX. Mantém todos os componentes das Hastes de Iluminação e do Módulo da Luz secos. Certifica-te de que desligas o interruptor (OFF) da Módulo da Luz quando terminares. Não deixes o Módulo da Luz ligado quando não estiver a ser usado. O Módulo da Luz emite um ligeiro som sussurrante, o que é normal. Verifica a eficiência das Luzes: Introduz 2 pilhas AAA (LR03) no Módulo da Luz e testa as luzes antes de iniciares a construção. Encaixa as extremidades de metal (contactos), das Hastes de Iluminação, firmemente no Módulo da Luz Coloca o interruptor do Módulo da Luz na posição contínua de ON (LIGADO) e de BLINK (INTERMITENTE). As luzes não funcionam? Verifica se as pilhas são novas e se encontram instaladas com a polaridade correcta. Verifica se as extremidades de metal das Hastes de Iluminação se encontram completamente introduzidas no Módulo da Luz. (As extremidades com as pontas de metal têm de estar totalmente introduzidas no Módulo da Luz para fazer contacto). Coloca o interruptor do Módulo da Luz na posição contínua de ON (LIGADO) ou de BLINK (INTERMITENTE). Se mesmo assim as luzes não funcionarem, contacta a Linha Directa de Atendimento ao Consumidor através do número KID-KNEX (apenas nos EUA e Canadá). (Página 3) Pontos básicos para a construção K NEX OLÁ! Eu sou o teu companheiro que te vai ajudar a montar o teu K NEX. Encontrarás modelos destinados a três diferentes níveis de dificuldade de construção. Procura-me antes de começares a montar cada construção; eu estarei segurando num letreiro para te mostrar qual o grau de dificuldade que apresenta cada modelo. ESTÁS PRONTO? COMEÇA POIS A CONSTRUIR Para começar o teu modelo, procura o 1 e segue os números. Cada peça tem a sua própria forma definida e cor. Basta simplesmente olhares para a ilustração, procurar as peças do teu jogo correspondentes às que estás a ver e, em seguida, conectar umas nas outras. Enquanto estás a montar as peças, tenta manter o teu modelo na mesma direcção, conforme mostrado na ilustração, para assim ligares as peças correctamente. CONTINUANDO As cores desbotadas indicam que esta secção já está montada. Passarás então a fazer a conexão da nova secção no local indicado pelas setas. Esta peça terá uma cor viva. CONECTORES É muito importante que posiciones os conectores azuis e cor de prateados numa direcção específica. Presta muita atenção às instruções e coloca estes conectores horizontal ou verticalmente, exactamente conforme se mostra nas ilustrações. Junta as partes simultaneamente e com firmeza até ouvires um estalido. ESPAÇADORES Existirão certos pontos no teu modelo que necessitam a colocação de espaçadores azuis e prateados. Assegura-te que os contas cuidadosamente. VARETAS FLEXÍVEIS Uma vareta flexível é uma vareta que podes dobrar para formar curvas. Para montares no teu modelo, será mais fácil se dobrares primeiro a vareta para trás e para a frente. HASTES DE ILUMINAÇÃO Existem duas extremidades diferentes nas Hastes de Iluminação. A extremidade que apresenta a ponta em metal (contactos), tem que encaixar firmemente no Módulo da Luz. A outra extremidade encaixa nos Conectores K NEX. Durante a construção, certifica-te de que utilizas as extremidades correctas das Hastes de Iluminação. Empurra as extremidades metálicas das Hastes de Iluminação firmemente para dentro do Módulo da Luz para fazer contacto. 59
60
EN CAUTION: ATTENZIONE: PT CUIDADO: Important Tips: ATTENTION : DE VORSICHT: CAUTION: Sugestões Importantes: ES PRECAUCIÓN: Wichtige Tipps:
 EN CAUTION: To Avoid Battery Leakage - Be sure to insert the batteries correctly and always follow the toy and battery manufacturers instructions. Do not mix old and new batteries or alkaline, standard
Capa de alimentação CP12
 Manual do usuário Capa de alimentação CP12 Índice Introdução...3 O carregamento facilitado...3 Especificações...3 Usando a capa de alimentação...4 Carregando seu celular...4 Informações legais...6 2 Introdução
Manual do usuário. MHL to HDMI Adapter IM750
 Manual do usuário MHL to HDMI Adapter IM750 Índice Introdução...3 Visão geral do MHL to HDMI Adapter...3 Introdução...4 Smart Connect...4 Como atualizar o Smart Connect...4 Utilização do MHL to HDMI Adapter...5
Building Basics. Tyrannosaurus...10 Ferris Wheel...12 Catamaran...14 Excavator...17 Building Ideas...20
 Ice Cream Cone/Fish...4 Coconut Tree...5 Plane...6 Skier...7 Rocket Ship...8 AMERICAN MADE PARTS (EN) CONTENTS Parts List Tyrannosaurus...0 Ferris Wheel... Catamaran...4 Excavator...7 Building Ideas...0
Building Basics. CONTENTS Eggbeater...10 Jet...12 Dragster...14 Dune Buggy...17 Dump Truck...20 Building Ideas...23.
 Moose/Snowboarder... Tow Truck/Squirrel...5 Butterfly/Weightlifter...6 Submarine...7 Hammerhead Shark...8 Swing Ride...9 AMERICAN MADE PARTS CONTENTS Eggbeater...0 Jet... Dragster... Dune Buggy...7 Dump
Building Basics CONTENTS. Fish...4 Wind Surfer...5 Hang Glider...6 High Diver...7 Jellyfish...8 Anchor...9 Inner Tube...10 Swordfish...
 Fish...4 Wind Surfer...5 Hang Glider...6 High Diver...7 Jellyfish...8 Anchor...9 Inner Tube...0 Swordfish... AMERICAN MADE PARTS CONTENTS Picnic Basket...4 Turtle...6 Sea Plane...0 Fishing Boat... Lifeguard
Manual do usuário. LiveDock multimedia station DK10
 Manual do usuário LiveDock multimedia station DK10 Índice Visão geral da LiveDock multimedia station... 4 Visão geral da parte traseira...5 Visão geral da parte inferior... 5 Introdução... 6 Para carregar...7
SmartDock for Xperia ion Manual do usuário
 SmartDock for Xperia ion Manual do usuário Índice Introdução...3 Visão geral do SmartDock...3 Carregando o SmartDock...3 Introdução...5 LiveWare manager...5 Como atualizar o LiveWare manager...5 Como selecionar
Presenter SNP6000. Register your product and get support at PT Manual do utilizador
 Register your product and get support at www.philips.com/welcome Presenter SNP6000 PT Manual do utilizador 1 a b c d e 2 3 4 Federal Communication Commission Interference Statement This equipment has been
Manual do usuário. Xperia P TV Dock DK21
 Manual do usuário Xperia P TV Dock DK21 Índice Introdução...3 Visão geral da parte traseira do TV Dock...3 Introdução...4 Gerenciador do LiveWare...4 Como atualizar o Gerenciador do LiveWare...4 Utilização
BUILDING BASICS BATTERY INFORMATION
 Parts List Before you start building, be sure to compare the parts in your set with the parts list here. If anything is missing, call or write to us using the information on the back cover. We are here
Building Basics. Parts List
 Building Basics Start Building To begin your model, find the and follow the numbers. Each piece has its own shape and color. Just look at the pictures, find the pieces in your set that match and then connect
Magnetic Charging Dock
 Manual do usuário Magnetic Charging Dock Índice Introdução...3 Carregamento facilitado...3 Utilizando a Plataforma de carregamento magnética...4 Utilizando os apoios...4 Carregando seu celular...4 Informações
Building Ideas! Idees de 35Construction! * Building Worlds Kids Love. 350pc/pza. Super Value Tub Conteneur la Valeur Super.
 35 Building Ideas! Idees de 35Construction! * Building Worlds Kids Love 350 350pc/pza Super Value Tub Conteneur la Valeur Super pc/pza 7 + 16490 Start Building To begin your model, find the and follow
Manual do usuário. Bluetooth Keyboard BKB10
 Manual do usuário Bluetooth Keyboard BKB10 Índice Noções básicas...3 Visão geral...3 Carregando o teclado...4 Ligando o teclado...5 Configurando o teclado...6 Suporte na Web...7 Informações legais...8
FOR PARENTS & KIDS. WARNING: CHOKING HAZARD - Small parts. Not for children under 3 years.
 IMPORTANT STUFF FOR PARENTS & KIDS Keep these instructions in a handy location. They contain important safety information. Read all warnings and instructions before you start to build and operate the model.
ROBO-JAWS BUILDING SET JEU DE CONSTRUCTION. 2 X Not included MOTOR MOTEUR. Building Worlds Kids Love MOTOR BUILDS CONSTRUIRE **
 Building Worlds Kids Love MOTOR ROBO-JAWS BUILDING SET JEU DE CONSTRUCTION MOTOR MOTEUR BUILDS À 3À CONSTRUIRE ** 7 + 34406 X Not included AA (LR6) Pas inclus No se incluyen Nicht enthalten Non incluse
IMPORTANT STUFF FOR PARENTS AND KIDS INFORMATIONS IMPORTANTES POUR LES PARENTS ET LES ENFANTS CONTENUS CONTENTS. Go to for instruction updates
 (EN) CONTENTS K NEX Building Basics... 4 Parts List... 5 Amazin 8 Roller Coaster... 6 Track Building Tips... 16 Tips and Troubleshooting... 29 (FR) CONTENUS K NEX Bases de la Construction... 4 Liste des
1 # DE SW Hoth_v13.indd 1 9/17/13 11:41 AM
 1 # 80 980 DE SW Hoth_v13.indd 1 9/17/13 11:41 AM x2 x6 x2 x30 x30 x6 2 DE SW Hoth_v13.indd 2 9/17/13 11:41 AM x2 x2 3 DE SW Hoth_v13.indd 3 9/17/13 11:41 AM ± 2 cm 4 DE SW Hoth_v13.indd 4 9/17/13 11:41
INFORMATIONS IMPORTANTES POUR LES PARENTS ET LES ENFANTS IMPORTANT STUFF FOR PARENTS AND KIDS CONTENUS CONTENTS. Go to for instruction updates
 (EN) CONTENTS K NEX Building Basics... 4 Parts List... 5 Building Idea... 5 Raptor s Revenge Roller Coaster... 6 Track Building Tips.... 21 Tips and Troubleshooting.... 41 (FR) CONTENUS K NEX Bases de
MOTOR * Building Worlds Kids Love REVOLUTION FERRIS WHEEL BUILDING SET RÉVOLUTION GRANDE ROUE JEU DE CONSTRUCTION. * Motore
 Building Worlds Kids Love REVOLUTION FERRIS WHEEL BUILDING SET RÉVOLUTION GRANDE ROUE JEU DE CONSTRUCTION EEL WH FERRIS 7+ 540 LR6 ) A ( A X MOTOR * MOTEUR Not included Pas inclus No se incluyen Nicht
CONTENTS CONTENIDOS CONTENUS. Important stuff for Parents & Kids. Información importante para los Padres y Niños
 ES EN CONTENTS K NEX Building Basics................ 4 Parts List.......................... 5 Building Idea........................ 5 SUPER CYCLONE COASTER.......... 6 Track Building Tips....................
7 + 2 X Not included MOTOR MOTEUR * REVVIN RACECAR 2-IN-1 BUILDING SET VOITURE DE COURSE MONTÉE EN RÉGIME 2 EN 1 JEU DE CONSTRUCTION BUILDS
 Building Worlds Kids Love MOTOR MOTEUR * REVVIN RACECAR -IN- BUILDING SET VOITURE DE COURSE MONTÉE EN RÉGIME EN JEU DE CONSTRUCTION 7 + BUILDS À CONSTRUIRE ** 7 + 6005 X Not included AA (LR6) Pas inclus
SkillGuide. Guia do usuário. Português
 SkillGuide Guia do usuário Português SkillGuide O SkillGuide é um dispositivo de feedback para oferecer comentários em tempo real e cumulativo do desempenho da RCP. www.laerdal.com.br Itens incluídos SkillGuide
SCREAMING SIDESHOW ROLLER COASTER BUILDING SET SIDESHOW CRI MONTAGNES RUSSES JEU DE CONSTRUCTION X Not included MOTOR MOTEUR *
 Building Worlds Kids Love SCREAMING SIDESHOW ROLLER COASTER BUILDING SET SIDESHOW CRI MONTAGNES RUSSES JEU DE CONSTRUCTION 7 + X Not included AA (LR6) Pas inclus No se incluyen Nicht enthalten Non incluse
AVERTISSEMENT : RISQUE D ÉTOUFFEMENT
 (EN) English WARNING: CHOKING HAZARD Small parts. Not for children under 3 years. CAUTION: Keep hands, face, hair, clothing and Power Cord away from all moving parts. Caution: Do not trip on cord. WARNING:
VORSICHT: NL OPGEPAST:
 EN CAUTION: To Avoid Battery Leakage - Be sure to insert the batteries correctly and always follow the toy and battery manufacturers instructions. Do not mix old and new batteries or alkaline, standard
INFORMATIONS IMPORTANTES POUR LES PARENTS ET LES ENFANTS IMPORTANT STUFF FOR PARENTS AND KIDS. Go to for instruction updates
 IMPORTANT STUFF FOR PARENTS AND KIDS Keep these instructions in a handy location. They contain important safety information. Read all warnings and instructions before you start to build and operate the
Manual do usuário VH700 VH700VH700
 Manual do usuário VH700 VH700VH700 Índice 1... 3 2... 4 Visão geral do fone de ouvido... 4 Introdução...4 Carregamento...4 Ligando e desligando...4 Pareando o fone de ouvido... 5 Vários pontos... 5 Chamando...6
OVER 7 ft TALL! PLUS DE 2 m DE HAUT! ** MOTORIZED LAUNCHER ** LANCEUR MOTORISE SKY SPRINTER ROLLER COASTER BUILDING SET SPRINTER DU CEIL
 Building Worlds Kids Love MOTORIZED LAUNCHER ** LANCEUR MOTORISE SKY SPRINTER ROLLER COASTER BUILDING SET SPRINTER DU CEIL 3X C 52478 (LR1 4) MONTAGNES RUSSES JEU DE CONSTRUCTION Not included Pas inclus
Fone de ouvido Bluetooth mono
 Manual do usuário Fone de ouvido Bluetooth mono Índice Visão geral da função...3 Visão geral dos acessórios...4 Noções básicas...5 Carregamento da bateria...5 Ligando e desligando o fone de ouvido...5
Keep this important information for future reference
 MECHA CLAW Roller Coaster Building Set GRIFFE DE MECHA Montagnes Russes Jeu de construction.5 ft 79 cm [] AA (LR6) AA (LR6) Not Included/Pas Inclus[] Ages 7-447 (EN) English Keep this important information
2x AM03773F. 4x AM03773KJ. 1x AM03772BBG. 2x AM03772KJ. 2x AM03772F. 3x AM09493BBG. 2x AM09493F. 2x AM09493BDG. 2x AM09493BMG.
 AM01480YG AM01480BBG AM09493F AM09493YG 5x AM09493KJ AM09493BBG AM09493BDG AM09493BMG AM03772BBG AM03772KJ AM03772F AM03773F AM03773KJ AM01113F AM03328AGZ AM03328F AM03328BDG AM01140F M12251F AM09105F
Important Stuff for Parents and Kids
 (EN) English CONTENTS K NEX Building Basics... 6 Parts List... 7 Star Shooter Roller Coaster... 8 Tips and Troubleshooting... 30 Keep this important information for future reference Important Stuff for
9-14. WARNING: CHOKING HAZARD Small parts. Not for children under 3 years.
 KRAKEN S REVENGE Roller Coaster Building Set LA VENGEANCE mc DE KRAKEN Montagnes Russes Jeu de construction [] AA (LR6) AA (LR6) Not Included/Pas Inclus [] WARNING: CHOKING HAZARD Small parts. Not for
ROBO-STING. Building Worlds Kids Love BUILDING SET JEU DE CONSTRUCTION
 Building Worlds Kids Love ROBO-STING BUILDING SET JEU DE CONSTRUCTION 7+ 13244 LR6 ) A ( A 2X Not included Pas inclus No se incluyen Nicht enthalten Non incluse Não estão incluídas Niet inberepen Building
Important Stuff for Parents and Kids
 (EN) English CONTENTS K NEX Building Basics... 6 Parts List... 7 Amazin 8 Roller Coaster... 8 Tips and Troubleshooting... 30 Keep this important information for future reference Important Stuff for Parents
Manual do usuário. Style Cover Window SCR26
 Manual do usuário Style Cover Window SCR26 Índice Introdução...3 Introdução...3 Visão geral...3 Carregar...3 Configuração de um toque...4 Aprendizagem dos conceitos básicos...5 Interagir com a janela...5
CAUTION: Important Tips
 CONTENTS STEEL SCORPION COASTER....... 4 Track Building Tips................. 25 Tips & Troubleshooting............. 42 DOUBLE DIP COASTER........... 43 ES EN FR CONTENIDOS STEEL SCORPION COASTER.......
Guia de Instalação Rápida TE100-PCBUSR
 Guia de Instalação Rápida TE100-PCBUSR Table Índice of Contents Português... 1. Antes de Iniciar... 2. Como Instalar... 1 1 2 Troubleshooting... 3 Version 07.27.2007 1. Antes de Iniciar Conteúdo da Embalagem
Education MOTOR MOTEUR* 2 X. Experiments Expériences
 Education STEM EXPLORATIONS: SWING RIDE BUILDING SET EXPLORATION STEM : SE BALANCER MONTER JEU DE CONSTRUCTION S SCIENCE LA SCIENCE T TECHNOLOGY TECHNOLOGIE E ENGINEERING INGÉNIERIE M MATH MATHÉMATIQUES
1. DESCARGA DEL SOFTWARE DE BLUETOOTH EN EL SMARTPHONE
 MANUAL DEL USUARIO PARA BLUETOOTH ES 1. DESCARGA DEL SOFTWARE DE BLUETOOTH EN EL SMARTPHONE Entre en Apple Store o Google Play y busque: - BH Premium - BH Lite BH Premium BH Lite 2. FIJACIÓN DEL MÓDULO
IAN 93902 1/22. Washing machine cabinet. Mobile lavatrice Istruzioni per il montaggio. Armario saledizo de máquina lavadora Instrucciones de montaje
 Washing machine cabinet ES PT DE AT CH Armario saledizo de máquina lavadora Instrucciones de montaje Armário para montar por cima da máquina de lavar a roupa Instruções de montagem Waschmaschinenüberbauschrank
BUILD AND BLAST WARNING:
 TM Building Worlds Kids Love FLASH FIRE MOTORIZED BLASTER BUILDING SET MOTORISÉ DE LA FLASH FIRE BLASTER JEU DE CONSTRUCTION BUILD AND BLAST FIRES UP TO 75 ft! TIRE Á PLUS DE m!** 0 - - SHOT MOTORIZED
P C I - E A D A P T E R W I R E L E S S 1 5 0 N 1 5 0 M B P S M A N U A L N I - 7 0 7 5 2 9
 P C I - E A D A P T E R W I R E L E S S 1 5 0 N 1 5 0 M B P S M A N U A L N I - 7 0 7 5 2 9 P O R T U G U E S - C O N T E Ú D O D A E M B A L A G E M 4 - E S P E C I F I C A Ç Õ E S T É C N I C A S 4 -
Instruções de Montagem Assembly instructions
 Instruções de Montagem Assembly instructions Material que você precisará Material you'll need 1. Cola branca White glue 2. Canetas ou lápis coloridos Color markers or pencils Dicas úteis Useful tips Leia
VH110 Manual do usuário
 VH110 Manual do usuário Índice Visão geral do fone de ouvido...5 Introdução...6 Carregamento...7 Ligando e desligando...8 Pareando o fone de ouvido...9 Pareie o fone de ouvido com um telefone...9 Colocando
9 + WILD WHIPLASH ROLLER COASTER BUILDING SET COUP DE FOUET SAUVAGE MONTAGNES RUSSES JEU DE CONSTRUCTION MOTOR MOTEUR * 2 X Not included
 Building Worlds Kids Love WILD WHIPLASH ROLLER COASTER BUILDING SET COUP DE FOUET SAUVAGE MONTAGNES RUSSES JEU DE CONSTRUCTION 9 + X Not included AA (LR6) Pas inclus No se incluyen Nicht enthalten Non
Start Here Comece aqui Mise en route Empezar aquí
 Start Here Comece aqui Mise en route Empezar aquí 1 Install the software (required for full functionality). Instale o software (necessário para funcionalidade total). Installez le logiciel (requis pour
1. Product Name. 2. Product Code. 3. Colour. 4. Brief Description. 5. Contents. Switch Adapted Clip On Fan. Colours may vary
 1. Product Name Switch Adapted Clip On Fan 2. Product Code 20489 3. Colour Colours may vary 4. Brief Description Connects to your switch for switch activation. 5. Contents Fan with cable with 3.5mm jack
Fone de ouvido Bluetooth estéreo
 Manual do usuário Fone de ouvido Bluetooth estéreo Índice Introdução...3 Visão geral dos acessórios...3 Noções básicas...4 Chamando...6 Como ouvir música...6 Tecnologia multiponto...7 Solução de problemas...7
Kodak AUTO/ 1700 AUTO Camera
 Kodak 1600 AUTO/ 1700 AUTO Camera 1 Film Status Indicator (FSI) A highlighted indicator advances from one symbol to another to identify the status of the film inside the cassette. Unexposed 4 3 1 Processed
3x AM15494E. 6x M1346BLG. 3x AM15500F. 2x AM04219BLG. 1x AM09825BLG. 1x AM09186BLG. 1x AM09826BLG. 1x AM09187BLG. 8x AM07475BLG.
 AS032491 AM01086BDG 6x AM01086BLG 4x AM07629BDG AM09013BYE 4x AM09013BDG 6x AM09013BLG AM01087BDG 6x AM01087BLG AM01313BDG 4x AM01313BLG AM09033BYE 10x AM09033BDG 6x AM09033BLG 5x AM01323BDG AM10273F 3x
START HERE PTB: COMECE AQUI FRA: MISE EN ROUTE ITA: PER COMINCIARE PTG: INICIAR AQUI ESP: EMPEZAR AQUÍ
 START HERE PTB: COMECE AQUI FRA: MISE EN ROUTE ITA: PER COMINCIARE PTG: INICIAR AQUI ESP: EMPEZAR AQUÍ Install the software (required for full webcam functionality). Instale o software (necessário para
BUILD AND BLAST WARNING:
 TM Building Worlds Kids Love MEGA BOOM BUILDING SET MÉGA- BOUM JEU DE CONSTRUCTION BUILD AND BLAST FIRES UP TO 75 ft! TIRE Á PLUS DE 22 m!** BUILDS CONSTRUIT LES*6 8 + 47527 WARNING: Do not aim at eyes
1. Product Name. 2. Product Code. 3. Colour. 4. Brief Description. 5. Contents. 6. Snoezelen Stimulations. Switch Adapted Fibre Optic Lamp
 1. Product Name Switch Adapted Fibre Optic Lamp 2. Product Code 20709 3. Colour Clear base; white fibres 4. Brief Description Activate your switch to activate the light through the fibres and in the base.
DONKEY 19689. 2. Using a small cross-head (positive) screwdriver, undo the screw that secures the battery compartment door. Copyright ROMPA Ltd
 screwdriver, undo the screw that secures the battery compartment door. Copyright ROMPA Ltd") DONKEY 19689 CONTENTS 1 x switch-adapted Donkey This product requires, but does not include, 3 AA batteries and a switch See www.rompa.com for a comprehensive range of switches BEFORE USE 1. Locate the
DONKEY 19689 CONTENTS 1 x switch-adapted Donkey This product requires, but does not include, 3 AA batteries and a switch See www.rompa.com for a comprehensive range of switches BEFORE USE 1. Locate the
TWILIGHT TURTLE 20491
 Page 1 of 6 TWILIGHT TURTLE 20491 CONTENTS Your Twilight Turtle is supplied in one box containing: 1 x Twilight Turtle 1 x Star Guide (small booklet) Please note: This product requires, and includes, 3
-UTILITÁRIO DE SOFTWARE PARA O ADAPTADOR USB 7
 U S B A D A P T E R W I R E L E S S 3 0 0 N 1 5 0 M B P S M A N U A L N I - 7 0 7 5 2 2 P O R T U G U E S - C O N T E Ú D O D A E M B A L A G E M 4 - E S P E C I F I C A Ç Õ E S T É C N I C A S 4 - G A
U S B A D A P T E R W I R E L E S S 3 0 0 N 1 5 0 M B P S. M a n u A l N I - 7 0 7 5 3 5
 U S B A D A P T E R W I R E L E S S 3 0 0 N 1 5 0 M B P S M a n u A l N I - 7 0 7 5 3 5 P O R T U G U E S - C o n t e ú d o d a e m b a l a g e m 4 - E s p e c i f i c a ç õ e s t é c n i c a s 4 - G a
SLINGSHOT LAUNCHER PROPULSEUR* LANCE-PIERRE. Building Worlds Kids Love INFINITE JOURNEY ROLLER COASTER BUILDING SET
 Building Worlds Kids Love INFINITE JOURNEY ROLLER COASTER BUILDING SET ROLLERR COASTE VOYAGE INFINI MONTAGNES RUSSES JEU DE CONSTRUCTION 7+ SLINGSHOT LAUNCHER PROPULSEUR* LANCE-PIERRE 5407 * Lanzador Tirabete
As 100 melhores piadas de todos os tempos (Portuguese Edition)
") As 100 melhores piadas de todos os tempos (Portuguese Edition) Click here if your download doesn"t start automatically As 100 melhores piadas de todos os tempos (Portuguese Edition) As 100 melhores piadas
As 100 melhores piadas de todos os tempos (Portuguese Edition) Click here if your download doesn"t start automatically As 100 melhores piadas de todos os tempos (Portuguese Edition) As 100 melhores piadas
Radio / CD. Honolulu CD50. Installation instructions Notice de montage Instrucciones de instalación Instruções de de montagem
 Radio / D Honolulu D50 Installation instructions Notice de montage Instrucciones de instalación Instruções de de montagem Installation instructions Notice de montage Instrucciones de instalación Instruções
LIGHT PANEL CONTENTS Light Panel Power supply Fixtures (brackets, screws)
") Page 1 of 8 LIGHT PANEL 20367 CONTENTS Light Panel Power supply Fixtures (brackets, screws) ABOUT THIS PRODUCT The Light Panel may be used on a table top as a free-standing object, or mounted either horizontally
Page 1 of 8 LIGHT PANEL 20367 CONTENTS Light Panel Power supply Fixtures (brackets, screws) ABOUT THIS PRODUCT The Light Panel may be used on a table top as a free-standing object, or mounted either horizontally
Quick user guide. (réf )
") Quick user guide (réf. 34889) Download the app «mobile eye door +» How to SETUP, for the first time, your Chacon IP VDP Connect the cables with the same color to each other, of both units. Connect the
Quick user guide (réf. 34889) Download the app «mobile eye door +» How to SETUP, for the first time, your Chacon IP VDP Connect the cables with the same color to each other, of both units. Connect the
Swingline Stack-and-Shred 100X Shredder Auto+ Technology. Déchiqueteuse Swingline Stack-and-Shred 100X à technologie Auto+
 Swingline Stack-and-Shred 100X Shredder Auto+ Technology To register this product go to www.swingline.com Pour enregistrer ce produit allez sur www.swingline.com Para registrar este producto vaís en www.swingline.com
Guia de Instalação Rápida TBW-101UB TBW-102UB
 Guia de Instalação Rápida TBW-101UB TBW-102UB Índice Português... 1. Antes de Iniciar... 2. Como instalar... 3. Usando o Adaptador Bluetooth... 1 1 2 4 Troubleshooting... 5 (Version 05.30.2006) 1. Antes
BUILDING BASICS BASES DE LA CONSTRUCTION
 (EN) English Keep this important information for future reference WARNING: CHOKING HAZARD Small parts. Not for children under 3 years. CAUTION: Keep hands, face, hair and clothing away from all moving
Manual do usuário. Style Cover Window SCR26
 Manual do usuário Style Cover Window SCR26 Índice Introdução... 3 Introdução...3 Visão geral...3 Configuração de um toque...3 Carregar...4 Aprendizagem dos conceitos básicos...6 Interagir com a janela...6
3 0 0 m b p s M A N U A L E N I - 7 0 7 5 4 7
 n e t w o r k r e p e a t e r w i r e l e s s 3 0 0 n 3 0 0 m b p s M A N U A L E N I - 7 0 7 5 4 7 P O R T U G U E S n e t w o r k r e p e a t e r w i r e l e s s 3 0 0 n 3 0 0 m b p s Em primeiro lugar,
Copyright ROMPA Ltd SNORING PIG 20134
 SNORING PIG 20134 CONTENTS 1 x Snoring Pig with cable attached Please note: Snoring Pig requires, but does not include 3 x AA batteries. BEFORE USE 1. Lay the pig down so that his head is facing to the
Guia de Instalação Rápida TEW-432BRP
 Guia de Instalação Rápida TEW-432BRP Table Índice of Contents Português... 1. Antes de Iniciar... 2. Instalar Roteador... 3. Bônus... Troubleshooting... 1 1 2 4 5 Version 08.07.2006 1. Antes de Iniciar
Radio / Cassette. Long Beach C31. Installation instructions Notice de montage Instrucciones de instalación Instruções de montagem
 Radio / assette Long each 3 Installation instructions Notice de montage Instrucciones de instalación Instruções de montagem Installation instructions Notice de montage Instrucciones de instalación Instruções
Quickstart Guide. WiPry-Pro Combo
 Quickstart Guide CONNECT TO APPLE DEVICE ACCESSORY EXTERNAL TRIGGER 2.4-2.5GHz ANTENNA WARNING DO NOT APPLY MORE THAN 20DBM TO THE ANTENNA WITHOUT EXTERNAL ATTENUATION WARNING DO NOT APPLY MORE THAN -0.5/+3.8V
DIBELS TM. Portuguese Translations of Administration Directions
 DIBELS TM Portuguese Translations of Administration Directions Note: These translations can be used with students having limited English proficiency and who would be able to understand the DIBELS tasks
Manual do usuário. Bluetooth Speaker BSP10
 Manual do usuário Bluetooth Speaker BSP10 Índice Introdução...3 Visão geral da função...3 Visão geral do hardware...3 Status da luz de notificação...3 Carregar...4 Carregar seu acessório...4 Introdução...5
8-18. WARNING: Do not aim at eyes or face. TO AVOID INJURY: Use only foam darts designed for this product. Do not modify foam dart or Blaster Chamber.
 BUILD AND BLAST BARRACUDA ROTOSHOT BLASTER Building Set BLASTER Á TIR ROTATIF BARRACUDA Jeu de construction BUILDS 5MODÈLES* Ages 8-8 4703 WARNING: Do not aim at eyes or face. TO AVOID INJURY: Use only
Rato laser para jogos ASUS GX900
 Rato laser para jogos ASUS GX900 Manual do Utilizador PG5887 Primeira edição(v1) Agosto 20 Copyright 20 ASUSTeK COMPUTER INC. Reservados todos os direitos. Nenhuma parte deste manual, incluindo os produtos
BUILD AND BLAST WARNING:
 TM Building Worlds Kids Love K-X ROTOSHOT BLASTER BUILDING SET JEU DE CONSTRUCTION BUILD AND BLAST FIRES UP TO 7 ft! TIRE Á PLUS DE m! ** -SHOT ROTO CHAMBER ROTO CHAMBRE A -TIR BUILDS CONSTRUIT LES* 8
LUNAR LAUNCH. Roller Coaster Building Set LANCEMENT LUNAIR. Montagnes Russes Jeu de construction. 44 in 114 cm. Ages 9-14
 LUNAR LAUNCH Roller Coaster Building Set LANCEMENT LUNAIR Montagnes Russes Jeu de construction 44 in 4 cm STOMP LAUNCHER Ages 9-4 545 (EN) English Keep this important information for future reference (FR)
EN-9235TX-32 Manual de instalação rápida
 EN-9235TX-32 Manual de instalação rápida 09-2012 / v2.0 1 COPYRIGHT Copyright Edimax Technology Co., Ltd. all rights reserved. No part of this publication may be reproduced, transmitted, transcribed, stored
Anybus-CC Modules. Módulos Anybus-CC. Módulos Anybus-CC. Installation, Configuration Guía de Instalación, Guia de Instalação,
 Anybus-CC Modules Módulos Anybus-CC Módulos Anybus-CC Installation, Configuration Guía de Instalación, Guia de Instalação, and Operation Guide Configuración y Operación Configuração e Operação Anybus-CC
Fone de ouvido Bluetooth estéreo SBH80
 Manual do usuário Fone de ouvido Bluetooth estéreo SBH80 Índice Introdução...3 Visão geral da função...3 Visão geral do hardware...3 Noções básicas...5 Carregamento da bateria...5 Status da bateria...5
Guia de Instalação Rápida TFM-560X H/W : YO
 Guia de Instalação Rápida TFM-560X H/W : YO Table Índice of Contents... 1. Antes de Iniciar... 2. Como instalar... 1 1 2 Troubleshooting... 7 Version 08.04.2008 1. Antes de Iniciar Conteúdo da Embalagem
1. DESCARGA DEL SOFTWARE DE BLUETOOTH EN EL SMARTPHONE
 M AN UAL DEL USUARIO PARA BLUETOOT H ES 1. DESCARGA DEL SOFTWARE DE BLUETOOTH EN EL SMARTPHONE Entre en Apple Store o Google Play y busque: - BH Premium BH Premium 2. FIJACIÓN DEL MÓDULO BLUETOOTH Fije
Guia de Instalação Rápida TMR-121EC H/W: V1.0R
 Guia de Instalação Rápida TMR-121EC H/W: V1.0R Table Índice of Contents Português... 1. Antes de Iniciar... 2. Como Instalar... 1 1 3 Troubleshooting... 5 Version 07.09.2008 1. Antes de Iniciar Conteúdo
Rato laser para jogos ASUS GX800 Manual do Utilizador
 Rato laser para jogos ASUS GX800 1 6 Manual do Utilizador 15G06S001000 PG5761 Primeira edição(v1) Abril 2010 Copyright 2010 ASUSTeK COMPUTER INC. Reservados todos os direitos. Nenhuma parte deste manual,
Manual do usuário. Teclado Bluetooth BKB50
 Manual do usuário Teclado Bluetooth BKB50 Índice Noções básicas...3 Visão geral...3 Visão geral do teclado...3 Carregando o teclado...4 Como ligar e desligar...5 Introdução...6 Configurando o teclado...6
MOTOR MOTEUR BLIZZARD BLAST ROLLER COASTER BUILDING SET MONTAGNES RUSSES EXPLOSION D UNE TEMPÊTE DE NEIGE JEU DE CONSTRUCTION
 MOTOR MOTEUR Building Worlds Kids Love BLIZZARD BLAST ROLLER COASTER BUILDING SET MONTAGNES RUSSES EXPLOSION D UNE TEMPÊTE DE NEIGE JEU DE CONSTRUCTION + ft ft.9 ++ m m 5440 LR6 ) A ( A 9 + X Not included
Caderno de Questões. Edição Abril 2013 Prova para Nível Básico 4ºano ao 6º do Ensino Fundamental
 www.redepoc.com Caderno de Questões Edição Abril Prova para Nível Básico 4ºano ao 6º do Ensino Fundamental Qualquer tentativa gera alguma pontuação. Responda cada questão em apenas uma folha A organização
Guião N. Descrição das actividades
 Proposta de Guião para uma Prova Grupo: 006 Disciplina: Inglês, Nível de Continuação, 11.º ano Domínio de Referência: Um Mundo de Muitas Culturas Duração da prova: 15 a 20 minutos 1.º MOMENTO Guião N Intervenientes
Sistema de localização de mesas Vuze
 Sistema de localização de mesas Vuze GUIA DE CONSULTA RÁPIDA HME Wireless, Inc. HME# 400G745P Rev. C 6/15/16 INSTRUÇÕES FÁCEIS DE CONFIGURAÇÃO O SISTEMA VUZE LEITOR VUZE (#G100A) GUEST COASTER TAG (# VUGST)
Synology Remote. Guia do Utilizador
 Synology Remote Guia do Utilizador Remote08312010 Índice 3 Bem-vindo 4 Visão Geral do Synology Remote 5 Conteúdo da Embalagem 6 Iniciar 8 Apreciar a Sua Música com o Synology Remote 11 Especificações do
Guia de Instalação Rápida TEG-PCITXR TEG-PCITXRL 3.02
 Guia de Instalação Rápida TEG-PCITXR TEG-PCITXRL 3.02 Índice Português 1 1. Antes de Iniciar 1 2. Como instalar 2 Troubleshooting 5 Version 03.18.2010 1. Antes de Iniciar Português Conteúdo da Embalagem
PL/SQL: Domine a linguagem do banco de dados Oracle (Portuguese Edition)
") PL/SQL: Domine a linguagem do banco de dados Oracle (Portuguese Edition) Eduardo Gonçalves Click here if your download doesn"t start automatically PL/SQL: Domine a linguagem do banco de dados Oracle (Portuguese
PL/SQL: Domine a linguagem do banco de dados Oracle (Portuguese Edition) Eduardo Gonçalves Click here if your download doesn"t start automatically PL/SQL: Domine a linguagem do banco de dados Oracle (Portuguese
CONTENTS BATTERY INFORMATION IMPORTANT STUFF FOR PARENTS AND KIDS
 (EN) English CONTENTS K NEX Building Basics...4 Parts List...5 Sorcerer s Eclipse Roller Coaster...6 Track Assembly Tips... 54 Tips and Troubleshooting... 57 IMPORTANT STUFF FOR PARENTS AND KIDS You will
Document Shredders Déchiqueteuses Destructoras de documentos Fragmentadoras de documentos LS32-30 LX20-30 LM12-30 LSM09-30
 LS32-30 LX20-30 LM12-30 LSM09-30 Document Shredders Déchiqueteuses Destructoras de documentos Fragmentadoras de documentos Instruction Manual Manuel d utilisation Manual de instrucciones Manual de instruções
Manual do Usuário User Manual
 www.multilaser.com.br Manual do Usuário User Manual Índice/ Index ÍNDICE PORTUGUÊS Introdução...3 Descrição...3 Receptor...3 Transmissor...4 Configurando a Babá Eletrônica Baby Sound...4 1 Inserindo as