BUILDING BASICS BATTERY INFORMATION
|
|
|
- João Henrique Ramalho Paixão
- 6 Há anos
- Visualizações:
Transcrição
1


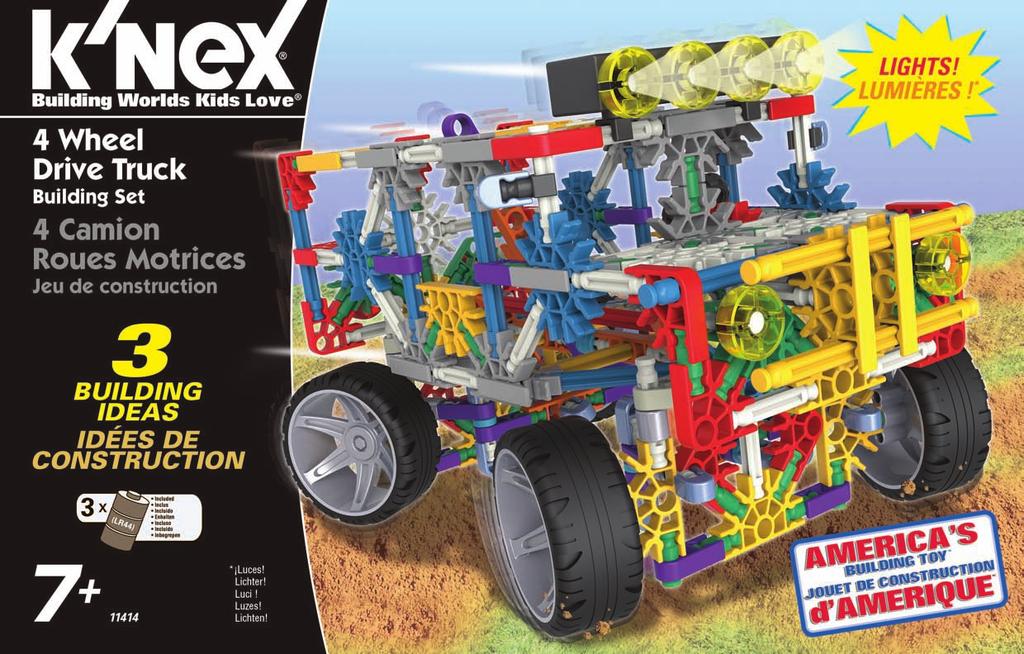
2 Parts List Before you start building, be sure to compare the parts in your set with the parts list here. If anything is missing, call or write to us using the information on the back cover. We are here to help you! Lista de piezas Antes de comenzar a construir, compare las piezas de su juego con las que se enumeran aquí. Si falta algo, llámenos o escríbanos utilizando la información que se encuentra en el reverso. Estamos aquí para ayudarle! Liste des pièces Avant de commencer à construire, assure-toi de comparer les pièces dans ta boîte à la liste de pièces fournie ici. S il manque quelque chose, téléphonenous ou écris-nous en te servant des informations figurant au verso de la notice. Nous sommes là pour t aider! 2

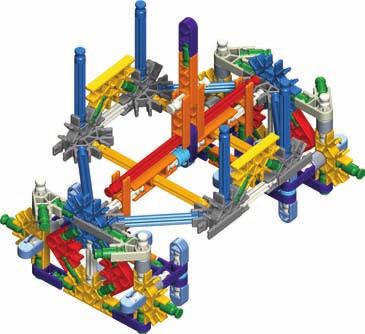
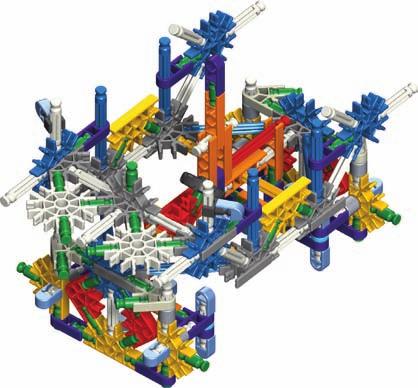
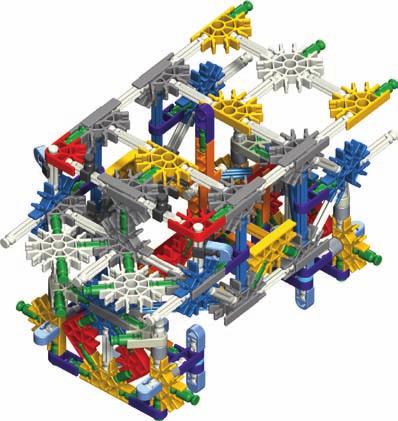
3 Start Building To begin your model, find the 1 and follow the numbers. Each piece has its own shape and color. Just look at the pictures, find the pieces in your set that match and then connect them together. Try to face your model in the same direction as the instructions while you build. The arrows show you where the parts connect, but not all connections points have arrows. Faded colors show you this section is already built. 1 BUILDING BASICS Connectors You can slide these special connectors together. Push tightly until you hear a click. Pay close attention to the instructions and position them horizontally or vertically exactly as they are shown. BATTERY INFORMATION WARNING: As with all small batteries, the batteries used in this toy should be kept away from small children, who still put things in their mouths. If they are swallowed, promptly see a doctor and have the doctor phone collect (US only). CAUTION: Be sure to insert the batteries correctly and always follow the toy and battery manufacturers instructions. Do not mix old and new batteries or alkaline, standard (carbon-zinc) or rechargeable (nickelcadmium) batteries. Only batteries of the same or equivalent type recommended should be used. Always remove weak or dead batteries from the product; do not short-circuit supply terminals. Insert batteries with correct polarity (+/-) as shown. Rechargeable batteries are not recommended. Remove rechargeable batteries from toy before charging; they must be charged only under adult supervision. Non-rechargeable batteries must not be recharged. Keep components free of dust; do not immerse or use in water. Do not dispose of batteries in a fire; they could leak or explode and cause injury. Remove all batteries if the toy will not be used for a long period of time. Help the environment by disposing of your product and packaging responsibly. The wheelie bin symbol indicates that the product and batteries must not be disposed of in the domestic waste as they contain substances which can be damaging to the environment and health. Please use designated collection points or recycling facilities when disposing of the item or batteries. How to Insert and Remove Batteries The light module comes with 3 batteries already installed. To replace the batteries, remove the screw. Insert 3 button cell (1.5v) batteries (LR44 or AG76) with the correct polarity (+/-) as shown here. FCC Statements: WARNING: Changes or modifications to this unit not expressly approved by the party responsible for the compliance could void the users right to operate the equipment. This device complies with Part 15 of the FCC Rules. Operation is subject to the following two conditions: 1. This device may not cause harmful interference and 2. This device must accept any interference received, including interference that may cause undesired operation. This model is tested to comply with FCC standards - FOR HOME OR OFFICE USE. This equipment has been tested and found to comply with the limits for a Class B digital device, pursuant to part 15 of the FCC Rules. These limits are designed to provide reasonable protection against harmful interference in a residential installation. This equipment generates, uses and can radiate radio frequency energy, and, if not installed and used in accordance with the instructions, may cause harmful interference to radio communications. However, there is no guarantee that interference will not occur in a particular installation. If this equipment does cause harmful interference to radio or television reception, which can be determined by turning the equipment off and on, the user is encouraged to try to correct the interference by one or more of the following measures: (1) Reorient or relocate the receiving antenna. (2) Increase the separation between the equipment and receiver. (3) Consult the dealer or an experienced radio/tv technician. (4) Connect the equipment into an outlet on a circuit different from that to which the receiver is connected. This Class B digital apparatus complies with Canadian ICES


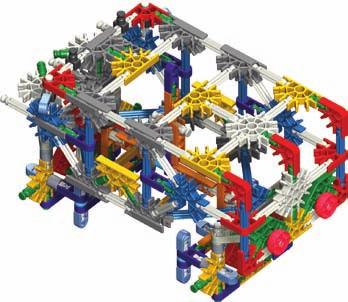
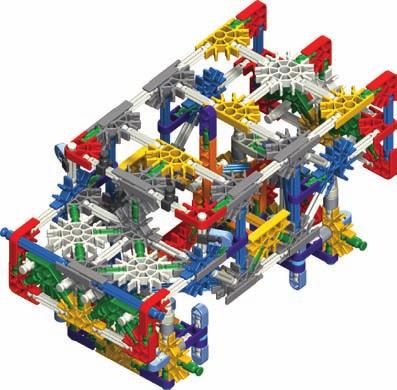
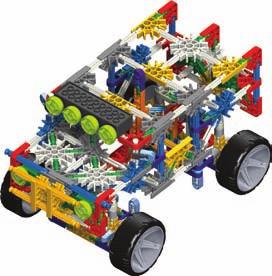
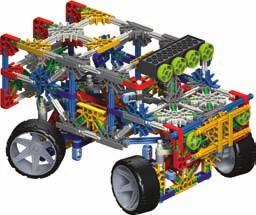
4 4 Wheel Drive Truck 4 Camion Roues Motrices 1 x2 x2 1-2 WARNING: CHOKING HAZARD SMALL PARTS. Not for children under 3 years. ADVERTENCIA: PELIGRO DE ASFIXIA PIEZAS PEQUEÑAS. No para niños menores de 3 años. ATTENTION! RISQUE D ÉTOUFFEMENT PIÈCES DE PETITE TAILLE. Ne convient pas aux enfants de moins de 3 ans. WARNHINWEIS: ERSTICKUNGSGEFAHR KLEINTEILE. Nicht geeignet für Kinder unter 3 Jahren. AVVERTENZA: PERICOLO DI SOFFOCAMENTO CONTIENE PICCOLE PARTI. Non adatto per bambini al di sotto di 3 anni. AVISO: PERIGO DE SUFOCAÇÃO PEÇAS PEQUENAS. Não se destina a crianças com menos de 3 anos de idade. WAARSCHUWING: VERSTIKKINGSGEVAAR KLEINE ONDERDELEN. Niet geschikt voor kinderen onder

5 x x

6

7

8

9

10

11

12

13


 o recargables (níquelcadmio). Se recomienda usar solamente baterías del mismo tipo o equivalentes.")

14 ES Español Esenciales de construcción K NEX Para comenzar a construir Para comenzar el modelo, encuentre el número 1 del paso y siga los números. Cada pieza tiene su propia forma y color. Observe las imágenes, encuentre las piezas que sean iguales a las que se muestran y conéctelas. Colocar el modelo en la misma dirección que se encuentra en las instrucciones le facilitará la construcción. Las flechas muestran en dónde se conectan las piezas, pero no todos los puntos de conexión tienen flechas. Las partes de color tenue son las que ya armó. 1 2 Conectores Puede unir estos conectores especiales deslizándolos Presione con fuerza hasta que oiga un clic. Preste especial atención a las instrucciones y colóquelos de forma horizontal o vertical, exactamente como se muestra Información sobre las baterías ADVERTENCIA: Como con todas las pilas pequeñas, las pilas que se usan en este juguete se deben tener lejos del alcance de los niños, quienes todavía están en edad de ponerse cosas en la boca. Si estas pilas son tragadas, inmediatamente vea a un médico. PRECAUCIÓN: Asegúrese de colocar las baterías correctamente y siga siempre las instrucciones del fabricante del juguete y de las baterías. No mezcle baterías viejas y nuevas o alcalinas, estándar (carbón-zinc) o recargables (níquelcadmio). Se recomienda usar solamente baterías del mismo tipo o equivalentes. Siempre retire las baterías descargadas del producto; no cause un corto circuito en las terminales de alimentación. Coloque las baterías con la polaridad correcta (+/-) como se muestra. No se recomienda el uso de baterías recargables. Retire las baterías recargables del juguete antes de cargarlas; solamente se deben recargar bajo la supervisión de un adulto. Las baterías no recargables no se deben recargar. Mantenga los componentes limpios y libres de polvo; no los sumerja ni utilice en el agua. No arroje las baterías al fuego; pueden tener fugas o explotar y provocar heridas. Retire todas las baterías del juguete si no lo usará por un periodo prolongado. Ayude al medio ambiente al desechar de manera responsable el producto y el empaque. El símbolo del contenedor indica que el producto y las baterías no se deben desechar en la basura doméstica pues contienen sustancias que pueden ser dañinas para la salud y el medio ambiente. Utilice los centros de recolección designados o centros de reciclado para desechar el producto o las baterías. Cómo colocar y retirar las baterías El luz trae 3 pilas, ya instaladas en tu modelo. Para reemplazar las baterías, retire el tornillo. Inserte 3 botones de células (1.5v) (LR44 o GA76) con la polaridad correcta (+/-) como se muestra. 14

15 FR Français Démarrer la construction Pour commencer le modèle, trouver l étape numéro 1 trouver les numéros. Chaque pièce a sa propre forme et sa propre couleur. Regarder les illustrations, trouve les pièces qui correspondent à l illustration et les assembler. Pour vous faciliter la tâcher, orienter le modèle dans le même sens que les instructions. Les flèches indiquent où les pièces s assemblent, mais les points de raccordement n ont pas tous des flèches. Les pièces de couleur délavée sont celles déjà assemblées. 1 Notions de base K NEX pour le montage Informations Pile AVERTISSEMENT : comme c est le cas pour toutes les piles de petite taille, les piles utilisées dans ce jouet doivent être tenues hors de la portée des jeunes enfants, qui sont à l âge où ils mettent encore des choses dans la bouche. Dans l éventualité où un enfant les avalerait, consulter un médecin sans tarder. ATTENTION : S assurer d installer les piles correctement et de suivre toujours les directives des fabricants du jouet et des piles. Ne pas mélanger des piles neuves avec des piles usées. Ne pas mélanger des piles alcalines avec des piles standard (Leclanché), ou des piles rechargeables (au nickel-cadmium). Il convient d utiliser uniquement des piles du type recommandé ou d un type équivalent. Retirer toujours les piles faibles ou mortes du produit ; ne pas faire court-circuiter les terminaux. Installer les piles en respectant la polarité (+/-) comme l indique le schéma. llest déconseillé d utiliser des piles rechargeables. Retirer les piles rechargeables du jouet avant de les recharger; elles doivent être chargées exclusivement en présence d un adulte. Les piles qui ne sont pas rechargeables ne doivent pas être rechargées. Veiller à ce que les éléments restent à l abri de la poussière ; ne pas les plonger dans l eau ; ne pas utiliser dans l eau. Ne pas jeter les piles dans le feu ; elles risqueraient de fuir ou d exploser et d entraîner des blessures. Retirer toutes les piles si le jouet restera inutilisé pendant longtemps. Aider l environnement en jetant le produit et son emballage de manière responsable. Le symbole de la poubelle à roulettes indique qu il ne faut pas jeter le produit et les piles avec les ordures ménagères car ils contiennent des substances pouvant être nocives à l environnement et à la santé. Veuillez utiliser les points de collecte de déchets ou les centres de tri désignés lorsque vous jetez l article ou les piles. Comment mettre et retirer des piles Utiliser un petit tournevis Philips pour desserrer la/les vis, puis retirer la porte de la pile. Introduire 3 neuves piles (LR44, AG76) dans chaque compartiment en respectant la polarité (+/-). Connecteurs Vous pouvez assembler ces connecteurs tout à fait uniques en les faisant glisser l un dans l autre. Pousser fort jusqu au «clic». Lire les instructions attentivement et es positionner horizontalement ou verticalement, en suivant exactement les illustrations. Déclaration de la FCC : AVERTISSEMENT : tout changement ou toute modification non approuvée par le parti responsable de la conformité pourraient annuler le droit de l utilisateur à faire fonctionner l appareil. Cet appareil conforme à la Partie 15 de la réglementation de la FCC. Son fonctionnement est soumis aux deux conditions suivantes: 1. Ce système ne saurait entraîner de brouillage préjudiciable. 2. Ce système doit accepter toute interférence reçue, y compris des interférences susceptibles d entraîner un fonctionnement indésirable. Ce modèle est testé afin d être conforme aux normes FCC POUR UN USAGE PERSONNEL OU PROFESSIONNEL.Cet équipement a été testé et est conforme aux limites d un appareil numérique de classe B, en vertu de la partie 15 de la réglementation de la FCC. Ces limites sont déterminées en vue de fournir une protection raisonnable contre un brouillage préjudiciable dans une installation résidentielle. Cet équipement génère, utilise et est en mesure d irradier de l énergie radiofréquence, et s il n est pas installé ou utilisé conformément au mode d emploi, risque d entraîner un brouillage préjudiciable pour les communications radio. Il n y a toutefois aucune garantie qu un brouillage ne surviendra pas pour une installation particulière. Si cet équipement entraîne un brouillage préjudiciable à une réception radio ou de télévision, ce qui peut être déterminé en l éteignant et en le rallumant, il est recommandé d essayer de remédier au brouillage en prenant l une ou plusieurs des mesures suivantes : (1) réorienter ou changer de place l antenne, de réception. (2) augmenter l écart entre l équipement et le récepteur. (3) consulter le fournisseur ou encore un technicien qualifié en matière de radio/tv. (4) brancher l équipement dans une prise sur un circuit qui soit différent de celui nécessaire au récepteur. Cet appareil numérique de classe B est conforme aux normes canadiennes NMB
16 DE Deutsch (Seite 2) Teileliste Bevor du mit dem Bauen anfängst, solltest du prüfen ob die Teile in deinem Bausatz mit denen auf dieser Teileliste übereinstimmen. Falls etwas fehlt, rufe uns an oder schreibe uns (siehe Rückseite). Wir sind für dich da! (Seite 3) Grundlegende Bauanleitungen für K NEX Los geht s mit dem Bauen Um mit dem Bauen deines Modells zu beginnen, suche die Nummer 1 und folge den laufenden Nummern. Jedes Teil hat seine eigene Form und Farbe. Schau dir einfach die Abbildungen an, such die Teile in deinem Bausatz, die so aussehen wie das, was du auf der Abbildung siehst und steck sie ineinander. Versuche, dein Modell beim Zusammenbauen so zu orientieren, dass es in die gleiche Richtung weist, wie es in den Anleitungen beschrieben und gezeigt wird. Blasse Farben weisen darauf hin, dass dieser Streckenabschnitt bereits zusammengebaut ist. Verbindungsstücke Blaue und silberfarbene verbindungsstücke haben besonders lange Schlitze. Wie du vauf der Abbildung sehen kannst, lassen sie sich ineinander schieben. Achte beim Aneinanderfügen dieser Teile darauf, dass du ein Klickgeräusch hörst. Erst dann sind die Teile fest miteinander verbunden. Abstandsstücke An manchen Stellen in deinem Modell musst du Abstandsstücke einbauen. Achte darauf, die richtige Farbe und Anzahl von Abstandsstücken wie in der Anleitung gezeigt zu verwenden. Informationen zu den Batterien WARNHINWEIS: Wie alle anderen kleinen Batterien sollten auch die in diesem Spielzeug verwendeten Batterien aus der Reichweite kleiner Kinder, die noch dazu neigen, Kleinteile in den Mund zu stecken, ferngehalten werden. Nach Verschlucken sofort einen Arzt konsultieren. VORSICHT: Achte darauf dass die Batterien korrekt eingelegt werden und folge den Anweisungen der Spielzeug- und Batterienfabrikanten. Mische keine alten und neuen Batterien oder alkaline Batterien, Standardbatterien (Kohle-Zink) oder wiederaufladbare Batterien (Nickel-Cadmium). Verwende nur Batterien des gleichen Typs oder des empfohlenen äquivalenten Typs. Leere oder verbrauchte Batterien aus dem Spielzeug entfernen; darauf achten, dass die Pole der Batterie nicht kurzgeschlossen werden. Beim Einlegen der Batterien auf die korrekte Polarität (+/-), wie dargestellt, achten. Wiederaufladbare Batterien sind nicht empfohlen. Bei Verwendung von wiederaufladbaren Batterien müssen diese aus dem Spielzeug entfernt werden, bevor sie wieder aufgeladen werden; das Wiederaufladen darf nur unter Aufsicht eines Erwachsenen stattfinden. Nichtwiederaufladbare Batterien dürfen nicht wieder aufgeladen werden. Die Komponenten von Staub freihalten; nicht in Wasser tauchen. Zu entsorgende Batterien nicht ins Feuer werfen; sie können auslaufen oder explodieren und Körperverletzungen verursachen. Wenn das Spielzeug längere Zeit nicht verwendet werden soll, alle Batterien entfernen. Trage zum Umweltschutz bei und entsorge unser Produkt sowie die Verpackung in verantwortungsvoller Weise. Das Mülltonnen-Symbol bedeutet, dass das Produkt und die Batterien nicht dem Restmüll zugeführt werden dürfen, weil sie Stoffe enthalten, die sich schädigend auf die Umwelt und die Gesundheit auswirken können. Bitte recycle den Artikel bzw. die Batterien und werfe sie in die entsprechenden Recyclingcontainer. Anweisungen zum Einlegen und Entfernen der Batterien Die Schraube(n) mit einem kleinen Kreuzschraubenzieher lösen. Danach den Deckel des Batteriefachs entfernen und 3 neue Batterien Typ (LR44, AG76) entsprechend der gekennzeichneten Polarität in jedes Fach einlegen. 16
17 IT Italiano (Pagina 2) Elenco delle parti Prima di cominciare a costruire, accertati di confrontare le parti che sono nel tuo set con l elenco delle parti qui. Se ne manca una chiamaci o scrivici usando le informazioni che sono nella retrocopertina. Noi siamo qui per aiutarti! (Pagina 3) Istruzioni di base per costruire con K NEX Comincia a costruire Per iniziare il modello, cerca il numero 1 e segui i numeri. Ogni pezzo ha una sua forma e un suo colore. Guarda la figura, trova i pezzi corrispondenti nel set e mettili insieme. Cerca di tenere il modello nella stessa direzione della figura e in tal modo sarà più semplice attaccare i pezzi nei posti giusti. I colori spenti ti dicono che questa sezione è già stata costruita. Dovrai collegare la nuova sezione al punto indicato dalla punta della freccia. Connettori È molto importante posizionare i connettori blu e argento in una specifica direzione. Presta molta attenzione alle istruzioni e posiziona i connettori orizzontalmente o verticalmente proprio come illustrato. Spingi con forza fino ad udire un clic. Spaziatori Ci sono punti nel tuo modello a cui dovrai aggiungere spaziatori blu e argento. Accertati si contarli attentamente. Informazioni sulle batterie AVVERTENZA: Come per tutte le batterie piccole, le batterie utilizzate in questo giocattolo devono essere tenute lontano dalla portata dei bambini piccoli, che mettono ancora oggetti in bocca. Se vengono ingerite, consultare un medico immediatamente e informarlo. ATTENZIONE: Accertarsi di inserire le batterie correttamente e seguire sempre le istruzioni del produttore delle batterie e del giocattolo. Non mettere insieme batterie nuove e vecchie o alcaline, standard (carboniozinco) e ricaricabili (nichel-cadmio). Usare sempre batterie raccomandate dello stesso tipo o di tipo equivalente. Rimuovere sempre batterie quasi scariche o completamente scariche dal prodotto; non causare corto circuito ai terminali di alimentazione. Inserire le batterie con la polarità corretta (+/-) come illustrato. Non si raccomanda l uso di batterie ricaricabili. Rimuovere le batterie ricaricabili dal giocattolo prima della carica: devono essere caricate solo sotto la supervisione di un adulto. Le batterie non ricaricabili non devono essere ricaricate. Mantenere i componenti privi di polvere; non immergere o usare in acqua. Non gettare le batterie nel fuoco, poiché potrebbero perdere o esplodere e causare lesioni. Rimuovere tutte le batterie se il giocattolo non verrà usato per un lungo periodo di tempo. Aiuta l ambiente eliminando il prodotto e la confezione in modo responsabile. Il simbolo concernente il secchio con le ruote indica che il prodotto e le batterie non possono essere eliminati con la spazzatura domestica in quanto contengono sostanze che possono danneggiare l ambiente e la salute. Usare i punti di raccolta designati o gli impianti di riciclaggio quando si devono eliminare l articolo e le batterie. Come inserire e rimuovere le batterie Usare un piccolo giravite a stella per allentare la vite e quindi rimuovere lo sportello delle batterie. Inserire 3 batterie a bottone nuove (LR44, AG76) nell alloggiamento delle batterie con la polarità corretta (+/-). 17
18 PT Português (Página 2) Liste des pièces Avant de commencer à construire, assure-toi de comparer les pièces dans ta boîte à la liste de pièces fournie ici. S il manque quelque chose, téléphone-nous ou écris-nous en te servant des informations figurant au verso de la notice. Nous sommes là pour t aider! (Página 3) Instruções básicas para montar o K NEX Comece a montar Para começar a montar o modelo, encontre o número 1 do passo e siga os números. Cada peça tem a sua própria forma e cor. Estude as ilustrações, encontre as peças que coincidem com o que você estiver vendo e conecte-as. Fique de frente para o modelo, na mesma direção que as figuras mostradas nas instruções. As setas mostram onde as peças se conectam, mas nem todos os pontos de conexão têm setas. As partes com cores desbotadas são as que você já montou. Conectores Você pode fazer com que estes conectores se deslizem e se conectem. Empurre até ouvir um clique. Preste atenção às instruções e posicione-os horizontal ou verticalmente exatamente conforme a ilustração. Separadores Há lugares no modelo onde você precisará usar separadores. Use o número de espaçadores corretos exibidos nas instruções. Informações sobre as pilhas AVISO: Como acontece com toda as pilhas pequenas, as pilhas usadas neste brinquedo devem ser mantidas fora do alcance de crianças pequenas, que estejam ainda em idade de pôr objectos na boca. No caso destas pilhas terem sido engolidas, consulte imediatamente um médico. CUIDADO: Coloque as pilhas corretamente e sempre siga as instruções de fabricantes de brinquedos e pilhas. Não misture pilhas velhas com pilhas novas ou alcalinas, ou pilhas padrão (carvão-zinco) com pilhas recarregáveis (níquel-cádmio). Somente pilhas do mesmo tipo ou tipo equivalente devem ser usadas. Sempre remova as pilhas fracas ou descarregadas do produto; não provoque um curto circuito nos terminais. Coloque as pilhas com a polaridade correta (+/-), como exibido. Não é recomendado o uso de pilhas recarregáveis. Remova as pilhas recarregáveis do brinquedo antes de carregar; elas devem ser carregadas somente sob a supervisão de um adulto. As pilhas não recarregáveis não devem ser colocadas. Mantenha os componentes livres de pó e não submerja ou use abaixo d água. Não descarte as pilhas perto do fogo, pois elas podem vazar ou explodir e causar ferimentos. Remova todas as pilhas se o brinquedo não estiver sendo usado por um longo período de tempo. Ajude ao meio ambiente descartando o produto e a embalagem de maneira responsável. O símbolo da lata de lixo com rodinhas indica que o produto e as pilhas não devem ser descartados no lixo doméstico, pois eles contêm substâncias que podem ser prejudiciais ao ambiente e à saúde. Use os pontos designados de coleta de lixo ao descartar o item ou as pilhas. Como inserir e remover as pilhas Use uma pequena chave de parafusos de cabeça Phillips para soltar o parafuso e retirar a porta do compartimento da pilha. Introduza 3 pilhas de célula tipo relógio novas (LR44, AG76) em cada divisória, posicionadas com a polaridade correcta (+/-). 18
19 NL Nederlands (Bladzijde 2) Onderdelen Lijst Voordat u begint met bouwen, moet u de onderdelen vergelijken de set met de onderdelen lijst hier. Als er iets ontbreekt, bel of schrijf ons gebruik van de informatie op de achterkant. We zijn hier om u te helpen! (Bladzijde 3) Basisstappen voor K NEX bouwen Begin te bouwen Om met je model te beginnen, vind eerst het nummer 1 en volg de nummers. Elk stuk heeft zijn eigen vorm en kleur. Kijk gewoonweg naar de afbeeldingen, vind de overeenstemmende stukken terug in je geheel en maak ze aan mekaar vast. Tracht je model in dezelfde richting te plaatsen als de aanwijzingen terwijl je bouwt en monteert. De vervaagde kleuren duiden aan dat dit deel reeds is opgebouwd. Gelieve het nieuwe deel vast te koppelen op de plaats aangeduid door de pijlen. Koppelstukken Er zijn blauwe en zilveren koppelstukken met speciale lange gleuven. Ze schuiven in mekaar zoals je kunt zien op de afbeeldingen. Duw deze onderdelen in mekaar tot je een klik hoort. Tussenstukken In je model zijn er plaatsen waar blauwe en zilveren tussenstukken moeten toegevoegd worden. Verzeker je ervan de juiste kleur te gebruiken en tel ze zorgvuldig. Batterijgegevens WAARSCHUWING: Zoals het geval is voor alle kleine batterijen, moeten de batterijen voor dit speelgoed buiten het bereik gehouden worden van kleine kinderen die nog steeds voorwerpen in de mond steken. Ingeval een batterij wordt ingeslikt, neem onmiddellijk contact op met een dokter. OPGEPAST: Verzeker je ervan dat de batterijen er op de juiste manier in te steken en volg steeds de aanduidingen van de speelgoed- en batterijenfabrikanten. Meng geen oude en nieuwe batterijen of alkalische, gewone (koolstof-zink) of herlaadbaarse (nikkel-cadmium) batterijen met mekaar. Uitsluitend batterijen van dezelfde of van een aanbevolen equivalente soort dienen gebruikt te worden. Verwijder steeds uitgeputte of ontladen batterijen uit het produkt; veroorzaak geen kortsluiting van de voedingspolen. Steek de batterijen erin volgens de juiste polariteit (+/-) zoals afgebeeld. Herlaadbare batterijen worden niet aanbevolen. Verwijder herlaadbare batterijen uit het speelgoed alvorens ze te herladen; ze moeten slechts herladen worden onder het toezicht van een volwassene. Niet-herlaadbare batterijen mogen niet herladen worden. Bescherm onderdelen tegen stof; dompel ze niet of gebruik ze niet in water. Werp de batterijen niet in het vuur; ze zouden kunnen lekken of ontploffen en verwondingen veroorzaken. Verwijder alle batterijen wanneer het speelgoed gedurende lange tijd niet gebruikt zal worden. Help de omgeving door uw product en verpakking verantwoordelijk weg te werpen. Het symbol met de vuilnisbak op wieltjes duidt aan dat het product en de batterijen niet mogen weggeworpen worden in huishoudvuil vermits ze stoffen bevatten die de omgeving en de gezondheid kunnen schaden. Gelieve de aangeduide verzamelpunten of recyclageinstallaties te gebruiken wanneer u zich wil ontdoen van dit artikel of deze batterijen. Insteken en verwijderen van batterijen Använd en liten Phillips-skruvmejsel för att lossa skruven. Sätt i 3 nya batterier (LR44, AG76) i utrymmet med rätt polaritet enligt vidstående figur. 19

20
Building Basics. Tyrannosaurus...10 Ferris Wheel...12 Catamaran...14 Excavator...17 Building Ideas...20
 Ice Cream Cone/Fish...4 Coconut Tree...5 Plane...6 Skier...7 Rocket Ship...8 AMERICAN MADE PARTS (EN) CONTENTS Parts List Tyrannosaurus...0 Ferris Wheel... Catamaran...4 Excavator...7 Building Ideas...0
Manual do usuário. MHL to HDMI Adapter IM750
 Manual do usuário MHL to HDMI Adapter IM750 Índice Introdução...3 Visão geral do MHL to HDMI Adapter...3 Introdução...4 Smart Connect...4 Como atualizar o Smart Connect...4 Utilização do MHL to HDMI Adapter...5
SmartDock for Xperia ion Manual do usuário
 SmartDock for Xperia ion Manual do usuário Índice Introdução...3 Visão geral do SmartDock...3 Carregando o SmartDock...3 Introdução...5 LiveWare manager...5 Como atualizar o LiveWare manager...5 Como selecionar
Manual do usuário. Xperia P TV Dock DK21
 Manual do usuário Xperia P TV Dock DK21 Índice Introdução...3 Visão geral da parte traseira do TV Dock...3 Introdução...4 Gerenciador do LiveWare...4 Como atualizar o Gerenciador do LiveWare...4 Utilização
Magnetic Charging Dock
 Manual do usuário Magnetic Charging Dock Índice Introdução...3 Carregamento facilitado...3 Utilizando a Plataforma de carregamento magnética...4 Utilizando os apoios...4 Carregando seu celular...4 Informações
Manual do usuário. Bluetooth Keyboard BKB10
 Manual do usuário Bluetooth Keyboard BKB10 Índice Noções básicas...3 Visão geral...3 Carregando o teclado...4 Ligando o teclado...5 Configurando o teclado...6 Suporte na Web...7 Informações legais...8
Presenter SNP6000. Register your product and get support at PT Manual do utilizador
 Register your product and get support at www.philips.com/welcome Presenter SNP6000 PT Manual do utilizador 1 a b c d e 2 3 4 Federal Communication Commission Interference Statement This equipment has been
SkillGuide. Guia do usuário. Português
 SkillGuide Guia do usuário Português SkillGuide O SkillGuide é um dispositivo de feedback para oferecer comentários em tempo real e cumulativo do desempenho da RCP. www.laerdal.com.br Itens incluídos SkillGuide
ROBO-STING. Building Worlds Kids Love BUILDING SET JEU DE CONSTRUCTION
 Building Worlds Kids Love ROBO-STING BUILDING SET JEU DE CONSTRUCTION 7+ 13244 LR6 ) A ( A 2X Not included Pas inclus No se incluyen Nicht enthalten Non incluse Não estão incluídas Niet inberepen Building
FOR PARENTS & KIDS. WARNING: CHOKING HAZARD - Small parts. Not for children under 3 years.
 IMPORTANT STUFF FOR PARENTS & KIDS Keep these instructions in a handy location. They contain important safety information. Read all warnings and instructions before you start to build and operate the model.
ROBO-JAWS BUILDING SET JEU DE CONSTRUCTION. 2 X Not included MOTOR MOTEUR. Building Worlds Kids Love MOTOR BUILDS CONSTRUIRE **
 Building Worlds Kids Love MOTOR ROBO-JAWS BUILDING SET JEU DE CONSTRUCTION MOTOR MOTEUR BUILDS À 3À CONSTRUIRE ** 7 + 34406 X Not included AA (LR6) Pas inclus No se incluyen Nicht enthalten Non incluse
AVERTISSEMENT : RISQUE D ÉTOUFFEMENT
 (EN) English WARNING: CHOKING HAZARD Small parts. Not for children under 3 years. CAUTION: Keep hands, face, hair, clothing and Power Cord away from all moving parts. Caution: Do not trip on cord. WARNING:
Building Basics. Parts List
 Building Basics Start Building To begin your model, find the and follow the numbers. Each piece has its own shape and color. Just look at the pictures, find the pieces in your set that match and then connect
Fone de ouvido Bluetooth estéreo
 Manual do usuário Fone de ouvido Bluetooth estéreo Índice Introdução...3 Visão geral dos acessórios...3 Noções básicas...4 Chamando...6 Como ouvir música...6 Tecnologia multiponto...7 Solução de problemas...7
Fone de ouvido Bluetooth mono
 Manual do usuário Fone de ouvido Bluetooth mono Índice Visão geral da função...3 Visão geral dos acessórios...4 Noções básicas...5 Carregamento da bateria...5 Ligando e desligando o fone de ouvido...5
7 + 2 X Not included MOTOR MOTEUR * REVVIN RACECAR 2-IN-1 BUILDING SET VOITURE DE COURSE MONTÉE EN RÉGIME 2 EN 1 JEU DE CONSTRUCTION BUILDS
 Building Worlds Kids Love MOTOR MOTEUR * REVVIN RACECAR -IN- BUILDING SET VOITURE DE COURSE MONTÉE EN RÉGIME EN JEU DE CONSTRUCTION 7 + BUILDS À CONSTRUIRE ** 7 + 6005 X Not included AA (LR6) Pas inclus
VORSICHT: NL OPGEPAST:
 EN CAUTION: To Avoid Battery Leakage - Be sure to insert the batteries correctly and always follow the toy and battery manufacturers instructions. Do not mix old and new batteries or alkaline, standard
IMPORTANT STUFF FOR PARENTS AND KIDS INFORMATIONS IMPORTANTES POUR LES PARENTS ET LES ENFANTS CONTENUS CONTENTS. Go to for instruction updates
 (EN) CONTENTS K NEX Building Basics... 4 Parts List... 5 Amazin 8 Roller Coaster... 6 Track Building Tips... 16 Tips and Troubleshooting... 29 (FR) CONTENUS K NEX Bases de la Construction... 4 Liste des
MOTOR * Building Worlds Kids Love REVOLUTION FERRIS WHEEL BUILDING SET RÉVOLUTION GRANDE ROUE JEU DE CONSTRUCTION. * Motore
 Building Worlds Kids Love REVOLUTION FERRIS WHEEL BUILDING SET RÉVOLUTION GRANDE ROUE JEU DE CONSTRUCTION EEL WH FERRIS 7+ 540 LR6 ) A ( A X MOTOR * MOTEUR Not included Pas inclus No se incluyen Nicht
INFORMATIONS IMPORTANTES POUR LES PARENTS ET LES ENFANTS IMPORTANT STUFF FOR PARENTS AND KIDS. Go to for instruction updates
 IMPORTANT STUFF FOR PARENTS AND KIDS Keep these instructions in a handy location. They contain important safety information. Read all warnings and instructions before you start to build and operate the
SCREAMING SIDESHOW ROLLER COASTER BUILDING SET SIDESHOW CRI MONTAGNES RUSSES JEU DE CONSTRUCTION X Not included MOTOR MOTEUR *
 Building Worlds Kids Love SCREAMING SIDESHOW ROLLER COASTER BUILDING SET SIDESHOW CRI MONTAGNES RUSSES JEU DE CONSTRUCTION 7 + X Not included AA (LR6) Pas inclus No se incluyen Nicht enthalten Non incluse
CONTENTS CONTENIDOS CONTENUS. Important stuff for Parents & Kids. Información importante para los Padres y Niños
 ES EN CONTENTS K NEX Building Basics................ 4 Parts List.......................... 5 Building Idea........................ 5 SUPER CYCLONE COASTER.......... 6 Track Building Tips....................
VH110 Manual do usuário
 VH110 Manual do usuário Índice Visão geral do fone de ouvido...5 Introdução...6 Carregamento...7 Ligando e desligando...8 Pareando o fone de ouvido...9 Pareie o fone de ouvido com um telefone...9 Colocando
Manual do usuário. Bluetooth Speaker BSP10
 Manual do usuário Bluetooth Speaker BSP10 Índice Introdução...3 Visão geral da função...3 Visão geral do hardware...3 Status da luz de notificação...3 Carregar...4 Carregar seu acessório...4 Introdução...5
Guia de Instalação Rápida TE100-PCBUSR
 Guia de Instalação Rápida TE100-PCBUSR Table Índice of Contents Português... 1. Antes de Iniciar... 2. Como Instalar... 1 1 2 Troubleshooting... 3 Version 07.27.2007 1. Antes de Iniciar Conteúdo da Embalagem
Keep this important information for future reference
 MECHA CLAW Roller Coaster Building Set GRIFFE DE MECHA Montagnes Russes Jeu de construction.5 ft 79 cm [] AA (LR6) AA (LR6) Not Included/Pas Inclus[] Ages 7-447 (EN) English Keep this important information
P C I - E A D A P T E R W I R E L E S S 1 5 0 N 1 5 0 M B P S M A N U A L N I - 7 0 7 5 2 9
 P C I - E A D A P T E R W I R E L E S S 1 5 0 N 1 5 0 M B P S M A N U A L N I - 7 0 7 5 2 9 P O R T U G U E S - C O N T E Ú D O D A E M B A L A G E M 4 - E S P E C I F I C A Ç Õ E S T É C N I C A S 4 -
IAN 93902 1/22. Washing machine cabinet. Mobile lavatrice Istruzioni per il montaggio. Armario saledizo de máquina lavadora Instrucciones de montaje
 Washing machine cabinet ES PT DE AT CH Armario saledizo de máquina lavadora Instrucciones de montaje Armário para montar por cima da máquina de lavar a roupa Instruções de montagem Waschmaschinenüberbauschrank
START HERE PTB: COMECE AQUI FRA: MISE EN ROUTE ITA: PER COMINCIARE PTG: INICIAR AQUI ESP: EMPEZAR AQUÍ
 START HERE PTB: COMECE AQUI FRA: MISE EN ROUTE ITA: PER COMINCIARE PTG: INICIAR AQUI ESP: EMPEZAR AQUÍ Install the software (required for full webcam functionality). Instale o software (necessário para
OVER 7 ft TALL! PLUS DE 2 m DE HAUT! ** MOTORIZED LAUNCHER ** LANCEUR MOTORISE SKY SPRINTER ROLLER COASTER BUILDING SET SPRINTER DU CEIL
 Building Worlds Kids Love MOTORIZED LAUNCHER ** LANCEUR MOTORISE SKY SPRINTER ROLLER COASTER BUILDING SET SPRINTER DU CEIL 3X C 52478 (LR1 4) MONTAGNES RUSSES JEU DE CONSTRUCTION Not included Pas inclus
Manual do usuário. Teclado Bluetooth BKB50
 Manual do usuário Teclado Bluetooth BKB50 Índice Noções básicas...3 Visão geral...3 Visão geral do teclado...3 Carregando o teclado...4 Como ligar e desligar...5 Introdução...6 Configurando o teclado...6
-UTILITÁRIO DE SOFTWARE PARA O ADAPTADOR USB 7
 U S B A D A P T E R W I R E L E S S 3 0 0 N 1 5 0 M B P S M A N U A L N I - 7 0 7 5 2 2 P O R T U G U E S - C O N T E Ú D O D A E M B A L A G E M 4 - E S P E C I F I C A Ç Õ E S T É C N I C A S 4 - G A
U S B A D A P T E R W I R E L E S S 3 0 0 N 1 5 0 M B P S. M a n u A l N I - 7 0 7 5 3 5
 U S B A D A P T E R W I R E L E S S 3 0 0 N 1 5 0 M B P S M a n u A l N I - 7 0 7 5 3 5 P O R T U G U E S - C o n t e ú d o d a e m b a l a g e m 4 - E s p e c i f i c a ç õ e s t é c n i c a s 4 - G a
1. DESCARGA DEL SOFTWARE DE BLUETOOTH EN EL SMARTPHONE
 MANUAL DEL USUARIO PARA BLUETOOTH ES 1. DESCARGA DEL SOFTWARE DE BLUETOOTH EN EL SMARTPHONE Entre en Apple Store o Google Play y busque: - BH Premium - BH Lite BH Premium BH Lite 2. FIJACIÓN DEL MÓDULO
Guia de Instalação Rápida TBW-101UB TBW-102UB
 Guia de Instalação Rápida TBW-101UB TBW-102UB Índice Português... 1. Antes de Iniciar... 2. Como instalar... 3. Usando o Adaptador Bluetooth... 1 1 2 4 Troubleshooting... 5 (Version 05.30.2006) 1. Antes
Fone de ouvido Bluetooth estéreo SBH80
 Manual do usuário Fone de ouvido Bluetooth estéreo SBH80 Índice Introdução...3 Visão geral da função...3 Visão geral do hardware...3 Noções básicas...5 Carregamento da bateria...5 Status da bateria...5
Guia de Instalação Rápida TEW-432BRP
 Guia de Instalação Rápida TEW-432BRP Table Índice of Contents Português... 1. Antes de Iniciar... 2. Instalar Roteador... 3. Bônus... Troubleshooting... 1 1 2 4 5 Version 08.07.2006 1. Antes de Iniciar
Swingline Stack-and-Shred 100X Shredder Auto+ Technology. Déchiqueteuse Swingline Stack-and-Shred 100X à technologie Auto+
 Swingline Stack-and-Shred 100X Shredder Auto+ Technology To register this product go to www.swingline.com Pour enregistrer ce produit allez sur www.swingline.com Para registrar este producto vaís en www.swingline.com
Education MOTOR MOTEUR* 2 X. Experiments Expériences
 Education STEM EXPLORATIONS: SWING RIDE BUILDING SET EXPLORATION STEM : SE BALANCER MONTER JEU DE CONSTRUCTION S SCIENCE LA SCIENCE T TECHNOLOGY TECHNOLOGIE E ENGINEERING INGÉNIERIE M MATH MATHÉMATIQUES
Manual do usuário. Style Cover Window SCR44
 Manual do usuário Style Cover Window SCR44 Índice Introdução... 3 Introdução... 3 Visão geral... 3 Configuração de um toque...3 Carregar...4 Aprendizagem dos conceitos básicos... 5 Interagir com a janela...
SLINGSHOT LAUNCHER PROPULSEUR* LANCE-PIERRE. Building Worlds Kids Love INFINITE JOURNEY ROLLER COASTER BUILDING SET
 Building Worlds Kids Love INFINITE JOURNEY ROLLER COASTER BUILDING SET ROLLERR COASTE VOYAGE INFINI MONTAGNES RUSSES JEU DE CONSTRUCTION 7+ SLINGSHOT LAUNCHER PROPULSEUR* LANCE-PIERRE 5407 * Lanzador Tirabete
Manual do usuário. Bluetooth Remote with Handset Function BRH10
 Manual do usuário Bluetooth Remote with Handset Function BRH10 Índice Introdução...3 Visão geral da função...3 Visão geral do hardware...3 Noções básicas...5 Carregando o Bluetooth Remoto...5 Ligando e
Guia de Instalação Rápida TFM-560X H/W : YO
 Guia de Instalação Rápida TFM-560X H/W : YO Table Índice of Contents... 1. Antes de Iniciar... 2. Como instalar... 1 1 2 Troubleshooting... 7 Version 08.04.2008 1. Antes de Iniciar Conteúdo da Embalagem
EN-9235TX-32 Manual de instalação rápida
 EN-9235TX-32 Manual de instalação rápida 09-2012 / v2.0 1 COPYRIGHT Copyright Edimax Technology Co., Ltd. all rights reserved. No part of this publication may be reproduced, transmitted, transcribed, stored
Rato laser para jogos ASUS GX900
 Rato laser para jogos ASUS GX900 Manual do Utilizador PG5887 Primeira edição(v1) Agosto 20 Copyright 20 ASUSTeK COMPUTER INC. Reservados todos os direitos. Nenhuma parte deste manual, incluindo os produtos
Security Kit. Security Kit. Security Kit. Security Kit. See Reverse Side For Security Installation Instructions 8811-000008
 Security Kit Security Kit See Reverse Side For 8811-000008 See Reverse Side For 8811-000008 Security Kit Security Kit See Reverse Side For 8811-000008 See Reverse Side For 8811-000008 1. Using security
3 0 0 m b p s M A N U A L E N I - 7 0 7 5 4 7
 n e t w o r k r e p e a t e r w i r e l e s s 3 0 0 n 3 0 0 m b p s M A N U A L E N I - 7 0 7 5 4 7 P O R T U G U E S n e t w o r k r e p e a t e r w i r e l e s s 3 0 0 n 3 0 0 m b p s Em primeiro lugar,
Manual do usuário. Aparelho Bluetooth Inteligente SBH52
 Manual do usuário Aparelho Bluetooth Inteligente SBH52 Índice Aparelho Bluetooth Inteligente Guia do usuário...3 Introdução...4 Visão geral da função...4 Visão geral do hardware...4 Visão geral do ícone
BUILD AND BLAST WARNING:
 TM Building Worlds Kids Love K-X ROTOSHOT BLASTER BUILDING SET JEU DE CONSTRUCTION BUILD AND BLAST FIRES UP TO 7 ft! TIRE Á PLUS DE m! ** -SHOT ROTO CHAMBER ROTO CHAMBRE A -TIR BUILDS CONSTRUIT LES* 8
9 + WILD WHIPLASH ROLLER COASTER BUILDING SET COUP DE FOUET SAUVAGE MONTAGNES RUSSES JEU DE CONSTRUCTION MOTOR MOTEUR * 2 X Not included
 Building Worlds Kids Love WILD WHIPLASH ROLLER COASTER BUILDING SET COUP DE FOUET SAUVAGE MONTAGNES RUSSES JEU DE CONSTRUCTION 9 + X Not included AA (LR6) Pas inclus No se incluyen Nicht enthalten Non
Synology Remote. Guia do Utilizador
 Synology Remote Guia do Utilizador Remote08312010 Índice 3 Bem-vindo 4 Visão Geral do Synology Remote 5 Conteúdo da Embalagem 6 Iniciar 8 Apreciar a Sua Música com o Synology Remote 11 Especificações do
Quickstart Guide. WiPry-Pro Combo
 Quickstart Guide CONNECT TO APPLE DEVICE ACCESSORY EXTERNAL TRIGGER 2.4-2.5GHz ANTENNA WARNING DO NOT APPLY MORE THAN 20DBM TO THE ANTENNA WITHOUT EXTERNAL ATTENUATION WARNING DO NOT APPLY MORE THAN -0.5/+3.8V
BUILD AND BLAST WARNING:
 TM Building Worlds Kids Love MEGA BOOM BUILDING SET MÉGA- BOUM JEU DE CONSTRUCTION BUILD AND BLAST FIRES UP TO 75 ft! TIRE Á PLUS DE 22 m!** BUILDS CONSTRUIT LES*6 8 + 47527 WARNING: Do not aim at eyes
Document Shredders Déchiqueteuses Destructoras de documentos Fragmentadoras de documentos LS32-30 LX20-30 LM12-30 LSM09-30
 LS32-30 LX20-30 LM12-30 LSM09-30 Document Shredders Déchiqueteuses Destructoras de documentos Fragmentadoras de documentos Instruction Manual Manuel d utilisation Manual de instrucciones Manual de instruções
Rato laser para jogos ASUS GX800 Manual do Utilizador
 Rato laser para jogos ASUS GX800 1 6 Manual do Utilizador 15G06S001000 PG5761 Primeira edição(v1) Abril 2010 Copyright 2010 ASUSTeK COMPUTER INC. Reservados todos os direitos. Nenhuma parte deste manual,
GUIA PRINCIPAL CONTEÚDO
 GUIAPRINCIPAL ORazerNagaéomouseMMO(MassivelyMultiplayerOnlineGaming,jogodecomputadorcom centenasdemilharesdejogadoreson linesimultaneamente)definitivo,quemudaoequilíbrioentre tecladoemouse,reunindoumnúmeroinéditodecomandosdejogoemumúnicolocal.ogrip
Start Here Comece aqui Mise en route Empezar aquí
 Start Here Comece aqui Mise en route Empezar aquí 1 Install the software (required for full functionality). Instale o software (necessário para funcionalidade total). Installez le logiciel (requis pour
Guia de Instalação Rápida TMR-121EC H/W: V1.0R
 Guia de Instalação Rápida TMR-121EC H/W: V1.0R Table Índice of Contents Português... 1. Antes de Iniciar... 2. Como Instalar... 1 1 3 Troubleshooting... 5 Version 07.09.2008 1. Antes de Iniciar Conteúdo
Guia de Instalação Rápida TEG-448WS H/W: B2.0R
 Guia de Instalação Rápida TEG-448WS H/W: B2.0R Table Índice of Contents Português... 1 1. Antes de Iniciar... 1 2. Instalação do Hardware... 2 3. Utilitário de Gerenciamento Web... 3 Troubleshooting...
Radio / Cassette. Long Beach C31. Installation instructions Notice de montage Instrucciones de instalación Instruções de montagem
 Radio / assette Long each 3 Installation instructions Notice de montage Instrucciones de instalación Instruções de montagem Installation instructions Notice de montage Instrucciones de instalación Instruções
Guia de Instalação Rápida TEG-PCITXR TEG-PCITXRL 3.02
 Guia de Instalação Rápida TEG-PCITXR TEG-PCITXRL 3.02 Índice Português 1 1. Antes de Iniciar 1 2. Como instalar 2 Troubleshooting 5 Version 03.18.2010 1. Antes de Iniciar Português Conteúdo da Embalagem
Radio / CD. Honolulu CD50. Installation instructions Notice de montage Instrucciones de instalación Instruções de de montagem
 Radio / D Honolulu D50 Installation instructions Notice de montage Instrucciones de instalación Instruções de de montagem Installation instructions Notice de montage Instrucciones de instalación Instruções
Composite AV Cable. 2 English
 Composite AV Cable Composite AV Cable Use the Composite AV Cable to connect your ipod, iphone, or ipad to the composite video port and analog audio ports on your TV, home theater receiver, or stereo receiver.
Guia de Instalação Rápida TBW-105UB H/W: V1.1R
 Guia de Instalação Rápida TBW-105UB H/W: V1.1R Índice... 1. Antes de Iniciar... 2. Como Instalar... 3. Configurando o Adaptador Bluetooth... Troubleshooting... 10 1 1 2 5 Version 08.04.2008 1. Antes de
Guia de Instalação Rápida TEW-430APB
 Guia de Instalação Rápida TEW-430APB Table Índice of Contents Português... 1. Antes de Iniciar... 2. Instalação de Hardware... 3. Configure o Ponto de Acesso... 1 1 2 3 Troubleshooting... 6 Version 08.04.2008
DONKEY 19689. 2. Using a small cross-head (positive) screwdriver, undo the screw that secures the battery compartment door. Copyright ROMPA Ltd
 screwdriver, undo the screw that secures the battery compartment door. Copyright ROMPA Ltd") DONKEY 19689 CONTENTS 1 x switch-adapted Donkey This product requires, but does not include, 3 AA batteries and a switch See www.rompa.com for a comprehensive range of switches BEFORE USE 1. Locate the
DONKEY 19689 CONTENTS 1 x switch-adapted Donkey This product requires, but does not include, 3 AA batteries and a switch See www.rompa.com for a comprehensive range of switches BEFORE USE 1. Locate the
Apêndice B AVISOS REGULAMENTARES DA AGÊNCIA. Apêndice B AVISOS REGULARMENTARES DA AGÊNCIA B-1
 Apêndice B AVISOS REGULAMENTARES DA AGÊNCIA Apêndice B AVISOS REGULARMENTARES DA AGÊNCIA B-1 MANUAL DO USUÁRIO Aviso da Commissão das Comunicações Federais Este equipamento tem sido testado e fundado para
BUILDING BASICS BASES DE LA CONSTRUCTION
 (EN) English Keep this important information for future reference WARNING: CHOKING HAZARD Small parts. Not for children under 3 years. CAUTION: Keep hands, face, hair and clothing away from all moving
1. Product Name. 2. Product Code. 3. Colour. 4. Brief Description. 5. Contents. 6. Snoezelen Stimulations. Switch Adapted Fibre Optic Lamp
 1. Product Name Switch Adapted Fibre Optic Lamp 2. Product Code 20709 3. Colour Clear base; white fibres 4. Brief Description Activate your switch to activate the light through the fibres and in the base.
TEW-510APB Guia de Instalação Rápida Version 05.18.2007
 TEW-510APB Guia de Instalação Rápida Version 05.18.2007 Copyright 200 7. All Rights Reserved. TRENDnet. Índice... 1 1. Preparar para Instalação... 1 2. IInstalar Hardware... 2 3. Configurar TCP/IP... 3
Guia de Instalação Rápida TU2-DVIV H/W: V1.0R
 Guia de Instalação Rápida TU2-DVIV H/W: V1.0R Table Índice of Contents Português... 1. Antes de Iniciar... 2. Como Instalar... Troubleshooting... 1 1 3 6 Version 06.27.2008 1. Antes de Iniciar Conteúdo
Transmissor DigiMemo Bluetooth para Smartphone
 Transmissor DigiMemo Bluetooth para Smartphone Guia do Usuário BTX-100 Preparo... 1 Acompanhando o Transmissor Bluetooth... 1 Instalando o Software DigiMemo Express no Seu Telefone... 1 Ligar e Modos
Synology Remote. Guia do Usuário
 Synology Remote Guia do Usuário Remote08312010 Sumário 3 Bem-vindo 4 Visão geral do Synology Remote 5 Conteúdo do Pacote 6 Introdução 8 Desfrute suas músicas com o Synology Remote 11 Especificações de
Guia de Instalação Rápida TW100-BRV204
 Guia de Instalação Rápida TW100-BRV204 Table Índice of Contents Português... 1. Antes de Iniciar... 2. Instalação de Hardware... 3. Configure o Roteador... 1 1 2 3 Troubleshooting... 5 Version 08.05.2008
100171058_N369225491 100171074_N369225492 100171084_N369225490 100171066_N369225488 URBAN C
 100171058_N369225491 100171074_N369225492 100171066_N369225488 100171084_N369225490 URBAN C Lea atentamente estas instrucciones antes de comenzar la instalación. - Compruebe el producto por si faltasen
MOTOR MOTEUR BLIZZARD BLAST ROLLER COASTER BUILDING SET MONTAGNES RUSSES EXPLOSION D UNE TEMPÊTE DE NEIGE JEU DE CONSTRUCTION
 MOTOR MOTEUR Building Worlds Kids Love BLIZZARD BLAST ROLLER COASTER BUILDING SET MONTAGNES RUSSES EXPLOSION D UNE TEMPÊTE DE NEIGE JEU DE CONSTRUCTION + ft ft.9 ++ m m 5440 LR6 ) A ( A 9 + X Not included
Guia de Instalação Rápida TU2-ETG H/W: V1.3R
 Guia de Instalação Rápida TU2-ETG H/W: V1.3R Table Índice of Contents Português... 1. Antes de Iniciar... 2. Como instalar... 1 1 2 Troubleshooting... 7 Version 08.27.2008 1. Antes de Iniciar Conteúdo
Guia de Instalação Rápida TU-S9 H/W: V1
 Guia de Instalação Rápida TU-S9 H/W: V1 Table Índice of Contents Português... 1. Antes de Iniciar... 2. Como Instalar... 1 1 2 Troubleshooting... 7 Version 02.19.2009 1. Antes de Iniciar Conteúdo da Embalagem
Manual do usuário. User s Manual JS052. Super band - guitarra sem fio PS2 / PS3 / Wii Super band - wireless guitar PS2 / PS3 / Wii
 Super band - guitarra sem fio Manual do usuário User s Manual Super band - guitarra sem fio PS2 / PS3 / Wii Super band - wireless guitar PS2 / PS3 / Wii 1 JS052 ÍNDICE CARACTERÍSTICAS DO PRODUTO...03 peças
TEW-501PC TEW-503PI. Guia de Instalação Rápida. Copyright All Rights Reserved. TRENDnet. Version
 TEW-501PC TEW-503PI Guia de Instalação Rápida Version 05.21.2007 Copyright 200 7. All Rights Reserved. TRENDnet. Índice... 1 1. Preparar para Instalação... 1 2. Instalar o Utilitário de Configuração Wireless...
Guia de Instalação Rápida
 Guia de Instalação Rápida Table Índice of Contents Português... 1. Antes de Iniciar... 2. Instalação do Hardware... 1 1 2 Troubleshooting... 6 Version 08.04.2008 1. Antes de Iniciar Requisitos de Sistema
As 100 melhores piadas de todos os tempos (Portuguese Edition)
") As 100 melhores piadas de todos os tempos (Portuguese Edition) Click here if your download doesn"t start automatically As 100 melhores piadas de todos os tempos (Portuguese Edition) As 100 melhores piadas
As 100 melhores piadas de todos os tempos (Portuguese Edition) Click here if your download doesn"t start automatically As 100 melhores piadas de todos os tempos (Portuguese Edition) As 100 melhores piadas
Guia de Instalação Rápida TWG-BRF114
 Guia de Instalação Rápida TWG-BRF114 Table Índice of Contents Português... 1. Antes de Iniciar... 2. Instalação de Hardware... 3. Configurando o Roteador... 1 1 2 3 Troubleshooting... 5 Version 09.24.2008
B R O A D B A N D R O U T E R W I R E L E S S 3 0 0 N 3 0 0 M B P S M A N U A L N I - 7 0 7 5 3 4
 B R O A D B A N D R O U T E R W I R E L E S S 3 0 0 N 3 0 0 M B P S M A N U A L N I - 7 0 7 5 3 4 P O R T U G U E S C o n t e ú d o d a e m b a l a g e m 5 E s p e c i f i c a ç õ e s t é c n i c a s 5
Film Status Indicator (FSI) A highlighted indicator advances from one symbol to another to identify the status of the film inside the cassette.
 A highlighted indicator advances from one symbol to another to identify the status of the film inside the cassette.") 3100AF Camera 1 Film Status Indicator (FSI) A highlighted indicator advances from one symbol to another to identify the status of the film inside the cassette. Unexposed 1 4 2 3 Processed Negatives Partially
3100AF Camera 1 Film Status Indicator (FSI) A highlighted indicator advances from one symbol to another to identify the status of the film inside the cassette. Unexposed 1 4 2 3 Processed Negatives Partially
Guia de Instalação Rápida TBW-106UB H/W: V1
 Guia de Instalação Rápida TBW-106UB H/W: V1 Índice... 1. Antes de Iniciar... 2. Como Instalar... 3. Configurando o Adaptador Bluetooth... 1 1 2 5 Troubleshooting... 7 Version 06.05.2009 1. Antes de Iniciar
INSTRUÇÕES DE UTILIZAÇÃO A FAMÍLIA UNIQUE DA WIDEX
 WIDEX UNIQUE INSTRUÇÕES DE UTILIZAÇÃO A FAMÍLIA UNIQUE DA WIDEX Modelo U-PA Recetor intra-auricular O SEU APARELHO AUDITIVO WIDEX (A ser preenchido pelo profissional de saúde auditiva) A sua série de aparelhos
PROCEDIMENTOS NECESSÁRIOS ANTES DE UTILIZAR O EQUIPAMENTO. Instalação do Rasther PC. Habilitação das Montadoras
 Guia Rápido Rasther PC PROCEDIMENTOS NECESSÁRIOS ANTES DE UTILIZAR O EQUIPAMENTO Antes de iniciar o uso do Rasther, será necessário instalar o programa Rasther PC, habilitar as montadoras adquiridas juntamente
SRW 01-HMI. Remote Keypad (HMI) HMI Remoto HMI Remota. Installation Guide Guía de Instalación Guia de Instalação. English / Español / Português
 HMI Remoto HMI Remota. Installation Guide Guía de Instalación Guia de Instalação. English / Español / Português") Motors Automation Energy Transmission & Distribution Coatings Remote Keypad (HMI) HMI Remoto HMI Remota SRW 01-HMI Installation Guide Guía de Instalación Guia de Instalação English / Español / Português
Motors Automation Energy Transmission & Distribution Coatings Remote Keypad (HMI) HMI Remoto HMI Remota SRW 01-HMI Installation Guide Guía de Instalación Guia de Instalação English / Español / Português
Film Status Indicator (FSI) A highlighted indicator advances from one symbol to another to identify the status of the film inside the cassette.
 A highlighted indicator advances from one symbol to another to identify the status of the film inside the cassette.") 2100AUTO Camera 1 Film Status Indicator (FSI) A highlighted indicator advances from one symbol to another to identify the status of the film inside the cassette. Unexposed 1 4 2 3 Processed Negatives Partially
2100AUTO Camera 1 Film Status Indicator (FSI) A highlighted indicator advances from one symbol to another to identify the status of the film inside the cassette. Unexposed 1 4 2 3 Processed Negatives Partially
Guião N. Descrição das actividades
 Proposta de Guião para uma Prova Grupo: 006 Disciplina: Inglês, Nível de Continuação, 11.º ano Domínio de Referência: Um Mundo de Muitas Culturas Duração da prova: 15 a 20 minutos 1.º MOMENTO Guião N Intervenientes
Caderno de Questões. Edição Abril 2013 Prova para Nível Básico 4ºano ao 6º do Ensino Fundamental
 www.redepoc.com Caderno de Questões Edição Abril Prova para Nível Básico 4ºano ao 6º do Ensino Fundamental Qualquer tentativa gera alguma pontuação. Responda cada questão em apenas uma folha A organização
JELLY BEAMER WIRELESS SWITCH 19458
 JELLY BEAMER WIRELESS SWITCH 19458 CONTENTS 1 x receiver (left, above) 1 x switch (transmitter, right, above) 3 x extra interchangeable tops yellow, blue, green This product requires, but does not include
5827 Blue Ranger vs. Xandred Ranger Azul vs. Xandred Ranger Bleu contre Xandred
 5827 Blue Ranger vs. Xandred Ranger Azul vs. Xandred Ranger Bleu contre Xandred Ranger Blu contro Xandred Ranger Azul X Xandred Blauer Ranger gegen Xandred Blue Ranger vs. Xandred MA03019B MA11101F 4X
RS-485 Kit. Kit RS-485. Kit RS-485. SSW-07 / SSW-08 English / Español / Português Document: / 04. Installation Guide. Guia de Instalación
 RS-485 Kit Kit RS-485 Kit RS-485 Installation Guide SSW-07 / SSW-08 English / Español / Português Document: 0899.5711 / 04 Guia de Instalación Guia de Instalação 1. DESCRIPTION OF THE KIT Contents: Table
Roteador WiFi AC2600 StreamBoost MU-MIMO TEW-827DRU
 Roteador WiFi AC2600 StreamBoost MU-MIMO TEW-827DRU Ÿ Guia de Instalação Rápida (1) TEW-827DRU(V1)/11.13.2015 1. Antes de começar Conteúdo da embalagem Ÿ TEW-827DRU Ÿ Guia de instalação rápida Ÿ CD-ROM
DIVERSOS PEDRAVELHA REF REF 1123 ± 14 Kg 43 x Ø 23cm S/ACESSÓRIOS REF ± 421 Kg 207 x Ø 126cm REF 1124 ± 180 Kg 140 x Ø 100cm
 CATÁLOGO DIVERSOS DIVERSOS REF 1123 REF 1124.1 REF 1124 REF 1123 ± 14 Kg 43 x Ø 23cm S/ACESSÓRIOS REF 1124.1 ± 421 Kg 207 x Ø 126cm REF 1124 ± 180 Kg 140 x Ø 100cm REF 1166 REF 1166.1 REF 1166.2 REF 1139
Manual do Usuário User Manual
 www.multilaser.com.br Manual do Usuário User Manual Índice/ Index ÍNDICE PORTUGUÊS Introdução...3 Descrição...3 Receptor...3 Transmissor...4 Configurando a Babá Eletrônica Baby Sound...4 1 Inserindo as
G I G A B I T R O U T E R W I R E L E S S 3 0 0 N 3 0 0 M B P S W I T H U S B P O R T M A N U A L N I - 7 0 7 5 3 3
 G I G A B I T R O U T E R W I R E L E S S 3 0 0 N 3 0 0 M B P S W I T H U S B P O R T M A N U A L N I - 7 0 7 5 3 3 1 P O R T U G U E S C o n t e ú d o d a e m b a l a g e m 5 E s p e c i f i c a ç õ e
B R O A D B A N D R O U T E R W I R E L E S S 3 0 0 N 3 0 0 M B P S
 B R O A D B A N D R O U T E R W I R E L E S S 3 0 0 N 3 0 0 M B P S m a n u a l N I - 7 0 7 5 3 9 P O R T U G U E S C o n t e ú d o d a e m b a l a g e m 4 E s p e c i f i c a ç õ e s t é c n i c a s 4