DIGITAL SNAKE DL Input, 16 Output Stage Box with 32 MIDAS Microphone Preamplifiers, ULTRANET and ADAT Interfaces.
|
|
|
- Ricardo Mirandela Madeira
- 7 Há anos
- Visualizações:
Transcrição


1 DIGITL SNKE DL32 32 Input, 16 Output Stage ox with 32 MIDS Microphone Preamplifiers, ULTRNET and DT Interfaces Quick Start Guide
2 2 DIGITL SNKE DL32 Quick Start Guide 3 Important Safety Instructions Terminals marked with this symbol carry electrical current of sufficient magnitude to constitute risk of electric shock. Use only high-quality professional speaker cables with ¼" TS or twist-locking plugs pre-installed. ll other installation or modification should be performed only by qualified personnel. This symbol, wherever it appears, alerts you to the presence of uninsulated dangerous voltage inside the enclosure - voltage that may be sufficient to constitute a risk of shock. This symbol, wherever it appears, alerts you to important operating and maintenance instructions in the accompanying literature. Please read the manual. Caution To reduce the risk of electric shock, do not remove the top cover (or the rear section). No user serviceable parts inside. Refer servicing to qualified personnel. Caution To reduce the risk of fire or electric shock, do not expose this appliance to rain and moisture. The apparatus shall not be exposed to dripping or splashing liquids and no objects filled with liquids, such as vases, shall be placed on the apparatus. Caution These service instructions are for use by qualified service personnel only. To reduce the risk of electric shock do not perform any servicing other than that contained in the operation instructions. Repairs have to be performed by qualified service personnel. 1. Read these instructions. 2. Keep these instructions. 3. Heed all warnings. 4. Follow all instructions. 5. Do not use this apparatus near water. 6. Clean only with dry cloth. 7. Do not block any ventilation openings. Install in accordance with the manufacturer s instructions. 8. Do not install near any heat sources such as radiators, heat registers, stoves, or other apparatus (including amplifiers) that produce heat. 9. Do not defeat the safety purpose of the polarized or grounding-type plug. polarized plug has two blades with one wider than the other. grounding-type plug has two blades and a third grounding prong. The wide blade or the third prong are provided for your safety. If the provided plug does not fit into your outlet, consult an electrician for replacement of the obsolete outlet. 10. Protect the power cord from being walked on or pinched particularly at plugs, convenience receptacles, and the point where they exit from the apparatus. 11. Use only attachments/accessories specified by the manufacturer. 12. Use only with the cart, stand, tripod, bracket, or table specified by the manufacturer, or sold with the apparatus. When a cart is used, use caution when moving the cart/apparatus combination to avoid injury from tip-over. 13. Unplug this apparatus during lightning storms or when unused for long periods of time. 14. Refer all servicing to qualified service personnel. Servicing is required when the apparatus has been damaged in any way, such as power supply cord or plug is damaged, liquid has been spilled or objects have fallen into the apparatus, the apparatus has been exposed to rain or moisture, does not operate normally, or has been dropped. 15. The apparatus shall be connected to a MINS socket outlet with a protective earthing connection. 16. Where the MINS plug or an appliance coupler is used as the disconnect device, the disconnect device shall remain readily operable. 17. Correct disposal of this product: This symbol indicates that this product must not be disposed of with household waste, according to the WEEE Directive (2012/19/EU) and your national law. This product should be taken to a collection center licensed for the recycling of waste electrical and electronic equipment (EEE). The mishandling of this type of waste could have a possible negative impact on the environment and human health due to potentially hazardous substances that are generally associated with EEE. t the same time, your cooperation in the correct disposal of this product will contribute to the efficient use of natural resources. For more information about where you can take your waste equipment for recycling, please contact your local city office, or your household waste collection service. 18. Do not install in a confined space, such as a book case or similar unit. 19. Do not place naked flame sources, such as lighted candles, on the apparatus. 20. Please keep the environmental aspects of battery disposal in mind. atteries must be disposed-of at a battery collection point. 21. Use this apparatus in tropical and/or moderate climates. LEGL DISCLIMER MUSIC Group accepts no liability for any loss which may be suffered by any person who relies either wholly or in part upon any description, photograph, or statement contained herein. Technical specifications, appearances and other information are subject to change without notice. ll trademarks are the property of their respective owners. MIDS, KLRK TEKNIK, L GRUPPEN, LKE, TNNOY, TUROSOUND, TC ELECTRONIC, TC HELICON, EHRINGER, UGER and DD are trademarks or registered trademarks of MUSIC Group IP Ltd. MUSIC Group IP Ltd ll rights reserved. LIMITED WRRNTY For the applicable warranty terms and conditions and additional information regarding MUSIC Group s Limited Warranty, please see complete details online at music-group.com/warranty. Instrucciones de seguridad Las terminales marcadas con este símbolo transportan corriente eléctrica de magnitud suficiente como para constituir un riesgo de descarga eléctrica. Utilice solo cables de altavoz profesionales y de alta calidad con conectores TS de 6,3 mm o de bayoneta prefijados. Cualquier otra instalación o modificación debe ser realizada únicamente por un técnico cualificado. Este símbolo, siempre que aparece, le advierte de la presencia de voltaje peligroso sin aislar dentro de la caja; este voltaje puede ser suficiente para constituir un riesgo de descarga. Este símbolo, siempre que aparece, le advierte sobre instrucciones operativas y de mantenimiento que aparecen en la documentación adjunta. Por favor, lea el manual. tención Para reducir el riesgo de descarga eléctrica, no quite la tapa (o la parte posterior). No hay piezas en el interior del equipo que puedan ser reparadas por el usuario. Si es necesario, póngase en contacto con personal cualificado. tención Para reducir el riesgo de incendio o descarga eléctrica, no exponga este aparato a la lluvia, humedad o alguna otra fuente que pueda salpicar o derramar algún líquido sobre el aparato. No coloque ningún tipo de recipiente para líquidos sobre el aparato. tención Las instrucciones de servicio deben llevarlas a cabo exclusivamente personal cualificado. Para evitar el riesgo de una descarga eléctrica, no realice reparaciones que no se encuentren descritas en el manual de operaciones. Las reparaciones deben ser realizadas exclusivamente por personal cualificado. 1. Lea las instrucciones. 2. Conserve estas instrucciones. 3. Preste atención a todas las advertencias. 4. Siga todas las instrucciones. 5. No use este aparato cerca del agua. 6. Limpie este aparato con un paño seco. 7. No bloquee las aberturas de ventilación. Instale el equipo de acuerdo con las instrucciones del fabricante. 8. No instale este equipo cerca de fuentes de calor tales como radiadores, acumuladores de calor, estufas u otros aparatos (incluyendo amplificadores) que puedan producir calor. 9. No elimine o deshabilite nunca la conexión a tierra del aparato o del cable de alimentación de corriente. Un enchufe polarizado tiene dos polos, uno de los cuales tiene un contacto más ancho que el otro. Una clavija con puesta a tierra dispone de tres contactos: dos polos y la puesta a tierra. El contacto ancho y el tercer contacto, respectivamente, son los que garantizan una mayor seguridad. Si el enchufe suministrado con el equipo no concuerda con la toma de corriente, consulte con un electricista para cambiar la toma de corriente obsoleta. 10. Coloque el cable de suministro de energía de manera que no pueda ser pisado y que esté protegido de objetos afilados. segúrese de que el cable de suministro de energía esté protegido, especialmente en la zona de la clavija y en el punto donde sale del aparato. 11. Use únicamente los dispositivos o accesorios especificados por el fabricante. 12. Use únicamente la carretilla, plataforma, trípode, soporte o mesa especificados por el fabricante o suministrados junto con el equipo. l transportar el equipo, tenga cuidado para evitar daños y caídas al tropezar con algún obstáculo. 13. Desenchufe el equipo durante tormentas o si no va a utilizarlo durante un periodo largo. 14. Confíe las reparaciones únicamente a servicios técnicos cualificados. La unidad requiere mantenimiento siempre que haya sufrido algún daño, si el cable de suministro de energía o el enchufe presentaran daños, se hubiera derramado un líquido o hubieran caído objetos dentro del equipo, si el aparato hubiera estado expuesto a la humedad o la lluvia, si ha dejado de funcionar de manera normal o si ha sufrido algún golpe o caída. 15. l conectar la unidad a la toma de corriente eléctrica asegúrese de que la conexión disponga de una unión a tierra. 16. Si el enchufe o conector de red sirve como único medio de desconexión, éste debe ser accesible fácilmente. 17. Cómo debe deshacerse de este aparato: Este símbolo indica que este aparato no debe ser tratado como basura orgánica, según lo indicado en la Directiva WEEE (2012/19/EU) y a las normativas aplicables en su país. En lugar de ello deberá llevarlo al punto limpio más cercano para el reciclaje de sus elementos eléctricos / electrónicos (EEE). l hacer esto estará ayudando a prevenir las posibles consecuencias negativas para el medio ambiente y la salud que podrían ser provocadas por una gestión inadecuada de este tipo de aparatos. demás, el reciclaje de materiales ayudará a conservar los recursos naturales. Para más información acerca del reciclaje de este aparato, póngase en contacto con el yuntamiento de su ciudad o con el punto limpio local. 18. No instale esta unidad en un espacio muy reducido, tal como encastrada en una librería o similar. 19. No coloque objetos con llama, como una vela encendida, sobre este aparato. 20. Tenga presentes todas las advertencias relativas al reciclaje y correcta eliminación de las pilas. Las pilas deben ser siempre eliminadas en un punto limpio y nunca con el resto de la basura orgánica. 21. Use este aparato en rangos de temperatura moderados y/o tropicales. NEGCIÓN LEGL MUSIC Group no admite ningún tipo de responsabilidad por cualquier daño o pérdida que pudiera sufrir cualquier persona por confiar total o parcialmente en la descripciones, fotografías o afirmaciones contenidas en este documento. Las especificaciones técnicas, imágenes y otras informaciones contenidas en este documento están sujetas a modificaciones sin previo aviso. Todas las marcas comerciales que aparecen aquí son propiedad de sus respectivos dueños. MIDS, KLRK TEKNIK, L GRUPPEN, LKE, TNNOY, TUROSOUND, TC ELECTRONIC, TC HELICON, EHRINGER, UGER y DD son marcas comerciales o marcas registradas de MUSIC Group IP Ltd. MUSIC Group IP Ltd Reservados todos los derechos. GRNTÍ LIMITD Si quiere conocer los detalles y condiciones aplicables de la garantía así como información adicional sobre la Garantía limitada de MUSIC Group, consulte online toda la información en la web music-group.com/warranty.
3 4 DIGITL SNKE DL32 Quick Start Guide 5 Consignes de sécurité Les points repérés par ce symbole portent une tension électrique suffisante pour constituer un risque d électrocution. Utilisez uniquement des câbles d enceintes professionnels de haute qualité avec fiches Jack mono 6,35 mm ou fiches à verrouillages déjà installées. Toute autre installation ou modification doit être effectuée uniquement par un personnel qualifié. Ce symbole avertit de la présence d une tension dangereuse et non isolée à l intérieur de l appareil - elle peut provoquer des chocs électriques. ttention Ce symbol signale les consignes d utilisation et d entre! Tien importantes dans la documentation fournie. Lisez les consignes de sécurité du manuel d utilisation de l appareil. ttention Pour éviter tout risque de choc électrique, ne pas ouvrir le capot de l appareil ni démonter le panneau arrière. L intérieur de l appareil ne possède aucun élément réparable par l utilisateur. Laisser toute réparation à un professionnel qualifié. ttention Pour réduire les risques de feu et de choc électrique, n exposez pas cet appareil à la pluie, à la moisissure, aux gouttes ou aux éclaboussures. Ne posez pas de récipient contenant un liquide sur l appareil (un vase par exemple). ttention Ces consignes de sécurité et d entretien sont destinées à un personnel qualifié. Pour éviter tout risque de choc électrique, n effectuez aucune réparation sur l appareil qui ne soit décrite par le manuel d utilisation. Les éventuelles réparations doivent être effectuées uniquement par un technicien spécialisé. 1. Lisez ces consignes. 2. Conservez ces consignes. 3. Respectez tous les avertissements. 4. Respectez toutes les consignes d utilisation. 5. N utilisez jamais l appareil à proximité d un liquide. 6. Nettoyez l appareil avec un chiffon sec. 7. Veillez à ne pas empêcher la bonne ventilation de l appareil via ses ouïes de ventilation. Respectez les consignes du fabricant concernant l installation de l appareil. 8. Ne placez pas l appareil à proximité d une source de chaleur telle qu un chauffage, une cuisinière ou tout appareil dégageant de la chaleur (y compris un ampli de puissance). 9. Ne supprimez jamais la sécurité des prises bipolaires ou des prises terre. Les prises bipolaires possèdent deux contacts de largeur différente. Le plus large est le contact de sécurité. Les prises terre possèdent deux contacts plus une mise à la terre servant de sécurité. Si la prise du bloc d alimentation ou du cordon d ali-mentation fourni ne correspond pas à celles de votre installation électrique, faites appel à un électricien pour effectuer le changement de prise. 10. Installez le cordon d alimentation de telle façon que personne ne puisse marcher dessus et qu il soit protégé d arêtes coupantes. ssurez-vous que le cordon d alimentation est suffisamment protégé, notamment au niveau de sa prise électrique et de l endroit où il est relié à l appareil; cela est également valable pour une éventuelle rallonge électrique. 11. Utilisez exclusivement des accessoires et des appareils supplémentaires recommandés par le fabricant. 12. Utilisez exclusivement des chariots, des diables, des présentoirs, des pieds et des surfaces de travail recommandés par le fabricant ou livrés avec le produit. Déplacez précautionneusement tout chariot ou diable chargé pour éviter d éventuelles blessures en cas de chute. 13. Débranchez l appareil de la tension secteur en cas d orage ou si l appareil reste inutilisé pendant une longue période de temps. 14. Les travaux d entretien de l appareil doivent être effectués uniquement par du personnel qualifié. ucun entretien n est nécessaire sauf si l appareil est endommagé de quelque façon que ce soit (dommages sur le cordon d alimentation ou la prise par exemple), si un liquide ou un objet a pénétré à l intérieur du châssis, si l appareil a été exposé à la pluie ou à l humidité, s il ne fonctionne pas correctement ou à la suite d une chute. 15. L appareil doit être connecté à une prise secteur dotée d une protection par mise à la terre. 16. La prise électrique ou la prise IEC de tout appareil dénué de bouton marche/arrêt doit rester accessible en permanence. 17. Mise au rebut appropriée de ce produit: Ce symbole indique qu en accord avec la directive DEEE (2012/19/EU) et les lois en vigueur dans votre pays, ce produit ne doit pas être jeté avec les déchets ménagers. Ce produit doit être déposé dans un point de collecte agréé pour le recyclage des déchets d équipements électriques et électroniques (EEE). Une mauvaise manipulation de ce type de déchets pourrait avoir un impact négatif sur l environnement et la santé à cause des substances potentiellement dangereuses généralement associées à ces équipements. En même temps, votre coopération dans la mise au rebut de ce produit contribuera à l utilisation efficace des ressources naturelles. Pour plus d informations sur l endroit où vous pouvez déposer vos déchets d équipements pour le recyclage, veuillez contacter votre mairie ou votre centre local de collecte des déchets. 18. N installez pas l appareil dans un espace confiné tel qu une bibliothèque ou meuble similaire. 19. Ne placez jamais d objets enflammés, tels que des bougies allumées, sur l appareil. 20. Gardez à l esprit l impact environnemental lorsque vous mettez des piles au rebus. Les piles usées doivent être déposées dans un point de collecte adapté. 21. Utilisez l appareil dans un climat tropical et/ou modéré. DÉNI LÉGL MUSIC Group ne peut être tenu pour responsable pour toute perte pouvant être subie par toute personne se fiant en partie ou en totalité à toute description, photographie ou affirmation contenue dans ce document. Les caractéristiques, l apparence et d autres informations peuvent faire l objet de modifications sans notification. Toutes les marques appartiennent à leurs propriétaires respectifs. MIDS, KLRK TEKNIK, L GRUPPEN, LKE, TNNOY, TUROSOUND, TC ELECTRONIC, TC HELICON, EHRINGER, UGER et DD sont des marques ou marques déposées de MUSIC Group IP Ltd. MUSIC Group IP Ltd Tous droits réservés. GRNTIE LIMITÉE Pour connaître les termes et conditions de garantie applicables, ainsi que les informations supplémentaires et détaillées sur la Garantie Limitée de MUSIC Group, consultez le site Internet music-group.com/warranty. Wichtige Sicherheitshinweise Vorsicht Die mit dem Symbol markierten nschlüsse führen so viel Spannung, dass die Gefahr eines Stromschlags besteht. Verwenden Sie nur hochwertige, professionelle Lautsprecherkabel mit vorinstallierten 6,35 mm MONO-Klinkensteckern oder Lautsprecherstecker mit Drehverriegelung. lle anderen Installationen oder Modifikationen sollten nur von qualifiziertem Fachpersonal ausgeführt werden. chtung Um eine Gefährdung durch Stromschlag auszuschließen, darf die Geräteabdeckung bzw. Geräterückwand nicht abgenommen werden. Im Innern des Geräts befinden sich keine vom enutzer reparierbaren Teile. Reparaturarbeiten dürfen nur von qualifiziertem Personal ausgeführt werden. chtung Um eine Gefährdung durch Feuer bzw. Stromschlag auszuschließen, darf dieses Gerät weder Regen oder Feuchtigkeit ausgesetzt werden noch sollten Spritzwasser oder tropfende Flüssigkeiten in das Gerät gelangen können. Stellen Sie keine mit Flüssigkeit gefüllten Gegenstände, wie z.. Vasen, auf das Gerät. chtung Die Service-Hinweise sind nur durch qualifiziertes Personal zu befolgen. Um eine Gefährdung durch Stromschlag zu vermeiden, führen Sie bitte keinerlei Reparaturen an dem Gerät durch, die nicht in der edienungsanleitung beschrieben sind. Reparaturen sind nur von qualifiziertem Fachpersonal durchzuführen. 1. Lesen Sie diese Hinweise. 2. ewahren Sie diese Hinweise auf. 3. eachten Sie alle Warnhinweise. 4. efolgen Sie alle edienungshinweise. 5. etreiben Sie das Gerät nicht in der Nähe von Wasser. 6. Reinigen Sie das Gerät mit einem trockenen Tuch. 7. lockieren Sie nicht die elüftungsschlitze. eachten Sie beim Einbau des Gerätes die Herstellerhinweise. 8. Stellen Sie das Gerät nicht in der Nähe von Wärmequellen auf. Solche Wärmequellen sind z.. Heizkörper, Herde oder andere Wärme erzeugende Geräte (auch Verstärker). 9. Entfernen Sie in keinem Fall die Sicherheitsvorrichtung von Zweipol- oder geerdeten Steckern. Ein Zweipolstecker hat zwei unterschiedlich breite Steckkontakte. Ein geerdeter Stecker hat zwei Steckkontakte und einen dritten Erdungskontakt. Der breitere Steckkontakt oder der zusätzliche Erdungskontakt dient Ihrer Sicherheit. Falls das mitgelieferte Steckerformat nicht zu Ihrer Steckdose passt, wenden Sie sich bitte an einen Elektriker, damit die Steckdose entsprechend ausgetauscht wird. 10. Verlegen Sie das Netzkabel so, dass es vor Tritten und scharfen Kanten geschützt ist und nicht beschädigt werden kann. chten Sie bitte insbesondere im ereich der Stecker, Verlängerungskabel und an der Stelle, an der das Netzkabel das Gerät verlässt, auf ausreichenden Schutz. 11. Das Gerät muss jederzeit mit intaktem Schutzleiter an das Stromnetz angeschlossen sein. 12. Sollte der Hauptnetzstecker oder eine Gerätesteckdose die Funktionseinheit zum bschalten sein, muss diese immer zugänglich sein. 13. Verwenden Sie nur Zusatzgeräte/Zubehörteile, die laut Hersteller geeignet sind. 14. Verwenden Sie nur Wagen, Standvorrichtungen, Stative, Halter oder Tische, die vom Hersteller benannt oder im Lieferumfang des Geräts enthalten sind. Falls Sie einen Wagen benutzen, seien Sie vorsichtig beim ewegen der Wagen- Gerätkombination, um Verletzungen durch Stolpern zu vermeiden. 15. Ziehen Sie den Netzstecker bei Gewitter oder wenn Sie das Gerät längere Zeit nicht benutzen. 16. Lassen Sie alle Wartungsarbeiten nur von qualifiziertem Service-Personal ausführen. Eine Wartung ist notwendig, wenn das Gerät in irgendeiner Weise beschädigt wurde (z.. eschädigung des Netzkabels oder Steckers), Gegenstände oder Flüssigkeit in das Geräteinnere gelangt sind, das Gerät Regen oder Feuchtigkeit ausgesetzt wurde, das Gerät nicht ordnungsgemäß funktioniert oder auf den oden gefallen ist. 17. Korrekte Entsorgung dieses Produkts: Dieses Symbol weist darauf hin, das Produkt entsprechend der WEEE Direktive (2012/19/EU) und der jeweiligen nationalen Gesetze nicht zusammen mit Ihren Haushaltsabfällen zu entsorgen. Dieses Produkt sollte bei einer autorisierten Sammelstelle für Recycling elektrischer und elektronischer Geräte (EEE) abgegeben werden. Wegen bedenklicher Substanzen, die generell mit elektrischen und elektronischen Geräten in Verbindung stehen, könnte eine unsachgemäße ehandlung dieser bfallart eine negative uswirkung auf Umwelt und Gesundheit haben. Gleichzeitig gewährleistet Ihr eitrag zur richtigen Entsorgung dieses Produkts die effektive Nutzung natürlicher Ressourcen. Für weitere Informationen zur Entsorgung Ihrer Geräte bei einer Recycling-Stelle nehmen Sie bitte Kontakt zum zuständigen städtischen üro, Entsorgungsamt oder zu Ihrem Haushaltsabfallentsorger auf. 18. Installieren Sie das Gerät nicht in einer beengten Umgebung, zum eispiel ücherregal oder ähnliches. 19. Stellen Sie keine Gegenstände mit offenen Flammen, etwa brennende Kerzen, auf das Gerät. 20. eachten Sie bei der Entsorgung von atterien den Umweltschutz-spekt. atterien müssen bei einer atterie-sammelstelle entsorgt werden. 21. Verwenden Sie das Gerät in tropischen und/oder gemäßigten Klimazonen. HFTUNGSUSSCHLUSS MUSIC Group übernimmt keine Haftung für Verluste, die Personen entstanden sind, die sich ganz oder teilweise auf hier enthaltene eschreibungen, Fotos oder ussagen verlassen haben. Technische Daten, Erscheinungsbild und andere Informationen können ohne vorherige nkündigung geändert werden. lle Warenzeichen sind Eigentum der jeweiligen Inhaber. MIDS, KLRK TEKNIK, L GRUPPEN, LKE, TNNOY, TUROSOUND, TC ELECTRONIC, TC HELICON, EHRINGER, UGER und DD sind Warenzeichen oder eingetragene Warenzeichen der MUSIC Group IP Ltd. MUSIC Group IP Ltd lle Rechte vorbehalten. ESCHRÄNKTE GRNTIE Die geltenden Garantiebedingungen und zusätzliche Informationen bezüglich der von MUSIC Group gewährten beschränkten Garantie finden Sie online unter music-group.com/warranty.
4 6 DIGITL SNKE DL32 Quick Start Guide 7 Instruções de Segurança Importantes viso! Terminais marcados com o símbolo carregam corrente elétrica de magnitude suficiente para constituir um risco de choque elétrico. Use apenas cabos de alto-falantes de alta qualidade com plugues TS de ¼" ou plugues com trava de torção pré-instalados. Todas as outras instalações e modificações devem ser efetuadas por pessoas qualificadas. Este símbolo, onde quer que o encontre, alerta-o para a leitura das instruções de manuseamento que acompanham o equipamento. Por favor leia o manual de instruções. tenção De forma a diminuir o risco de choque eléctrico, não remover a cobertura (ou a secção de trás). Não existem peças substituíveis por parte do utilizador no seu interior. Para esse efeito recorrer a um técnico qualificado. tenção Para reduzir o risco de incêndios ou choques eléctricos o aparelho não deve ser exposto à chuva nem à humidade. lém disso, não deve ser sujeito a salpicos, nem devem ser colocados em cima do aparelho objectos contendo líquidos, tais como jarras. tenção Estas instruções de operação devem ser utilizadas, em exclusivo, por técnicos de assistência qualificados. Para evitar choques eléctricos não proceda a reparações ou intervenções, que não as indicadas nas instruções de operação, salvo se possuir as qualifi-cações necessárias. Para evitar choques eléctricos não proceda a reparações ou intervenções, que não as indicadas nas instruções de operação. Só o deverá fazer se possuir as qualificações necessárias. 1. Leia estas instruções. 2. Guarde estas instruções. 3. Preste atenção a todos os avisos. 4. Siga todas as instruções. 5. Não utilize este dispositivo perto de água. 6. Limpe apenas com um pano seco. 7. Não obstrua as entradas de ventilação. Instale de acordo com as instruções do fabricante. 8. Não instale perto de quaisquer fontes de calor tais como radiadores, bocas de ar quente, fogões de sala ou outros aparelhos (incluindo amplificadores) que produzam calor. 9. Não anule o objectivo de segurança das fichas polarizadas ou do tipo de ligação à terra. Uma ficha polarizada dispõe de duas palhetas sendo uma mais larga do que a outra. Uma ficha do tipo ligação à terra dispõe de duas palhetas e um terceiro dente de ligação à terra. palheta larga ou o terceiro dente são fornecidos para sua segurança. Se a ficha fornecida não encaixar na sua tomada, consulte um electricista para a substituição da tomada obsoleta. 10. Proteja o cabo de alimentação de pisadelas ou apertos, especialmente nas fichas, extensões, e no local de saída da unidade. Certifique-se de que o cabo eléctrico está protegido. Verifique particularmente nas fichas, nos receptáculos e no ponto em que o cabo sai do aparelho. 11. O aparelho tem de estar sempre conectado à rede eléctrica com o condutor de protecção intacto. 12. Se utilizar uma ficha de rede principal ou uma tomada de aparelhos para desligar a unidade de funcionamento, esta deve estar sempre acessível. 13. Utilize apenas ligações/acessórios especificados pelo fabricante. 14. Utilize apenas com o carrinho, estrutura, tripé, suporte, ou mesa especificados pelo fabricante ou vendidos com o dispositivo. Quando utilizar um carrinho, tenha cuidado ao mover o conjunto carrinho/dispositivo para evitar danos provocados pela terpidação. 15. Desligue este dispositivo durante as trovoadas ou quando não for utilizado durante longos períodos de tempo. 16. Qualquer tipo de reparação deve ser sempre efectuado por pessoal qualificado. É necessária uma reparação sempre que a unidade tiver sido de alguma forma danificada, como por exemplo: no caso do cabo de alimentação ou ficha se encontrarem danificados; na eventualidade de líquido ter sido derramado ou objectos terem caído para dentro do dispositivo; no caso da unidade ter estado exposta à chuva ou à humidade; se esta não funcionar normalmente, ou se tiver caído. 17. Correcta eliminação deste produto: este símbolo indica que o produto não deve ser eliminado juntamente com os resíduos domésticos, segundo a Directiva REEE (2012/19/EU) e a legislação nacional. Este produto deverá ser levado para um centro de recolha licenciado para a reciclagem de resíduos de equipamentos eléctricos e electrónicos (EEE). O tratamento incorrecto deste tipo de resíduos pode ter um eventual impacto negativo no ambiente e na saúde humana devido a substâncias potencialmente perigosas que estão geralmente associadas aos EEE. o mesmo tempo, a sua colaboração para a eliminação correcta deste produto irá contribuir para a utilização eficiente dos recursos naturais. Para mais informação acerca dos locais onde poderá deixar o seu equipamento usado para reciclagem, é favor contactar os serviços municipais locais, a entidade de gestão de resíduos ou os serviços de recolha de resíduos domésticos. 18. Não instale em lugares confinados, tais como estantes ou unidades similares. 19. Não coloque fontes de chama, tais como velas acesas, sobre o aparelho. 20. Favor, obedecer os aspectos ambientais de descarte de bateria. aterias devem ser descartadas em um ponto de coletas de baterias. 21. Use este aparelho em climas tropicais e/ou moderados. LEGL RENUNCINTE O MUSIC Group não se responsabiliza por perda alguma que possa ser sofrida por qualquer pessoa que dependa, seja de maneira completa ou parcial, de qualquer descrição, fotografia, ou declaração aqui contidas. Dados técnicos, aparências e outras informações estão sujeitas a modificações sem aviso prévio. Todas as marcas são propriedade de seus respectivos donos. MIDS, KLRK TEKNIK, L GRUPPEN, LKE, TNNOY, TUROSOUND, TC ELECTRONIC, TC HELICON, EHRINGER, UGER e DD são marcas ou marcas registradas do MUSIC Group IP Ltd. MUSIC Group IP Ltd Todos direitos reservados. GRNTI LIMITD Para obter os termos de garantia aplicáveis e condições e informações adicionais a respeito da garantia limitada do MUSIC Group, favor verificar detalhes na íntegra através do website music-group.com/warranty.
5 8 DIGITL SNKE DL32 Quick Start Guide DIGITL SNKE DL32 Hook-up Step 1: Hook-Up DL32 rear panel connections DL32 common connections Shielded CT5 DI ox P16-D M32 P16-M iq12 Keyboard Cabling for all ES50 connections between M32 and DL32 stageboxes: Shielded CT-5e, Ethercon terminated ends Maximum cable length 100 meters (330 feet) M12 M15 M18 9
6 10 DIGITL SNKE DL32 Quick Start Guide 11 DIGITL SNKE DL32 Hook-up DL32 between two M32 consoles Linking a DL32 and DL16 Step 1: Hook-Up M32 at Front-of-House M32 IN 1-32 M32 OUT 1-16 ES50- DL32 on stage Shielded CT5 IN M32 at Side-stage Note: The signals on both units are fully defined on the M32 s Routing/ES50 Output page. OUT ES50- M32 Shielded CT5 DL32 with two consoles: from stage Mixing Console FOH (clock master) to stage DL32 Digital Stage ox DL32 Local In Local In Local In Local In S32 DL32 XLR OUT XLR OUT DT OUT DT OUT P16 OUT P16 OUT Local In Local In Local In Local In to FOH Mixing Console Stage (sync slave) DL32 with DL16 and console: from stage Mixing Console FOH (clock master) to stage DL32 Digital Stage ox DL32 Local In Local In Local In Local In S32 DL32 XLR OUT XLR OUT DT OUT DT OUT P16 OUT P16 OUT DL16-2-(Out ) Local In Local In S32 DL16-2-(Out ) XLR OUT DT OUT P16 OUT P16 OUT
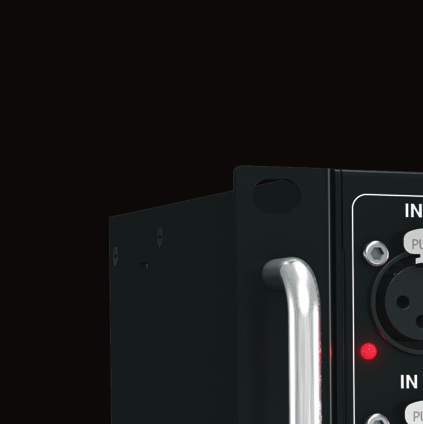
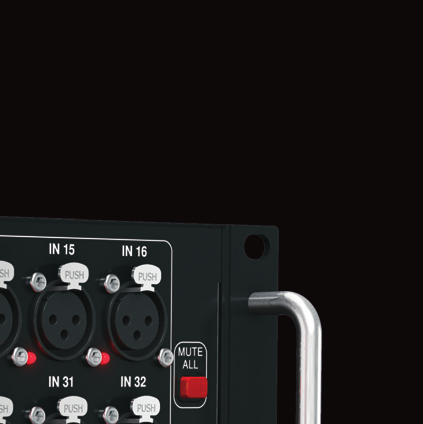
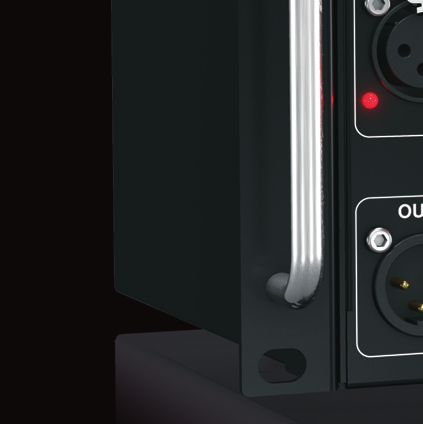
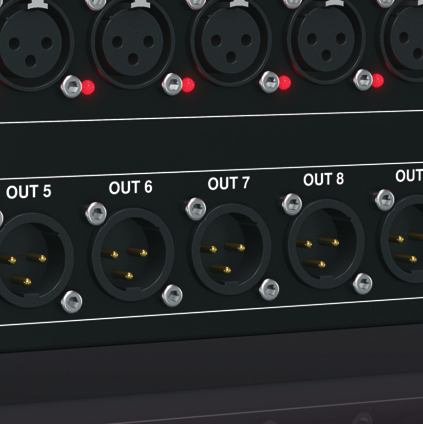
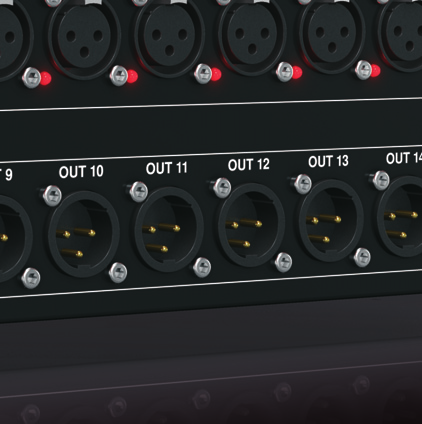
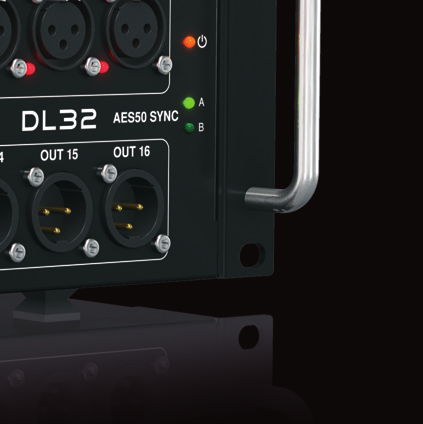
7 12 DIGITL SNKE DL32 Quick Start Guide 13 DIGITL SNKE DL32 Controls (1) (2) (3) (4) Step 2: Controls (1) PHNTOM LEDs light when 48V supply voltage is engaged for a particular channel. (2) MIDS-designed mic/line inputs accept balanced XLR male plugs. (3) MUTE LL button mutes all outputs for safely connecting and disconnecting cables while the P system is still on. Keep the button depressed while patching cables on XLR inputs The button s red light will turn off shortly after releasing it, indicating that the inputs are now active again. (4) ES50 SYNC LEDs indicate proper clock synchronisation on either ES50 port with a green light. red light indicates the ES50 connection is not synchronised, and off indicates ES50 is not connected. (5) XLR outputs 1-16 accept female balanced XLR plugs and provide the signals 1-16 of ES50 port. (6) POWER switch turns the unit on and off. (7) US input accepts a US type- plug for firmware updates via PC. (8) ES50 ports and allow connection to a SuperMC digital multi-channel network via shielded Cat-5e Ethernet cable with terminated ends compatible to Neutrik ethercon. NOTE: The clock master, typically the digital mixer, must be connected to the ES50 port, while additional stage boxes would be connected to port. (9) ULTRNET port provides the 16 ES50 channels on a single shielded CT5 cable to a EHRINGER P16 personal monitoring system. (10) DT OUT jacks send ES50 channels to external equipment via optical cable. (11) ES/EU outputs send the ES50 channels 13/14 and 15/16 to devices with digital inputs. (12) MIDI IN/OUT jacks accept standard 5-pin MIDI cables for MIDI communication to and from an M32 console. (5) (6) (7) (8) (9) (10) (11) (12)
8 14 DIGITL SNKE DL32 Quick Start Guide 15 DIGITL SNKE DL32 Output Configuration DL32 Output Signals Outputs > mixer: 44.1/48 khz clock sync nalog XLR out 1-16 connected to DL32 port ES50 port = ES50-, ch01-ch16 ES/EU (ES 3) = ES50- ch13-ch14 ch15-ch16 DT OUT (Toslink) = ES50- ch17-ch24 ch25-ch32 P-16 Ultranet Personal Monitoring with Turbosound iq control = ES50- ch33-ch48
9 16 DIGITL SNKE DL32 Quick Start Guide 17 Specifications Other important information Processing /D-D/ conversion (Cirrus Logic /D CS5368, D/ CS4398) Networked I/O latency (stagebox in > console processing* > stagebox out) Connectors 44.1 / 48 khz, 114 d dynamic range (-weighted) 1.1 ms Programmable MIDS mic preamps, balanced XLR 32 Line outputs, balanced XLR 16 ES/EU outputs (ES3 XLR) 2 ES50 ports, SuperMC networking, NEUTRIK ethercon 2 ULTRNET output, RJ45 (no power supplied) 1 MIDI inputs / outputs 1/1 DT outputs, Toslink 2 US port for system updates, type 1 Mic Input Characteristics (MIDS PRO) Input impedance, XLR 10 kω Non clip maximum input level, XLR du THD + noise, unity gain, 0 du out < 0.01%, unweighted THD + noise, +45 d gain, 0 du out < 0.03%, unweighted Phantom power, switchable per input 48 V Equivalent input +45 d gain, (150 Ω source) < -126 du, 22 Hz - 22 khz, unweighted 1 khz, unity gain (typical) > 70 d 1 khz, +45 d gain (typical) > 90 d Input/Output Characteristics Frequency 48 khz sample rate, at any gain 20 Hz - 20 khz, 0 d to -1 d Dynamic range, analogue mic in to analogue out 107 d, 22 Hz - 22 khz, unweighted /D dynamic range, mic preamp to converter 109 d, 22 Hz - 22 khz, unweighted D/ dynamic range, converter and output 110 d, 22 Hz - 22 khz, unweighted Crosstalk 1 khz, adjacent channels 100 d Output Characteristics Output impedance, XLR 50 Ω Maximum output level, XLR +21 du Residual noise level, unity gain, XLR < -86 du, 22 Hz - 22 khz, unweighted Residual noise level, muted, XLR < -100 du, 22 Hz - 22 khz, unweighted Digital In/Out ES50 SuperMC 48 or 44.1 khz, 24-bit PCM 2 x 48 channels, bidirectional ES50 SuperMC cable length, CT5e shielded** up to 100 m ULTRNET 48 or 44.1 khz, 22-bit PCM 1 x 16 channels, unidirectional ULTRNET cable length, CT5 shielded up to 75 m DT 48 or 44.1 khz, 24-bit PCM 2 x 8 channels, unidirectional Toslink optical, cable length 5 m, typical ES/EU 48 or 44.1 khz, 24-bit PCM 2 x 2 channels, unidirectional XLR, 110 Ω balanced, cable length 5 m, typical Power Switch-mode autorange power supply V (50/60 Hz) Power consumption 55 W Physical Standard operating temperature 5 C to 40 C (41 F to 104 F) Dimensions 483 x 242 x 138 mm (19 x 9.5 x 5.4") Weight 5.7 kg (12.5 lbs) *incl. all channel and bus processing, excl. insert effects and line delays **KLRK TEKNIK NCT5E-50M recommended NOTE: Please verify that your specific ES50 connections provide stable operation prior to using the products in a live performance or recording situation. The maximum distance for ES50 CT5 connections is 100 m / 330 ft. Please consider using shorter connections where possible for gaining safety margin. Combining 2 or more cables with extension connectors can reduce the reliability and maximum distance between ES50 products. Unshielded (UTP) cable may work well for many applications, but entails an additional risk for ESD issues. We guarantee, that all our products will perform as specified with 50 m of KLRK TEKNIK NCT5E-50M, and we recommend using cable of similar quality, only. KLRK TEKNIK also offers the very cost-effective DN9610 ES50 Repeater or DN9620 ES50 Extender for situations where extremely long cable runs are required. Important information 1. Register online. Please register your new MUSIC Group equipment right after you purchase it by visiting midasconsoles. com. Registering your purchase using our simple online form helps us to process your repair claims more quickly and efficiently. lso, read the terms and conditions of our warranty, if applicable. 2. Malfunction. Should your MUSIC Group uthorized Reseller not be located in your vicinity, you may contact the MUSIC Group uthorized Fulfiller for your country listed under Support at midasconsoles. com. Should your country not be listed, please check if your problem can be dealt with by our Online Support which may also be found under Support at midasconsoles. com. lternatively, please submit an online warranty claim at midasconsoles. com EFORE returning the product. 3. Power Connections. efore plugging the unit into a power socket, please make sure you are using the correct mains voltage for your particular model. Faulty fuses must be replaced with fuses of the same type and rating without exception. spectos importantes 1. Registro online. Le recomendamos que registre su nuevo aparato MUSIC Group justo después de su compra accediendo a la página web midasconsoles. com. El registro de su compra a través de nuestro sencillo sistema online nos ayudará a resolver cualquier incidencia que se presente a la mayor brevedad posible. demás, aproveche para leer los términos y condiciones de nuestra garantía, si es aplicable en su caso. 2. verías. En el caso de que no exista un distribuidor MUSIC Group en las inmediaciones, puede ponerse en contacto con el distribuidor MUSIC Group de su país, que encontrará dentro del apartado Support de nuestra página web midasconsoles. com. En caso de que su país no aparezca en ese listado, acceda a la sección Online Support (que también encontrará dentro del apartado Support de nuestra página web) y compruebe si su problema aparece descrito y solucionado allí. De forma alternativa, envíenos a través de la página web una solicitud online de soporte en periodo de garantía NTES de devolvernos el aparato. 3. Conexiones de corriente. ntes de enchufar este aparato a una salida de corriente, asegúrese de que dicha salida sea del voltaje adecuado para su modelo concreto. En caso de que deba sustituir un fusible quemado, deberá hacerlo por otro de idénticas especificaciones, sin excepción. Informations importantes 1. Enregistrez-vous en ligne. Prenez le temps d enregistrer votre produit MUSIC Group aussi vite que possible sur le site Internet midasconsoles. com. Le fait d enregistrer le produit en ligne nous permet de gérer les réparations plus rapidement et plus efficacement. Prenez également le temps de lire les termes et conditions de notre garantie. 2. Dysfonctionnement. Si vous n avez pas de revendeur MUSIC Group près de chez vous, contactez le distributeur MUSIC Group de votre pays : consultez la liste des distributeurs de votre pays dans la page Support de notre site Internet midasconsoles. com. Si votre pays n est pas dans la liste, essayez de résoudre votre problème avec notre aide en ligne que vous trouverez également dans la section Support du site midasconsoles. com. Vous pouvez également nous faire parvenir directement votre demande de réparation sous garantie par Internet sur le site midasconsoles. com VNT de nous renvoyer le produit. 3. Raccordement au secteur. vant de relier cet équipement au secteur, assurez-vous que la tension secteur de votre région soit compatible avec l appareil. Veillez à remplacer les fusibles uniquement par des modèles exactement de même taille et de même valeur électrique sans aucune exception. Weitere wichtige Informationen 1. Online registrieren. itte registrieren Sie Ihr neues MUSIC Group-Gerät direkt nach dem Kauf auf der Website midasconsoles. com. Wenn Sie Ihren Kauf mit unserem einfachen online Formular registrieren, können wir Ihre Reparaturansprüche schneller und effizienter bearbeiten. Lesen Sie bitte auch unsere Garantiebedingungen, falls zutreffend. 2. Funktionsfehler. Sollte sich kein MUSIC Group Händler in Ihrer Nähe befinden, können Sie den MUSIC Group Vertrieb Ihres Landes kontaktieren, der auf midasconsoles. com unter Support aufgeführt ist. Sollte Ihr Land nicht aufgelistet sein, prüfen Sie bitte, ob Ihr Problem von unserem Online Support gelöst werden kann, den Sie ebenfalls auf midasconsoles. com unter Support finden. lternativ reichen Sie bitte Ihren Garantieanspruch online auf midasconsoles. com ein, EVOR Sie das Produkt zurücksenden. 3. Stromanschluss. evor Sie das Gerät an eine Netzsteckdose anschließen, prüfen Sie bitte, ob Sie die korrekte Netzspannung für Ihr spezielles Modell verwenden. Fehlerhafte Sicherungen müssen ausnahmslos durch Sicherungen des gleichen Typs und Nennwerts ersetzt werden. Outras Informações Importantes 1. Registre-se online. Por favor, registre seu novo equipamento MUSIC Group logo após a compra visitando o site midasconsoles. com Registrar sua compra usando nosso simples formulário online nos ajuda a processar seus pedidos de reparos com maior rapidez e eficiência. lém disso, leia nossos termos e condições de garantia, caso seja necessário. 2. Funcionamento Defeituoso. Caso seu fornecedor MUSIC Group não esteja localizado nas proximidades, você pode contatar um distribuidor MUSIC Group para o seu país listado abaixo de Suporte em midasconsoles. com. Se seu país não estiver na lista, favor checar se seu problema pode ser resolvido com o nosso Suporte Online que também pode ser achado abaixo de Suporte em midasconsoles. com. lternativamente, favor enviar uma solicitação de garantia online em midasconsoles. com NTES da devolução do produto. 3. Ligações. ntes de ligar a unidade à tomada, assegure-se de que está a utilizar a voltagem correcta para o modelo em questão. Os fusíveis com defeito terão de ser substituídos, sem qualquer excepção, por fusíveis do mesmo tipo e corrente nominal.
10 18 DIGITL SNKE DL32 Quick Start Guide 19 FEDERL COMMUNICTIONS COMMISSION COMPLINCE INFORMTION MIDS DIGITL SNKE DL32 Responsible Party Name: MUSIC Group Research UK Limited ddress: Klark Industrial Park, Walter Nash Road, Kidderminster. Worcestershire. DY11 7HJ. England. Phone Number: DIGITL SNKE DL32 complies with the FCC rules as mentioned in the following paragraph: This equipment has been tested and found to comply with the limits for a Class digital device, pursuant to Part 15 of the FCC Rules. These limits are designed to provide reasonable protection against harmful interference when the equipment is operated in a commercial environment. This equipment generates, uses, and can radiate radio frequency energy and, if not installed and used in accordance with the instruction manual, may cause harmful interference to radio communications. Operation of this equipment in a residential area is likely to cause harmful interference in which case the user will be required to correct the interference at his own expense. Important information: Changes or modifications to the equipment not expressly approved by MUSIC Group can void the user s authority to use the equipment.


11 midasconsoles.com
Manual de Instruções POWERLIGHT PL2000. Professional Rack Light and Power Distributor
 Manual de Instruções POWERLIGHT PL2000 Professional Rack Light and Power Distributor 2 POWERLIGHT PL2000 Manual de Instruções Índice Instruções de Segurança Importantes...3 Legal Renunciante...4 Garantia
Manual de Instruções CABLE TESTER CT100. Professional 6-in-1 Cable Tester
 Manual de Instruções CABLE TESTER CT100 Professional 6-in-1 Cable Tester 2 CABLE TESTER CT100 Manual de Instruções 3 CABLE TESTER CT100 Manual de Instruções Índice Instruções de Segurança Importantes...3
Manual de Instruções CABLE TESTER CT100. Professional 6-in-1 Cable Tester
 Manual de Instruções CABLE TESTER CT100 Professional 6-in-1 Cable Tester 2 Índice Instruções de Segurança Importantes...3 Legal Renunciante...5 Garantia Limitada...5 1. Introdução...6 2. Modo de Teste
OUTPUT1 MIN VOL CV NORM. Quick Start Guide FCV100. Ultra-Flexible Dual-Mode Foot Pedal for Volume and Modulation Control
 CV NORM OUTPUT2 OUTPUT1 MIN VOL 0 10 Quick Start Guide FCV100 Ultra-Flexible Dual-Mode Foot Pedal for Volume and Modulation Control 2 FCV100 Manual de Instruções Índice Obrigado... 2 1. Instruções de Segurança...
X AIR XR16/XR12. Quick Start Guide
 Quick Start Guide (Visit behringer.com for Full Manual) X AIR XR16/XR12 16/12-Input Digital Mixer for ipad/android Tablets with 8/4 Programmable MIDAS Preamps, 8 Line Inputs, Integrated Wifi Module and
INSTALLATION GUIDE MANUAL DE INSTALAÇÃO MANUAL DE INSTALACIÓN
 INSTALLATION GUIDE MANUAL DE INSTALAÇÃO MANUAL DE INSTALACIÓN General Information/ Informações Gerais/ Informaciones Generales Compatible with Open Rack Enterprise. To be installed in closed environments.
Guia de Instalação Rápida TE100-PCBUSR
 Guia de Instalação Rápida TE100-PCBUSR Table Índice of Contents Português... 1. Antes de Iniciar... 2. Como Instalar... 1 1 2 Troubleshooting... 3 Version 07.27.2007 1. Antes de Iniciar Conteúdo da Embalagem
Dallas RMD 169 Texas DJ
 Radio / MD Dallas RMD 69 Texas DJ Installation instructions Notice de montage Instrucciones de instalación Instruções de montagem G Safety precautions Installation and connection regulations In the event
INSTALLATION GUIDE MANUAL DE INSTALAÇÃO MANUAL DE INSTALACIÓN
 INSTALLATION GUIDE MANUAL DE INSTALAÇÃO MANUAL DE INSTALACIÓN General Information/ Informações Gerais/ Información General Structure for the installation of high depth equipaments; Standard 19 rack; Capacity
Manual do Usuário. Ingenico Avenue Charles de Gaulle Neuilly sur Seine Tél. 33(0) Fax 33 (0)
 Fax 33 (0)") Manual do Usuário ismp CRADLE Ingenico 190-192 Avenue Charles de Gaulle 92200 Neuilly sur Seine Tél. 33(0)1 46 25 82 00 - Fax 33 (0)1 47 72 56 95 Índice 1. Introdução 3 2. Desembalando 4 3. Recomendações
Manual do Usuário ismp CRADLE Ingenico 190-192 Avenue Charles de Gaulle 92200 Neuilly sur Seine Tél. 33(0)1 46 25 82 00 - Fax 33 (0)1 47 72 56 95 Índice 1. Introdução 3 2. Desembalando 4 3. Recomendações
Manual do usuário. Xperia TX TV Dock DK22 Xperia T TV Dock DK23 DK22/DK23
 Manual do usuário Xperia TX TV Dock DK22 Xperia T TV Dock DK23 DK22/DK23 Índice Introdução... 3 Visão geral do TV Dock... 3 Introdução... 4 Smart Connect... 4 Como atualizar o Smart Connect...4 Utilização
KBW: KIT WIRELESS WIRELESS KEYBOARD + WIRELESS OPTICAL MOUSE USER GUIDE MANUAL DE UTILIZADOR GUÍA DEL USUARIO
 KBW: KIT WIRELESS WIRELESS KEYBOARD + WIRELESS OPTICAL MOUSE USER GUIDE MANUAL DE UTILIZADOR GUÍA DEL USUARIO EN INSTALLATION 1) Plug the USB 2.4 GHZ RF wireless adapter to an available port on your computer.
INSTALLATION GUIDE MANUAL DE INSTALAÇÃO MANUAL DE INSTALACIÓN
 INSTALLATION GUIDE MANUAL DE INSTALAÇÃO MANUAL DE INSTALACIÓN youtube.com/furukawaelectriclatam Use um leitor de códigos QR 42U General Information/ Informações Gerais/ Informaciones Generales Compatible
Manual do usuário. MHL to HDMI Adapter IM750
 Manual do usuário MHL to HDMI Adapter IM750 Índice Introdução...3 Visão geral do MHL to HDMI Adapter...3 Introdução...4 Smart Connect...4 Como atualizar o Smart Connect...4 Utilização do MHL to HDMI Adapter...5
TKT Series TKT105/TKT102/TKT122. Full Range Loudspeaker for KTV Applications
 TKT Series TKT105/TKT102/TKT122 Full Range Loudspeaker for KTV Applications 2 TKT Series Quick Start Guide 3 Important Safety Instructions Terminals marked with this symbol carry electrical current of
OCV Series OCV 8 / OCV 6. 8"/6" Coaxial Pendant Loudspeaker for Installation Applications
 OCV Series OCV 8 / OCV 6 8"/6" Coaxial Pendant Loudspeaker for Installation Applications 2 OCV Series Quick Start Guide 3 Important Safety Instructions Terminals marked with this symbol carry electrical
TFM Series TFM122M and TFM152M. Co-axial 2 Way 12/15" Stage Monitor for Touring Applications
 TFM Series TFM122M and TFM152M Co-axial 2 Way 12/15" Stage Monitor for Touring Applications 2 TFM Series Quick Start Guide 3 Important Safety Instructions Terminals marked with this symbol carry electrical
Manual do usuário. Carregador rápido para veículos AN420
 Manual do usuário Carregador rápido para veículos AN420 Índice Introdução... 3 Carregamento fácil... 3 Usando o Carregador rápido para veículos...4 Carregar dispositivos... 4 Informações jurídicas...5
Quick Start Guide TC2290-DT. Legendary Dynamic Delay Plug-In with Dedicated Desktop Interface and Signature Presets
 Quick Start Guide TC2290-DT Legendary Dynamic Delay Plug-In with Dedicated Desktop Interface and Signature Presets 2 TC2290-DT Quick Start Guide 3 Important Safety Instructions Terminals marked with this
Presenter SNP6000. Register your product and get support at PT Manual do utilizador
 Register your product and get support at www.philips.com/welcome Presenter SNP6000 PT Manual do utilizador 1 a b c d e 2 3 4 Federal Communication Commission Interference Statement This equipment has been
AES50/Dual Network Bridge Format Converter with up to 64 Bidirectional Channels and Asynchronous Sample Rate Conversion
 DN9650/DN9652 AES50/Dual Network Bridge Format Converter with up to 64 Bidirectional Channels and Asynchronous Sample Rate Conversion Quick Start Guide (Visit klarkteknik.com for Full Manual) 2 DN9650/DN9652
Getting started with Première utilisation Logitech Stereo Speakers Z110
 Getting started with Première utilisation Logitech Stereo Speakers Z110 Getting started with Première utilisation Logitech Stereo Speakers Z110 2 2 1 English Basic setup You will need to adjust the volume
Manual do usuário. LiveDock multimedia station DK10
 Manual do usuário LiveDock multimedia station DK10 Índice Visão geral da LiveDock multimedia station... 4 Visão geral da parte traseira...5 Visão geral da parte inferior... 5 Introdução... 6 Para carregar...7
DN9650/DN9652. Quick Start Guide
 DN9650/DN9652 AES50/Dual Network Bridge Format Converter with up to 64 Bidirectional Channels and Asynchronous Sample Rate Conversion Quick Start Guide 2 DN9650/DN9652 Quick Start Guide 3 Important Safety
Register your product and get support at SBA3010/00. Manual do utilizador
 Register your product and get support at www.philips.com/welcome SBA3010/00 Manual do utilizador 1 Importante Segurança Importantes instruções de segurança Respeite todos os avisos. Siga todas as
Guia de Instalação Rápida TEW-432BRP
 Guia de Instalação Rápida TEW-432BRP Table Índice of Contents Português... 1. Antes de Iniciar... 2. Instalar Roteador... 3. Bônus... Troubleshooting... 1 1 2 4 5 Version 08.07.2006 1. Antes de Iniciar
Performer TPX Series TPX122M 2 Way 12" Full Range Loudspeaker and Stage Monitor for Portable PA Applications
 Performer TPX Series TPX122M 2 Way 12" Full Range Loudspeaker and Stage Monitor for Portable PA Applications TPX152 2 Way 15" Full Range Loudspeaker for Portable PA Applications TPX118B 18" Front Loaded
Outdoor External Strobe Siren. ADD-ON DEVICE Quickstart Guide. What's inside: 1x Outdoor External Strobe Siren
 ADD-ON DEVICE Quickstart Guide Outdoor External Strobe Siren Model No. OSR1300 What's inside: 1x Outdoor External Strobe Siren 1x Power Adapter Mounting Accessories Broadband internet connection, ios or
NEUTRON-NB. Quick Start Guide. Dual Network Bridge Expansion Module with 10 Port AES50 Interface for NEUTRON Audio System Engine
 NEUTRON-NB Dual Network Bridge Expansion Module with 10 Port AES50 Interface for NEUTRON Audio System Engine Quick Start Guide (Check out midasconsoles.com for Full Manual) 2 NEUTRON-NB Quick Start Guide
2/4 BD8201FM. Lot No. REV. A
 1/4 2/4 BD8201FM Lot No. 3/4 Ω Function Description 4/4 Appendix Notes No technical content pages of this document may be reproduced in any form or transmitted by any means without prior permission of
SkillGuide. Guia do usuário. Português
 SkillGuide Guia do usuário Português SkillGuide O SkillGuide é um dispositivo de feedback para oferecer comentários em tempo real e cumulativo do desempenho da RCP. www.laerdal.com.br Itens incluídos SkillGuide
DC IN 18V 3A. Manual de Instruções EUROPORT EPA Watt Handheld PA System with Microphone and Rechargeable Battery
 DC IN 18V 3A Manual de Instruções EUROPORT EPA40 40-Watt Handheld PA System with Microphone and Rechargeable Battery 2 EUROPORT EPA40 Manual de Instruções Índice Obrigado...2 Instruções de Segurança Importantes...3
MANUAL DE INSTALAÇÃO MANUAL DE INSTALACIÓN INSTALLATION GUIDE
 MANUAL DE INSTALAÇÃO MANUAL DE INSTALACIÓN INSTALLATION GUIDE Patch Panel Descarregado Angular/ Patch Panel Descargado Angular/ Angled Modular Patch Panel youtube.com/furukawabrasil Use um leitor de códigos
INSTALLATION GUIDE MANUAL DE INSTALAÇÃO MANUAL DE INSTALACIÓN
 INSTALLATION GUIDE MANUAL DE INSTALAÇÃO MANUAL DE INSTALACIÓN youtube.com/furukawaelectriclatam Use um leitor de códigos QR 6U/ 12U General Information/ Informações Gerais/ Información General Compatible
Registe o seu produto e obtenha suporte em SBA3011/00. Manual do utilizador
 Registe o seu produto e obtenha suporte em www.philips.com/welcome SBA3011/00 Manual do utilizador 1 Importante Segurança Importantes instruções de segurança Respeite todos os avisos. Siga todas as
Capa de alimentação CP12
 Manual do usuário Capa de alimentação CP12 Índice Introdução...3 O carregamento facilitado...3 Especificações...3 Usando a capa de alimentação...4 Carregando seu celular...4 Informações legais...6 2 Introdução
MANUAL DE INSTALAÇÃO MANUAL DE INSTALACIÓN INSTALLATION GUIDE
 MANUAL DE INSTALAÇÃO MANUAL DE INSTALACIÓN INSTALLATION GUIDE youtube.com/furukawabrasil Use um leitor de códigos QR/ Utilice el lector de códigos QR/ Use the QR code reader Informações Gerais/ Información
WI180C-PB. Sem data Sheet online
 Sem data Sheet online A B C D E F H I J K L M N O P Q R S T Dados técnicos em detalhe Dados técnicos Família de acessórios Observação Grau de proteção Dimensões (L x A x C) Descrição Classificações Informações
Platinum Electric Griddle. Children should be supervised to ensure that they do not play with the appliance.
 Platinum Children should be supervised to ensure that they do not play with the appliance. 1 2 ELECTRIC GRIDDLE 1. Receptacle for power probe 2. Side handle 3. Non-stick heating plate 4. Power cable with
Quick Start Guide FOOT CONTROLLER FC600. Heavy-Duty Foot Pedal for Volume and Expression Control A
 Quick Start Guide FOOT CONTROLLER FC600 Heavy-Duty Foot Pedal for Volume and Expression Control A54-00001-23318 2 FOOT CONTROLLER FC600 Quick Start Guide 3 Important Safety Instructions Terminals marked
LIGHT PANEL CONTENTS Light Panel Power supply Fixtures (brackets, screws)
") Page 1 of 8 LIGHT PANEL 20367 CONTENTS Light Panel Power supply Fixtures (brackets, screws) ABOUT THIS PRODUCT The Light Panel may be used on a table top as a free-standing object, or mounted either horizontally
Page 1 of 8 LIGHT PANEL 20367 CONTENTS Light Panel Power supply Fixtures (brackets, screws) ABOUT THIS PRODUCT The Light Panel may be used on a table top as a free-standing object, or mounted either horizontally
Manual de Instruções. The Ultimate Guitar-to-USB Interface for Recording and Jamming with your PC/Mac or ios device
 Manual de Instruções GUITAR UCG102 The Ultimate Guitar-to-USB Interface for Recording and Jamming with your PC/Mac or ios device 2 GUITAR LINK UCG102 Manual de Instruções Índice Instruções de Segurança
500 SERIES COMPRESSOR LIMITER Series Modular Presence Accenting Compressor/Limiter
 500 SERIES COMPRESSOR LIMITER 522 500 Series Modular Presence Accenting Compressor/Limiter 2 500 SERIES COMPRESSOR LIMITER 522 Important Safety Instructions Terminals marked with this symbol carry electrical
DvS Series. DvS 8/DvS 6/DvS 4 8/6/4" Coaxial Surface-Mount Loudspeaker for Installation Applications
 DvS Series DvS 8/DvS 6/DvS 4 8/6/4" Coaxial Surface-Mount Loudspeaker for Installation Applications DvS 8T/DvS 6T/DvS 4T 8/6/4" Coaxial Surface-Mount Loudspeaker with Transformer for Installation Applications
Guia de Instalação Rápida TMR-121EC H/W: V1.0R
 Guia de Instalação Rápida TMR-121EC H/W: V1.0R Table Índice of Contents Português... 1. Antes de Iniciar... 2. Como Instalar... 1 1 3 Troubleshooting... 5 Version 07.09.2008 1. Antes de Iniciar Conteúdo
Magnetic Charging Dock
 Manual do usuário Magnetic Charging Dock Índice Introdução...3 Carregamento facilitado...3 Utilizando a Plataforma de carregamento magnética...4 Utilizando os apoios...4 Carregando seu celular...4 Informações
Current Measurement Unit - UMC Unidad de Medición de Corriente - UMC Unidade de Medição de Corrente - UMC
 Motors Automation Energy Transmission & Distribution Coatings Current Measurement Unit - UMC Unidad de Medición de Corriente - UMC Unidade de Medição de Corrente - UMC SRW 01-UMC Installation, Configuration
Digital Inputs and Outputs Expansion Kit Kit de Expansión de Entradas y Salidas Digitales Kit de Expansão de Entradas e Saídas Digitais
 Motors Energy Automation Coatings Digital Inputs and Outputs Expansion Kit Kit de Expansión de Entradas y Salidas Digitales Kit de Expansão de Entradas e Saídas Digitais SSW-06 Installation Guide Guia
INSTRUÇÕES DE SEGURANÇA IMPORTANTES Este símbolo, onde quer que se encontre, alerta-o para a existência de tensão perigosa não isolada no interior do
 Instruções Breves Versão 1.0 agosto 2003 PORTUGUÊS INSTRUÇÕES DE SEGURANÇA IMPORTANTES Este símbolo, onde quer que se encontre, alerta-o para a existência de tensão perigosa não isolada no interior do
RS-485 Kit. Kit RS-485. Kit RS-485. SSW-07 / SSW-08 English / Español / Português Document: / 04. Installation Guide. Guia de Instalación
 RS-485 Kit Kit RS-485 Kit RS-485 Installation Guide SSW-07 / SSW-08 English / Español / Português Document: 0899.5711 / 04 Guia de Instalación Guia de Instalação 1. DESCRIPTION OF THE KIT Contents: Table
Radio / Cassette. Long Beach C31. Installation instructions Notice de montage Instrucciones de instalación Instruções de montagem
 Radio / assette Long each 3 Installation instructions Notice de montage Instrucciones de instalación Instruções de montagem Installation instructions Notice de montage Instrucciones de instalación Instruções
Complimentary Reference Material
 Complimentary Reference Material This PDF has been made available as a complimentary service for you to assist in evaluating this model for your testing requirements. TMG offers a wide range of test equipment
English Español Français canadien Português brasileiro
 English Español Français canadien Português brasileiro English Tuxera NTFS for Mac The Toshiba Canvio External Hard Drive is formatted with NTFS and can be read and written on Windows PCs. Mac OS X can
Registe o seu produto e obtenha suporte em SBA3210/00. Manual do utilizador
 Registe o seu produto e obtenha suporte em www.philips.com/welcome SBA3210/00 Manual do utilizador 1 Importante Segurança Importantes instruções de segurança Respeite todos os avisos. Siga todas as instruções.
Durante a instalação do rack, manuseie com cuidado para evitar acidentes.
 MANUAL DE INSTALAÇÃO MANUAL DE INSTALACIÓN INSTALLATION GUIDE youtube.com/furukawabrasil Rack de Parede Enterprise Rack de Pared Enterprise Enterprise Wall Cabinet Use um leitor de códigos QR/ Utilice
DIGITAL SNAKE S32. Quick Start Guide
 Quick Start Guide DIGITL SNKE I/O ox with 32 Remote-Controllable MIDS Preamps, 16 Outputs and ES50 Networking featuring KLRK TEKNIK SuperMC Technology 2 DIGITL SNKE Quick Start Guide 3 Important Safety
Quick Start Guide MS16. High-Performance, Active 16-Watt Personal Monitor System
 Quick Start Guide MS16 High-Performance, Active 16-Watt Personal Monitor System 2 MS16 Quick Start Guide 3 Important Safety Instructions Terminals marked with this symbol carry electrical current of sufficient
Immersive. Register your product and get support at series. Quick start guide
 Register your product and get support at www.philips.com/welcome Immersive 5000 series Quick start guide HTS556_55_QSG_A5_9Dec.indd /9/0 0:9:54 AM EN Before using your product, read all accompanying safety
Quick start guide LED series
 Quick start guide 3000 LED series Before using your product, read all accompanying safety information Antes de usar o produto, leia todas as informações de segurança em anexo. Antes de usar el producto,
Guia de Instalação Rápida TBW-105UB H/W: V1.1R
 Guia de Instalação Rápida TBW-105UB H/W: V1.1R Índice... 1. Antes de Iniciar... 2. Como Instalar... 3. Configurando o Adaptador Bluetooth... Troubleshooting... 10 1 1 2 5 Version 08.04.2008 1. Antes de
QFLEX WP Series QFLEX 16-WP/QFLEX 24-WP/QFLEX 32-WP/ QFLEX 40-WP/QFLEX 48-WP/QFLEX 64-WP QFLEX 32LS-WP
 QFLEX WP Series QFLEX 16-WP/QFLEX 24-WP/QFLEX 32-WP/ QFLEX 40-WP/QFLEX 48-WP/QFLEX 64-WP QFLEX 32LS-WP Digitally Steerable Powered Column Array Loudspeaker with 64/48/40/32/24/16 Independently Controlled
Quick Start Guide EUROLIVE. VP2520 Professional 2000-Watt PA Speaker with Dual 15" Woofers and 1.75" Titanium-Diaphragm Compression Driver
 Quick Start Guide EUROLIVE VP2520 Professional 2000-Watt PA Speaker with Dual 15" Woofers and 1.75" Titanium-Diaphragm Compression Driver VP1800S Professional 1600-Watt 18" PA Subwoofer VP1520 Professional
Quick Start Guide. (Check out behringer.com for Full Manual) Mounting Bracket for P16-M
 Mounting Bracket for P16-M") Quick Start Guide (Check out behringer.com for Full Manual) POWERPLAY P16-MB Mounting Bracket for P16-M 2 POWERPLAY 16 P16-MB Quick Start Guide 3 Important Safety Instructions Terminals marked with this
Quick Start Guide (Check out behringer.com for Full Manual) POWERPLAY P16-MB Mounting Bracket for P16-M 2 POWERPLAY 16 P16-MB Quick Start Guide 3 Important Safety Instructions Terminals marked with this
ELECTROSÓN. Ficha Tecnica SAI INTERACTIVO PHASAK SERIE BASIC INTERACTIVE 400 / 600 / 800 VA
 Ficha Tecnica SAI INTERACTIVO PHASAK SERIE BASIC INTERACTIVE Descripción General: Os SAI's PHASAK BASIC INTERACTIVE, con tecnología digital interactiva. Han sido objeto de rigurosos controles de calidad,
DM16/DM12. 16/12 Input Analogue Live and Studio Mixer with MIDAS Microphone Preamplifiers. Quick Start Guide
 DM16/DM12 16/12 Input Analogue Live and Studio Mixer with MIDAS Microphone Preamplifiers Quick Start Guide 2 DM16/DM12 Quick Start Guide 3 Important Safety Instructions Terminals marked with this symbol
BI-AMP. User Manual / Manual do Usuário 312A / 312AU / 312AQU / 315A / 315AU / 315AQU / 315AQI / 315AUQI ( PORTABLE P.A. SYSTEM )
") 312A / 312AU / 312AQU / 315A / 315AU / 315AQU / 315AQI / 315AUQI ( PORTABLE P.A. SYSTEM ) BI-AMP Nos modelos 312A / 315A User Manual / Manual do Usuário Important Safe Instructions 1. Read these instructions
312A / 312AU / 312AQU / 315A / 315AU / 315AQU / 315AQI / 315AUQI ( PORTABLE P.A. SYSTEM ) BI-AMP Nos modelos 312A / 315A User Manual / Manual do Usuário Important Safe Instructions 1. Read these instructions
INSTALLATION GUIDE MANUAL DE INSTALAÇÃO MANUAL DE INSTALACIÓN
 INSTALLATION GUIDE MANUAL DE INSTALAÇÃO MANUAL DE INSTALACIÓN youtube.com/furukawaelectriclatam Use the QR code reader/ Use um leitor de códigos QR/ Utilice el lector de códigos QR General Information/
Manual de Instruções ULTRALINK PRO MX882. Ultra-Flexible 8-Channel Splitter/Mixer
 Manual de Instruções ULTRALINK PRO MX882 Ultra-Flexible 8-Channel Splitter/Mixer 2 ULTRALINK PRO MX882 Manual de Instruções Índice Instruções de Segurança Importantes... 3 Legal Renunciante... 3 Garantia
TCS SERIES TCS52C-T-WH/TCS32C-T-WH. 2 Way 5"/3.5" Full Range Ceiling Loudspeaker with Line Transformer for Installation Applications (White)
") TCS SERIES TCS52C-T-WH/TCS32C-T-WH 2 Way 5"/3.5" Full Range Ceiling Loudspeaker with Line Transformer for Installation Applications (White) 2 TCS52C-T-WH/TCS32C-T-WH Quick Start Guide 3 Important Safety
TCS SERIES TCS52C-T-WH/TCS32C-T-WH 2 Way 5"/3.5" Full Range Ceiling Loudspeaker with Line Transformer for Installation Applications (White) 2 TCS52C-T-WH/TCS32C-T-WH Quick Start Guide 3 Important Safety
Quick Start Guide. (Check out behringer.com for Full Manual) DJ CONTROLLER CMD MICRO. Compact 2-Deck DJ MIDI Controller
 DJ CONTROLLER CMD MICRO. Compact 2-Deck DJ MIDI Controller") Quick Start Guide (Check out behringer.com for Full Manual) DJ CONTROLLER CMD MICRO Compact 2-Deck DJ MIDI Controller 2 DJ CONTROLLER CMD MICRO Quick Start Guide 3 Important Safety Instructions Terminals
Quick Start Guide (Check out behringer.com for Full Manual) DJ CONTROLLER CMD MICRO Compact 2-Deck DJ MIDI Controller 2 DJ CONTROLLER CMD MICRO Quick Start Guide 3 Important Safety Instructions Terminals
Manual de Instruções. The Ultimate Guitar-to-USB Interface for Recording and Jamming with your PC/Mac or ios device
 Manual de Instruções GUITAR UCG102 The Ultimate Guitar-to-USB Interface for Recording and Jamming with your PC/Mac or ios device 2 GUITAR LINK UCG102 Manual de Instruções Índice Instruções de Segurança
Motors Automation Energy Transmission & Distribution Coatings. Bluetooth Communication Module. Módulo de Comunicación Bluetooth
 Motors Automation Energy Transmission & Distribution Coatings Bluetooth Communication Module Módulo de Comunicación Bluetooth Módulo de Comunicação Bluetooth CFW100 Installation, Configuration and Operation
EUROLIVE B15X/B12X. Quick Start Guide
 Quick Start Guide EUROLIVE B15X/B12X 1000 Watt 2 Way 15/12" Powered Loudspeaker with Digital Mixer, Wireless Option, Remote Control via iphone/ipad and Bluetooth Audio Streaming A54-XXXXX-XXXXX 2 EUROLIVE
MARQUE: MICROSOFT REFERENCE: NATURAL ERGO 4000 CODIC:
 MARQUE: MICROSOFT REFERENCE: NATURAL ERGO 4000 CODIC: 4327829 NOTICE ENG: Microsoft wired keyboard Teclado com fio da Microsoft Clavier avec fil Microsoft Teclado alámbrico de Microsoft ENG: Install the
Guia de Instalação Rápida TWG-BRF114
 Guia de Instalação Rápida TWG-BRF114 Table Índice of Contents Português... 1. Antes de Iniciar... 2. Instalação de Hardware... 3. Configurando o Roteador... 1 1 2 3 Troubleshooting... 5 Version 09.24.2008
ix SERIES 1000 Watt 2 Way Powered Loudspeaker with KLARK TEKNIK DSP Technology, Remote Control via iphone/ipad and Bluetooth Audio Streaming
 ix SERIES 1000 Watt 2 Way Powered Loudspeaker with KLARK TEKNIK DSP Technology, Remote Control via iphone/ipad and Bluetooth Audio Streaming 2 ix series Quick Start Guide 3 Important Safety Instructions
VSX215B Twin 15" Horn Loaded Passive Subwoofer for Touring and Installation Applications
 VSX218B/VSX 12.2BP (WH)/VSX 8.2BP (WH) Twin 18"/12"/8" Compact Band Pass/Direct Radiating Passive Subwoofer with Low Frequency Driver for Portable and Installation Applications VSX215B Twin 15" Horn Loaded
EUROPORT MPA400. Manual de Instruções A50-A
 Manual de Instruções A50-A2030-22001 * alerta-o Instruções de Segurança Importantes Este símbolo, onde quer que se encontre, para a existência de tensão perigosa não isolada no interior do invólucro -
Guia de Instalação Rápida TFM-560X H/W : YO
 Guia de Instalação Rápida TFM-560X H/W : YO Table Índice of Contents... 1. Antes de Iniciar... 2. Como instalar... 1 1 2 Troubleshooting... 7 Version 08.04.2008 1. Antes de Iniciar Conteúdo da Embalagem
SONDA DE ÁGUA QUENTE SANITÁRIA
 SONDA DE ÁGUA QUENTE SANITÁRIA PT Avisos preliminares Estas instruções são parte integrante do manual do aparelho no qual o KIT é instalado. Consulte este manual para as ADVERTÊNCIAS GERAIS e REGRAS FUNDAMENTAIS
Quick Start Guide TRUTH B2031A/B2030A. High-Resolution, Active 2-Way Reference Studio Monitor A
 Quick Start Guide TRUTH B2031A/B2030A High-Resolution, Active 2-Way Reference Studio Monitor A54-00001-76643 2 TRUTH B2031A/B2030A Quick Start Guide 3 Important Safety Instructions Terminals marked with
inspire ip3000 A54-XXXXX-XXXXX
 inspire ip3000 2,000 Watt Powered Column Loudspeaker with a 2 x 12" Subwoofer, 18 Neodymium Drivers, KLARK TEKNIK Spatial Sound Technology, Digital Mixer, Remote Control via iphone/ipad and Bluetooth Audio
DISTRIBUCIÓN DE HABITACIONES
 DISTRIBUCIÓN DE HABITACIONES Cada una de las habitaciones del apartamento son dobles (para dos personas). y se habilitarán el número de habitaciones en función del numero de huéspedas a alojar. Ejemplos:
Sempre pronto a ajudar. Registe o seu produto e obtenha suporte em SPA1330. Questões? Contacte a Philips. Manual do utilizador
 Sempre pronto a ajudar Registe o seu produto e obtenha suporte em www.philips.com/welcome Questões? Contacte a Philips SPA1330 Manual do utilizador Índice 1 Importante 2 Segurança 2 Aviso 2 Português
Enclosure Size 2 Ventilation Kit. Kit Ventilación para Tamaño 2. Kit Ventilação para Mecânica 2. Installation Guide. Guia de Instalación
 Enclosure Size 2 Ventilation Kit Kit Ventilación para Tamaño 2 Kit Ventilação para Mecânica 2 Installation Guide SSW-07 / SSW-08 English / Español / Português Document: 0899.5542 / 02 Guia de Instalación
Manual de Instruções ULTRAVOICE XM1800S. 3 Dynamic Cardioid Vocal and Instrument Microphones (Set of 3)
") Manual de Instruções ULTRAVOICE XM1800S 3 Dynamic Cardioid Vocal and Instrument Microphones (Set of 3) 2 ULTRAVOICE XM1800S Manual de Instruções Instruções de Segurança Importantes Aviso! Terminais marcados
Manual de Instruções ULTRAVOICE XM1800S 3 Dynamic Cardioid Vocal and Instrument Microphones (Set of 3) 2 ULTRAVOICE XM1800S Manual de Instruções Instruções de Segurança Importantes Aviso! Terminais marcados
Quick Start Guide DIGITAL MONITOR SPEAKERS MS40/MS Bit/192 khz Digital 40/20-Watt Stereo Near Field Monitors
 Quick Start Guide DIGITAL MONITOR SPEAKERS MS40/MS20 24-Bit/192 khz Digital 40/20-Watt Stereo Near Field Monitors 2 DIGITAL MONITOR SPEAKERS MS40/MS20 Quick Start Guide 3 Important Safety Instructions
Hairdryer. Register your product and get support at HP8296/00. Manual do utilizador
 Register your product and get support at www.philips.com/welcome Hairdryer HP8296/00 PT Manual do utilizador c d b e g a f Português Parabéns pela compra do seu produto e bem-vindo à Philips! Para tirar
inspire ip2000/ip1000
 inspire ip2000/ip1000 2 inspire ip2000/ip1000 Quick Start Guide 3 Important Safety Instructions Terminals marked with this symbol carry electrical current of sufficient magnitude to constitute risk of
2 ip300 Quick Start Guide 3
 ip300 600 Watt Powered Column Loudspeaker with 2 x 6.5" woofers, 4 Neodymium Drivers, KLARK TEKNIK Spatial Sound Technology, Reverb, Digital Mixer, Remote Control via iphone/ipad and Bluetooth Audio Streaming
DISTRIBUCIÓN DE HABITACIONES
 DISTRIBUCIÓN DE HABITACIONES Cada una de las habitaciones del apartamento son dobles (para dos personas). y se habilitarán el número de habitaciones en función del numero de huéspedas a alojar. Ejemplos:
Register your product and get support at FWP1000. Guia de início rápido
 Register your product and get support at FWP1000 PT-BR Guia de início rápido Quick start guide PT-BR Dispositivo host (FWP2000, FWP3100D e versões posteriores) FWP1000 PT-BR Para ouvir as músicas do FWP1000,
Ewpe Smart App Operation Manual
 Ewpe Smart App Operation Manual Control Flow Chart intelligent home appliances Home Wi-Fi Cellular/ Other Wi-FI Home wireless router Home Wi-Fi APP Operating Systems Requirement for User's smart phone:
2 ip300 Quick Start Guide 3
 ip300 600 Watt Powered Column Loudspeaker with 2 x 6.5" woofers, 4 Neodymium Drivers, KLARK TEKNIK Spatial Sound Technology, Reverb, Digital Mixer, Remote Control via iphone/ipad and Bluetooth Audio Streaming
Guia de Instalação Rápida TEG-PCITXR TEG-PCITXRL 3.02
 Guia de Instalação Rápida TEG-PCITXR TEG-PCITXRL 3.02 Índice Português 1 1. Antes de Iniciar 1 2. Como instalar 2 Troubleshooting 5 Version 03.18.2010 1. Antes de Iniciar Português Conteúdo da Embalagem
Venue/Madrid TVX/TMS SERIES
 Venue/Madrid TVX/TMS SERIES TVX122M/TVX152/TVX118B/TMS122M/TMS152/ TMS153/TMS118B/TMS218B Full Range Loudspeakers and Subwoofers for Portable PA and Installation Applications 2 TVX/TMS Series Quick Start
CEM SCA-05 KIT KIT CEM SCA-05. CEM SCA-05 Kit Installation Guide. Kit CEM SCA-05 Guía de Instalación. Kit CEM SCA-05 Guia de Instalação
 CEM SCA-05 KIT KIT CEM SCA-05 CEM SCA-05 Kit Installation Guide Kit CEM SCA-05 Guía de Instalación Kit CEM SCA-05 Guia de Instalação CONTENTS 1. Kit Description... 1 2. Safety Information... 2 3. Procedures
BeoLink Active. Livro de consulta de configuração
 BeoLink Active Livro de consulta de configuração 2 CAUTION RISK OF ELECTRIC SHOCK DO NOT OPEN ATENÇÃO: Para reduzir o risco de choque eléctrico, a tampa não deve ser retirada (ou parte traseira). No interior
Manual de Instruções ULTRAGAIN PRO-8 DIGITAL ADA8000. Audiophile 8-Channel A/D & D/A Converter with Premium Mic Preamplifiers and ADAT Interface
 Manual de Instruções ULTRAGAIN PRO-8 DIGITAL ADA8000 Audiophile 8-Channel A/D & D/A Converter with Premium Mic Preamplifiers and ADAT Interface 2 ULTRAGAIN PRO-8 DIGITAL ADA8000 Manual de Instruções Índice