Instructions for use WASHING MACHINE. Contents XWE 91282
|
|
|
- Elisa Beppler Covalski
- 8 Há anos
- Visualizações:
Transcrição
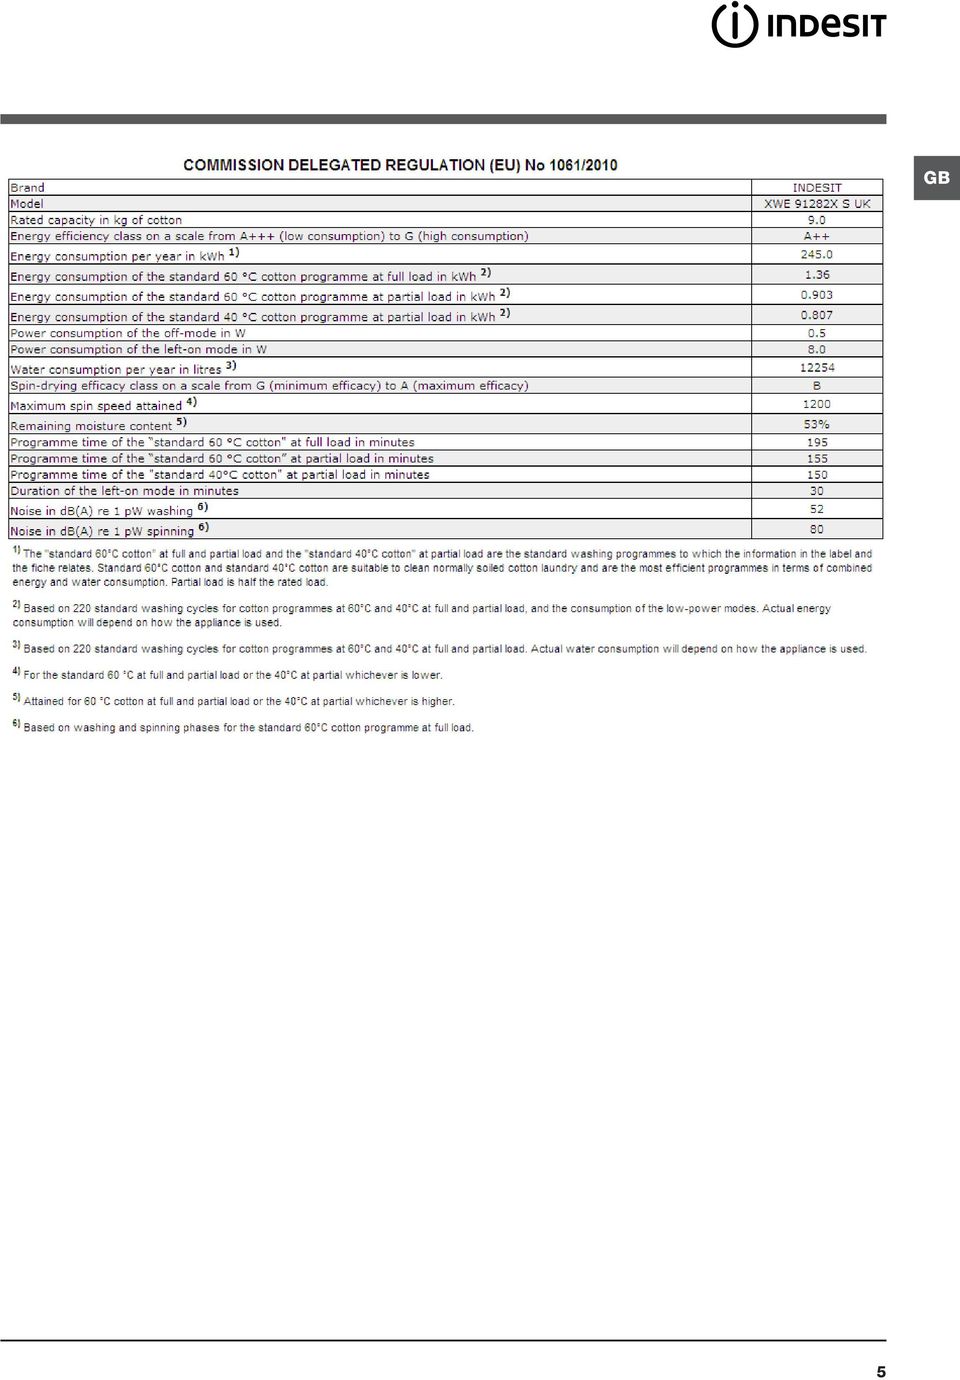
1 Instructions for use WASHING MACHINE GB English, 1 PT Português,19 Contents Installation, Unpacking and levelling Connecting the electricity and water supplies The first wash cycle Technical data Care and maintenance, 6 Cutting off the water and electricity supplies Cleaning the washing machine Cleaning the detergent dispenser drawer Caring for the door and drum of your appliance Cleaning the pump Checking the water inlet hose GB XWE Precautions and tips, 7 General safety Disposal Opening the porthole door manually Description of the washing machine, 8-9 Control panel Display Running a wash cycle, 10 Wash cycles and options, Table of wash cycles Wash options Push & Wash Detergents and laundry, Detergent dispenser drawer Preparing the laundry Special wash cycles Load balancing system Troubleshooting, Assistance,

2 Installation GB! This instruction manual should be kept in a safe place for future reference. If the washing machine is sold, transferred or moved, make sure that the instruction manual remains with the machine so that the new owner is able to familiarise himself/ herself with its operation and features.! Read these instructions carefully: they contain vital information relating to the safe installation and operation of the appliance. Unpacking and levelling Unpacking 1. Remove the washing machine from its packaging. 2. Make sure that the washing machine has not been damaged during the transportation process. If it has been damaged, contact the retailer and do not proceed any further with the installation process. 3. Remove the 4 protective screws (used during transportation) and the rubber washer with the corresponding spacer, located on the rear part of the appliance (see figure). 4. Close off the holes using the plastic plugs provided. 5. Keep all the parts in a safe place: you will need them again if the washing machine needs to be moved to another location.! Packaging materials should not be used as toys for children. Levelling 1. Install the washing machine on a flat sturdy floor, without resting it up against walls, furniture cabinets or anything else. 2. If the floor is not perfectly level, compensate for any unevenness by tightening or loosening the adjustable front feet (see figure); the angle of inclination, measured in relation to the worktop, must not exceed 2. Levelling the machine correctly will provide it with stability, help to avoid vibrations and excessive noise and prevent it from shifting while it is operating. If it is placed on carpet or a rug, adjust the feet in such a way as to allow a sufficient ventilation space underneath the washing machine. Connecting the electricity and water supplies Connecting the water inlet hose 1. Connect the supply pipe by screwing it to a cold water tap using a ¾ gas threaded connection (see figure). Before performing the connection, allow the water to run freely until it is perfectly clear. 2. Connect the inlet hose to the washing machine by screwing it onto the corresponding water inlet of the appliance, which is situated on the top right-hand side of the rear part of the appliance (see figure). 3. Make sure that the hose is not folded over or bent.! The water pressure at the tap must fall within the values indicated in the Technical details table (see page 5).! If the inlet hose is not long enough, contact a specialised shop or an authorised technician.! Never use second-hand hoses.! Use the ones supplied with the machine. 2

3 Connecting the drain hose cm Where it connects to the waste water pipe cut end off spigot or remove the blanking cap Connect the drain hose, without bending it, to a draining duct or a wall drain situated between 65 and 100 cm from the floor; The drain hose may be connected to an under-sink trap. Before connecting the drain hose from the machine ensure that any blanks or removable ends have been taken off the spigot. If it is placed over the edge of a basin or sink be sure the free end of the hose should not be underwater.! We advise against the use of hose extensions; in case of absolute need, the extension must have the same diameter as the original hose and must not exceed 150 cm in length. Ensure that if the drain hose is pushed into a standpipe, that the end does not go down more than 15cms (6 inches). If the hose is pushed down too far, this may cause the machine to self -syphon ie. continuously empty as it is filling. Electric connection Before plugging the appliance into the mains socket, make sure that: the socket is earthed and in compliance with the applicable law; the socket is able to sustain the appliance s maximum power load indicated on the Technical Data Plate fixed on the machine; the supply voltage is included within the values indicated on the Technical Data Plate fixed on the machine. the socket is compatible with the washing machine s plug. If this is not the case, replace the socket or the plug. Your appliance is now supplied with a 13 amp fused plug it can be plugged into a 13 amp socket for immediate use. Before using the appliance please read the instructions below. WARNING - THIS APPLIANCE MUST BE EARTHED. THE FOLLOWING OPERATIONS SHOULD BE CARRIED OUT BY A QUALIFIED ELECTRICIAN. Replacing the fuse: When replacing a faulty fuse, a 13 amp ASTA approved fuse to BS 1362 should always be used, and the fuse cover re-fitted. If the fuse cover is lost, the plug must not be used until a replacement is obtained. Replacement fuse covers: If a replacement fuse cover is fitted, it must be of the correct colour as indicated by the coloured marking or the colour that is embossed in words on the base of the plug. Replacements can be obtained directly from your nearest Service Depot. Removing the plug: If your appliance has a non-rewireable moulded plug and you should wish to re-route the mains cable through partitions, units etc., please ensure that either: the plug is replaced by a fused 13 ampere rewireable plug bearing the BSI mark of approval. or: the mains cable is wired directly into a 13 amp cable outlet, controlled by a switch, (in compliance with BS 5733) which is accessible without moving the appliance. Disposing of the plug: Ensure that before disposing of the plug itself, you make the pins unusable so that it cannot be accidentally inserted into a socket. Instructions for connecting cable to an alternative plug: Important: the wires in the mains lead are coloured in accordance with the following code: Green & Yellow Earth Blue Neutral Brown Live GB 3

4 GB As the colours of the wires in the lead may not correspond with the coloured markings identifying the terminals in your plug, proceed as follows: Connect Green & Yellow wire to terminal marked E or or coloured Green or Green & Yellow. Connect Brown wire to terminal marked L or coloured Red. Connect Blue wire to terminal marked N or coloured Black. If a 13 amp plug (BS 1363) is used it must be fitted with a 13 amp fuse, either in the plug or adaptor or at the distribution board. If you are in any doubt regarding the electrical supply to your machine, consult a qualified electrician before use. How to connect an alternative plug: The wires in this mains lead are coloured in accordance with the following code: BLUE NEUTRAL (N) BROWN LIVE (L) GREEN & YELLOW EARTH (E) GREEN & YELLOW BROWN BLUE 13 ampere fuse CROSS-BAR CORD GRIP Disposing of the appliance: When disposing of the appliance please remove the plug by cutting the mains cable as close as possible to the plug body and dispose of it as described above.! The washing machine should not be installed in an outdoor environment, not even where the area is sheltered, because it may be very dangerous to leave it exposed to damp, rain and thunderstorms.! When the washing machine is installed, the mains socket must be within easy reach.! Do not use extensions or multiple sockets.! The power supply cable must never be bent or dangerously compressed.! The power supply cable must only be replaced by an authorised serviceman. Warning! The company denies all liability if and when these norms are not respected. The first wash cycle Once the appliance has been installed, and before you use it for the first time, run a wash cycle with detergent and no laundry, using the wash cycle Auto Clean (see Cleaning the washing machine ). Technical data Model XWE Dimensions Capacity Electrical connections Water connections Spin speed Test wash cycles in accordance with directives 1061/2010 and 1015/2010 width 59.5 cm height 85 cm depth 60.5 cm from 1 to 9 kg please refer to the technical data plate fixed to the machine maximum pressure 1 MPa (10 bar) minimum pressure 0.05 MPa (0.5 bar) drum capacity 62 litres up to 1200 rotations per minute Programme 8: Cotton Standard 60. Programme 9: Cotton Standard 40. This appliance conforms to the following EC Directives: /108/EC (Electromagnetic Compatibility) /95/EC (Low Voltage) /19/EU 4

5 5 GB
6 Care and maintenance GB Cutting off the water and electricity supplies Turn off the water tap after every wash cycle. This will limit wear on the hydraulic system inside the washing machine and help to prevent leaks. Unplug the washing machine when cleaning it and during all maintenance work. Cleaning the washing machine The outer parts and rubber components of the appliance can be cleaned using a soft cloth soaked in lukewarm soapy water. Do not use solvents or abrasives. The washing machine has a Auto Clean programme for its internal parts that must be run with no load in the drum. For maximum performance you may want to use either the detergent (i.e. a quantity 10% the quantity specified for lightly-soiled garments) or special additives to clean the washing machine. We recommend running a cleaning programme every 40 wash cycles. To start the programme press buttons A and B simultaneously for 5 seconds (see figure). The programme will start automatically and will last approximately 70 minutes. To stop the cycle press the START/PAUSE button. A Cleaning the pump The washing machine is fitted with a selfcleaning pump which does not require any maintenance. Sometimes, small items (such as coins or buttons) may fall into the protective pre-chamber at the base of the pump.! Make sure the wash cycle has finished and unplug the appliance. To access the pre-chamber: Take off the cover panel on the front of the machine by first pressing it in the centre and then pushing downwards on both sides until you can remove it (see figures). 2. Unscrew the lid by rotating it anticlockwise (see figure): a little water may trickle out. This is perfectly normal. B Cleaning the detergent dispenser drawer To remove the drawer, 1 press lever (1) and pull the drawer outwards (2) (see figure). Wash it under running water; this procedure 2 should be repeated frequently. 3. Clean the inside thoroughly. 4. Screw the lid back on. 5. Reposition the panel, making sure the hooks are securely in place before you push it onto the appliance. Checking the water inlet hose Check the inlet hose at least once a year. If there are any cracks, it should be replaced immediately: during the wash cycles, water pressure is very strong and a cracked hose could easily split open.! Never use second-hand hoses. Caring for the door and drum of your appliance Always leave the porthole door ajar in order to prevent unpleasant odours from forming. 6
 or special additives to clean the washing machine.")
7 Precautions and tips! This washing machine was designed and constructed in accordance with international safety regulations. The following information is provided for safety reasons and must therefore be read carefully. General safety This appliance was designed for domestic use only. This appliance can be used by children aged from 8 years and above and persons with reduced physical, sensory or mental capabilities or lack of experience and knowledge if they have been given supervision or instruction concerning use of the appliance in a safe way and understand the hazards involved. Children shall not play with the appliance. Cleaning and user maintenance shall not be made by children without supervision. The washing machine must only be used by adults, in accordance with the instructions provided in this manual. Do not touch the machine when barefoot or with wet or damp hands or feet. Do not pull on the power supply cable when unplugging the appliance from the electricity socket. Hold the plug and pull. Do not open the detergent dispenser drawer while the machine is in operation. Do not touch the drained water as it may reach extremely high temperatures. Never force the porthole door. This could damage the safety lock mechanism designed to prevent accidental opening. If the appliance breaks down, do not under any circumstances access the internal mechanisms in an attempt to repair it yourself. Always keep children well away from the appliance while it is operating. The door can become quite hot during the wash cycle. If the appliance has to be moved, work in a group of two or three people and handle it with the utmost care. Never try to do this alone, because the appliance is very heavy. Before loading laundry into the washing machine, make sure the drum is empty. Disposal Disposing of the packaging materials: observe local regulations so that the packaging may be re-used. The European Directive 2012/19/EU on Waste Electrical and Electronic Equipment, requires that old household electrical appliances must not be disposed of in the normal unsorted municipal waste stream. Old appliances must be collected separately in order to optimise the recovery and recycling of the materials they contain and reduce the impact on human health and the environment. The crossed out wheeled bin symbol on the product reminds you of your obligation, that when you dispose of the appliance it must be separately collected. Consumers should contact their local authority or retailer for information concerning the correct disposal of their old appliance. Opening the porthole door manually In the event that it is not possible to open the porthole door due to a powercut, and if you wish to remove the laundry, proceed as follows: remove the plug from the electrical socket. 2. make sure the water level inside the machine is lower than the door opening; if it is not, remove excess water using the drain hose, collecting it in a bucket as indicated in the figure. 3. remove the cover panel on the lower front part of the washing machine (see figure). 4. pull outwards using the tab as indicated in the figure, until the plastic tie-rod is freed from its stop position; pull downwards and open the door at the same time. 5. reposition the panel, making sure the hooks are securely in place before you push it onto the appliance. GB 7

8 Description of the washing machine GB Control panel START/PAUSE button and indicator light ON/OFF button TEMPERATURE button DISPLAY WASH CYCLE Detergent dispenser drawer SELECTOR KNOB PUSH & WASH button SPIN button DELAYED START button OPTION buttons Detergent dispenser drawer: used to dispense detergents and washing additives (see Detergents and laundry ). ON/OFF button: press this briefly to switch the machine on or off. The START/PAUSE indicator light which flashes slowly in a green colour shows that the machine is switched on. To switch off the washing machine during the wash cycle, press and hold the button for approximately 3 seconds; if the button is pressed briefly or accidentally the machine will not switch off. If the machine is switched off during a wash cycle, this wash cycle will be cancelled. PUSH & WASH button: (see Wash cycles and options ). WASH CYCLE SELECTOR KNOB: used to set the desired wash cycle (see Table of wash cycles ). OPTION buttons: press to select the available options. The indicator light corresponding to the selected option will remain lit. DELAYED START button: press to set a delayed start for the selected wash cycle; the delay period appears on the display. START/PAUSE button and indicator light: when the green indicator light flashes slowly, press the button to start a wash cycle. Once the cycle has begun the indicator light will remain lit in a fixed manner. To pause the wash cycle, press the button again; the indicator light will flash in an amber colour. If the symbol is not illuminated, the door may be opened. To start the wash cycle from the point at which it was interrupted, press the button again. Standby mode This washing machine, in compliance with new energy saving regulations, is fitted with an automatic standby system which is enabled after about 30 minutes if no activity is detected. Press the ON-OFF button briefly and wait for the machine to start up again. Consumption in off-mode: 0,5 W Consumption in Left-on: 8 W TEMPERATURE button: press to reduce or completely exclude the temperature; the value appears on the display. SPIN button: press to reduce or completely exclude the spin cycle; the value appears on the display. 8

9 Display GB B A C C The display is useful when programming the machine and provides a great deal of information. The duration of the available wash cycles and the remaining time of a running cycle appear in section A; if the DELAYED START option has been set, the countdown to the start of the selected wash cycle will appear. Pressing the corresponding button allows you to view the maximum spin speed and temperature values attained by the machine during the set wash cycle, or the values selected most recently, if these are compatible with the set wash cycle. The hour-glass flashes while the machine processes the data on the basis of the selected programme. After a maximum of 10 minutes, the icon remains lit in a fixed manner and the final amount of time remaining is displayed. The hour-glass icon will then switch off approximately 1 minute after the final amount of time remaining has appeared. The wash cycle phases corresponding to the selected wash cycle and the wash cycle phase of the running wash cycle appear in section B: Main wash Rinse Spin Drain The delay symbol, when lit, indicates that the set delayed start value has appeared on the display. There are three levels in section C concerning the washing options. DOOR LOCKED indicator light: The lit symbol indicates that the door is locked. To prevent any damage, wait until the symbol turns off before opening the door. To open the door while a cycle is in progress, press the START/PAUSE button; if the DOOR LOCKED symbol is switched off the door may be opened. 9

10 Running a wash cycle GB Rapid programming 1. LOAD THE LAUNDRY. Open the porthole door. Load the laundry, making sure you do not exceed the maximum load value indicated in the table of programmes and wash cycles on the following page. 2. ADD THE DETERGENT. Pull out the detergent dispenser drawer and pour the detergent into the relevant compartments as described in Detergents and laundry. 3. CLOSE THE DOOR. 4. Press the PUSH & WASH button to start the wash programme. Traditional programming 1. SWITCH THE MACHINE ON. Press the button; the START/PAUSE indicator light will flash slowly in a green colour. 2. LOAD THE LAUNDRY. Open the porthole door. Load the laundry, making sure you do not exceed the maximum load value indicated in the table of programmes and wash cycles on the following page. 3. ADD THE DETERGENT. Pull out the detergent dispenser drawer and pour the detergent into the relevant compartments as described in Detergents and laundry. 4. CLOSE THE DOOR. 5. SELECT THE WASH CYCLE. Use the WASH CYCLE SELECTOR knob to select the desired wash cycle. A temperature and spin speed is set for each wash cycle; these values may be adjusted. The duration of the cycle will appear on the display. 6. CUSTOMISE THE WASH CYCLE. Use the relevant buttons: Modify the temperature and/or spin speed. The machine automatically displays the maximum temperature and spin speed values set for the selected cycle, or the most recently-used settings if they are compatible with the selected cycle. The temperature can be decreased by pressing the button, until the cold wash OFF setting is reached. The spin speed may be progressively reduced by pressing the button, until it is completely excluded (the OFF setting). If these buttons are pressed again, the maximum values are restored. Setting a delayed start. To set a delayed start for the selected cycle, press the corresponding button repeatedly until the required delay period has been reached. When this option has been activated, the symbol lights up on the display. To remove the delayed start setting, press the button until the text OFF appears on the display. Modify the cycle settings. Press the button to enable the option; the indicator light corresponding to the button will switch on. Press the button again to disable the option; the indicator light will switch off.! If the selected option is not compatible with the set wash cycle, the indicator light will flash and the option will not be activated.! If the selected option is not compatible with another previously selected option, the indicator light will flash accompanied by a buzzer (3 beeps), and only the latter option will be activated; the indicator light corresponding to the activated option will turn on.! The options may affect the recommended load value and/or the duration of the cycle. 7. START THE WASH CYCLE. Press the START/ PAUSE button. The corresponding indicator light will turn green, remaining lit in a fixed manner, and the door will be locked (the DOOR LOCKED symbol will be lit). To change a wash cycle while it is in progress, pause the washing machine using the START/PAUSE button (the START/PAUSE indicator light will flash slowly in an amber colour); then select the desired cycle and press the START/PAUSE button again. To open the door while a cycle is in progress, press the START/PAUSE button; if the DOOR LOCKED symbol is switched off the door may be opened. Press the START/PAUSE button again to restart the wash cycle from the point at which it was interrupted. 8. THE END OF THE WASH CYCLE. This will be indicated by the text END on the display; when the DOOR LOCKED symbol switches off the door may be opened. Open the door, unload the laundry and switch off the machine.! If you wish to cancel a cycle which has already begun, press and hold the button. The cycle will be stopped and the machine will switch off. 10

11 Wash cycles and options Table of wash cycles Wash cycles Description of the wash cycle Max. temp. ( C) Max. speed (rpm) Detergents Max. load (kg) Residual dampness % Energy consumption kwh Special 1 Sport Dark Anti-odour (Cotton) , Anti-odour (Synthetic) , Delicate Wool: for wool, cashmere, etc Duvet: for down-stuffed garments , Standard 7 White Cotton: extremely soiled whites , Cotton Standard 60 (1): heavily soiled whites and resistant colours ,36 57, Cotton Standard 40 (2): lightly soiled whites and delicate colours , Synthetic: heavily soiled resistant colours ,5 46 1, Synthetic (3): lightly soiled resistant colours ,5 46 0, Coloured , Eco & Rapid 12 Cotton Standard 20 : lightly soiled whites and delicate colours Eco Synthetic Rapid , Rapid ,5 80 0, Rapid Partials Rinse Spin + Drain Wash Fabric softener Total water lt Cycle duration GB The length of cycle shown on the display is an estimation only and is calculated assuming standard working conditions. The actual duration can vary according to factors such as water temperature and pressure, the amount of detergent used, the amount and type of load inserted, load balancing and any wash options selected. 1) Test wash cycle in compliance with directive 1061/2010: set wash cycle 8 with a temperature of 60 C. This cycle is designed for cotton loads with a normal soil level and is the most efficient in terms of both electricity and water consumption; it should be used for garments which can be washed at 60 C. The actual washing temperature may differ from the indicated value. 2) Test wash cycle in compliance with directive 1061/2010: set wash cycle 9 with a temperature of 40 C. This cycle is designed for cotton loads with a normal soil level and is the most efficient in terms of both electricity and water consumption; it should be used for garments which can be washed at 40 C. The actual washing temperature may differ from the indicated value. For all Test Institutes: 2) Long wash cycle for cottons: set wash cycle 9 with a temperature of 40 C. 3) Synthetic program along: set wash cycle 10 with a temperature of 40 C. Wash options When this button is pressed the first time, the 9 icon will light up, when pressed the second time the 30 icon lights up and the third time the 1h icon lights up. When pressed the fourth time the 9 icon lights up again.! It cannot be used in conjunction with wash cycles Fast Forward During a wash programme and under certain conditions, pressing this button allows for ending the wash programme after only 20 if necessary, by performing a brief rinse cycle followed by a spin cycle at maximum 800 rpm or lower, if reduced manually during the programme customisation phase. In this case, washing and rinsing performance will be reduced. After pressing the button, the relative indicator light turns on together with the indicator light of the rinse phase. If the selected temperature is equal to 40 and/or the button is pressed during the initial phase of the programme, the Fast Forward option lasts longer so that the detergent can dissolve properly and avoid damaging the fabrics. In this case, the rinse phase indicator light flashes while the wash indicator light remains fixed until the necessary activation conditions are fulfilled. If less than 20 remain of the wash programme, the option will be disabled.! It cannot be used in conjunction with wash cycles This option allows for selecting the most suitable programme for any type of sports clothing, and is designed to remove dirt while optimally preserving the technical features of the garments. The various Sport option levels offer the following wash cycles: - Sport Shoes, a cycle designed to safely wash up to 2 pairs of sports shoes simultaneously. - Gym Kit, a cycle designed to simultaneously wash any type of sports clothing together with gym towels. - Technical Wear, designed for specifically washing waterproof garments or clothing with special technical fibres like Gore-Tex, so as to optimise washing performance while preserving their technical properties over time. Do not use fabric softeners for garments with technical fibres.! It cannot be used in conjunction with wash cycles
: heavily soiled whites and resistant colours. 60 1200 9 53 1,36 57,5 195 9 Cotton Standard 40 (2): lightly soiled whites and delicate colours.")
12 GB Push & Wash This function allows for starting a wash cycle even when the machine is switched off without having to press the ON/OFF button in advance, or after switching on the machine, without having activated any button and/or selector (otherwise, the Push & Wash function will be deactivated). To start the Push & Wash cycle press and hold the relative button for 2 seconds. The lit indicator light indicates that the cycle has started. This wash cycle is ideal for cotton or synthetic fabrics, as it washes at a temperature of 30 and a maximum spin speed of 1200 rpm. Maximum load 4 kg. (Cycle duration 50 ). How does it work? 1. Load the laundry (cotton and/or synthetic garments) and close the door. 2. Pour the detergent and additives. 3. Start the programme by pressing and holding the Push & Wash button for 2 seconds. The relative indicator light turns green and the door will lock (the DOOR LOCKED symbol turns on). N.B.: starting the wash cycle through the Push & Wash button activates an automatic non-customisable cycle recommended for cotton and synthetic fabrics. This programme does not allow for setting any additional options. To open the door while an automatic cycle is under way, press the START/PAUSE button; if the DOOR LOCKED symbol is switched off the door may be opened. Press the START/PAUSE button again to restart the wash cycle from the point at which it was interrupted. 4. Once the programme is finished, the END indicator light turns on. 12
. How does it work? 1. Load the laundry (cotton and/or synthetic garments) and close the door. 2. Pour the detergent and additives. 3.")
13 Detergents and laundry Detergent dispenser drawer Successful washing results also depend on the correct dose of detergent: adding too much detergent will not necessarily result in a more efficient wash, and may in fact cause build up on the inside of your appliance and contribute to environmental pollution.! Do not use hand washing detergents because these create too much foam.! Use powder detergent for white cotton garments, for prewashing, and for washing at temperatures over 60 C.! Follow the instructions given on the detergent packaging. B Open the detergent dispenser drawer and pour in the detergent or washing additive, as follows.! Do not pour detergent into the compartment 1. Detergent should only be poured into the compartment 2. Compartment 2: Washing detergent (powder or liquid) If liquid detergent is used, it is recommended that the removable plastic partition A (supplied) be used for proper dosage. If powder detergent is used, place the partition into slot B. Compartment 3: Additives (fabric softeners, etc.) The fabric softener must not exceed the max level indicated on the central pin. Preparing the laundry Divide the laundry according to: - the type of fabric/the symbol on the label - the colours: separate coloured garments from whites. Empty all garment pockets and check the buttons. Do not exceed the values listed in the Table of wash cycles, which refer to the weight of the laundry when dry. How much does your laundry weigh? 1 sheet g 1 pillow case g 1 tablecloth g 1 bathrobe g 1 towel g A Special wash cycles Sport (programme 1) is designed for washing lightly soiled sports clothing (tracksuits, shorts, etc.); for best results, we recommend not exceeding the maximum load indicated in the Table of wash cycles. We recommend using liquid detergent, and adding the amount suitable for a half-load. Dark: use programme 2 to wash dark-coloured garments. This programme is designed to maintain dark colours over time. We recommend using a liquid detergent for the best results when washing darkcoloured garments. Anti-odour: use programme 3 for washing garments with bad odours (e.g. smoke, sweat, fried food). The programme is designed to remove bad odours while preserving the fabric fibres. Synthetics fabrics or mixed loads should be washed at 40, and resistant cotton fabrics at 60. Delicate: use programme 4 to wash very delicate garments. It is advisable to turn the garments inside out before washing them. For best results, use liquid detergent on delicate garments. Wool: the wool wash programme of this machine has been tested and approved by The Woolmark Company for the washing of wool containing garments labelled as hand wash provided that the garments are washed according to the instructions on the garment label and those issued by the manufacturer of this washing machine. (M1127) In UK, Eire, Hong Kong and India the Woolmark trade mark is a Certification trade mark. Duvet: to wash double or single duvets (the weight of which should not exceed 3,5 kg), cushions or clothes padded with goose down such as puffa jackets, use the special wash programme number 6. We recommend that duvets are placed in the drum with their edges folded inwards (see figure) and that no more than ¾ of the total volume of the drum is used. To achieve the best results, we recommend that a liquid detergent is used and placed inside the detergent dispenser drawer. GB 13

14 GB Coloured: use this programme 11 to wash bright coloured clothes. The programme is designed to maintain bright colours over time. Cotton Standard 20 (programme 12) ideal for lightly soiled cotton loads. The effective performance levels achieved at cold temperatures, which are comparable to washing at 40, are guaranteed by a mechanical action which operates at varying speed, with repeated and frequent peaks. Eco Synthetic (programme 13) ideal for mixed loads (cotton and synthetics) with a normal soil level. The effective performance levels achieved at cold temperatures are guaranteed by a mechanical action which operates at varying speed, across set average intervals. Rapid (programme 14) allows for varying the garment treatment duration from 9 to 1h. Pressing the corresponding Rapid button allows for varying the cycle duration between 9 (refresh), 30 (wash), 1h (wash). The 9 cycle refreshes garments using fabric softener only; it is advisable not to add any detergent into the machine. The 30 programme is designed to wash lightly soiled garments at 30 (excluding wool and silk) with a 3 kg maximum load in a short time: it only lasts 30 minutes and allows for saving time and energy. The 1h cycle is designed to wash moderately soiled resistant cotton garments at 60 in an hour, with good washing performance. For synthetic or mixed garments, we recommend lowering the temperature down to 40. Load balancing system Before every spin cycle, to avoid excessive vibrations before every spin and to distribute the load in a uniform manner, the drum rotates continuously at a speed which is slightly greater than the washing rotation speed. If, after several attempts, the load is not balanced correctly, the machine spins at a reduced spin speed. If the load is excessively unbalanced, the washing machine performs the distribution process instead of spinning. To encourage improved load distribution and balance, we recommend small and large garments are mixed in the load. 14
 ideal for mixed loads (cotton and synthetics) with a normal soil level.")
15 Troubleshooting Your washing machine could occasionally fail to work. Before contacting the Technical Assistance Service (see Service ), make sure that the problem cannot be solved easily using the following list. GB Problem: The machine does not switch on. The wash cycle does not start. The machine does not fill with water or H20 in the display. The machine continuously fills with water and continually drains away or Water left in the drum or Stuck on wash. The machine does not drain or spin - (error lights flashing). The machine does spin The programme takes too long. The Display sticks at one time to end for more than 1 Minute or the Display changes the estimated Time to End during the programme. The machine vibrates a lot during the spin cycle. Push & Wash does not activate. The programme lasts a lot less that expected Possible causes / Solutions: The appliance is not plugged into the socket fully, or not enough to make contact. There is no power to the socket, or the fuse has blown in the mains plug. The door is not closed properly. The ON/OFF button has not been pressed. The START/PAUSE button has not been pressed. The water tap has not been turned on to allow water to flow into the machine. A delayed start has been set. The water inlet hose is kinked. The water inlet hose is not connected to the water supply. The water pressure is too low. The water tap has not been turned on to allow water to flow into the machine. There is no water supply to the house. The inlet valve filter is blocked. The START/PAUSE button has not been pressed. The top of the drain hose is too low - It must be fitted at a height between 65 and 100 cm from the floor (see Installation ). The drain hose is connected incorrectly to the sink trap allowing water to run into the machine, the drain hose must be positioned higher than the bottom of the sink to prevent water flowing down the drain hose. The end of the drain hose has been pushed too far down the standpipe, the U bracket should be fitted 100 mm from the end of the drain hose. The Pump filter is blocked. The drain hose is kinked (see Installation ). New Installation - The blanking cap or spigot has not been removed if connected under a sink. The drain hose or sink trap is blocked. The Spin Speed is set to OFF. Programme times will vary due to water pressure, the incoming water temperature and if the wash load goes out of balance. This will increase the programme times accordingly (see The machine wont spin properly below). The display time is for guidance only - it is not a precise time to finish and may vary. The feet have not been adjusted, enabling the machine to rock. New Installation - Either the Transit Bolts including the plastic spacers, or the Polystyrene Packaging have not been removed when installing the machine. The machine is trapped between cabinets and/or walls. The load is in a slight out of balance condition and machine is spinning, but at a lower speed. After switching on the machine a control other than Push & Wash was activated. Switch the machine off and press the Push & Wash button. The Fast Forward option was activated. 15
.")
16 GB The machine is noisy. The machine wont spin properly. The machine leaks from the dispenser. The machine leaks (other than dispenser). The option lights and the START/ PAUSE indicator light are flash rapidly and an error code appears on the display (eg F-01, F-..). The machine smells. The machine door cannot be opened. Door Seal damaged at the bottom. The water level is too low when the machine is washing. There is too much foam. After completing the programme, or before starting a programme, the machine has turned itself off (no lights). General. There will always be some motor, pump and drum noise during spin. Out of Balance detected when attempting to go into a spin cycle - If this happens the machine will continue to try to repeat the distribution of the load required before the machine will go into higher spin speeds - This will increase the programme time accordingly. This is a safety feature to prevent damage. Out of Balance can be caused by washing a single heavy item (eg duvet, quilt, etc). - Try the programme again using a different load. The dispenser drawer is blocked with detergent and requires cleaning. The water pressure is too high and requires turning down - turn down the tap on the water supply pipe slightly and try again. The machine is tilting forwards - It must be level when in its final position. The fill hose is loose, check both the cabinet and tap ends. The fill hose is tight but still leaks, if so replace the rubber washers, or the fill hose is missing the rubber washer. The drain hose is not fixed in properly. Switch off the machine and unplug it, wait for approximately 1 minute and then switch back on again. If the problem persists contact Technical Assistance Centre. The machine requires a service wash. Run a Auto Clean wash cycle with detergent and no laundry. The door will not open until the door lock indicator light goes out shortly after the program has finished. If there is no power to the machine you need to perform the manual unlocking procedure. The door seal has drainage holes at the bottom - This is normal. The water level is correct if it can be seen at the bottom of the door. The detergent is not suitable for machine washing (it should display the text for washing machines or hand and machine wash or the like). Too much detergent was used - less detergent is required in soft water. To comply with new energy saving regulations the machine is fitted with an automatic standby system. Press ON/OFF button for 3 seconds to activate the machine, it can then either be switched off or a new programme selected. Your washing machine contains sensors that monitor progress during the wash cycle (eg: Water Levels, Temperatures, Out of Balance loads, Wash time/progress). Normally, if your machine successfully completes the cycle, there is unlikely to be anything wrong! Remember, you will be charged for a service call for problems caused by incorrect installation, as listed above. Not emptying contents from pockets may cause pump or drain blockages, or may damage the machine. Do not wash items which do not have a wash label, or wash items that are not intended as machine washable. 16
. General. There will always be some motor, pump and drum noise during spin.")
17 Assistance 12 Months Parts and Labour Guarantee Your appliance has the benefit of our manufacturer s guarantee, which covers the cost of breakdown repairs for twelve months from the date of purchase. This gives you the reassurance that if, within that time, your appliance is proven to be defective because of either workmanship or materials, we will, at our discretion, either repair or replace the appliance at no cost to you. GB This guarantee is subject to the following conditions: - The appliance has been installed and operated correctly and in accordance with our operating and maintenance instructions. - The appliance is used only on the electricity or gas supply printed on the rating plate. - The appliance has been used for normal domestic purposes only. - The appliance has not been altered, serviced, maintained, dismantled, or otherwise interfered with by any person not authorised by us. - Any repair work must be undertaken by us or our appointed agent. - Any parts removed during repair work or any appliance that is replaced become our property. - The appliance is used in the United Kingdom or Republic of Ireland. The guarantee does not cover: - Damage resulting from transportation, improper use, neglect or interference or as a result of improper installation. - Replacement of any consumable item or accessory. These include but are not limited to: plugs, cables, batteries, light bulbs, fluorescent tubes and starters, covers and filters. - Replacement of any removable parts made of glass or plastic. THIS GUARANTEE WILL NOT APPLY IF THE APPLIANCE HAS BEEN USED IN COMMERCIAL OR NON-DOMESTIC PREMISES. 5 Year Parts Guarantee Indesit also offers you a free 5 year parts guarantee. This additional guarantee is conditional on you registering your appliance with us and the parts being fitted by one of our authorised engineers. There will be a charge for our engineer s time. To activate the extra parts warranty on your appliance, simply call our registration line on (Republic of Ireland ). Extended Guarantees We offer a selection of repair protection plans that enable you to fully cover yourself against the expense of repair bills for the life of your policy. To find the ideal plan for you please call our advice line on (Republic of Ireland ). Free Helpdesk Service We have a dedicated team who can provide free advice and assistance with your appliance if you experience any technical difficulties within the first 90 days of ownership. Simply call our Indesit Service Hotline on (Republic of Ireland ) for telephone assistance, or, where necessary, to arrange for an engineer to call. 17

18 GB After Sales Service No one is better placed to care for your Indesit appliance during the course of its working life than us - the manufacturer. Essential Contact Information Indesit Service We are the largest service team in Europe offering you access to 400 skilled telephone advisors and 1100 fully qualified engineers on call to ensure you receive fast, reliable, local service. UK: Republic of Ireland: Please note: Our advisors will require the following information: Model number: Serial number: Parts and Accessories We supply a full range of genuine replacement parts as well as accessory products that protect and hygienically clean your appliance to keep it looking good and functioning efficiently throughout its life. UK: Republic of Ireland: Appliance Registration We want to give you additional benefits of Indesit ownership. To activate your free 5 year parts guarantee you must register your appliance with us. UK: Republic of Ireland: Indesit Company UK Ltd. Morley Way, Peterborough, PE2 9JB Indesit Company Unit 49 Airways Industrial Estate, Dublin 17 Recycling & Disposal Information As part of Indesit s continued commitment to helping the environment, Indesit reserves the right to use quality, recycled components to keep down customer costs and minimise material wastage. Please dispose of packaging and old appliances carefully. To minimise the risk of injury to children, remove the door, plug and cut the mains cable off flush with the appliance. Dispose of these parts separately to ensure that the appliance can no longer be plugged into a mains socket, and the door cannot be locked shut. 18

19 Instruções para a utilização MÁQUINA DE LAVAR ROUPA PT Português XWE Sumário Instalação, Desembalar e nivelar Ligações hidráulicas e eléctricas Primeiro ciclo de lavagem Dados técnicos Manutenção e cuidados, 24 Interromper a alimentação de água e de corrente eléctrica Limpar a máquina de lavar roupa Limpar a gaveta dos detergentes Cuidados com a porta de vidro e o tambor Limpar a bomba Verificar o tubo de alimentação de água Precauções e conselhos, 25 Segurança geral Eliminação Abertura manual da porta de vidro Descrição da máquina de lavar roupa, Painel de comandos Visor Como efectuar um ciclo de lavagem, 28 Programas e opções, Tabela dos programas Opções de Lavagem Push & Wash Detergentes e roupa, Gaveta dos detergentes Preparar a roupa Programas especiais Sistema de balanceamento da carga Anomalias e soluções, 33 Assistência, 34 PT 19

20 Instalação PT! É importante guardar este livrete para poder consultá-lo a qualquer momento. Se a máquina for vendida, cedida ou transferida, certifique-se que este livrete permaneça com a máquina para informar o novo proprietário acerca do seu funcionamento e das respectivas advertências.! Leia com atenção estas instruções: há importantes informações acerca da instalação, da utilização e da segurança. Desembalar e nivelar Desembalar 1. Tire a máquina de lavar roupa da embalagem. 2. Verifique se a máquina de lavar roupa sofreu danos no transporte. Se estiver danificada não efectue a sua ligação e contacte o revendedor. 3. Tire os 4 parafusos de protecção para o transporte e a borrachinha com o respectivo calço, situados na parte traseira (veja a figura). 4. Tape os furos com as tampas em plástico fornecidas. 5. Guarde todas as peças: se for necessário transportar a máquina de lavar roupa, terão de ser montadas outra vez.! Embalagens não são brinquedos para as crianças! Nivelamento 1. Instale a máquina de lavar roupa sobre um pavimento plano e rígido, sem encostá-la em paredes, móveis nem outro. 2. Se o pavimento não for perfeitamente horizontal, para compensar qualquer irregularidade, desatarraxe ou atarraxe os pés dianteiros (veja a figura); ; o ângulo de inclinação, medido no plano de trabalho, não deve ultrapassar 2. Um cuidadoso nivelamento dá estabilidade à máquina e evita vibrações, ruídos e deslocamentos durante o funcionamento. Se houver tapete ou alcatifa, regule os pés De modo a que debaixo da máquina de lavar roupa haja um espaço suficiente para ventilação. Ligações hidráulicas e eléctricas Ligação do tubo de alimentação da água 1. Realize a ligação do tubo de alimentação parafusando-o a uma torneira de água fria com bocal de rosca de 3/4 gás(veja a figura). Antes de realizar esta ligação, haja a água escorrer até estar límpida. 2. Ligue o tubo de alimentação na máquina de lavar roupa atarraxando-o no apropriado fornecimento da água, na parte traseira, em cima à direita (veja a figura). 3. Tome cuidado para o tubo não ser dobrado nem esmagado.! A pressão hídrica da torneira deve ser entre os valores da tabela dos Dados técnicos (veja a página ao lado).! Se o comprimento do tubo de alimentação não for suficiente, contacte uma oficina especializada ou um técnico autorizado.! Nunca utilize tubos já usados.! Utilize aqueles fornecidos com a máquina. 20

21 Ligação do tubo de descarga cm Ligue o tubo de descarga, sem dobrálo, a um conduto de descarga ou a uma descarga de parede colocados entre 65 e 100 cm do chão; em alternativa, coloque na beira de um lavabo ou de uma banheira, prendendo na torneira a guia fornecida (veja a figura). A ponta solta do tubo de descarga não deve permanecer emergida na água.! É desaconselhado empregar tubos de extensão; mas se for indispensável, a extensão deve ter o mesmo diâmetro do tubo original e não medir mais de 150 cm de comprimento. Ligação eléctrica Antes de ligar a ficha na tomada eléctrica, certifique-se que: a tomada tenha uma ligação à terra e seja nos termos da legislação; a tomada tenha a capacidade para suportar a carga máxima de potência da máquina, indicada na tabela dos Dados técnicos; a tensão de alimentação seja entre os valores indicados na tabela dos Dados técnicos (veja ao lado); a tomada seja compatível com a ficha da máquina de lavar roupa. Se não for, substitua a tomada ou a ficha. Este electrodoméstico agora é equipado com uma ficha de 13 amperes que pode ser ligada a uma tomada compatível, para uma utilização imediata. Leia as seguintes instruções antes de utilizar este electrodoméstico. ATENÇÃO O ELECTRODOMÉSTICO DEVE SER LIGADO À MASSA. AS ACTIVIDADES DESCRITAS A SEGUIR DEVEM SER EFECTUADAS POR UM ELECTRICISTA QUALIFICADO. Substituição de fusível: Quando for substituir um fusível defeituoso, utilize sempre fusíveis de 13 amperes ASTA em conformidade com o padrão BS1362 e coloque novamente a tampa do fusível. Se tiver perdido a tampa de fusível, não utilize a ficha antes desta peça que faltava ser colocada novamente. Tampas de fusível: Se for substituir a tampa do fusível, assegurese que a cor seja a certa, indicada pelo código ou pelos dizeres coloridos na base da ficha. Para as peças de reposição, contacte directamente o centro de assistência técnica mais próximo. Desmontar a ficha: Se o electrodoméstico for equipado com uma ficha incorporada que não possa ser novamente ligada aos cabos e for necessário fazer passar o cabo por divisões, aparelhos etc. certifique-se que: a ficha seja substituída por uma que possa ser ligada a cabos de 13 amperes com o selo BSI ou: o cabo de rede esteja ligado directamente à ficha de 13 amperes, comandada por um interruptor (em conformidade com a norma BS 5733), acessível sem ser necessário deslocar o electrodoméstico. Eliminação da ficha: Antes de deitar fora uma ficha eléctrica, inutilize os seus pinos de maneira que não seja mais possível colocá-la acidentalmente numa tomada. Instruções para a ligação do cabo a uma nova ficha eléctrica: Importante: a cor dos fios do cabo da rede indica os seguintes códigos: Amarelo/verde Terra Azul Neutro Castanho Sob tensão PT 21
Instructions for use WASHING MACHINE. Contents IWC 8105
 Instructions for use WASHING MACHINE GB English,1 GR ÅËËÇÍÉÊÁ,13 PT Português,25 Contents Installation, 2-3 Unpacking and levelling Connecting the electricity and water supplies The first wash cycle Technical
WATER MATTRESS MASSAGE SYSTEM 20439
 Page 1 of 10 WATER MATTRESS MASSAGE SYSTEM 20439 CONTENTS Massage System with Controller Please note: the above image shows a white unit and a blue unit. The white unit is supplied inside the blue unit
DONKEY 19689. 2. Using a small cross-head (positive) screwdriver, undo the screw that secures the battery compartment door. Copyright ROMPA Ltd
 screwdriver, undo the screw that secures the battery compartment door. Copyright ROMPA Ltd") DONKEY 19689 CONTENTS 1 x switch-adapted Donkey This product requires, but does not include, 3 AA batteries and a switch See www.rompa.com for a comprehensive range of switches BEFORE USE 1. Locate the
DONKEY 19689 CONTENTS 1 x switch-adapted Donkey This product requires, but does not include, 3 AA batteries and a switch See www.rompa.com for a comprehensive range of switches BEFORE USE 1. Locate the
SAP911. Acondicionador de aire portátil Ar condicionado portátil Portable Air Conditioner. Manual do utilizador
 ES PT EN SAP911 Acondicionador de aire portátil Ar condicionado portátil Portable Air Conditioner ES Manual del usuario PT Manual do utilizador EN User Manual ES Gracias por elegir este acondicionador
hdd enclosure caixa externa para disco rígido
 hdd enclosure caixa externa para disco rígido USER S GUIDE SPECIFICATONS HDD Support: SATA 2.5 Material: Aluminium and plastics Input connections: SATA HDD Output connections: USB 3.0 (up to 5.0Gbps)
SATA 3.5. hd:basic. hdd enclosure caixa externa para disco rígido
 SATA 3.5 hd:basic hdd enclosure caixa externa para disco rígido hd:basic USER S GUIDE SPECIFICATIONS HDD support: SATA 3.5 Material: Aluminium Input connections: SATA HDD Output connections: USB 2.0
LIGHT PANEL CONTENTS Light Panel Power supply Fixtures (brackets, screws)
") Page 1 of 8 LIGHT PANEL 20367 CONTENTS Light Panel Power supply Fixtures (brackets, screws) ABOUT THIS PRODUCT The Light Panel may be used on a table top as a free-standing object, or mounted either horizontally
Page 1 of 8 LIGHT PANEL 20367 CONTENTS Light Panel Power supply Fixtures (brackets, screws) ABOUT THIS PRODUCT The Light Panel may be used on a table top as a free-standing object, or mounted either horizontally
GEAR PUMPS RECOMMENDATIONS BEFORE START-UP
 GEAR PUMPS RECOMMENDATIONS BEFORE START-UP CTI Gear pumps recommendations before start-up 0811-0 Attention: The application of ABER gear pumps must follow all the instructions hereby mentioned in order
Operação de Instalações Marítimas
 ENIDH, Abril 2011 Sumário 1 Steering Gear 2 Bow Thrust 3 Propeller Servo 1 Steering Gear 2 Bow Thrust 3 Propeller Servo Steering Gear System Comprises two identical hydraulic systems. Each system includes:
Instruções para utilização
 Instruções para utilização MÁQUINA DE LAVAR ROUPA Português AWM 129 Sumário Instalação, 16-17-18-19 Desembalar e nivelar Ligações hidráulicas e eléctricas Primeiro ciclo de lavagem Dados técnicos Instruções
A machine that blows bubbles at the press of your switch (not included)
") 1. Product Name Bubbles 2. Product Code 20139 3. Colour As shown 4. Brief Description A machine that blows bubbles at the press of your switch (not included) 5. Contents Bubbles machine with cable attached
1. Product Name Bubbles 2. Product Code 20139 3. Colour As shown 4. Brief Description A machine that blows bubbles at the press of your switch (not included) 5. Contents Bubbles machine with cable attached
Nome empresa: Criado por: Telefone:
 Texto da proposta Data: 22-1-216 SCALA2 3-45 A Grundfos SCALA2 is a fully integrated, self-priming, compact waterworks for pressure boosting in domestic applications. SCALA2 incorporates integrated speed
Parts of the Solar Charger. Charging the Solar Battery. Using the Solar Lamp. Carry in hand. Shows how much light is left. Table light.
 Parts of the Solar Charger Solar Lamp LCD Panel 1 Solar Panel Cell Phone Charger Port Protective Cover Solar Charger Port Lamp Stand Adaptors On/Off Switch Cell Phone Charger Cable Charging the Solar Battery
VGM. VGM information. ALIANÇA VGM WEB PORTAL USER GUIDE June 2016
 Overview The Aliança VGM Web portal is an application that enables you to submit VGM information directly to Aliança via our e-portal Web page. You can choose to enter VGM information directly, or to download
Instructions for use WASHING MACHINE. Contents XWE 91282
 Instructions for use WASHING MACHINE GB English, 1 PT Português,19 Contents Installation, 2-3-4-5 Unpacking and levelling Connecting the electricity and water supplies The first wash cycle Technical data
Operator Manual Thermoplan AG, Subject to change REV-0
 1 Overview Control panel Foamer head Cup platform Liner pouch 8 Overview Heating basin Milk foam tube Level controller Milk container Cover Hood 9 Putting into operation Plug the appliance into a suitable
Manual de instruções para Caixa Coletora Johnson Pump
 Manual de instruções para Caixa Coletora Johnson Pump Em caso dúvidas na instalação após a leitura do manual, favor entrar em contato com nosso departamento técnico através do telefone: (11) 3477-5655
1. Product Name. 2. Product Code. 3. Colour. 4. Brief Description. 5. Contents. 6. Snoezelen Stimulations. Switch Adapted Fibre Optic Lamp
 1. Product Name Switch Adapted Fibre Optic Lamp 2. Product Code 20709 3. Colour Clear base; white fibres 4. Brief Description Activate your switch to activate the light through the fibres and in the base.
1 WC System. Instrução Técnica Instrucción Técnica Technical Instruction
 WC System . WC SYSTEM Technical characteristics: Electro-pneumatic system The toilet mechanism works with pneumatic energy supplied by the chassis's pneumatic system. The water timer is done by a relay,
Thank you for using Shepherd 240 Biometric Fingerprint Lock. Please read this Installation Manual carefully before attempting
 Preface Thank you for using Shepherd 240 Biometric Fingerprint Lock Please read this Installation Manual carefully before attempting to install your new lock. This manual covers installation procedures
Seu manual do usuário JURA COMPRESSOR COOLER PRO http://pt.yourpdfguides.com/dref/2468329
 Você pode ler as recomendações contidas no guia do usuário, no guia de técnico ou no guia de instalação para JURA COMPRESSOR COOLER PRO. Você vai encontrar as respostas a todas suas perguntas sobre a JURA
WI FI INTERACTIVE MAT SWITCH SET 19939
 Page 1 of 6 WI FI INTERACTIVE MAT SWITCH SET 19939 CONTENTS 1 x Control Box with 9V battery 9 x carpet switches: 1 x pink vinyl 1 x purple carpet 1 x blue non-slip mat 1 x green Soft & Silky 1 x light
Torre Purificadora de Ar MCP-
 Filtro de cartuchos compacto com pulsos de limpeza A torre de purificação de ar MCP-16 RC é um filtro de cartuchos compacto para limpeza e reciclagem do ar interior. A unidade filtrante compacta é fornecida
Aqui pode escolher o Sistema operativo, e o software. Para falar, faça download do Cliente 2.
 TeamSpeak PORTUGUES ENGLISH Tutorial de registo num servidor de TeamSpeak Registration tutorial for a TeamSpeak server Feito por [WB ].::B*A*C*O::. membro de [WB ] War*Brothers - Non Dvcor Dvco Made by:
1. Product Name. 2. Product Code. 3. Colour. 4. Brief Description. 5. Contents. 6. Snoezelen Stimulations. 7. Best Use
 1. Product Name Mood Cushion with infra red remote control 2. Product Code 20425 3. Colour White fur, internal light colour can be selected via the remote. 4. Brief Description An extremely lightweight
1. Dados Técnicos...3. 2. Utilização...3. 3. Local de Uso...3. 4. Validade...3. 5. Instruções de Uso...3. 6. Indicações de Segurança...
 SUMÁRIO PORTUGUÊS 1. Dados Técnicos...3 2. Utilização...3 3. Local de Uso...3 4. Validade...3 5. Instruções de Uso...3 6. Indicações de Segurança...4 7. Local de Uso...4 8. Manutenção...4 9. Resolução
1. Product Name. 2. Product Code. 3. Colour. 4. Brief Description. 5. Contents. Peek A Boo Bear. Light brown bear the colour of the blanket may vary
 1. Product Name Peek A Boo Bear 2. Product Code 20837 3. Colour Light brown bear the colour of the blanket may vary 4. Brief Description Activate your switch to make this adorable bear play peek a boo.
1. Product Name 2. Product Code 3. Colour 4. Brief Description 5. Contents 6. Snoezelen Stimulations
 1. Product Name Wheel Rotator 2. Product Code 13170, 16570, 20685 3. Colour Black 4. Brief Description A wheel rotator is needed to rotate the effect wheel in the ROMPA Projector. 5. Contents 1 x Wheel
1. Product Name. 2. Product Code. 3. Colour. 4. Brief Description. 5. Contents. Switch Adapted Clip On Fan. Colours may vary
 1. Product Name Switch Adapted Clip On Fan 2. Product Code 20489 3. Colour Colours may vary 4. Brief Description Connects to your switch for switch activation. 5. Contents Fan with cable with 3.5mm jack
VGM. VGM information. ALIANÇA VGM WEB PORTAL USER GUIDE September 2016
 Overview The Aliança VGM Web portal is an application that enables you to submit VGM information directly to Aliança via our e-portal Web page. You can choose to enter VGM information directly, or to download
User Guide Manual de Utilizador
 2400 DPI OPTICAL GAMING MOUSE User Guide Manual de Utilizador 2014 1Life Simplify it All rights reserved. www.1-life.eu 2 2400 DPI OPTICAL GAMING MOUSE ENGLISH USER GUIDE...4 MANUAL DE UTILIZADOR PORTUGUÊS...18
1. Product Name. 2. Product Code. 3. Colour. 4. Brief Description. 5. Contents. Hip Hop Jumping Cushion. Colours may vary
 1. Product Name Hip Hop Jumping Cushion 2. Product Code 19229 3. Colour Colours may vary 4. Brief Description Provides hours of healthy fun for children. Has a strong padding and has no frame or edges.
Motor PTC Kit. Kit PTC del Motor. Kit PTC do Motor SSW-07 / SSW-08
 Motors Automation Energy Transmission & Distribution Coatings Motor PTC Kit Kit PTC del Motor Kit PTC do Motor SSW-07 / SSW-08 Installation, Configuration and Operation Guide Guía de Instalación, Configuración
Instructions for use WASHING MACHINE. Contents WMG 622
 Instructions for use WASHING MACHINE Contents English,1 WMG 622 Português,13 Installation, 2-3 Unpacking and levelling Connecting the electricity and water supplies The first wash cycle Technical data
Miniature Solenoid Valve Type 200
 2/2-Way, Direct-acting, G1/8 - M5 Advantages/Benefits Normally closed Body materials: brass, stainless steel Short response time Compact design Design/Function Applications is a direct-acting plungertype
1. Product Name. 2. Product Code. 3. Colour. 4. Brief Description. 5. Contents. 6. Snoezelen Stimulations. Fibre Optic UFO
 1. Product Name Fibre Optic UFO 2. Product Code 16692 3. Colour Transparent base*; white fibres * Base may be silver-coloured, subject to availability 4. Brief Description Captivating, fine fibre optics.
de lo normal. A continuación, póngase en contacto con un electricista cualificado. Los datos antes mencionados podrán modificarse sin previo aviso par
 de lo normal. A continuación, póngase en contacto con un electricista cualificado. Los datos antes mencionados podrán modificarse sin previo aviso para introducir mejoras en el producto. 12 Limpar
WI FI STARRY SKY PANEL 20287, KH 5.11
 Page 1 of 10 CONTENTS 1 square Panel with chain 1 Light Source WI FI STARRY SKY PANEL 20287 INSTALLATION If in any doubt about the installation of this product consult a suitably qualified electrician.
Versão: 1.0. Segue abaixo, os passos para o processo de publicação de artigos que envolvem as etapas de Usuário/Autor. Figura 1 Creating new user.
 Órgão: Ministry of Science, Technology and Innovation Documento: Flow and interaction between users of the system for submitting files to the periodicals RJO - Brazilian Journal of Ornithology Responsável:
ÍNDICE PORTUGUÊS INDEX ENGLISH
 ÍNDICE PORTUGUÊS 1. Introdução...2 2. Características...2 3. Avisos...3 4. Instalação...3 4.1 Alimentação por pilha AAA 4.2 Alimentação pela entrada USB 5. Utilizando o Produto...5 6. Solução de Problemas...5
TECHNO 35. Code: 600202SE. Thermostatic Flexi Shower Kit. technical specifications. Pack consists of:
 technical specifications Code: 600202SE TECHNO 35 Thermostatic Flexi Shower Kit Pack consists of: 1 x 600021SE Thermostatic Shower valve made up of: 1 x 35820SE Trim Set 1 x 3580012 Valve Rough 1 x 070
DEPARTAMENTO DE ENGENHARIA CIVIL E ARQUITETURA
 SCHOOL YEAR 01/013 1 ST EXAM 013/01/16 08h00 DURATION: h00 THEORY QUESTIONS (maximum 45 minutes) 1. In a pumped trunk main system explain why the smallest technically viable diameter may not be the least
ILLUMINATED VIBRATING BALLPOOL 19273
 ILLUMINATED VIBRATING BALLPOOL 19273 CONTENTS 4 x straight walls 2 x raised floor sections with LED lighting and speakers Power supply and mains lead and splitter box 9 Boxes of 7.5cm balls ASSEMBLY INSTRUCTIONS
VC Series Round Vinyl Caps
 1 VC Series Round Vinyl Caps (Round Vinyl Caps) Series VC Caps are extremely flexible and durable protective closures which are ideal for use as thread protectors, dust and moisture seals, pipe and stud
Painel De Controlo ClassicPlus
 Painel De Controlo ClassicPlus Manual Do Utilizador 0994909_G (POR) Valmont Industries, Inc. 2008 All rights reserved Valmont Irrigation 402-359-2201 www.valmont.com/irrigation/ i ii DECLARAÇÃO DE CONFORMIDADE
Desumidificador de ar
 MANUAL DO USUÁRIO USER MANUAL Desumidificador de ar Baby Care Português 4// Manual do Usuário Parabéns! Você acaba de adquirir mais um produto com a qualidade Multilaser! O Desumidificador de Ar Multilaser
Guia de Instalação Rápida TU2-ETG H/W: V1.3R
 Guia de Instalação Rápida TU2-ETG H/W: V1.3R Table Índice of Contents Português... 1. Antes de Iniciar... 2. Como instalar... 1 1 2 Troubleshooting... 7 Version 08.27.2008 1. Antes de Iniciar Conteúdo
11g Wireless Broadband Router (Roteador banda-larga sem fio- Wireless G) Quick Installation Guide
 Quick Installation Guide") LevelOne WBR-3408 11g Wireless Broadband Router (Roteador banda-larga sem fio- Wireless G) Quick Installation Guide English Português Table of Contents English... 3 Português... 16 2 English Package Contents
LevelOne WBR-3408 11g Wireless Broadband Router (Roteador banda-larga sem fio- Wireless G) Quick Installation Guide English Português Table of Contents English... 3 Português... 16 2 English Package Contents
Select a single or a group of files in Windows File Explorer, right-click and select Panther Print
 Quick Start Guide SDI Panther Print Panther Print SDI Panther products make sharing information easier. Panther Print is an intuitive dialog box that provides a thumbnail view of the file to print, depicting
Stick Up Cam Battery
 Stick Up Cam Battery 1. Charge and insert the battery. Charge the provided battery. First, fully charge the battery by plugging it into a USB port using the provided orange cable. The battery is fully
ROLL IN - PASS THROUGH
 RANGE COMPOSITION A range of refrigerators designed to satisfy the food-conservation requirements of professional caterers who want the high performance and reliability of a commercial unit suited for
Automotive Retrofit Procedure
 Automotive Retrofit Procedure Replacing R-12 with R-134a Tom Birch Refrigerant Choice R-134a is the only Significant New Alternative Policy (SNAP), single-molecule refrigerant. R-134a is used by all original
PRODUCT FAMILY DATASHEET SubstiTUBE PURE
 SubstiTUBE PURE Economic LED tubes for electromagnetic control gears AREAS OF APPLICATION Corridors, stairways, parking garages Cooling and storage rooms Warehouses Domestic applications General illumination
TUTTOPIZZA - 700 DEEP
 RANGE COMPOSITION The range consists of 3 models of refrigerated tables with a worktop in granite and 700 mm in depth. Three models are 1780 mm, in length, all with a refrigerated section. The code has
Meditacao da Luz: O Caminho da Simplicidade
 Meditacao da Luz: O Caminho da Simplicidade Leonardo Boff Click here if your download doesn"t start automatically Meditacao da Luz: O Caminho da Simplicidade Leonardo Boff Meditacao da Luz: O Caminho da
Easy Linux! FUNAMBOL FOR IPBRICK MANUAL. IPortalMais: a «brainware» company www.iportalmais.pt. Manual
 IPortalMais: a «brainware» company FUNAMBOL FOR IPBRICK MANUAL Easy Linux! Title: Subject: Client: Reference: Funambol Client for Mozilla Thunderbird Doc.: Jose Lopes Author: N/Ref.: Date: 2009-04-17 Rev.:
1,55m or 1,25m (if portable 1,58m or 1,28m)
") www.portcril.com 1,55m or 1,25m (if portable 1,58m or 1,28m) Information Dimensões / Dimentions Peso sem água / Weight without water Peso com água / Weight with water Capacidade / Capacity 4,20x2,32x1,55m
www.portcril.com 1,55m or 1,25m (if portable 1,58m or 1,28m) Information Dimensões / Dimentions Peso sem água / Weight without water Peso com água / Weight with water Capacidade / Capacity 4,20x2,32x1,55m
1. Product Name. 2. Product Code. 3. Colour. 4. Brief Description. 5. Contents. 6. Snoezelen Stimulations. Mirror Ball Motor
 1. Product Name Mirror Ball Motor 2. Product Code 18524 Motor 1RPM 18525 Motor 1/2RPM 3. Colour As available (models may vary from photographs) 4. Brief Description When a Spotlight is shone onto the Mirror
Instructions for use WASHING MACHINE. Contents FMG 923
 Instructions for use WASHING MACHINE Contents GB GB PT GR English,1 Português,13 ΕΛΛΗΝΙΚΑ,25 Installation, 2-3 Unpacking and levelling Connecting the electricity and water supplies The first wash cycle
Instalação do encosto. Recursos. Como usar os tubos adaptadores. Estrutura do produto. Sistema de Som
 MANUAL Instalação do encosto Sistema de Som Recursos Disponível em preto, cinza Hastes de montagem ajustáveis para encaixe em qualquer assento Hastes ajustáveis a partir de 4 polegadas de distância a 8
Atividade extra. Questão 01. Lingua Estrangeira Inglês
 Atividade extra Questão 01 http://www.sxc.hu/photo/1406799 We hear a list of problems affecting the environment almost every day: pollution, acid rain, global warming, and the destruction of rain forest,
User Manual. Linksys PAP2 Broadband Phone Service. Linhagratuita grupo csdata
 User Manual Linksys PAP2 Broadband Phone Service Linhagratuita grupo csdata www.linhagratuita.com.br Please follow the step-by-step guide below to set up your Linksys PAP2 for use with Linhagratuita Broadband
2/4 BD8201FM. Lot No. REV. A
 1/4 2/4 BD8201FM Lot No. 3/4 Ω Function Description 4/4 Appendix Notes No technical content pages of this document may be reproduced in any form or transmitted by any means without prior permission of
Intellectual Property. IFAC Formatting Guidelines. Translated Handbooks
 Intellectual Property IFAC Formatting Guidelines Translated Handbooks AUTHORIZED TRANSLATIONS OF HANDBOOKS PUBLISHED BY IFAC Formatting Guidelines for Use of Trademarks/Logos and Related Acknowledgements
Guião M. Descrição das actividades
 Proposta de Guião para uma Prova Grupo: Inovação Disciplina: Inglês, Nível de Continuação, 11.º ano Domínio de Referência: O Mundo do trabalho Duração da prova: 15 a 20 minutos 1.º MOMENTO Guião M Intervenientes
Serviços: API REST. URL - Recurso
 Serviços: API REST URL - Recurso URLs reflectem recursos Cada entidade principal deve corresponder a um recurso Cada recurso deve ter um único URL Os URLs referem em geral substantivos URLs podem reflectir
Instructions for use WASHING MACHINE. Contents ARXXL 129 S
 Instructions for use WASHING MACHINE English,1 Português,13 Contents Installation, 2-3 Unpacking and levelling Connecting the electricity and water supplies The first wash cycle Technical data Description
TEMPER. GLASS TOP HOT UNITS - BRIDGE
 RANGE COMPOSITION ActiveSelf is a servery system consisting of modular units designed to meet the servery requirements of both profit and cost sector catering outlets. The careful choice of materials and
Importante. 13. Não ultrapassar a capacidade máxima do recipiente. 14. Não utilizar o Espremedor de Citrinos por períodos muito longos.
 Importante 1.Leia todas as instruções cuidadosamente antes de usar o espremedor de citrinos Orima. 2. Este aparelho pode ser usado por crianças de 8 anos ou mais e pessoas com reduzidas capacidades físicas,
manualdepsiquiatriainfant il manual de psiquiatria infantil
 manualdepsiquiatriainfant il manual de psiquiatria infantil Topic on this manual is about the greatest of those manualdepsiquiatriainfantil manual de psiquiatria infantil might have lots 1000s of different
Manual de instruções para Sifões VETUS e Johnson Pump
 Manual de instruções para Sifões VETUS e Johnson Pump Em caso dúvidas na instalação após a leitura do manual, favor entrar em contato com nosso departamento técnico através do telefone: (11) 3477-5655
FIT SYSTEM BAIN MARIE UNITS ZANUSSI RANGE COMPOSITION
 RANGE COMPOSITION The new Self Service Fit System is a flexible solution with compact dimensions to solve the problems of food servery in any location. It is versatile and trendy (with its appealing aesthetics
Kit Tecsystem for MVW-01. Kit Tecsystem para MVW-01. Kit Tecsystem Installation, Configuration and Operation Guide
 Kit Tecsystem for MVW0 Kit Tecsystem para MVW0 Kit Tecsystem Installation, Configuration and Operation Guide Kit Tecsystem Guía de Instalación, Configuración y Operación Kit Tecsystem Guia de Instalação,
A dança do corpo vestido: Um estudo do desenvolvimento do figurino de balé clássico até o século XIX (Portuguese Edition)
") A dança do corpo vestido: Um estudo do desenvolvimento do figurino de balé clássico até o século XIX (Portuguese Edition) Francisca Dantas Mendes Click here if your download doesn"t start automatically
A dança do corpo vestido: Um estudo do desenvolvimento do figurino de balé clássico até o século XIX (Portuguese Edition) Francisca Dantas Mendes Click here if your download doesn"t start automatically
2 Categorias Categories Todas as categorias de actividade são apresentadas neste espaço All activity categories are presented in this space
 1 Próximas Actividades Next Activities Visualiza as próximas actividades a ter inicio, com a indicação do tempo restante Displays upcoming activities and indicating the remaining time 2 Categorias Categories
To activate your free* 10 years parts guarantee
 Instruction booklet TUMBLE DRYER Contents GB GB English,1 PT Português,19 NL FR Français,37 Installation, 2 Where to put your dryer Ventilation Electrical connection Levelling the tumble dryer Before you
75, 8.º DTO 1250-068 LISBOA
 EAbrief: Medida de incentivo ao emprego mediante o reembolso da taxa social única EAbrief: Employment incentive measure through the unique social rate reimbursement Portaria n.º 229/2012, de 03 de Agosto
Completing your Participant Agreement Como preencher o Contrato de Participação
 Completing your Participant Agreement Como preencher o Contrato de Participação A quick-start guide for stock plan participants. Um guia rápido para participantes do plano de compra de ações. Your company
SUMÁRIO PORTUGUÊS INDEX ENGLISH
 SUMÁRIO PORTUGUÊS Componentes do produto...2 Sugestões de uso: pescoço, ombro, perna, braço, cintura...2 Os defeitos mais comuns e como resolvê-los...3 Utilização:...3 INDEX ENGLISH Product Components...6
Medicina Integrativa - A Cura pelo Equilíbrio (Portuguese Edition)
") Medicina Integrativa - A Cura pelo Equilíbrio (Portuguese Edition) Click here if your download doesn"t start automatically Medicina Integrativa - A Cura pelo Equilíbrio (Portuguese Edition) Medicina Integrativa
Medicina Integrativa - A Cura pelo Equilíbrio (Portuguese Edition) Click here if your download doesn"t start automatically Medicina Integrativa - A Cura pelo Equilíbrio (Portuguese Edition) Medicina Integrativa
SIMPLY 5T 10T 14T SUPER CONGELADOR BLAST CHILLERS / SHOCK FREEZERS. Tramontina
 PT Estrutura monobloco em aço inox Aisi 304; com acabamento satinado; espessura de isolamento de mm com poliuretano de alta densidade (43 kg/m3); pés ajustáveis em aço inox; cantos internos arredondados
Easy Linux! FUNAMBOL FOR IPBRICK MANUAL. IPortalMais: a «brainmoziware» company www.iportalmais.pt. Manual Jose Lopes
 IPortalMais: a «brainmoziware» company www.iportalmais.pt FUNAMBOL FOR IPBRICK MANUAL Easy Linux! Title: Subject: Client: Reference: Funambol Client for Microsoft Outlook Doc.: Author: N/Ref.: Date: 2009-04-17
Receitas na Pressão - Vol. 01: 50 Receitas para Panela de Pressão Elétrica (Portuguese Edition)
") Receitas na Pressão - Vol. 01: 50 Receitas para Panela de Pressão Elétrica (Portuguese Edition) Click here if your download doesn"t start automatically Receitas na Pressão - Vol. 01: 50 Receitas para Panela
Receitas na Pressão - Vol. 01: 50 Receitas para Panela de Pressão Elétrica (Portuguese Edition) Click here if your download doesn"t start automatically Receitas na Pressão - Vol. 01: 50 Receitas para Panela
CINTOS DE SEGURANÇA INSTRUÇÕES DE MONTAGEM (EN) SAFETY BELTS (ES) CINTURONES DE SEGURIDAD
 SAFETY BELTS (ES) CINTURONES DE SEGURIDAD") INSTRUÇÕES DE MONTAGEM (EN) INSTALL MOUNTING INSTRUCTIONS (ES) INSTRUCCIONES DE MONTAJE CINTOS DE SEGURANÇA (EN) SAFETY BELTS (ES) CINTURONES DE SEGURIDAD INSTRUÇÕES PARA O USO DO CINTO DE SEGURANÇA 1
INSTRUÇÕES DE MONTAGEM (EN) INSTALL MOUNTING INSTRUCTIONS (ES) INSTRUCCIONES DE MONTAJE CINTOS DE SEGURANÇA (EN) SAFETY BELTS (ES) CINTURONES DE SEGURIDAD INSTRUÇÕES PARA O USO DO CINTO DE SEGURANÇA 1
TWILIGHT TURTLE 20491
 Page 1 of 6 TWILIGHT TURTLE 20491 CONTENTS Your Twilight Turtle is supplied in one box containing: 1 x Twilight Turtle 1 x Star Guide (small booklet) Please note: This product requires, and includes, 3
ROLLER CONVEYOR SHORT ROLLERS
 RANGE COMPOSITION Some Zanussi dishwasher models can perform to their full potential, if combined with the Zanussi Handling System range. The modular system allows to design ergonomic and reliable solutions
Guia de Instalação Rápida TU-S9 H/W: V1
 Guia de Instalação Rápida TU-S9 H/W: V1 Table Índice of Contents Português... 1. Antes de Iniciar... 2. Como Instalar... 1 1 2 Troubleshooting... 7 Version 02.19.2009 1. Antes de Iniciar Conteúdo da Embalagem
As 100 melhores piadas de todos os tempos (Portuguese Edition)
") As 100 melhores piadas de todos os tempos (Portuguese Edition) Click here if your download doesn"t start automatically As 100 melhores piadas de todos os tempos (Portuguese Edition) As 100 melhores piadas
As 100 melhores piadas de todos os tempos (Portuguese Edition) Click here if your download doesn"t start automatically As 100 melhores piadas de todos os tempos (Portuguese Edition) As 100 melhores piadas
Filtros de Areia Aster Confiança na filtragem da sua piscina. Aster sand filters Reliable filtration for your pool
 Filtros de Areia Aster Confiança na filtragem da sua piscina Aster sand filters Reliable filtration for your pool Filtros de Areia Aster Filtri a sabbia Aster Acabamento perfeito e maior superfície de
MANUAL DO USUÁRIO USER MANUAL. Baby Care
 MANUAL DO USUÁRIO USER MANUAL Baby Care Balança digital Baby //3 Português 4// Manual Balança Digital Baby Multilaser Parabéns! Você acaba de adquirir mais um produto com a qualidade Multilaser! O peso
Métodos Formais em Engenharia de Software. VDMToolTutorial
 Métodos Formais em Engenharia de Software VDMToolTutorial Ana Paiva apaiva@fe.up.pt www.fe.up.pt/~apaiva Agenda Install Start Create a project Write a specification Add a file to a project Check syntax
Uma empresa do grupo:
 Rua Horta dos Bacelos, Lt. 18, 3º - 2690-390 Santa Iria de Azóia T: +351 219 533130 F: +351 219 533131 info@hseabra.seabraglobal.com www.seabraglobal.com Uma empresa do grupo: 02 03 Icestop é um sistema
Guia de Instalação Rápida TFM-560X H/W : YO
 Guia de Instalação Rápida TFM-560X H/W : YO Table Índice of Contents... 1. Antes de Iniciar... 2. Como instalar... 1 1 2 Troubleshooting... 7 Version 08.04.2008 1. Antes de Iniciar Conteúdo da Embalagem
Welcome to Lesson A of Story Time for Portuguese
 Portuguese Lesson A Welcome to Lesson A of Story Time for Portuguese Story Time is a program designed for students who have already taken high school or college courses or students who have completed other
Instruction manual TUMBLE DRYER. Contents IDCA G35
 Instruction manual TUMBLE DRYER EN English,1 PT Português,17 GR ÅËËÇÍÉÊÁ,33 Contents Important information, 2-3 Installation, 4 Where to install the tumble dryer Ventilation Electrical connections Preliminary
Descrição das actividades
 Proposta de Guião para uma Prova Grupo: Em Acção Disciplina: Inglês, Nível de Continuação, 11.º ano Domínio de Referência: O Mundo do Trabalho Duração da prova: 15 a 20 minutos Guião D 1.º MOMENTO Intervenientes
GUIÃO A. Ano: 9º Domínio de Referência: O Mundo do Trabalho. 1º Momento. Intervenientes e Tempos. Descrição das actividades
 Ano: 9º Domínio de Referência: O Mundo do Trabalho GUIÃO A 1º Momento Intervenientes e Tempos Descrição das actividades Good morning / afternoon / evening, A and B. For about three minutes, I would like
Vaporpunk - A fazenda-relógio (Portuguese Edition)
") Vaporpunk - A fazenda-relógio (Portuguese Edition) Octavio Aragão Click here if your download doesn"t start automatically Vaporpunk - A fazenda-relógio (Portuguese Edition) Octavio Aragão Vaporpunk - A
Vaporpunk - A fazenda-relógio (Portuguese Edition) Octavio Aragão Click here if your download doesn"t start automatically Vaporpunk - A fazenda-relógio (Portuguese Edition) Octavio Aragão Vaporpunk - A
Comportamento Organizacional: O Comportamento Humano no Trabalho (Portuguese Edition)
") Comportamento Organizacional: O Comportamento Humano no Trabalho (Portuguese Edition) John W. Newstrom Click here if your download doesn"t start automatically Comportamento Organizacional: O Comportamento
Comportamento Organizacional: O Comportamento Humano no Trabalho (Portuguese Edition) John W. Newstrom Click here if your download doesn"t start automatically Comportamento Organizacional: O Comportamento
ÍNDICE PORTUGUÊS INDEX ENGLISH
 ÍNDICE PORTUGUÊS 1. Características do Produto...2 2. Aplicação...2 3. Manual de Operação...2 4. Diferença entre os adaptadores AC e DC...3 5. Utilizando o Adaptador DC 12V...3 6. Utilizando o Adaptador