New Classics Toaster Article 2387
|
|
|
- Felipe Lemos Graça
- 8 Há anos
- Visualizações:
Transcrição
1 New Classics Toaster Article 2387 Gebruiksaanwijzing User's instructions Mode d'emploi Bedienungsanleitung Instrucciones de uso Istruzioni per l'uso Bruksanvisning Brugsanvisning Bruksanvisning Käyttöohje Instruções de uso

2
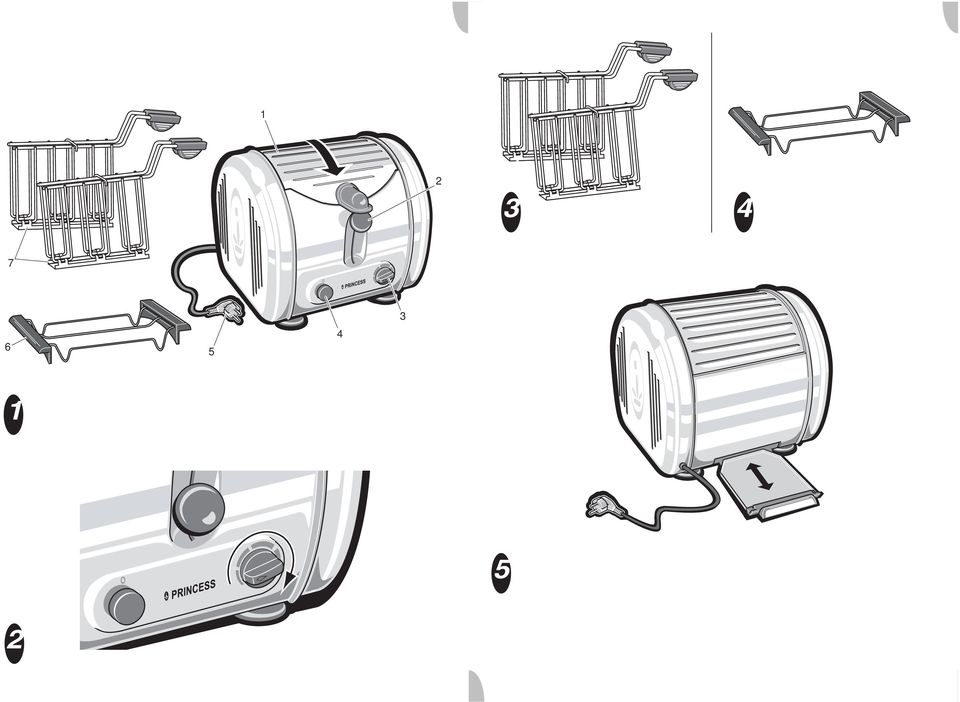
3 Algemeen Deze fraaie Princess New Classics Sandwich Toaster is onderdeel van onze New Classics-productlijn, die is uitgevoerd in robuust verchroomd staal. Compleet geleverd met tostihouders en een opzetrekje voor broodjes en stokbrood. Deze uitgekiende Toaster met een vermogen van W kan snel en gemakkelijk twee boterhammen of tosti's tegelijk roosteren. Ook kunt u er broodjes of stokbrood mee roosteren met behulp van het meegeleverde opzetrekje. Het apparaat is verder uitgerust met een stofdeksel, een stopknop, een bruiningsregelaar, een broodlift en een centreringsmechanisme. Het centreringsmechanisme zorgt ervoor dat het brood altijd op de juiste plaats in de gleuf van het apparaat zit. U sluit het apparaat aan op het elektriciteitsnet ( V). Werking en bediening Zie figuur 1. Het apparaat bevat de volgende onderdelen: 1 Stofwerend deksel 2 Broodlift 3 Bruiningsregelaar 4 Stopknop 5 Snoer met stekker 6 Opzetrekje voor broodjes en stokbrood 7 Twee tostihouders Aan de achterzijde van het apparaat bevindt zich de kruimellade voor het verwijderen van achtergebleven broodkruimels. Voor het eerste gebruik 1 Verwijder voor het eerste gebruik de gehele verpakking. 2 Nu kunt u beginnen met het roosteren van: brood; tosti's; broodjes/stokbrood (met het opzetrekje). Brood roosteren Brood roostert u door het in de gleuven van het apparaat te stoppen en het apparaat in werking te stellen. Druk het brood niet met geweld in de gleuven. Hierdoor kan het vastraken. Is het brood te groot, snijd het dan eerst op maat. Snijd het brood niet te klein, omdat u het dan niet meer goed uit de gleuf kunt halen. U kunt het apparaat altijd tussentijds stoppen door op de stopknop te drukken. Het apparaat stopt hierdoor met roosteren en de broodlift springt omhoog. 1 Steek de stekker in een geaard stopcontact. 2 Open het stofwerend deksel. 3 Plaats het brood in de gleuven van het apparaat. 4 Stel de gewenste bruiningsgraad in met de bruiningsregelaar. 5 Druk de broodlift met de hendel naar beneden om het roosteren te starten. Het apparaat zorgt ervoor dat het brood goed gecentreerd in de gleuven staat. 6 Het apparaat stopt automatisch met roosteren en de broodlift gaat automatisch omhoog. Haal het geroosterde brood uit het apparaat. 7 Trek bij einde gebruik de stekker uit het stopcontact en laat het apparaat afkoelen. Sluit het deksel. New Classics Toaster Article

4 Bruiningsgraad instellen Zie figuur 2. De bruiningsgraad stelt u in met de bruiningsregelaar. Draait u deze met de klok mee dan wordt het brood donkerder geroosterd: de linkerstand betekent net knapperig in het midden goudgeel de rechterstand betekent donkerbruin geroosterd. Probeer verschillende standen uit om het door u gewenste resultaat te bereiken. Start hierbij altijd op de laagste stand. Houd er rekening mee dat de toestand van het brood invloed heeft op het resultaat: droog en oud brood gaan sneller, vers en diepvriesbrood hebben wat meer tijd nodig. Tosti's roosteren Tosti's worden gewoonlijk gemaakt van brood en kaas. U kunt naar eigen keuze ingrediënten toevoegen als ham, bacon, ui, salami, ananas, tomaat, gerookte zalm, etc. Zie figuur 3. 1 Steek de stekker in een geaard stopcontact. 2 Open het stofwerend deksel. 3 Stop de tosti van uw keuze in de tostihouder en klem de handvatten tegen elkaar aan. 4 Plaats de gevulde tostihouder in een van de gleuven van het apparaat. 5 Rooster de tosti op de normale wijze. Volg hierbij de instructies vanaf punt 4 onder 'Brood roosteren'. Broodjes/stokbrood roosteren met het opzetrekje Broodjes en stokbrood die te breed zijn voor de gleuven van het apparaat, kunt u roosteren met behulp van het opzetrekje. Hierbij plaatst u het opzetrekje bovenop het apparaat. Zie figuur 4. 1 Steek de stekker in een geaard stopcontact. 2 Open het stofwerend deksel. 3 Plaats het opzetrekje bovenop het apparaat. 4 Leg de broodjes/het stokbrood op het rekje. 5 Rooster het brood op de normale wijze (onder 'Brood roosteren', vanaf punt 4), waarbij u eventueel de broodjes/ het stokbrood tussentijds kunt omdraaien voor een gelijkmatige bruining. Onderhoud en reinigen Reinig het apparaat en de bijbehorende onderdelen na ieder gebruik. Zo voorkomt u dat voedselresten aan het apparaat vastkoeken. Zorg ervoor dat er geen vocht aan de binnenkant van het apparaat komt. Dompel het apparaat nooit onder in water of een andere vloeistof. Mocht dit wel gebeuren, gebruik het apparaat dan niet meer en gooi het weg. Gebruik geen schurende of agressieve middelen. Kruimellade verwijderen Zie figuur 5. 1 Haal, als dat nog niet gebeurd is, altijd eerst de stekker uit het stopcontact. 2 Laat het apparaat afkoelen. 3 Trek de kruimellade aan de achterzijde uit het apparaat en verwijder de achtergebleven broodkruimels. 2 New Classics Toaster Article 2387

5 4 Was de losse onderdelen (kruimellade, tostihouders en opzetrekje) met water en zeep. Droog na met een droge doek. 5 Reinig de buitenzijde van het apparaat met het speciaal daarvoor bijgeleverde microvezeldoekje. Gebruik dit doekje alleen droog. 6 Plaats de kruimellade terug in het apparaat. 7 Zet het apparaat met gesloten deksel op een veilige plaats weg. Veiligheid Algemeen Lees de gebruiksaanwijzing goed door en bewaar deze zorgvuldig. Gebruik dit apparaat alleen zoals beschreven in deze gebruiksaanwijzing. Gebruik dit apparaat alleen voor huishoudelijke doeleinden. Houd het apparaat buiten het bereik van kinderen of personen die er niet goed mee om kunnen gaan. Laat reparaties uitvoeren door een gekwalificeerde monteur. Probeer nooit zelf het apparaat te repareren. Warmte en elektriciteit Controleer voordat u het apparaat gebruikt of de netspanning overeenkomt met de aangegeven netspanning op het typeplaatje van het apparaat. Gebruik een geaard stopcontact. Haal altijd de stekker uit het stopcontact wanneer u het apparaat niet gebruikt. Als u de stekker uit het stopcontact neemt, trek dan aan de stekker, niet aan het snoer. Controleer regelmatig of het snoer van het apparaat nog intact is. Gebruik het apparaat niet als het snoer beschadigingen vertoont. Laat een beschadigd snoer vervangen door een gekwalificeerde monteur. Zorg ervoor dat het apparaat en het snoer niet in aanraking komen met hittebronnen, zoals een hete kookplaat of open vuur. Zorg ervoor dat het apparaat, het snoer en de stekker niet in aanraking komen met water. Wees voorzichtig met het vastpakken van onderdelen en het apparaat zelf. Laat het apparaat eerst afkoelen. Het apparaat en de onderdelen worden namelijk heet tijdens het gebruik. Ook de behuizing van het apparaat wordt heet, omdat de behuizing de warmte goed geleidt. Het apparaat moet zijn warmte kwijt kunnen om brandgevaar te voorkomen. Zorg er dus voor dat het apparaat voldoende vrij is en niet in contact kan komen met brandbaar materiaal. Het apparaat mag niet worden bedekt. Tijdens gebruik Gebruik het apparaat nooit buiten. Plaats het apparaat op een stabiele en vlakke ondergrond, op een plaats waar het niet kan vallen. Laat het snoer niet over de rand van een aanrecht, werkblad of tafel hangen. Zorg ervoor dat uw handen droog zijn als u het apparaat, het snoer of de stekker aanraakt. Gebruik het apparaat nooit in vochtige ruimten. Schakel het apparaat uit en verwijder de stekker uit het stopcontact als u tijdens het gebruik storingen ondervindt, het apparaat gaat New Classics Toaster Article

6 reinigen, een accessoire aanbrengt of verwijdert, of klaar bent met het gebruik. Gebruik het apparaat nooit met een afgesloten deksel. Zorg dat kleine kinderen niet bij het apparaat kunnen. Het apparaat en de onderdelen kunnen tijdens het gebruik heet worden. Verwijder klemgeraakt brood nooit met een mes of ander scherp voorwerp. Indien het brood klem raakt in het rooster, trek dan eerst de stekker uit het stopcontact voordat u het brood verwijdert. Pak het apparaat niet op wanneer het in het water is gevallen. Neem direct de stekker uit het stopcontact. Gebruik het apparaat niet meer. Maak het apparaat na gebruik grondig schoon (zie hoofdstuk Onderhoud en reinigen ). Milieu Werp verpakkingsmateriaal zoals plastic en dozen in de daarvoor bestemde containers. Aan het eind van de levensduur dient het apparaat op een verantwoorde wijze afgevoerd te worden. Neem hiervoor contact op met uw gemeente of afvalverwerkingsinstantie. U kunt het apparaat ook inleveren bij de winkelier. 4 New Classics Toaster Article 2387
.")
7 General This attractive Princess New Classics Sandwich Toaster is one of the products in our New Classics range, all of which are finished in sturdy chrome-plated steel. The toaster is supplied complete with tosti holders and a rack accessory to toast rolls and French bread. This sophisticated W toaster rapidly toasts two slices of bread or tostis at the same time, and is very simple to use. The rack accessory also enables you to toast rolls or French bread. In addition, the appliance is equipped with a dustproof cover, a stop button, a browning control, a bread lift, and a centring mechanism. The centring mechanism ensures that slices of bread are always correctly positioned in the slots. Connect the appliance to a V mains power supply. Operation and controls See Figure 1. The appliance is equipped with the following features: 1 Dustproof cover 2 Bread lift 3 Browning control 4 Stop button 5 Power cord and plug 6 Rack accessory for rolls and French bread 7 Two tosti holders A removable crumb tray at the rear of the appliance collects any loose breadcrumbs for easy cleaning. Before use for the first time 1 Remove all packaging materials before using the appliance for the first time. 2 You can now toast any of the following: slices of bread; tostis rolls/french bread (using the rack accessory). Toasting bread Toast slices of bread by dropping them into the slots and switching on the appliance. Do not force the slices into the slots; they could become stuck. Slices of bread that are too high for the appliance should be cut to size before toasting. However, slices that are too small will be difficult to remove from the slots. You can break off the toasting cycle by pressing the stop button. The appliance will stop toasting, and the bread lift will rise. 1 Put the plug into an earthed wall socket. 2 Open the dustproof cover. 3 Drop the slices in the toaster s slots. 4 Adjust the browning control to the required degree of browning. 5 Press the lever downwards to lower the bread lift and start the toasting. The appliance ensures that the slices are correctly centred in the slots. 6 The appliance will automatically stop toasting, and the bread lift will automatically rise. Remove the toast from the appliance. 7 When you have finished using the toaster remove the plug from the wall socket and allow the appliance to cool. Close the cover. New Classics Toaster Article

8 Adjusting the degree of browning See Figure 2. The degree of browning can be varied with the browning control. Turning the control clockwise will yield browner toast: with the control in the left position the toast will be just crisp with the control in the mid position the toast will be yellowish-gold with the control in the right position the toast will be dark-brown. Try different settings to obtain the required result. Always begin with the control in the lowest setting. Bear in mind that the result will depend on the nature of the bread: dry or older bread will toast more rapidly, fresh or deep-frozen bread will require a little more time. Toasting tostis Tostis are usually prepared from bread and cheese. If you so wish, you can also add ingredients such as ham, bacon, onion, salami, pineapple, tomato, smoked salmon, etc. See Figure 3. 1 Put the plug into an earthed wall socket. 2 Open the dustproof cover. 3 Put the tosti in the tosti holder and clamp the grips together. 4 Fit the tosti holder containing the tosti in one of the toaster s slots. 5 Toast the tosti in the normal manner, in accordance with the 'Toasting bread' instructions from step 4 onwards. Toasting rolls/french bread with the rack accessory Rolls and French bread that are too wide for the toaster s slots can be toasted using the rack accessory. Fit the rack accessory to the top of the toaster. See Figure 4. 1 Put the plug into an earthed wall socket. 2 Open the dustproof cover. 3 Fit the rack accessory to the top of the toaster. 4 Lay the rolls/french bread on the rack. 5 Toast the bread in the normal manner (in accordance with the 'Toasting bread' instructions, from step 4 onwards); if so required, turning the rolls/french bread over whilst the toaster is operating will result in more uniform browning. Maintenance and cleaning Always clean the appliance and the accessories after each use. This will prevent food residues from baking onto the appliance. Make sure no moisture gets into the appliance. Do not immerse the appliance in water, or in other liquids. If this happens do not use the appliance any more; for safety reasons, dispose of the appliance. Never use corrosive or scouring cleaning agents. Removing the crumb tray See Figure 5. 1 Always remove the plug from the wall socket before removing the crumb tray. 2 Allow the appliance to cool. 3 Pull the crumb tray out of the rear of the appliance, and remove any breadcrumbs. 4 Wash the loose parts (crumb tray, tosti holders and rack accessory) with water containing washing-up liquid. Dry with a dry cloth. 6 New Classics Toaster Article 2387

9 5 Clean the exterior of the toaster with the special microfibre cloth supplied with the appliance. Do not moisten the cloth. 6 Return the crumb tray to the appliance. 7 Close the cover, and store the appliance in a safe place. Safety General Please read these instructions carefully and retain them for reference. Use this appliance only in accordance with the instructions. This appliance is intended solely for domestic use. Keep the appliance out of the reach of children, and of persons who may not be able to operate it safely. Have the appliance repaired only by a qualified electrician. Never try to repair the appliance yourself. Electricity and heat Verify that the mains voltage is the same as that indicated on the type plate on the appliance before use. Plug the appliance into an earthed wall socket. Always remove the plug from the socket when the appliance is not in use. Always remove the plug from the wall socket by pulling on the plug, not the power cord. Check the appliance s power cord regularly to make sure it is not damaged. Do not use the appliance if the power cord is damaged. Have a damaged power cord replaced by a qualified electrician. Make sure that the appliance and the power cord do not come in contact with sources of heat, such as a hot hob or naked flame. Make sure that the appliance, the power cord and plug do not come in contact with water. Take care when touching the toaster and the accessories. Allow the appliance to cool down first. The toaster and the accessories will become hot whilst the appliance is in use. The toaster s housing will also become hot, since the housing is an excellent conductor of heat. The appliance needs space to allow heat to escape, thereby preventing the risk of fire. Make sure that the appliance has sufficient space around it, and does not come in contact with flammable material. The appliance must not be covered. During use Never use the appliance outdoors. Place the appliance on a flat, stable surface where it cannot fall. Never allow the power cord to hang over the edge of the draining board, worktop or table. Make sure that your hands are dry before touching the appliance, power cord or plug. Never use the appliance in a humid room. Switch off the appliance and remove the plug from the wall socket in the event of a malfunction during use, and before cleaning the appliance, fitting or removing an accessory, or storing the appliance after use. Never use the appliance with the cover closed. Make sure that the appliance is outside the reach of children. The New Classics Toaster Article

10 toaster and the accessories can become hot whilst the appliance is in use. Never remove jammed toast with a knife or other sharp object. Always remove the plug from the wall socket before removing jammed toast. Do not pick up the appliance if it falls into water. Remove the plug from the wall socket immediately. Do not use the appliance any more. Clean the appliance thoroughly after use (see the Cleaning and maintenance Section). U.K. WIRING INSTRUCTIONS The wires in the mains lead are coloured in accordance with the following code: BLUE NEUTRAL BROWN LIVE GREEN/YELLOW EARTH As the colours of the wire in the mains lead of this appliance may not correspond with the colour markings identifying the terminals on your plug, proceed as follows: The wire which is coloured BLUE must be connected to the terminal which is marked with the letter N or coloured black. The wire which is coloured BROWN must be connected to the terminal which is marked with the letter L or coloured red. The wire which is coloured GREEN/ YELLOW must be connected to the terminal which is marked with the letter E or (earth symbol) and is coloured GREEN or GREEN/YELLOW The Environment Dispose of packaging material, such as plastic and boxes, in the appropriate waste containers. When it reaches the end of its useful life the appliance must be disposed of in a responsible manner. Contact your municipal council or refuse-disposal agency for disposal instructions. You can also hand in the appliance to the retailer. WARNING: THIS APPLIANCE MUST BE EARTHED 8 New Classics Toaster Article 2387

11 7 Deux grilles à croque-monsieur Généralités Le magnifique grille-pain Princess New Classics Toaster fait partie de notre ligne de produits New Classics en robuste acier chromé. Il est livré avec accessoires: la grille à croque-monsieur et le support à viennoiseries. Votre grille-pain de pointe dispose d'une puissance de W et est capable de griller vite et facilement deux tranches de pain ou deux croque-monsieur à la fois. Il vous permet également, grâce au support à viennoiseries, de préparer des petits pains ou une baguette. L'appareil est en outre équipé d'un couvercle cache-poussière, d'un bouton 'stop', d'un sélecteur du niveau de brunissage, d'un dispositif de remontée du toast, et d'un mécanisme de centrage automatique. Le mécanisme de centrage automatique positionne toujours automatiquement votre tranche de pain exactement au milieu de la fente de l'appareil. L'appareil se connecte simplement sur le secteur (courant V). Fonctionnement et utilisation Voir la figure 1. Les composants de l'appareil sont : 1 Couvercle cache-poussière 2 Dispositif de remontée du toast 3 Sélecteur du niveau de brunissage 4 Bouton 'stop' 5 Cordon et fiche 6 Support à viennoiseries À l'arrière de l'appareil, vous trouvez le tiroir à miettes permettant de ramasser les miettes de pain tombées dans l'appareil. Avant la première utilisation 1 Enlevez entièrement l'emballage avant la première utilisation. 2 Ensuite, vous pouvez commencer à griller : pain; croque-monsieur; petits pain, baguette (sur le support à viennoiseries). Griller du pain Pour faire des toasts, vous glissez des tranches de pain dans les fentes du grillepain et vous le mettez en marche. N'enfoncez pas les tranches de pain de force. Elles pourraient se coincer. Si la tranche ne passe pas, coupez-la sur mesure. Ne coupez pas de tranches trop petites, qui sont difficiles à retirer de la fente. Vous avez toujours le choix d'arrêter l'appareil en cours de fonctionnement, il vous suffit d'enfoncer le bouton 'stop'. L'appareil s'arrête alors et le dispositif de remontée du toast se relève. 1 Branchez la fiche sur une prise raccordée à la terre. 2 Ouvrez le couvercle cache-poussière. 3 Placez les tranches de pain dans les fentes de l'appareil. 4 Réglez le sélecteur du niveau de brunissage au niveau voulu. 5 Enfoncez le dispositif de remontée du toast pour mettre le grille-pain en marche. L'appareil centre automatiquement les tranches de pain dans les fentes. 6 L'appareil s'arrête automatiquement et le dispositif de remontée du toast se relève. Sortez les toasts de l'appareil. New Classics Toaster Article

12 7 Lorsque vous avez terminé d'utiliser l'appareil, débranchez la fiche et laissez-le refroidir. Refermez le couvercle. Sélection du niveau de brunissage Voir la figure 2. Le sélecteur du niveau de brunissage vous permet de sélectionner à quel degré vous grillez votre pain. Tournez-le vers la droite et votre pain sera grillé plus fort. la position de gauche donne un pain juste croustillant la position du milieu donne un pain doré la position de droite donne un pain grillé bien brun. Faites l'essai des différentes positions pour déterminer laquelle vous conviendra. Commencez toujours par la position minimale. Tenez compte des différences d'un pain à l'autre, qui influencent le résultat; un pain rassis sera grillé plus rapidement, le pain frais ou surgelé demande un peu plus de temps. Préparation de croquemonsieur Le croque-monsieur ordinaire se compose de pain et de fromage. Vous pouvez l'enrichir à volonté de jambon, bacon, oeuf, salami, ananas, tomate, saumon fumé etc. Voir la figure 3. 1 Branchez la fiche sur une prise raccordée à la terre. 2 Ouvrez le couvercle cache-poussière. 3 Placez le croque-monsieur de votre composition dans la grille et refermez la grille, en bloquant les poignées l'une contre l'autre. 4 Enfoncez la grille à croque-monsieur dans l'une des fentes de l'appareil. 5 Faites griller le croque-monsieur comme un toast ordinaire. Suivez les instructions à partir du point 4 du paragraphe 'Griller du pain'. Le support à viennoiseries, pour petits pains et baguettes La baguette, les petits pains et autres viennoiseries sont trop grands pour les fentes de l'appareil; pour les griller ou les réchauffer, utilisez le support à viennoiseries. Le support à viennoiseries se place sur le dessus de l'appareil. Voir la figure 4. 1 Branchez la fiche sur une prise raccordée à la terre. 2 Ouvrez le couvercle cache-poussière. 3 Placez le support à viennoiseries sur le dessus de l'appareil. 4 Posez les petits pains ou autres sur le support. 5 Faites fonctionner l'appareil comme pour un toast ordinaire (suivez les instructions à partir du point 4 du paragraphe 'Griller du pain'); pour un résultat égal, retourner au bout d'un moment le pain placé sur le support. Entretien et nettoyage Nettoyez l'appareil et les accessoires chaque fois que vous les avez utilisés. Vous évitez ainsi que d'éventuels restes se collent à l'intérieur de l'appareil. Ne laissez pas d'humidité pénétrer à l'intérieur de l'appareil. N'immergez jamais l'appareil dans l'eau ou dans un autre liquide. Le cas échéant, cessez d'utiliser l'appareil et mettez-le au rebut. N'utilisez pas de détergents agressifs ou décapants. Sortir le tiroir à miettes Voir la figure New Classics Toaster Article 2387

13 1 Débranchez la fiche, si ce n'est pas déjà fait. 2 Laissez l'appareil refroidir. 3 Sortez le tiroir à miettes à l'arrière de l'appareil, et videz les miettes de pain qui restent. 4 Nettoyez les composants amovibles (tiroir à miettes, grille à croquemonsieur, support à viennoiseries) à l'eau chaude additionnée d'un peu de détergent pour la vaisselle. Séchez bien avec un chiffon sec. 5 Nettoyez l'extérieur de l'appareil avec le chiffon microfibres spécial livré avec l'appareil. Utilisez ce chiffon uniquement à sec. 6 Remettez le tiroir à miettes en place dans l'appareil. 7 Rangez l'appareil, couvercle fermé, dans un endroit sûr. Sécurité Généralités Lisez soigneusement le mode d'emploi et conservez-le précieusement. Utilisez cet appareil uniquement suivant les instructions décrites dans le mode d'emploi. L'appareil est destiné uniquement à l'utilisation domestique. Tenez l'appareil hors de la portée des enfants ou des personnes incapables de l'utiliser correctement. Faites effectuer les réparations par un technicien qualifié. Ne tentez jamais de réparer vous-même l'appareil. Électricité et chaleur Avant d'utiliser cet appareil, assurezvous que la tension du réseau correspond à la tension du réseau indiquée sur la plaquette type de l'appareil. Utilisez une prise raccordée à la terre. Débranchez toujours l'appareil lorsque vous ne l'utilisez pas. Lorsque vous débranchez la fiche, saisissez la fiche elle-même; ne tirez pas sur le cordon. Vérifiez régulièrement que le cordon de l'appareil est intact. N'utilisez pas l'appareil si vous constatez que le cordon est endommagé. Faites remplacer le cordon endommagé par un technicien qualifié. Assurez-vous que ni l'appareil, ni le cordon n'entre en contact avec une source de chaleur telle qu'une plaque électrique chaude ou une flamme. Assurez-vous que ni l'appareil, ni le cordon, ni la fiche n'entre en contact avec de l'eau. Faites attention lorsque vous touchez les composants et l'appareil proprement dit. Laissez d'abord l'appareil refroidir. L'appareil et ses composants peuvent devenir brûlants pendant l'utilisation. L'extérieur de l'appareil se réchauffe également, car le matériau conduit bien la chaleur. L'appareil doit pouvoir évacuer cette chaleur pour ne pas risquer de prendre feu. Laissez donc suffisamment d'espace autour de l'appareil et évitez tout contact avec des matériaux inflammables. L'appareil ne doit jamais être recouvert. Pendant l'utilisation N utilisez jamais l'appareil à l'extérieur. Installez l'appareil sur une surface plane et stable, à un endroit où il ne risque pas de tomber. New Classics Toaster Article

14 Ne laissez pas le cordon pendre pardessus le bord du plan de travail ou de la table. Assurez-vous que vos mains sont sèches avant de toucher l'appareil, le cordon ou la fiche. N'utilisez jamais l'appareil dans une pièce humide. Éteignez l'appareil et débranchez la fiche en cas de problème durant l'utilisation, pour le nettoyage, le montage ou le démontage d'un accessoire, et dès que vous avez fini de l'utiliser. Ne faites jamais fonctionner l'appareil pendant que le couvercle est fermé. Gardez l'appareil hors de portée des enfants. L'appareil et ses composants peuvent devenir brûlants pendant l'utilisation. Si une tranche de pain s'est coincée, n'utilisez jamais un couteau ou autre objet coupant pour la décoincer. Si une tranche de pain se coince dans le grille-pain, débranchez la fiche de l'appareil avant de décoincer la tranche de pain. Si l'appareil est tombé à l'eau, ne le rattrapez pas. Débranchez immédiatement la fiche. Cessez d'utiliser l'appareil. Nettoyez soigneusement l'appareil après l'utilisation (voir 'Nettoyage et entretien'). Environnement Jetez le matériel d'emballage, tel que le plastique et les boîtes, dans les conteneurs prévus à cet effet. Lorsque l'appareil est usé, il doit être mis au rebut selon les règlements en vigueur. Pour plus d'informations, contactez les autorités communales ou l'autorité responsable du retraitement des déchets. Vous pouvez également rapporter l'appareil au point de vente. 12 New Classics Toaster Article 2387

15 6 Aufsatzgestell für Brötchen und Baguette 7 zwei Sandwichhalterungen Allgemein Dieser formschöne Princess New Classics Sandwichtoaster ist Teil unserer New Classics-Produktreihe, die aus stabilem, verchromten Stahl hergestellt wird. Der Toaster wird komplett mit Sandwichhalterungen und einem Aufsatzgestell für Brötchen und Baguette geliefert. Dieser ausgeklügelte Toaster mit einer Leistung von W kann schnell und einfach zwei Brotscheiben oder Sandwiches gleichzeitig toasten. Mithilfe des mitgelieferten Aufsatzgestells können Sie damit auch Brötchen oder Baguette toasten. Das Gerät ist weiterhin mit einem Staubdeckel, einer Stopptaste, einem Bräunungsregler, einem Brotheber sowie einem Zentrierungsmechanismus ausgestattet. Der Zentrierungsmechanismus sorgt dafür, dass sich das Brot immer an der richtigen Stelle im Schlitz des Geräts befindet. Das Gerät wird an das Elektrizitätsnetz ( V) angeschlossen. Funktion und Bedienung Siehe Abbildung 1. Das Gerät besteht aus den folgenden Teilen: 1 staubabweisender Deckel 2 Brotheber 3 Bräunungsregler 4 Stopptaste 5 Kabel mit Stecker An der Geräterückseite befindet sich die Krümelschublade, mit der die zurückgebliebenen Brotkrümel entfernt werden können. Vor der ersten Verwendung 1 Entfernen Sie vor der ersten Verwendung die komplette Verpackung. 2 Jetzt können Sie mit dem Toasten von: Brot; Sandwiches; Brötchen/Baguette (mit dem Aufsatzgestell) beginnen. Brot toasten Zum Toasten von Brot stecken Sie dieses in die Schlitze des Geräts und schalten das Gerät ein. Drücken Sie das Brot nicht mit Gewalt in die Schlitze. Dadurch kann es steckenbleiben. Wenn das Brot zu groß ist, dann schneiden Sie es erst zurecht. Schneiden Sie das Brot nicht zu klein, da Sie es sonst nicht mehr gut aus dem Schlitz herausnehmen können. Sie können das Gerät zwischendurch immer ausschalten, indem Sie auf die Stopptaste drücken. Das Gerät beendet den Toastvorgang und der Brotheber springt nach oben. 1 Stecken Sie den Stecker in eine geerdete Steckdose. 2 Öffnen Sie den staubabweisenden Deckel. 3 Stecken Sie das Brot in die Schlitze des Geräts. 4 Stellen Sie den gewünschten Bräunungsgrad mit dem Bräunungsregler ein. 5 Drücken Sie den Brotheber mit dem Griff nach unten, um den Toastvorgang zu starten. Das Gerät sorgt dafür, dass New Classics Toaster Article

16 das Brot richtig zentriert in den Schlitzen steckt. 6 Das Gerät beendet den Toastvorgang automatisch und der Brotheber springt automatisch nach oben. Nehmen Sie das getoastete Brot aus dem Gerät. 7 Ziehen Sie nach der Benutzung den Stecker aus der Steckdose und lassen Sie das Gerät abkühlen. Schließen Sie den Deckel. Bräunungsgrad einstellen Siehe Abbildung 2. Den Bräunungsgrad stellen Sie mit dem Bräunungsregler ein. Drehen Sie diesen im Uhrzeigersinn, dann wird das Brot dunkler getoastet: die linke Einstellung bedeutet schön knusprig in der Mitte goldgelb die rechte Einstellung bedeutet dunkelbraun getoastet. Probieren Sie verschiedene Einstellungen aus, um das von Ihnen gewünschte Ergebnis zu erreichen. Fangen Sie dabei immer mit der niedrigsten Einstellung an. Berücksichtigen Sie, dass das Ergebnis durch den Zustand des Brots beeinflusst wird: trockenes und altes Brot ist schneller zu toasten, frisches und tiefgefrorenes Brot benötigen etwas mehr Zeit. Sandwiches toasten Sandwiches werden normalerweise aus Brot und Käse hergestellt. Sie können nach eigener Wahl Zutaten wie Schinken, Speck, Zwiebel, Salami, Ananas, Tomate, geräucherten Lachs usw. hinzufügen. Siehe Abbildung 3. 1 Stecken Sie den Stecker in eine geerdete Steckdose. 2 Öffnen Sie den staubabweisenden Deckel. 3 Stecken Sie die Sandwiches Ihrer Wahl in die Sandwichhalterung und drücken Sie die Griffe gegeneinander. 4 Stecken Sie die gefüllten Sandwichhalterungen in einen der Schlitze des Geräts. 5 Toasten Sie die Sandwiches wie gewohnt. Befolgen Sie hierzu die Anweisungen ab Punkt 4 unter Brot toasten. Brötchen/Baguette mit dem Aufsatzgestell toasten Brötchen und Baguette, die zu breit für die Schlitze des Geräts sind, können Sie mithilfe des Aufsatzgestells toasten. Hierzu bringen Sie das Aufsatzgestell oben auf dem Gerät an. Siehe Abbildung 4. 1 Stecken Sie den Stecker in eine geerdete Steckdose. 2 Öffnen Sie den staubabweisenden Deckel. 3 Bringen Sie das Aufsatzgestell oben auf dem Gerät an. 4 Legen Sie die Brötchen/das Baguette auf das Gestell. 5 Toasten Sie das Brot wie gewohnt (unter Brot toasten, ab Punkt 4), wobei Sie die Brötchen/das Baguette zwischendurch eventuell umdrehen können, um eine gleichmäßige Bräunung zu erhalten. Pflege und Reinigung Reinigen Sie das Gerät und die dazugehörigen Teile nach jeder Verwendung. So verhindern Sie, dass Essensreste am Gerät anhaften. 14 New Classics Toaster Article 2387

17 Achten Sie darauf, dass keine Feuchtigkeit in die Innenseite des Geräts gelangt. Tauchen Sie das Gerät nie ins Wasser oder in andere Flüssigkeiten. Sollte dies trotzdem passieren, dann verwenden Sie das Gerät nicht mehr und entsorgen Sie es. Verwenden Sie keine aggressiven Reinigungs- oder Scheuermittel. Krümelschublade entfernen Siehe Abbildung 5. 1 Ziehen Sie, falls dies noch nicht geschehen ist, immer erst den Stecker aus der Steckdose. 2 Lassen Sie das Gerät abkühlen. 3 Ziehen Sie die Krümelschublade an der Rückseite aus dem Gerät heraus und entfernen Sie die zurückgebliebenen Brotkrümel. 4 Reinigen Sie die einzelnen Teile (Krümelschublade, Sandwichhalterungen und Aufsatzgestell) mit Wasser und Seife. Trocken Sie diese mit einem trockenen Tuch nach. 5 Reinigen Sie die Außenseite des Gerät mit dem speziell dafür mitgelieferten Microfasertuch. Verwenden Sie diees Tuch nur trocken. 6 Schieben Sie die Krümelschublade zurück ins Gerät. 7 Verstauen Sie das Gerät mit geschlossenem Deckel an einem sicheren Platz. Sicherheit Allgemein Lesen Sie die Bedienungsanleitung gut durch und bewahren Sie diese sorgfältig auf. Verwenden Sie dieses Gerät nur so wie in dieser Bedienungsanleitung beschrieben. Verwenden Sie dieses Gerät nur für den Hausgebrauch. Halten Sie das Gerät außerhalb der Reichweite von Kindern oder Personen, die damit nicht gut umgehen können. Lassen Sie Reparaturen von einem qualifizierten Mechaniker ausführen. Versuchen Sie nie, das Gerät selbst zu reparieren. Wärme und Elektrizität Bevor Sie das Gerät verwenden, prüfen Sie, ob die Netzspannung mit der auf dem Typenschild des Geräts angegebenen Stromstärke übereinstimmt. Verwenden Sie eine geerdete Steckdose. Ziehen Sie immer den Stecker aus der Steckdose, wenn Sie das Gerät nicht benutzen. Ziehen Sie beim Entfernen des Steckers aus der Steckdose am Stecker und nicht am Kabel. Überprüfen Sie regelmäßig, ob das Gerätekabel noch intakt ist. Benutzen Sie das Gerät nicht, wenn das Kabel beschädigt ist. Lassen Sie ein beschädigtes Kabel von einem qualifizierten Wartungsdienst ersetzen. Sorgen Sie dafür, dass das Gerät und das Kabel nicht mit Hitzequellen wie heißen Kochplatten oder offenem Feuer in Berührung kommen. Sorgen Sie dafür, dass das Gerät, das Kabel und der Stecker nicht mit Wasser in Berührung kommen. Seien Sie vorsichtig, wenn Sie die Teile und das Gerät selbst anfassen. Lassen Sie das Gerät erst abkühlen. New Classics Toaster Article

18 Das Gerät und die Teile werden nämlich während der Benutzung heiß. Auch das Gerätegehäuse wird heiß, da das Gehäuse die Wärme gut leitet. Um Brandgefahr zu verhindern, muss das Gerät seine Wärme abgeben können. Sorgen Sie also dafür, dass das Gerät ausreichend frei steht und nicht in Kontakt mit brennbarem Material kommen kann. Das Gerät darf nicht abgedeckt werden. Bei der Benutzung Benutzen Sie das Gerät nie im Freien. Stellen Sie das Gerät auf einen stabilen und ebenen Untergrund und an eine Stelle, wo es nicht herunterfallen kann. Lassen Sie das Kabel nicht über den Rand einer Anrichte, der Arbeitsplatte oder eines Tisches hängen. Sorgen Sie dafür, dass Ihre Hände trocken sind, wenn Sie das Gerät, das Kabel oder den Stecker berühren. Benutzen Sie das Gerät nie in feuchten Räumen. Schalten Sie das Gerät aus und ziehen Sie den Stecker aus der Steckdose, wenn bei der Benutzung Störungen auftreten, Sie das Gerät reinigen, Zubehör anbringen oder abnehmen oder Sie das Gerät nicht mehr benutzen. Benutzen Sie das Gerät nie mit geschlossenem Deckel. Sorgen Sie dafür, dass kleine Kinder nicht an das Gerät kommen. Das Gerät und die Teile können während der Benutzung heiß werden. Entfernen Sie eingeklemmtes Brot nie mit einem Messer oder einem anderen scharfen Gegenstand. Wenn das Brot im Toaster eingeklemmt ist, ziehen Sie dann zuerst den Stecker aus der Steckdose bevor Sie das Brot entfernen. Nehmen Sie das Gerät nicht auf, wenn es ins Wasser gefallen ist. Ziehen Sie sofort den Stecker aus der Steckdose. Benutzen Sie das Gerät nicht mehr. Reinigen Sie das Gerät nach der Benutzung gründlich (siehe Kapitel Reinigung und Wartung ). Umwelt Werfen Sie Verpackungsmaterial wie Kunststoff und Kartons in die dafür vorgesehenen Container. Wenn das Gerät das Ende seiner Lebensdauer erreicht hat, muss es auf verantwortungsvolle Weise entsorgt werden. Nehmen Sie hierzu Kontakt mit Ihrer Stadt oder der Müllverarbeitungsgesellschaft auf. Sie können das Gerät auch beim Händler abgeben. 16 New Classics Toaster Article 2387

19 Generalidades Esta hermosa tostadora-sandwichera Princess New Classics Sandwich Toaster hace parte de nuestra nueva línea de productos clásicos, fabricada en acero cromado de alta calidad. Incluye rejillas para los sandwiches y una parrilla para panecillos y pan francés. Esta excelente tostadora, con una potencia de W, permite tostar dos rebanadas de pan o asar dos sandwiches simultáneamente. También se puede usar para tostar panecillos o pan francés usando la parrilla adjunta. El aparato viene provisto con una tapa de protección contra el polvo, un botón de parada, un regulador para ajustar el grado de tostado, un dispositivo para levantar el pan y un mecanismo de centrado. El mecanismo de centrado se encarga de que el pan quede colocado siempre en el lugar correcto en las ranuras del aparato. El aparato se debe conectar a la red de suministro eléctrico ( V). Funcionamiento y manejo Véase la figura 1. El aparato está compuesto por las siguientes partes: 1 Tapa de protección contra el polvo 2 Palanca para levantar el pan 3 Regulador del grado de tostado 4 Botón de parada 5 Cable con enchufe 6 Parrilla para panecillos y pan francés 7 Dos rejillas para sandwiches El aparato trae en la parte posterior un depósito en el que se recogen las migas del pan. Antes del primer uso 1 Antes de usar el aparato por primera vez, sáquelo del embalaje. 2 Ahora ya puede empezar a tostar: pan; sandwiches; panecillos/pan francés (con la parilla adjunta). Tostar pan Para tostar el pan, introdúzcalo en las ranuras del aparato y enciéndalo. No ejerza presión al introducir el pan en las ranuras. Es posible que esto haga atascar el pan. Si el pan es demasiado grande, córtelo primero a la medida. No corte el pan demasiado pequeño ya que se le dificultará extraerlo de las ranuras. Puede detener el funcionamiento del aparato en cualquier momento accionando el botón de parada. El aparato se apaga y se acciona el dispositivo que hace levantar el pan. 1 Conecte el enchufe en una toma de alimentación eléctrica con conexión a tierra. 2 Abra la tapa protectora. 3 Coloque el pan en las ranuras del aparato. 4 Ajuste el grado de tostado mediante el regulador. 5 Empuje hacia abajo la palanca para introducir el pan e iniciar el proceso de tostado. El aparato se encarga de centrar bien el pan en las ranuras. 6 El aparato se apaga automáticamente y se acciona el dispositivo para levantar el pan. Saque el pan tostado del aparato. 7 Al terminar de usar el aparato, retire el enchufe de la toma y déjelo enfriar. Cierre la tapa. New Classics Toaster Article

20 Ajuste del grado de tostado Véase la figura 2. El grado de tostado del pan se ajusta mediante el regulador. Gire el regulador en el sentido de las agujas del reloj y el pan adquirirá un color más oscuro: en la posición izquierda el pan será tostado levemente en la posición central obtendrá un color dorado en la posición derecha adquirirá un color más oscuro. Pruebe las diferentes posiciones para lograr el resultado deseado. Inicie siempre en la posición más baja. Tenga en cuenta que el estado del pan influye en el resultado final: el pan reseco o viejo se tuesta más rápido, mientras que el pan fresco o congelado necesita más tiempo. Asar sandwiches Por lo general, los sandwiches se hacen de pan y queso. Usted puede añadir, a su gusto, otros ingredientes como jamón, tocino, cebolla, salami, piña, salmón ahumado, etc. Véase la figura 3. 1 Conecte el enchufe en una toma de alimentación eléctrica con conexión a tierra. 2 Abra la tapa protectora. 3 Introduzca el sandwich en la rejilla para sandwiches y junte las asas una contra la otra. 4 Coloque la rejilla con el sandwich en una de las ranuras del aparato. 5 Ase el sandwich en la forma corriente. Para hacerlo, siga las instrucciones del apartado 'Tostar pan' a partir del punto 4. Tostar panecillos o pan francés en la parrilla Los panecillos o el pan que sean demasiado grandes para caber en las ranuras del aparato se pueden tostar en la parrilla adjunta. Para ello, coloque la parrilla encima del aparato. Véase la figura 4. 1 Conecte el enchufe en una toma de alimentación eléctrica con conexión a tierra. 2 Abra la tapa protectora. 3 Coloque la parrilla encima del aparato. 4 Coloque los panecillos o el pan francés sobre la parrilla. 5 Tueste el pan de la forma corriente (siga las instrucciones del apartado 'Tostar pan' a partir del punto 4). De vuelta al pan para que se dore uniformemente por ambos lados. Mantenimiento y limpieza Limpie el aparato y sus partes después de cada uso. Así evita que los restos de comida se adhieran a él. Asegúrese de que ningún líquido pueda entrar al interior del aparato. No sumerja el aparato nunca en agua ni en ningún otro líquido. Si esto ocurre, no vuelva a usar más el aparato y deshágase del él. No use productos abrasivos o agresivos. Retirar el depósito de las migas Véase la figura 5. 1 Retire primero, si no lo ha hecho, el enchufe de la toma de alimentación eléctrica. 2 Deje enfriar el aparato. 3 Retire de la parte posterior del aparato el depósito donde se recogen las migas y tírelas a la basura. 18 New Classics Toaster Article 2387

21 4 Lave las partes sueltas (depósito de las migas, rejillas para sandwiches y parilla) con agua y jabón. Séquelas luego con un paño seco. 5 Limpie la parte exterior del aparato con el paño especial de microfibra adjunto. Use este paño únicamente seco. 6 Vuelva a colocar el depósito para las migas en su lugar. 7 Coloque el aparato con la tapa cerrada en un lugar seguro. Seguridad Generalidades Lea las instrucciones de uso con detenimiento y guárdelas cuidadosamente. Utilice este aparato únicamente en la forma que se describe en las instrucciones. Use este aparato únicamente para fines domésticos. Manténgalo fuera del alcance de los niños o de personas que no sepan utilizarlo en la forma correcta. Haga reparar el aparato únicamente por personal cualificado. No intente nunca repararlo usted mismo. Electricidad y fuentes de calor Antes de utilizar el aparato, verifique que el voltaje de la red corresponda al voltaje indicado en la placa. Use una toma de alimentación con conexión a tierra. Retire siempre el enchufe de la toma de alimentación cuando no esté utilizando el aparato. Al retirar el enchufe de la toma, asegúrese de tirar del enchufe y no del cable. Verifique regularmente que el cable del aparato esté en buenas condiciones. No utilice el aparato si el cable está averiado. Haga sustituir el cable deteriorado por un técnico de servicio cualificado. Asegúrese de que ni el aparato, ni el cable están en contacto con fuentes de calor, por ejemplo, con una placa caliente de la estufa o con fuego abierto. Asegúrese de que ni el aparato, ni el cable, ni el enchufe están en contacto con el agua. Tenga cuidado cuando manipule el aparato o sus partes integrantes. Deje enfriar primero el aparato. El aparato y sus partes se calientan durante el uso. También la parte externa del aparato se calienta; esto se debe a que la carcasa es un buen conductor del calor. El aparato debe poder tener la posibilidad de deshacerse del calor para evitar peligro de incendio. Asegúrese entonces de que esté lo suficientemente libre y que no haga contacto con materiales inflamables. No se debe cubrir el aparato. Durante el uso No use nunca este aparato fuera del hogar. Coloque el aparato sobre una superficie plana y estable, en un lugar donde no pueda caerse. No deje que el cable quede colgando por el borde del fregadero, la encimera o la mesa. Asegúrese de tener las manos secas cuando manipule el aparato, el cable o el enchufe. No use el aparato en lugares húmedos. Apague el aparato y retire el enchufe de la toma de alimentación si se New Classics Toaster Article
22 presentan fallos durante el uso, cuando quiera limpiarlo, cuando vaya a colocar o a retirar un accesorio o cuando haya terminado de usarlo. No use nunca el aparato estando cerrada la tapa. No deje que los niños se acerquen al aparato. El aparato y sus partes pueden calentarse durante el uso. No use nunca cuchillos ni ningún otro objeto con filo para remover atascos de pan. Si el pan se atasca en la tostadora, retire primero el enchufe de la toma de alimentación eléctrica antes de proceder a desatascarlo. No coja el aparato cuando haya caído en el agua. Retire inmediatamente el enchufe de la toma de alimentación. No vuelva a utilizar más el aparato. Limpie bien el aparato después de usarlo (véase el apartado 'Mantenimiento y limpieza'). Medio ambiente Tire el material de embalaje, como plástico y cajas, en los contenedores destinados para ello. Al concluir la vida útil del aparato, deséchelo en forma responsable llevándolo a un lugar autorizado. Para ello, póngase en contacto con las autoridades municipales o con el servicio de procesamiento de basuras. También puede llevar el aparato a la tienda donde lo adquirió. 20 New Classics Toaster Article 2387
23 Caratteristiche generali Il prodotto New Classics Sandwich Toaster di Princess, dal design moderno ed elegante, fa parte della gamma New Classics, realizzata in robusto acciaio cromato. La dotazione del prodotto comprende due pinze per toast e un pratico supporto per la preparazione di panini e sfilatini. Questo tostapane dal design intelligente ha una potenza di W ed è in grado di tostare contemporaneamente e in modo semplice e rapido due panini o due toast. Grazie al pratico supporto in dotazione sarà inoltre possibile tostare o scaldare panini o sfilatini. L apparecchio è altresì provvisto di un coperchio antipolvere, di un tasto di arresto, di una manopola per la regolazione del livello di tostatura, di un meccanismo per l espulsione automatica delle fette e di un dispositivo di centratura. Il dispositivo di centratura permette sempre di ottenere un corretto posizionamento del pane all interno degli appositi cestelli dell apparecchio. L apparecchio funziona con alimentazione elettrica ( V). Funzionamento e utilizzo del prodotto Vedere la fig. 1. L apparecchio è composto dai seguenti elementi: 1 Coperchio antipolvere 2 Meccanismo per l espulsione automatica delle fette 3 Manopola per la regolazione del livello di tostatura 4 Tasto di arresto 5 Cavo e spina 6 Supporto per la preparazione di panini e sfilatini 7 Due pinze per toast Sulla parte posteriore dell apparecchio si trova il vassoio raccoglibriciole per la rimozione delle briciole di pane cadute sul fondo dell apparecchio. Operazioni preliminari al primo utilizzo 1 Prima di procedere al primo utilizzo, rimuovere completamente l imballaggio del prodotto. 2 Una volta rimosso l imballaggio, il prodotto è pronto per tostare: pane; Toast; panini/sfilatini (mediante l apposito supporto). Tostatura del pane Per tostare il pane, inserire il pane negli appositi cestelli presenti nell apparecchio e azionare l apparecchio. Evitare di inserire il pane nei cestelli esercitando forza o pressione, poiché in tal modo ilo pane può rimanere incastrato nei cestelli. Se il pane o le fette da tostare sono di dimensioni troppo grosse, assicurarsi di tagliarli in modo tale da permetterne il perfetto inserimento all interno del tostapane. Evitare di tagliare il pane in fette troppo piccole, in quanto ciò renderà più difficoltosa l estrazione del pane dai cestelli. Il funzionamento dell apparecchio può essere arrestato in qualsiasi momento azionando il tasto di arresto. In tal modo verrà arrestata la tostatura del pane e verrà azionato il meccanismo New Classics Toaster Article
24 per l espulsione automatica delle fette. 1 Inserire la spina in una presa di corrente provvista di messa a terra. 2 Aprire il coperchio antipolvere. 3 Inserire il pane all interno dei cestelli presenti nell apparecchio. 4 Impostare il livello di tostatura desiderato mediante l apposita manopola di regolazione. 5 Agire sulla leva per inserire il pane all interno del tostapane e avviare la tostatura. Il dispositivo di centratura assicura il corretto posizionamento del pane nei cestelli. 6 L apparecchio terminerà la tostatura del pane e verrà azionato automaticamente il meccanismo per l espulsione delle fette. Estrarre il pane tostato dal tostapane. 7 Dopo l utilizzo, disinserire la spina dalla presa di corrente e lasciare raffreddare l apparecchio. Richiudere quindi il coperchio. Regolazione del livello di tostatura Vedere la fig. 2. Il livello di tostatura può essere impostato mediante l apposita manopola di regolazione. Il livello di tostatura del pane viene aumentato ruotando la manopola in senso orario: il livello di sinistra permette di tostare il pane in modo appena croccante il livello centrale permette di tostare il pane in modo dorato il livello di destra permette di tostare il pane in modo intenso. Si consiglia di eseguire alcune tostature sui diversi livelli per vedere quale livello corrisponde alla tostatura desiderata. A tale scopo, iniziare sempre dal livello di tostatura più basso. La condizione del pane influisce sempre sul risultato di tostatura: il pane non fresco o secco verrà tostato più velocemente rispetto al pane fresco o surgelato. Cottura dei toast Normalmente, i toast sono costituiti da pane e formaggio. È comunque possibile scegliere di aggiungere altri ingredienti, quali ad es. prosciutto, speck, cipolle, salame, ananas, pomodori, salmone affumicato, ecc. Vedere la fig Inserire la spina in una presa di corrente provvista di messa a terra. 2 Aprire il coperchio antipolvere. 3 Inserire il toast da preparare nella pinza per toast e chiudere la pinza agendo sui manici. 4 Inserire la pinza per toast con il toast in uno dei cestelli del tostapane. 5 Tostare i toast in modo consueto seguendo le istruzioni riportate a partire dal punto 4 all interno della sezione Tostatura del pane. Tostatura di panini/sfilatini mediante l apposito supporto I panini e gli sfilatini di dimensioni troppo grandi per i cestelli del tostapane possono essere tostati con l ausilio dell apposito supporto. Il supporto va in tal caso posizionato sul tostapane. Vedere la fig Inserire la spina in una presa di corrente provvista di messa a terra. 2 Aprire il coperchio antipolvere. 3 Collocare il supporto sul tostapane. 4 Disporre quindi sul supporto i panini, lo sfilatino o la baguette da tostare. 5 Tostare il pane in modo consueto (seguendo le istruzioni riportate a partire dal punto 4 all interno della sezione Tostatura del pane ), girando eventualmente ogni tanto i panini / gli sfilatini durante la preparazione per ottenere una tostatura uniforme. 22 New Classics Toaster Article 2387
START HERE PTB: COMECE AQUI FRA: MISE EN ROUTE ITA: PER COMINCIARE PTG: INICIAR AQUI ESP: EMPEZAR AQUÍ
 START HERE PTB: COMECE AQUI FRA: MISE EN ROUTE ITA: PER COMINCIARE PTG: INICIAR AQUI ESP: EMPEZAR AQUÍ Install the software (required for full webcam functionality). Instale o software (necessário para
IAN 93902 1/22. Washing machine cabinet. Mobile lavatrice Istruzioni per il montaggio. Armario saledizo de máquina lavadora Instrucciones de montaje
 Washing machine cabinet ES PT DE AT CH Armario saledizo de máquina lavadora Instrucciones de montaje Armário para montar por cima da máquina de lavar a roupa Instruções de montagem Waschmaschinenüberbauschrank
Kit Tecsystem for MVW-01. Kit Tecsystem para MVW-01. Kit Tecsystem Installation, Configuration and Operation Guide
 Kit Tecsystem for MVW0 Kit Tecsystem para MVW0 Kit Tecsystem Installation, Configuration and Operation Guide Kit Tecsystem Guía de Instalación, Configuración y Operación Kit Tecsystem Guia de Instalação,
Security Kit. Security Kit. Security Kit. Security Kit. See Reverse Side For Security Installation Instructions 8811-000008
 Security Kit Security Kit See Reverse Side For 8811-000008 See Reverse Side For 8811-000008 Security Kit Security Kit See Reverse Side For 8811-000008 See Reverse Side For 8811-000008 1. Using security
WEIGHTED BLANKET 17689
 WEIGHTED BLANKET 17689 CONTENTS 1 x Weighted Blanket Instructions and maintenance check list USE For indoor use only. Use under supervision. CARE & MAINTENANCE Using the maintenance check list supplied,
DISTRIBUCIÓN DE HABITACIONES
 DISTRIBUCIÓN DE HABITACIONES Cada una de las habitaciones del apartamento son dobles (para dos personas). y se habilitarán el número de habitaciones en función del numero de huéspedas a alojar. Ejemplos:
Quickstart Guide. WiPry-Pro Combo
 Quickstart Guide CONNECT TO APPLE DEVICE ACCESSORY EXTERNAL TRIGGER 2.4-2.5GHz ANTENNA WARNING DO NOT APPLY MORE THAN 20DBM TO THE ANTENNA WITHOUT EXTERNAL ATTENUATION WARNING DO NOT APPLY MORE THAN -0.5/+3.8V
DISTRIBUCIÓN DE HABITACIONES
 DISTRIBUCIÓN DE HABITACIONES Cada una de las habitaciones del apartamento son dobles (para dos personas). y se habilitarán el número de habitaciones en función del numero de huéspedas a alojar. Ejemplos:
PROCEDIMENTOS NECESSÁRIOS ANTES DE UTILIZAR O EQUIPAMENTO. Instalação do Rasther PC. Habilitação das Montadoras
 Guia Rápido Rasther PC PROCEDIMENTOS NECESSÁRIOS ANTES DE UTILIZAR O EQUIPAMENTO Antes de iniciar o uso do Rasther, será necessário instalar o programa Rasther PC, habilitar as montadoras adquiridas juntamente
DS100 Dual Monitor Desk Stand, Vertical
 USA 1-800-888-88 Europe +31 (0)33-600 DS100 Dual Monitor Desk Stand, Vertical ASSEMBLY INSTRUCTIONS INSTRUCCIONES DE INSTALACIÓN NOTICE D ASSEMBLAGE INSTRUÇÕES DE MONTAGEM 1 A B C 1x 2x 2x 8x 8x 7-100mm
SAP911. Acondicionador de aire portátil Ar condicionado portátil Portable Air Conditioner. Manual do utilizador
 ES PT EN SAP911 Acondicionador de aire portátil Ar condicionado portátil Portable Air Conditioner ES Manual del usuario PT Manual do utilizador EN User Manual ES Gracias por elegir este acondicionador
Radio / CD. Honolulu CD50. Installation instructions Notice de montage Instrucciones de instalación Instruções de de montagem
 Radio / D Honolulu D50 Installation instructions Notice de montage Instrucciones de instalación Instruções de de montagem Installation instructions Notice de montage Instrucciones de instalación Instruções
MANUAL DE OPERACIONES
 MANUAL DE OPERACIONES INTRUCCIONES DE SEGURIDAD IMPORTANTES El signo de exclamación dentro del triángulo equilátero intenta alertar al usuario de la presencia de instrucciones operativas y de mantenimiento
1. DESCARGA DEL SOFTWARE DE BLUETOOTH EN EL SMARTPHONE
 MANUAL DEL USUARIO PARA BLUETOOTH ES 1. DESCARGA DEL SOFTWARE DE BLUETOOTH EN EL SMARTPHONE Entre en Apple Store o Google Play y busque: - BH Premium - BH Lite BH Premium BH Lite 2. FIJACIÓN DEL MÓDULO
SISTEMA AUTO-NIVELADOR DE FARÓIS
 INSTRUÇÕES DE MONTAGEM (EN) INSTALL MOUNTING INSTRUCTIONS (ES) INSTRUCCIONES DE MONTAJE (FR) GUIDE D'INSTALLATION SISTEMA AUTO-NIVELADOR DE FARÓIS P/ KITS HID (EN) Auto Leveling System for HID KITS (ES)
Memory Module MMF-02. Modulo de Memoria MMF-02. Módulo de Memória MMF-02 CFW70X
 Motors Automation Energy Transmission & Distribution Coatings Memory Module MMF-02 Modulo de Memoria MMF-02 Módulo de Memória MMF-02 CFW70X Installation, Configuration and Operation Guide Guía de Instalación,
Beer Cooler Article 282990 Nederlands 1 English 6 Français 11 Deutsch 15 Español 20 Italiano 25 Svenska 30 Dansk 34 Norsk 38 Suomi 42 Português 46 50
 Beer Cooler Article 282990 Nederlands 1 English 6 Français 11 Deutsch 15 Español 20 Italiano 25 Svenska 30 Dansk 34 Norsk 38 Suomi 42 Português 46 50 Gebruiksaanwijzing User's instructions Mode d'emploi
100171058_N369225491 100171074_N369225492 100171084_N369225490 100171066_N369225488 URBAN C
 100171058_N369225491 100171074_N369225492 100171066_N369225488 100171084_N369225490 URBAN C Lea atentamente estas instrucciones antes de comenzar la instalación. - Compruebe el producto por si faltasen
A machine that blows bubbles at the press of your switch (not included)
") 1. Product Name Bubbles 2. Product Code 20139 3. Colour As shown 4. Brief Description A machine that blows bubbles at the press of your switch (not included) 5. Contents Bubbles machine with cable attached
1. Product Name Bubbles 2. Product Code 20139 3. Colour As shown 4. Brief Description A machine that blows bubbles at the press of your switch (not included) 5. Contents Bubbles machine with cable attached
ÍNDICE PORTUGUÊS INDEX ENGLISH
 ÍNDICE PORTUGUÊS 1. Introdução...2 2. Características...2 3. Avisos...3 4. Instalação...3 4.1 Alimentação por pilha AAA 4.2 Alimentação pela entrada USB 5. Utilizando o Produto...5 6. Solução de Problemas...5
Powerfix D A RADMUTTERNSCHLÜSSEL KH4055 E P. IB_KH4055_0706_EP :05 Uhr Seite 1
 IB_KH4055_0706_EP 18.09.2006 14:05 Uhr Seite 1 Powerfix D A RADMUTTERNSCHLÜSSEL KH4055 E P LLAVE PARA TUERCA DE RUEDA KH4055 CHAVE DE PORCAS PARA RODAS DE VEÍCULOS KH4055 IB_KH4055_0706_EP 18.09.2006 14:05
1 a M5 x 12mm. Neo-Flex LCD Stand A B C ASSEMBLY INSTRUCTIONS INSTRUCCIONES DE INSTALACIÓN NOTICE D ASSEMBLAGE INSTRUÇÕES DE MONTAGEM.
 Neo-Flex LCD Stand ASSEMBLY INSTRUCTIONS INSTRUCCIONES DE INSTALACIÓN NOTICE D ASSEMBLAGE INSTRUÇÕES DE MONTAGEM 5" (127 mm) height range Rango de ajuste en altura: 5 (127 mm) Ajustement en hauteur sur
Dallas RMD 169 Texas DJ
 Radio / MD Dallas RMD 69 Texas DJ Installation instructions Notice de montage Instrucciones de instalación Instruções de montagem G Safety precautions Installation and connection regulations In the event
Seu manual do usuário JURA COMPRESSOR COOLER PRO http://pt.yourpdfguides.com/dref/2468329
 Você pode ler as recomendações contidas no guia do usuário, no guia de técnico ou no guia de instalação para JURA COMPRESSOR COOLER PRO. Você vai encontrar as respostas a todas suas perguntas sobre a JURA
DISTRIBUCIÓN DE HABITACIONES
 DISTRIBUCIÓN DE HABITACIONES El alojamiento cuenta con dos habitaciones, una de las habitaciones es triple (para tres personas), y la otra doble (para dos personas). Se habilitarán el número de habitaciones
MARQUE: MOULINEX REFERENCE: OX OPTIMO CODIC:
 MARQUE: MOULINEX REFERENCE: OX484100 OPTIMO CODIC: 4257138 NOTICE FR NL Optimo 39L DE EN ES IT PT 1 2 3 4 5 6 7 8 9 10 * * 11 * 12 * 13 * 2 * selon modèle - afhankelijk van het model - je nach Modell -
Importante. 13. Não ultrapassar a capacidade máxima do recipiente. 14. Não utilizar o Espremedor de Citrinos por períodos muito longos.
 Importante 1.Leia todas as instruções cuidadosamente antes de usar o espremedor de citrinos Orima. 2. Este aparelho pode ser usado por crianças de 8 anos ou mais e pessoas com reduzidas capacidades físicas,
HaNNES WET TSTEIN / 2008
 Hannes Wettstein / 2008 IT Programma di tavoli con ottime caratteristiche di adattabilità grazie alla varietà di forme e finiture disponibili. Plato risponde alle più svariate esigenze degli spazi domestici
Acti 9 Smartlink fr en es de cz pt nl zh ru
 Ati 9 Smartlink fr en es de z pt nl zh ru Ati 9 Smartlink SB- iat A99 iatl A9 ifs A9A6897 FS A96899 RA i6 A97p Reflex i6 A96pppp A9MEMT P M SV F V F iemt Y Y() ) Y(manu Auto i6 F F A u t o www.shneider-eletri.om
SR2 COM01 Quick start
 SR COM0 Quick start Aim: SR COM0 alarm message on your mobile phone. Objectif : réception sur votre téléphone mobile d'un message d'alarme provenant du SR COM0. Zweck: Empfang einer Alarmmeldung vom SR
1. Product Name. 2. Product Code. 3. Colour. 4. Brief Description. 5. Contents. Rapid Water Change Pump. As available (typically orange)
") 1. Product Name Rapid Water Change Pump 2. Product Code 20601 3. Colour As available (typically orange) 4. Brief Description Offers quick, safe and easy means of emptying and filling your bubble tube and
1. Product Name Rapid Water Change Pump 2. Product Code 20601 3. Colour As available (typically orange) 4. Brief Description Offers quick, safe and easy means of emptying and filling your bubble tube and
DONKEY 19689. 2. Using a small cross-head (positive) screwdriver, undo the screw that secures the battery compartment door. Copyright ROMPA Ltd
 screwdriver, undo the screw that secures the battery compartment door. Copyright ROMPA Ltd") DONKEY 19689 CONTENTS 1 x switch-adapted Donkey This product requires, but does not include, 3 AA batteries and a switch See www.rompa.com for a comprehensive range of switches BEFORE USE 1. Locate the
DONKEY 19689 CONTENTS 1 x switch-adapted Donkey This product requires, but does not include, 3 AA batteries and a switch See www.rompa.com for a comprehensive range of switches BEFORE USE 1. Locate the
MINIKIT. 20-500 mg/l Na 2 SO 3 L414350 EN PT ES. Sulfite HR Sulfito HR Sulfito HR
 MINIKIT 20-500 mg/l Na 2 L414350 EN PT ES Sulfite HR Sulfito HR Sulfito HR EN Introduction The Sulfite High Range MINIKIT provides a simple means of checking sulfite levels in water over the range 20-500
Start Here Comece aqui Mise en route Empezar aquí
 Start Here Comece aqui Mise en route Empezar aquí 1 Install the software (required for full functionality). Instale o software (necessário para funcionalidade total). Installez le logiciel (requis pour
ENGLISH PORTUGUÊS ENGLISH FRANÇAIS DEUTSCH ESPAÑOL. Pop-up Blocker settings:
 ENGLISH PORTUGUÊS ESPAÑOL DEUTSCH FRANÇAIS ENGLISH It has come to our attention that some users are having trouble viewing the new Data Policy and Privacy Statement due to their pop-up being blocked by
RECHARGEABLE PORTABLE SOUND SYSTEM WITH USB-MP3 & VHF MIC
 RECHARGEABLE PORTABLE SOUND SYSTEM WITH USB-MP3 & VHF MIC SYSTEME DE SONORISATION PORTABLE RECHARGEABLE AVEC LECTEUR USB-MP3 & MICRO VHF SISTEMA DE SOM PORTÁTIL RECARREGÁVEL COM USB-MP3 & MICROFONE VHF
Platinum Electric Griddle. Children should be supervised to ensure that they do not play with the appliance.
 Platinum Children should be supervised to ensure that they do not play with the appliance. 1 2 ELECTRIC GRIDDLE 1. Receptacle for power probe 2. Side handle 3. Non-stick heating plate 4. Power cable with
LIGHT PANEL CONTENTS Light Panel Power supply Fixtures (brackets, screws)
") Page 1 of 8 LIGHT PANEL 20367 CONTENTS Light Panel Power supply Fixtures (brackets, screws) ABOUT THIS PRODUCT The Light Panel may be used on a table top as a free-standing object, or mounted either horizontally
Page 1 of 8 LIGHT PANEL 20367 CONTENTS Light Panel Power supply Fixtures (brackets, screws) ABOUT THIS PRODUCT The Light Panel may be used on a table top as a free-standing object, or mounted either horizontally
R-080539 MESTRA. TALLERES MESTRAITUA S.L. Txori-Erri Etorbidea, 60 Tfno. + 34 944530388 - Fax + 34 944711725 E-mail: mestra@mestra.es - www.mestra.
 Manual dei ns t r uç õe s As pi r adorgemi ni www. odont omega. c om. br R-080539 E...UNIDAD DE ASPIRACIÓN GEMINI...6 GB...GEMINI ASPIRATION UNIT...8 P...UNIDADE DE ASPIRAÇÃO GEMINI...10 MESTRA TALLERES
hdd enclosure caixa externa para disco rígido
 hdd enclosure caixa externa para disco rígido USER S GUIDE SPECIFICATONS HDD Support: SATA 2.5 Material: Aluminium and plastics Input connections: SATA HDD Output connections: USB 3.0 (up to 5.0Gbps)
SATA 3.5. hd:basic. hdd enclosure caixa externa para disco rígido
 SATA 3.5 hd:basic hdd enclosure caixa externa para disco rígido hd:basic USER S GUIDE SPECIFICATIONS HDD support: SATA 3.5 Material: Aluminium Input connections: SATA HDD Output connections: USB 2.0
UNIVERSAL MASTERPIECE BORN IN JAPAN MADE IN JAPAN METAL MOVEMENT
 INSTRUCTION MANUAL FOR MIYOTA WATCH MOVEMENT CALIBER NO.,, MULTI EYES WITH RETROGRADE DAY FUNCTION BATTERY: SR621SW INSTRUCTION MANUAL A) DISPLAYS AND BUTTONS B) SETTING THE TIME 1. Pull the crown out
WI FI INTERACTIVE MAT SWITCH SET 19939
 Page 1 of 6 WI FI INTERACTIVE MAT SWITCH SET 19939 CONTENTS 1 x Control Box with 9V battery 9 x carpet switches: 1 x pink vinyl 1 x purple carpet 1 x blue non-slip mat 1 x green Soft & Silky 1 x light
SILLA DE ESCRITORIO MOD. YS
 SILLA DE ESCRITORIO MOD. YS 511-02786 Por favor, lea las instrucciones cuidadosamente antes de montarlo para garantizar un funcionamiento seguro y satisfactorio. Por favor, leia as instruções cuidadosamente
MINIKIT. 10-500 mg/l CaCO 3 L414160 EN FR ES PT. Calcium Hardness Dureté calcique Dureza cálcica Dureza de cálcio
 MINIKIT 10-500 mg/l CaCO 3 L414160 EN FR ES PT Calcium Hardness Dureté calcique Dureza cálcica Dureza de cálcio EN Introduction This MINIKIT provides a simple way of measuring calcium hardness in the range
Descrição das Actividades. [O examinador cumprimenta os examinandos, confirma os seus nomes, e explicita os procedimentos do 1º momento da prova.
 Duração da Prova: 15 a 20 minutos Domínios de Referência: A Escola; o Lazer (Férias) 1.º Momento Avaliação da Expressão Oral no Ensino Secundário Disciplina: Alemão (Iniciação, Nível 3 12º ano) GUIÃO B
MANUAL DE MONTAGEM ASSEMBLY INSTRUCTIONS INSTRUCCIONES DE MONTAJE COD BR: BPP 21 COD US: 3AMC V : 00
 MANUAL DE MONTAGEM ASSEMBLY INSTRUCTIONS INSTRUCCIONES DE MONTAJE COD BR: BPP 2 COD US: 3AMC 2 Sumário Summary Resumen Introdução Introduction Introducción Antes de começar Before starting Antes de comenzar
TLS-401 TLS-403 Turbo
 TLS-401 TLS-403 Turbo Convectores Convectors Convecteurs Convectores Convectors Convettori Instrucciones de uso User instructions Notice d utilisation Instruções de utilização Gebruiksaanwijzing Instruzioni
MARQUE: MICROSOFT REFERENCE: NATURAL ERGO 4000 CODIC:
 MARQUE: MICROSOFT REFERENCE: NATURAL ERGO 4000 CODIC: 4327829 NOTICE ENG: Microsoft wired keyboard Teclado com fio da Microsoft Clavier avec fil Microsoft Teclado alámbrico de Microsoft ENG: Install the
VC Series Round Vinyl Caps
 1 VC Series Round Vinyl Caps (Round Vinyl Caps) Series VC Caps are extremely flexible and durable protective closures which are ideal for use as thread protectors, dust and moisture seals, pipe and stud
HR Connect System Alert
 HR Connect System Alert To: All Employees Alert: System Downtime From November 30 December 3, the HR Connect Self-Service system will be down for maintenance. You will be unable to complete transactions
 Língua Estrangeira: FRANCÊS L alarme intelligente Finis les hurlements intempestifs, elle reconnaît les cambrioleurs Les alarmes, c est bien pratique Sauf quand ça se met à hurler à tout bout de champ
Manual de instruções para Caixa Coletora Johnson Pump
 Manual de instruções para Caixa Coletora Johnson Pump Em caso dúvidas na instalação após a leitura do manual, favor entrar em contato com nosso departamento técnico através do telefone: (11) 3477-5655
Guia de Instalação Rápida TFM-560X H/W : YO
 Guia de Instalação Rápida TFM-560X H/W : YO Table Índice of Contents... 1. Antes de Iniciar... 2. Como instalar... 1 1 2 Troubleshooting... 7 Version 08.04.2008 1. Antes de Iniciar Conteúdo da Embalagem
Page 1 of Rev D Steelcase Inc. Grand Rapids, MI U.S.A. Printed in U.S.A.
 Bivi Accessories - Top Shelf, Bottom Shelf & Hook Accessoires BiviMC - Tablette du haut, tablette du bas et crochet Acessórios Bivi - Prateleira superior, prateleira inferior e gancho Accesorios BiviTM
CAJONERA Instrucciones de montaje. CASSETTIERA Istruzioni per il montaggio. KOMMODE Montageanleitung. CHEST OF DRAWERS Assembly instruction
 ES CAJONERA Instrucciones de montaje IT CASSETTIERA Istruzioni per il montaggio GB CHEST OF DRAWERS Assembly instruction DE AT KOMMODE Montageanleitung CH PT MÓVEL Instruções de montagem new / 9 0 8 7
WATER MATTRESS MASSAGE SYSTEM 20439
 Page 1 of 10 WATER MATTRESS MASSAGE SYSTEM 20439 CONTENTS Massage System with Controller Please note: the above image shows a white unit and a blue unit. The white unit is supplied inside the blue unit
PROPOSTA DE GUIÃO PARA UMA PROVA
 PROPOSTA DE GUIÃO PARA UMA PROVA Alemão Iniciação (Nível 2) Domínio de Referência: Junge Leute Schule und Reisen 1.º MOMENTO Intervenientes e Tempos (1 minuto) (Introdução) Descrição das actividades Hallo!
Table Chef BBQ Article /112324
 Table Chef BBQ Article 112323/112324 Princess 2008 Gebruiksaanwijzing User's instructions Mode d'emploi Bedienungsanleitung Instrucciones de uso Istruzioni per l'uso Bruksanvisning Brugsanvisning Bruksanvisning
Table Chef Article /102210/ Nederlands 1 English Français Deutsch 13 Español 17 Italiano Svenska 25 Dansk 29 Norsk 33 Suomi 37 Português
 Table Chef Article 102200/102210/102211 Nederlands 1 English 5 Français 9 Deutsch 13 Español 17 Italiano 21 Svenska 25 Dansk 29 Norsk 33 Suomi 37 Português 41 45 49 Princess 2007 Gebruiksaanwijzing User's
TOASTER. TOASTER BROODROOSTER TOSTADOR TORRADEIRA ºƒÀ π ƒ. BRÖDROST BRØDRISTER LEIVÄNPAAHDIN TOSTER KENYÉRPIRÍTÓ TOUSTOVAĺ
 A1-281IDL 15-04-2004 15:32 Pagina 1 TOASTER BROODROOSTER TOSTADOR TORRADEIRA ºƒÀ π ƒ TOASTER BRÖDROST BRØDRISTER LEIVÄNPAAHDIN TOSTER KENYÉRPIRÍTÓ TOUSTOVAĺ íéëíöêä 10 Instructions for use Mode d emploi
Télécommande standard non polarisée 0 039 01
 01 Télécommande standard non polarisée R Caractéristiques techniques Alimentation...:230 V± 50/60 Hz 10 ma Capacité des bornes : 2 X 1,5 mm 2 Fixation...:surrailoméga Encombrement.... : 4 modules (70 mm)
Manuel d utilisation du microphone EMPLACEMENT DES COMMANDES
 FR Manuel d utilisation du microphone EMPLACEMENT DES COMMANDES 1. Bouton rotatif de réglage de volume (minuscule) 2. Sélecteur de fonctions (FM radio, off, CD) 3. Prise secteur 4. Antenne tige 5. Commutateur
1. Dados Técnicos...3. 2. Utilização...3. 3. Local de Uso...3. 4. Validade...3. 5. Instruções de Uso...3. 6. Indicações de Segurança...
 SUMÁRIO PORTUGUÊS 1. Dados Técnicos...3 2. Utilização...3 3. Local de Uso...3 4. Validade...3 5. Instruções de Uso...3 6. Indicações de Segurança...4 7. Local de Uso...4 8. Manutenção...4 9. Resolução
1 # DE SW Hoth_v13.indd 1 9/17/13 11:41 AM
 1 # 80 980 DE SW Hoth_v13.indd 1 9/17/13 11:41 AM x2 x6 x2 x30 x30 x6 2 DE SW Hoth_v13.indd 2 9/17/13 11:41 AM x2 x2 3 DE SW Hoth_v13.indd 3 9/17/13 11:41 AM ± 2 cm 4 DE SW Hoth_v13.indd 4 9/17/13 11:41
1:24 Scale BUGGY +14 GD30103 1:24 MANUAL DE UTILIZADOR MANUALE DE USUÁRIO / USER MANUAL
 1:24 Scale BUGGY +14 GD30103 1:24 MANUAL DE UTILIZADOR MANUALE DE USUÁRIO / USER MANUAL PT ES EN OFF-ROAD BUGGY R/C Manual de Utilização Página 4 OFF-ROAD BUGGY R/C Manuale de Usuário Pagina 6 OFF-ROAD
Complimentary Reference Material
 Complimentary Reference Material This PDF has been made available as a complimentary service for you to assist in evaluating this model for your testing requirements. TMG offers a wide range of test equipment
Guia de Instalação Rápida TW100-BRV204
 Guia de Instalação Rápida TW100-BRV204 Table Índice of Contents Português... 1. Antes de Iniciar... 2. Instalação de Hardware... 3. Configure o Roteador... 1 1 2 3 Troubleshooting... 5 Version 08.05.2008
ACHOCOLATADO EN POLVO ACHOCOLATADO EM PÓ CHOCOLATE POWDER DRINK
 ACHOCOLATADO EN POLVO ACHOCOLATADO EM PÓ CHOCOLATE POWDER DRINK ACHOCOLATADO EN POLVO ACHOCOLATADO EM PÓ CHOCOLATE POWDER DRINK ACHOCOLATADO EN POLVO Achocolatado em Pó Chocolate Powder Drink El achocolatado
MANUAL DE MONTAGEM ASSEMBLY INSTRUCTIONS INSTRUCCIONES DE MONTAJE COD BR: BC 67 COD US: 136AMC V : 00
 MANUAL DE MONTAGEM ASSEMBLY INSTRUCTIONS INSTRUCCIONES DE MONTAJE COD BR: BC 67 COD US: 36AMC 2 Sumário Summary Resumen Introdução Introduction Introducción Antes de começar Before starting Antes de comenzar
de lo normal. A continuación, póngase en contacto con un electricista cualificado. Los datos antes mencionados podrán modificarse sin previo aviso par
 de lo normal. A continuación, póngase en contacto con un electricista cualificado. Los datos antes mencionados podrán modificarse sin previo aviso para introducir mejoras en el producto. 12 Limpar
MANUAL DE INSTRUCCIONES VENTILADOR DE 12 AB-5466BX
 MANUAL DE INSTRUCCIONES VENTILADOR DE 12 AB-5466BX ESTIMADO CLIENTE Con el fin de que obtenga el mayor desempeño de su producto, por favor lea este manual de instrucciones cuidadosamente antes de comenzar
POLYPLAY MASTER INSTRUÇÕES DE MONTAGEM INSTRUCCIONES DE MONTAJE/ASSEMBLE INSTRUCTION. Ref.: 0957.7
 Com a adição de mais Polyplays ao seu, ele pode tomar a forma que você quiser. Conheça todos os modelos de Polyplays: Super, Master e Mega. Depois disso, sua imaginação é que dita as regras. Super Master
Tip: If you want a smaller bead, trim a couple inches off the length of the foil. Experiment until you get the perfect size!
 TM MAKING A BEAD: Video instructionswww.alextoys.com Search: Foil Bead 1. Fold foil lengthwise into thirds. The color should be on the outside of the folded strip. The strip should measure about 1.25 in
MANUAL DE MONTAGEM ASSEMBLY INSTRUCTIONS INSTRUCCIONES DE MONTAJE COD BR: BPP 70 COD US: 133AMC V : 00
 MANUAL DE MONTAGEM ASSEMBLY INSTRUCTIONS INSTRUCCIONES DE MONTAJE COD BR: BPP 70 COD US: 33AMC 2 Sumário Summary Resumen Introdução Introduction Introducción Antes de começar Before starting Antes de comenzar
1. Product Name 2. Product Code 3. Colour 4. Brief Description 5. Contents 6. Snoezelen Stimulations
 1. Product Name Wheel Rotator 2. Product Code 13170, 16570, 20685 3. Colour Black 4. Brief Description A wheel rotator is needed to rotate the effect wheel in the ROMPA Projector. 5. Contents 1 x Wheel
Copyright ROMPA Ltd SNORING PIG 20134
 SNORING PIG 20134 CONTENTS 1 x Snoring Pig with cable attached Please note: Snoring Pig requires, but does not include 3 x AA batteries. BEFORE USE 1. Lay the pig down so that his head is facing to the
O que torna o ambiente urbano sedutor?
 O que torna o ambiente urbano sedutor? Será a modernidade, a arquitetura, a vitalidade, as escolhas, o direito à diferença? Talvez um pouco de tudo. E tudo isso está presente no HF Fénix Urban. A combinação
TOD11707009-Manual_Proprietario_148x210_c.indd 1 05/10/2012 10:09:43
 TOD11707009-Manual_Proprietario_148x210_c.indd 1 05/10/2012 10:09:43 2 MANUAL DO PROPRIETÁRIO TODESCHINI Agradecemos a sua escolha pelos produtos Todeschini. Para aumentar a vida útil de seu mobiliário,
PROXIMA PLUS - 4 Rue François Arago Plaisance-du-Touch
 PROXIMA PLUS - 4 Rue François Arago - 31830 Plaisance-du-Touch FR MISE À JOUR DU PILOTE PS4TM MANETTE SANS FIL VIA PC La mise à jour de la mane e PS4TM se fait automa quement avec la console, cependant
De'Longhi S.p.A. via Seitz, 47 31100 Treviso Italia
 BARBECUE ELETTRICO SENZA FUMO SMOKE FREE ELECTRIC BARBECUE BARBECUE ÉLECTRIQUE SANS FUMÉES ELEKTRISCHER BARBECUE-TISCHGRILL OHNE- RAUCHENTWICKLUNG ELEKTRISCHE BARBECUE ZONDER ROOKVORMING BARBACOA ELÉCTRICA
INSTALLATION GUIDE MANUAL DE INSTALAÇÃO MANUAL DE INSTALACIÓN
 INSTALLATION GUIDE MANUAL DE INSTALAÇÃO MANUAL DE INSTALACIÓN General Information/ Informações Gerais/ Informaciones Generales Compatible with Open Rack Enterprise. To be installed in closed environments.
MANUAL DE INSTRUCCIONES CONTROL REMOTO AA-5454
 MANUAL DE INSTRUCCIONES CONTROL REMOTO AA-5454 ESTIMADO CLIENTE Con el fin de que obtenga el mayor desempeño de su producto, por favor lea este manual de instrucciones cuidadosamente antes de comenzar
Motors Automation Energy Transmission & Distribution Coatings
 Motors Automation Energy Transmission & Distribution Coatings Remote Serial HMI HMI Remota Serial CFW100 Installation, Configuration and Operation Guide Guía de Instalación, Configuración y Operación Guia
Guia de Instalação Rápida TEG-PCITXR TEG-PCITXRL 3.02
 Guia de Instalação Rápida TEG-PCITXR TEG-PCITXRL 3.02 Índice Português 1 1. Antes de Iniciar 1 2. Como instalar 2 Troubleshooting 5 Version 03.18.2010 1. Antes de Iniciar Português Conteúdo da Embalagem
Motors Automation Energy Transmission & Distribution Coatings
 Motors Automation Energy Transmission & Distribution Coatings Serial Remote HMI HMI Remota Serial HMI Remota Serial CFW500 Installation, Configuration and Operation Guide Guía de Instalación, Configuración
PAAES/UFU 2ª Etapa Subprograma 2011-2014
 SERVIÇO PÚBLICO FEDERAL MINISTÉRIO DA EDUCAÇÃO UNIVERSIDADE FEDERAL DE UBERLÂNDIA Pró-Reitoria de Graduação Diretoria de Processos Seletivos PAAES 2ª ETAPA SUBPROGRAMA 2011/2014 24 de fevereiro de 2013
Guia de Instalação Rápida TBW-101UB TBW-102UB
 Guia de Instalação Rápida TBW-101UB TBW-102UB Índice Português... 1. Antes de Iniciar... 2. Como instalar... 3. Usando o Adaptador Bluetooth... 1 1 2 4 Troubleshooting... 5 (Version 05.30.2006) 1. Antes
PLACA ELÉCTRICA 1 DISCO
 PLACA ELÉCTRICA 1 DISCO JPE102-D6 MANUAL DE INSTRUCÇÕES MANUAL DE INSTRUCCIONES PORTUGUÊS INSTRUÇÕES DE SEGURANÇA IMPORTANTES Por favor, leia cuidadosamente estas instruções antes de utilizar o aparelho.
Turbo-trituradores TRX-21 / TRX-22
 Turbo-trituradores TRX-21 / TRX-22 TRX-21 / TRX-22 La gama de turbo-trituradores TRX de Sammic, diseñada para trabajar en calderos de hasta 800 litros de capacidad, permite mezclar y triturar directamente
Guia de Instalação Rápida TEW-430APB
 Guia de Instalação Rápida TEW-430APB Table Índice of Contents Português... 1. Antes de Iniciar... 2. Instalação de Hardware... 3. Configure o Ponto de Acesso... 1 1 2 3 Troubleshooting... 6 Version 08.04.2008
GUIA PRINCIPAL CONTEÚDO
 GUIAPRINCIPAL ORazerNagaéomouseMMO(MassivelyMultiplayerOnlineGaming,jogodecomputadorcom centenasdemilharesdejogadoreson linesimultaneamente)definitivo,quemudaoequilíbrioentre tecladoemouse,reunindoumnúmeroinéditodecomandosdejogoemumúnicolocal.ogrip
11863 TAMPO DE MADEIRA 1600x900x45
 11863 TMPO DE MDEIR 1600x900x5 5 900 15 kg 01 1600 ENTENDENDO OS CÓDIOS 1293. 003 Cód. da Cor Cód. da peça CÓDIOS DS CORES 05 - MDERO TX 06 - TEK TX 07 - RÚSTICO MLEC 09 - RÚSTICO YORK 051 - CSTNO X 052
Wine Tap & Cooler Article
 Wine Tap & Cooler Article 282997 Princess 2008 Gebruiksaanwijzing User's instructions Mode d'emploi Bedienungsanleitung Instrucciones de uso Istruzioni per l'uso Bruksanvisning Brugsanvisning Bruksanvisning
Guião A. Descrição das actividades
 Proposta de Guião para uma Prova Grupo: Ponto de Encontro Disciplina: Inglês, Nível de Continuação, 11.º ano Domínio de Referência: Um Mundo de Muitas Culturas Duração da prova: 15 a 20 minutos 1.º MOMENTO
958 FL TORRADEIRA TOSTADORA TOASTER GRILLE-PAIN 808 250 178 I958.00. Fábrica de louças e electrodomésticos, S.A. Linha Directa Consumidor
 TORRADEIRA TOSTADORA TOASTER GRILLE-PAIN 958 FL Fábrica de louças e electrodomésticos, S.A. Rua Alto de Mirões, nº 249 Zona Industrial Ap. 2041 3700-727 CESAR Portugal Tel. +351 256 850 170 Fax +351 256
1. Product Name. 2. Product Code. 3. Colour. 4. Brief Description. 5. Contents. Switch Adapted Clip On Fan. Colours may vary
 1. Product Name Switch Adapted Clip On Fan 2. Product Code 20489 3. Colour Colours may vary 4. Brief Description Connects to your switch for switch activation. 5. Contents Fan with cable with 3.5mm jack
INSTRUÇÕES DE INSTALAÇÃO E OPERAÇÃO DOS MOTORES TUBULARES MONOFÁSICOS DA SÉRIE TUB (PT) - Pag. 02
 - Pag. 02") INSTRUÇÕES DE INSTALAÇÃO E OPERAÇÃO DOS MOTORES TUBULARES MONOFÁSICOS DA SÉRIE TUB (PT) - Pag. 02 INSTALLATION AND OPERATION INSTRUCTIONS OF TUBULAR SINGLE-PHASE MOTORS TUB SERIES (EN) - Pag. 0 INSTRUCCIONES
INSTRUÇÕES DE INSTALAÇÃO E OPERAÇÃO DOS MOTORES TUBULARES MONOFÁSICOS DA SÉRIE TUB (PT) - Pag. 02 INSTALLATION AND OPERATION INSTRUCTIONS OF TUBULAR SINGLE-PHASE MOTORS TUB SERIES (EN) - Pag. 0 INSTRUCCIONES